Integrations
- Express Relais integration
- BLIK integration
- Passmachine integration
- Orlen delivery integration
- Exponea
- JOY webservice
- Click and Collect
- Zbozi.cz integration
- Heureka integration
- Login via Apple ID
- Glovo feed
- Data layer
- Magyar Posta delivery method
- Baselinker
- Allegro
Express Relais integration
 Getting started
In this article, you can find information about the Express Relais delivery option used in the Moroccan market. Express Relais is a delivery option available for customers, that allows them to deliver their products to a delivery point that they have selected on the interactive map. This integration is implemented in both the E-commerce platform and TC Logistics.
Table of contents:
E-commerce
Configuration of the integration
For the functionality to work properly on the E-commerce platform, it needs to be enabled and configured in the admin panel. Express Relais system settings can be found in:
System > System / Settings > Integrations > Express Relais API
 |
| Visualization of the Express Relais system settings |
In the Express Relais system settings you can find the following options:
- URL - URL of an Express Relais API. This URL shouldn't be changed.
- Username - API username used to access the API.
- Password - API password used to access the API.
- Allowed mobile prefixes separated by comma - A list of mobile numbers separated by a comma, that is allowed to use the Express Relais delivery.
![]() RememberFor the delivery to be visible it needs to be enabled in System > Delivery types / list and Altshop > Delivery costs / list.
RememberFor the delivery to be visible it needs to be enabled in System > Delivery types / list and Altshop > Delivery costs / list.
Customer perspective
When the delivery is configured and enabled in the admin panel it can be accessed during the order creation process.
 |
| Visualization of the Express Relais delivery |
By selecting the Express Relais delivery customers will open an interactive map with a list of points provided by Express Relais that they can select to have their package delivered to. If the Express Relais is first on the delivery list it will open the map by default, once the customer proceeds with the order process.
Only customers with a mobile number starting with 2126 and 2127 (e.g. +2126123456789) will be able to use this delivery method, as Express Relais only accepts orders from these prefixes. This prefixes can be changed in the system settings.
 |
| Visualization of the delivery point widget |
The Delivery point map contains basic point information, like its name, number, and address.
After the point is selected and the transaction is finalized the order will be exported to TC Logistics.
TC Logistics
-
up to 2 days old - every 1 hour
- 3 to 5 days old - every 2 hours
-
6 to 10 days old - every 6 hours
-
11 to 14 days old - every 12 hours
-
Orders older than 14 days do not receive automatic status checks from Express Relais. This value can be changed in integration settings as described in System Settings.
System Settings
Express Relais additionally needs to be configured on TC Logistics alongside E-commerce to ensure order communication and status exchange. Express Relais settings can be found in:
System config > Integrations > Express Relais
 |
| Visualization of the TC logistics system settings |
In the Express Relais integration settings you can find the following options:
- Functionality enabled - A switch enabling the functionality. When it's disabled the Express Relais orders won't be sent to the vendor and their status won't be updated.
- API URL - URL of an Express Relais API. This URL shouldn't be changed.
- API username - API username used to access the API.
- API password - API password used to access the API.
- Max check period (days) - Maximum number of days to check the order status in Express Relais. The default value is set to 14, which means that when the order is older than 14 days it won't anymore have automatic status checks. This value should be set to at least a number of days when the customer is allowed to return their product.
- Mobile prefix - Prefix added to mobile phone numbers on Express Relais order creation.
- Pickup city, address, contact, phone, email - Store or warehouse information from where the Express Relais orders should be received from. It is essential for these fields to be filled in.
Order Management
In the order details a new Delivery point table is visible when the Express Relais delivery is used (1). This table contains:
- Delivery point ID - ID of the delivery point.
- Delivery point name - Name of the delivery point.
- Delivery point address - Address of the delivery point.
 |
| Visualization of the TC logistics order details (Details tab) |
When the TC Logistics status is set to Packaging the Express Relais tab is visible (2). This tab contains detailed information regarding the Express Relais statuses.
Below you can find what Express Relais statuses are automatically mapped to TC Logistics statuses. The change of the Express Relais status will change TC Logistics status during the next status check.
|
Express Relais status
|
TCLogistics status
|
ER status description
|
|
NEW_ORDER
|
ID_PACKAGING
|
Initial status at order creation
|
|
ORDER_CONFIRMED
|
ID_READY_TO_SHIP
|
Order Confirmed
|
|
ORDER_CANCELED
|
ID_CANCELLED
|
The order was canceled by the client
|
|
ORDER_REFUSED
|
ID_DELIVERY_FAILURE
|
Order refused by Express Relais
|
|
MISSING_PARCEL
|
ID_DELIVERY_FAILURE
|
Missing parcel during pickup
|
|
PARCEL_PICKEDUP
|
ID_SHIPPED
|
Parcel picked up
|
|
PARCEL_IN_AGENCY
|
ID_SHIPPING_IN_PROGRESS
|
The package arrived at the regional agency
|
|
PARCEL_IN_TRANSIT
|
ID_SHIPPING_IN_PROGRESS
|
Parcel in transit
|
|
PARCEL_IN_DELIVERY
|
ID_SHIPPING_IN_PROGRESS
|
The parcel is delivered to the locker or destination address
|
|
DELIVERED_TO_LOCKER
|
ID_SHIPPING_IN_PROGRESS
|
Parcel delivered to the locker
|
|
PARCEL_RETRIEVED
|
ID_DELIVERED
|
Parcel received from Smartlocker
|
|
WAITING_IN_LOCKER
|
ID_SHIPPING_IN_PROGRESS
|
The package waiting for pickup from the automated locker
|
|
DELAY_IN_RETRIEVE
|
ID_SHIPPING_IN_PROGRESS
|
Package delayed for pickup at the destination locker
|
|
WAITING_COD
|
ID_SHIPPING_IN_PROGRESS
|
The package arrived at the destination locker and awaiting payment upon delivery
|
|
COD_PAID
|
ID_SHIPPING_IN_PROGRESS
|
Payment upon delivery at the locker completed, the recipient can retrieve their parcel
|
|
PARCEL_TO_RETURN
|
ID_RETURN
|
The client has initiated the return of the parcel in question
|
|
PARCEL_ABANDONED
|
ID_RETURN
|
The package was abandoned because the package was not delivered and the client did not initiate its return
|
|
PARCEL_RETURNED
|
ID_RETURN
|
Parcel returned successfully
|
|
PARCEL_IN_FINAL_AGENCY
|
ID_SHIPPING_IN_PROGRESS
|
Parcel has arrived at the final agency
|
|
RETURN_REQUEST_CONFIRMED
|
ID_RETURN
|
The requested return parcel has been confirmed
|
 |
| Visualization of the TC logistics order details (Express Relais tab) |
In the Express Relais tab you can find the current status of the orders with the following information:
- Parcel ID - ID of the order from E-commerce platform.
- Status - Current Express Relais status of the order.
- Status Description - Status description is taken from Express Relais.
- Status comment - Status comment taken from Express Relais
- Status update time - Last update them when the status was updated.
Below the table with order status, you can find a log of status changes that additionally contains a waybill column. Waybill is assigned to the order once it is present in the status update.
As mentioned in TC Logistics the status update frequency depends on how the order is, but if there is a need to receive a new update even after an allowed 14 days by default it is possible by pressing the update status button located in the top right corner of the Express Relais tab. This button will immediately check the status of a desired order and update all data if there is a change.
BLIK integration
Getting started
In this article, you can find information about the BLIK integration used on a Polish website.
Blik is a payment system in Poland that allows users to make instant payments and withdraw cash using only the user's standard mobile banking app. The system allows to make online and in-store purchases and to transfer money in real time between bank accounts without the need for a payment card. BLIK is a typical T6 payment that uses 6 numbers long codes, that are randomly generated every 2 minutes to pair the payment request to their bank application.
This integration uses PayU integration, as PayU manages all BLIK payments as well as provides necessary keys and IDs.
Table of contents:
Configuration
Blik doesn't have any internal options in System / Settings and is configured like every PayU payment method in System > Payment types / list.
 |
| Visualization of the BLIK configuration |
Available settings are:
- Is active? - A switch that definies if the selected payment method is active
- Public name - A public name of a payment method. This name is visible on the website for the customers.
- Public description - A description of a payment method. This description is visible on the website for the customers.
- Export tag - A tag that will be exported to JOY. For BLIK it should be set to PAY_PP_CREDIT_CARD export tag.
- Sort order - A sort order of the payment. It defines in which order payments should be sorted on the payment page. The higher the number the later in the list payment will be visible.
- enable_optional_payu_payment - Enables a button on a BLIK page, which allows customers to use PayU instead. This option shouldn't be enabled if the transparent blik is enabled. Accepted values are 1 for true and 0 for false.
- key1 - An integration key provided by a PayU panel.
- key2 - An integration key provided by a PayU panel.
- onlyBlik - Provides an option for an on-page blik handling instead of redirecting the users to a PayU page. In the case of transparent BLIK payment, it should be enabled. Accepted values are 1 for true and 0 for false.
- posID - ID of a POS from a PayU panel.
- ssl_receiver - An option to enable a Secure sockets layer receiver. It should be enabled.
- use_sandbox - An option to enable a sandbox mode for a selected payment. This option should only be enabled on UAT environments.
With a BLIK payment option created and configured, it needs to be enabled in the altshops. You can find more about it in the Alt shop / payment types article.
![]() RememberBLIK payment option needs to be properly configured in the PayU panel beforehand. PayU themselves need to enable a transparent blik option for a selected payment method.
RememberBLIK payment option needs to be properly configured in the PayU panel beforehand. PayU themselves need to enable a transparent blik option for a selected payment method.
Customer perspective
Enabled BLIK payment option will be instantly usable by the customers during the payment process
 |
| Visualization of the payment options in the order process |
When the OnlyBlik option is selected the customers will be redirected at the last step into an order confirmation page where the field for a BLIK code is visible. Customers can put there their BLIK code and confirm it.
 |
| Visualization of the BLIK payment |
If the BLIK code is correct the customer order will be instantly paid for. If the code is not correct customers will see information, that the typed code is incorrect and will be able to try once again. In case of expired or used codes customers will be able to type the code again as well.
 |
| Visualization of the incorrect BLIK code |
Passmachine integration
Getting started
In this article, you can find information about the passmachine integration, which allows customers to add their FIDEN2 cards to their virtual wallets on iOS and Android devices.
Table of contents:
Enabling the functionality
Passmachine integration is disabled by default and needs to be enabled in the
System / settings > Integrations > Passmachine
 |
| Visualization of the passmachine system settings |
In the passmachine integration system settings there are the following options:
- Enabled -A switch that enables or disables the functionality.
- Display on the website - A switch that enables the integration for the website. If it's turned off, the functionality will only work in the mobile app.
- Login (e-mail) - E-mail is used to log in to PassMachine account. It should have User-level privileges and should be limited to only one subproject.
- Password - Password to the PassMachine account.
- Template ID - Template ID from the PassMachine panel which should be used for new passes (virtual cards).
- Endpoint URL - Absolute URL to PassMachine API. This URL should always point to https://api.passmachine.cz unless there are changes on the passmachine side.
With the functionality configured and enabled it is ready to be used by the customers.
Passmachine passes
Passmachine assigns it's internal passes to the customers e-mail addresses. This way passmachine can connect which customer is which by their pass from the wallet, and then link it to the customer on the Yves Rocher application or website.
If there is a need to remove a singular customer pass or clear the entire pass database it is possible to do so in
System > Passmachine / passes
When the customer has their pass removed from the database a new one will be generated, when the customer logs in to their account.
![]() Warning Removing the passes is irreversible. All the connections between Yves Rocher and Passmachine wallet integration will be severed, so customers no longer will be able to use or see their FIDEN2 points in their Google / Apple wallet.
Warning Removing the passes is irreversible. All the connections between Yves Rocher and Passmachine wallet integration will be severed, so customers no longer will be able to use or see their FIDEN2 points in their Google / Apple wallet.
 |
| Visualization of the passmachine passes tab |
In the Passmachine / Passes you can find the following options:
- (1) Show X Entries allows to filter how many entries should be visible at once
-
(2) Various table columns. All of them can be sorted by clicking on them.
- ID - Pass internal ID
- E-mail - Customers e-mail address to which the selected pass is assigned to.
- Pass ID - Identification of the pass used in the passmachine.
- Update time - A date and hour when the last time pass was updated
-
Actions
- Delete - A button, that allows to deletion of a selected pass. This action is irreversible.
- (3) Clear database button allows to clear the whole pass database. Do not use this functionality unless it is absolutely necessary. This action is irreversible.
- (4) Search field allows to search the passes by the customer e-mail address or their pass ID.
- (5) Pages list allows to show the next batch of passes on the another page according to applied sorting option and filters.
Customer perspective
With the functionality enabled, customers will be able to add their FIDEN2 cards to their virtual wallets. The new buttons can be found in the customer profile below the bar code and card number.
 |
| Visualization of the customer profile |
 |
| Visualization of the passmachine website |
Orlen delivery integration
Getting started
In this article you can find information about Orlen delivery service, which can be used by customers to deliver their packages to the selected pickup points.
Orlen delivery doesn't have system configuration, as all of it's content is provided and managed by Orlen. All needed to start using this delivery option is enabling it in System > Delivery / types and in a selected altshops.
![]() RememberYou can find more about enabling delivery options in Delivery costs / list - browsing and managing delivery costs article
RememberYou can find more about enabling delivery options in Delivery costs / list - browsing and managing delivery costs article
Table of contents:
Frontend overview
With enabled and configured delivery type customers are allowed to use the Orlen delivery pickup.
 |
| Visualization of the Delivery step in the order process |
 |
| Visualization of the Orlen delivery window |
In the delivery point popup customers are able:
(1) Search for their desire location. This option will move the map to the typed location
(2) Allow the device to share their current location. This option will center the map on the users location. Users approval to use the devices GPS is required for this functionality to work properly.
(3) Select one of the closest locations. This option shows customers the exact location of the pickup point as well as it's opening and closing hours. The delivery cost is taken from the Orlen Delivery Pickup delivery cost configured in Delivery costs / list - browsing and managing delivery costs.
![]() RememberOrlen delivery view is provided by Orlen, and Tau Ceti is unable to make any changes to the design and functionality at it's current state.
RememberOrlen delivery view is provided by Orlen, and Tau Ceti is unable to make any changes to the design and functionality at it's current state.
With selected delivery point customers are able to proceed with their order, and the order will be delivered to the selected Orlen pickup point.
Exponea
Getting started
Exponea is an external cloud-based e-commerce experience platform by Bloomreach. It specializes in B2B services in marketing automation, product discovery, and content management system.
Tau Ceti platform integrates with Exponea, allowing Yves Rocher employees to configure AI product recommendations and personalized content and inject it into desired places on the website.
![]() RememberIn order to use the Exponea panel under URL https://app.exponea.com/ you have to have an account with proper access. Yves Rocher provides access to Yves Rocher Exponea, so if you require access please get in touch with your superior.
RememberIn order to use the Exponea panel under URL https://app.exponea.com/ you have to have an account with proper access. Yves Rocher provides access to Yves Rocher Exponea, so if you require access please get in touch with your superior.
![]() RememberYou can learn more about using the Exponea panel in Bloomreach documentation under URL https://documentation.bloomreach.com/engagement/docs
RememberYou can learn more about using the Exponea panel in Bloomreach documentation under URL https://documentation.bloomreach.com/engagement/docs
Table of contents:
Configuration
Exponea integration connects to the Yves Rocher website with a unique project token and keys. Every country using exponea has separate projects for each country, so their content is separated.
You can find the Exponea configuration in:
System > System / Settings > Integrations > Exponea
| Visualization of the |
In the Exponea configuration you can find the following options:
- Public key - An Exponea public integration key
- Private key - An Exponea private integration key
- Use non-flickering experiments snippet - A switch that defines if a non-flickering snippet for experiments should be used. You can find more about it under URL https://documentation.bloomreach.com/engagement/docs/flickering-effect-in-experiments
- Webpush support enabled - A switch that defines if webpush support should be enabled. If this switch is turned on the built-in web push support should be disabled.
- Show popup with webpush subscription proposal on all pages - A switch that defines if a newsletter subscription proposal web push should be displayed on all pages for the customer. Whenever it is disabled it will be visible only on a homepage.
With all necessary fields filled Exponea integration is ready to use and projects set up in the Exponea panel will affect the selected Yves Rocher website.
Exponea product recommendation
Exponea can be configured to recommend customers products that might interest them based on their purchase history and view history. Bloomreach is using an AI technology, to find the most likely products that customer will purchase, when recommended.
In the Tau Ceti admin panel these recommendations can be configured in:
CMS > Exponea / Recommend product block
Below you will find a description of all possible actions you can perform in the Select block section.
| Visualization of the |
- Select the Show X entries (1) field to set the number of product recommendations, displayed on one page (min 10 / max 100).
- The names of the columns (2) that contain information about a target product recommendation. Each column is susceptible to sorting. To sort the records, click on the title of the column.
- ID - An internal ID of the Exponea product recommendation
- Name -
- Is active? -
-
Actions - List of buttons with possible actions that can be done to the desired recommendation:
- Edit - Edit desired product recommendation. Editing has exactly same actions as adding new one, so the list of actions can be found in Creating a product recommendation chapter.
- Select the Add (3) button to go to the adding the new Expoena product recommendation. You can learn more about adding of the recommendations in Creating a product recommendation chapter.
- Search box (4) where you can search for desired recommendation by using their name.
- Page buttons (5), which allows user to change the page of the recommendation list.
Creating a product recommendation
While creating or editing a new product recommendation we have to have prepared a correct recommendation ID from the Exponea panel. You can find more information about this topic and recommendation examples in the Bloomreach documentation under URL https://documentation.bloomreach.com/engagement/docs/recommendations#section-4-implement
Below you can find field descriptions in the Tau Ceti panel
| Visualization of the |
- Name - An internal product recommendation name.
- Recommendation ID - Exponeas recommendation ID
- Size - A number of recommended items to return i.e. 5 will result in 5 items shown.
- Items - Information about currently viewed product by the browsing user. Represented as dictionary 'product_id: weight.' Please use only single item in the dictionary with weight = 1.
- Strategy -
- Picture - This field is only visible when creating a new product recommendation.
- Category id - This field is only visible when creating a new product recommendation.
- Block title - This field is only visible when creating a new product recommendation.
- Anti -
- Similarity - A switch that decides the similarity between two items. When it's turned on the AI will try to recommend similiar items to the customer.
- Anonymous -
- Consider known items -
- Active - A switch which defines if a selected recommendation is active on the Yves Rocher website.
JOY webservice
Getting started
In this article, you can read about JOY integration and its options in the Tau Ceti panel.
JOY is an external integration Yves Rocher uses for order, stock, and campaign code management. Currently, during the order creation process at the last step, JOY validates if a current product stock in JOY and assigned to the altshop campaign code is correct. If it's not correct customer is unable to finish the order with a notification to try again later.
When the order is created in Tau Ceti it's going through an internal check process, which is followed by a JOY check process. After passing both checks the order is being sent to JOY.
Table of contents:
- JOY - TC communication
- Configuration
- Orders to verify
- JOY stocks
- JOY / Failed orders report
- JOY / Real time validation
JOY - TC communication
Communication between JOY and Tau Ceti happens in cycles or during certain events. Below you can find used communications between Tau Ceti and JOY:
Cyclic communication
Stock synchronization happens every hour at different times for every environment. Updates stock levels stored in the TC database based on values from JOY. Stocks are retrieved from JOY always using the regular altshop default campaign code. This value uses the Order API.
Stock synchronization schedule:
- Polish environment synchronizes every hour at
XX:00. - Czech environment synchronizes every hour at
XX:12. - Slovak environment synchronizes every hour at
XX:24. - Hungarian environment synchronizes every hour at
XX:36. - Romanian environment synchronizes every hour at
XX:48.
Import of invoice numbers happens every 30 minutes. Retrieves invoice numbers from JOY for orders that, when placed in JOY, did not generate an invoice. The invoice number is used in other processes (i.e.: invoicing, EET CZ). This value uses the Order API.
Export e-commerce orders happen every 3 minutes. Exports orders to JOY. When exporting orders in JOY, Tau Ceti creates and updates consumer data (this doesn't happen anywhere else). The order is exported regardless of the paid status. When exporting orders, Tau Ceti also performs a check to see if a city name definition exists in JOY for the postal code used. If it does not exist, the record is created. In this way, we automatically populate the address dictionary in JOY, because otherwise, JOY would not allow us to save multiple orders. This value uses the Order API.
Export e-commerce order payment information happens every 3min. Exports order payment information if such information was not available when the order was exported. Uses Invoice API.
Event-based communication
Export BaseLinker orders - when a positive validation of an order from BaseLinker is completed. Always creates new consumers in JOY. It does not use existing accounts. Orders with e-payments are exported to JOY only if they have already been paid. It uses Order API.
Import of order status changes and waybill numbers from JOY - when Tau Ceti gets a notification sent to TC API. Order status change information may include a waybill number, which is stored in the database for presentation to the consumer for order tracking. Waybill numbers are also sent to BaseLinker if the notification is for an order originating from BaseLinker.
Checking campaign code and inventory in real-time - at the time of order closing (approval of order placement by the consumer). Uses Order API.
![]() RememberTau Ceti service is waiting 5 seconds for a connection initiation. If the connection is not initiated it will result in a timeout.
RememberTau Ceti service is waiting 5 seconds for a connection initiation. If the connection is not initiated it will result in a timeout.
If Tau Ceti doesn't receive a response to their request from the JOY service within 30 seconds it will result in a timeout.
Configuration
Initial JOY configuration on a new environment requires joint cooperation between Tau Ceti developer team and the JOY team to set it up properly.
You can find the JOY configuration in the:
System > System / Settings > Integrations > JOY Webservices
 |
| Visualization of the JOY webservices tab in System / Settings |
In the JOY configuration you can find the following options:
- JOY Enabled - A switch that enables or disables JOY integration
- Invoice API: WSDL URL - URL of Invoice API WSDL. This URL shouldn't be changed.
- Invoice API: market code - Market code. This code is provided by JOY
- Invoice API: login - Login provided by JOY, which allows connecting to the JOY API
- Invoice API: password - Password provided by JOY, which allows connecting to the JOY API
- Invoice API: Use Keep-Alive - Defines whether we reuse existing connections to the JOY API when we make more than 1 request to the API in a single process. This option is unstable and may cause issues, so it is recommended to leave it disabled.
- Order API: WSDL URL - URL of Order API WSDL. This URL shouldn't be changed.
- Order API: market code - Market code. This code is provided by JOY
- Order API: login - Login provided by JOY, which allows connecting to the JOY API
- Order API: password - Password provided by JOY, which allows connecting to the JOY API
- Order API: Use Keep-Alive - Defines whether we reuse existing connections to the JOY API when we make more than 1 request to the API in a single process. This option is unstable and may cause issues, so it is recommended to leave it disabled.
- Order API: skip order filters - If enabled, filters set in JOY are ignored. It should be enabled because it is very common to have filters set up in JOY that prevent orders from being placed. If skip orders filters are enabled, filters in JOY do not block order placement.
- API: Technical breaks - Definies in a HH:MM-HH:MM;HH:MM-HH:MM (i.e. 08:00-10:00;22:00-23:00) format when the API technical break occurs. Please do not use e.g. 23:00-01:00 range, as the time is always checked for the current day.
- Stock real time validation - A switch that defines if real-time validation for stocks is enabled when creating a new e-commerce order. If it is enabled, but JOY is unable to validate stocks because of i.e. connection issues customers won't be able to create new orders.
- Campaign codes real time validation - A switch that defines if real-time validation for campaign codes is enabled when creating a new e-commerce order. If it is enabled, but JOY is unable to validate the campaign codes because of i.e. connection issues customers won't be able to create new orders.
- Joy Export Logs: Lifetime (days) - Defines for how long JOY export logs will be stored.
- Delete errors older than (days) - Defines after how many days system deletes JOY errors
- Export company data - A switch that defines if customer company data in the Invoice table should be exported to JOY.
Please notice that JOY allows only for setting company data within customer records. It means that customers placing two orders using the same account, on the same day, with different invoice data will probably receive invoices with the same data as the person/company receiving the invoice. It applies not only to company data, it applies to entire billing data. They are overwritten during the export of every customer's order.
Additionally used fields were added to JOY for Romania only. It means that JOY may not support the usage of these fields for any other country than Romania.
Only billing address company data are transferred to JOY. There is no option to pass company data for delivery data.
Orders to verify
Whenever an order fails an internal Tau Ceti check or JOY check it will be visible with an error message in the:
Orders > Orders / to verify
 |
| Visualization of the Orders / to verify tab |
In the Orders / to verify tab there is an option to
- Re-export the order - The system tries once again to verify the order and re-export it to the JOY. If the verification fails once again the order will be visible once again in Orders / to verify after a short time.
![]() RememberIn most cases whenever an error cannot be re-exported it should be handled by the JOY team on their side unless it's an error with incorrect customer invoice/delivery data, which needs to be fixed in the Tau Ceti panel.
RememberIn most cases whenever an error cannot be re-exported it should be handled by the JOY team on their side unless it's an error with incorrect customer invoice/delivery data, which needs to be fixed in the Tau Ceti panel.
The JOY support team can be contacted via email helpdesk-se@yves-rocher.se.
If you are not sure about the error please contact the Tau Ceti helpdesk team via
email helpdesk@tauceti.email.
- Mark the order as correctly exported - Severs the connection between Tau Ceti and JOY regarding this order and marks it as correctly exported in the Tau Ceti admin panel.
![]() Warning Marking an order as correctly exported severs the connection between Tau Ceti and JOY regarding this order, which means any updates on both platforms won't be sent to the other platform. This means that the order will also not have a generated invoice.
Warning Marking an order as correctly exported severs the connection between Tau Ceti and JOY regarding this order, which means any updates on both platforms won't be sent to the other platform. This means that the order will also not have a generated invoice.
![]() RememberIn Orders / to verify there are also visible orders with errors from other integrations like Rumanku used in Click & Collect functionality. Rumanku errors can be recognized with a CC: at the beginning of the error message. The JOY team is not handling Rumanku errors.
RememberIn Orders / to verify there are also visible orders with errors from other integrations like Rumanku used in Click & Collect functionality. Rumanku errors can be recognized with a CC: at the beginning of the error message. The JOY team is not handling Rumanku errors.
JOY stocks
JOY stocks functionality can be used to verify a product stock available in JOY as well as it is a quick way to verify if a connection with JOY works correctly, as it will return an error whenever trying to check a stock.
You can find JOY stocks in:
Catalog > Joy stocks
 |
| Visualization of the JOY stocks |
In the JOY stocks you are able to choose a desired campaign code and then type the SKU number of a desired product. By pressing the Check stock button you will be able to see how exactly many pieces of typed product are available for a selected campaign code. You are additionally able to see an XML request sent to JOY and its response.
If typed product is not available in JOY or the connection to JOY doesn't work properly you won't see any product information, but a message that the product couldn't be found.
JOY / Failed orders report
It is possible to see all orders that have not been placed in Tau Ceti admin panel, because of failed JOY campaign code or stock validation. You can find such report with failed JOY orders in:
Reports > JOY / Failed orders
 |
| Visualization of the filter in JOY failed orders report |
In the filters tab we have following options:
- Error time - Defines a range of dates within the errors will be searched for
- Order ID - Defines an order ID of a failed order
- Customer ID - Defines a customer's internal ID.
 |
| Visualization of the filtered JOY failed orders |
With an applied filter, you can see all of the orders in a selected date range that has failed. In the Error column, you can see what was exactly a source of an error.
If the order was placed afterward it's Order ID will be blue and clickable. By clicking the Order ID you will be redirected to the order page.
JOY / Real time validation
Whenever there will be a planned maintenance of JOY webservice Yves Rocher can prepare for that by disabling the real-time validation for campaign codes and stocks. This can be done in JOY system settings described in Configuration chapter, but it can also be automated in:
System > JOY / Real time validation
 |
| Visualization of the JOY real time validation tab |
In the JOY / real time validation tab, we are able to select the:
- Mode - A Enable / Disable choice. Whenever the mode is set to Disable it will disable both validations (stock and campaign code) for a selected execution time, whenever it's set to Enable it will enable them.
- Execution time - A local time whenever the selected mode should be executed. Below the field, you are able to see a local time for a selected environment. As execution happens according to the local time please check if provided information by JOY applies to the environment local time i.e. if the JOY team has provided information that they have maintenance at 23:00 UTC+2 and the selected environment country is located in a UTC+3 timezone you have to select the hour 00:00.
The schedule applies only once for a selected mode, so there is no automatic way to enable the validation back whenever it's been disabled. In this case please remember to put another schedule, whenever you want to enable the validations back. For example:
29.07.2023 22:00 - Disabled mode
29.07.2023 23:00 - Enabled mode
This way JOY validation will be disabled for an hour on a selected environment.
Click and Collect
Getting started
In this article, you will find information about click and collect integration, which will connect the Yves-Rocher e-commerce website with selected local POS stores. By doing so, customers will be able to check products and their available stock for a selected store, order them online, and collect them in the store. This functionality allows to even further expand the user experience by giving them more options to handle the delivery as they please as well as verify if their desired product is available in the selected store before going there.
![]() RememberClick & Collect uses Rumanku integration in order to connect to the stores. Setting up Click & Collect on a website requires both configuring it in the Tau Ceti admin panel described in the Configuration chapter as well as configuring the stores in Rumanku itself.
RememberClick & Collect uses Rumanku integration in order to connect to the stores. Setting up Click & Collect on a website requires both configuring it in the Tau Ceti admin panel described in the Configuration chapter as well as configuring the stores in Rumanku itself.
Table of contents:
Configuration
Click & Collect functionality configuration can be found in the
System > System / Settings > Integrations > Click and collect
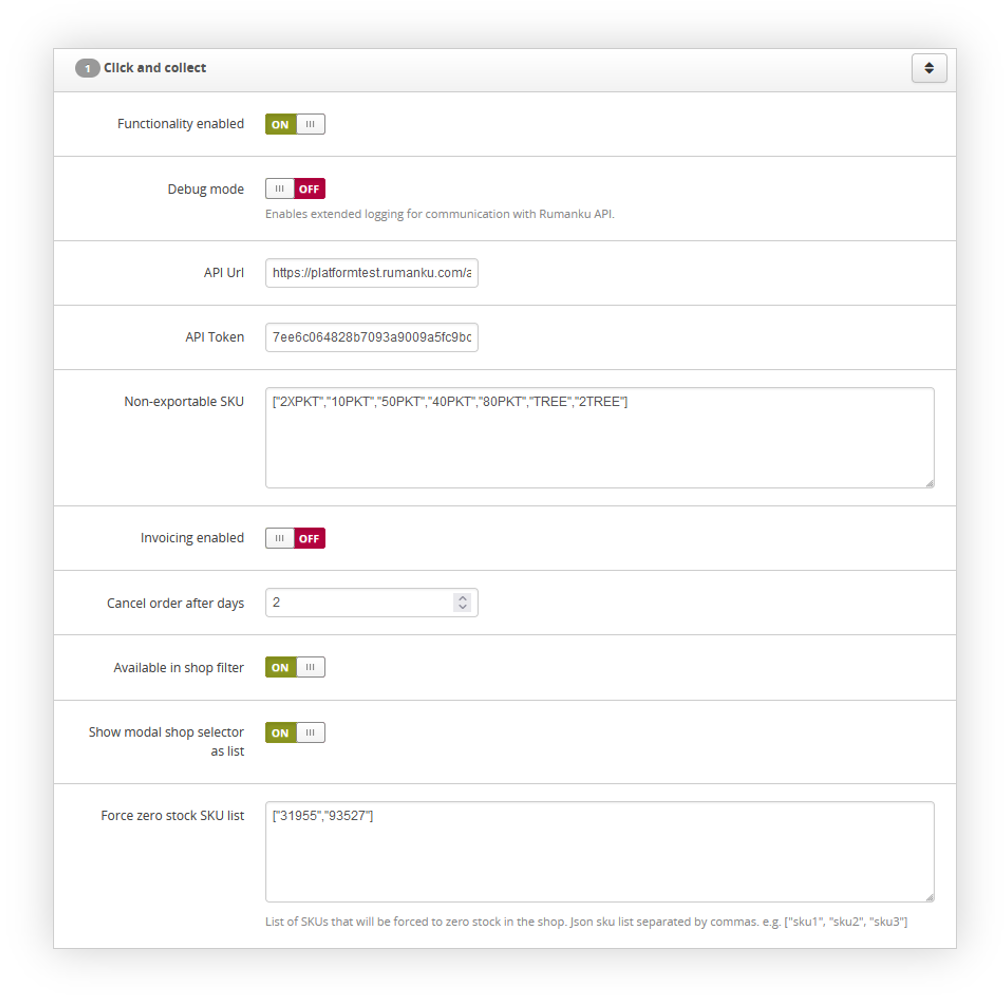 |
| Visualization of the Click and Collect functionality |
In the Click and Collect tab you can find the following options:
- Functionality enabled - enables the click & collect functionality.
- Debug mode - Enables expanded logging for communication between TC and Rumanku. This option should be turned off unless the TC team is verifying the functionality.
- API URL - Rumanku API URL. This URL shouldn't be changed.
- API Token - Rumanku API token
- Non-exportable SKU - An array of SKUs that shouldn't be exported to Rumanku. In this list, there should be products that are virtual only and are not available in the POS stores like FIDEN2 points from a Gift of Choice promotion. Example of an array:
["40PKT","80PKT","TREE"]
- Invoicing enabled - Enables invoice generation for C&C orders.
- Cancel order after days - A numerical value that defines after how many days an order should get canceled automatically if not received by the customer.
- Available in shop filter - Adds a filter in the product catalog, which allows customers to filter only products available in the selected POS store.
- Show modal shop selector as list - Defines if the POS store list should be visible for customers as a vertical list or modal tiles. You can find a visualization of these options in the E-commerce perspective chapter.
- Force zero stock SKU list - An array of SKU numbers that will have forced a stock value of 0 for all C&C stores.
![]() RememberWith Click & Collect functionality enabled it is important to enable the Click & Collect delivery option in System > Delivery types / list (You can find more about this section in the [UNDER CONSTRUCTION] article), and enable it in the desired altshops in Altshops > Delivery costs / list. (You can find more about this section in the Delivery costs / list - browsing and managing delivery costs article).
RememberWith Click & Collect functionality enabled it is important to enable the Click & Collect delivery option in System > Delivery types / list (You can find more about this section in the [UNDER CONSTRUCTION] article), and enable it in the desired altshops in Altshops > Delivery costs / list. (You can find more about this section in the Delivery costs / list - browsing and managing delivery costs article).
POS stocks configuration
As POS stocks are stored locally and are sent from the Tau Ceti platform to Rumanku this functionality needs to be enabled for Click & Collect to work properly. It can be found in:
System > System / Settings > Built-in functions > POS stocks
 |
| Visualization of the POS stocks system settings |
In the POS stocks system settings you can find the following options:
- Import enabled -Enables/disables automatic import of POS Stocks from the local directory.
- Ignored SKU prefixes - List of SKU prefixes that are removed from SKU before checking real stock value. JSON array should be in the following format:
["P", "F", "S"] - Fixed stock SKU - List of fixed stocks for point of sales. They are never checked against real values. JSON array should be in the following format:
[{"sku":"40PKT","stock":1000},{"sku":"80PKT","stock":1000} - Stock buffer - Minimum stock value which allows customers to buy products. For example, value "3" means that the customer will be able to buy 2 pieces if stock is "5". It affects all orders referencing POS stocks (both Click&Collect and Beauty Advisor). Set to "0" to disable the buffer.
E-commerce perspective
With Click & Collect functionality enabled customers are able while looking through the product catalog or searching for desired products to select a desired Yves Rocher store (1).
 |
| Visualization of the Click & Collect POS selection (desktop) |
 |
| Visualization of the Click & Collect POS selection (mobile) |
This filter option will open a pop up with a list of available POS stores that can be searched by their address, name, or POS number. The content of every modal or list is configured in Rumanku.
 |
| Visualization of the POS selection popup (modal tiles) |
 |
| Visualization of the POS selection popup (list) |
 |
| Visualization of the POS selection popup (mobile) |
After customers select a desired POS store now they are able to filter all of the products in the search query or a product catalog by their availability in the store (2).
 |
| Visualization of the "Show only products available products in the store" filter |
Additionally whenever customer enters a product page there will be an information about availability of the product in the selected store as well as their exact stock if they are available (3).
 |
| Visualization of the product stock information on the product page (desktop) |
 |
| Visualization of the product stock information on the product page (mobile) |
With the order ready customers are able to select the Click & Collect delivery option, which means they will get their order in person in the selected POS Store. If in the product catalog, no store was selected customers will be requested to choose a POS store at this step.
 |
| Visualization of the Click & Collect delivery option |
If at least one selected product is not available in the POS store customer will receive an information about that when selecting the POS store
 |
| Visualization of the POS store list with unavailable products from the cart |
As well as if a customer tries to proceed with the order they will be brought back to the delivery option selection in case one of the products are not available in the selected store with a popup which products are not available.
 |
| Visualization of the popup informing which products are not available in the selected store |
Zbozi.cz integration
Getting started
In this article, you can learn about zbozi.cz integration. Zbozi.cz integration contains configuration in the system settings, feed, and API connection with zbozi, which exports order data to zbozi whenever it is paid for. The API export does not contain gifts from the order.
Zbozi.cz feed is located under /partner/feedZBOZI.xml URL
(i.e. https://www.yves-rocher.cz/partner/feedZBOZI.xml)
![]() RememberZboží.cz is an internet comparison engine providing information for shopping on the internet. It allows customers to sort, filter and compare prices of products, find out the stock availability of goods or locate a store near them.
RememberZboží.cz is an internet comparison engine providing information for shopping on the internet. It allows customers to sort, filter and compare prices of products, find out the stock availability of goods or locate a store near them.
 |
| Visualization of the zbozi.cz feed |
Table of contents:
Configuration of the integration
In order for zbozi.cz integration to work properly it needs to be configured first. It's configuration settings are located in:
System > System / Settings > Integrations > Zbozi
 |
| Visualization of the zbozi configuration in the system / settings |
In the Zbozi system settings you can find following fields:
- Enabled - Enables the integration
- Integration URL - URL Address where Zbozi application is available (sandbox: "https://sandbox.zbozi.cz", prod: "https://www.zbozi.cz/")
- Company ID - Identifier of the company on the Zbozi platform (Establishment ID)
-
Sklik ID - Sklik conversion identifier.
- Private Key - The authorization key for the integration (Secret Key)
- Sandbox - Enables the test mode
Zbozi API elements
With integration configured every order that has been paid for is being sent to zbozi API. Gifts are not being sent to the API.
 |
| Visualization of the example order sent to zbozi |
Following order data is being sent to zbozi:
- Order Number
- Delivery Price
- Other costs
- Payment method
- Calculated total price
- List of products
Heureka integration
Getting started
In this article, you can find information about the Heureka integration. This integration prepares a product feed that can be used on the Heureka platform. The feed is available under
/partner/feedHeureka.xml (i.e. http://www.yves-rocher.cz/partner/feedHeureka.xml) when it is enabled in the system settings. The feed is generated every two hours.
![]() RememberHeureka is a Czech e-commerce site. More than 38,000 online stores present their offers on the Heureka.cz platform, allowing portal users to choose offers and compare prices of more than 21 million products.
RememberHeureka is a Czech e-commerce site. More than 38,000 online stores present their offers on the Heureka.cz platform, allowing portal users to choose offers and compare prices of more than 21 million products.
 |
| Visualization of the Heureka xml feed |
Table of contents:
Configuration of the integration
In order for a feed to be available it needs to be enabled. You can find the feed configuration in the
System > System / Settings > Integrations > Heureka.
 |
| Visualization of the Heureka integration in the System settings. |
In the Heureka tab in the system settings you can find the following options:
-
Feed enabled - A switch that decides whether the feed should be generated or not. Disabling the feed does not delete the file that has already been generated.
-
Altshop - A list of altshops you can choose a single altshop from which products should be downloaded and applied to the feed.
-
Manufacturer - The name of the manufacturer, appearing in the MANUFACTURER field in the generated feed.
-
Delivery days - information after what time the product will be delivered. This is the DELIVERY_DATE field in the feed.
-
Categories limit - the limit of categories displayed in the feed for one product (analogous to the limit on the product card).
Feed overview
In the Heureka feed, we can find available products from the selected altshop.
|
| Visualization of the Heureka xml feed |
Every product in the feed has the following fields:
- ITEM_ID - Product SKU number taken from the SKU field
- PRODUCTNAME - Product name taken from a name field
- DESCRIPTION - Product description taken from the Main description field
- URL - Product URL starting with the website URL (i.e. https://www.yves-rocher.cz) and followed by the URL taken from the Friendly URL field.
- IMGURL - URL of the image assigned to the selected product.
- PRICE_VAT - Current price of the product
- MANUFACTURER - Manufacturer name set in the Heureka configuration.
- CATEGORYTEXT - Product properties and tag. Properties are separated by a vertical bar.
- EAN - Product EAN number taken from the EAN field.
- PRODUCTNO - Product SKU number taken from the SKU field
-
PARAM - List of parameters.
- PARAM_NAME - Name of the parameter.
- VAL - Value of the parameter.
- DELIVERY_DATE - Delivery date value set in the Heureka configuration.
- ITEMGROUP_ID - SKU of a parent product (applicable for example for color variations)
Login via Apple ID
Getting Started
Apple integration allows to register and log in using an Apple account with a simple click of a mouse (1). In order to enable the functionality, it is needed to provide the necessary keys from the Apple app, and enable it in the System / settings.
This integration allows customers to quickly log in or register to their accounts without the need to provide additional email and password information.
![]() RememberIt is also possible to register and log in using Google, Facebook, and Seznam accounts. You can find more about that in the Social login and Login via Seznam articles.
RememberIt is also possible to register and log in using Google, Facebook, and Seznam accounts. You can find more about that in the Social login and Login via Seznam articles.
 |
| Visualization of the Apple ID authorization button on the log in page |
Table of contents:
Configuring the functionality
Apple log-in can be configured in the:
System > System / Settings > Integrations > Apple Auth.
 |
| Visualization of the Apple.cz authorization tab |
In this tab we can find following options:
- Enabled - A switch that enables the functionality.
- API URL - URL of the Apple API. Should always be set to https://appleid.apple.com.
- Client ID - Client identifier which can be obtained from Identifiers / Services IDs section in Apple Developer website.
- Mobile App client ID - Client ID parameter used by mobile applicaiton
- Team ID - Apple team ID taken from Apple developer website.
- Private key path - Absolute path to Apple p8 private key.
- Private key ID - Apple p8 private key ID.
- Locale (f.x. pl_PL) - Integration locale. F.x. pl_PL for Poland.
Customer perspective
When functionality is enabled, the customer will be able to simply register and log in by pressing the Login with Apple button (1) and using his Apple ID on the log in page:
 |
| Visualization of the Apple authorization button on the log in page |
 |
| Visualization of the Apple authorization button in the register tab |
When a customer selects the option to log in via Apple ID, the Apple popup will appear, where the customer is able to log in to his Apple account or select logged in account and log in into it.
 |
| Visualization of the Apple authorization |
After logging in customer will have to allow Yves Rocher website access to their Apple ID.
 |
| Visualization of the Apple authorization |
After acceptance customer will be logged in if there is already a registered account using that
e-mail address.
In case there is no account with the customer's e-mail address in the database, he will be redirected to the registration web page, where he has to fill in the needed fields (2) for registration that are not provided by Apple.
 |
| Visualization of the Apple additional information page |
Glovo feed
Getting started
In this article, you will find how to enable and download Glovo feed. Glovo is an on-demand courier service that purchases, picks up, and delivers products ordered through its mobile app.
By default, the feed is disabled on all countries except Romania.
 |
| Visualization of the Glovo feed |
Table of contents:
Enabling the feed
The feed switch can be found the
System / settings > Integrations > Glovo
 |
| Visualization of the Glovo system settings |
Here you can change the Feed enabled switch state which will enable or disable the Glovo feed. The feed is updated every hour at XX:09.
Altshop option allows selecting from which altshop product list will be taken with their altshop prices.
Downloading the feed
When the switch is enabled in the system settings the feed can be accessed through /partner/feedGlovo.xlsx URL for example https://www.yves-rocher.ro/partner/feedGlovo.xlsx.
|
| Visualization of the Glovo feed |
In the feed you can find the following columns:
- External_ID - Contains product SKU.
- Product_Name - Contains product name.
- SuperCollection - This field is always empty.
- SuperCollection_Order - This field is always empty.
- SuperCollection_Image - This field is always empty.
- Collection - This field is always empty.
- Collection_Order - This field is always empty.
- Collection_image - This field is always empty.
- Section - This field is always empty.
- Section_Order - This field is always empty.
- Price - Contains the price of the product
- Image - Contains URL of an image of the product in 500x500 format.
- Extra_Images - Contains additional images if the product has them assigned to it.
- Description - Contains description of the product
- Is_Alcoholic - Is always set to NO
- Is_Tobacco- Is always set to NO
- Attribute_Groups - This field is always empty.
Data layer
Getting started
In this article, you will find information about available variables and events used in the data layer on a Yves Rocher websites. The data layer is a JavaScript object (array) that is used to pass data from a web page to the Google Tag Manager container. The data that the website passes to the data layer can then be used to create variables, rules, and tags.
![]() RememberThe data layer contains all of the data generated by visitors and customers engaging with the Yves Rocher website.
RememberThe data layer contains all of the data generated by visitors and customers engaging with the Yves Rocher website.
Table of contents:
-
Available variables in the data layer
- yr_gtm_a
- yr_gtm_a1
- yr_gtm_ab
- yr_gtm_b
- yr_gtm_ac
- yr_gtm_c
- yr_gtm_ad
- yr_gtm_d
- yr_gtm_e
- yr_gtm_f
- yr_gtm_fa
- yr_gtm_g
- yr_gtm_h
- yr_gtm_k
- yr_gtm_l
- yr_gtm_m
- yr_gtm_n
- yr_gtm_u
- yr_gtm_aa
- yr_gtm_ae
- yr_gtm_ag
- yr_gtm_x
- yr_gtm_y
- yr_gtm_z
- ecomm_pagetype
- ecomm_totalvalue
- ecomm_prodid
- ecomm_prodidpl
- id_sekce
- visitorLoginState
- hashed_email
- hashed_phone_number
- phone_number
- address_info
-
Available data layer events
- page_view
- ecommerce / view_cart
- ecommerce / add_to_cart
- ecommerce / remove_from_cart
- ecommerce / add_shipping_info
- cart.change_address_data
- ecommerce / add_payment_info
- ecommerce / begin_checkout
- ecommerce / purchase
- ecommerce / view_item
- ecommerce / view_item_list
- website_error
- mgm.button_share
- mgm.button_copy
- wishlist_add
Available variables in the data layer
yr_gtm_a
Shows URL parameter for current altshop (used also in ?yras=… URLs)
Example: default
Available on: All pages
yr_gtm_a1
Shows Offer_segment value from current altshop settings.
Example: OfferSegment
Available on: All pages
yr_gtm_ab
Shows historic offer_segment values from the last 90 days in current altshop.
Example:
| yr_gtm_ab | object |
| - . | object |
| .offer_segment | Old_offer |
| .total_visits | 189 |
| .total_orders | 8 |
Available on: All pages
yr_gtm_b
URL parameter of a current campaign code in current altshop
Example: CC1546592845
Available on: All pages
yr_gtm_ac
History of URL parameters of the campaign codes active in user session in last 90 days in current altshop
Example:
| yr_gtm_ac | object |
| .0 | CC1664286880 |
| .1 | CC1661009512 |
| .2 | CC1498480417 |
| .3 | CC1658042828 |
Available on: All pages
yr_gtm_c
Current campaign code in current altshop
Example: 3CYLAWS11
Available on: All pages
yr_gtm_ad
URL parameters of a history of campaign codes active in user session in last 90 days
Example:
| yr_gtm_ad | object |
| .0 | 3CYLAWS11 |
| .1 | 3CYL8WS11 |
| .2 | 3CYGCWP01 |
| .3 | 3CYL7WS11 |
Available on: All pages
yr_gtm_d
User fingerprint (RLC) stored in long lasting cookie.
Example: b51Fx9u0VgKaVkkKz1P1nGqZZknbNYRk5
Available on: All pages
yr_gtm_e
Customer hash. Non-empty only for sessions that can be connected with some customers.
Example: 062f89de75ddf516484a
Available on: All pages
yr_gtm_f
User type. There are the following types:
- "1" - Guest user, no information about a connection with any customer account
- "2" - User who has subscribed to newsletter
- "3" - Registered customer
- "4" - Registered customer with active VIP Zone subaccount (Member Club account)
Example: 4
Available on: All pages
yr_gtm_fa
Current customer VIP zone MC title.
Example: T0
Available on: All pages
yr_gtm_g
Count of customer orders from last 360 days.
Example: 7
Available on: All pages
yr_gtm_h
Date of last customer order (YYYY-MM-DD), only orders up to 360 days are taken into account.
Example: 2022-08-04
Available on: All pages
yr_gtm_k
Value of last customer order in websites currency, only orders up to 360 days are taken into account.
Example: 1000
Available on: All pages
yr_gtm_l
Average value of customer orders from last 90 days.
Example: 750
Available on: All pages
yr_gtm_m
List of product SKUs present in customer orders from last 360 days, excluding gifts
Example:
| yr_gtm_m | object |
| .0 | 97701 |
Available on: All pages
yr_gtm_n
List of gifts SKUs present in customer orders from last 360 days.
Example:
| yr_gtm_n | object |
| .0 | F02113 |
| .1 | F94615 |
| .2 | F67114 |
Available on: All pages
yr_gtm_u
Date of current visit (YYYY-MM-DD)
Example: 2022-10-25
Available on: All pages
yr_gtm_aa
Current visit status. There are the following statuses:
- 0 - standard visit (without order and abandoned cart).
- 1 - visit with an abandoned cart.
- 2 - visit with the placed order.
- Abandoned cart - another cart than current, with at least one product.
Example: 2
Available on: All pages
yr_gtm_ae
Date of previous visit (YYYY-MM-DD)
Example: 2022-10-24
Available on: All pages
yr_gtm_ag
Count of visits in last 360 days
Example: 607
Available on: All pages
yr_gtm_x
List of SKUs that the user saw during the current visit. Only SKUs seen on product pages are used.
Example:
| yr_gtm_x | object |
| .0 | 05241 |
| .1 | 74084 |
| .2 | 74084 |
Available on: All pages
yr_gtm_y
Example:
| yr_gtm_y | object |
| .0 | Kategorie: Vlasy > Masky a octy: Masky > Cílená péče: Detox vlasů |
| .1 | Kategorie: Vlasy |
| .2 | Kategorie: Vánoce |
| .3 | Kategorie: Vánoce |
Available on: All pages
yr_gtm_z
Top X product SKUs in abandoned carts from last 90 days, without gifts.
Example:
| -yr_gtm_z | object |
| .0 | 22456 |
| .1 | J0437 |
| .2 | 83020 |
Available on: All pages
ecomm_pagetype
A type of page. Available types are:
- "home"
- "product"
- "category"
- "purchase" (orderend = order thank you page)
- "cart" (all other cart pages)
- "siteview" (visit on any site not meeting above conditions)
Example: product
Available on: All pages
ecomm_totalvalue
Total cart/order value without delivery method cost
Example: 2000
Available on: Only on pages with ecomm_pagetype = purchase/cart
ecomm_prodid
On purchase/cart pages: list of SKUs in order/cart, without gifts.
On product pages: current product SKU.
Example:
- On product page: "10399"
- On other pages: ["10399","J0346"]
Available on: Only on pages with ecomm_pagetype = purchase/cart/product
ecomm_prodidpl
On purchase/cart pages: list of SKUs in order/cart, without gifts.
On product pages: current product SKU.
On category pages: top X top-rated products found by selected filters.
Example:
- On product page: "10399"
- On other pages: ["10399","J0346"]
Available on: Only on pages with ecomm_pagetype = purchase/cart/product/category
id_sekce
On category pages: list of selected tags IDs.
On product pages: list of tags IDs from the most important feature assigned to the product (eg. Category).
Example: ["1246","1252"]
Available on: Only on pages with ecomm_pagetype = product/category
visitorLoginState
Current state of user log in state. There are currently two states:
- "0" = guest
- "1" = logged in customer
Example: 1
Available on: All pages
hashed_email
SHA256 hash of normalized user e-mail address.
Methodology: https://developers.google.com/google-ads/api/docs/conversions/enhance-conversions?hl=en#normalization_and_hashing
Example: "1b4f0e9851971998e7320785...edf7caa332359d6f1d83567014"
Available on: Only on the order thank you page (/cart/orderend, /cart/prepayment)
hashed_phone_number
SHA256 hash of normalized user mobile number.
Methodology: Google does not provide it. We normalize phone numbers to digits only and then hash them.
Example: "60303ae22b998861bce3...8a213c86c93c076dbe9f558c11c752"
Available on: Only on order thank you page (/cart/orderend, /cart/prepayment)
User e-mail address.
The field is generated only when unsafe user info is enabled within System > System / Settings > Integrations > Google Tag Manager
Example: "example@example.com"
Available on: Only on order thank you page (/cart/orderend, /cart/prepayment)
phone_number
User mobile number.
Field is generated only when unsafe user info is enabled within System > System / Settings > Integrations > Google Tag Manager
Example: "+48999999999"
Available on: Only on order thank you page (/cart/orderend, /cart/prepayment)
address_info
An object containing delivery address data of placed order. First and last names are hashed using SHA256.
Methodology: https://developers.google.com/google-ads/api/docs/conversions/enhance-conversions?hl=en#enhancement_adjustments
Fields "first_name" and "last_name" are generated only when unsafe user info is enabled within System > System / Settings > Integrations > Google Tag Manager
Example:
{
"hashed_first_name": "4f0e9851971998e...e59d6f1d83567014",
"hashed_last_name": "60303ae861bce3...8a213c86c9311c752",
"city": "Praha",
"postal_code": "11800"
}
OR
{
"hashed_first_name": "4f0e9851971998e...e59d6f1d83567014",
"hashed_last_name": "60303ae861bce3...8a213c86c9311c752",
"first_name": "Jan",
"last_name": "Kowalski",
"city": "Praha",
"postal_code": "11800"
}
Available on: Only on order thank you page (/cart/orderend, /cart/prepayment)
Available data layer events
page_view
Event Generated automatically by Google Analitycs. All events handled by GA4 have anonymized IP (it's non-configurable).
Event parameters: (GA4 generated)
altshop
Triggered on every page if "Track page loads as "altshop" event" is enabled in GA4 system settings.
Event parameters:
{
name: 'alt shop name'
}
ecommerce / view_cart
This even is triggered on cart page (/cart).
Event parameters:
{
value: gross value of products,
currency: 'ISO currency code',
items: [{
item_name: 'product name',
item_id: 'product SKU',
item_variant: 'product attribute value / color name',
item_brand: 'YvesRocher',
item_category: 'Product category',
price: final price for 1pc,
discount: 'difference between catalog_price and final price',
currency: currency,
quantity: quantity
}],
shipping_tier: 'delivery method name'
}
ecommerce / add_to_cart
Triggered when a user adds an item to the cart. It applies only to regular 'add to cart' buttons. The value field contains the total row value after a change (determined by SKU). Items contain only elements with item_id equal to added SKU.
Event parameters:
{
value: gross value of products,
currency: 'ISO currency code',
items: [{
item_name: 'product name',
item_id: 'product SKU',
item_variant: 'product attribute value / color name',
item_brand: 'YvesRocher',
item_category: 'Product category',
price: final price for 1pc,
discount: 'difference between catalog_price and final price',
currency: currency,
quantity: quantity
}],
shipping_tier: 'delivery method name'
}
ecommerce / remove_from_cart
Triggered when the user removes an item from the cart using "X" in cart table at /cart. The value field contains the total row value after a change (determined by SKU). Items contain only elements with item_id equal to added SKU.
Event parameters:
{
value: gross value of products,
currency: 'ISO currency code',
items: [{
item_name: 'product name',
item_id: 'product SKU',
item_variant: 'product attribute value / color name',
item_brand: 'YvesRocher',
item_category: 'Product category',
price: final price for 1pc,
discount: 'difference between catalog_price and final price',
currency: currency,
quantity: quantity
}],
shipping_tier: 'delivery method name'
}
ecommerce / add_shipping_info
Triggered when user clicks on delivery method box on /cart/delivery (user changes delivery method).
Event parameters:
{
shipping_tier: 'delivery method name',
value: gross value of products,
currency: 'ISO currency code',
items: [{
item_name: 'product name',
item_id: 'product SKU',
item_variant: 'product attribute value / color name',
item_brand: 'YvesRocher',
item_category: 'Product category',
price: final price for 1pc,
discount: 'difference between catalog_price and final price',
currency: currency,
quantity: quantity
}]
}
cart.change_address_data
Triggered when the user clicks on "add new address" button on /cart/delivery page.
Event parameters: No parameters.
ecommerce / add_payment_info
Triggered when user clicks on the payment method box on /cart/payment (user changes payment method).
Event parameters:
{
payment_type: 'payment method name',
value: gross value of products,
currency: 'ISO currency code',
items: [{
item_name: 'product name',
item_id: 'product SKU',
item_variant: 'product attribute value / color name',
item_brand: 'YvesRocher',
item_category: 'Product category',
price: final price for 1pc,
discount: 'difference between catalog_price and final price',
currency: currency,
quantity: quantity
}],
shipping_tier: 'delivery method name'
}
ecommerce / begin_checkout
Triggered when "I confirm order" is clicked at the last step of the checkout process. Previously the event was triggered with every click of "next step" button.
Event parameters:
{
value: gross value of products,
currency: 'ISO currency code',
items: [{
item_name: 'product name',
item_id: 'product SKU',
item_variant: 'product attribute value / color name',
item_brand: 'YvesRocher',
item_category: 'Product category',
price: final price for 1pc,
discount: 'difference between catalog_price and final price',
currency: currency,
quantity: quantity
}],
shipping_tier: 'delivery method name'
}
ecommerce / purchase
Triggered on /cart/orderend page. The legacy implementation also triggered this event on /cart/prepayment page but it does not comply with GA4 e-commerce events.
Event parameters:
{
transaction_id: 'order id with prefix',
affiliation: 'VPI',
value: gross value with shipping,
shipping: gross delivery + payment method cost,
currency: 'ISO currency code',
items: [{
item_name: 'product name',
item_id: 'product SKU',
item_variant: 'product attribute value / color name',
price: final price for 1pc,
discount: 'difference between catalog_price and final price',z
currency: currency,
quantity: quantity
}],
shipping_tier: 'delivery method name'
}
ecommerce / view_item
This event is triggered on a product page.
Event parameters:
{
item_name: 'product name',
discount: 'difference between catalog_price and final price',
item_brand: 'YvesRocher',
item_category: 'Product category',
price: catalog price,
value: final price for 1pc,
}
ecommerce / view_item_list
Triggered on product list pages i.e. Category, Search result, Featured list.
Event parameters:
{
item_list_name: 'Name of list',
items: [{
item_name: 'product name',
item_id: 'product SKU',
item_brand: 'YvesRocher',
item_category: 'Product category',
price: final price for 1pc,
discount: 'difference between catalog_price and final price',
currency: currency
}]
}
website_error
Triggers whenever the user encounters an error on the website. Currently, there are 5 error types:
type: '404_error'
Triggered when a user enters 404 'not found' page.
type: 'wrong_discount'
Triggered when a user had activated the discount code that does not trigger any promotion rules. It's also triggered when the user had in the cart already used personal discount code.
type: 'missing_product_in_cart'
Triggered when some products were deleted from the cart due to low stocks.
type: 'old_offer_error'
Triggered when a customer is redirected to /auth/restricted.
type: 'zero_search'
Triggered when a customer entered search results page which did not return any results
mgm.button_share
Triggered when the user clicks on "share by e-mail" below the invitation link or code in a customer account.
Event parameters:
{
type: 'email'
}
mgm.button_copy
Triggered when user clicks on "copy" below invitation link or code in a customer account. This event triggers one of two parameters depending if the customer clicked copy below link or a code:
{
type: 'invitation_link'
}
or
{
type: 'invitation_code'
}
wishlist_add
Triggered when the user clicks on the wishlist button (small heart icon) which adds a product to the user's wishlist.
Event parameters:
{
item_name: 'product name',
item_id: 'product SKU',
item_brand: 'YvesRocher',
item_category: 'Product category',
price: final price for 1pc,
discount: 'difference between catalog_price and final price',
currency: currency
}
Magyar Posta delivery method
Getting started
In this article, you can find information about a new delivery method Magyar Posta Pickup. It is a pickup delivery method that displays near pickup points for the customers according to their delivery address set on the website, which can be used on a Hungarian Yves Rocher website.
 |
| Visualization of the Magyar Posta delivery pickup selection |
Table of contents:
Configuring the delivery method
Magyar Posta delivery has to be activated and configured in the admin panel. You can find its configuration in the:
System > System / Settings > Integrations > Magyar Posta
 |
| Visualization of the Magyar Posta delivery system settings |
in the Magyar Posta system settings, you have the following fields:
- URL to XML file - this is a field where the Magyar Posta .xml file should be linked. This link should not be changed unless needed.
![]() RememberAs Magyar Posta is using Google Maps API to show their points on the map it is also required to have necessary frontend and backend keys in the System > System / Settings > Integrations > Google maps API
RememberAs Magyar Posta is using Google Maps API to show their points on the map it is also required to have necessary frontend and backend keys in the System > System / Settings > Integrations > Google maps API
With all fields correctly filled remember to verify if the delivery method is correctly configured and set in the system > delivery types / list. You can find more about delivery types / list in the [UNDER CONSTRUCTION] article.
 |
| Visualization of the Magyar Posta delivery settings |
It is also important to remember to enable the selected delivery methods in the Altshops > Delivery costs / list. You can find more about delivery costs / list in the Delivery costs / list - browsing and managing delivery costs article.
Customer perspective
With the delivery method configured customers will see a new delivery method available in the delivery step of the purchase process ( /cart/delivery ).
 |
| Visualization of the magyar post delivery method in the delivery step |
When the customer selects the Magyar Posta delivery method he will get a pop-up with all available pick-up points near them.
|
| Visualization of the magyar Posta delivery pickup selection |
![]() RememberAs Magyar Posta integration shows only available stores near customers' delivery addresses it can show no delivery points if the customer has his set address in a place, where Magyar Posta doesn't work. It is possible to change the customer's delivery address in another delivery method if the customer wishes to deliver to a different address than the default one.
RememberAs Magyar Posta integration shows only available stores near customers' delivery addresses it can show no delivery points if the customer has his set address in a place, where Magyar Posta doesn't work. It is possible to change the customer's delivery address in another delivery method if the customer wishes to deliver to a different address than the default one.
Baselinker
Getting started
In this article, you can find information about BaseLinker integration, which allows Allegro and eMag orders to be processed directly into BaseLinker API and sent to JOY without the need to create orders in the Tau Ceti platform.
![]() RememberYou can find more about Allegro integration in the Allegro article
RememberYou can find more about Allegro integration in the Allegro article
This integration allows employees to edit, if needed information on the BaseLinker panel and helps to identify Allegro and eMag orders.
This integration also provides constant communication between the Tau Ceti platform and BaseLinker API with automatic updates for products and stocks.
Table of contents:
- Configuring the BaseLinker
- BaseLinker product fields
- BaseLinker / Orders tab
- Baselinker categories
- BaseLinker delivery mapping
- BaseLinker campaign codes
- BaseLinker errors
Configuring the BaseLinker
BaseLinker configuration can be found in the
System > System / Settings > Integrations > BaseLinker
 |
| Visualization of the system settings integration location |
 |
| Visualization of the BaseLinker settings |
In the BaseLinker tab we can find the following options:
- Functionality enabled – Switch that turns on or off the functionality.
- Debug mode – Switch that turns on the debug mode. By default, it should be turned off.
- Synchronize products - Turns ON/OFF products update executed daily. If disabled it will block the manual operation of products and categories creation. This switch does not affect stock updates.
- Turns ON/OFF support for attributes within products add & update processes. Every attribute is exported as a variant within BaseLinker API.
- Update stock - Switch which defines if the product's stock should be sent to the BaseLinker API. Stocks are updated every 15 minutes.
- Waybill Enabled - Switch which defines if information about a waybill should be sent to the BaseLinker API.
- Order prefix – Prefix of the orders made with BaseLinker.
- Campaign code – Optional field of the campaign codes that will be used by orders made with BaseLinker API.
-
Sales Channel -A field that defines the sales channel used during order export to JOY
(field: salesChannel). - Default postal code - Postal code used during order export to JOY if the order has no postal code within BaseLinker API.
- JOY Export: Append state name to the city - Turns ON/OFF Appending the state name field to the value of the city field during order export to JOY. This switch alters both delivery and billing addresses.
- BaseLinker altshop - Altshop that is used to get products that should be exported to the BaseLinker.
- Turns ON/OFF the addition of the ", Yves Rocher" to the product name.
- Warranty field value - Value for the "warranty" feature exported for every product.
-
Product price spread field value - Value used while calculating "min_sale_price" and "max_sale_price" features exported for every product. A value of 50 will mean that the minimum sale price will be set to 50% of the product promotion price and the maximum sale price will be set to 150% of the product promotion price.
- Manufacturer name - Value used as manufacturer name during product synchronization.
-
Sex feature URL name - Value of field "URL name" which can be found within the e-commerce properties dictionary. This value is used to find the sex features which will be exported as the "sex" feature to BaseLinker.
- Product image size - Image size identifier which will be used during exporting product images to BaseLinker. It must be an existing image size, eg. "500x500".
- API url – API url. It should always be https://api.BaseLinker.com/connector.php
- API Token – API token. This token can be found in the BaseLinker panel > User profile > My account > API > Your API token.
- Inventory ID - Inventory ID which should be gathered from the BaseLinker panel. It can be found in the lower-left corner of the Inventory edit form. Only inventory with this ID will be updated during product and stock synchronizations.
- Warehouse ID - Warehouse ID which should be gathered from the BaseLinker panel. It can be found in the lower-left corner of the Warehouse edit form. All stocks will be exported only for this warehouse. If there are any other warehouses within BaseLinker API, they will be ignored.
- Support company data - Turns ON/OFF considering company fields when importing orders from the BaseLinker. It also affects the export of billing data to the JOY as a result of BaseLinker order import with or without company data. It alters only BaseLinker orders and works regardless of the current value of the Company Fields switch (e-commerce related).
-
Company ID field identifier - The identifier of the extra field that contains the company ID. It can be found in BaseLinker panel section Orders > Settings > Additional fields > ID and should look like
extra_field_64542. -
Panel URL - It is used to generate buttons linking to the BaseLinker panel. Example:
https://panel-e.BaseLinker.com.
With all necessary options set and saved, we can find export and update buttons in the
Orders > BaseLinker / Processes
 |
| Visualization of the BaseLinker processes |
In BaseLinker Catalog we have 4 processes:
- Adding new categories (1) – Export all the categories to the BaseLinker. The category tree is defined by the exisiting categories in Catalog > Categories / list. It is possible to define what categories should be exported to JOY in Orders > BaseLinker / categories ( You can find more about this section here BaseLinker categories ) When this option is used again, we do not duplicate already exported categories, but only add new ones, and also old categories are not automatically removed.
-
Adding new products (2) – Exports products that are enabled on the selected in the System / Settings altshop and assigned to the categories. This option also does not duplicate already exported products, only adds new ones, and products with stock <= 0 are also ignored. It also controls the creation of product variants, which means that when Synchronize product attributes is active in the system settings, running product adding will add all active attributes to existing products. When one of the attributes is missing, it will be added. Product variants are created even if their stock value equals 0.
Please note, that only product main category will be assigned to it on the BaseLinker platform.
Below you will find supported fields: -
Field name Description Data source inventory_ID
Catalog ID ID from TC system settings (BaseLinker_inventory_id) product_ID Product ID Always null is_Bundle Is the product a part of a set Always false ean EAN of a product First found in the database EAN of the product. In case of multiple EAN codes, the first one taken from the database is exported. sku SKU of a product Main SKU of the product. Attribute sku if data is generated for product variant. tax_rate VAT tax rate Vat percentage taken from TC system settings from vat_percentage field. weight Weight of the product Capacity field from the product page. This field is converted to a floating point number or 0.0. height Height of the product Always 0.0 width Width of the product Always 0.0 length Length of the product Always 0.0 star Star type (indication in the BaseLinker panel) Always 0 manufacturer_id Manufacturer ID Manufacturer ID with a name that matches the BaseLinker_manufacturer_name system setting. Obtained from the getInventoryManufacturers method. If the manufacturer does not exist, it is created automatically. category_id Category ID ID obtained from the API in the process of going through the categories to create a product. In the case of finding a product within several categories, it is the ID of the first category encountered prices The list of prices in the price groups. id-price-group: price, where ID of the group is taken from the getInventoryPriceGroups method. Always default price group is used (is_default: true). locations Additional information regarding the location of the product in the warehouse Always an empty table ([]) text_fields descriptive fields with possible variants in different languages / for different integrations Object with a set of fields compatible with the Supported text fields table. images Product pictures List of images assigned to attribute if data is generated for product variant. The main photo is marked with index 0. We pass the photos as string url: {address}. If there are currently fewer photos than there were previously, the pre-existing object indexes are transferred with the value "" in order to force the deletion of the old photos. We are transferring photos in size 500x500px (system setting:
BaseLinker_product_img_size). The list is limited to 15 items.
Note: BaseLinker returns a list of photos with indexes increased by 1. When referring to these images, this index should always be decreased by 1. For update requests, the numbering is from 0, when retrieving product information, the numbering is from 1.
We only provide images related to the SKU set in the product, i.e. in the case of a SKU color variant, we will transfer only photos associated with a particular color.links Identifications of the product in the other warehouses. Always an empty table ([]) stock Stock value { "stock-id": { "stock-status" }
where ID of the warehouse comes from the system setting, while the stock is set according to the default altshop configuration. The logic is according to the cyclic process of updating stock levels.Fields stock, parent_id, and bundle_products are not exported to BaseLinker.
-
Updating existing products (3) – Updates whole existing products and product variants with their picture, data, and stock. This method is performed cyclically every 24 hours for the RO market. All fields that are being updated by adding new products are updated except fields star, stock, parent_id, and bundle_products which are not updated.
When the products update process detects a product or variant which is inactive, it will setstatusfeature to0. -
Updating products stocks (4) – Updates only existing product stocks and their variants without changing anything else. This method is performed cyclically every 15min for PL and RO markets. It excludes updating parent product stock as BaseLinker does not allow to set it. The stock of the parent product in BaseLinker is a sum of stocks assigned to all variants. The stock update process supports variants regardless the state of Synchronize product attributes switch. Depending on the product configuration, we send to BaseLinker:
- The true value of the stock minus the minimum stock.
- Value 99 in case of always in the stock setting.
- Value 0 if set to never in stock.
For each process, we are able to see their current status, last usage time, and a button to run the selected process. Available statuses are:
- started - the process is currently working.
- not-working - the process is not currently running and is not scheduled to run automatically (it will run only when you click on the run now button).
- disabled - the process is deactivated by system settings.
- scheduled - the process is not currently running, but it is scheduled to run automatically.
![]() RememberBaseLinker communication is also automated with TC platform:
RememberBaseLinker communication is also automated with TC platform:
- Orders are imported to the TC platform and they are updated every 5 minutes
- We export the stocks to the BaseLinker every 15 minutes.
- Products are exported and updated in the BaseLinker every 24 hours, every day at 01:10AM server time.
- Export of Emag orders from TC platform to JOY is sent every 2 minutes.
- Orders are exported from eMag to the BaseLinker every 10 minutes
Supported text fields in the product import:
| Name of the field | Description | Data source |
| name | Name of the product | Product name. adds - {color name} if data is generated for product variant.Value ", Yves Rocher" is added if the system setting BaseLinker_product_name_manufacturer is equal to 1. Value ", {capacity}" is added if the system setting BaseLinker_product_name_capacity is equal to 1 and the product has a non-empty capacity field value. Within the text, all diacritical characters are converted to characters in the ASCII range if the setting of the BaseLinker_remove_diactrics system setting has a value of 1. |
| description | Description of the product | combined text of all descriptions in order: main, effects, usage, ingredients, capacity, additional_info, notes. Within the text, all diacritical characters are converted to characters in the ASCII range if the setting of the BaseLinker_remove_diactrics system setting has a value of 1. |
| description_extra1 | Additional description 1 | Always an empty string ("") |
| description_extra2 | Additional description 2 | Always an empty string ("") |
| description_extra3 | Additional description 3 | Always an empty string ("") |
| description_extra4 | Additional description 4 | Always an empty string ("") |
| features | Features of the product | List of product features with additional features (please see Supported Features section).
|
Supported features
Within the features field within the product data, we upload:
- A warranty feature with a value derived from the system setting BaseLinker_warranty_field_value.
- The part_number feature with the product's main SKU.
- The min_sale_price feature with a value calculated according to the formula {spread} * {promotion price} / 100, where {spread} is the value of the system setting BaseLinker_price_spread_field_value.
- Feature max_sale_price with a value calculated according to the formula (100 + {spread}) * {promotion price} / 100*, where {spread} is the value of the system setting BaseLinker_price_spread_field_value.
The base_price feature with the promotional price of the product.
The sale_price feature with the value calculated according to the formula {price} - {vat percentage} * {promotion price} / 100. - Status feature with a value of 1 if the product is active in BaseLinker's alt shop, 0 otherwise.
- Feature sex with the value of the feature assigned to the product within the
e-commerce database.
The link is after the SEO (url friendly) name of the feature. The SEO name comes from the
BaseLinker_sex_feature_url_name system setting. If a product has more than one value assigned to the feature, they are separated by a comma with a space.
All values are cast to a string type
BaseLinker product fields
Updating the product changes almost the same amount of fields as importing the new ones.
 |
| Visualization of the BaseLinker product edit |
In the first tab “General Information” we have fields:
- Product name – The name of the product which is taken from the product “Name” field on the Yves Rocher platform. We add to this field automatically after the comma “Yves Rocher” and after another comma the capacity of the product from the product “capacity” field
- Category – The category of the product.
- Manufacturer – default value that will always be “Yves Rocher Romania” for RO website, other values will be visible for other countries
- Quantity in storage – The quantity of the product taken from the “Stock value” field on the Yves Rocher platform product page.
- Gross price – Base price of the product. If the product doesn’t have a promotion price it will be the catalog price taken from the “Price” product field. If the product has a promotion price it will take from the Altshop “Price” field from a specific product
- Purchase price – Same as Gross price
- EAN – EAN of the product which is added in the import process of the products to the Yves Rocher platform.
- Catalog number – SKU – SKU of the product taken from the “SKU” field.
- VAT rate – fixed value set in the BaseLinker settings
- Weight – The weight of the product taken from the “Capacity” product field.
 |
| Visualization of the BaseLinker product edit description |
In the descriptions tab, we can see product descriptions. The product description is taken from all description fields on Yves Rocher platform and put in one Description field on the
BaseLinker platform.
 |
| Visualization of the BaseLinker product edit photos |
In the Photos tab, we can see exported photos of the products. If the product has additional pictures they will be visible in Additional photo 1, Additional photo 2 etc. fields.
 |
| Visualization of the BaseLinker product edit parameters |
In the parameters tab we can see all product parameters:
- Status – Status of the product. 1 equals active, 0 equals that product is inactive. The default value is 1, but if the stock of the product falls to 0 the product status will change also to 0, so customers won’t be able to buy it. Disabling the product in the altshop also will change the status value to 0.
- Min_sale_price – Minimal sale price for the product. It is equal to 50% of the base price of the selected product.
- Max_sale_price – Maximal sale price for the product. It is equal to 150% of the base price of the selected product.
- Base_price – Base price of the product. It is taken from the product catalog or promotional price, same as in the “gross price” in the general information tab
- Sale_price – Sale price of the product. Base price minus VAT percentage.
- Warranty – The fixed value of 12 month
- Part_number – Product SKU number is taken from the SKU field.
- Sex – Male / Female values. It is only taken and read from the products that have the “sex” tag assigned to them.
BaseLinker / Orders tab
The BaseLinker / orders tab allows us to see all successfully exported orders made in the Allegro or eMag platform and imported to BaseLinker API. This tab can be found in
Orders > BaseLinker / Orders
All possible operations to perform on the BaseLinker view can be done in the Filters (1), and Orders (2) tabs.
 |
| Visualization of the BaseLinker orders tab |
Filters section
The Filters section allows sorting of the BaseLinker orders, based on the available filters. Below you will find a description of available filters
 |
| Visualization of the filters tab in the BaseLinker page |
- Creation time - Range of dates when filtered orders have been created.
-
Status - Current status of the BaseLinker orders. Possible order statuses are:
- Order created
- Order data validation & mapping success
- Order data validation & mapping failure
- JOY export success
- JOY export failure
- Order canceled
- Order unpaid
After defining the above filters, select the Apply Filters button to get a list of sites according to the applied filters.
Orders section
The Orders section allows for organizing the BaseLinker orders and searching for the desired ones.
Below you will find a description of all possible actions you can perform in the orders section.
 |
| Visualization of the orders tab in the BaseLinker orders page |
- Select the Show X entries(1) field to set the number of BaseLinker orders, displayed on one page (min 10 / max 100).
- The names of the columns (2) that contain information about target orders. Each column is susceptible to sorting.
To sort the records, click on the title of the column in question.
- ID - TauCeti internal ID of the order
- External ID – Allegro / eMag ID of the order
- First/last name – First and last name of the customer
- E-mail – Customers email address
- Mobile – Customers mobile number
- Creation Time – Creation time of the order
- Order ID – BaseLinker ID of the order
-
Status – Current status of the order. Possible statuses are:
- Order created
- Order data validation & mapping success
- Order data validation & mapping failure
- JOY export success
- JOY export failure
- Order canceled
- Order unpaid
- Actions - A show more button, which will open the selected order. Order details are described in the Order details section
- Search box (3) where you can search for orders by customers e-mail address, mobile number, name and surname, order ID, and External ID.
- Page buttons (4), which allows user to change the page of currently viewed BaseLinker orders.
Order details
When pressing the show more button you will get redirected to the selected order details.
 |
| Visualization of the order tab |
The first tab is the Order tab. In the Order tab we can check the order:
- ID – Internal ID of the order.
- Import date - Date of the order import to the TauCeti platform.
-
Order ID – BaseLinker platform order ID. This field has three additional actions:
- View button allows to see the order as a customer in the BaseLinker
- View in BaseLinker button allows to check particular order in BaseLinker.
- Cancel button is only visible when order is not exported to JOY (i.e. because it has an error). It allows to cancel the selected order in TC and BaseLinker.
- Order Status – Current status of the order.
- First/last name – First and last name of the customer.
- E-mail – Customers E-mail address.
- Mobile – Customers mobile number.
- Creation Time – Date of creation of the order.
- Confirmation time – Date of confirmation time. This date is provided by BaseLinker API.
The next tab is with Delivery Address data.
 |
| Visualization of the delivery address tab |
In this tab we can see delivery address data provided by the customer with postal code and city. Right below the delivery address data we can find company data fields. These fields are only visible if the Support company data switch in system / settings is enabled.
 |
| Visualization of the Company tab |
In the Company data tab we have listed the provided name of the company, its tax ID, and Company ID.
The next visible tab is the Order data tab. The order tab shows basic information about the order.
 |
| Visualization of the order data tab |
In this tab we can see Order information like:
- Status – BaseLinker status number. This number is provided by BaseLinker
- Delivery – The selected delivery method by customer.
- Delivery cost – Cost of the delivery
- Delivery point – Delivery post identification. It’ll be only filled when customer selects delivery to certain delivery point.
- Delivery point name – Full name of the delivery point.
- Delivery point address – Street name and number where selected delivery point is located
- Delivery point postcode – Postal code of the delivery point
- Delivery point city – City name, where delivery point is located.
 |
| Visualization of the payment tab |
In Payment tab, we can see what payment method has been selected and how much customer paid using this payment method.
 |
| Visualization of the order lines tab |
In the Order lines tab we can see all purchased products with their SKU, name, price, quantity and total value. If voucher was used in the order on the e-mag platform it will be also visible here with it's amount that has been deducted. When the order is exported to the JOY platform the amount of the discount is deducted from the order value, as JOY doesn't accept product negative
product values.
Last visible tab is the Events tab.
 |
| Visualization of the events tab |
In the Events tab, we can see all events that happened in a particular order. If one order is edited in BaseLinker panel, the change will be visible in that order in the Events tab.
BaseLinker categories
In this section, you can select the desired product categories, that should be exported to the Baselinker platform. The categories are created according to the existing category tree, that is configured in Catalog > Categories / list.
 |
| Visualization of the Baselinker categories section |
This table contains the following columns:
- Name - The name of the category. The categories are displayed as a tree. It means that it is impossible to select a subcategory without selecting the category higher in the branch.
- BaseLinker Inventory ID - The internal BaseLinker inventory ID of the category. It is only displayed once the category has been successfully exported to BaseLinker
- Synchronized to BaseLinker - The date and time when the category was exported to BaseLinker.
- Update time - The date and time when the category status has been last updated. Changing the is active? tickbox will update the update time.
- Is active? - A tickbox that defines if the category should be exported to BaseLinker. Only selected tickboxes will be exported. It is possible to deselected or selected all categories using the Deselect all categories or Select all categories buttons at the top of the table.
When the changes to the category selection are done they need to be saved using the Save button located in the top right corner of the table.
BaseLinker delivery mapping
In this section, we can edit, delete or add new BaseLinker delivery methods and map them to the Yves-Rocher delivery methods. In order to map BaseLinkers delivery method with available Yves-Rocher delivery methods we need to navigate to:
Orders > BaseLinker / Delivery mapping
Below you will find a description of all possible actions you can perform in the BaseLinker / Delivery mapping tab.
 |
| Visualization of the BaseLinker delivery tab |
- Select the Show X entries (1) field to set the number of BaseLinker delivery methods, displayed on one page (min 10 / max 100).
- The names of the columns (2) that contain information about target delivery methods. Each column is susceptible to sorting.
To sort the records, click on the title of the column in question.
- BaseLinker Name – Name of the delivery method provided by BaseLinker
- Joy name – Export tag of the delivery method sent to JOY. Export tags can be found in System > Delivery types / list. Based on that mapped name JOY sends to us waybill number which our system imports it to BaseLinker.
- Courier Code – Courier Code provided by BaseLinker.
- Name – System name of the delivery method.
-
Actions - There are two available actions:
- View - View created a delivery method
- Delete - Delete the selected delivery method
- Select the Add delivery method (3) button to go to the adding the new delivery method. You can learn more about adding of the new delivery method in the Adding a new delivery method chapter
- Search box (4) where you can search for delivery methods by their BaseLinker name, JOY name, or courier code.
- Page buttons (5), which allow users to change the page of currently viewed delivery options.
Adding a new delivery method
To link the new delivery method we need to fill all the fields according to the columns described above. After saving the new delivery method with correct data our delivery method will be automatically linked and all Allegro / eMag orders will be exported to JOY with delivery according to Joy name column.
 |
| Visualization of the adding of the new delivery method |
BaseLinker campaign codes
Campaign codes used by the BaseLinker need to be created in the
Orders > BaseLinker / Campaign codes
Without a proper campaign code, BaseLinker orders won't be able to be exported to JOY.
Below you will find a description of all possible actions you can perform in the BaseLinker / Campaign codes tab.
 |
| Visualization of the BaseLinker campaign codes tab |
- Select the Show X entries (1) field to set the number of BaseLinker campaign codes, displayed on one page (min 10 / max 100).
- The names of the columns (2) that contain information about target campaign codes. Each column is susceptible to sorting.
To sort the records, click on the title of the column in question.- ID - An internal identification number of the created campaign code
- Name – Name of the integration. This name must match a source of the order (i.e. Allegro).
- Campaign code – Campaign code value. This value has to match the campaign code created in the JOY platform.
-
Actions - There are two available actions:
- Edit - Edit selected campaign code.
- Delete - Delete the selected campaign code.
- Select the Add integration campaign code (3) button to go to the adding of a new campaign code. You can find more information about editing and creating of campaign codes in the Creating a new campaign code chapter.
- Search box (4) where you can search for campaign codes by their Name, JOY name, or campaign code.
- Page buttons (5), which allow users to change the page of currently viewed campaign codes.
Creating a new campaign code
When editing or creating a new campaign code user has to define two values
 |
| Visualization of the campaign code creation |
- Name - Name of the integration. This name must match a source of the order (i.e. Allegro).
- Campaign Code - Campaign code value. This value has to match the campaign code created in the JOY platform.
With both fields filled in we can save the changes by pressing the Save button.
BaseLinker errors
BaseLinker / errors is the tab where we can see all errors regarding importing orders made on Allegro / eMag platform. This tab can be found in
Orders > BaseLinker / Errors
 |
| Visualization of the BaseLinker errors tab |
In this tab we can find various individual JOY errors similar to Orders / To Verify tab.
When error has been fixed we can try to re-import the order by clicking Force re-export (1) button.
Allegro
Getting started
Allegro is the biggest Polish e-commerce platform with over 11 million users. This integration allows the Yves Rocher e-commerce platform to receive orders made on an Allegro platform and process them like an order made on the website.
![]() Remember Romanian Yves Rocher website is also using a Baselinker integration in a more expanded version, which works as a bridge between Emag.ro and Yves-rocher.ro websites. More about Baselinker can be found in the Baselinker article.
Remember Romanian Yves Rocher website is also using a Baselinker integration in a more expanded version, which works as a bridge between Emag.ro and Yves-rocher.ro websites. More about Baselinker can be found in the Baselinker article.
Table of contents:
Allegro
Allegro tab displays all successfully exported orders made in the Allegro platform. You can find this tab in
Orders > Allegro.
 |
| Visualization of the Allegro orders tab |
In this tab we can see basic information like:
- First and last name of the customer
- Customer’s city
- Customer’s Street
- Customer’s Postal code
- Customer’s Mobile number
- Order creation time
-
Yves Rocher order ID
We can see more details regarding the selected order by selecting Show more button (1).
 |
| Visualization of the order tab in the order details |
In Order tab, we can check order
- ID – Allegro module specific ID of the order
- Allegro order ID – Allegro platform order ID
- Order ID – Yves Rocher Order ID. By clicking “See” button (2) we can check it in the Orders > Orders / list section like rest of the e-commerce orders.
- Creation time – Creation time of the order
- Update time – Update time of the order (if updated)
- Message – Customer message to the seller
The next tabs are Customer Data and Delivery Address
 |
| Visualization of the Customer data and Delivery address tabs in the order details |
These tabs display detailed customer data and delivery address data.
They will have different data only when delivery address data is different from customer invoice data on the Allegro platform.
In the last tab we can see is Order data tab.
 |
|
Visualization of the Order data tab in the order details |
This tab displays order information like:
- Status – Order status. It should be set to “READY_FOR_PROCESSING” if imported correctly to the Yves Rocher e-commerce platform.
- Delivery method – Selected delivery method by customer
- Payment method – Selected payment method by customer. If delivery method is with COD, it’ll be empty
- Price – Price, that customer paid. If the delivery method is COD, it’ll be empty.
Allegro delivery methods
In order to map allegro’s delivery method on Yves-Rocher website, we need to navigate to
Orders > Allegro delivery method.
 |
|
Visualization of the Allegro delivery method page |
In this section we can edit, delete or add new Allegro delivery methods and map them to the Yves-Rocher delivery methods.
Adding new Allegro delivery method
To add a new delivery method, we need to press the "Add Allegro delivery method" button.
 |
|
Visualization of the adding new Allegro delivery method |
Required fields to fill are:
- Allegro ID – ID of the delivery method provided by the Allegro platform
- System Name – Name of the method read by the system. Has to be unique.
- Public name – Visible name of the delivery method on the backend
- Public Description – Visible description of the delivery method on the backend
 |
|
Visualization of the added Inpost24 delivery method |
With the newly added Allegro delivery method, we can proceed to map it.
Mapping Allegro delivery method
In order to map delivery methods, we need to press the "Add delivery method mapping" button.
 |
|
Visualization of the mapping delivery method |
We need to select from the list our desired Allegro delivery method created earlier and Yves Rocher delivery method defined from System > Delivery types / list.
After selecting desired delivery methods, we need to press Save button to map them.
 |
|
Visualization of the mapped delivery method |
With configured mapping, we can see which allegro delivery methods corresponds with already existing methods for e-store.
Allegro errors
Allegro errors is the tab that displays all errors of the imported orders made on Allegro platform. This tab can be found in the Orders > Allegro errors.
 |
|
Visualization of the Allegro errors tab |
Two most basic import errors we can find here are:
- Allegro product from order not found – this import error appears, when someone buys a product with certain SKU on allegro, that doesn’t exist on Yves Rocher e-commerce platform product catalog.
- Order Rejected: Address (delivery) does not match requirements – This error appears when customer buys products on allegro and types (in this case) a postal code that isn’t in the postal code dictionary on e-commerce platform. Works only when postal code dictionary is activated in the admin panel.
When the error has been fixed on the Allegro side, we can try to re-import the order by clicking the Force re-check button (1).