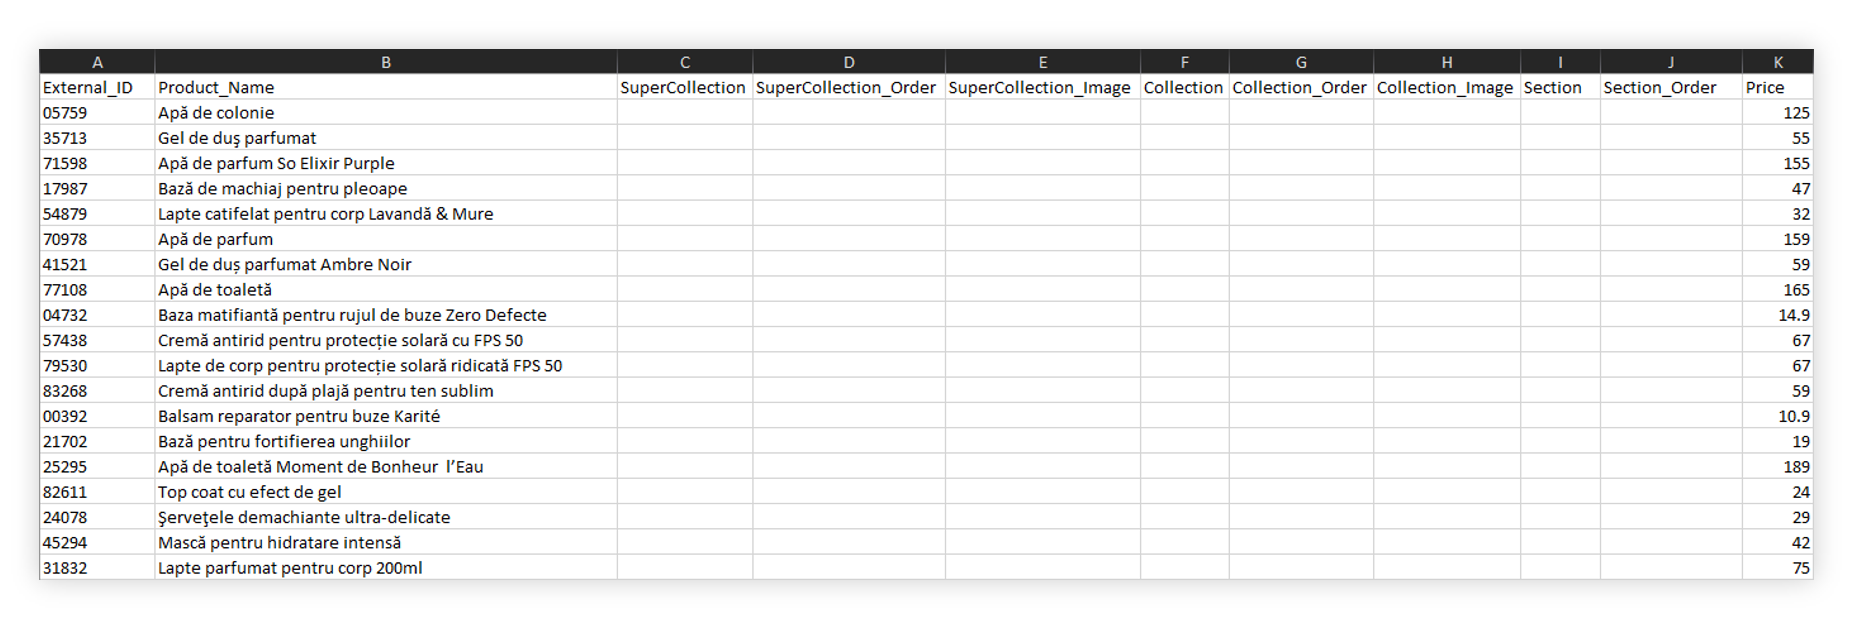
| 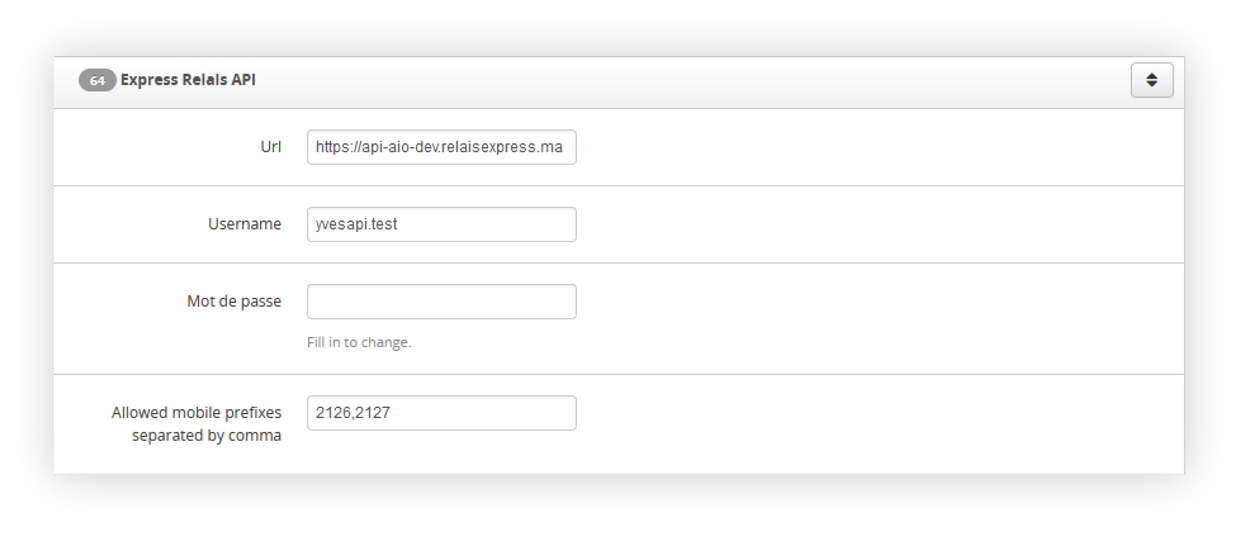 |
| *Visualization of the Express Relais system settings* |
| 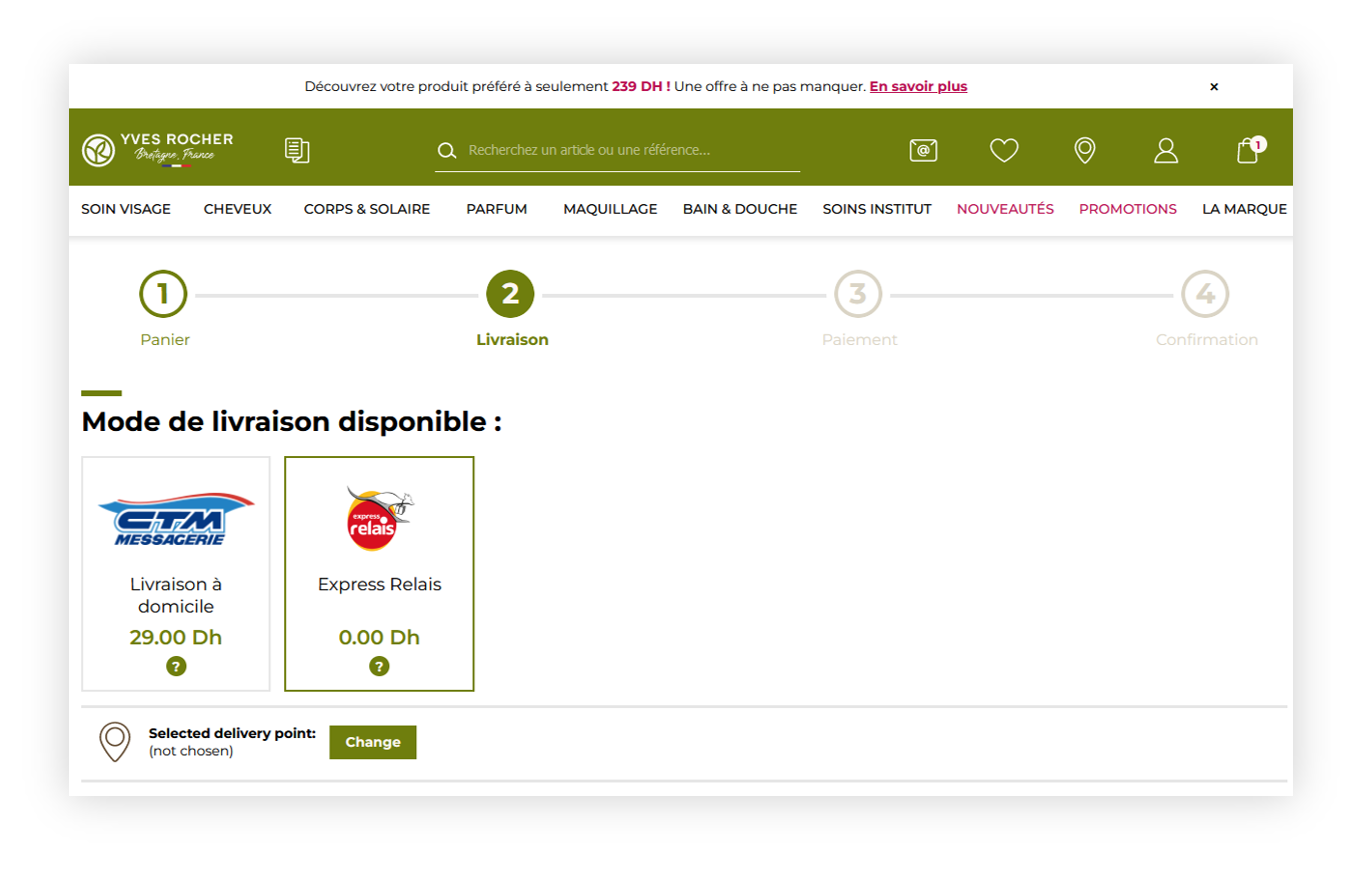 |
| *Visualization of the Express Relais delivery* |
| 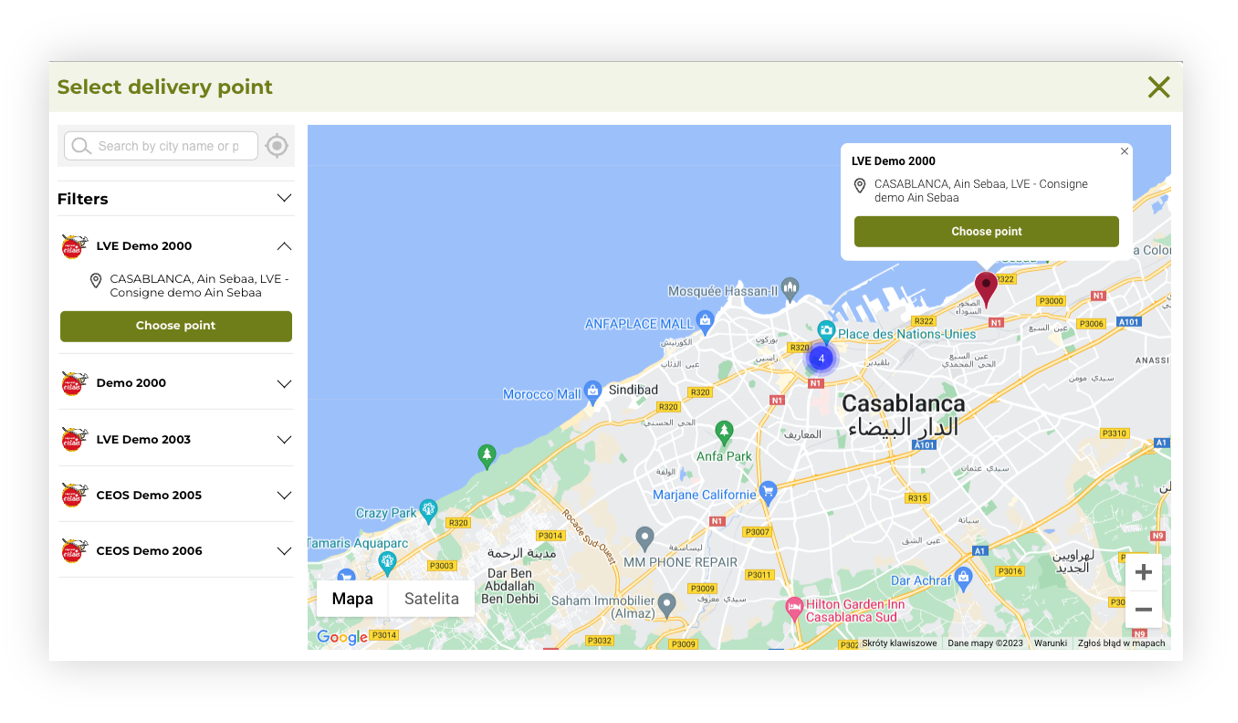 |
| *Visualization of the delivery point widget* |
| 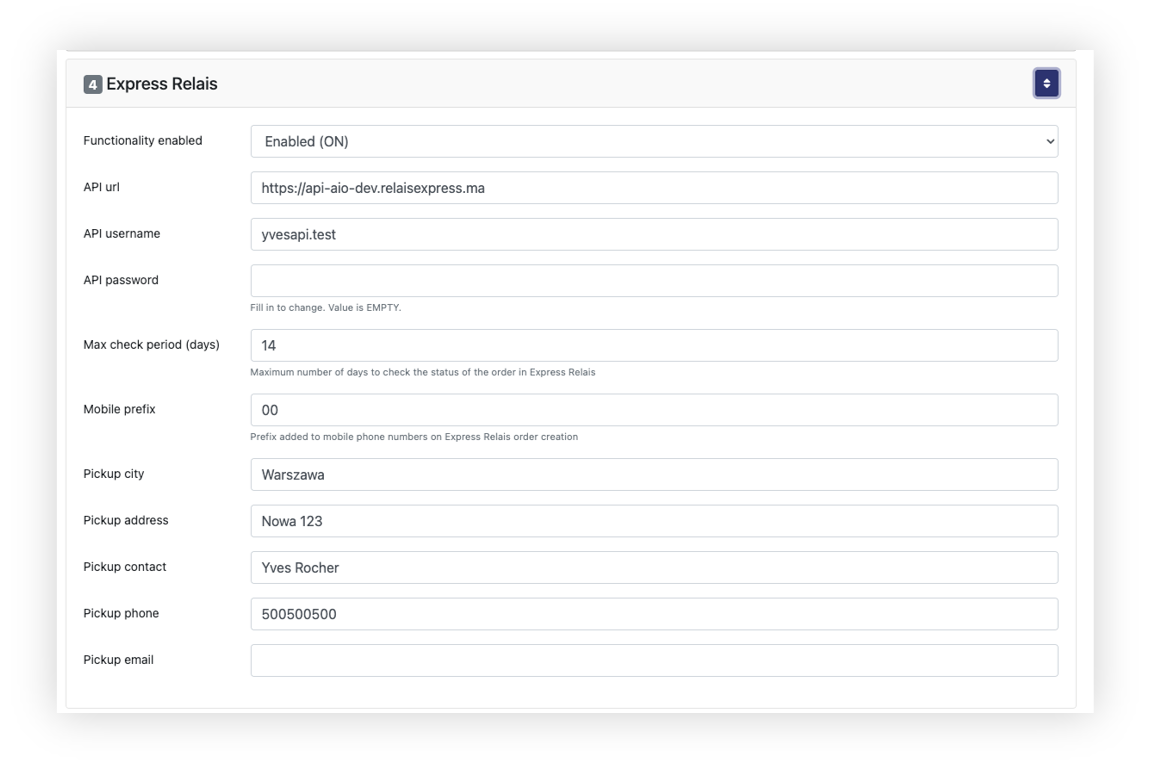 |
| *Visualization of the TC logistics system settings* |
| 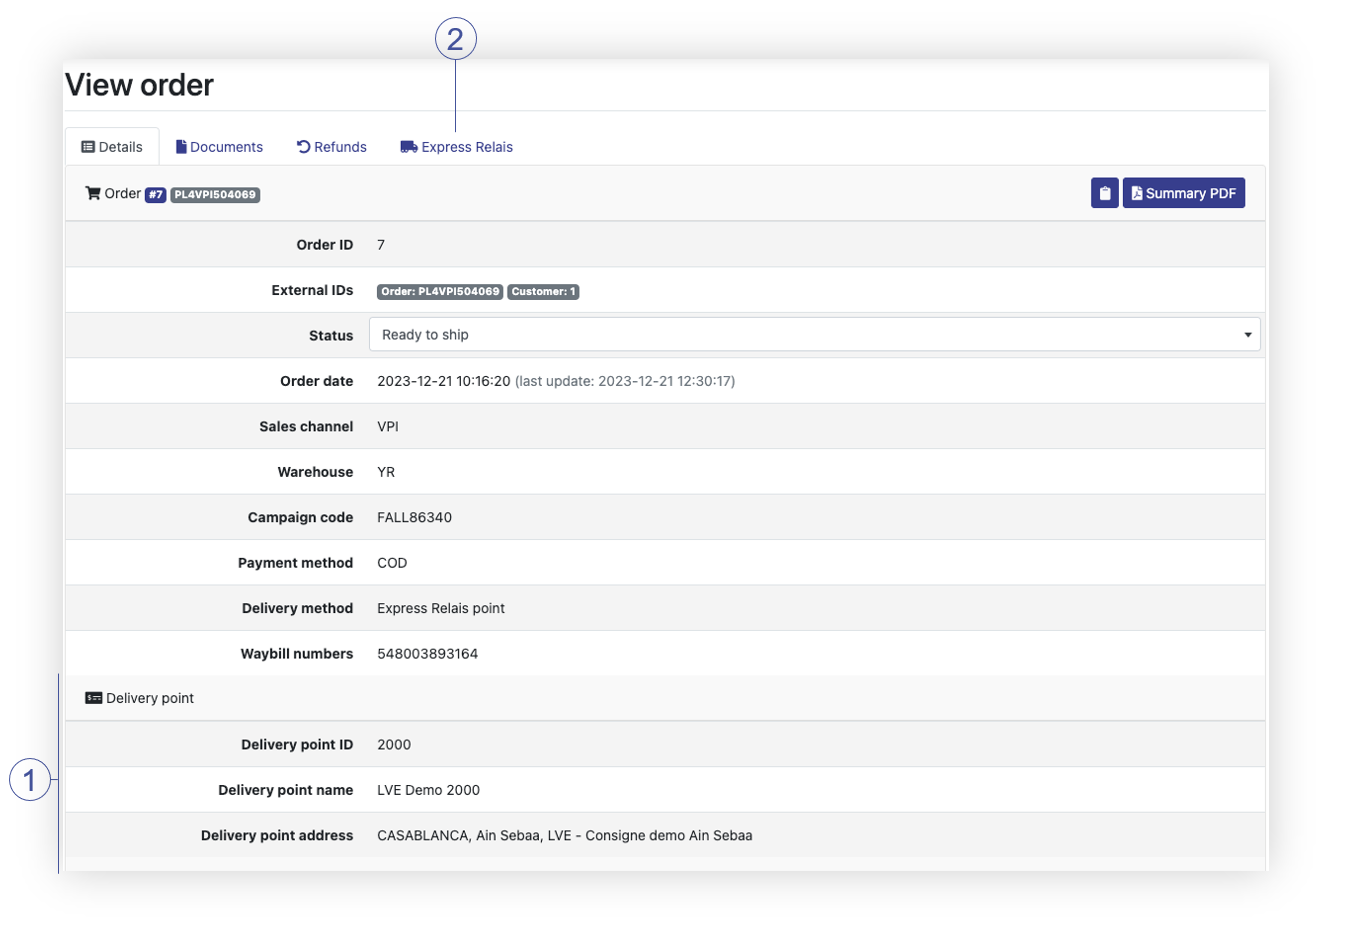 |
| *Visualization of the TC logistics order details (Details tab)* |
**Express Relais status** | **TCLogistics status** | **ER status description** |
NEW_ORDER | ID_PACKAGING | Initial status at order creation |
ORDER_CONFIRMED | ID_READY_TO_SHIP | Order Confirmed |
ORDER_CANCELED | ID_CANCELLED | The order was canceled by the client |
ORDER_REFUSED | ID_DELIVERY_FAILURE | Order refused by Express Relais |
MISSING_PARCEL | ID_DELIVERY_FAILURE | Missing parcel during pickup |
PARCEL_PICKEDUP | ID_SHIPPED | Parcel picked up |
PARCEL_IN_AGENCY | ID_SHIPPING_IN_PROGRESS | The package arrived at the regional agency |
PARCEL_IN_TRANSIT | ID_SHIPPING_IN_PROGRESS | Parcel in transit |
PARCEL_IN_DELIVERY | ID_SHIPPING_IN_PROGRESS | The parcel is delivered to the locker or destination address |
DELIVERED_TO_LOCKER | ID_SHIPPING_IN_PROGRESS | Parcel delivered to the locker |
PARCEL_RETRIEVED | ID_DELIVERED | Parcel received from Smartlocker |
WAITING_IN_LOCKER | ID_SHIPPING_IN_PROGRESS | The package waiting for pickup from the automated locker |
DELAY_IN_RETRIEVE | ID_SHIPPING_IN_PROGRESS | Package delayed for pickup at the destination locker |
WAITING_COD | ID_SHIPPING_IN_PROGRESS | The package arrived at the destination locker and awaiting payment upon delivery |
COD_PAID | ID_SHIPPING_IN_PROGRESS | Payment upon delivery at the locker completed, the recipient can retrieve their parcel |
PARCEL_TO_RETURN | ID_RETURN | The client has initiated the return of the parcel in question |
PARCEL_ABANDONED | ID_RETURN | The package was abandoned because the package was not delivered and the client did not initiate its return |
PARCEL_RETURNED | ID_RETURN | Parcel returned successfully |
PARCEL_IN_FINAL_AGENCY | ID_SHIPPING_IN_PROGRESS | Parcel has arrived at the final agency |
RETURN_REQUEST_CONFIRMED | ID_RETURN | The requested return parcel has been confirmed |
| 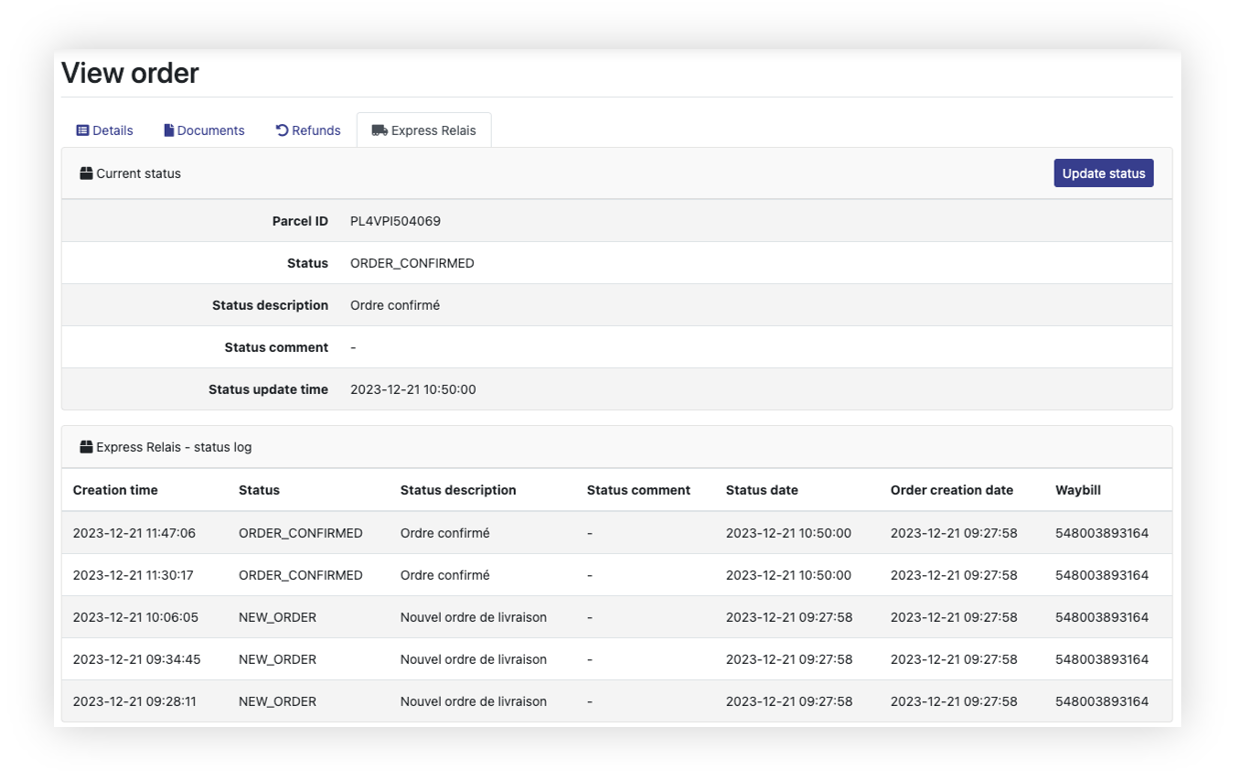 |
| *Visualization of the TC logistics order details (Express Relais tab)* |
| 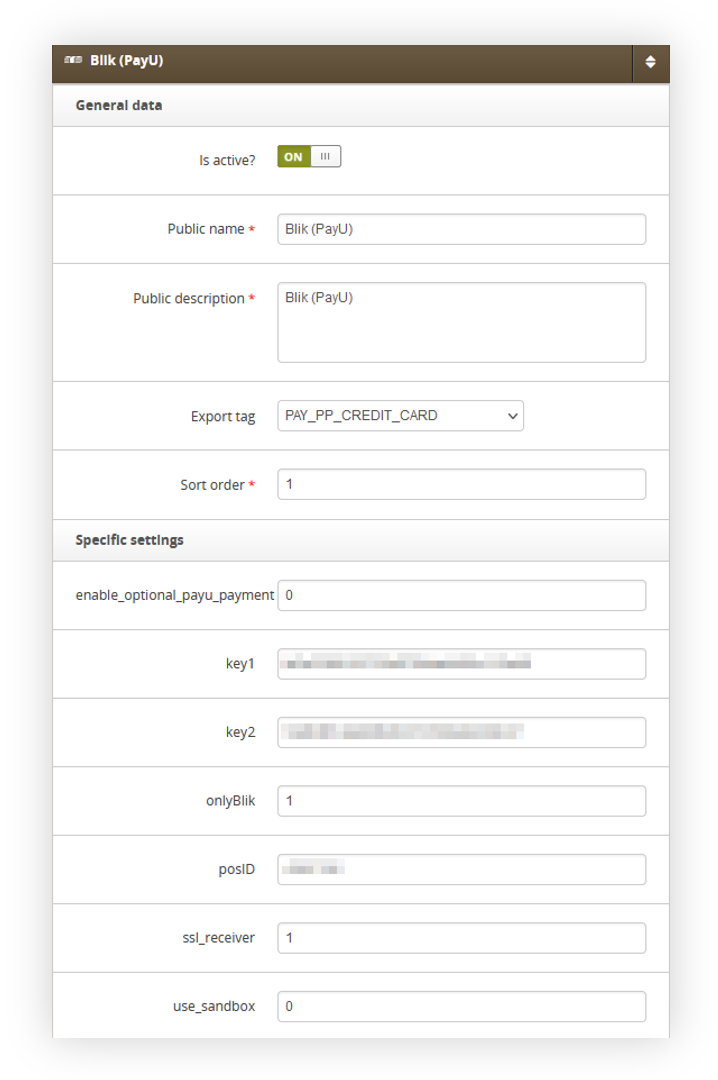 |
| *Visualization of the BLIK configuration* |
| 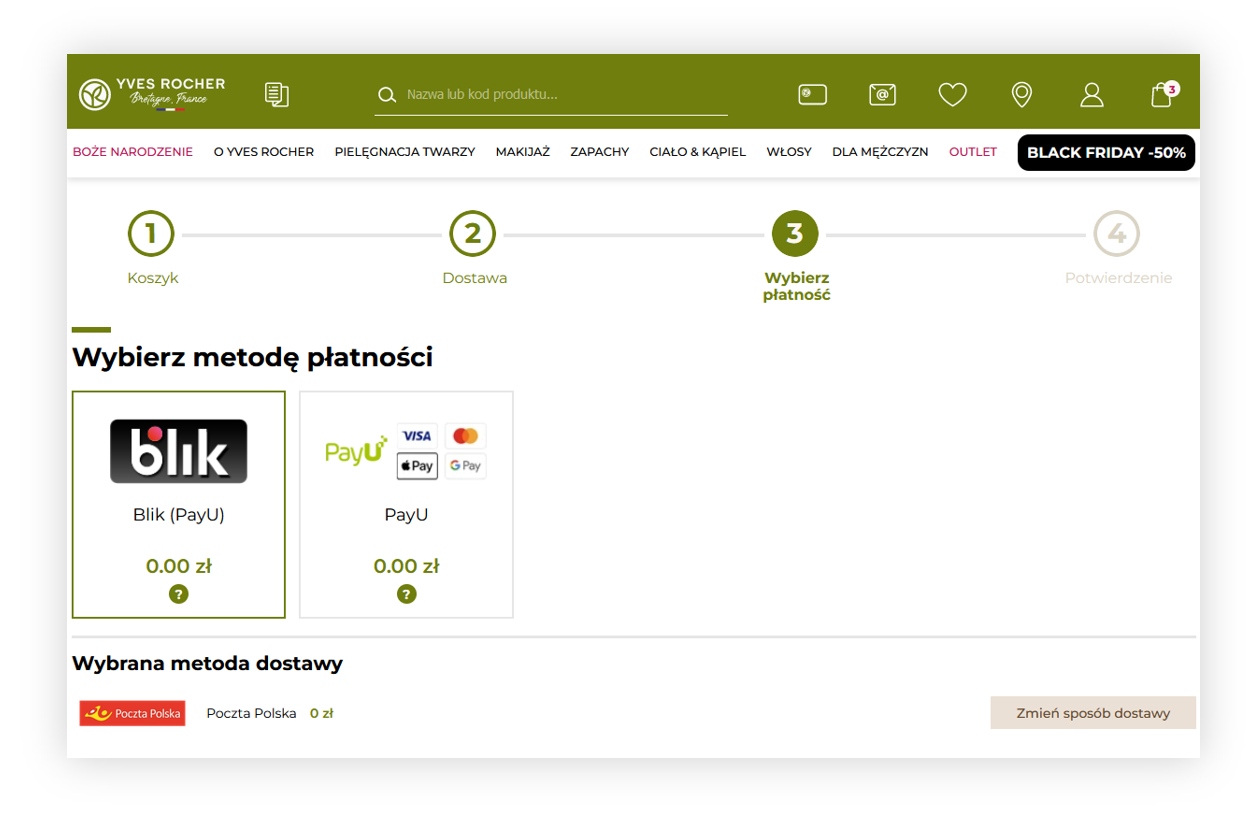 |
| *Visualization of the payment options in the order process* |
| 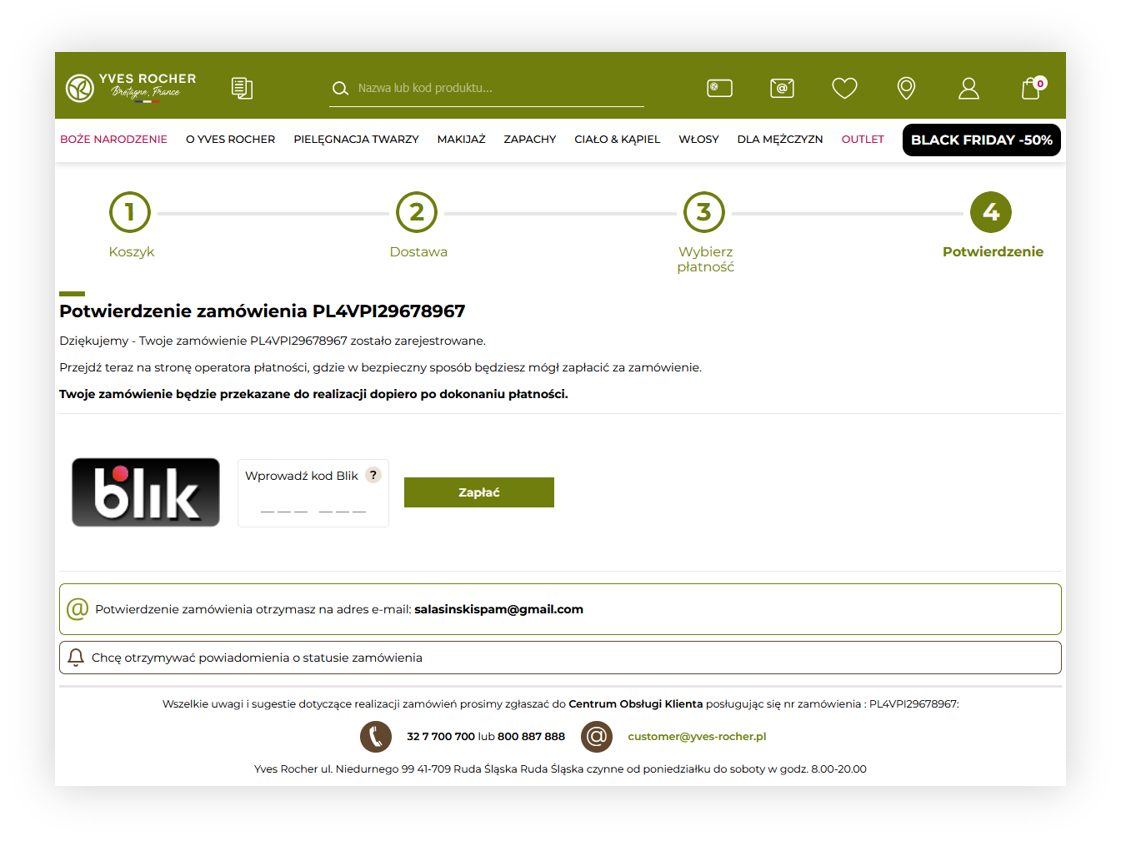 |
| *Visualization of the BLIK payment* |
|  |
| *Visualization of the incorrect BLIK code* |
| 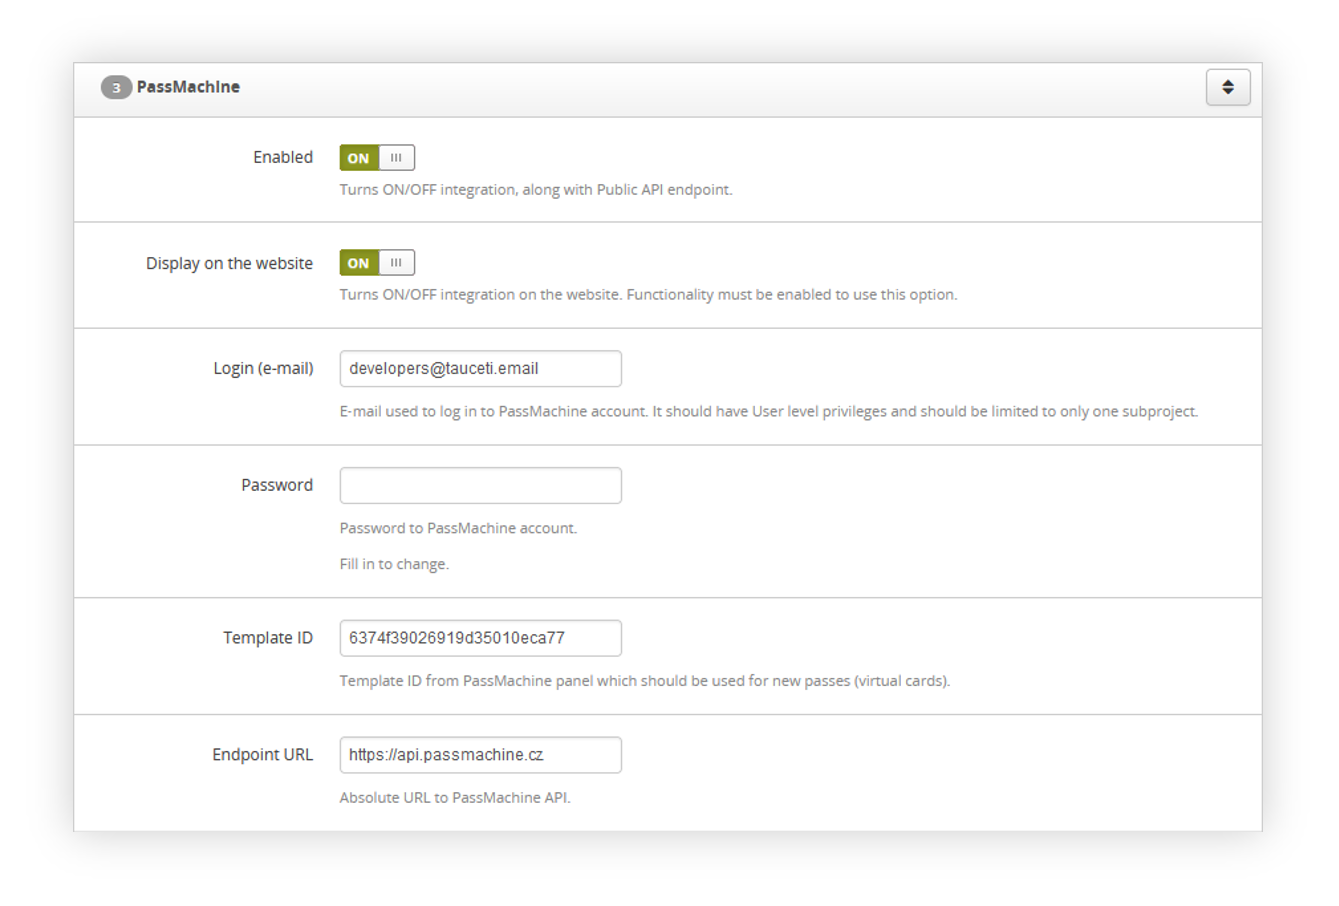 |
| *Visualization of the passmachine system settings* |
| 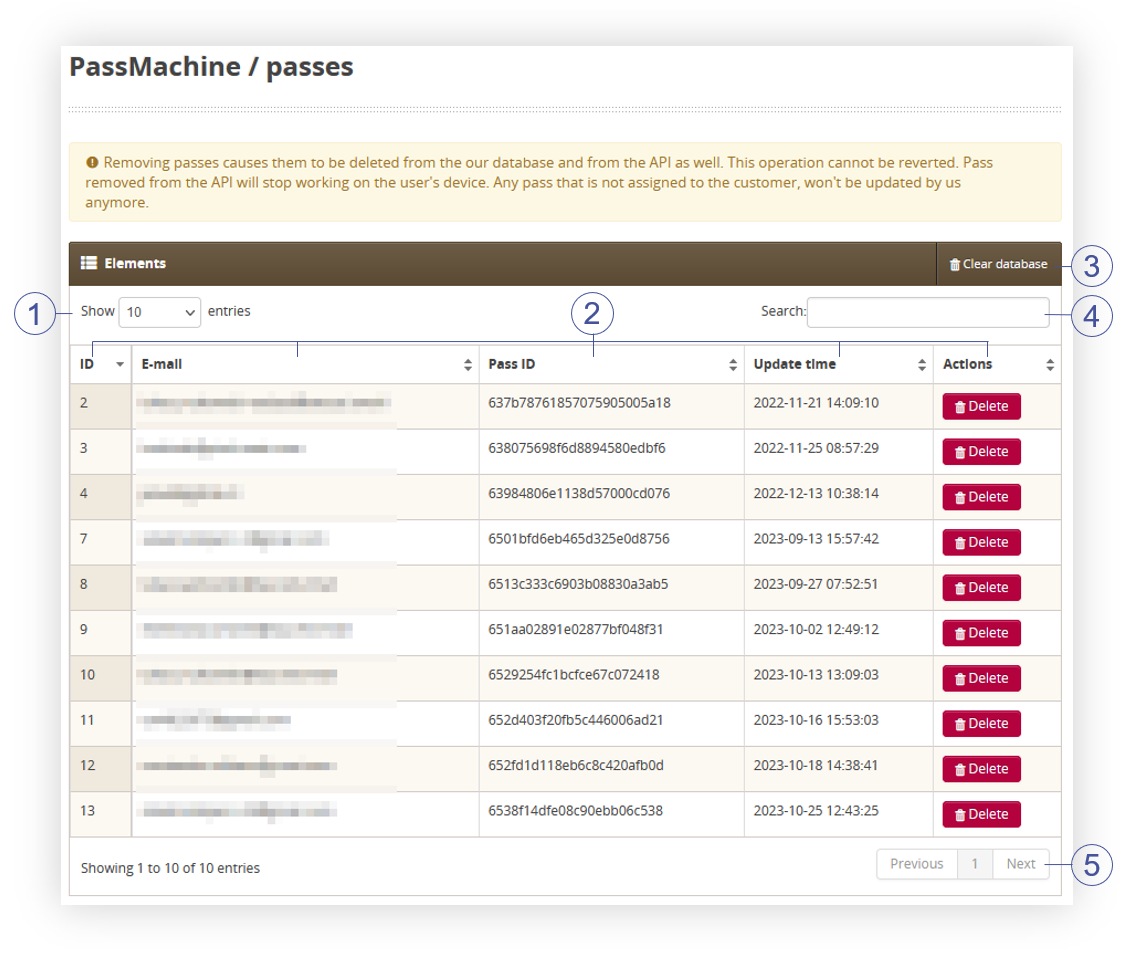 |
| *Visualization of the passmachine passes tab* |
| 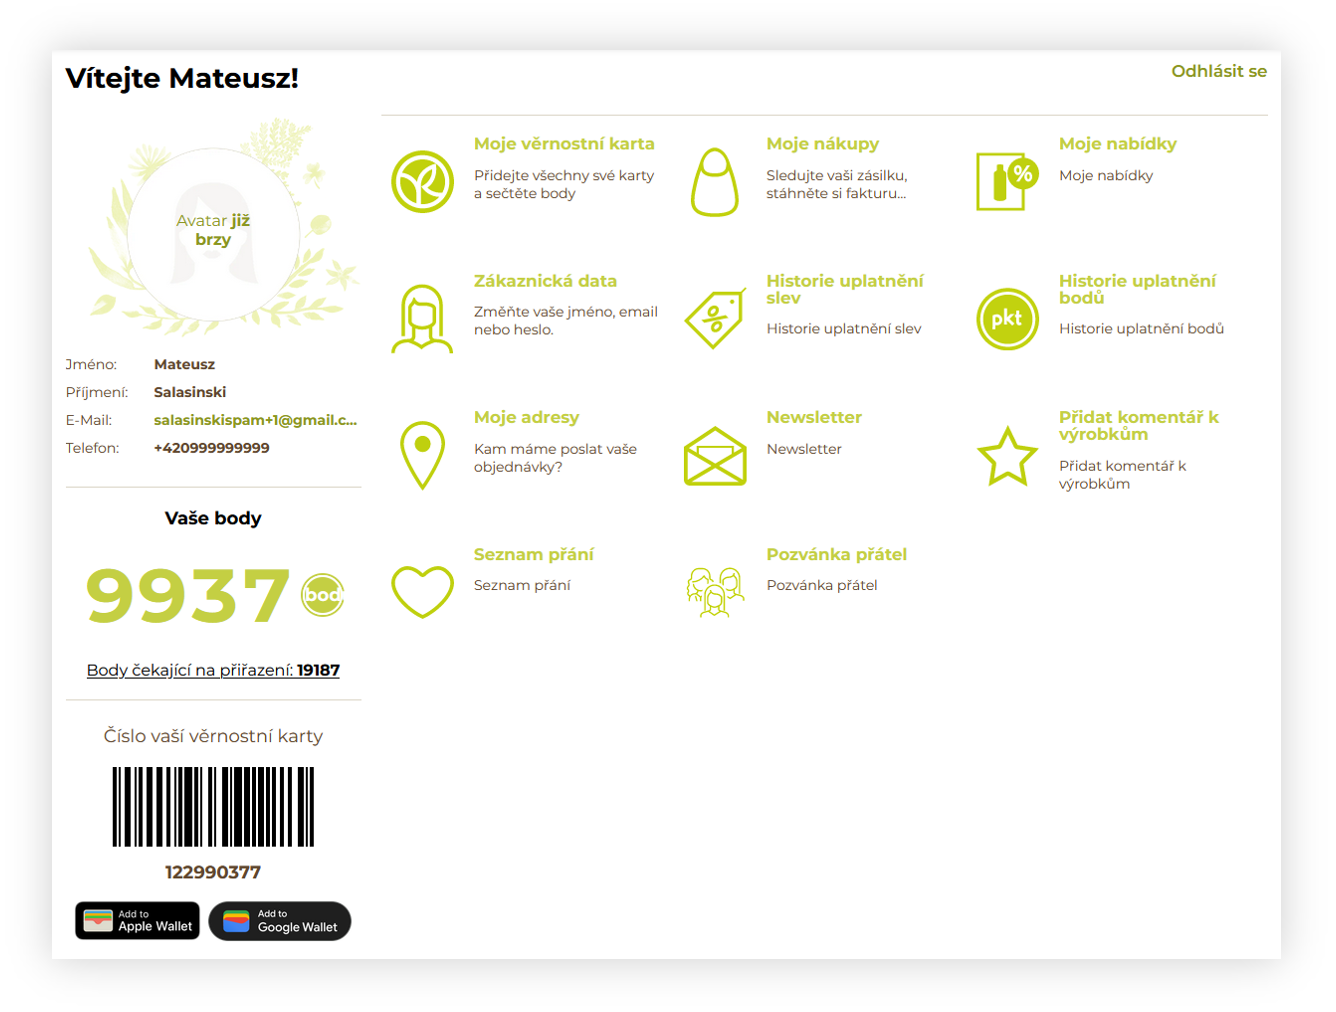 |
| *Visualization of the customer profile* |
|  |
| *Visualization of the passmachine website* |
| 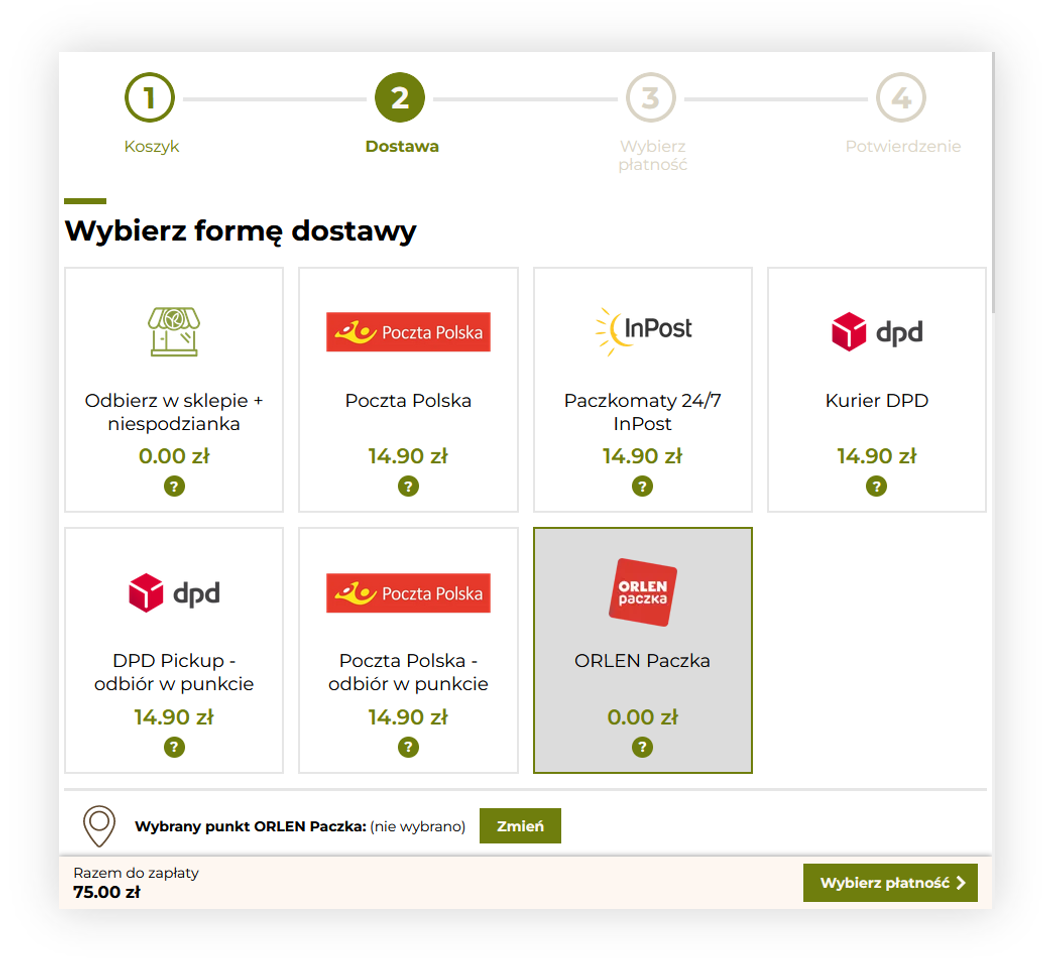 |
| *Visualization of the Delivery step in the order process* |
| 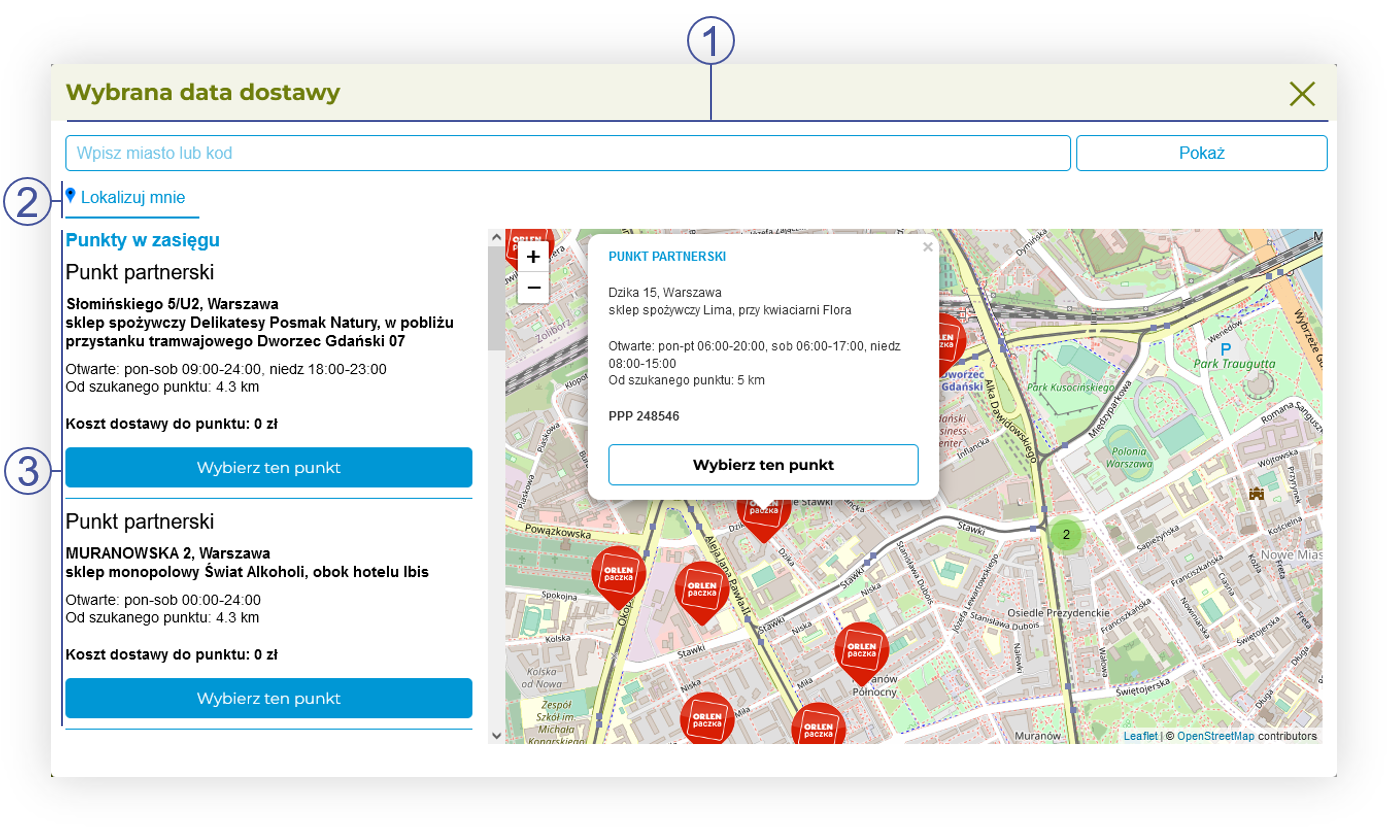 |
| *Visualization of the Orlen delivery window* |
| *Visualization of the* |
| *Visualization of the* |
| *Visualization of the* |
| 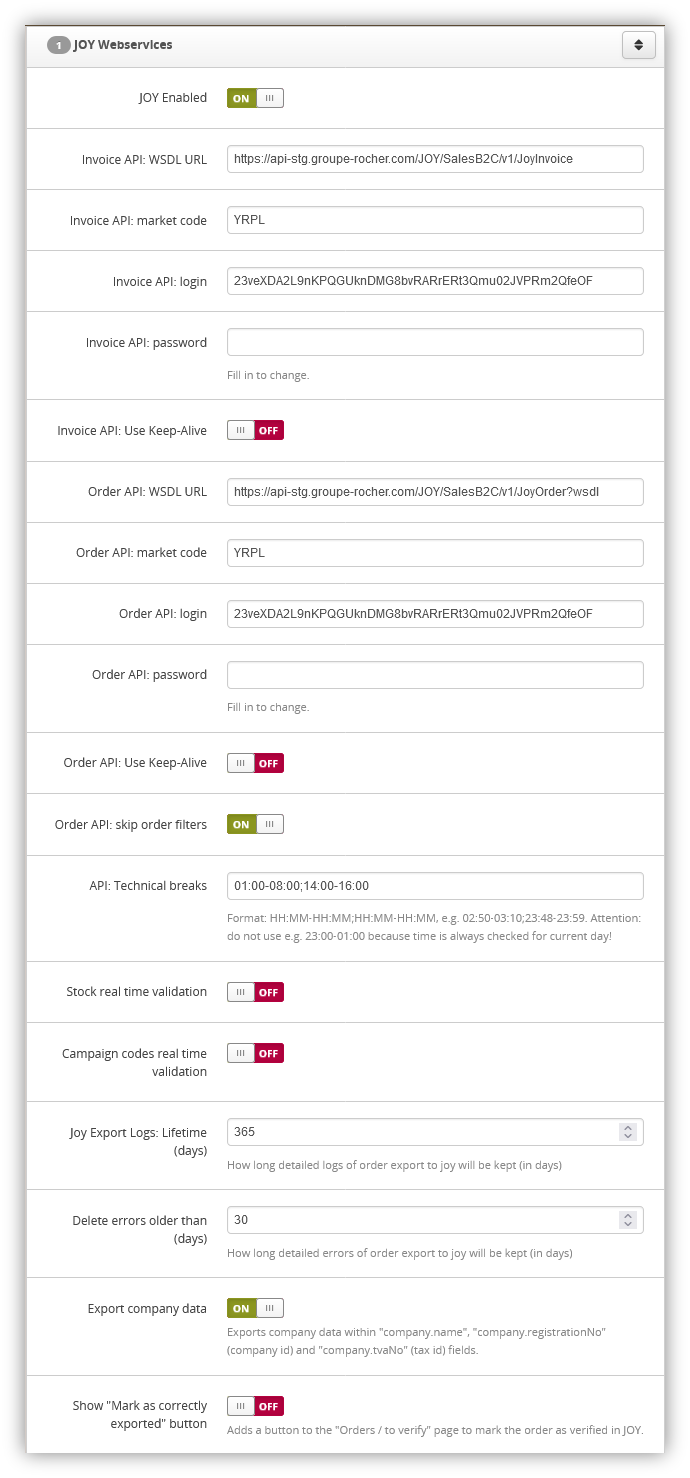 |
| *Visualization of the JOY webservices tab in System / Settings* |
|  |
| *Visualization of the Orders / to verify tab* |
| 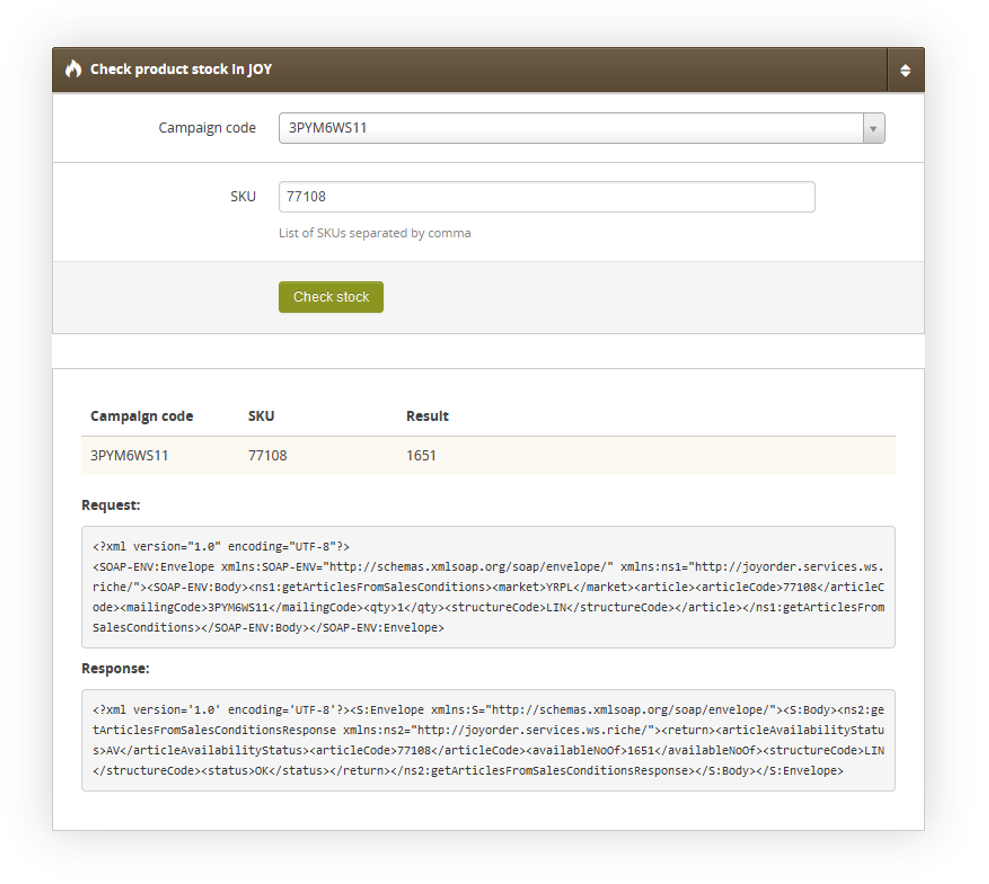 |
| *Visualization of the JOY stocks* |
| 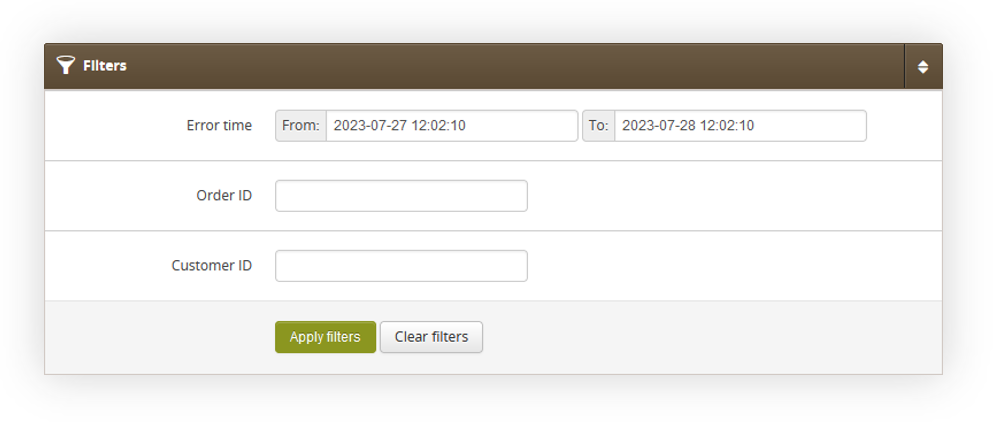 |
| *Visualization of the filter in JOY failed orders report* |
| 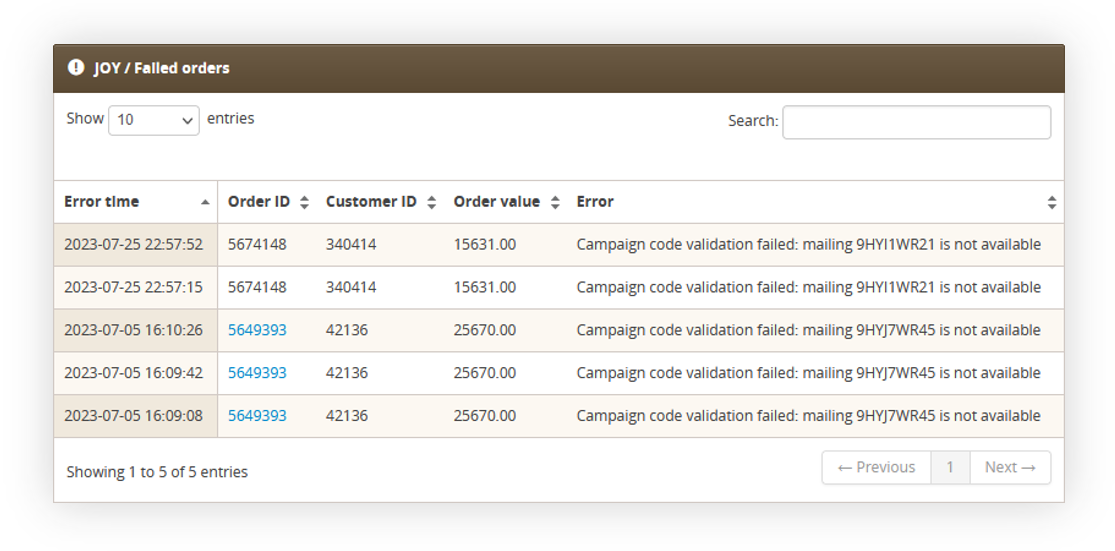 |
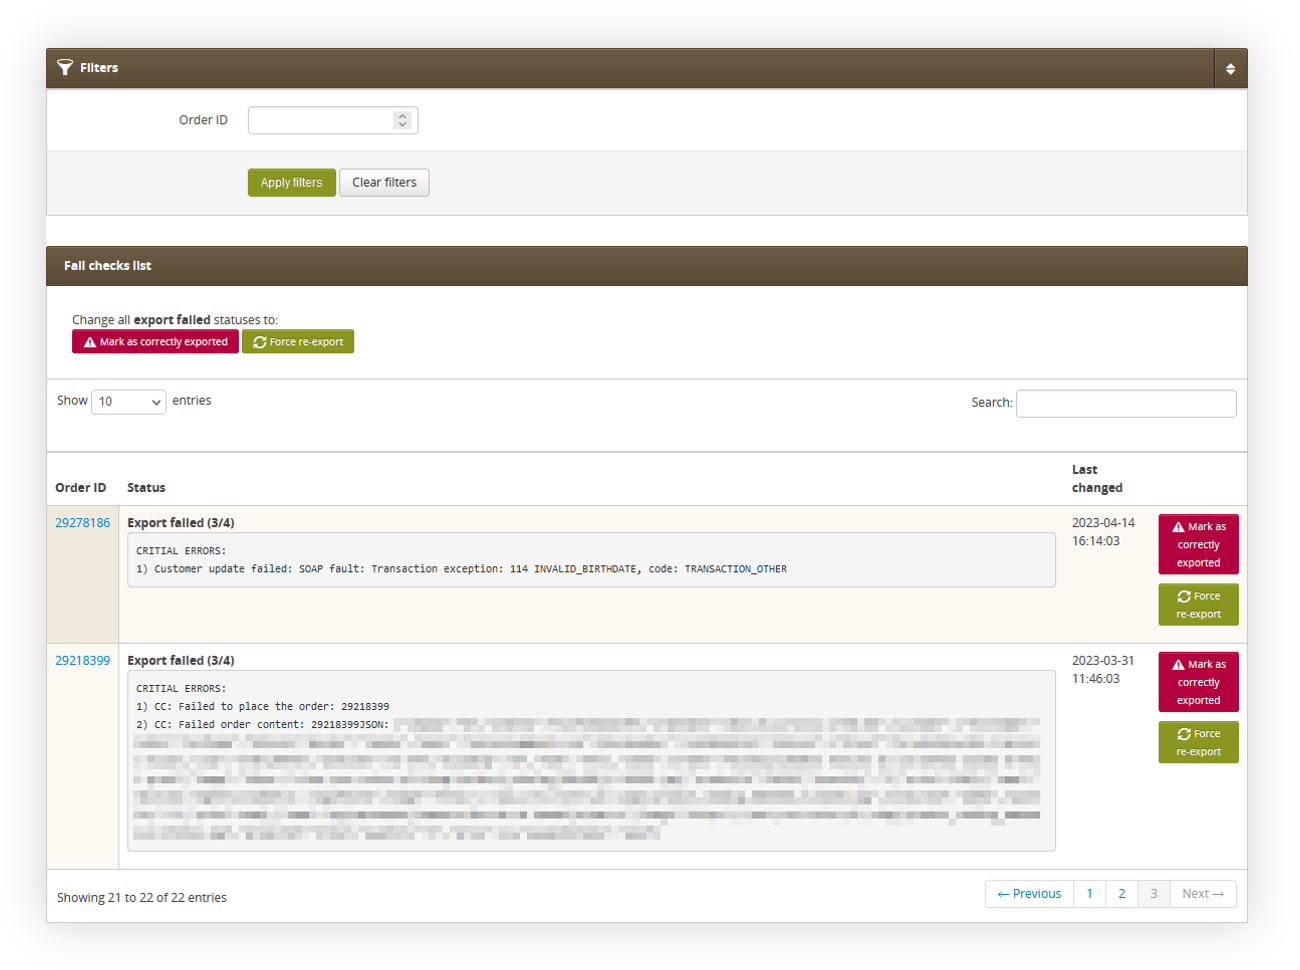
| *Visualization of the filtered JOY failed orders* |
| 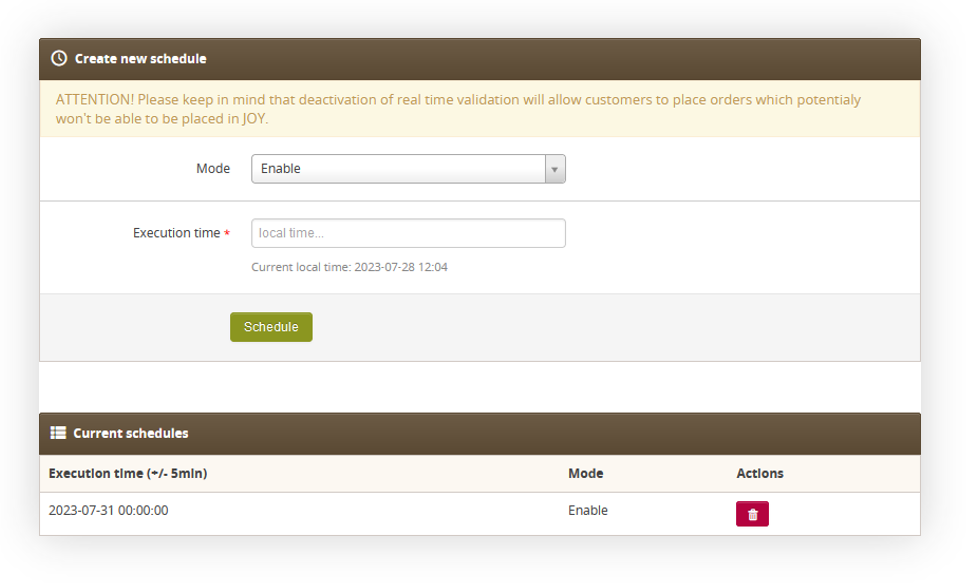 |
| *Visualization of the JOY real time validation tab* |
| [](https://knowledge.tauceti-digital.com/uploads/images/gallery/2024-12/powerpnt-ggz8u3e3ze.png) |
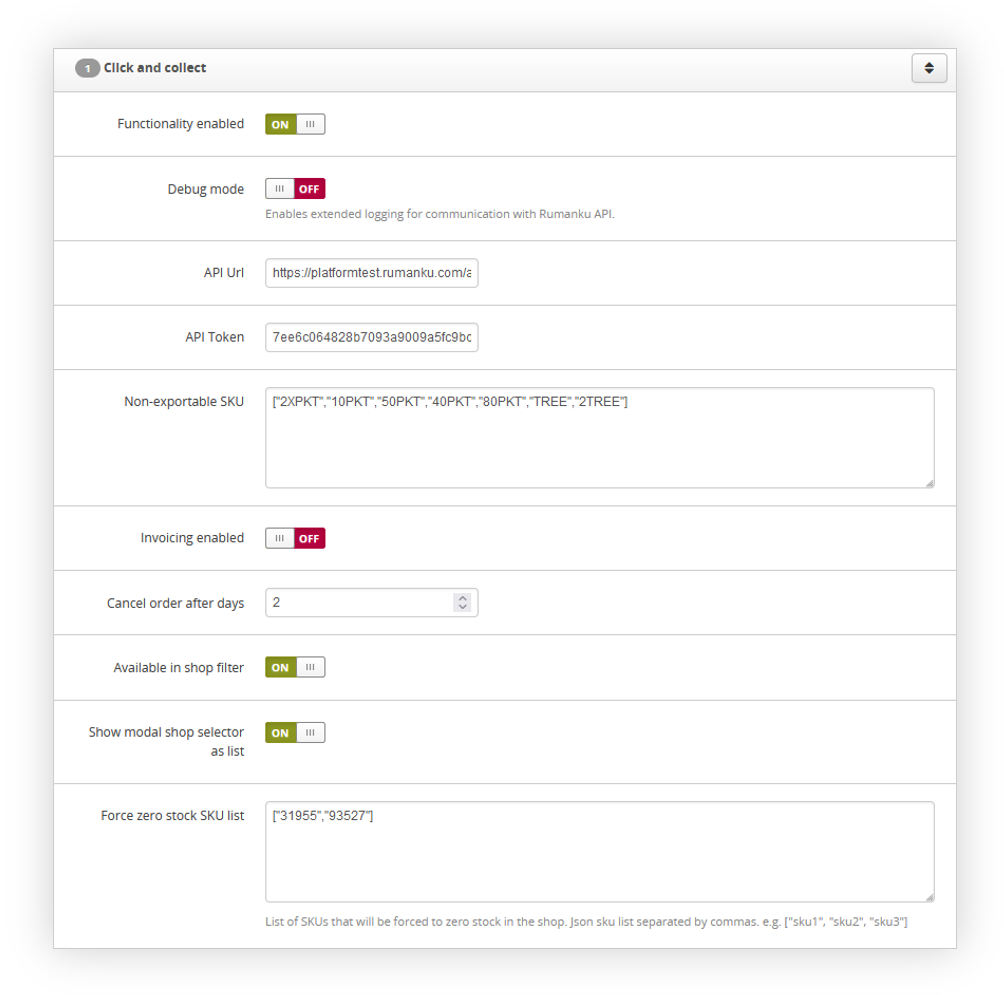
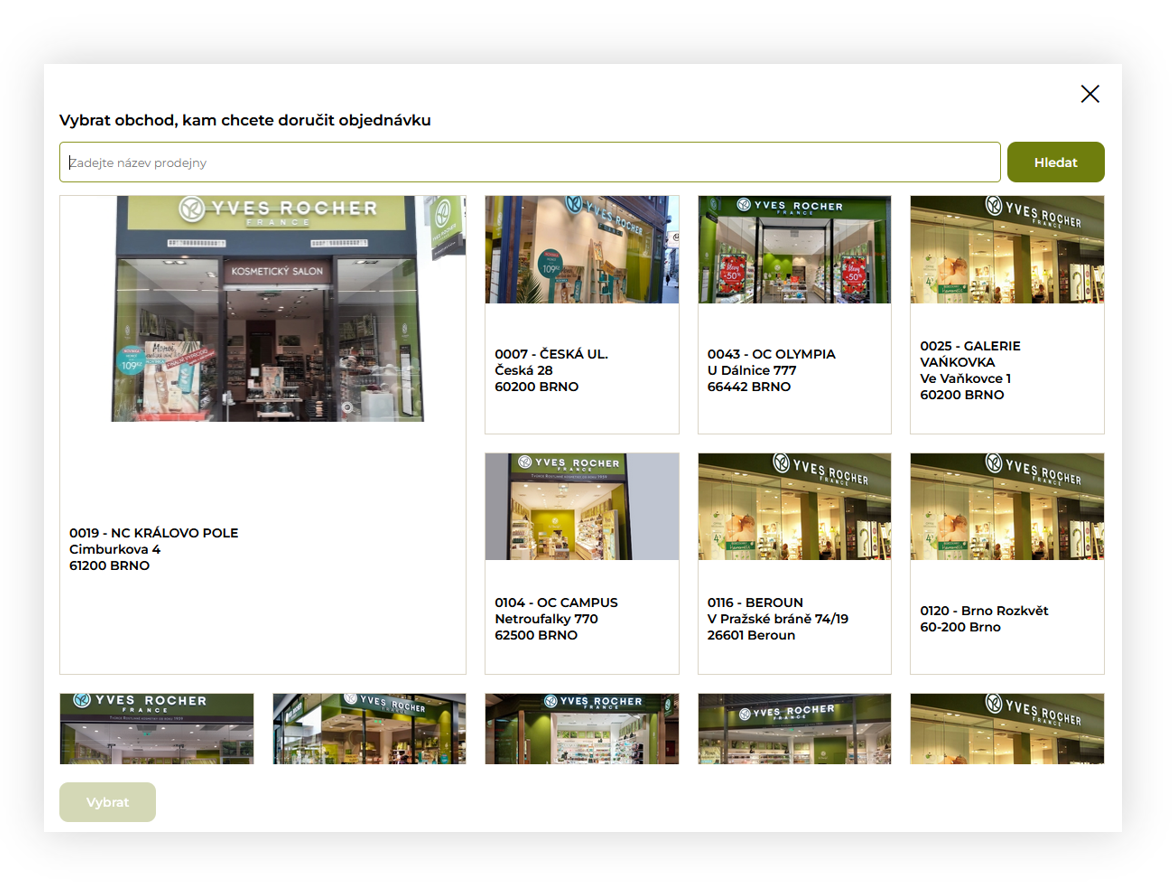
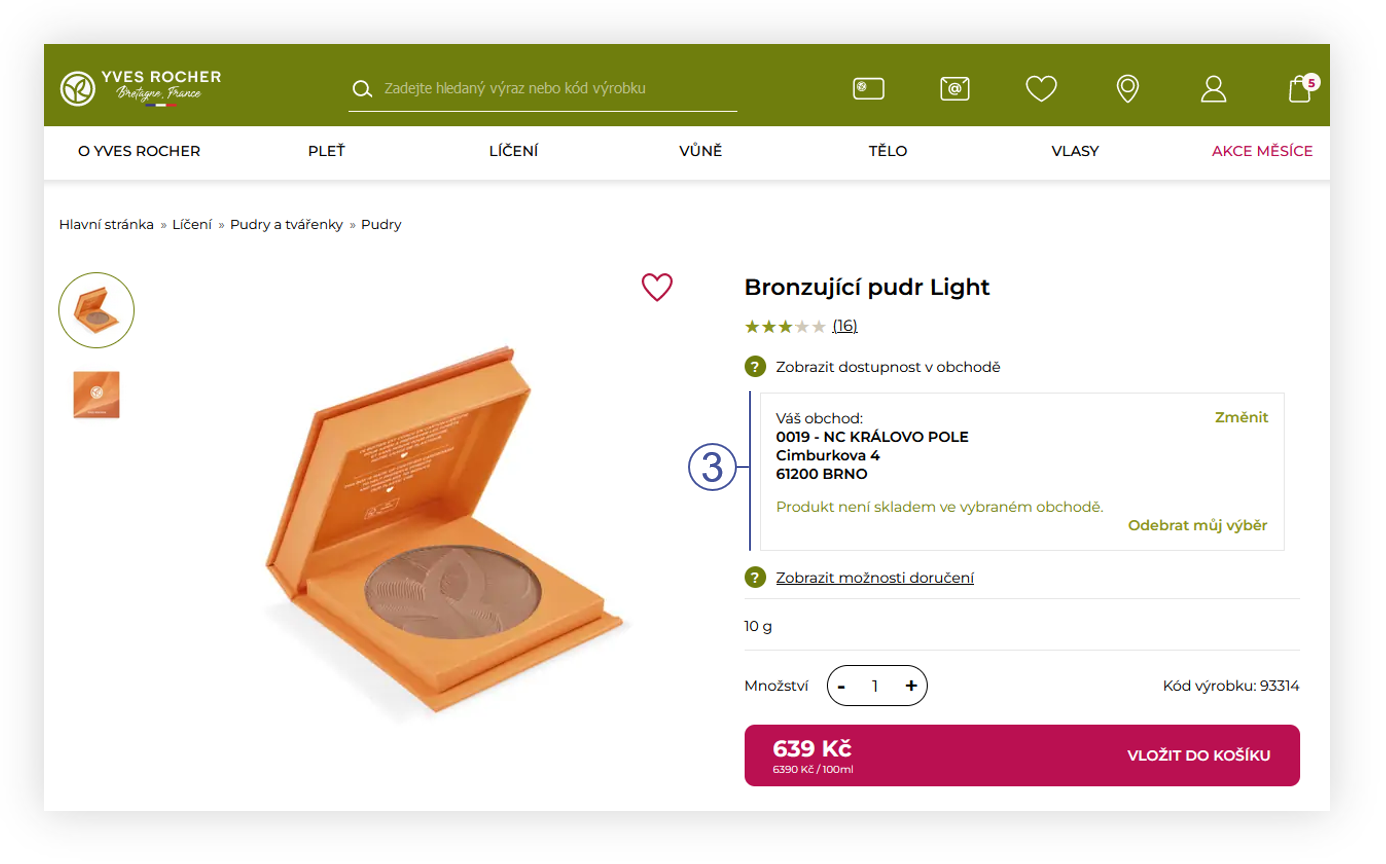
| *Visualization of the Click and Collect functionality* |
| 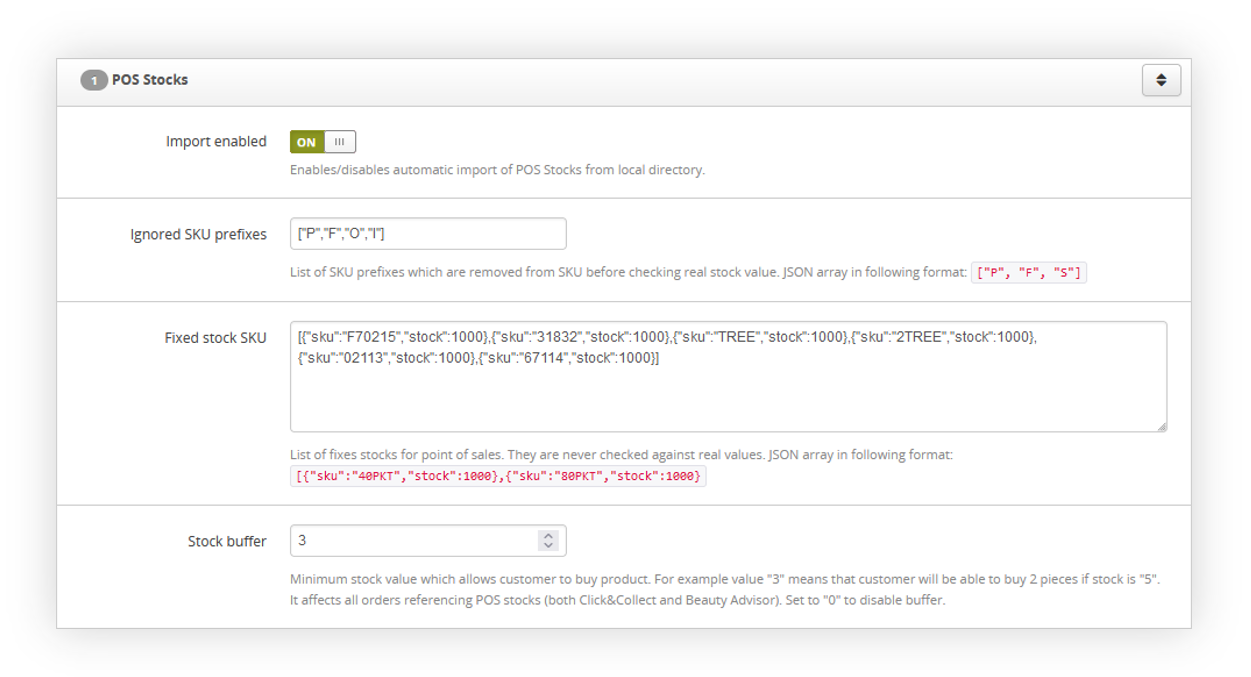 |
| *Visualization of the POS stocks system settings* |
| 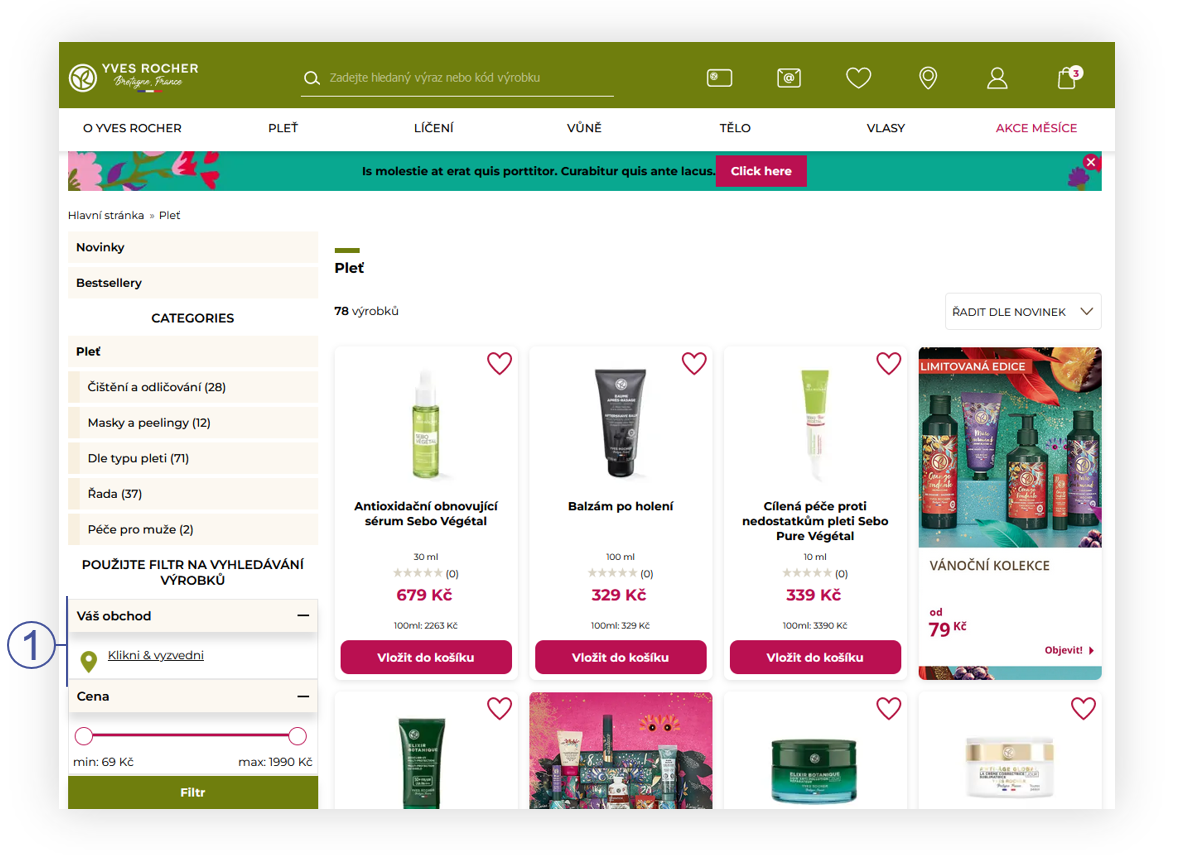 |
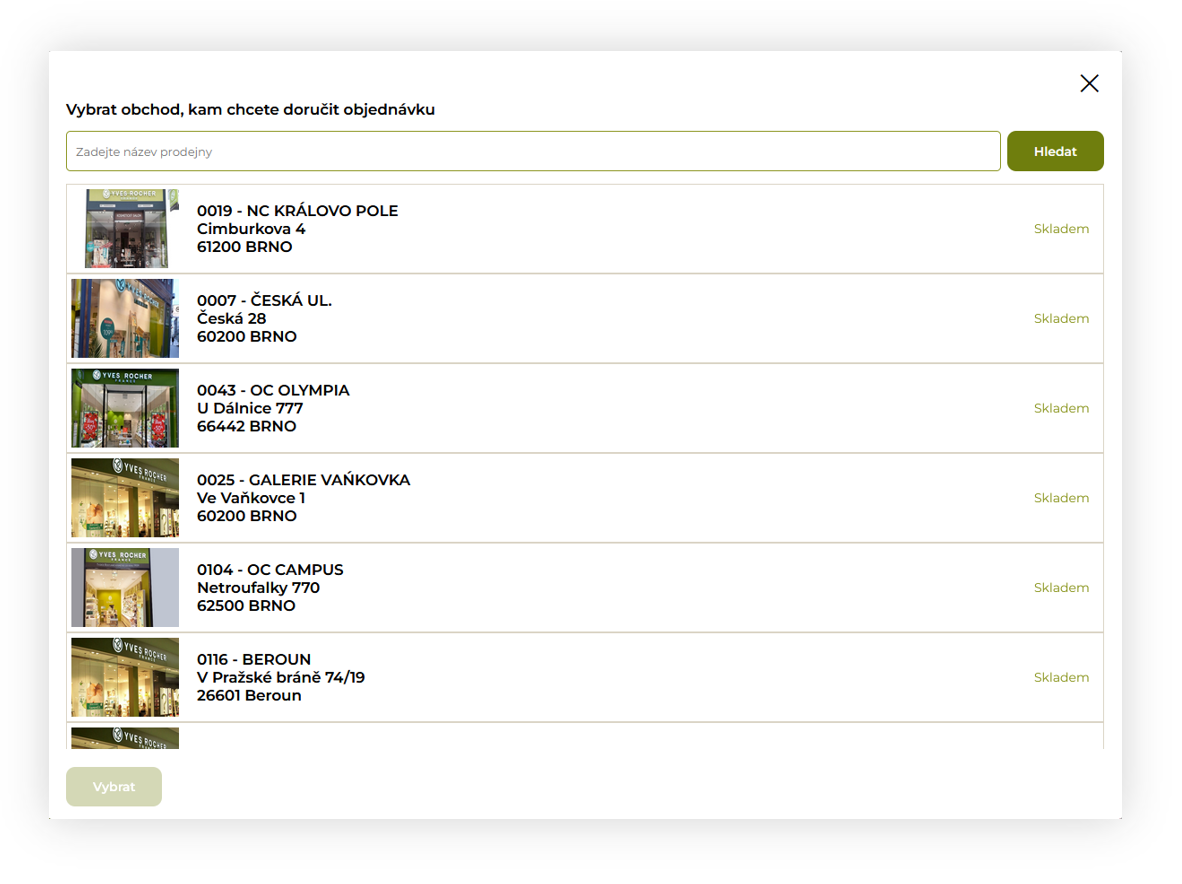
| *Visualization of the Click & Collect POS selection (desktop)* |
| 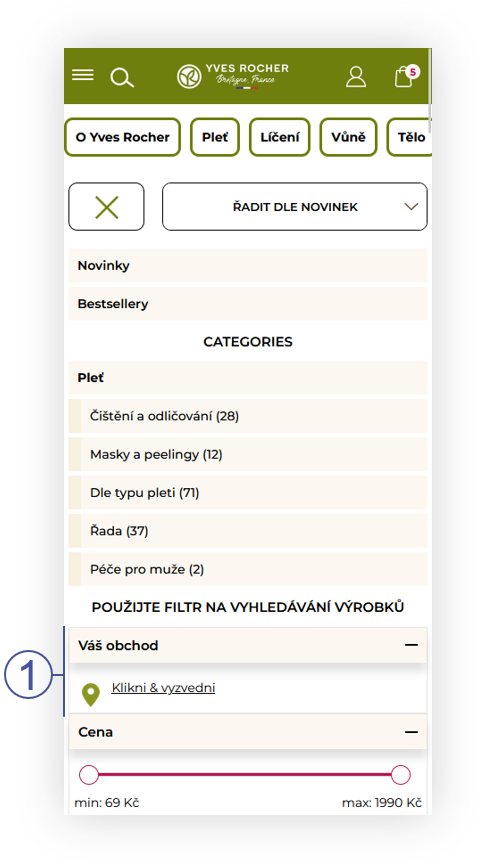 |
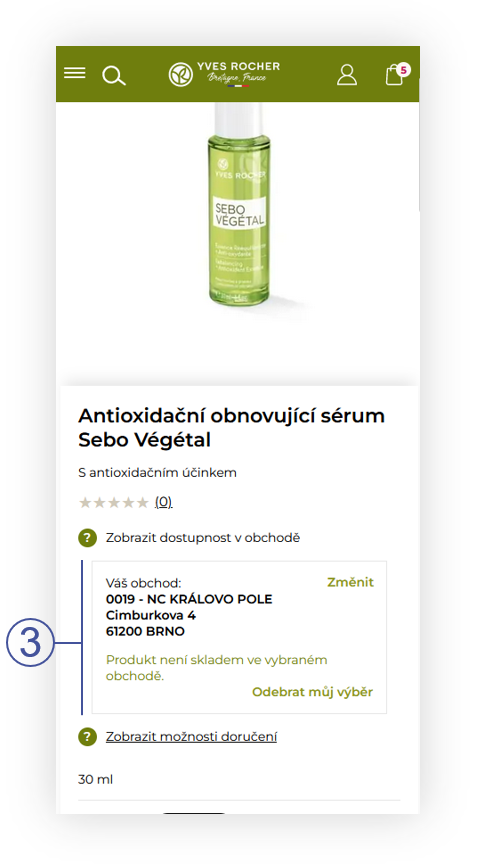
| *Visualization of the Click & Collect POS selection (mobile)* |
|  |
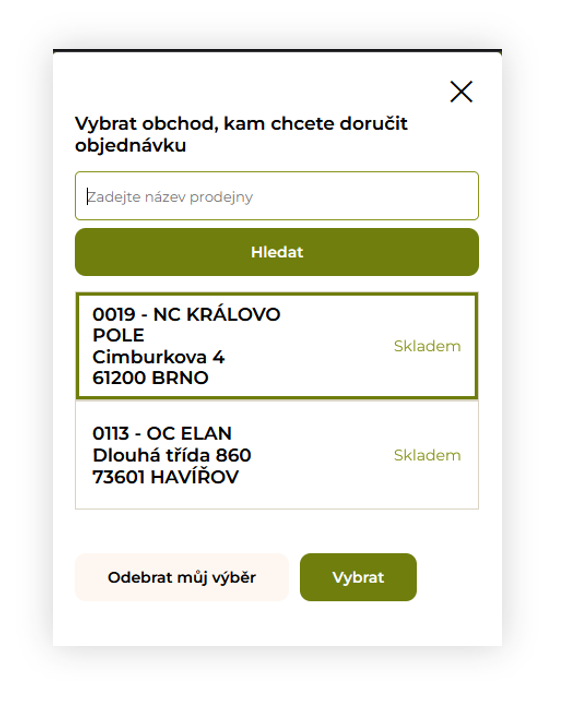
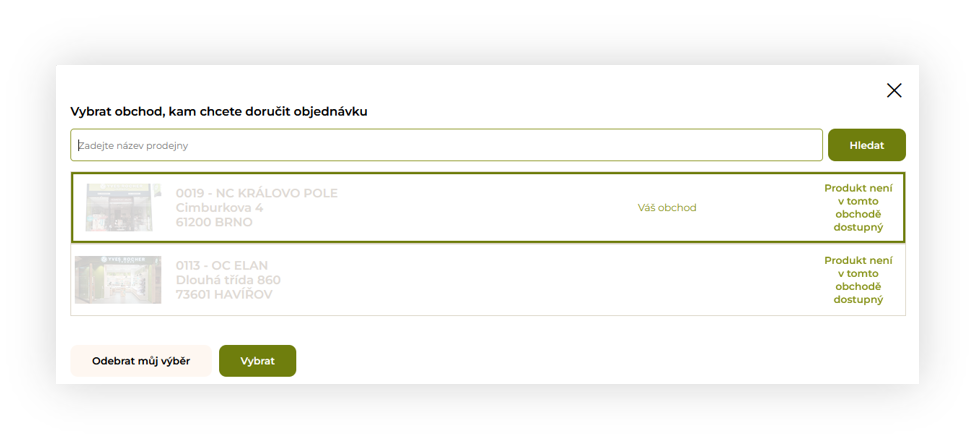
| *Visualization of the POS selection popup (modal tiles)* |
|  |
| *Visualization of the POS selection popup (list)* |
|  |
| *Visualization of the POS selection popup (mobile)* |
| 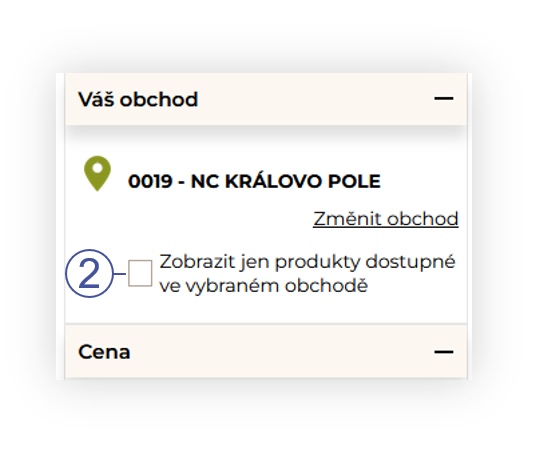 |
| *Visualization of the "Show only products available products in the store" filter* |
|  |
| *Visualization of the product stock information on the product page (desktop)* |
|  |
| *Visualization of the product stock information on the product page (mobile)* |
|  |
| *Visualization of the Click & Collect delivery option* |
|  |
| *Visualization of the POS store list with unavailable products from the cart* |
| 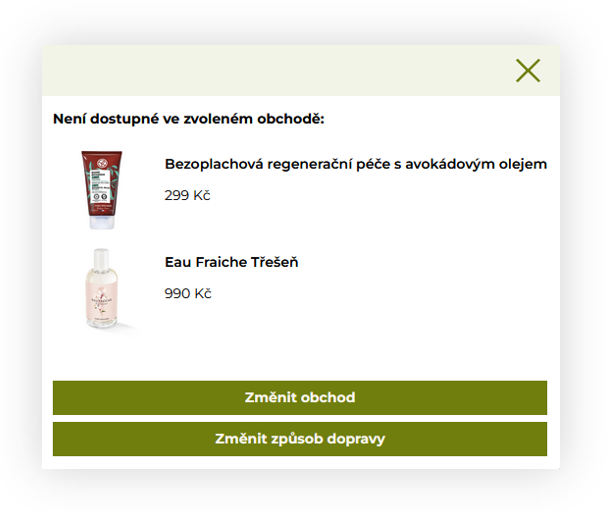 |
| *Visualization of the popup informing which products are not available in the selected store* |
| 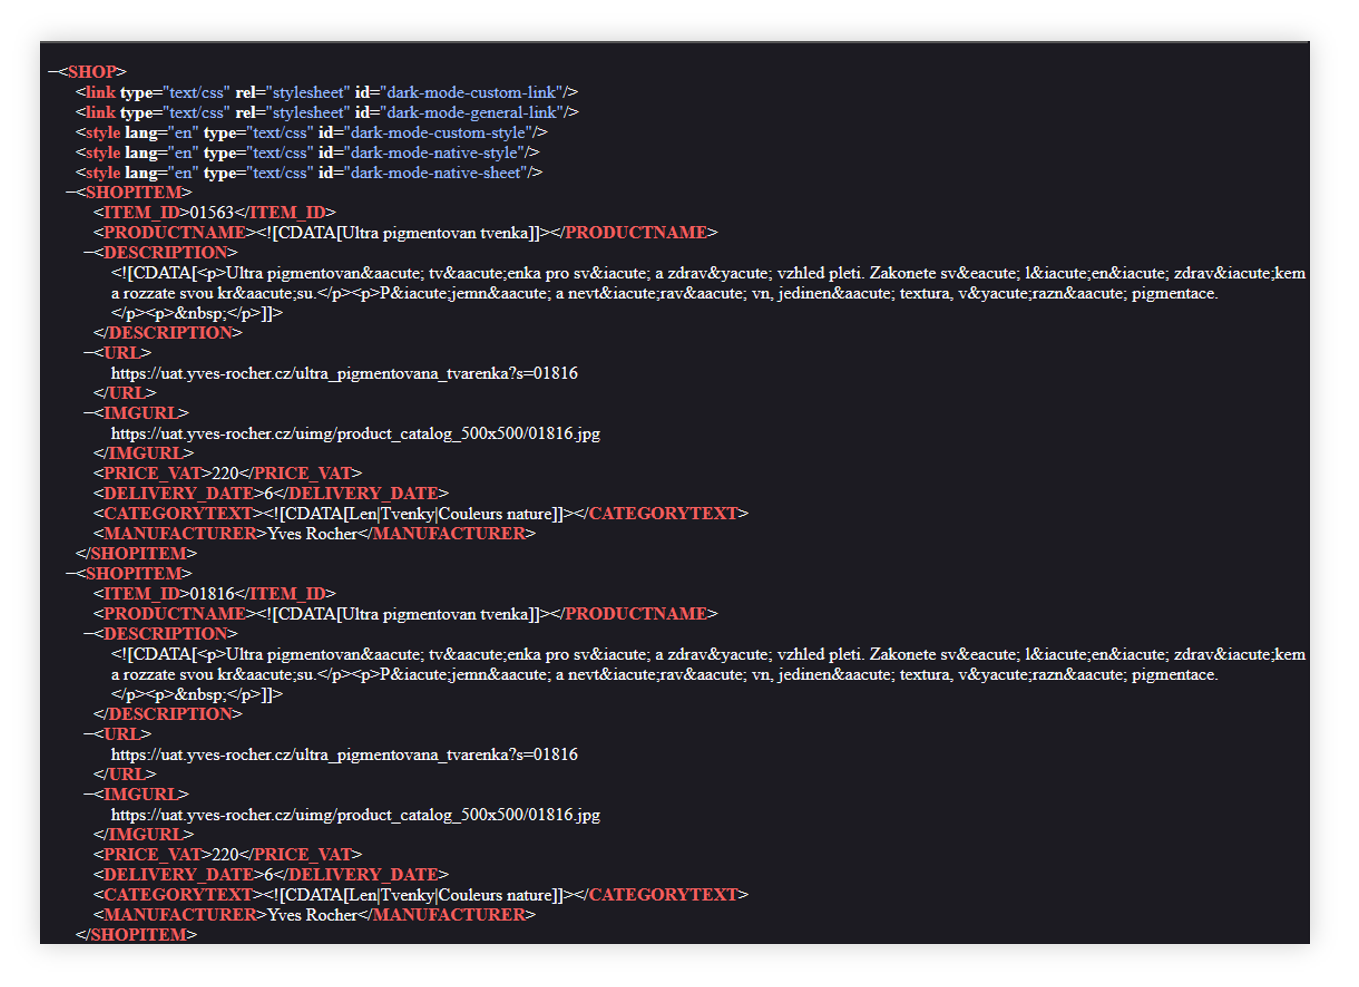 |
| *Visualization of the zbozi.cz feed* |
| 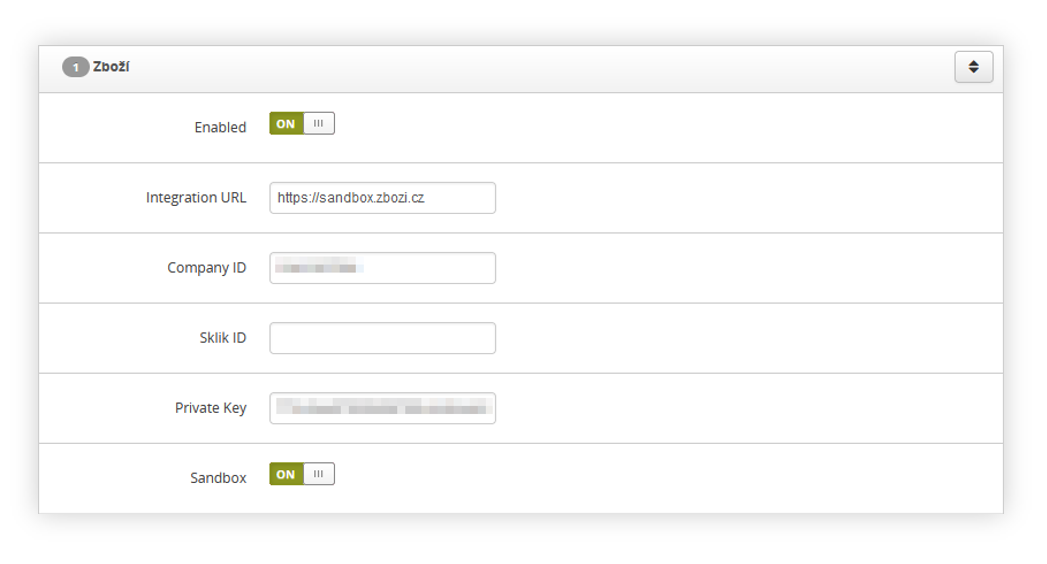 |
| *Visualization of the zbozi configuration in the system / settings* |
| 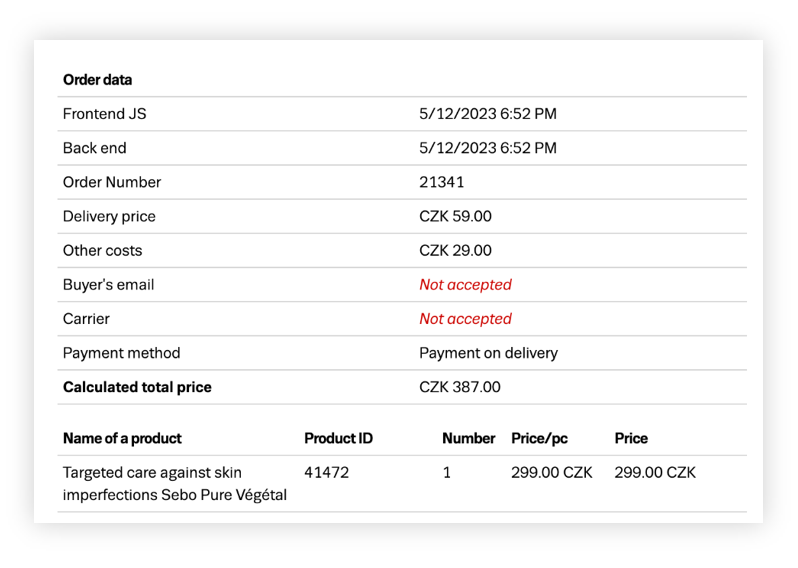 |
| *Visualization of the example order sent to zbozi* |
| 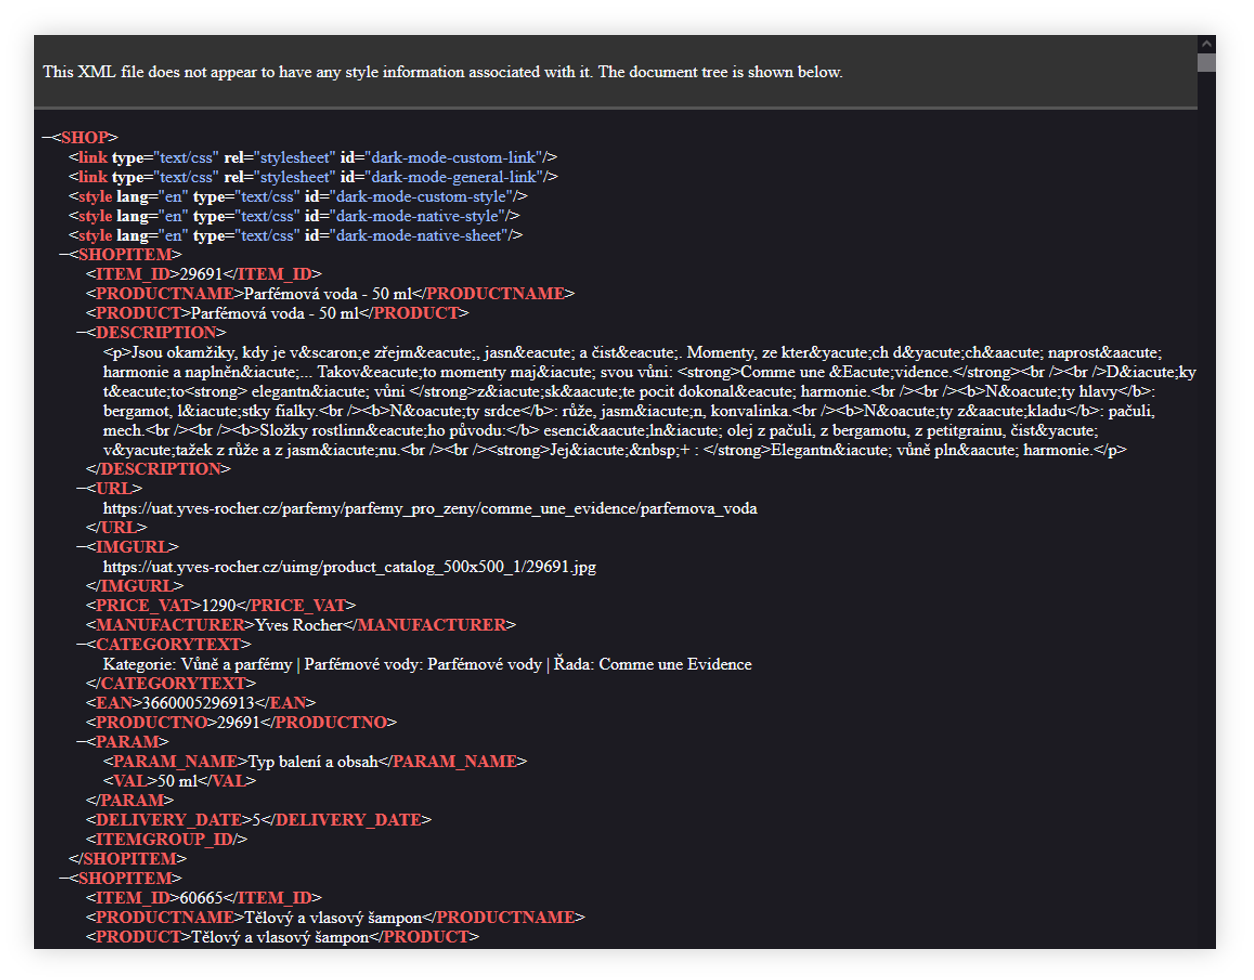 |
| *Visualization of the Heureka xml feed* |
| 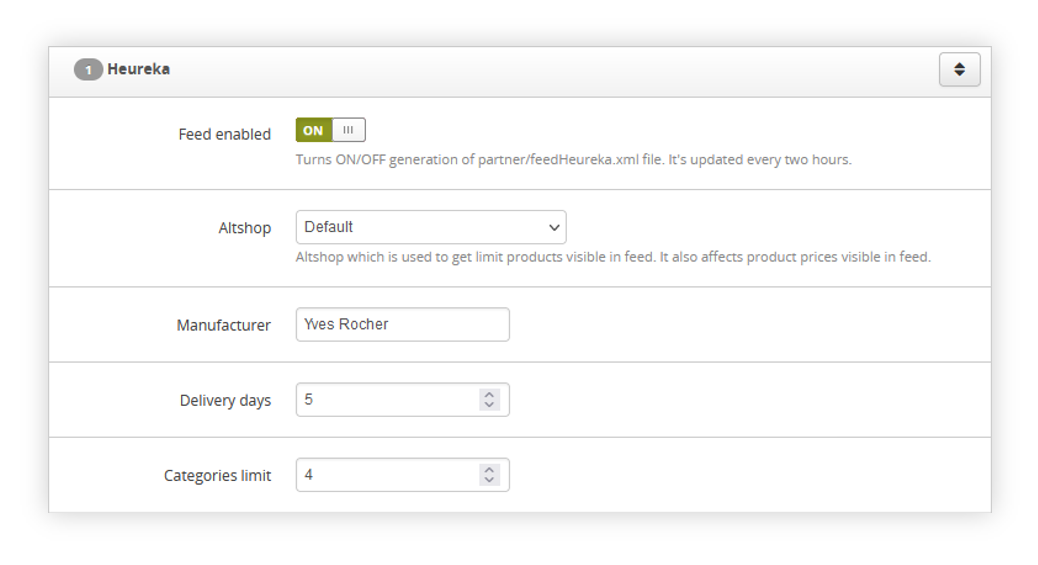 |
| *Visualization of the Heureka integration in the System settings.* |
|  |
| *Visualization of the Heureka xml feed* |
| 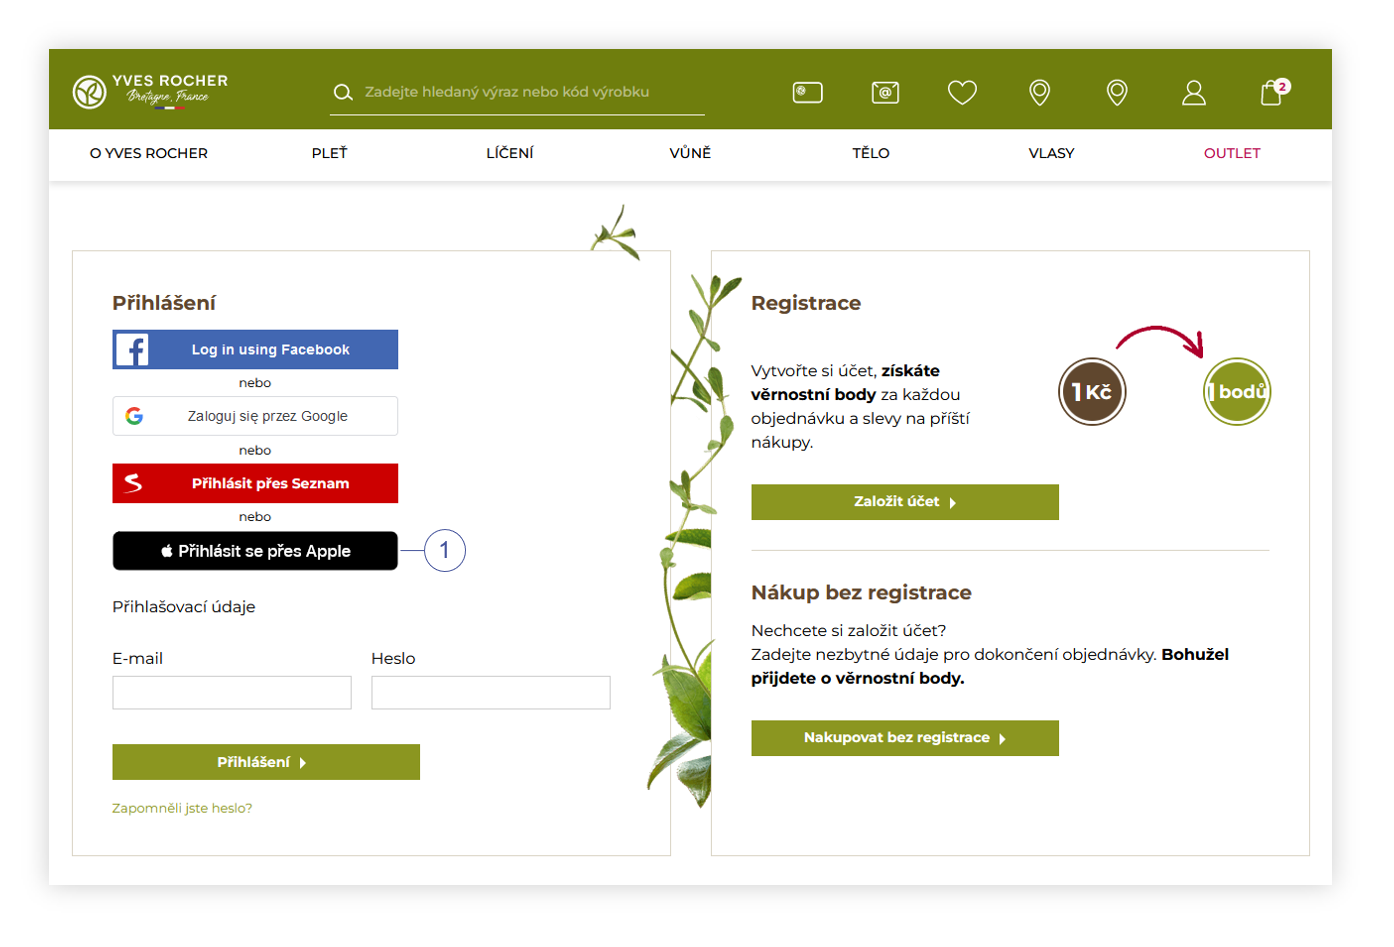 |
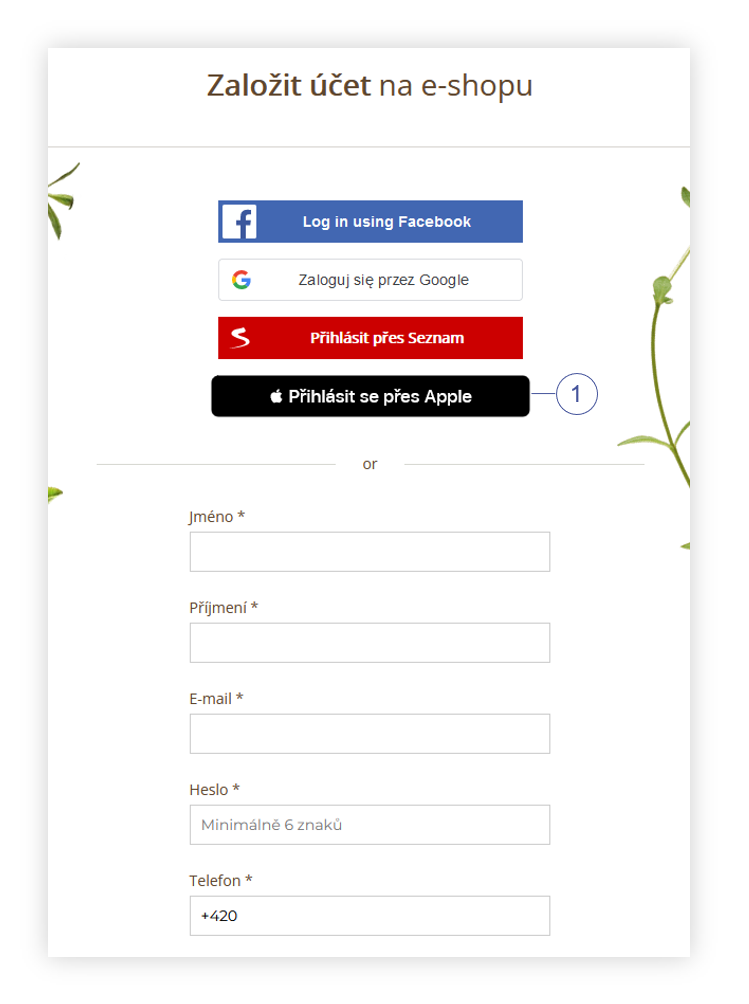
| *Visualization of the Apple ID authorization button on the log in page* |
| 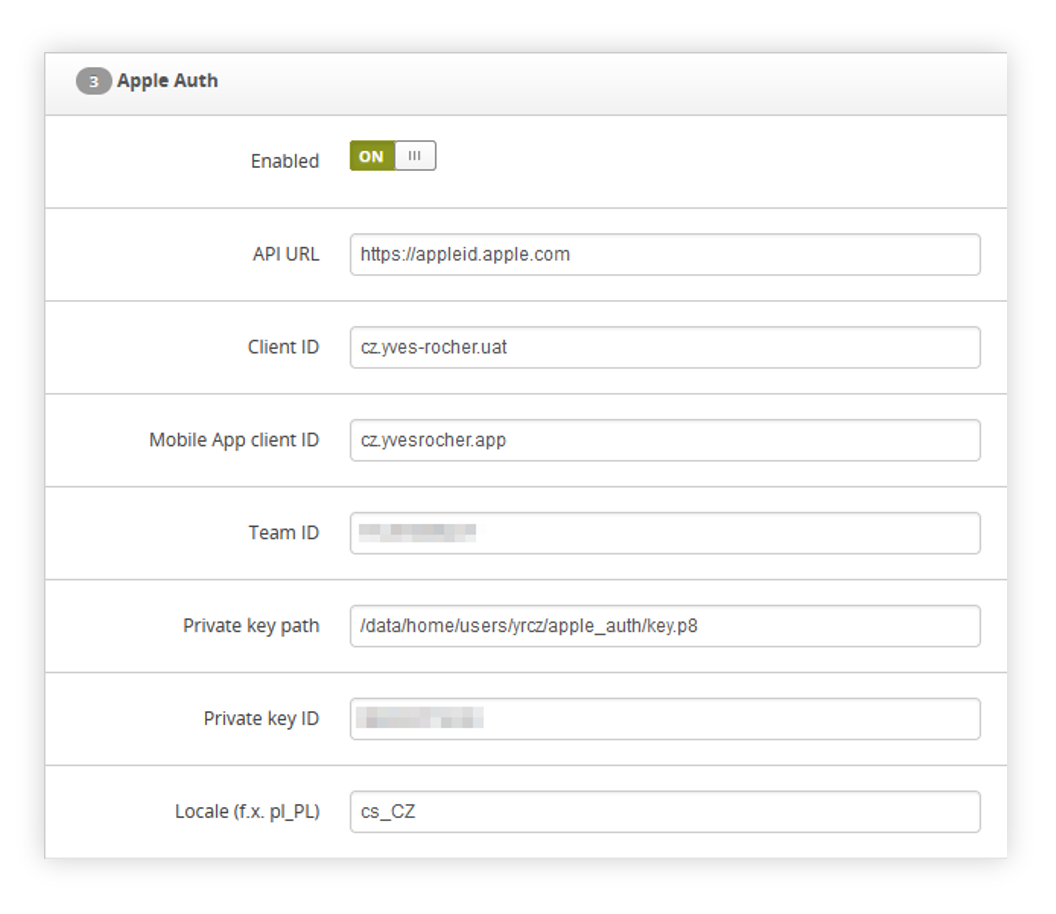 |
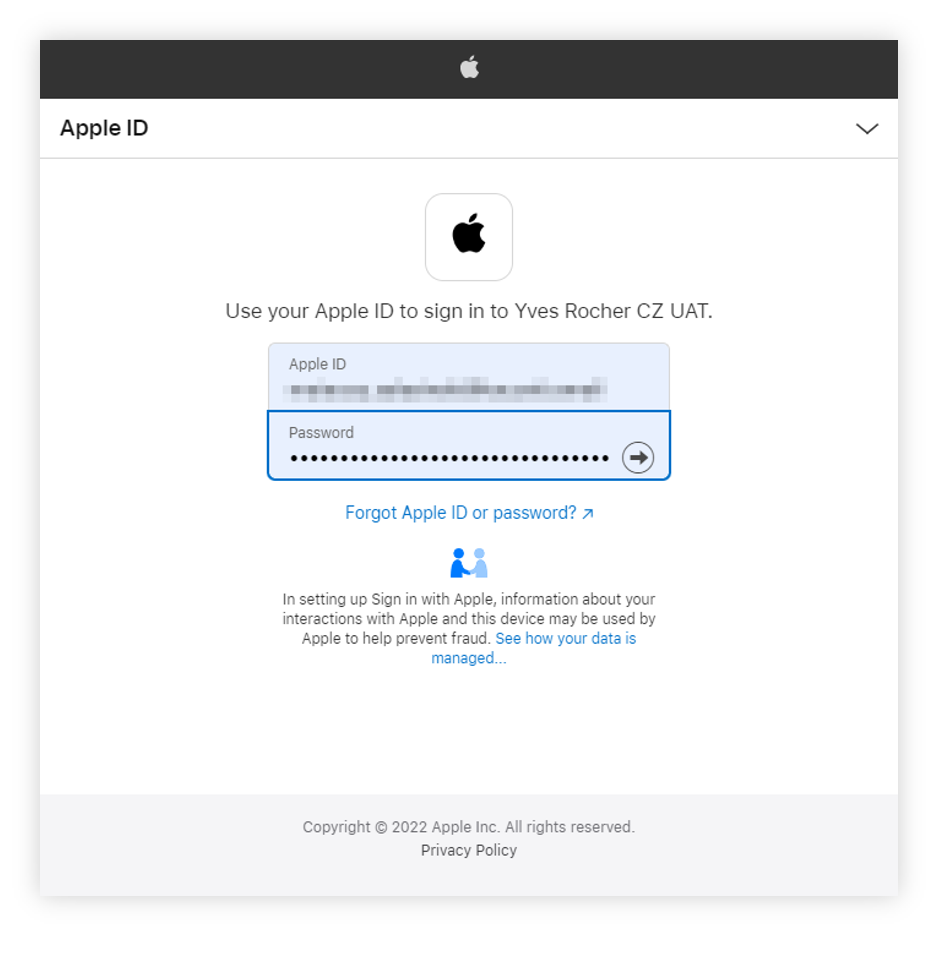
| *Visualization of the Apple.cz authorization tab* |
| 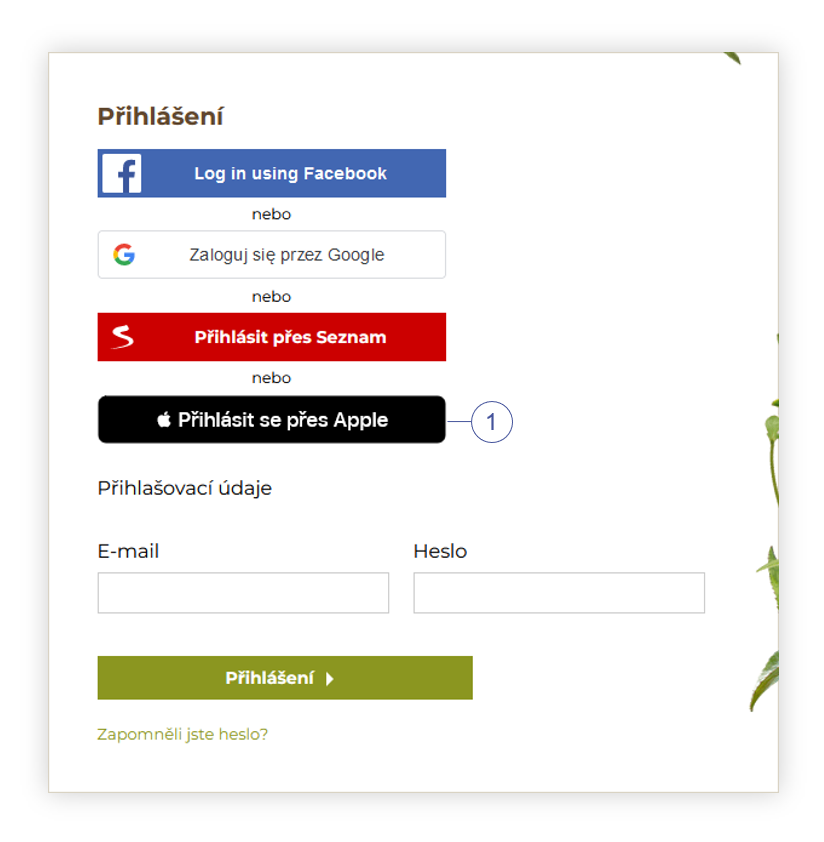 |
| *Visualization of the Apple authorization button on the log in page* |
|  |
| *Visualization of the Apple authorization button in the register tab* |
|  |
| *Visualization of the Apple authorization* |
| 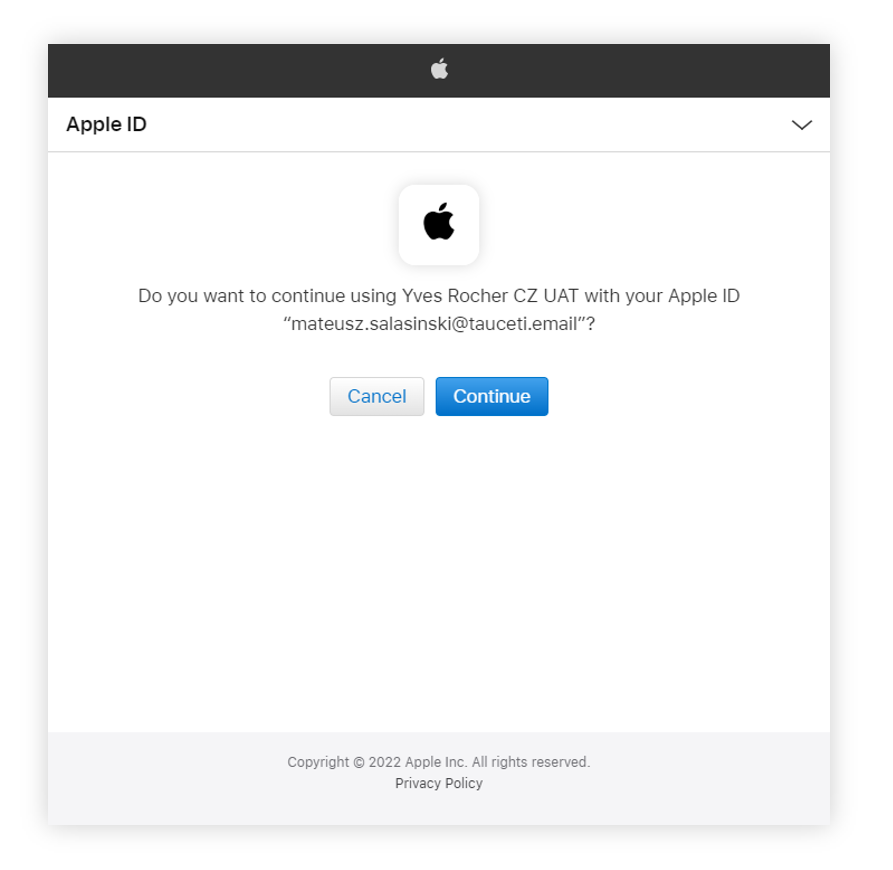 |
| *Visualization of the Apple authorization* |
| 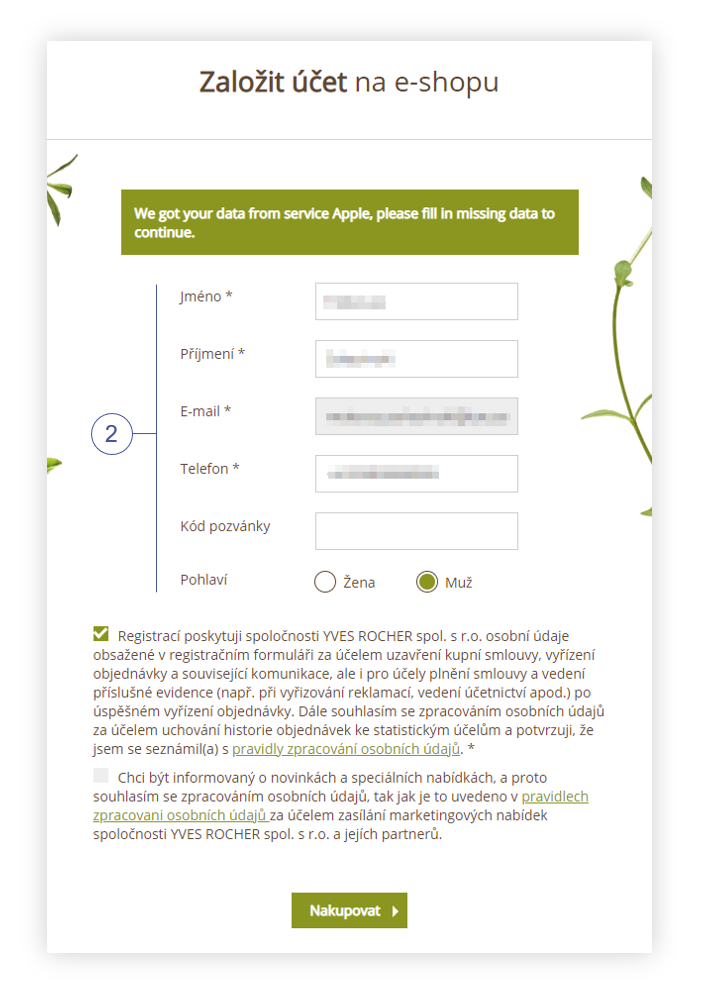 |
| *Visualization of the Apple additional information page* |
|  |
| *Visualization of the Glovo feed* |
|  |
| *Visualization of the Glovo system settings* |
|  |
| *Visualization of the Glovo feed* |
| **yr\_gtm\_ab** | *object* |
| *-* **.** | *object* |
| **.offer\_segment** | Old\_offer |
| **.total\_visits** | 189 |
| **.total\_orders** | 8 |
| **yr\_gtm\_ac** | *object* |
| **.0** | CC1664286880 |
| **.1** | CC1661009512 |
| **.2** | CC1498480417 |
| **.3** | CC1658042828 |
| **yr\_gtm\_ad** | *object* |
| **.0** | 3CYLAWS11 |
| **.1** | 3CYL8WS11 |
| **.2** | 3CYGCWP01 |
| **.3** | 3CYL7WS11 |
| **yr\_gtm\_m** | *object* |
| **.0** | 97701 |
| **yr\_gtm\_n** | *object* |
| **.0** | F02113 |
| **.1** | F94615 |
| **.2** | F67114 |
| **yr\_gtm\_x** | *object* |
| **.0** | 05241 |
| **.1** | 74084 |
| **.2** | 74084 |
| **yr\_gtm\_y** | *object* |
| **.0** | Kategorie: Vlasy > Masky a octy: Masky > Cílená péče: Detox vlasů |
| **.1** | Kategorie: Vlasy |
| **.2** | Kategorie: Vánoce |
| **.3** | Kategorie: Vánoce |
| *-***yr\_gtm\_z** | *object* |
| **.0** | 22456 |
| **.1** | J0437 |
| **.2** | 83020 |
| 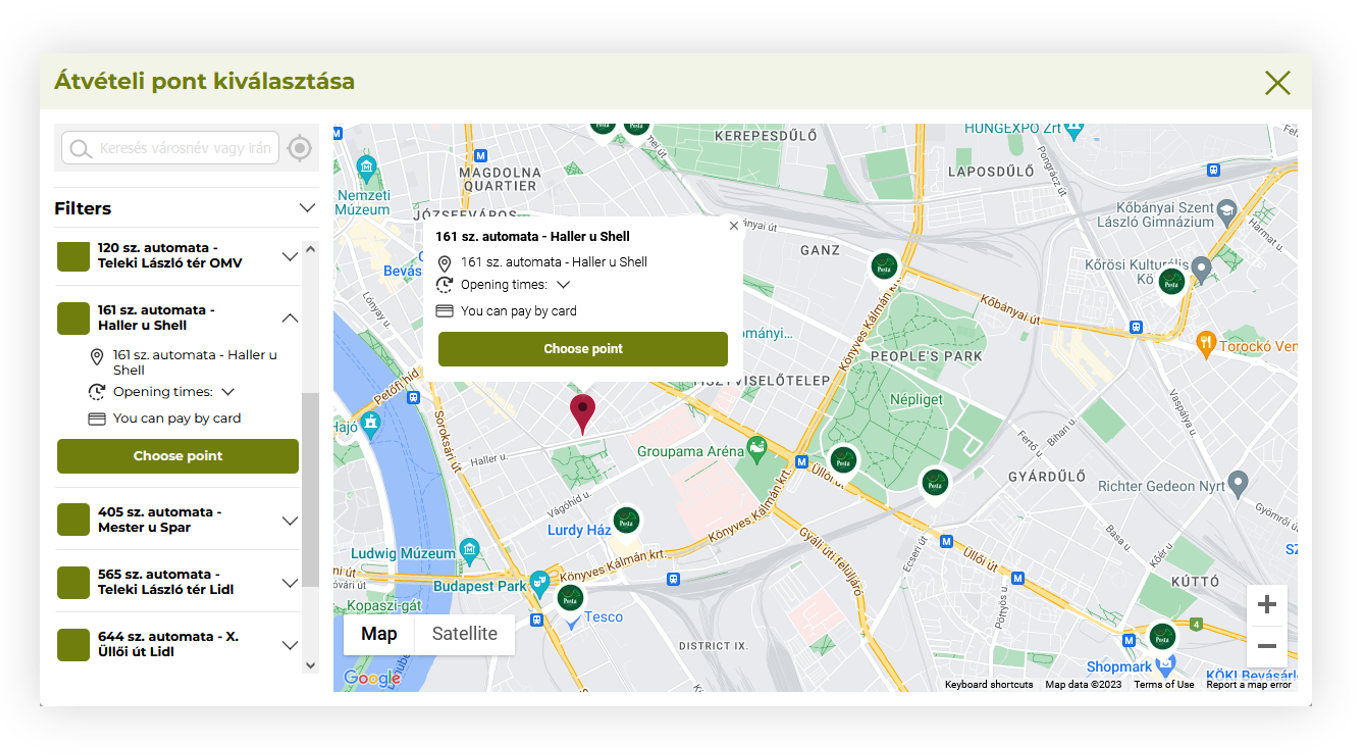 |
| *Visualization of the Magyar Posta delivery pickup selection* |
|  |
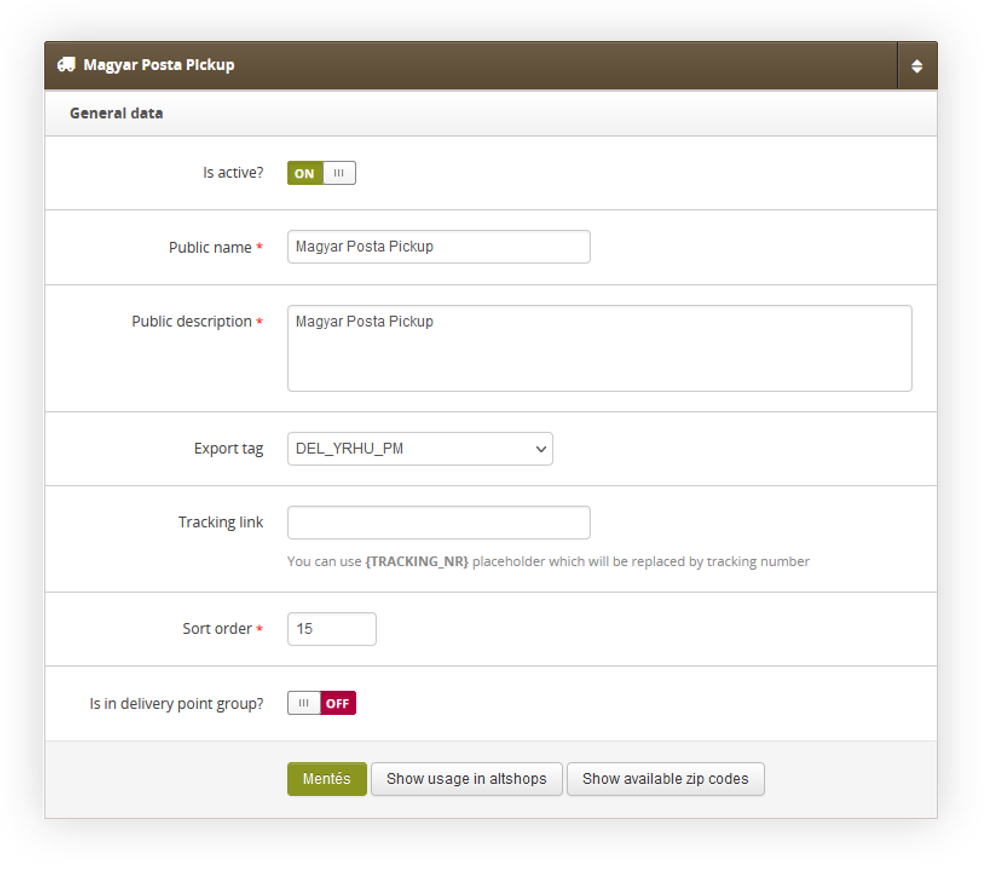
| *Visualization of the Magyar Posta delivery system settings* |
|  |
| *Visualization of the Magyar Posta delivery settings* |
| 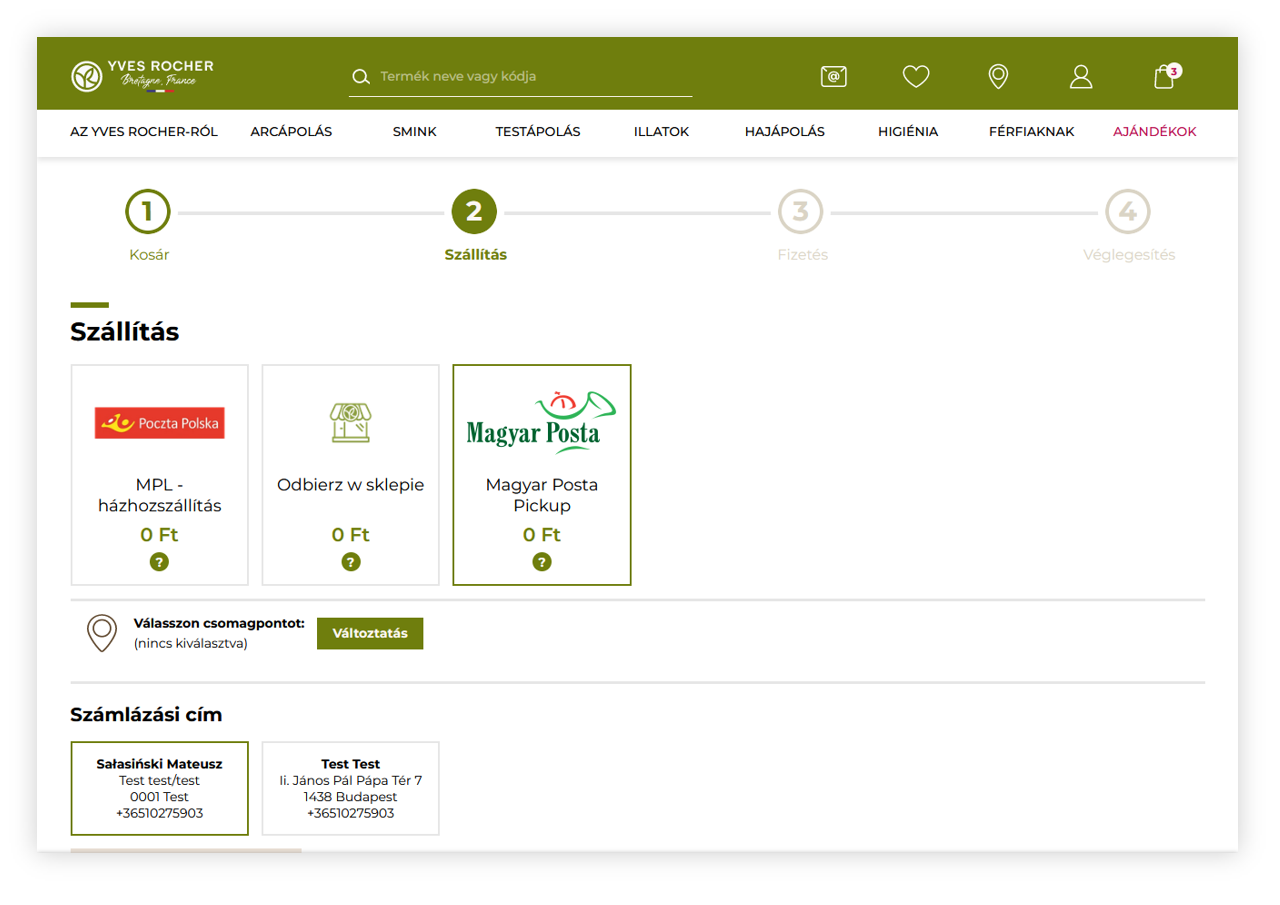 |
| *Visualization of the magyar post delivery method in the delivery step* |
|  |
| *Visualization of the magyar Posta delivery pickup selection* |
| 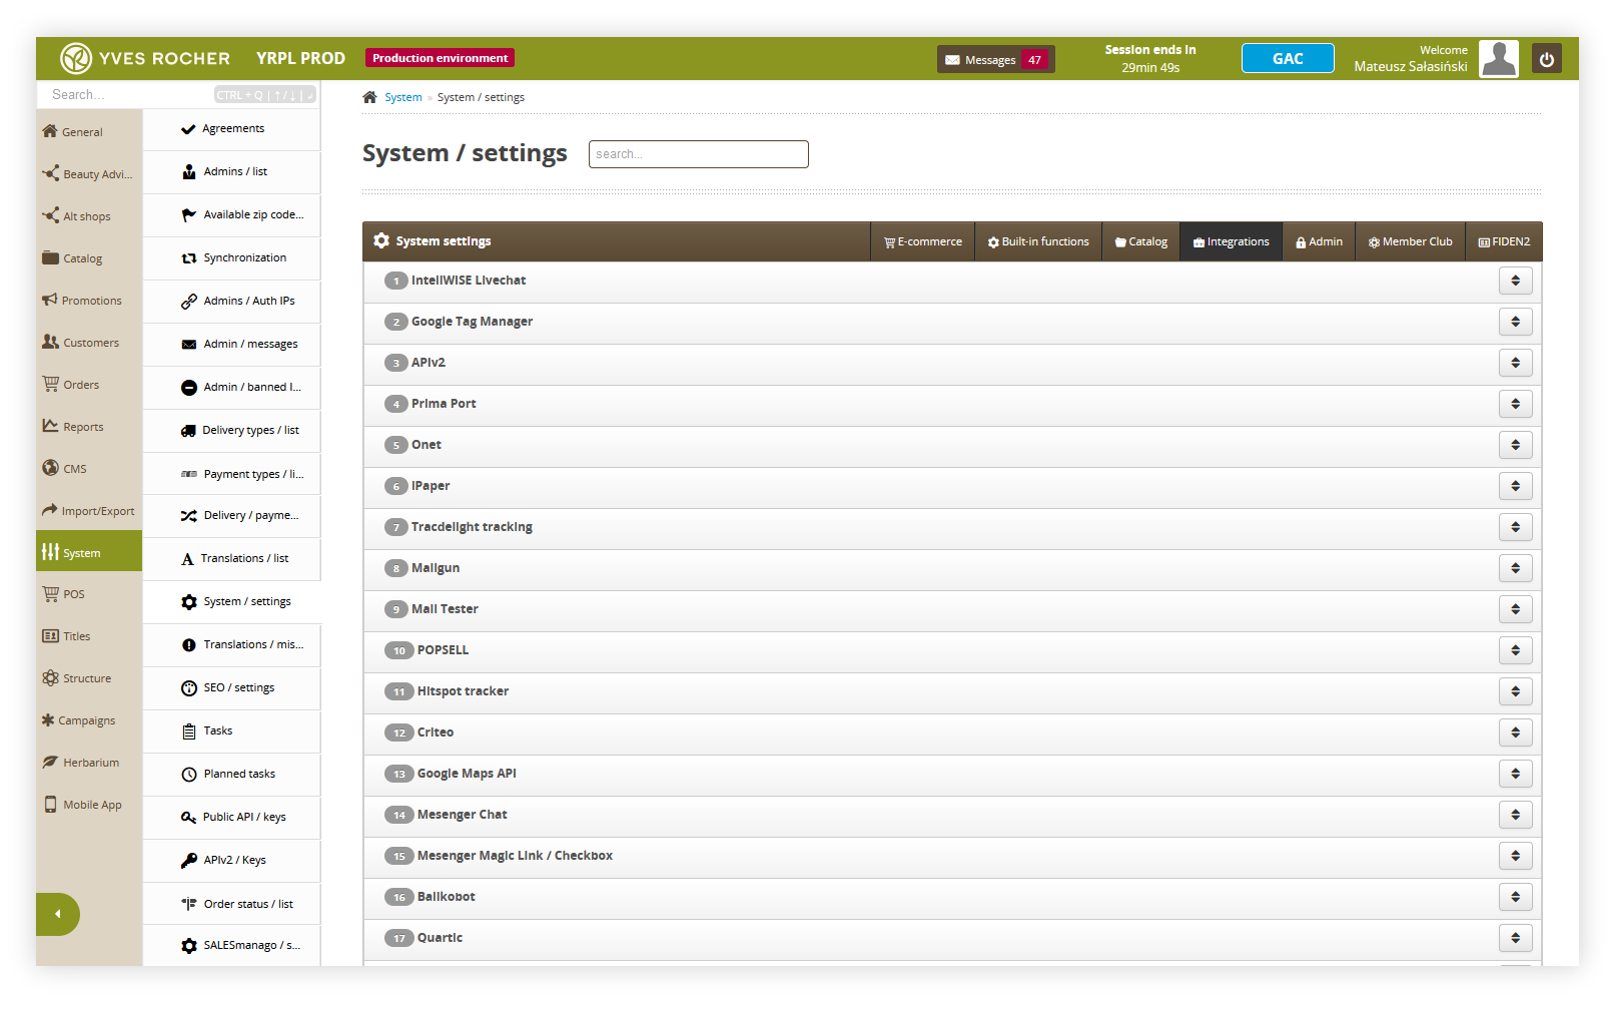 |
| *Visualization of the system settings integration location* |
| 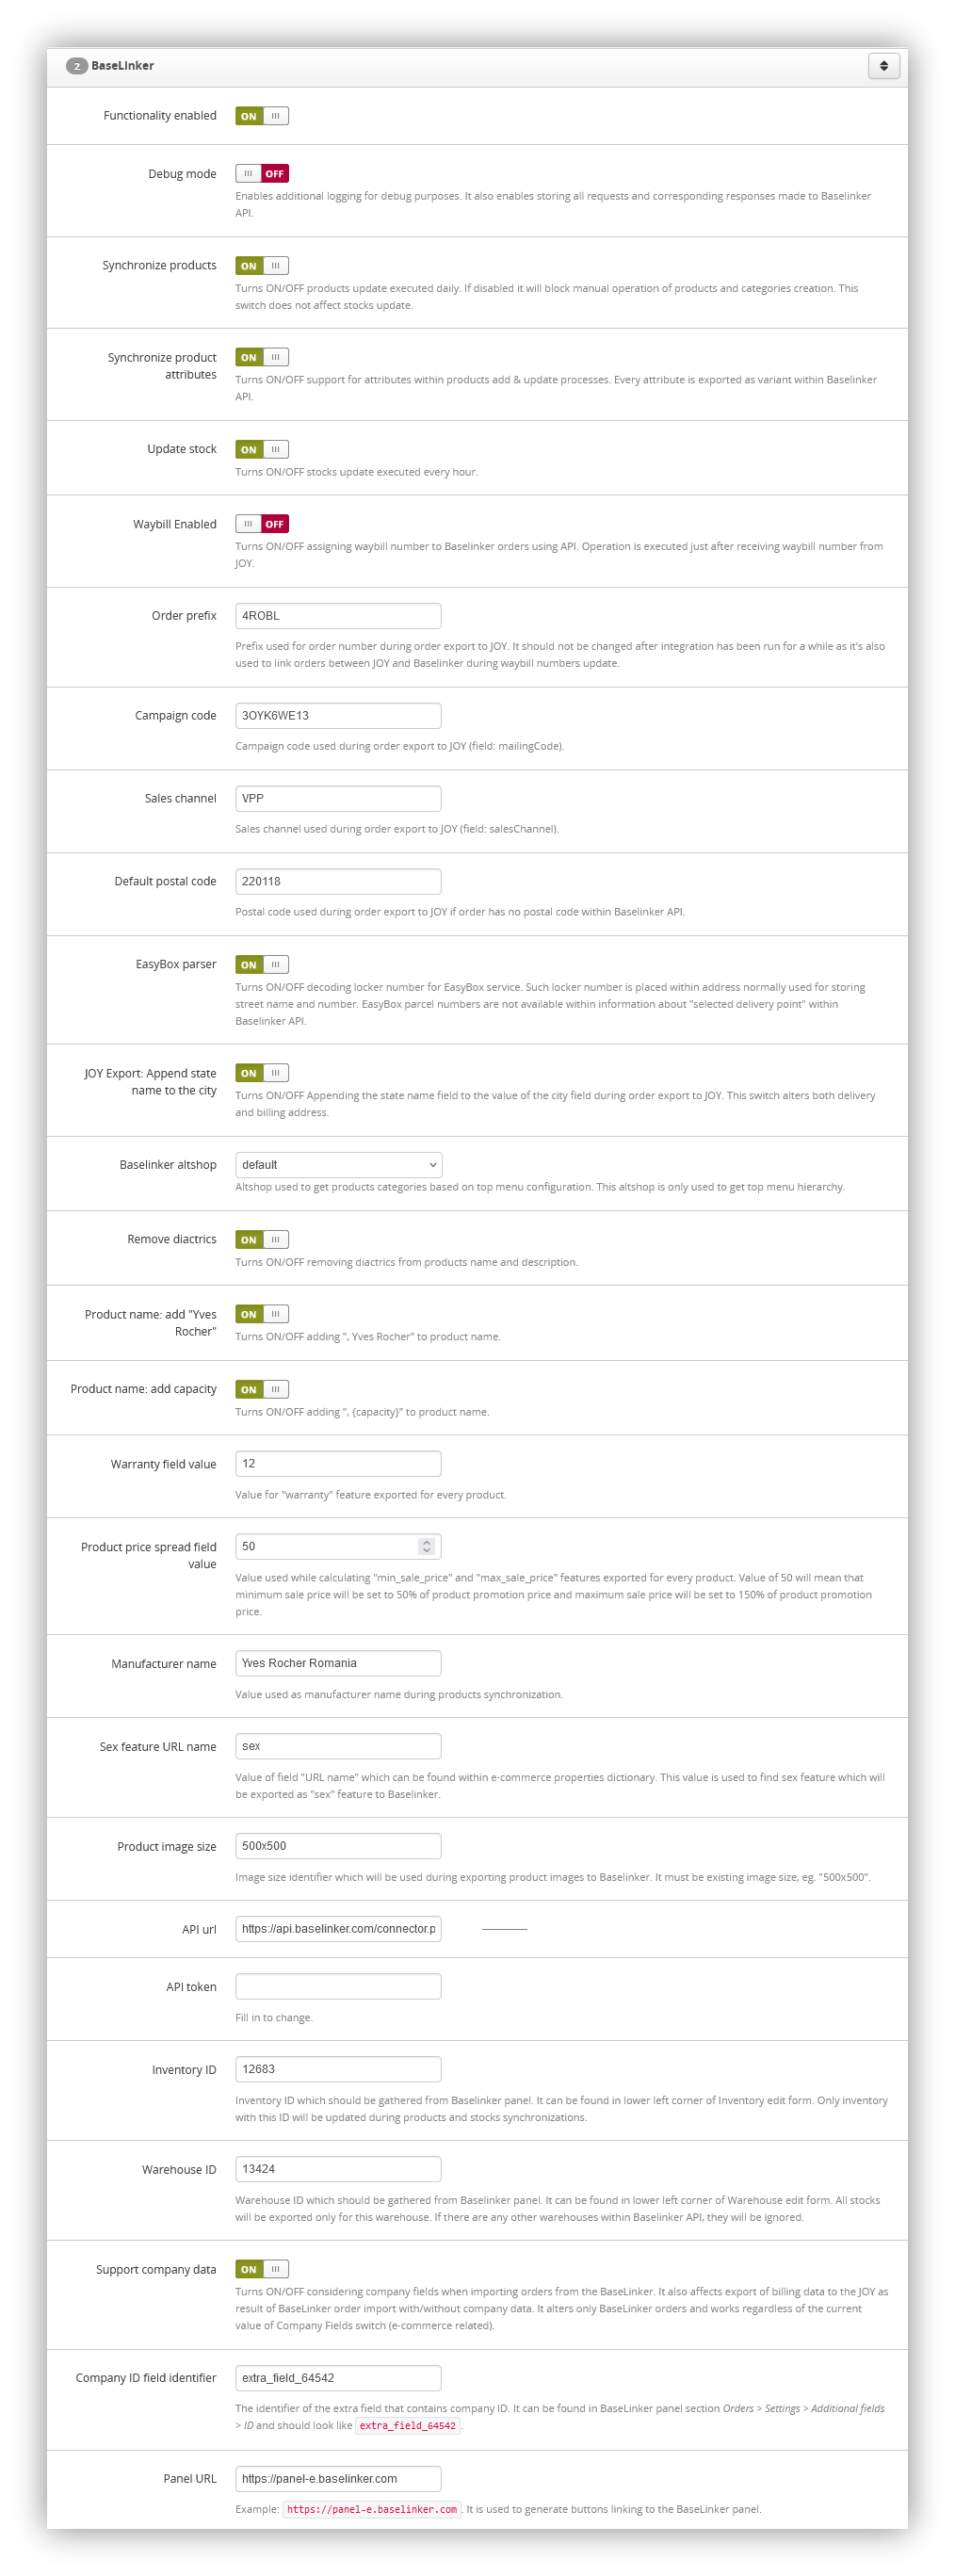 |
| *Visualization of the BaseLinker settings* |
| 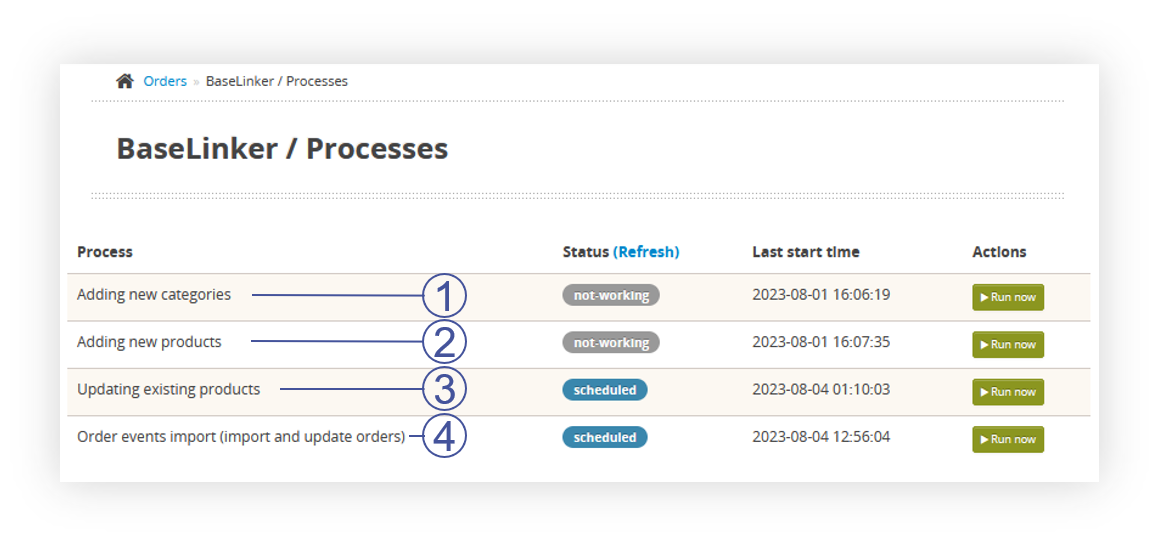 |
| *Visualization of the BaseLinker processes* |
| **Field name** | **Description** | **Data source** |
| inventory\_ID | Catalog ID | ID from TC system settings (BaseLinker\_inventory\_id) |
| product\_ID | Product ID | Always null |
| is\_Bundle | Is the product a part of a set | Always false |
| ean | EAN of a product | First found in the database EAN of the product. In case of multiple EAN codes, the first one taken from the database is exported. |
| sku | SKU of a product | Main SKU of the product. Attribute sku if data is generated for product variant. |
| tax\_rate | VAT tax rate | Vat percentage taken from TC system settings from vat\_percentage field. |
| weight | Weight of the product | Capacity field from the product page. This field is converted to a floating point number or 0.0. |
| height | Height of the product | Always 0.0 |
| width | Width of the product | Always 0.0 |
| length | Length of the product | Always 0.0 |
| star | Star type (indication in the BaseLinker panel) | Always 0 |
| manufacturer\_id | Manufacturer ID | Manufacturer ID with a name that matches the BaseLinker\_manufacturer\_name system setting. Obtained from the getInventoryManufacturers method. If the manufacturer does not exist, it is created automatically. |
| category\_id | Category ID | ID obtained from the API in the process of going through the categories to create a product. In the case of finding a product within several categories, it is the ID of the first category encountered |
| prices | The list of prices in the price groups. | **id-price-group:** **price**, where ID of the group is taken from the getInventoryPriceGroups method. Always default price group is used (is\_default: true). |
| locations | Additional information regarding the location of the product in the warehouse | Always an empty table (\[\]) |
| text\_fields | descriptive fields with possible variants in different languages / for different integrations | Object with a set of fields compatible with the [**Supported text fields** table](#bkmrk-supported-text-field). |
| images | Product pictures | List of images assigned to attribute if data is generated for product variant. The main photo is marked with index 0. We pass the photos as string url: {address}. If there are currently fewer photos than there were previously, the pre-existing object indexes are transferred with the value "" in order to force the deletion of the old photos. We are transferring photos in size 500x500px (system setting: **BaseLinker\_product\_img\_size**). The list is limited to 15 items. Note: BaseLinker returns a list of photos with indexes increased by 1. When referring to these images, this index should always be decreased by 1. For update requests, the numbering is from 0, when retrieving product information, the numbering is from 1. We only provide images related to the SKU set in the product, i.e. in the case of a SKU color variant, we will transfer only photos associated with a particular color. |
| links | Identifications of the product in the other warehouses. | Always an empty table (\[\]) |
| stock | Stock value | { "stock-id": { "stock-status" } where ID of the warehouse comes from the system setting, while the stock is set according to the default altshop configuration. The logic is according to the cyclic process of updating stock levels. |
| **Name of the field** | **Description** | **Data source** |
| name | Name of the product | Product name. adds `- {color name}` if data is generated for product variant. Value ", Yves Rocher" is added if the system setting **BaseLinker\_product\_name\_manufacturer** is equal to 1. Value ", {capacity}" is added if the system setting **BaseLinker\_product\_name\_capacity** is equal to 1 and the product has a non-empty capacity field value. Within the text, all diacritical characters are converted to characters in the ASCII range if the setting of the **BaseLinker\_remove\_diactrics** system setting has a value of 1. |
| description | Description of the product | combined text of all descriptions in order: **main, effects, usage, ingredients, capacity, additional\_info, notes.** Within the text, all diacritical characters are converted to characters in the ASCII range if the setting of the **BaseLinker\_remove\_diactrics** system setting has a value of 1. |
| description\_extra1 | Additional description 1 | Always an empty string ("") |
| description\_extra2 | Additional description 2 | Always an empty string ("") |
| description\_extra3 | Additional description 3 | Always an empty string ("") |
| description\_extra4 | Additional description 4 | Always an empty string ("") |
| features | Features of the product | List of product features with additional features (please see [Supported Features section](#bkmrk-supported-features)). `status` is `0` when the product is globally inactive (disabled in product definition). `status` is `0` if the product is active but data is generated for the inactive product variant. |
| 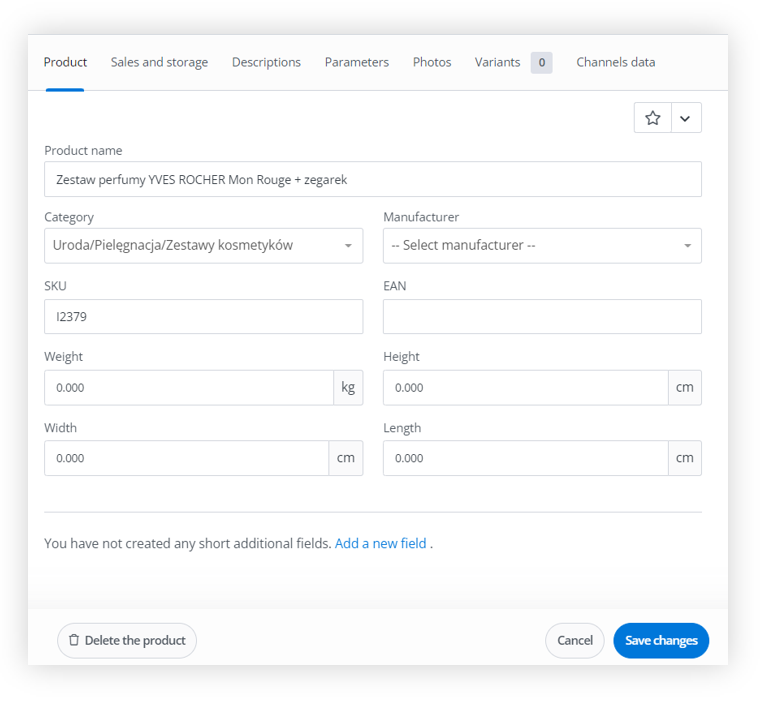 |
| *Visualization of the BaseLinker product edit* |
| 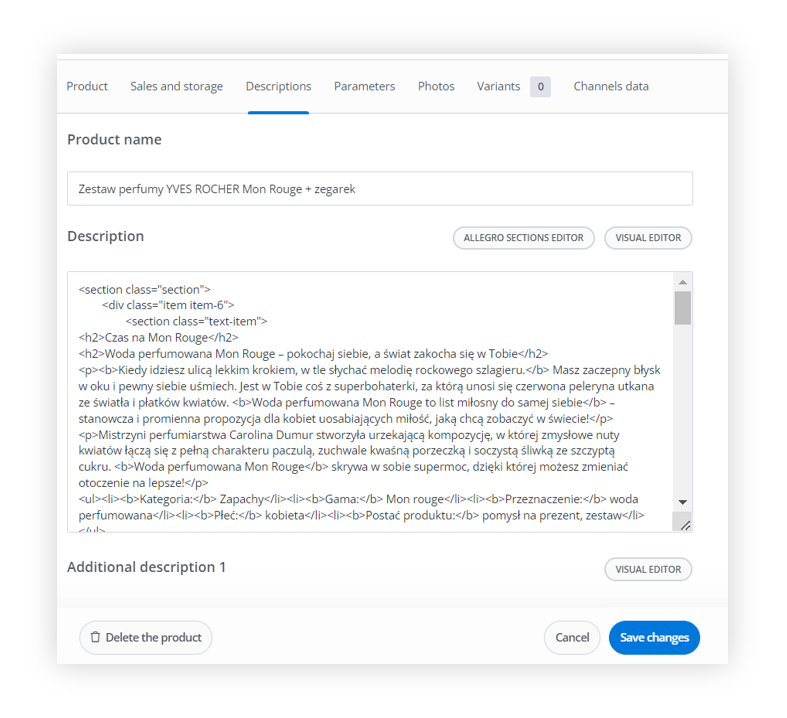 |
| *Visualization of the BaseLinker product edit description* |
| 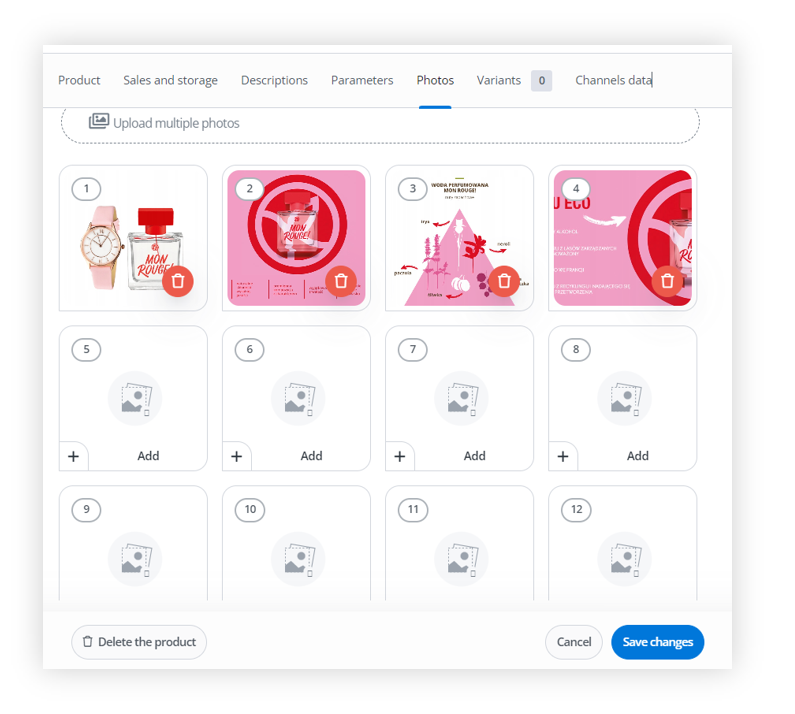 |
| *Visualization of the BaseLinker product edit photos* |
| 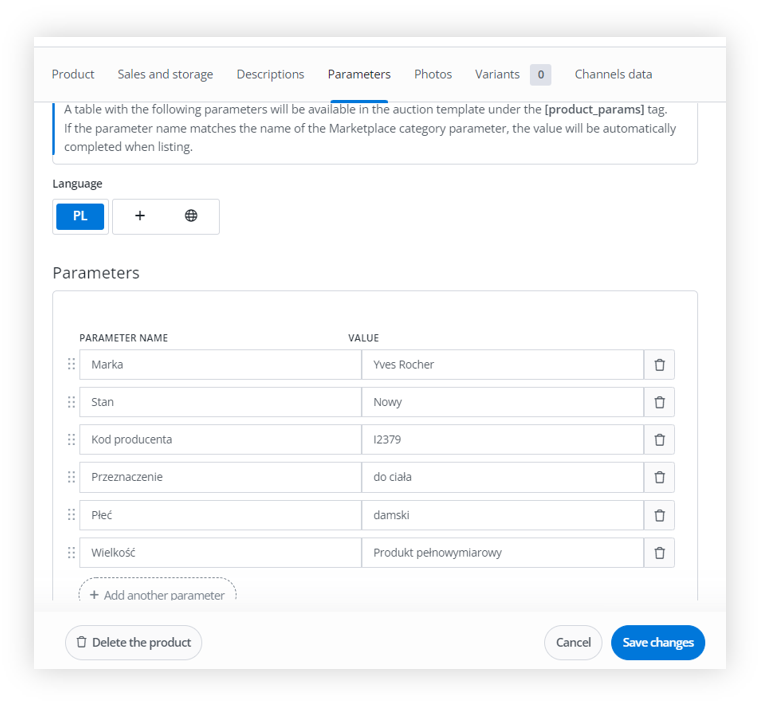 |
| *Visualization of the BaseLinker product edit parameters* |
|  |
| *Visualization of the BaseLinker orders tab* |
| 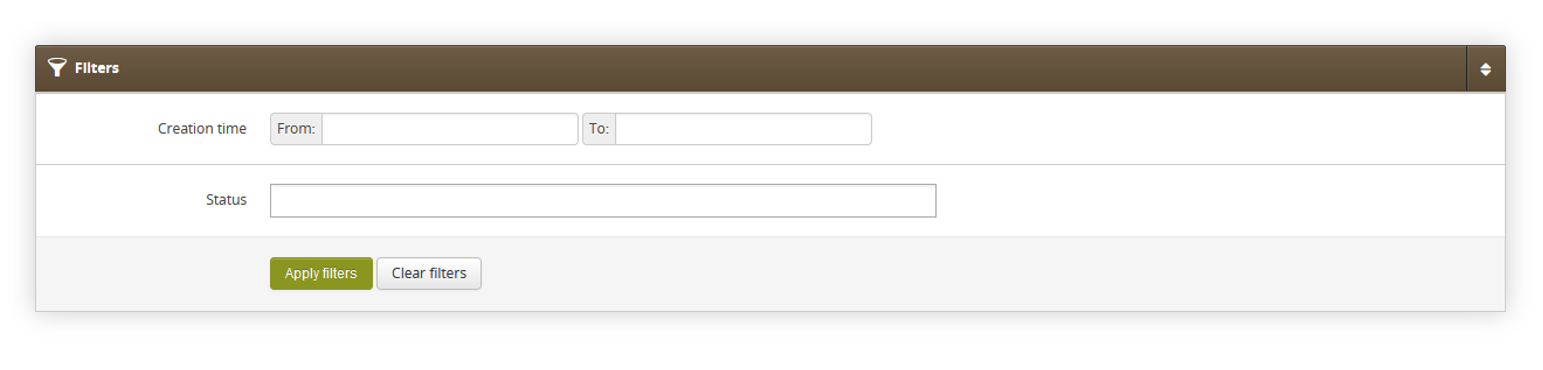 |
| *Visualization of the filters tab in the BaseLinker page* |
| 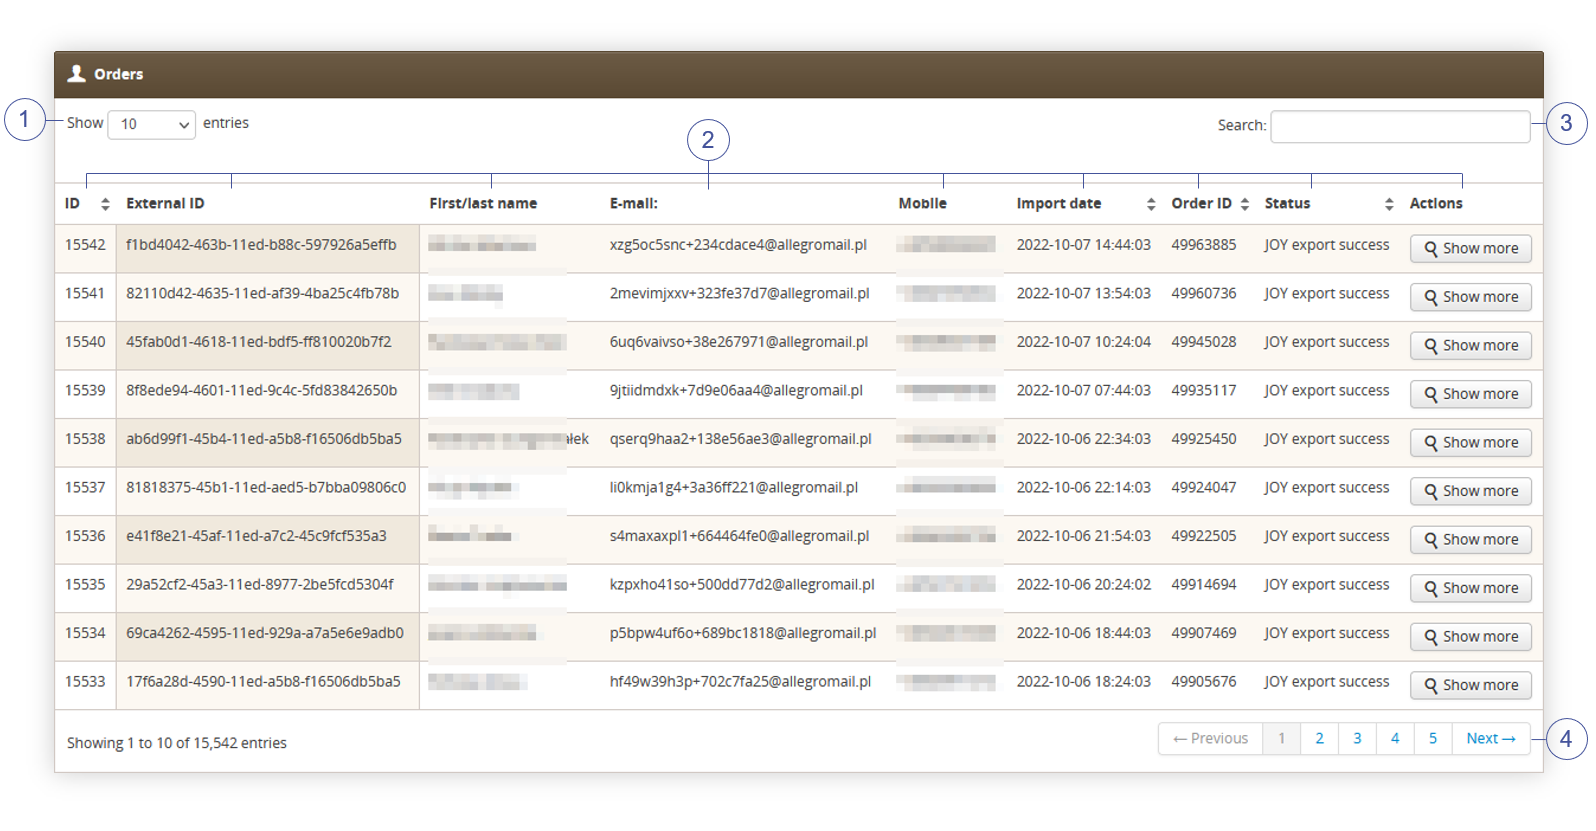 |
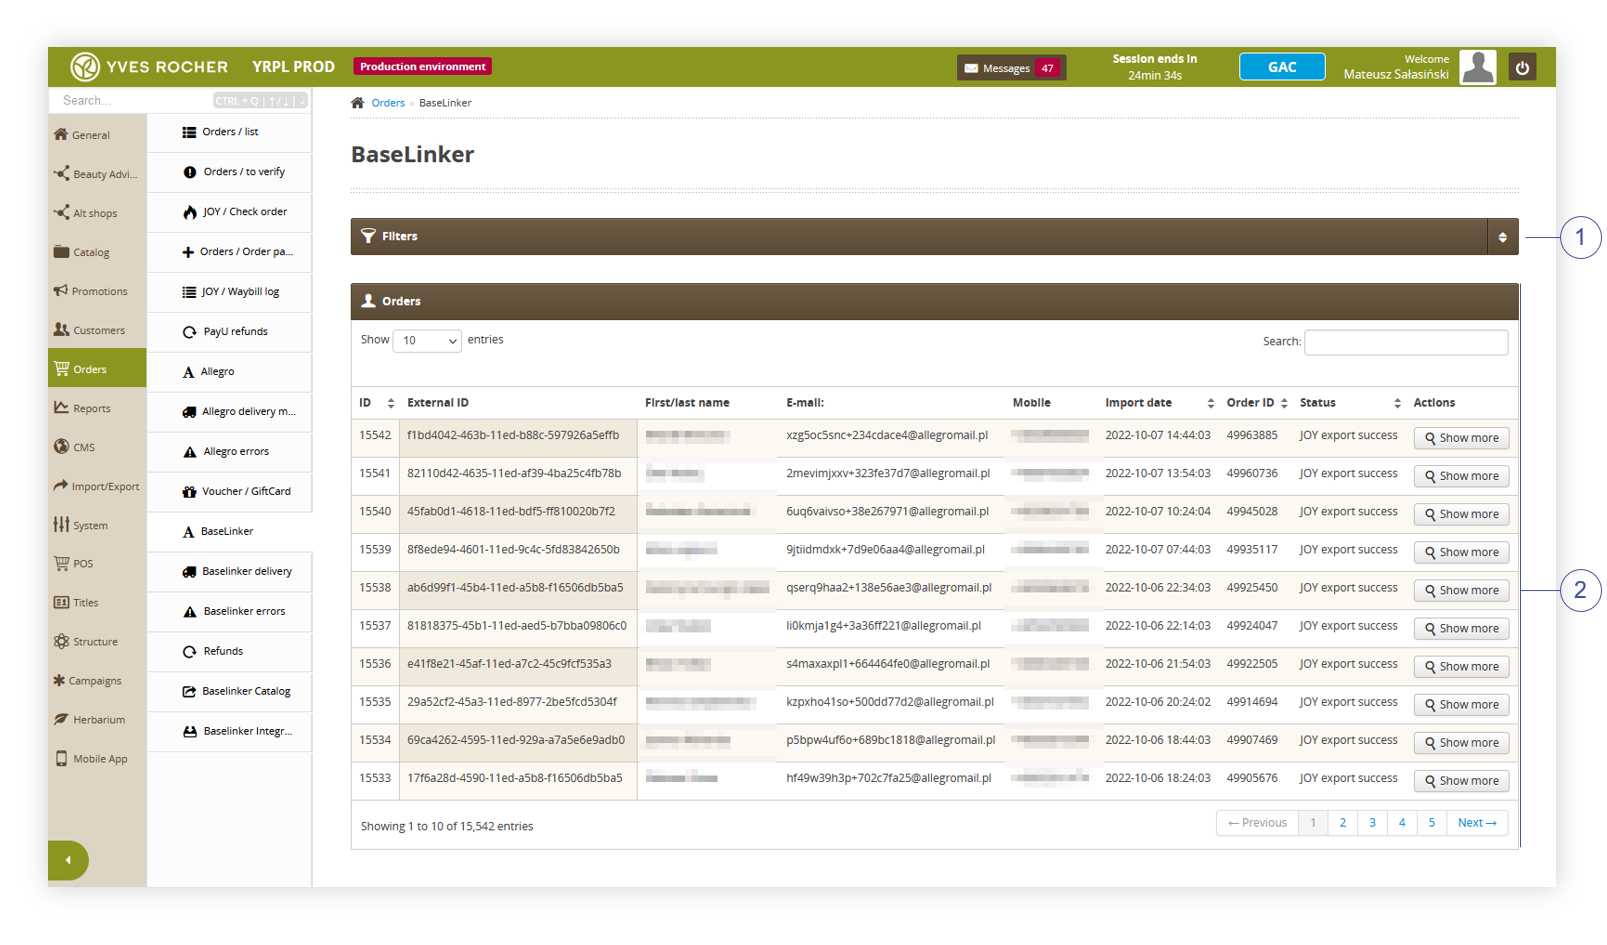
| *Visualization of the orders tab in the BaseLinker orders page* |
| 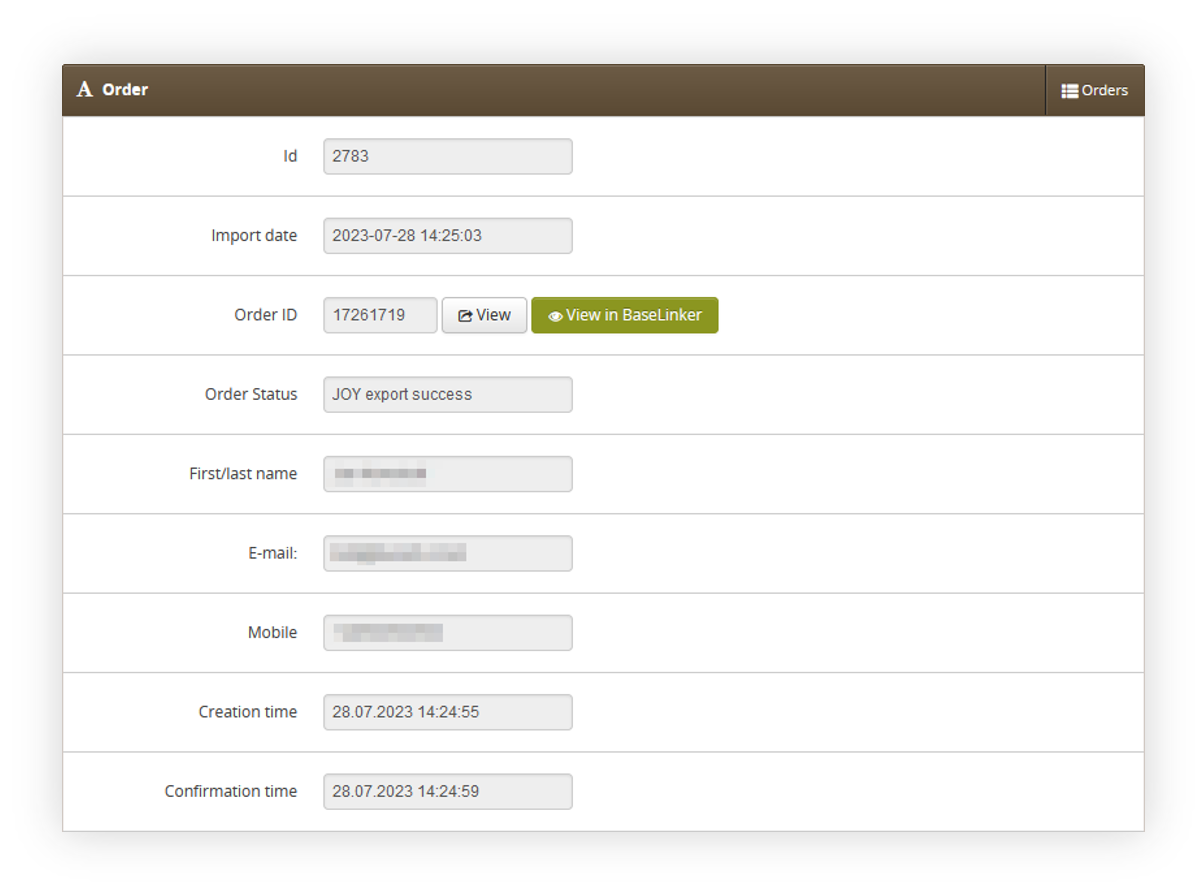 |
| *Visualization of the order tab* |
|  |
| *Visualization of the delivery address tab* |
| 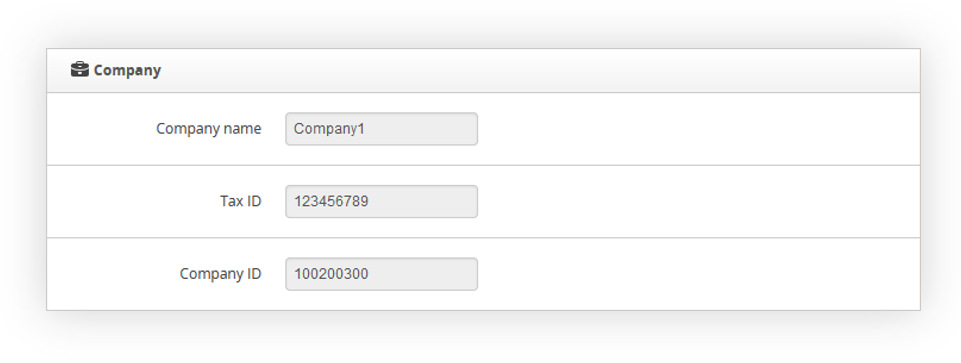 |
| *Visualization of the Company tab* |
| 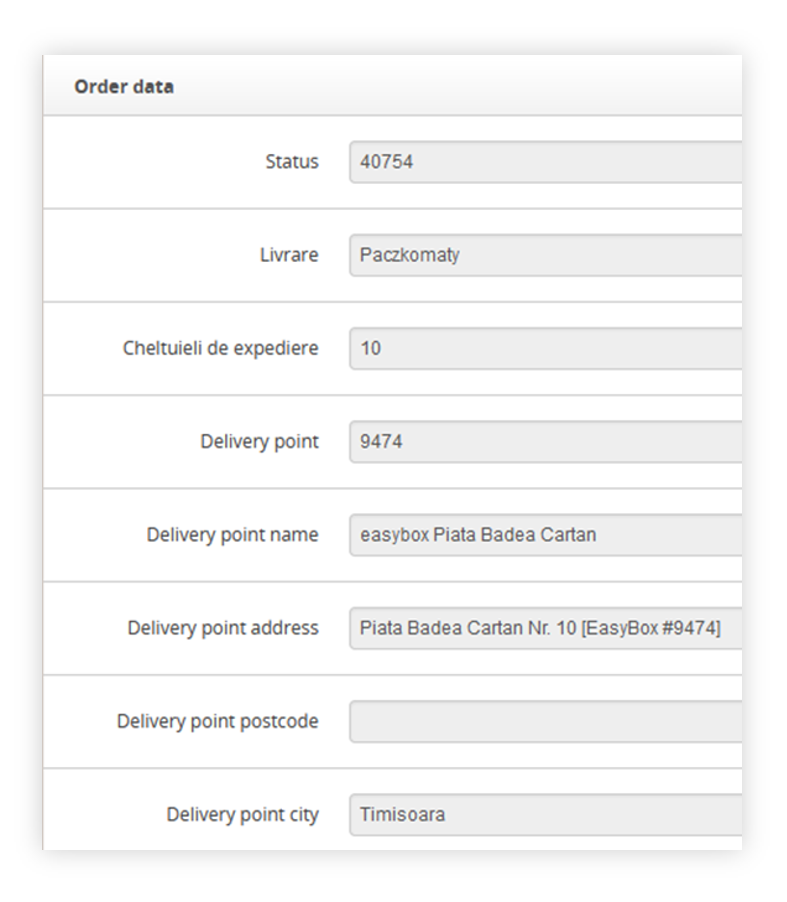 |
| *Visualization of the order data tab* |
| 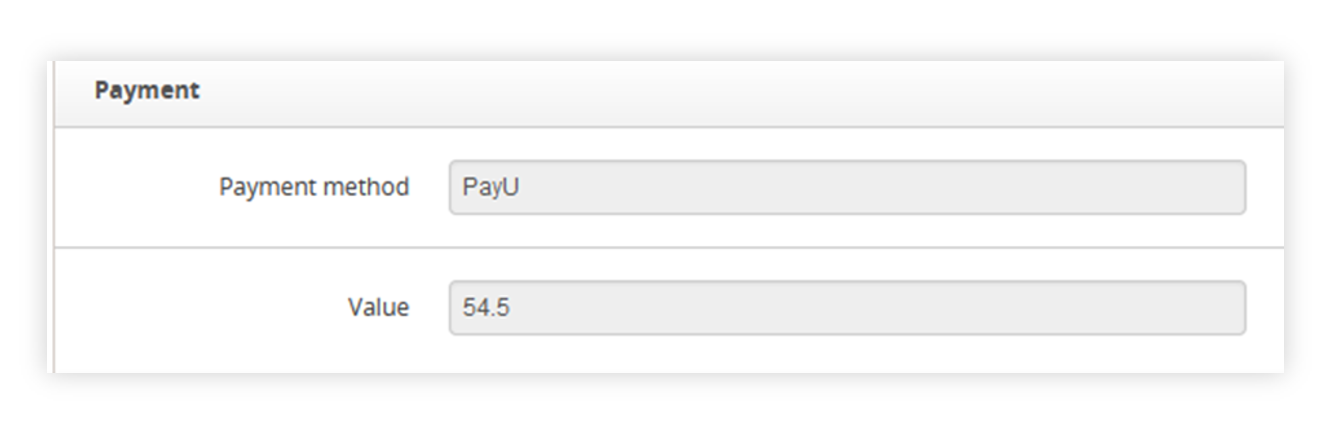 |
| *Visualization of the payment tab* |
| 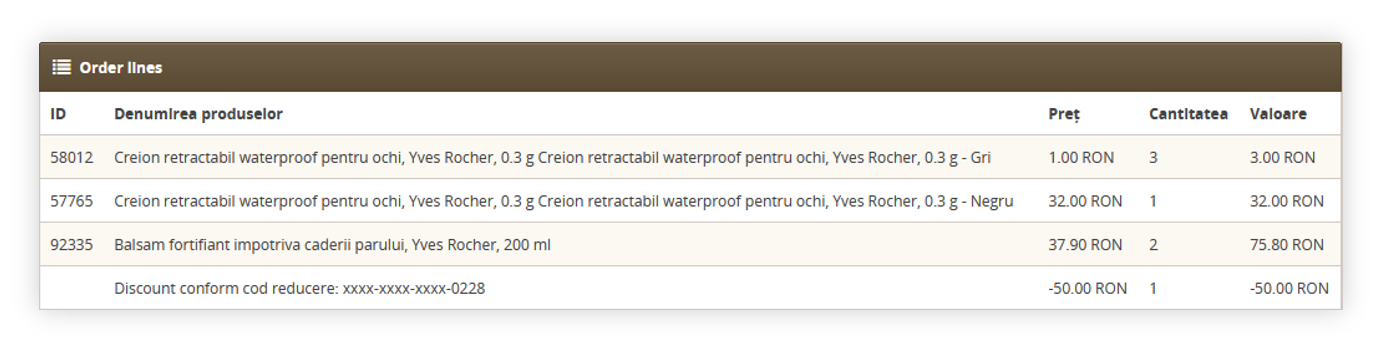 |
| *Visualization of the order lines tab* |
| 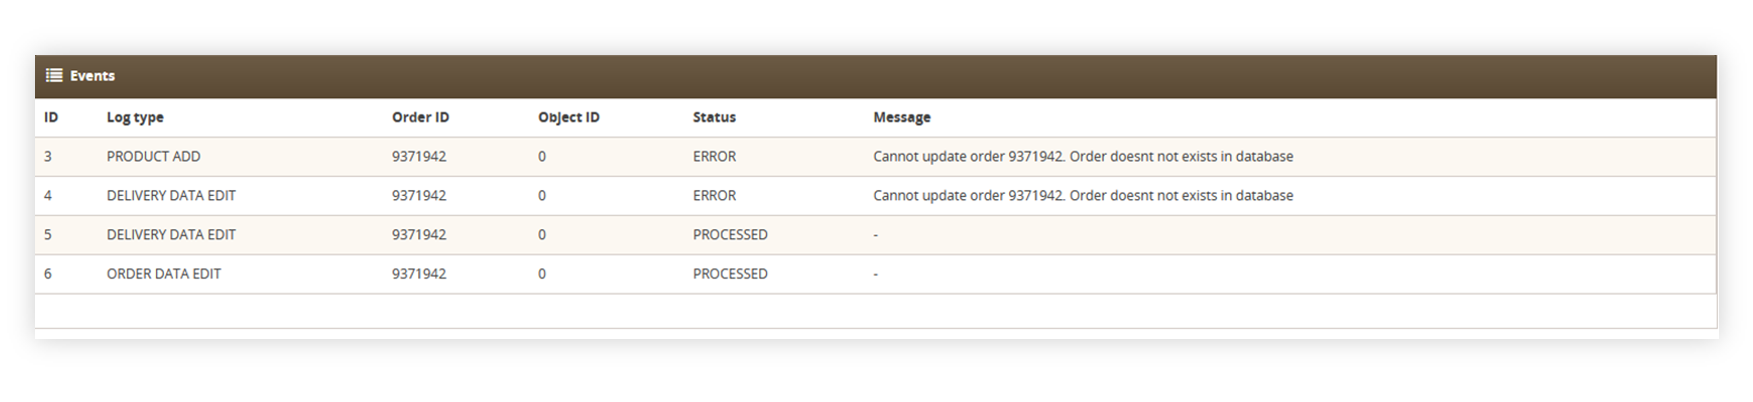 |
| *Visualization of the events tab* |
|  |
| *Visualization of the Baselinker categories section* |
| 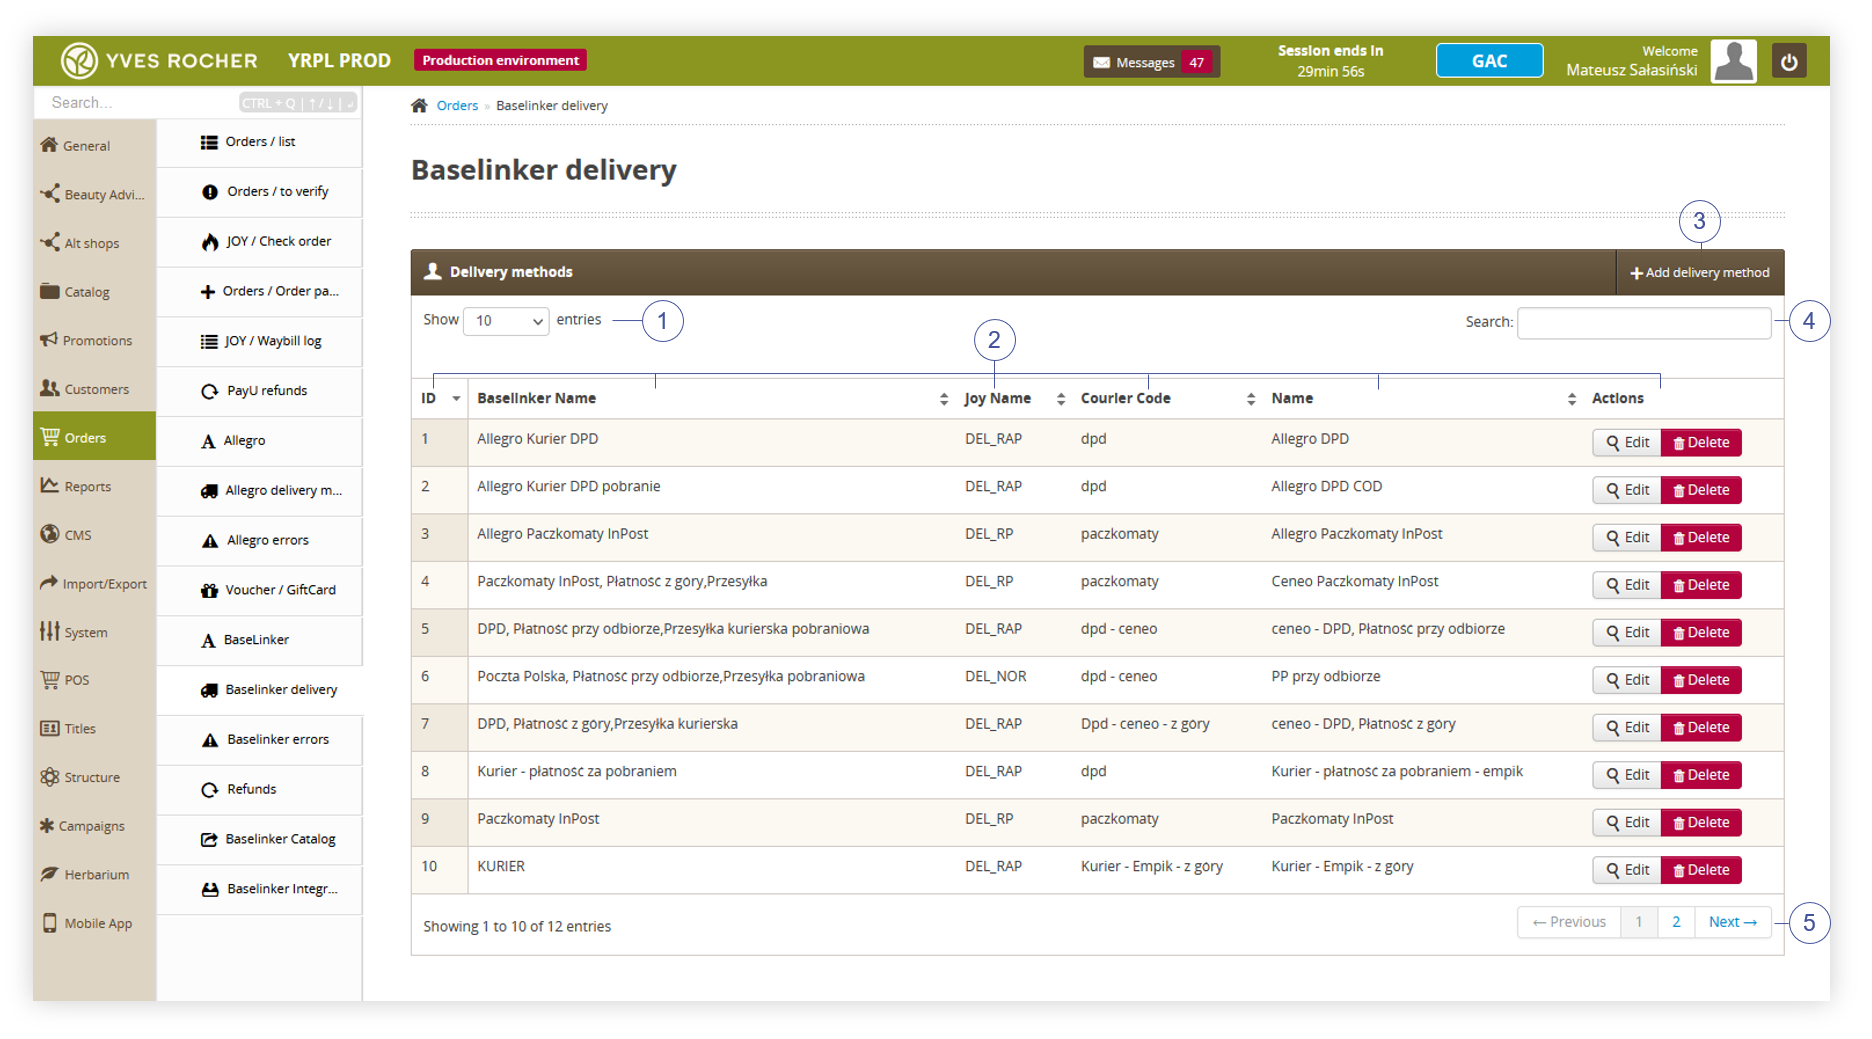 |
| *Visualization of the BaseLinker delivery tab* |
| 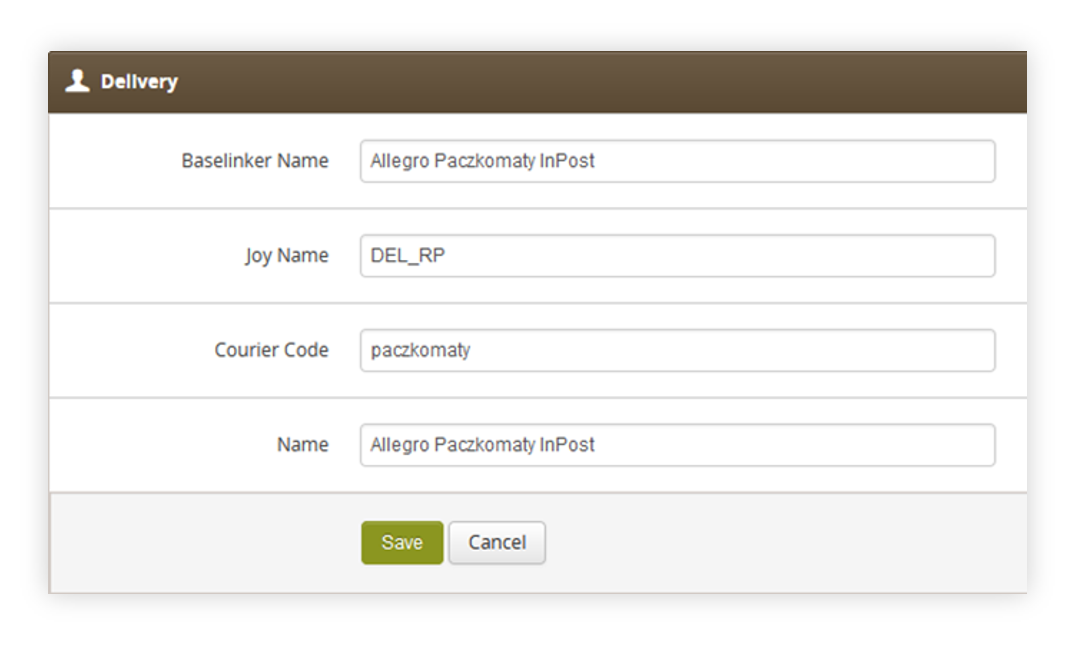 |
| *Visualization of the adding of the new delivery method* |
|  |
| *Visualization of the BaseLinker campaign codes tab* |
| 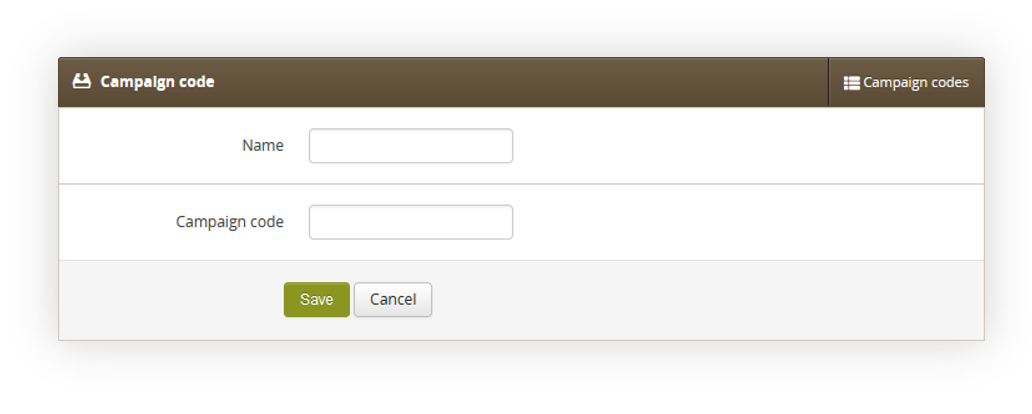 |
| *Visualization of the campaign code creation* |
| 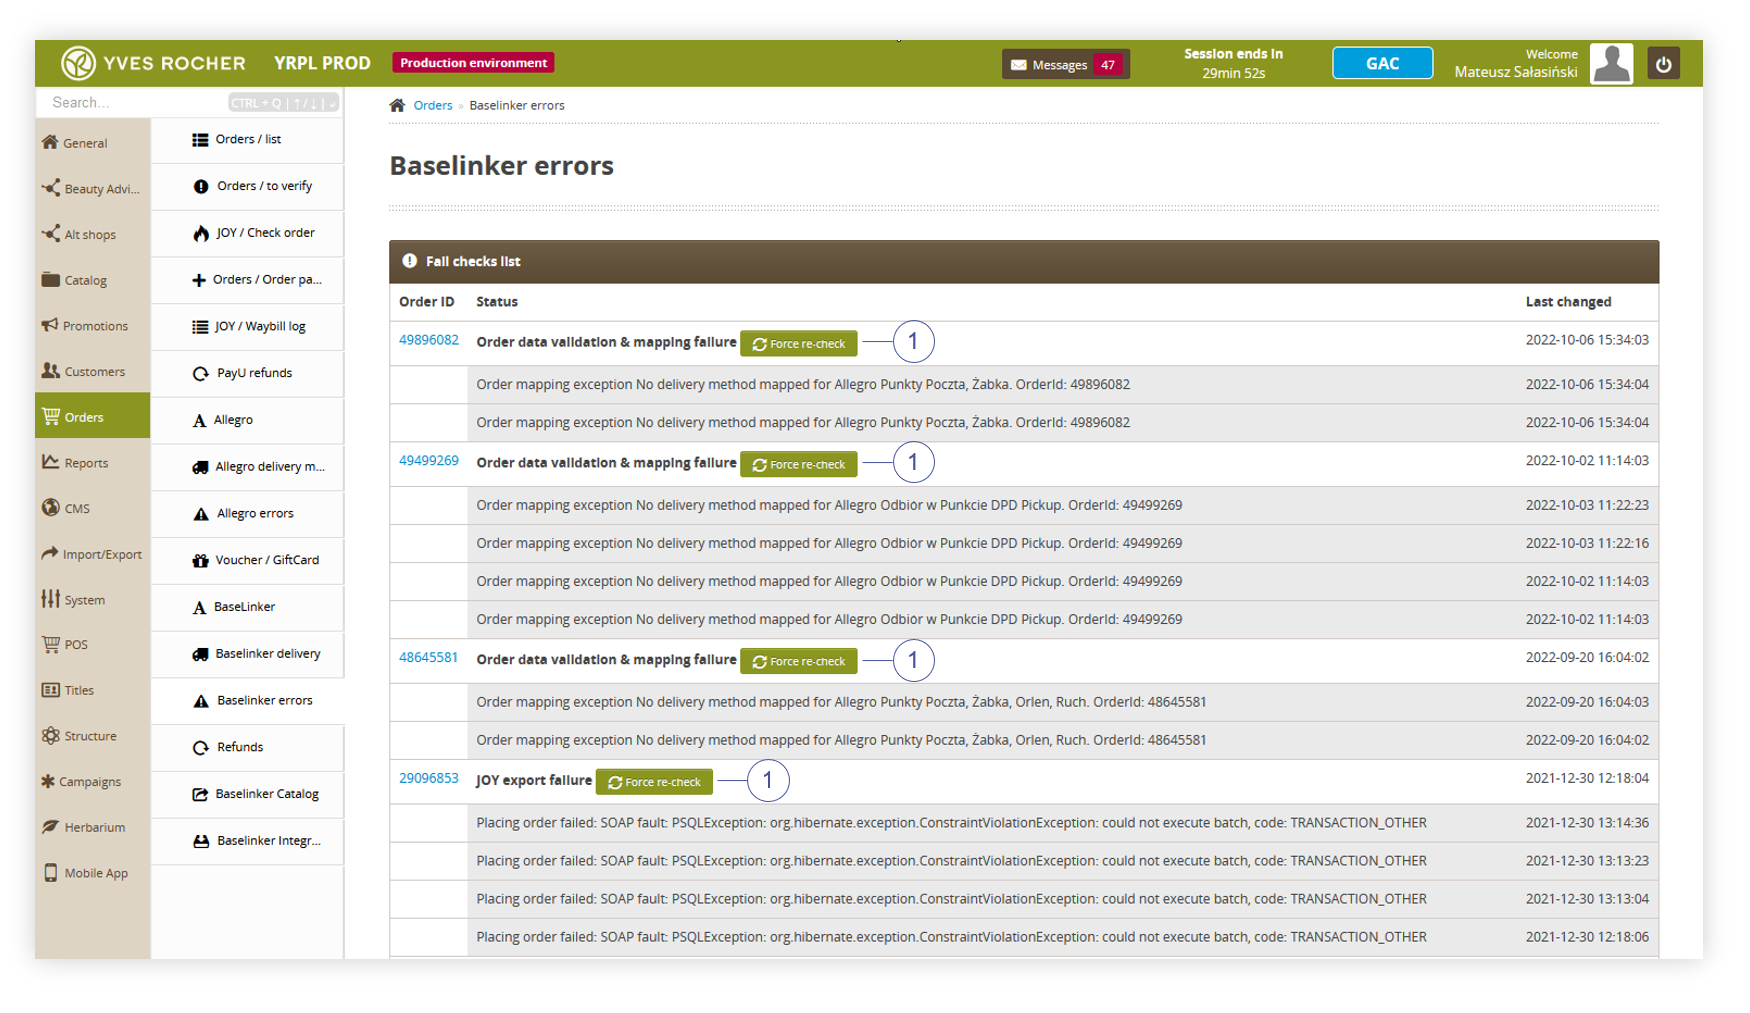 |
| *Visualization of the BaseLinker errors tab* |
|  |
| *Visualization of the Allegro orders tab* |
|  |
| *Visualization of the order tab in the order details* |
|  |
| *Visualization of the Customer data and Delivery address tabs in the order details* |
| 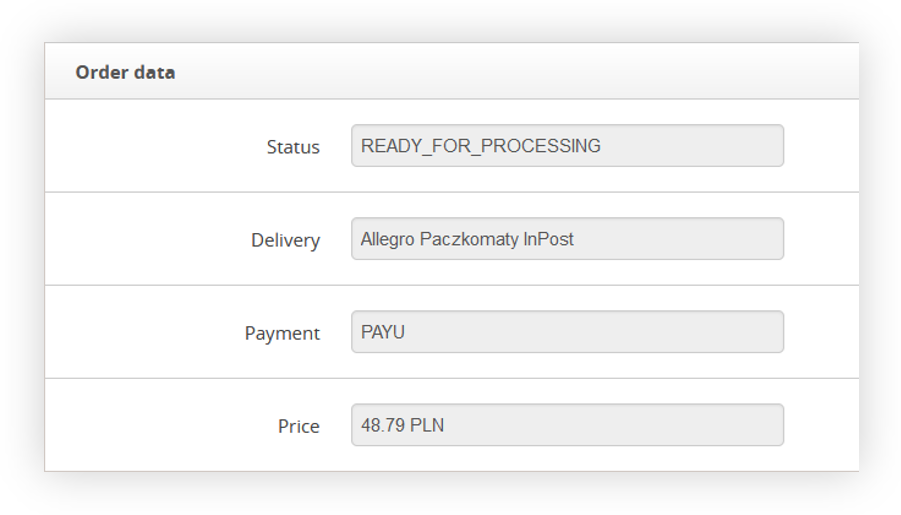 |
| *Visualization of the Order data tab in the order details* |
| 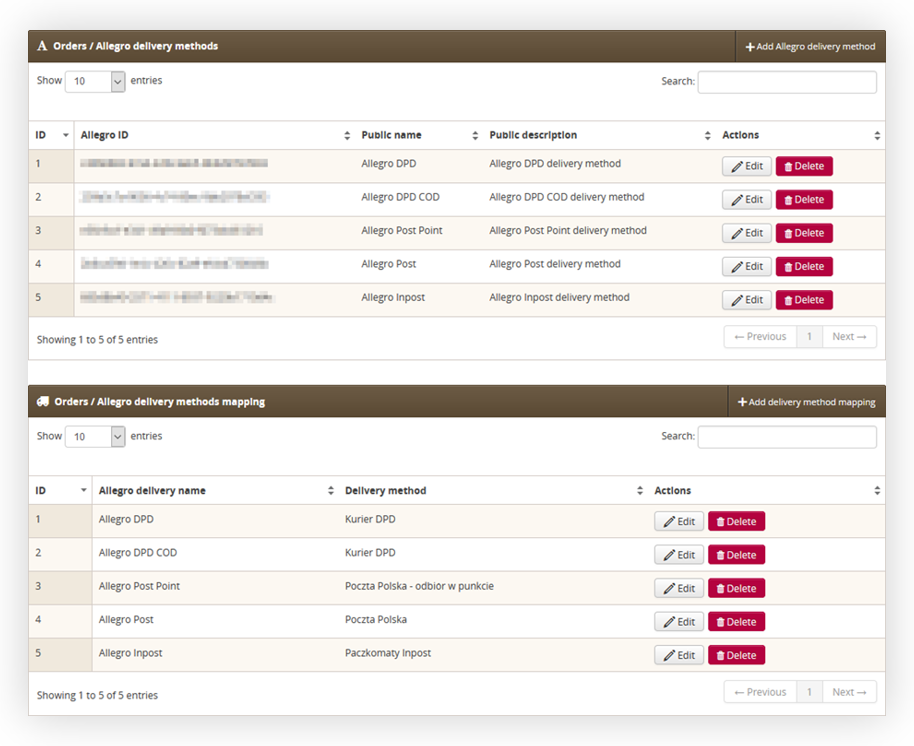 |
| *Visualization of the Allegro delivery method page* |
| 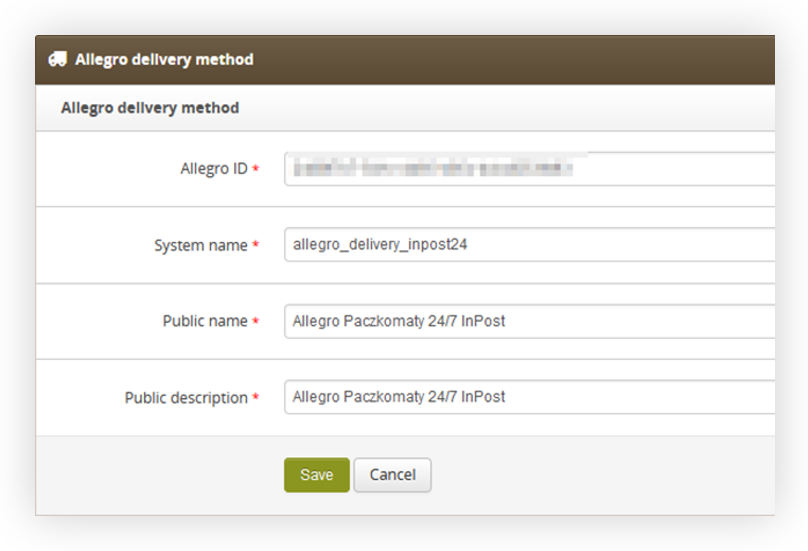 |
| *Visualization of the adding new Allegro delivery method* |
| 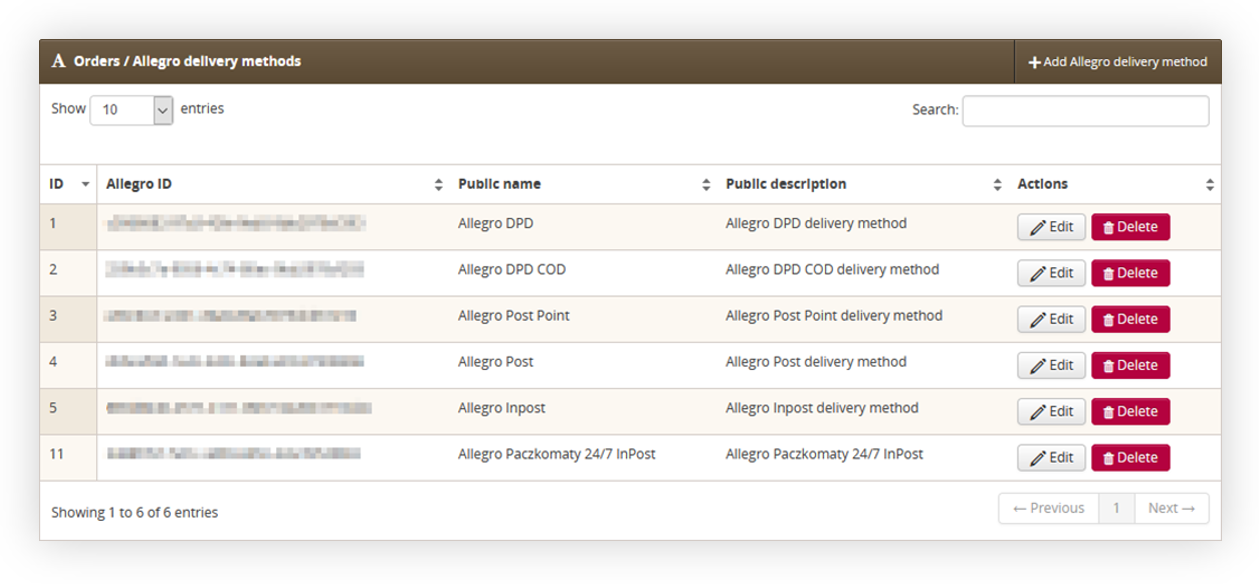 |
| *Visualization of the added Inpost24 delivery method* |
|  |
| *Visualization of the mapping delivery method* |
|  |
| *Visualization of the mapped delivery method* |
| 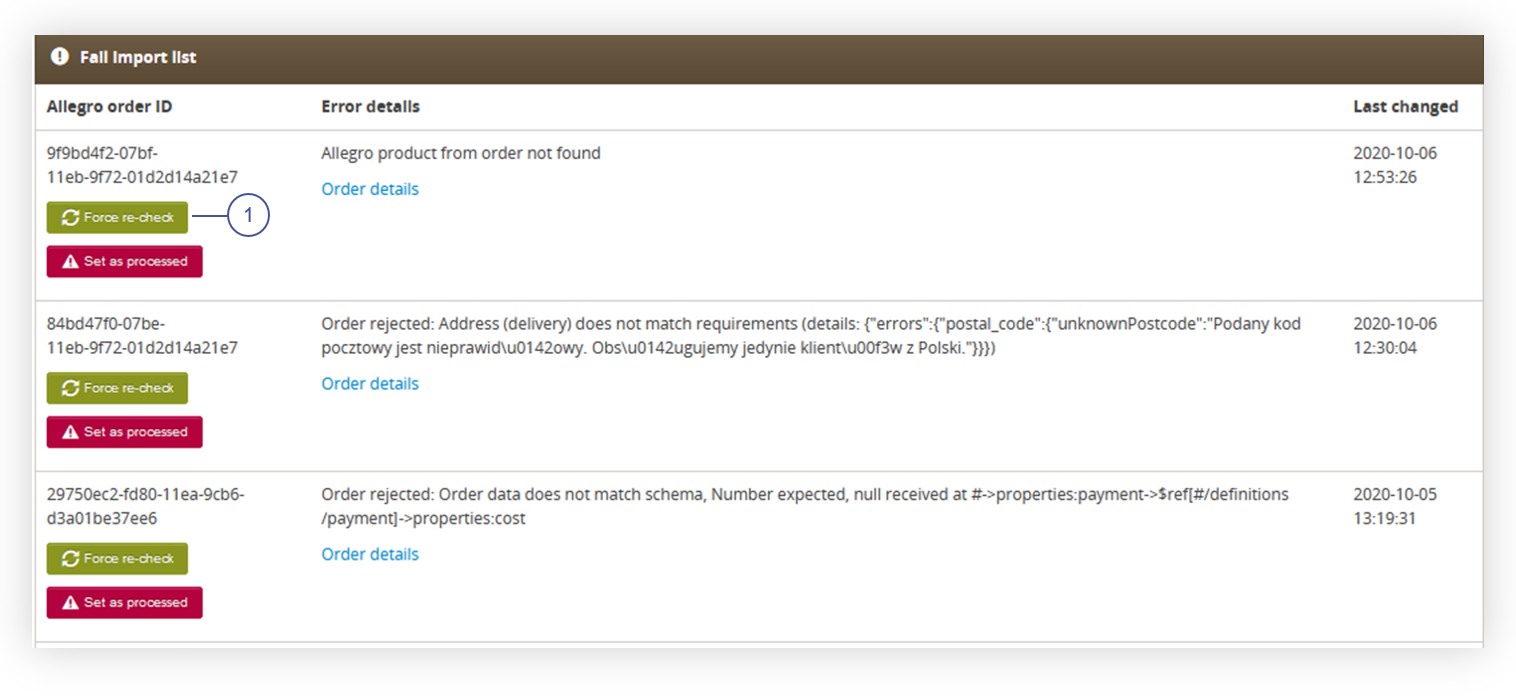 |
| *Visualization of the Allegro errors tab* |