| 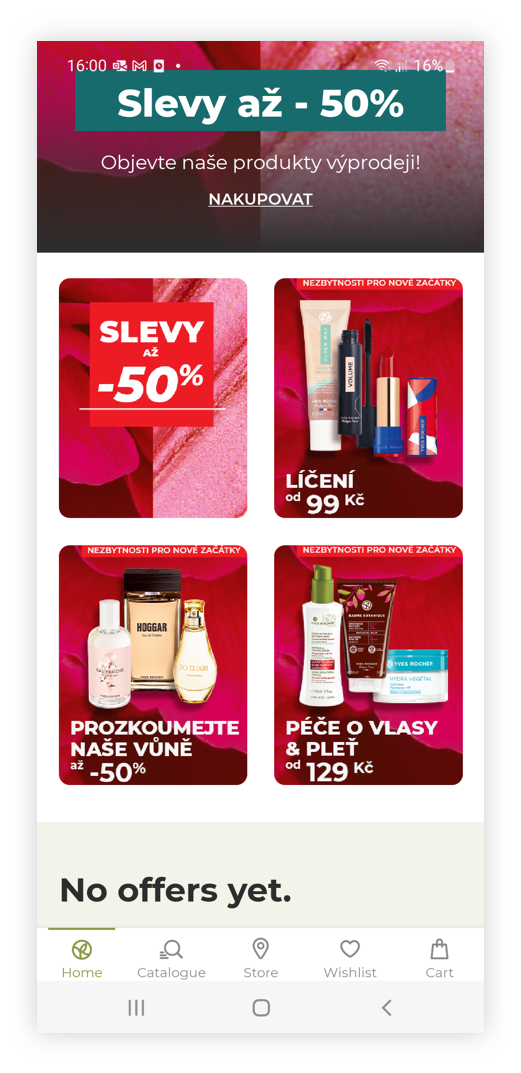 |
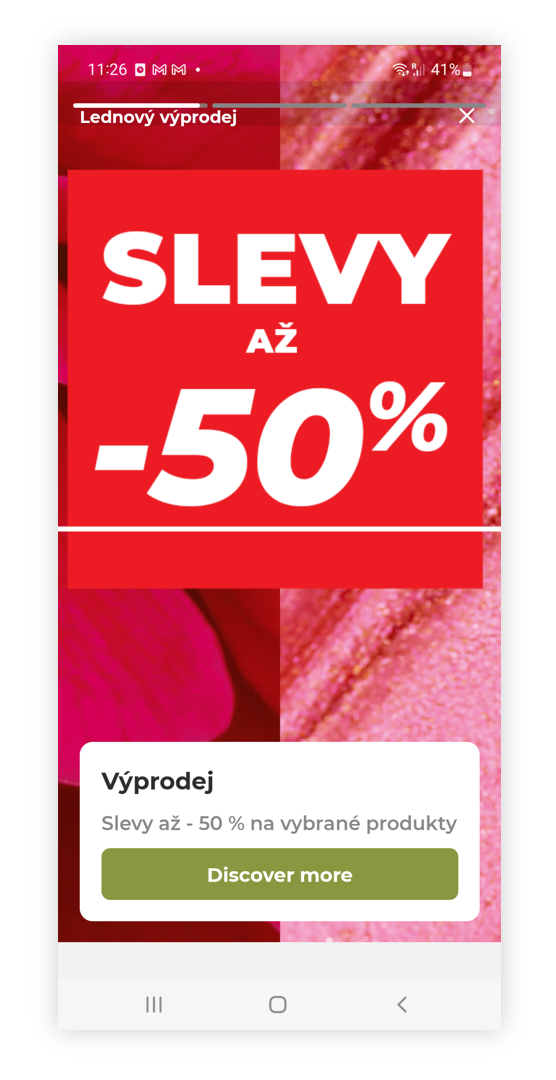
| *Visualization of the sub campaign on the mobile app* |
|  |
| *Visualization of the sub campaign sub-category* |
| 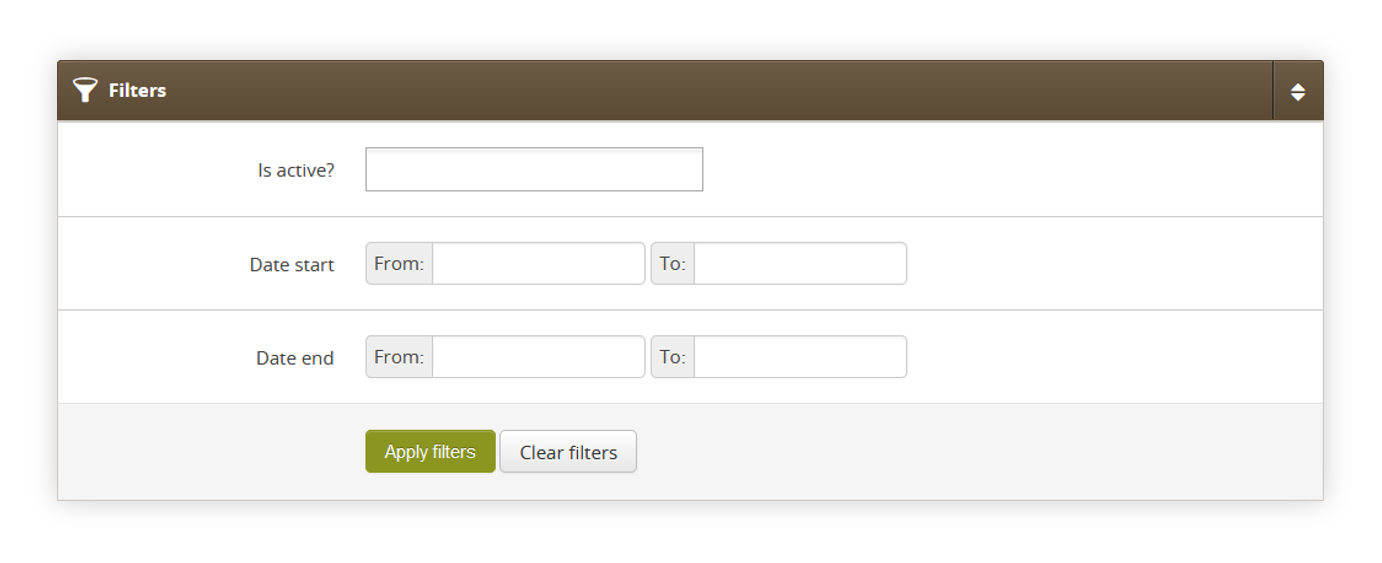 |
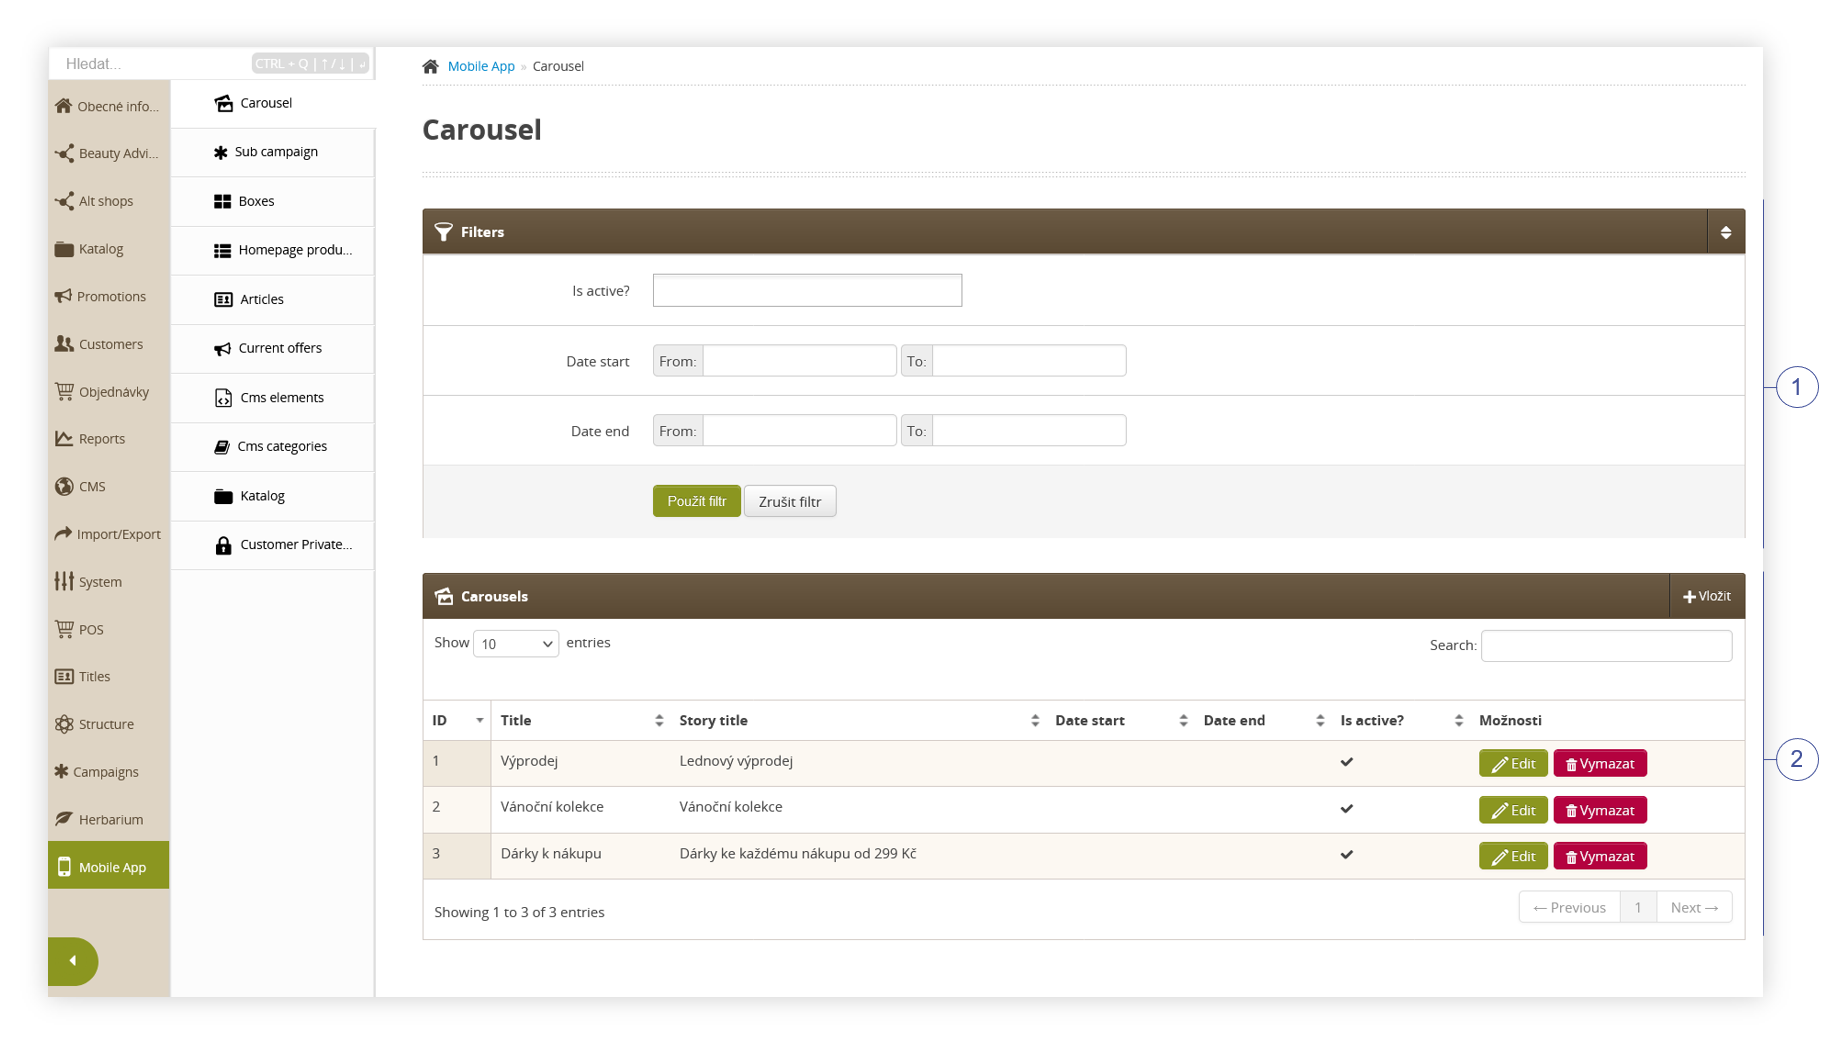
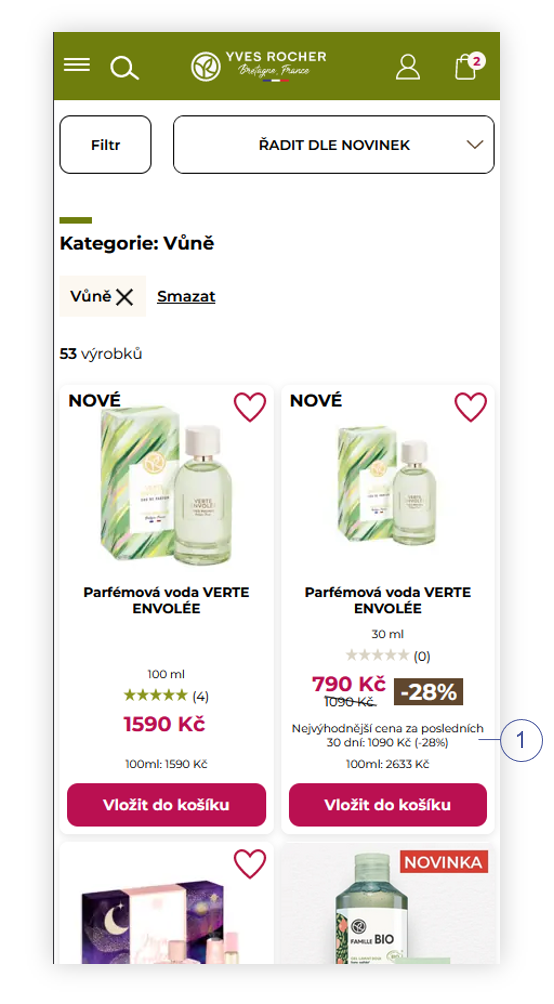
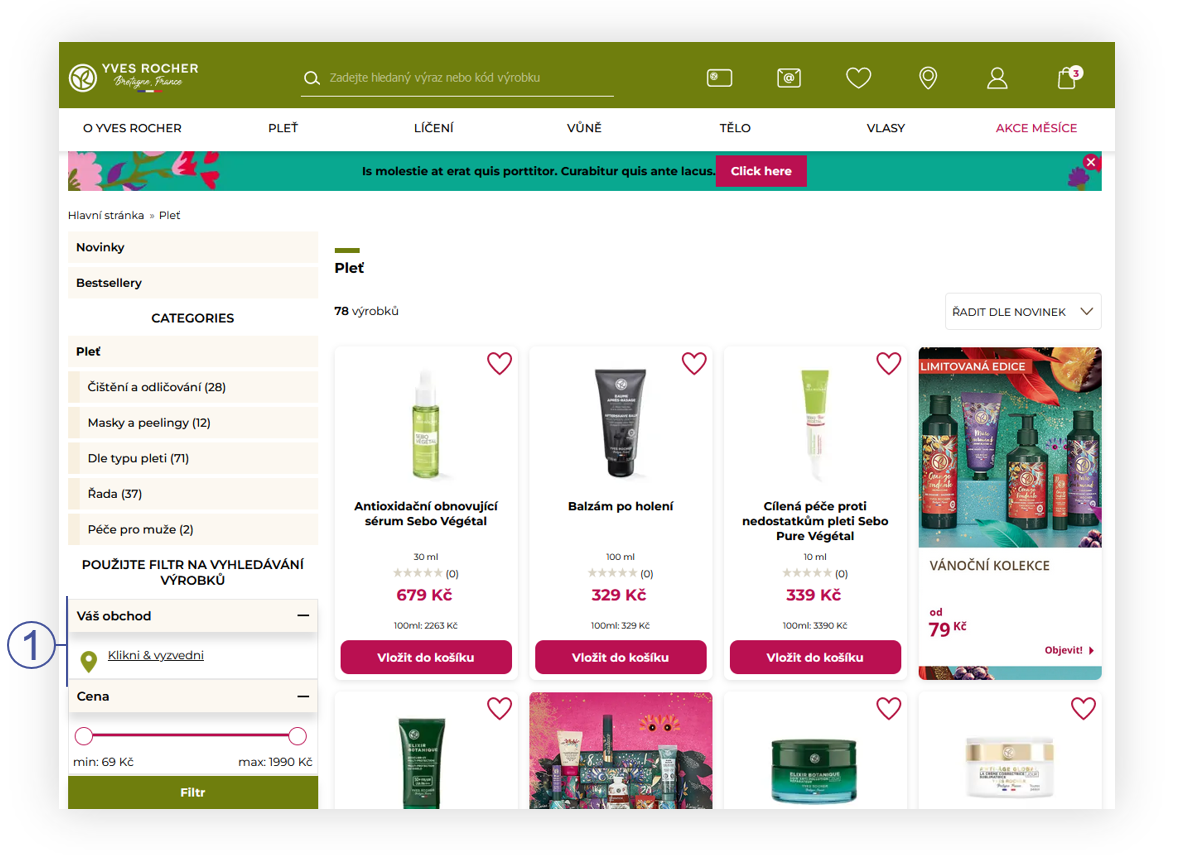
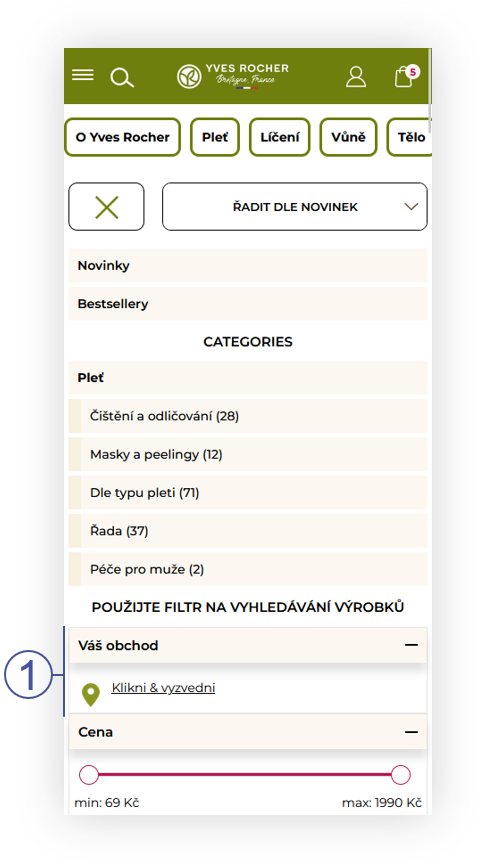
| *Visualization of the filters section* |
| 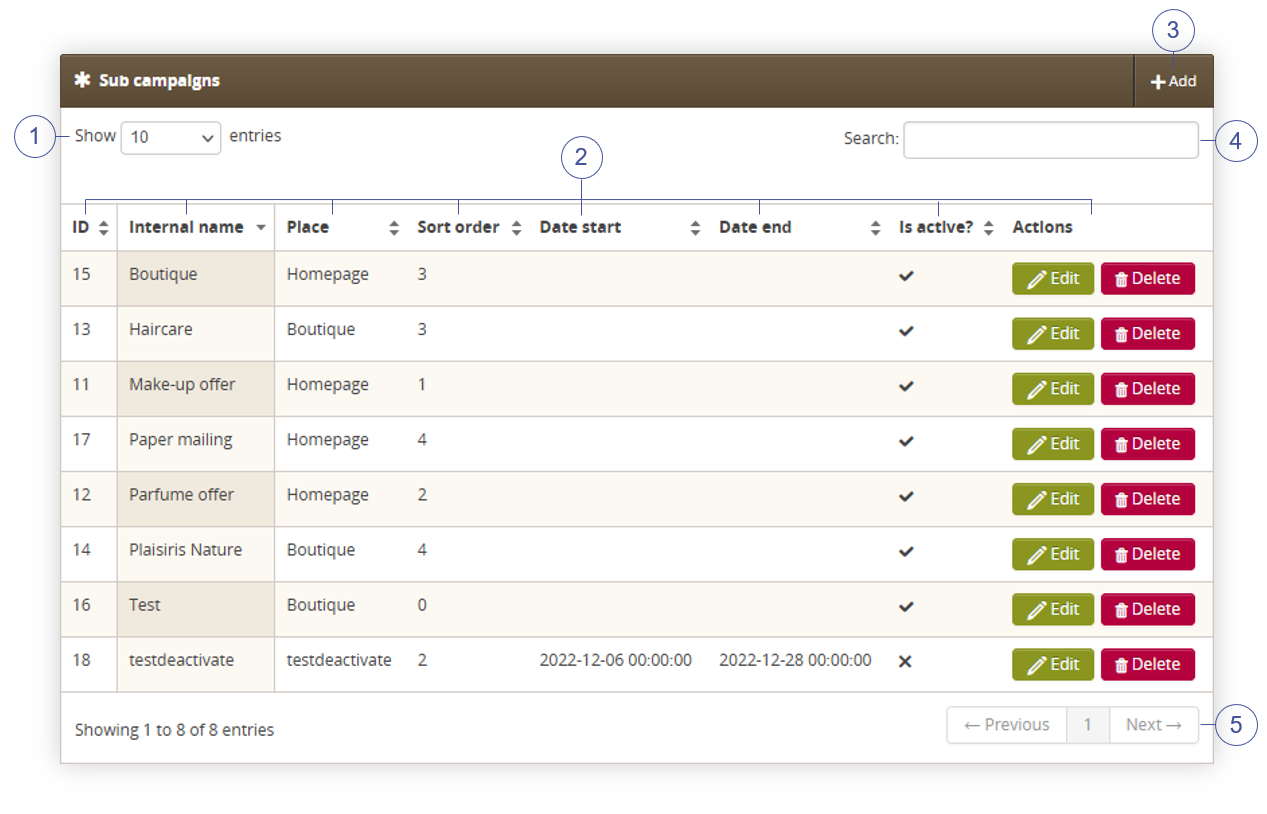 |
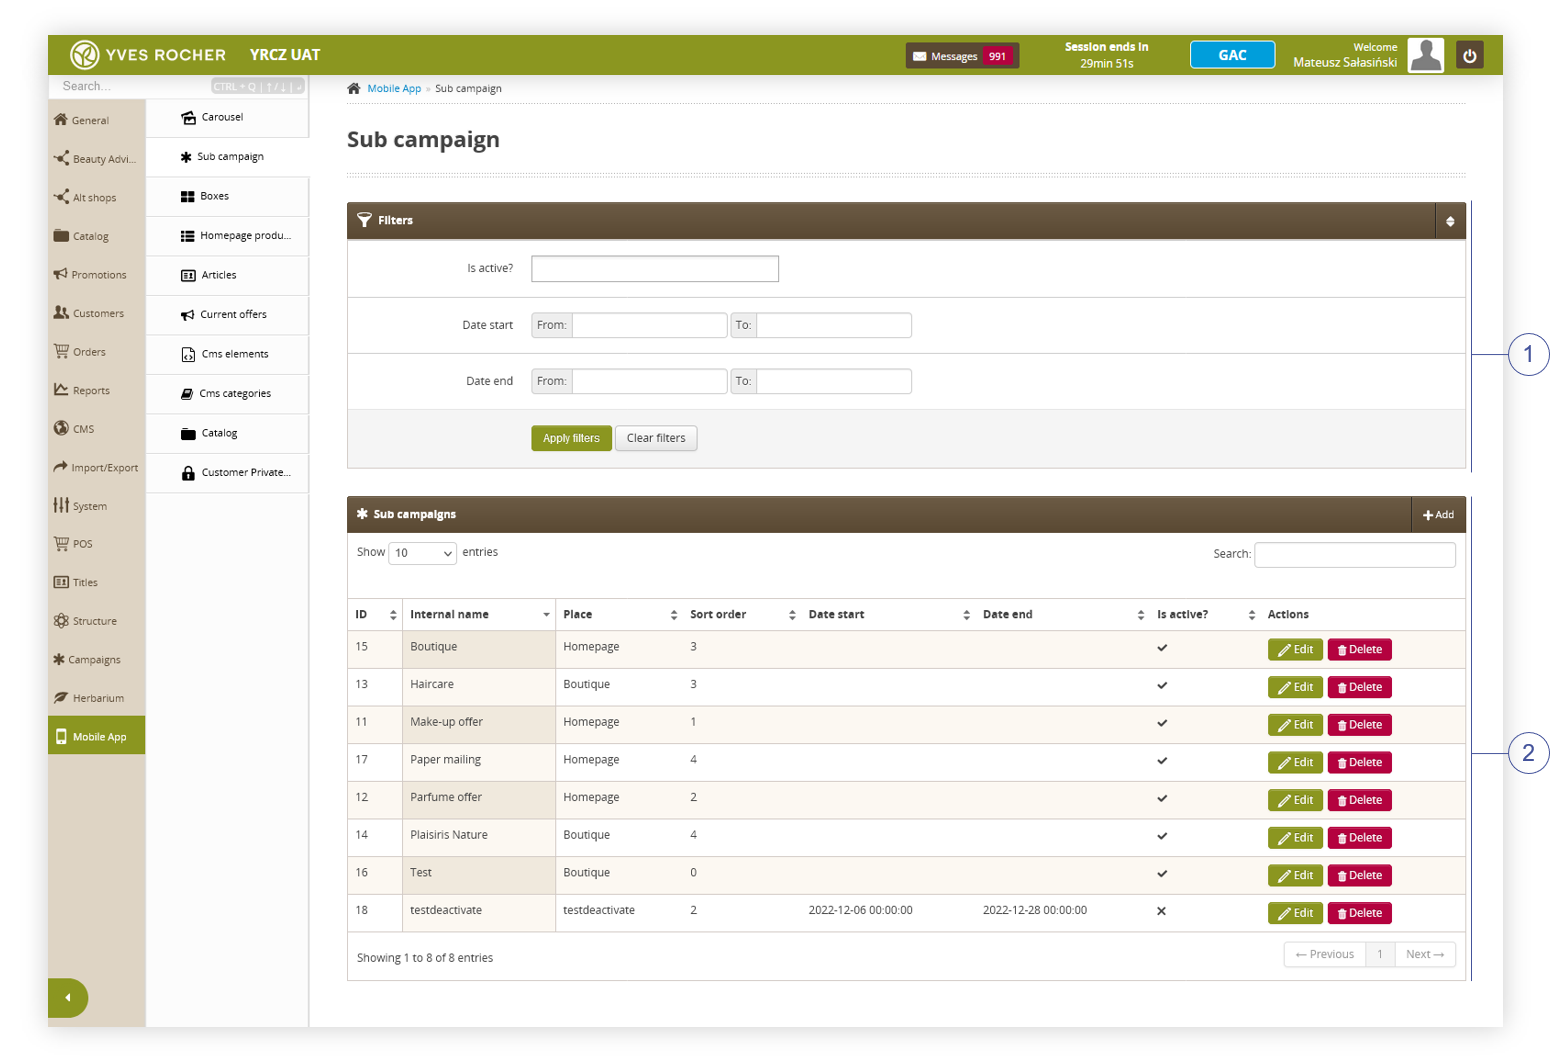
| *Visualization of the sub campaign section* |
| 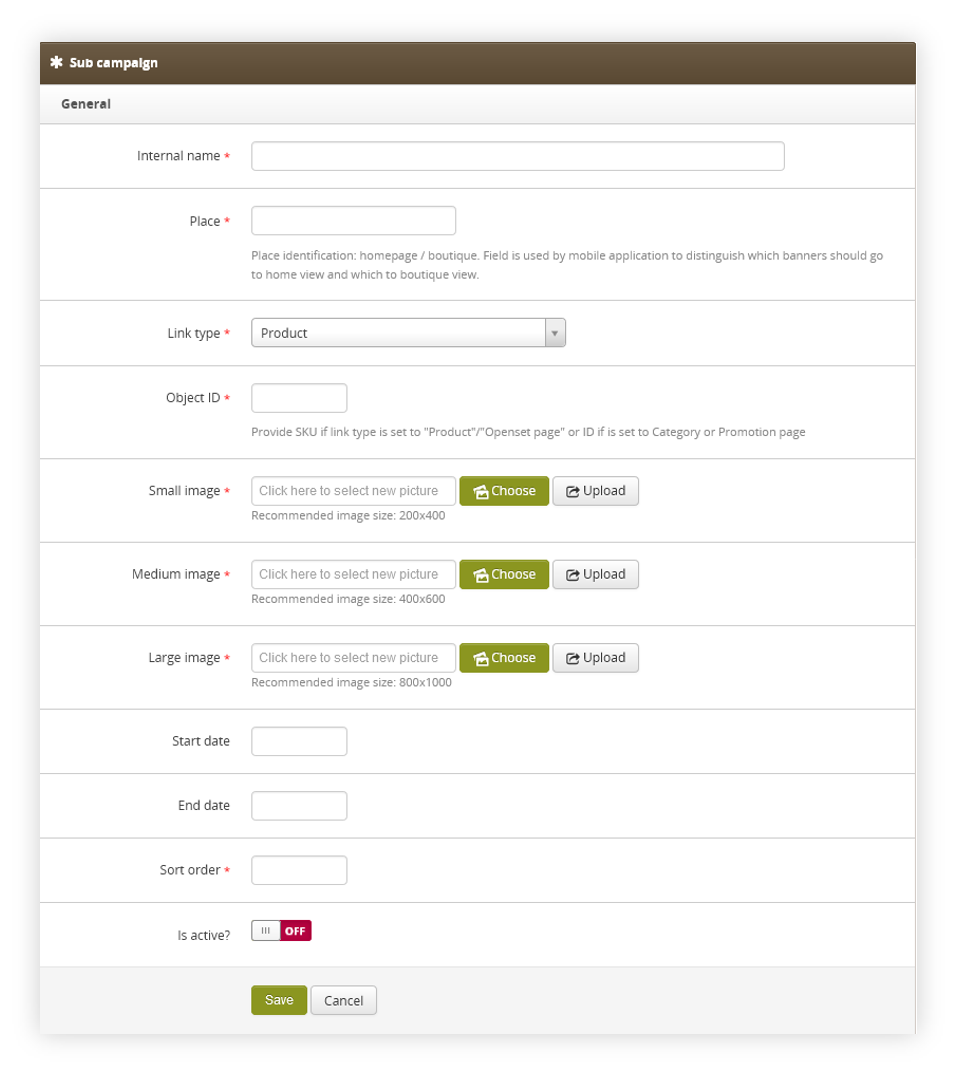 |
| *Visualization of the creating the sub campaign* |
|  |
| *Visualization of the carousel story on the mobile app* |
|  |
| *Visualization of the carousel sub-category* |
|  |
| *Visualization of the filters section* |
| 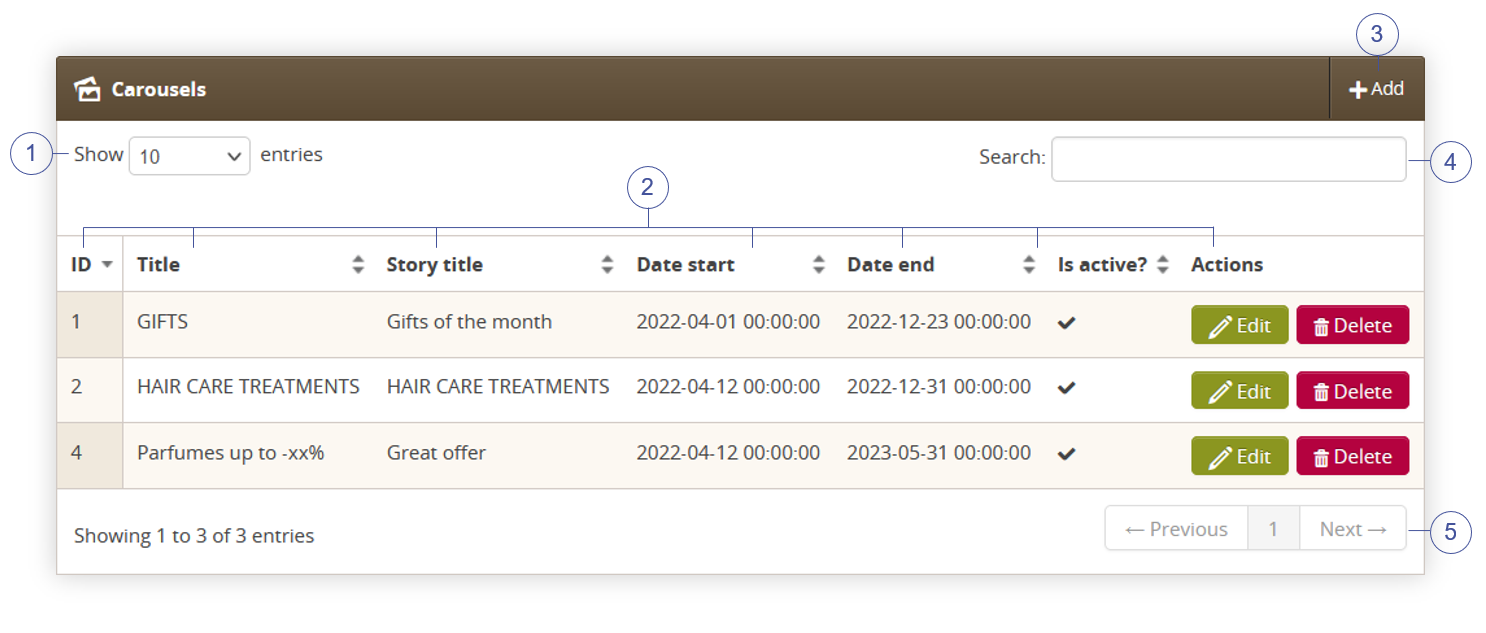 |
| *Visualization of the carousel section* |
| 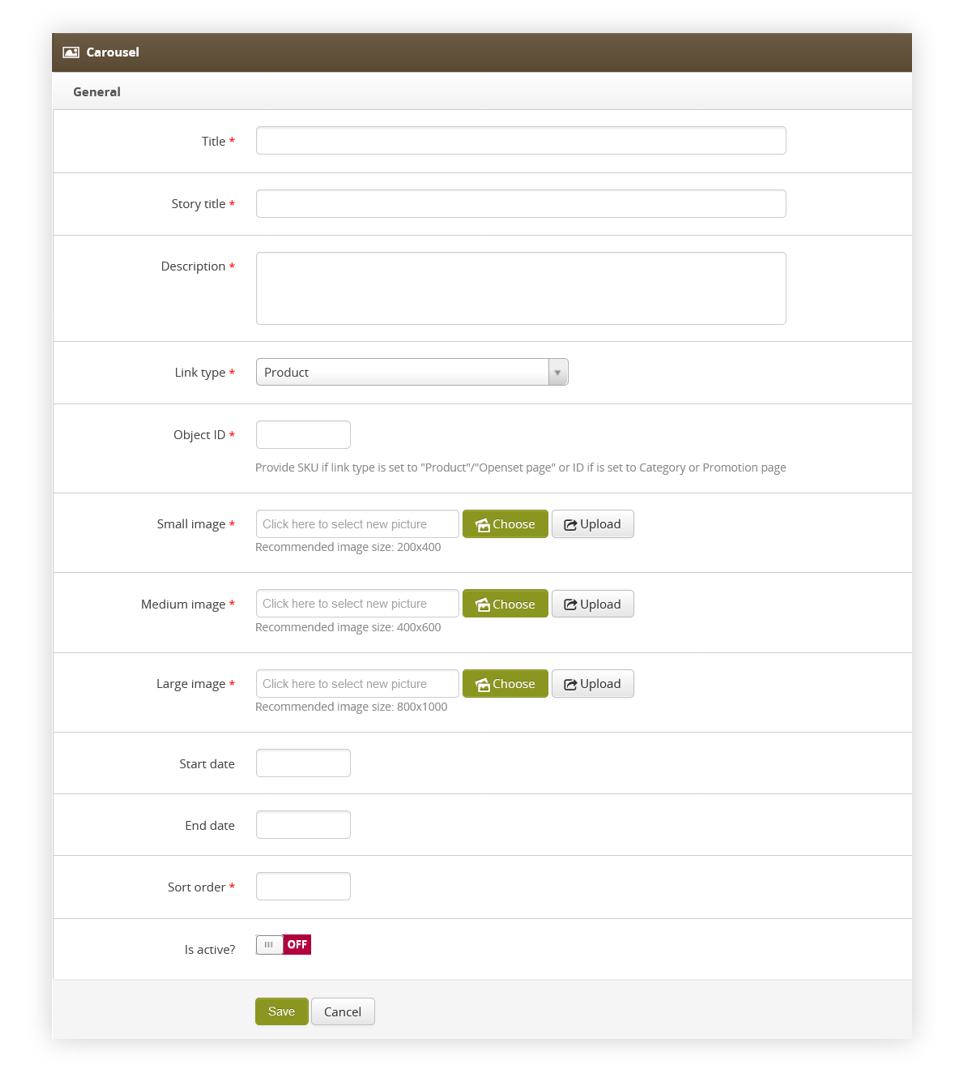 |
| *Visualization of the creating the carousel* |
| 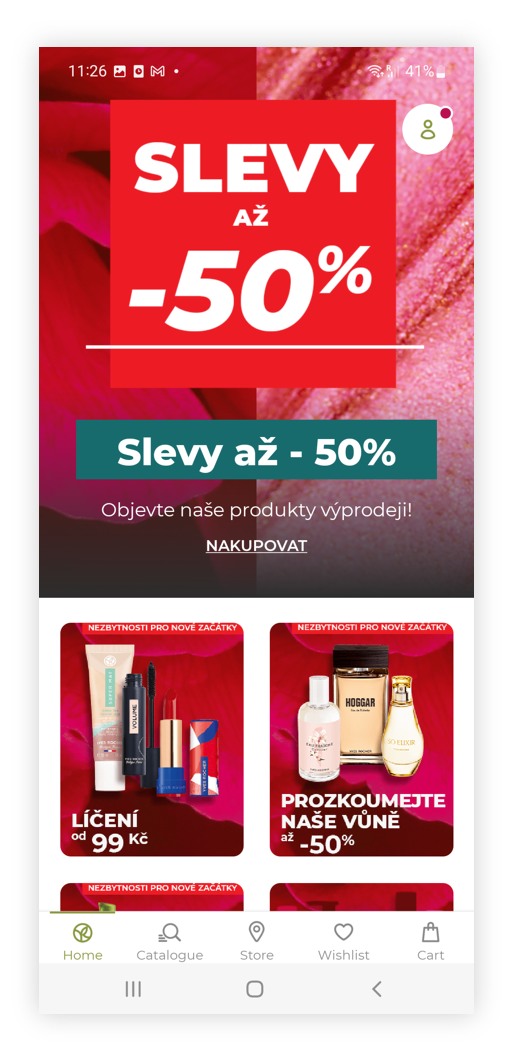 |
| *Visualization of the carousel on the mobile app* |
|  |
| *Visualization of the carousel story on the mobile app* |
|  |
| *Visualization of the promotional page* |
| 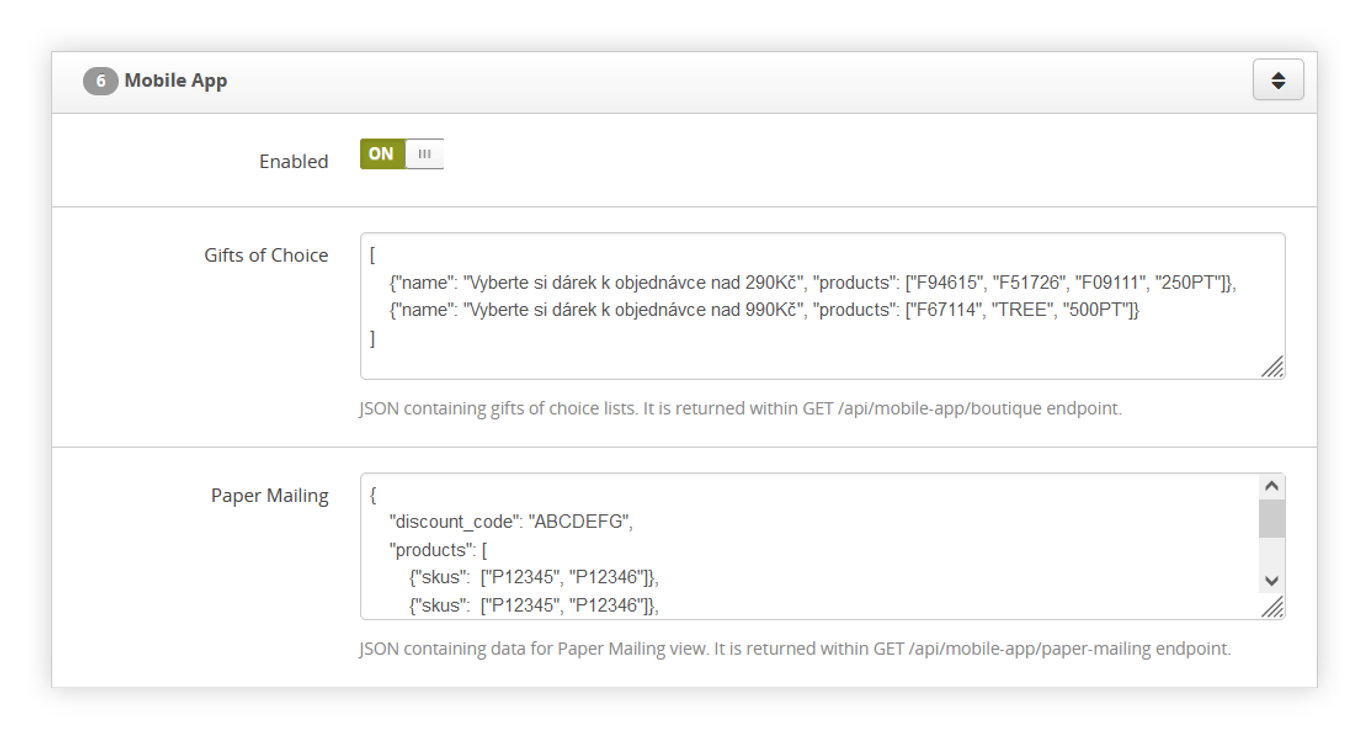 |
| *Visualization of the mobile app system settings* |
|  |
| *Visualization of the mobile app sub-categories* |
|  |
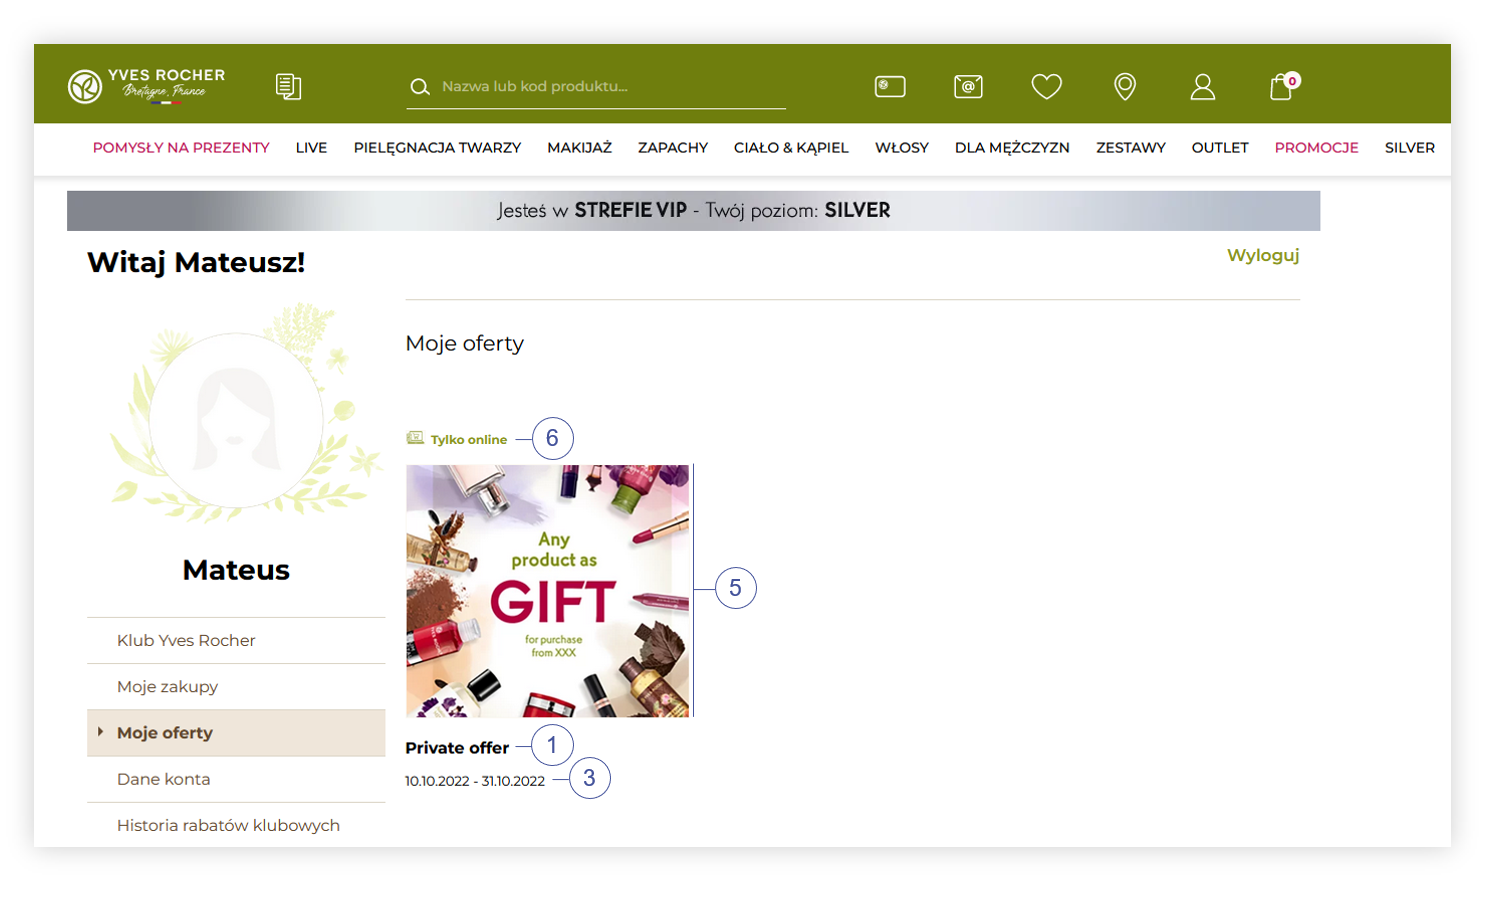
| *Visualization of the customer private offer in the customer panel (desktop)* |
| 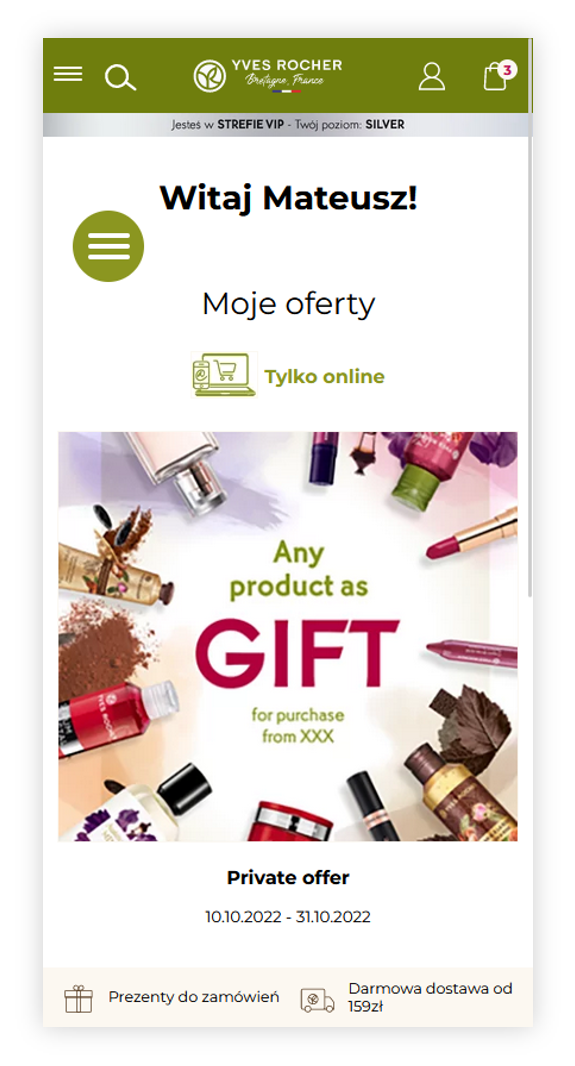 |
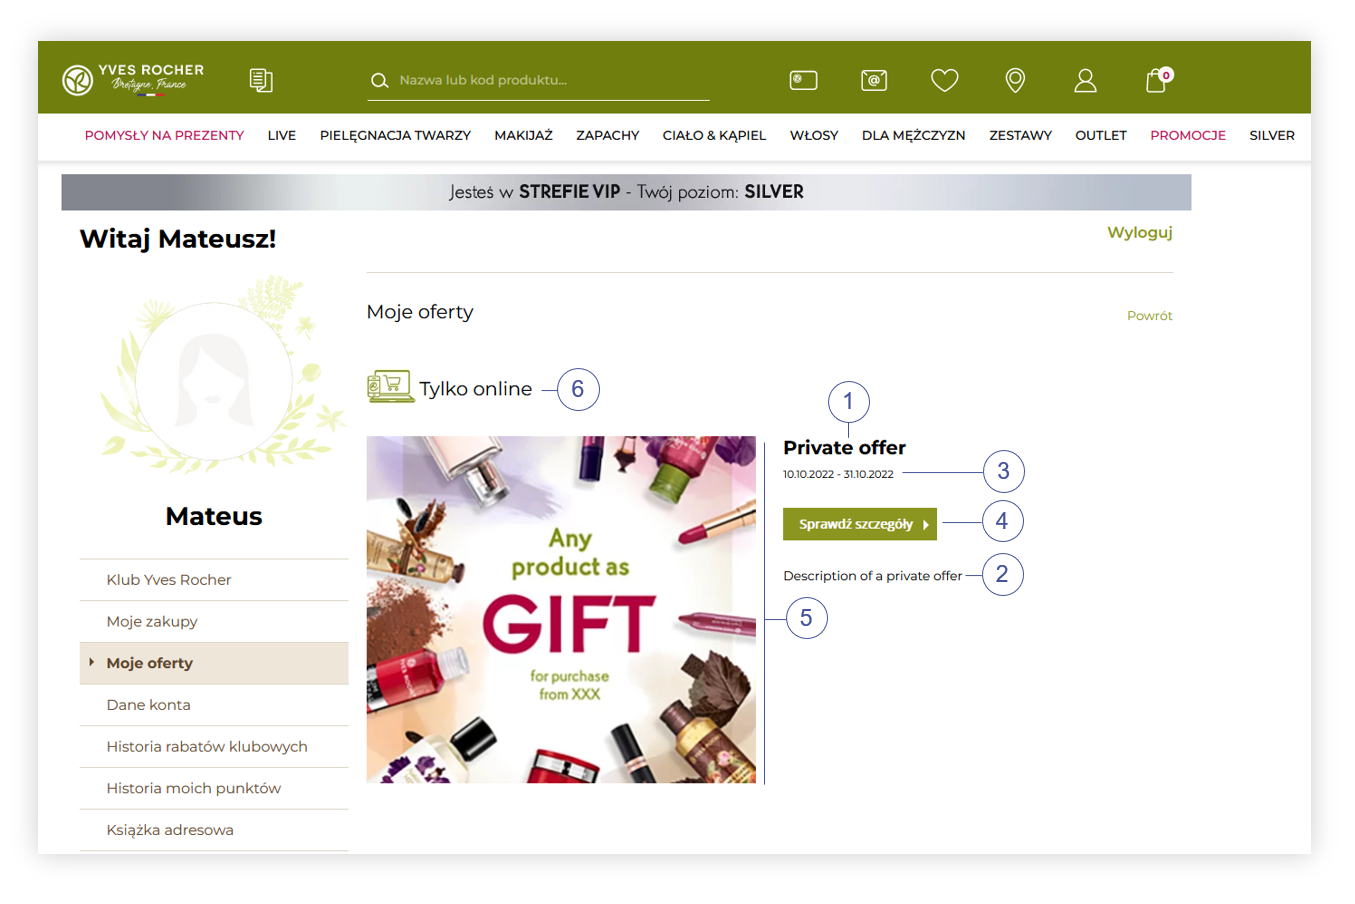
| *Visualization of the customer private offer in the customer panel (mobile)* |
| 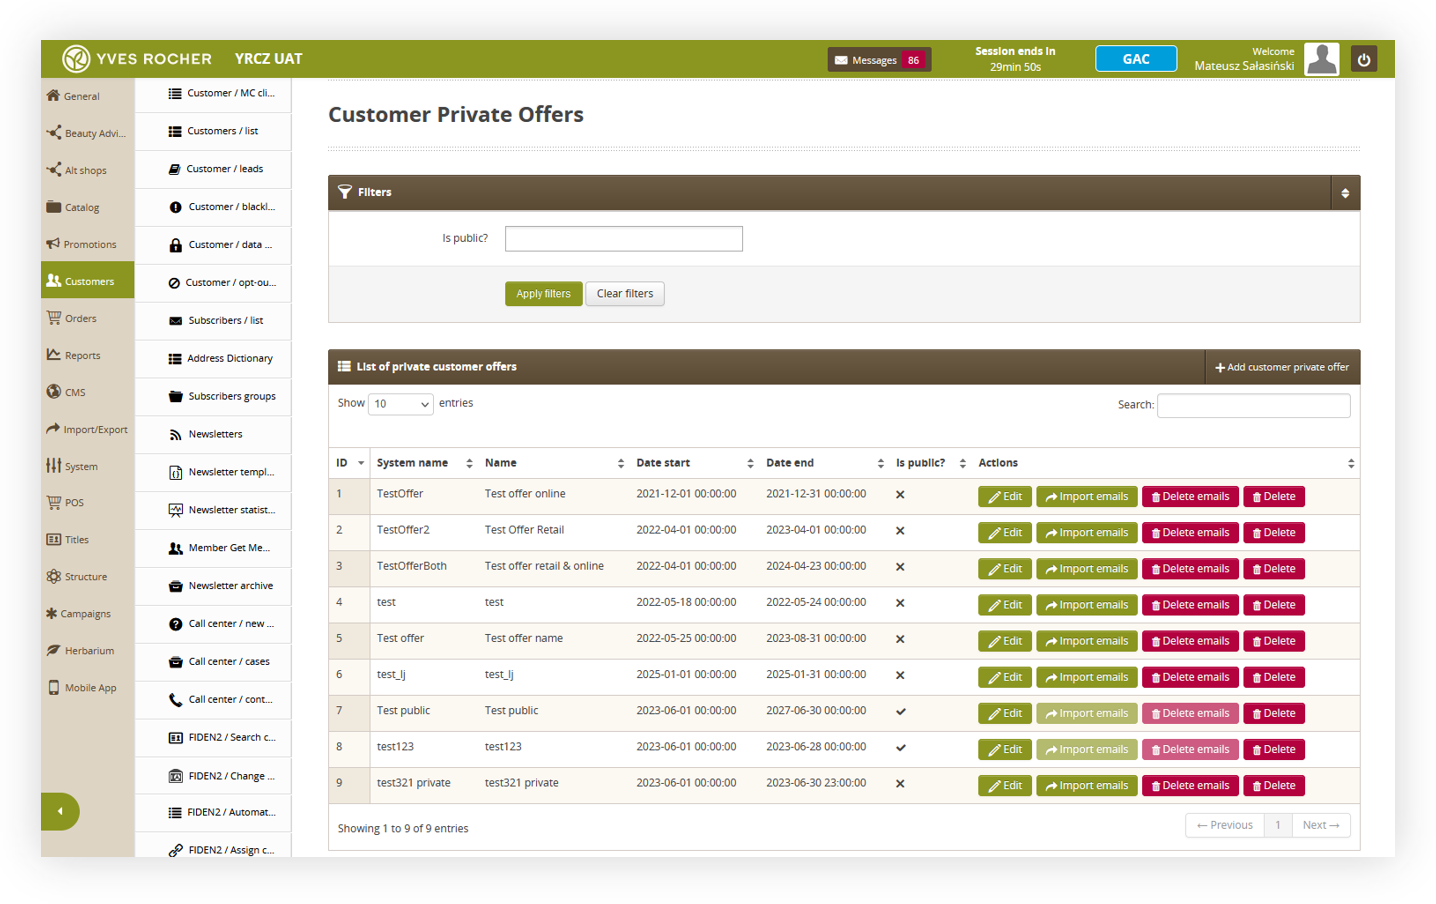 |
| *Visualization of the customer private offer tab in the admin panel* |
| 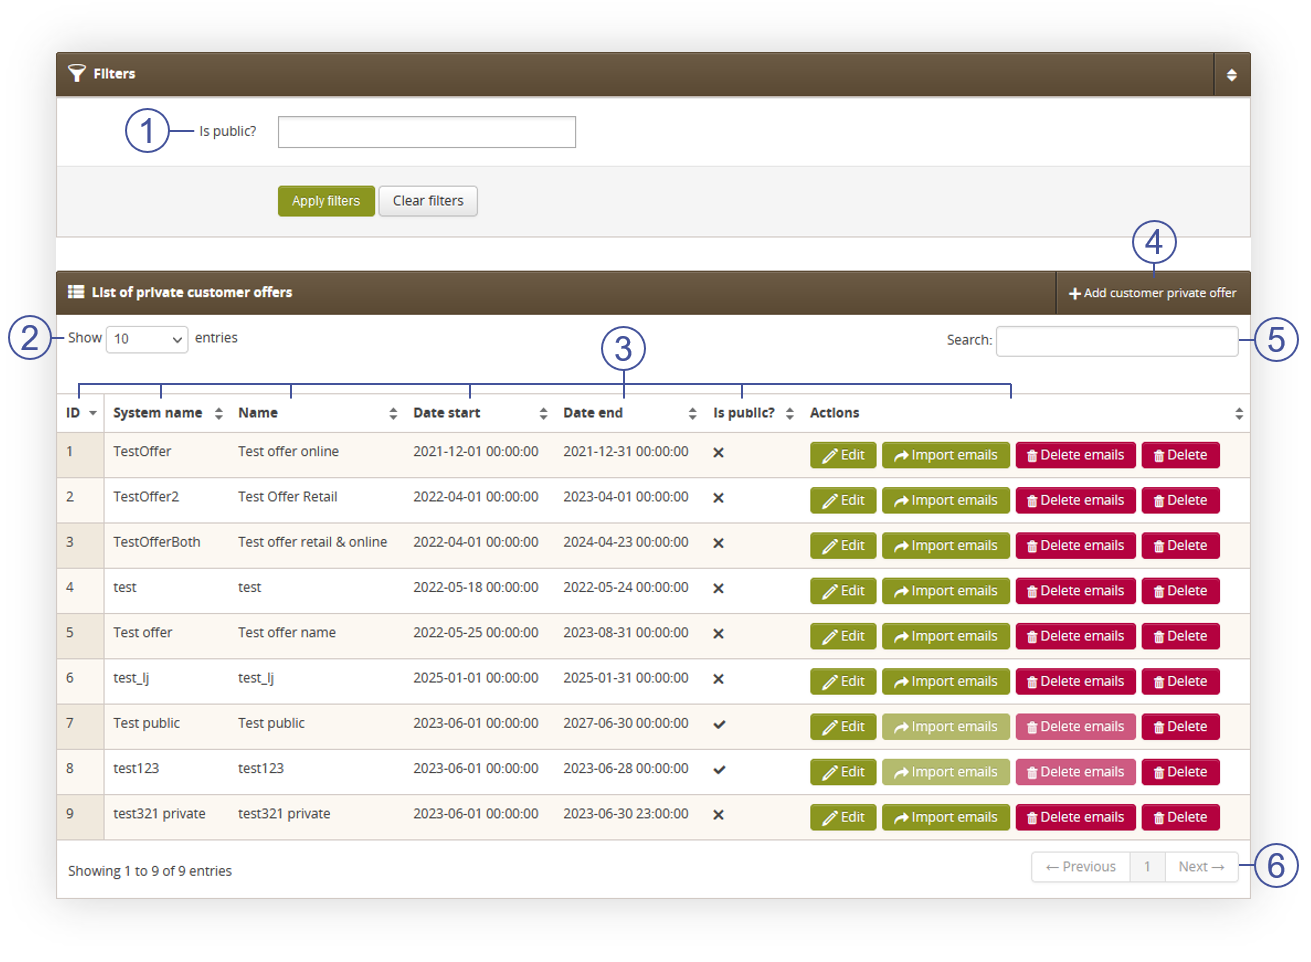 |
| *Visualization of the list of private customer offers tab* |
| 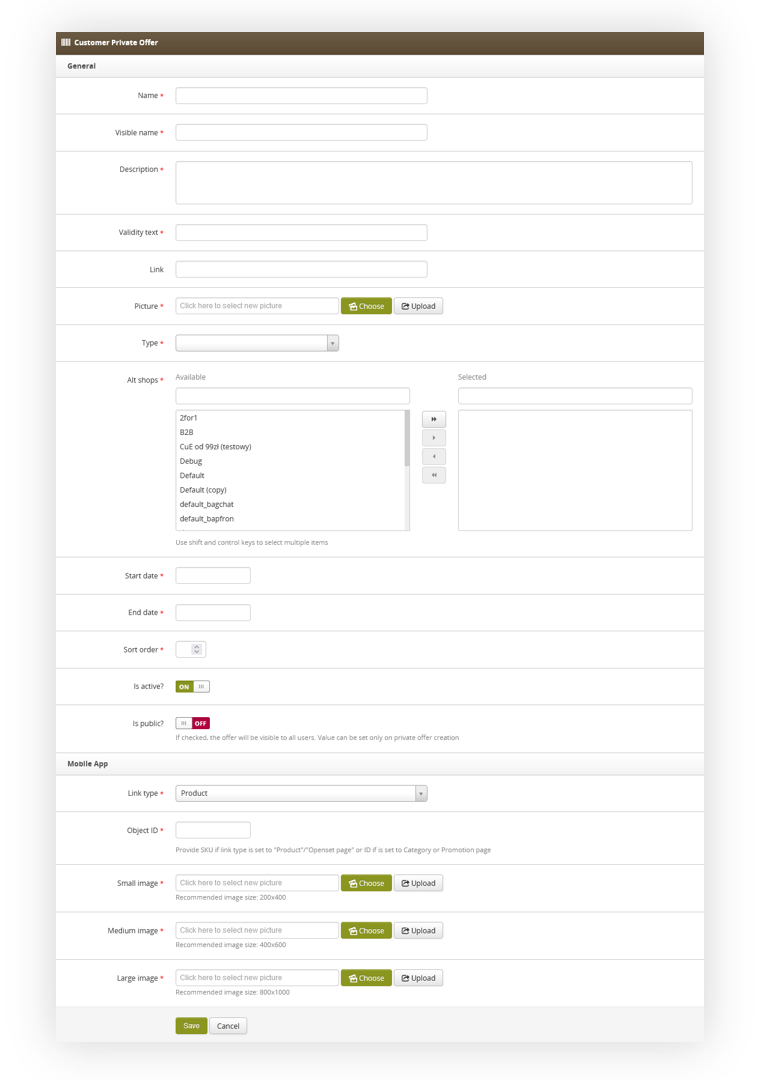 |
| *Visualization of the customer private offer creation* |
|  |
| *Visualization of the private offer tab in the customer panel* |
|  |
| *Visualization of the customer private offer in the customer panel* |
| 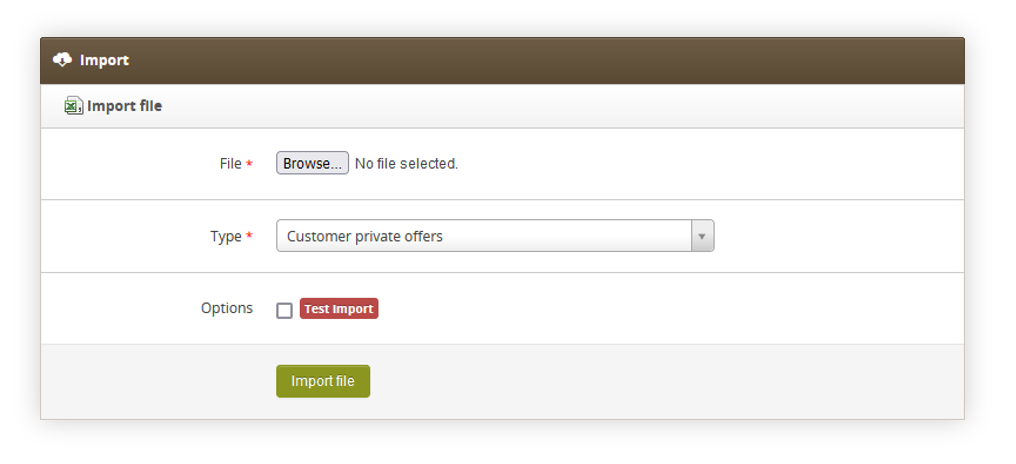 |
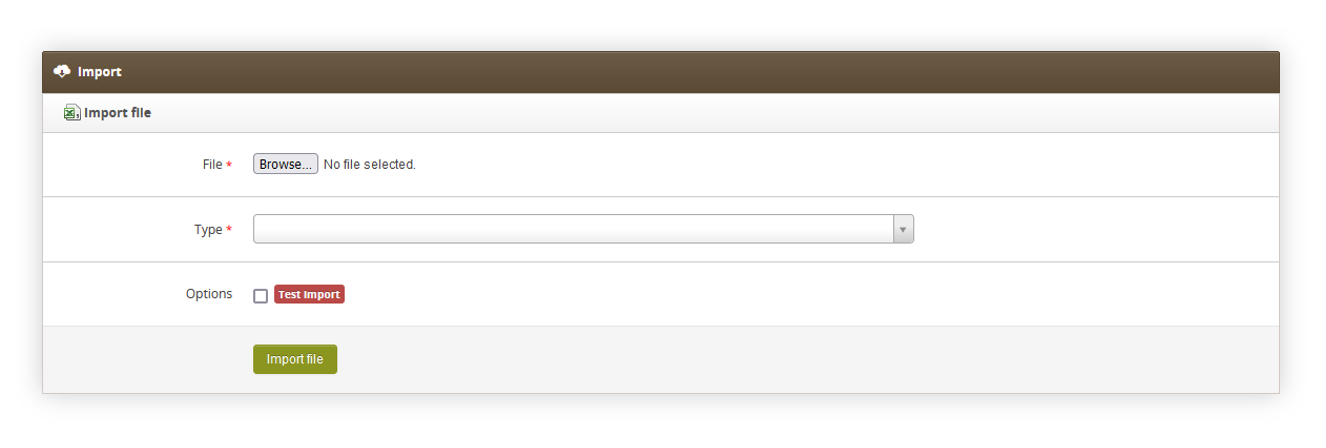
| *Visualization of the import tab in the import/export section* |
| 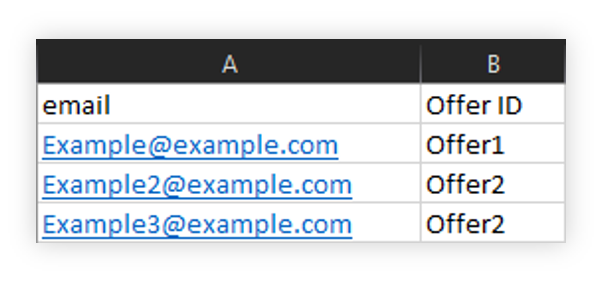 |
| *Visualization of the example CSV file of a private offer import* |
| 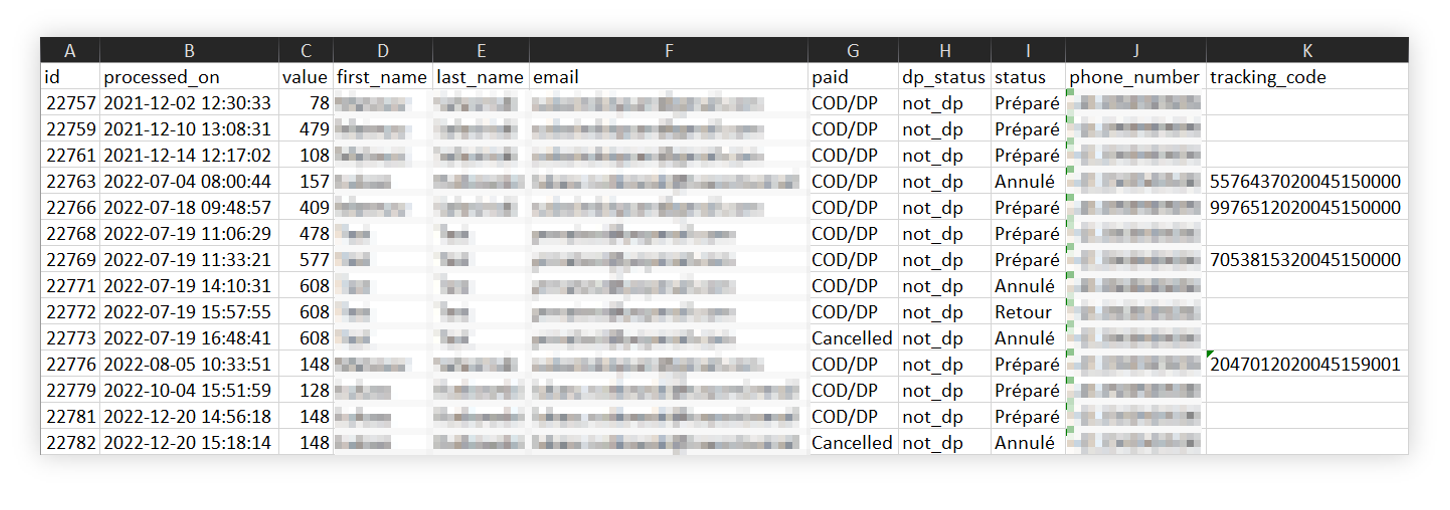 |
| *Visualization of the exported orders list* |
| 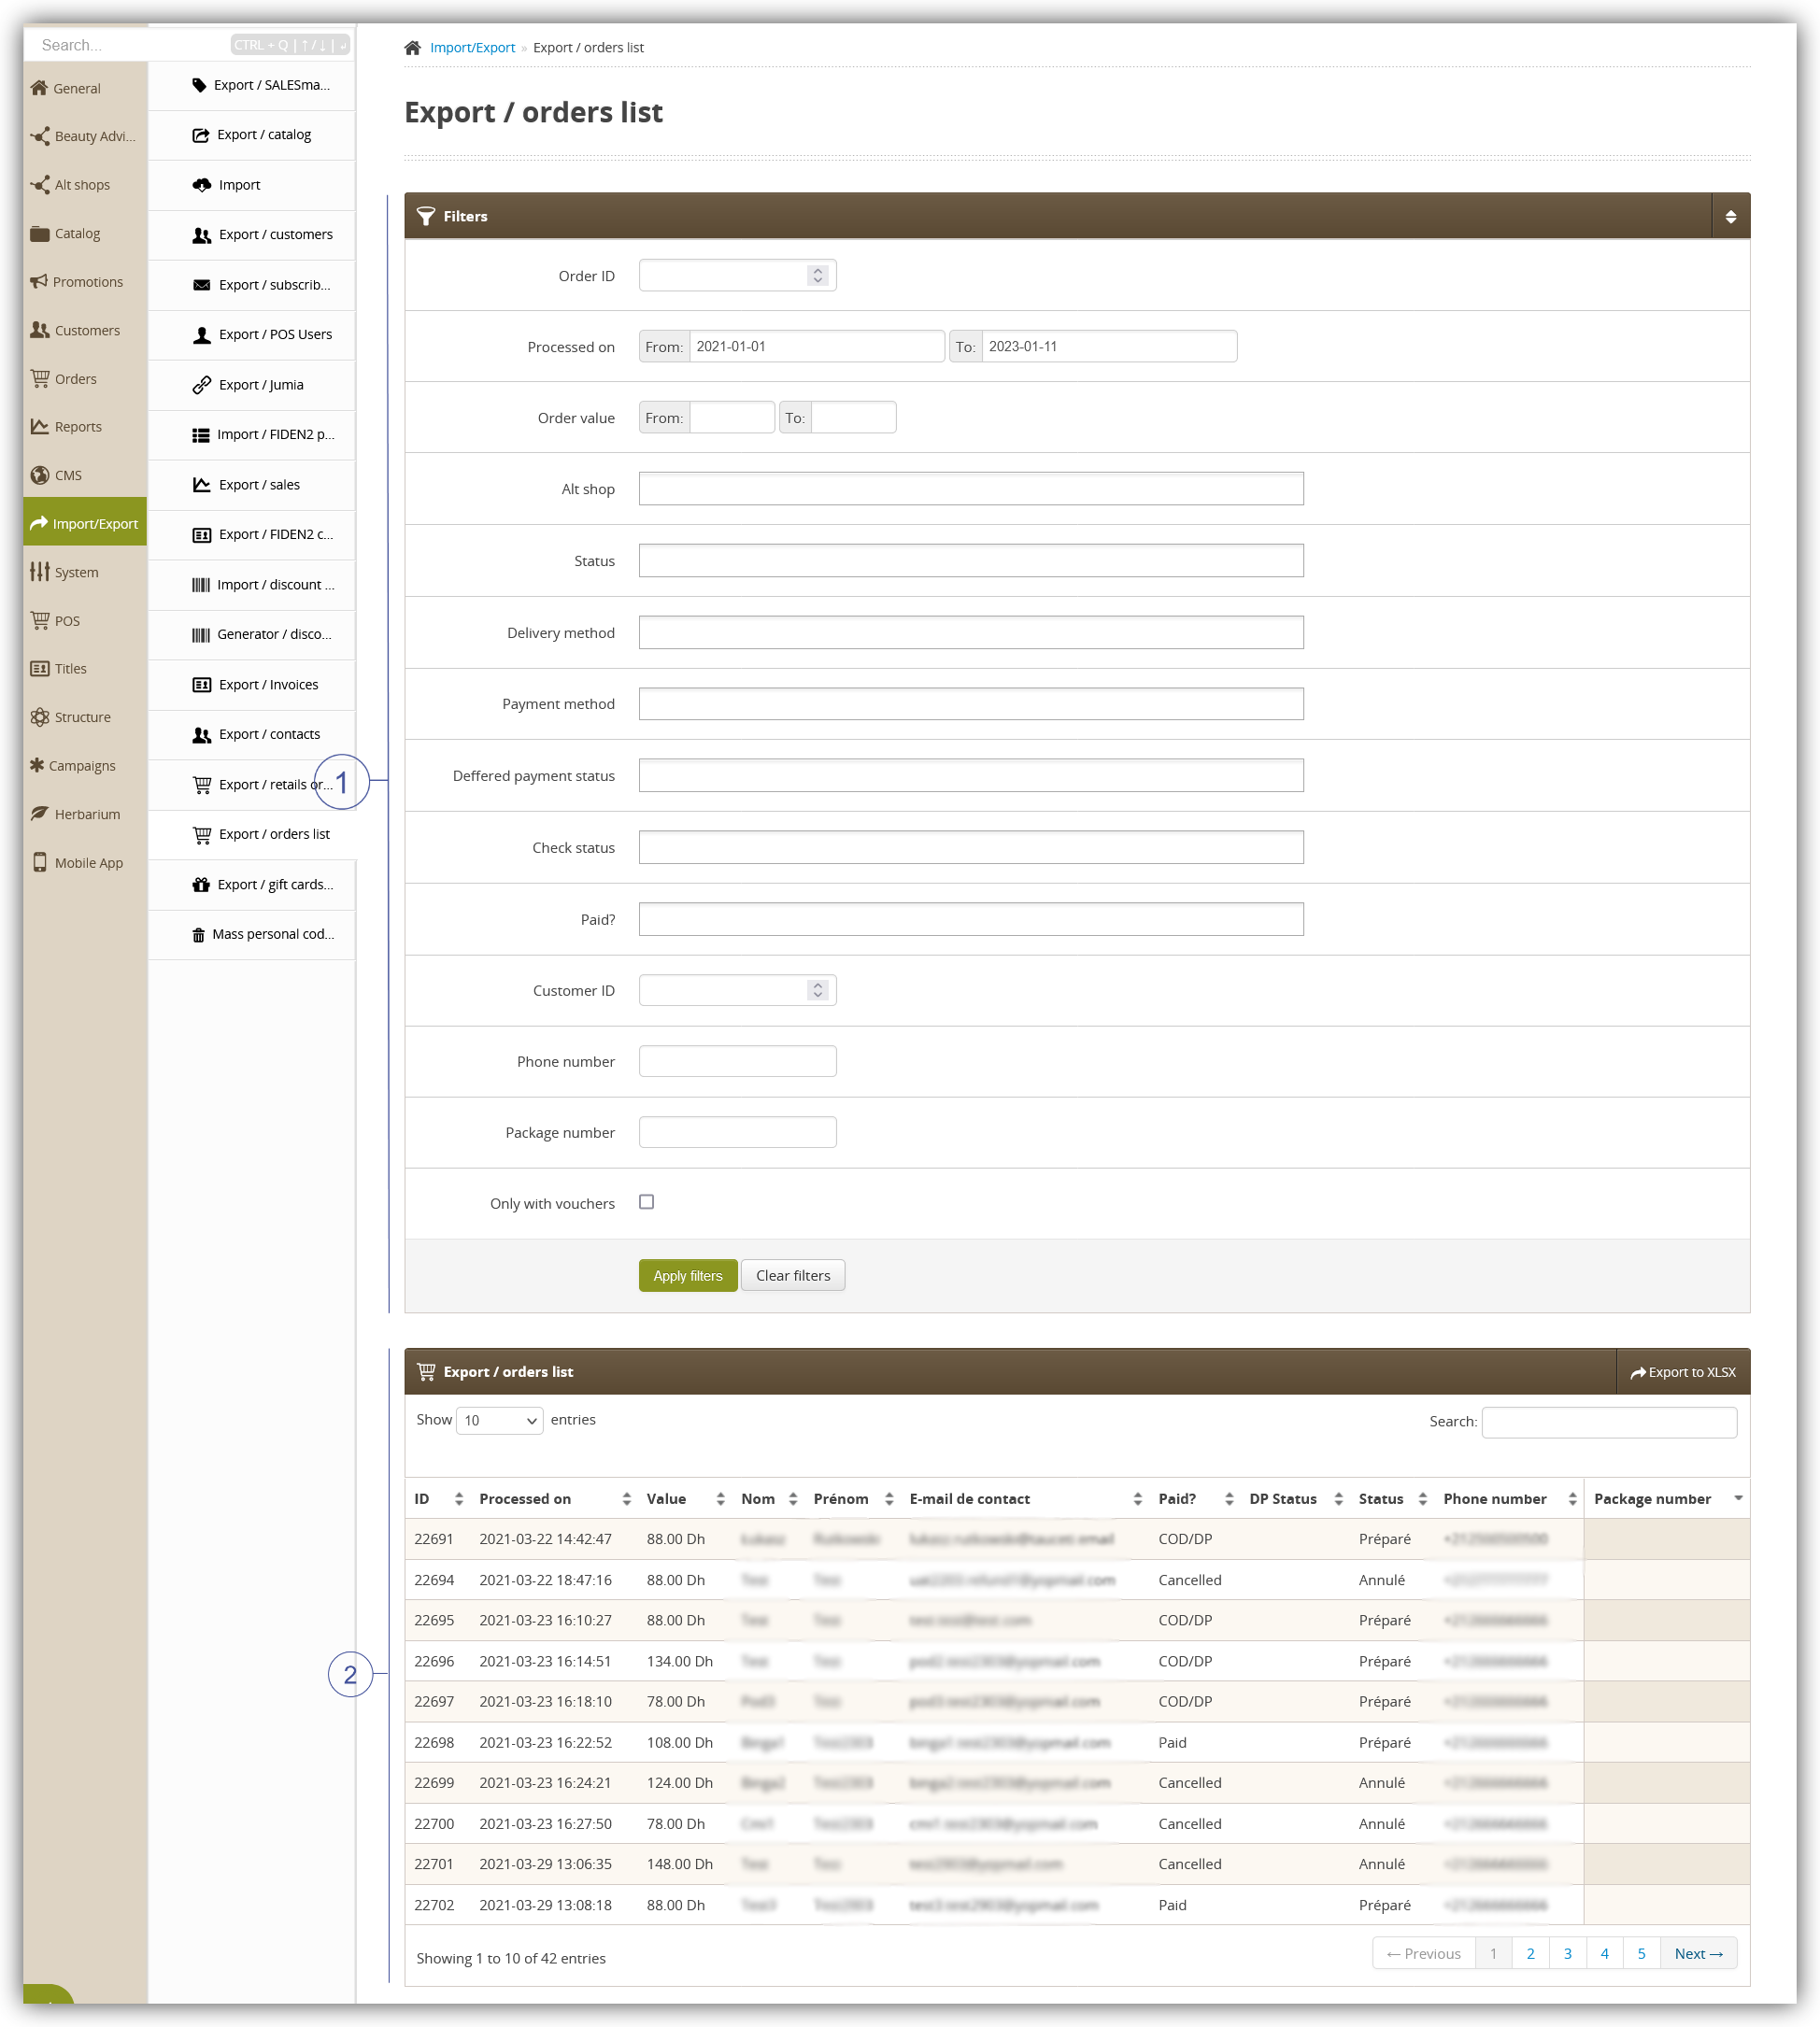 |
| *Visualization of the export / orders list module in the administrator panel* |
| 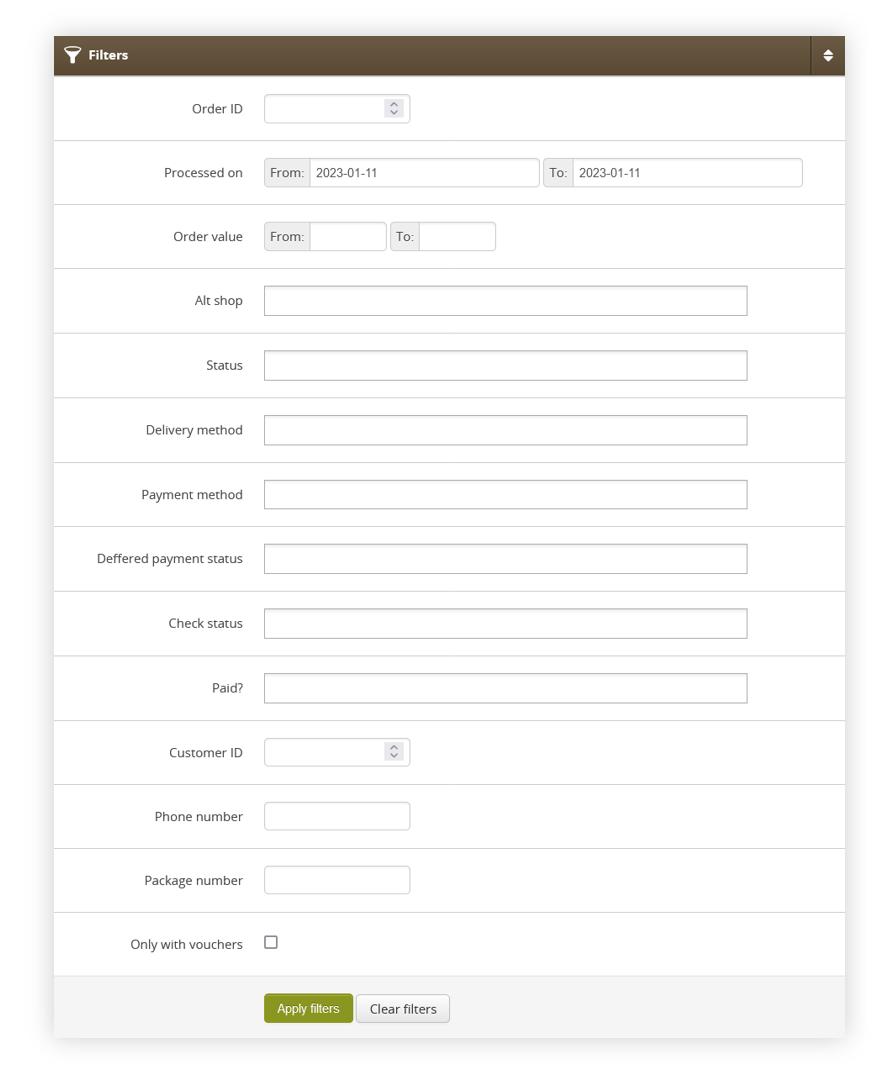 |
| *Visualization of the filters tab* |
| 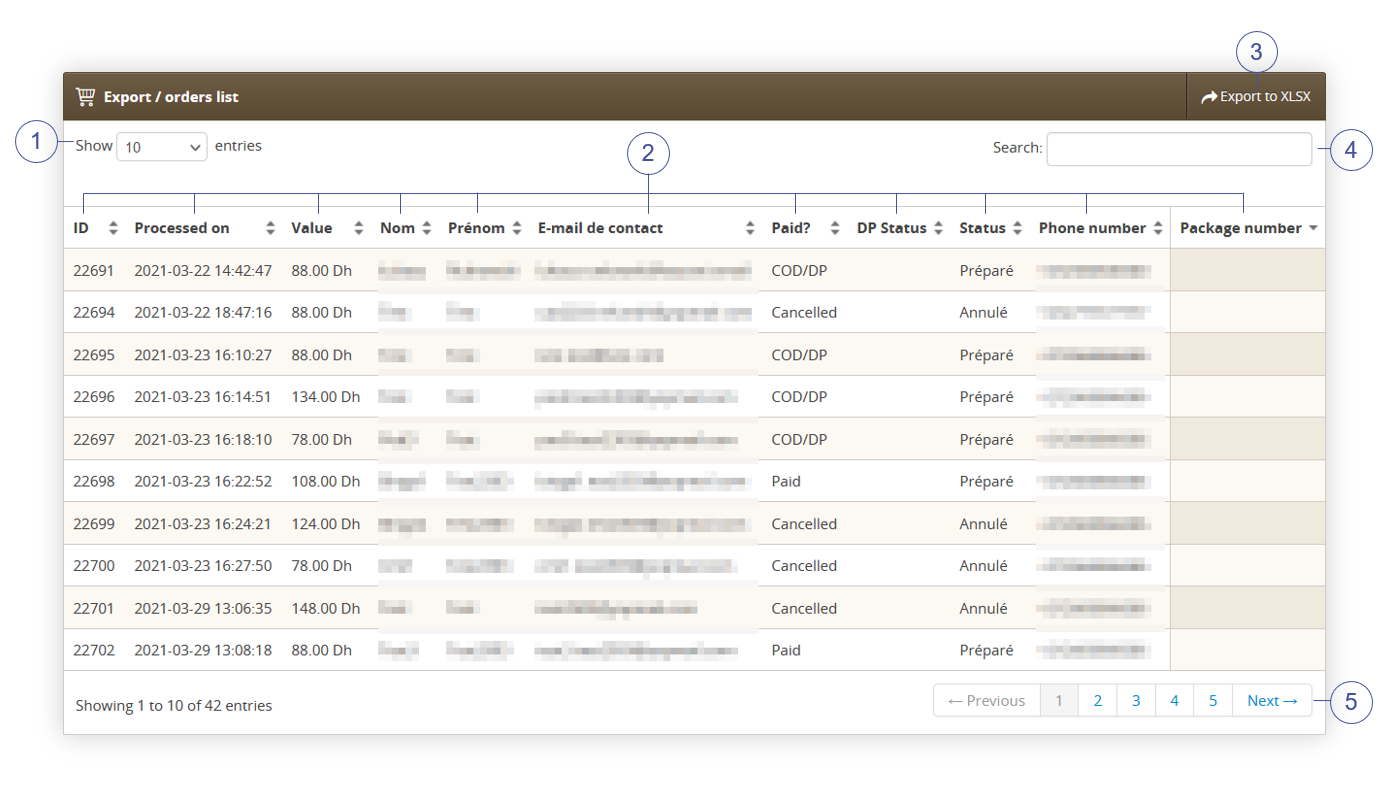 |
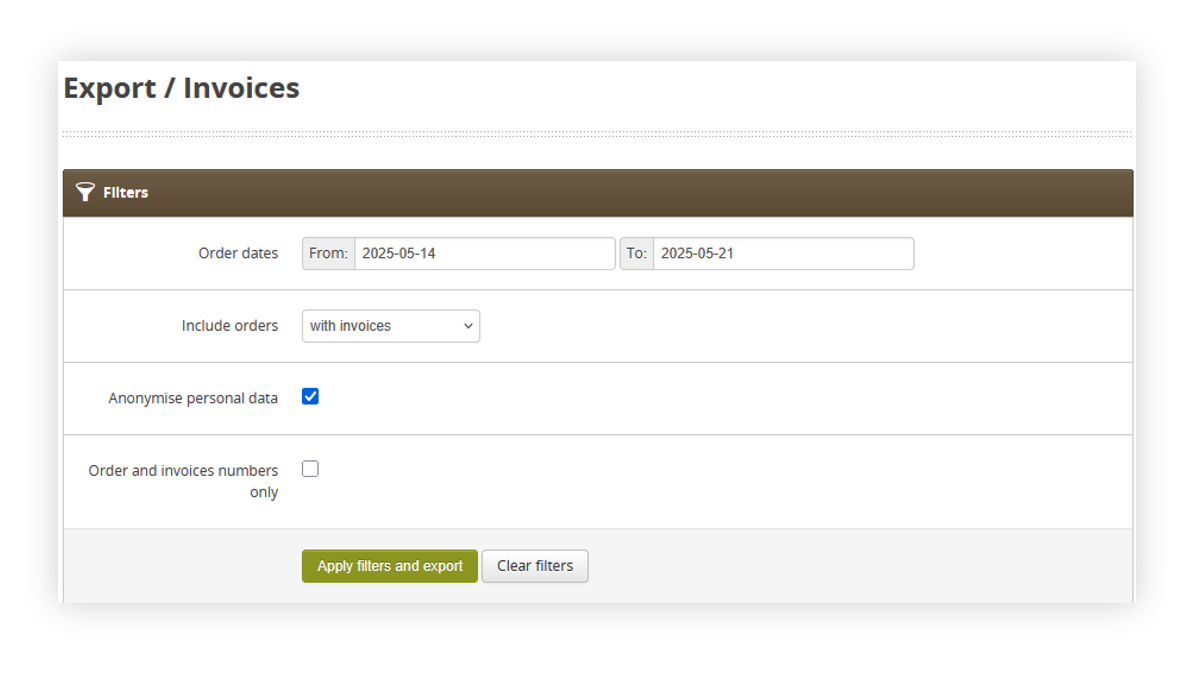
| *Visualization of the export / orders list section* |
|  |
| *Visualization of the exported orders=s* |
| 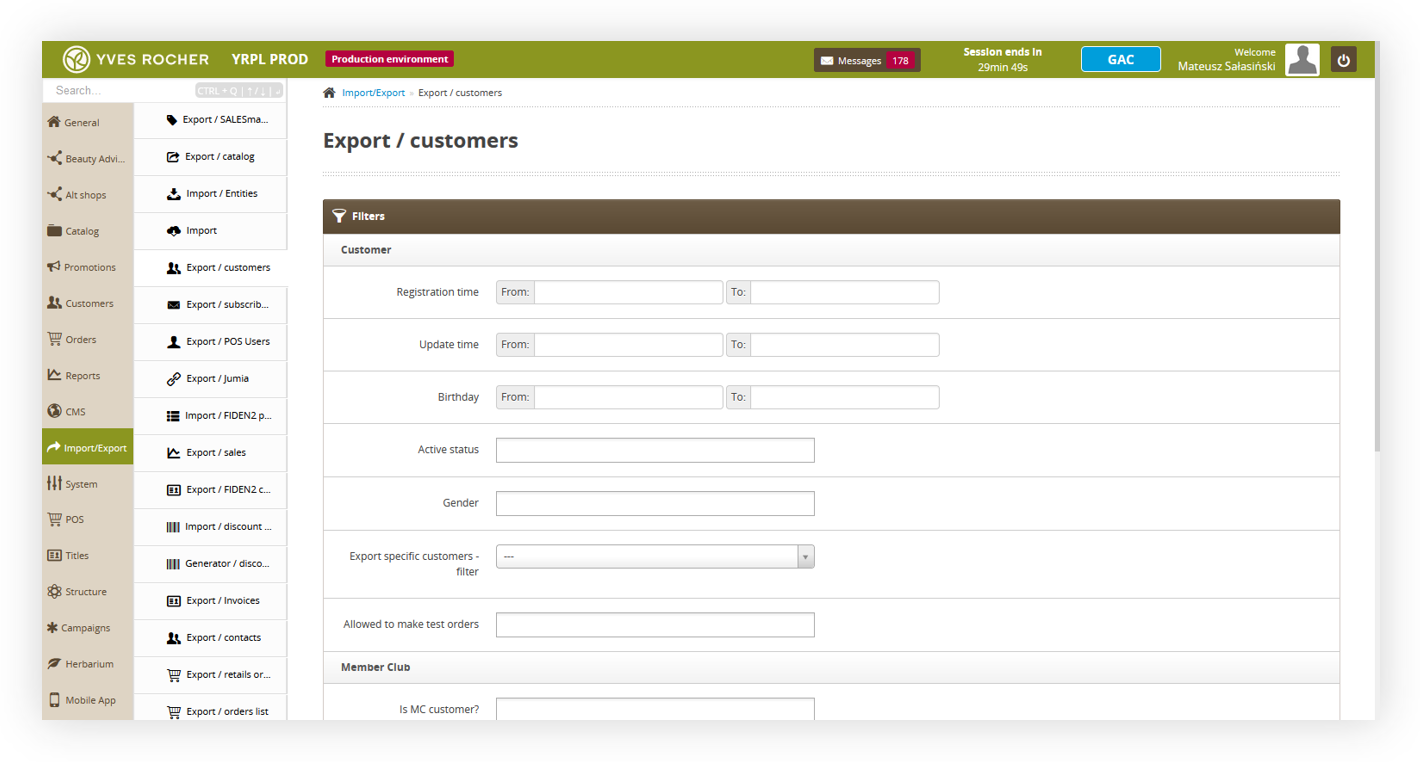 |
| *Visualization of the export customers tab location* |
| [](https://knowledge.tauceti-digital.com/uploads/images/gallery/2025-01/screenshot1-2025-01-21-at-12-45-16-export-customers-admin-module.png) |
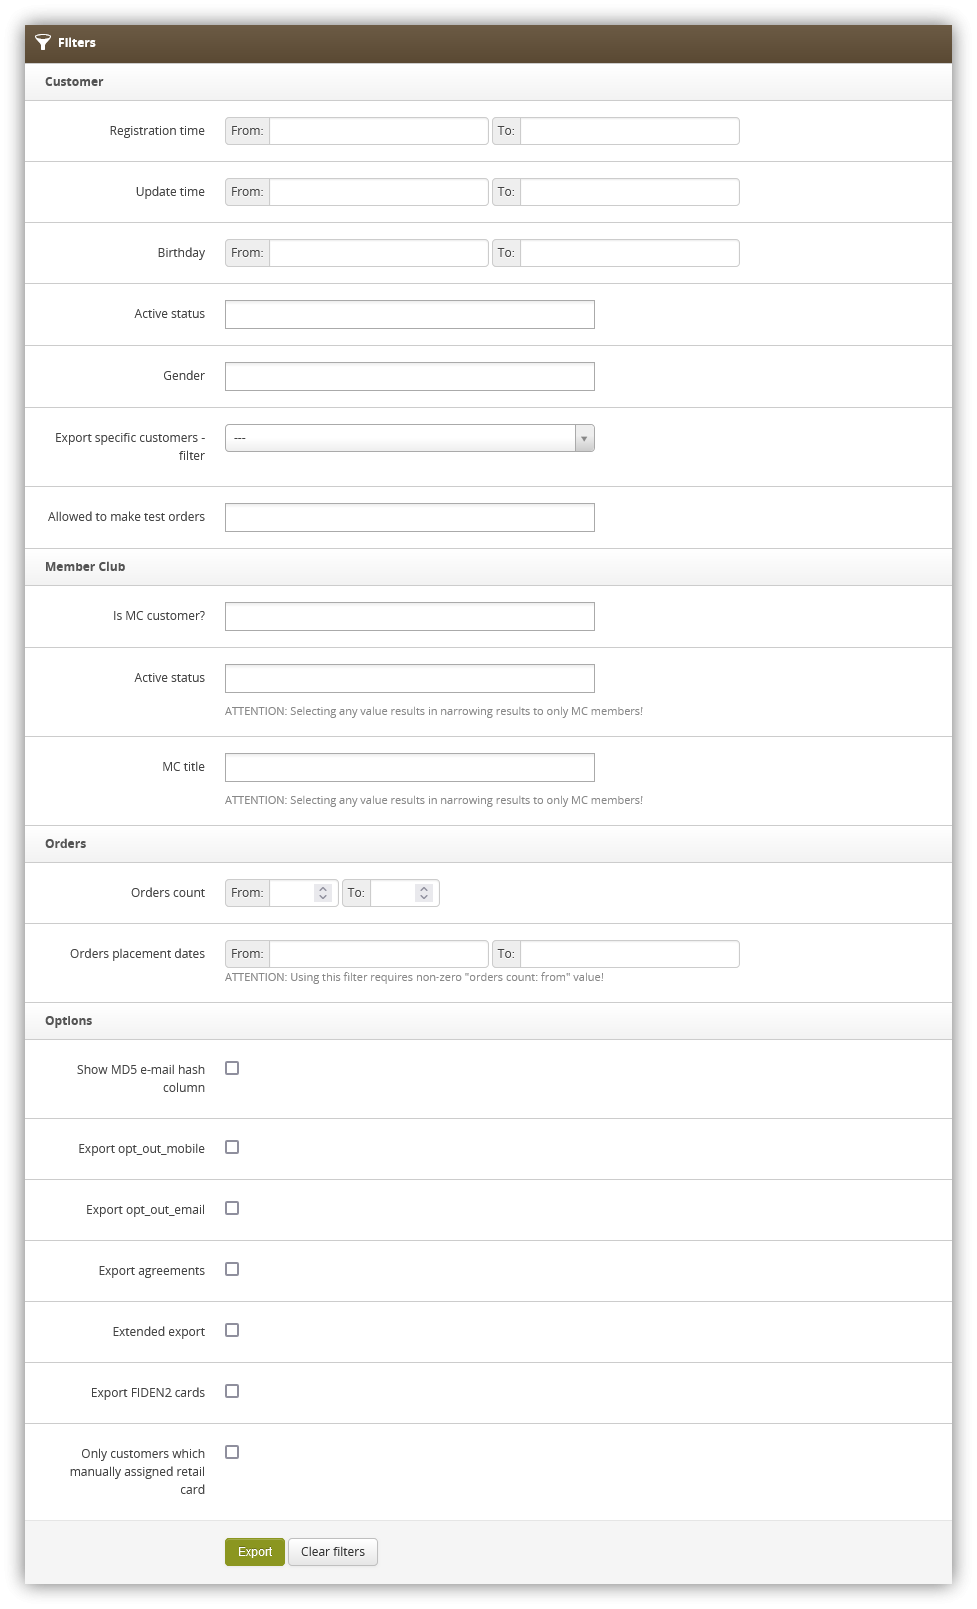
| *Visualization of the all available export filters* |
|  |
| *Visualization of the prepared export file* |
|  |
| *Visualization of the exported csv file* |
|  |
| *Visualization of the product catalog options in the Import / export module* |
|  |
| *Visualization of the Catalog export* |
|  |
| *Visualization of Import / Export, Import* |
| **\#** | **Column name** | **Value type** | **Max length** | **Can be empty?** | **Description** | **What, if empty** |
| 1 | SKU | STRING | 7 | No | Product code | - |
| 2 | is\_active | BOOLEAN (0/1) | 1 | No | Is the product visible? | - |
| 3 | name | STRING | 255 | No | Product name | - |
| 4 | title | STRING | 255 | Yes | Title for product | Empty product title |
| 5 | short\_description | STRING | 255 | Yes | Short description | Empty description |
| 6 | capacity | STRING | 125 | Yes | Capacity/size of the product | Capacity undefined |
| 7 | sort\_order | INTEGER | 1 | Yes | Sort Order | 0 |
| 8 | price | DECIMAL | 10,2 | No | Catalog price | - |
| 9 | f\_green\_point | BOOLEAN (0/1) | 1 | Yes | Flag: green point | 0 |
| 10 | f\_bestseller | BOOLEAN (0/1) | 1 | Yes | Flag: bestseller | 0 |
| 11 | f\_limited\_edition | BOOLEAN (0/1) | 1 | Yes | Flag: limited edition | 0 |
| 12 | f\_set | BOOLEAN (0/1) | 1 | Yes | Flag: set | 0 |
| 13 | f\_gift | BOOLEAN (0/1) | 1 | Yes | Flag: gift | 0 |
| 14 | f\_gift\_choice | BOOLEAN (0/1) | 1 | Yes | Flag: gift of choice | 0 |
| 15 | f\_outlet | BOOLEAN (0/1) | 1 | Yes | Flag: outlet 0 | 0 |
| 16 | is\_new\_until | DATE | 10 | Yes | Date till the product is marked as "new". Should be in a DD-MM-YYY format. | The product won't be marked as "new" |
| 17 | friendly\_url | STRING | 255 | Yes | URL for the product | - |
| 18 | ean | STRING | 13 | Yes | EAN code. Multiple EANs can be separated by a comma (,). The system verifies in the import process if the typed EAN is in correct EAN-8 or EAN-13 format. | - |
| 19 | EOL | STRING | 3 | No | Always must be “EOL” | - |
| **\#** | **Column name** | **Value type** | **Max length** | **Can be empty?** | **Description** | **What, if empty** |
| 1 | SKU | STRING | 7 | No | Product code | - |
| 2 | description\_main | STRING | undefined | Yes | Main description | empty description |
| 3 | description\_effect | STRING | undefined | Yes | Effects description | empty description |
| 4 | description\_usage | STRING | 5 | Yes | Usage description | empty description |
| 5 | description\_ingredient | STRING | undefined | Yes | Ingredients | empty description |
| 6 | description\_capacity | STRING | undefined | Yes | Type of package and capacity | empty description |
| 7 | description\_additional\_info | STRING | undefined | Yes | Additional information | empty description |
| 8 | description\_notes | STRING | undefined | Yes | Results | empty description |
| 9 | EOL | STRING | 3 | No | Always must be “EOL” | - |
| **\#** | **Column name** | **Value type** | **Max length** | **Can be empty?** | **Description** | **What, if empty** |
| 1 | SKU\_parent | STRING | 7 | No | Code of the parent product | - |
| 2 | SKU | STRING | 7 | No | Code of the color variant | - |
| 3 | color | STRING | 255 | No | Color name | - |
| 4 | is\_active | BOOLEAN (0/1) | 1 | No | Flag: is active? | - |
| 5 | EOL | STRING | 3 | No | Always must be “EOL” | - |
| **\#** | **Column name** | **Value type** | **Max length** | **Can be empty?** | **Description** | **What, if empty** |
| 1 | SKU | STRING | 7 | No | Product code | - |
| 2 | stock\_value | INTEGER | 5 | No | Amount of stock value | - |
| 3 | always\_in\_stock | BOOLEAN(0/1) | 1 | Yes | Flag: product is always in stock | 0 |
| 4 | min\_stock\_value | INTEGER | 5 | Yes | Minimal stock value | Default value from the database |
| 5 | warn\_stock\_value | INTEGER | 5 | Yes | Stock limit at which administrator will receive a warning about low stock value | Default value from the database |
| 6 | EOL | STRING | 3 | No | Always must be “EOL” | - |
| **\#** | **Column name** | **Value type** | **Max length** | **Can be empty?** | **Description** | **What, if empty** |
| 1 | SKU | STRING | 7 | No | Product code, if color variant then uses parent code. | - |
| 2 | property | STRING | 45 | No | Property name | - |
| 3 | tag1 | STRING | 150 | No | Tag name | - |
| 4 | tag2 | STRING | 150 | Yes | Tag name | - |
| 5 | tag3 | STRING | 150 | Yes | Tag name | - |
| 6 | tag4 | STRING | 150 | Yes | Tag name | - |
| 7 | tag5 | STRING | 150 | Yes | Tag name | - |
| 9 | EOL | STRING | 3 | No | Always must be “EOL” | - |
| **\#** | **Column name** | **Value type** | **Max length** | **Can be empty?** | **Description** | **What, if empty** |
| 1 | name | STRING | 45 | No | Property name | - |
| 2 | url\_name | STRING | 45 | Yes | Friendly URL | Will be generated automatically from the property name |
| 3 | sort\_order | INTEGER | 5 | No | Sort Order | - |
| 4 | is\_active | BOOLEAN(0/1) | 1 | No | Flag: Is this property active? | - |
| 5 | EOL | STRING | 3 | No | Always must be “EOL” | - |
| **\#** | **Column name** | **Value type** | **Max length** | **Can be empty?** | **Description** | **What, if empty** |
| 1 | property\_name | STRING | 45 | No | Nazwa cechy, do której jest przypisany tag | - |
| 2 | name | STRING | 150 | No | Nazwa tagu (wartość cechy) | - |
| 3 | url\_name | STRING | 150 | Yes | friendly URL for the tag | Will be generated automatically from the tag name |
| 4 | EOL | STRING | 3 | No | Always must be “EOL” | - |
| **\#** | **Column name** | **Value type** | **Max length** | **Can be empty?** | **Description** | **What, if empty** |
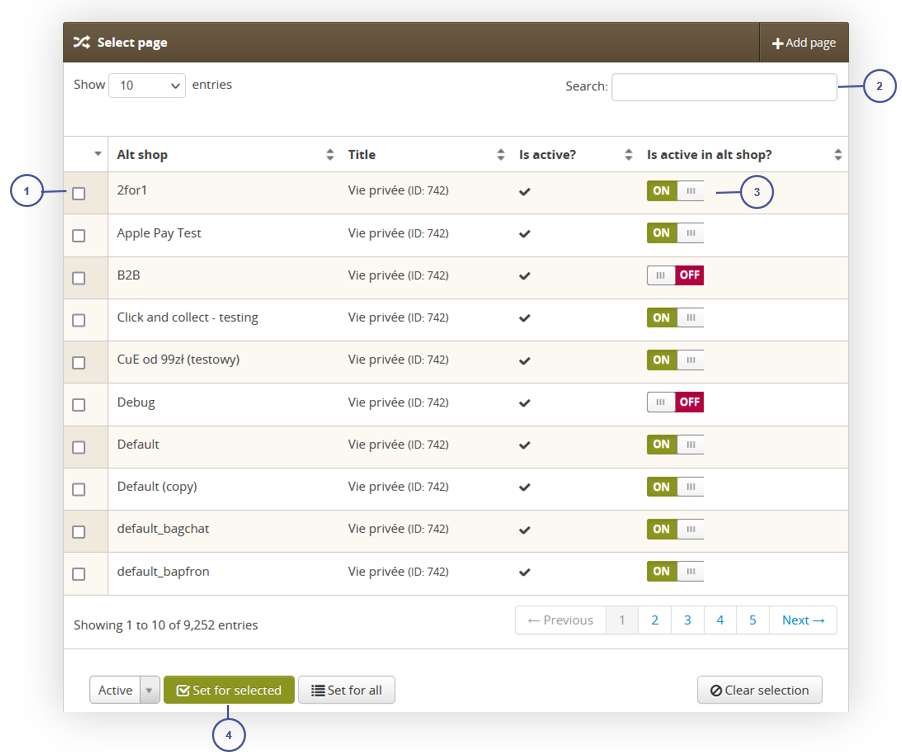
| 1 | alt\_shop | STRING | undefined | No | Altshop system name | - |
| 2 | SKU | STRING | 7 | No | Product code | - |
| 3 | is\_active | BOOLEAN(0/1) | 1 | No | Is the product active in altshop | - |
| 4 | promotion\_price | DECIMAL | undefined | Yes | Promotion price | No promotion price or set-by-price/percentage discounts |
| 5 | price\_discount | DECIMAL | undefined | Yes | Price discount subtracts value from the catalog price | No discount or discounted by promotion price/percentage discount |
| 6 | percentage\_discount | DECIMAL | 2 | Yes | Percentage discount counted from catalog price. | No promotion or discounted by promotion price/ price discount |
| 7 | promotion\_start\_date | DATE | undefined | Yes | **Information:** date of promotion start | No date of promotion start |
| 8 | promotion\_end\_date | DATE | undefined | Yes | **Information:** date of promotion end | No date of promotion end |
| 9 | promotion\_valid\_text | STRING | undefined | Yes | Text informing about promotion validation | Lack of text even, if promotion start and end dates are present. |
| 10 | EOL | STRING | 3 | No | Always must be “EOL” | EOL |
| **\#** | **Column name** | **Value type** | **Max length** | **Can be empty?** | **Description** | **What, if empty** |
| **1** | SKU** ** | STRING | 7 | No | Product code | **-** |
| **2** | category\_path | STRING | undefined | No | Category path. Path steps need to be separated by a Guillemet ("»") i.e. E-commerce » Włosy » Szampony. The category path should always start with E-commerce. | **-** |
| **3** | is\_main** ** | BOOLEAN(0/1) | 1 | No | A flag that shows if a selected category path for a selected SKU is marked as a main one | **-** |
| **4** | EOL | STRING | 3 | No | Always must be “EOL” | EOL |
| SKU | category\_path | is\_main | EOL |
| 32611 | E-commerce » Vůně | 1 | EOL |
| SKU | category\_path | is\_main | EOL |
| 32611 | E-commerce » Vlasy | 0 | EOL |
| SKU | category\_path | is\_main | EOL |
| 32611 | E-commerce » Vůně | 1 | EOL |
| 32611 | E-commerce » Vlasy | 0 | EOL |
| **\#** | **Column name** | **Value type** | **Max length** | **Can be empty?** | **Description** | **What, if empty** |
| 1 | SKU | STRING | 7 | No | Product code, if color variant then uses parent code. | - |
| 2 | property | STRING | 45 | No | Property name | - |
| 3 | tag1 | STRING | 150 | No | Tag name | - |
| 4 | tag2 | STRING | 150 | Yes | Tag name | - |
| 5 | tag3 | STRING | 150 | Yes | Tag name | - |
| 6 | tag4 | STRING | 150 | Yes | Tag name | - |
| 7 | tag5 | STRING | 150 | Yes | Tag name | - |
| 9 | EOL | STRING | 3 | No | Always must be “EOL” | - |
| **SKU** | **property** | **tag1** | **tag2** | **tag3** | **tag4** | **tag5** | **EOL** |
| 69726 | Péče o tělo | Tělové oleje | Tělové peelingy | EOL |
| **SKU** | **property** | **tag1** | **tag2** | **tag3** | **tag4** | **tag5** | **EOL** |
| 69726 | Péče o tělo | Tělové peelingy | EOL |
| **SKU** | **property** | **tag1** | **tag2** | **tag3** | **tag4** | **tag5** | **EOL** |
| 69726 | Péče o tělo | Tělové oleje | EOL |
| **Order** | **File name** |
| 1 | dict\_property.csv |
| 2 | dict\_tag.csv |
| 3 | catalog\_product.csv |
| 4 | catalog\_product\_description.csv |
| 5 | catalog\_product\_category.csv |
| 6 | catalog\_product\_attribute.csv |
| 7 | catalog\_product\_meta.csv |
| 8 | catalog\_product\_stock.csv |
| 9 | dict\_tag\_catalog\_product.csv |
| 10 | alt\_shop\_catalog\_product.csv |
| 11 | dict\_tag\_catalog\_product\_remove.csv |
|  |
| *Visualization of the import module in import/export* |
|  |
| *Visualization of the exporting file status, Import / Export module* |
| [](https://knowledge.tauceti-digital.com/uploads/images/gallery/2025-05/powerpnt-vzrn4ijb9y.png) |
| *Visualization of the exported invoices list* |
| [](https://knowledge.tauceti-digital.com/uploads/images/gallery/2025-05/powerpnt-taaycacene.png) |
| *Visualization of the export / orders list module in the administrator panel* |
| [](https://knowledge.tauceti-digital.com/uploads/images/gallery/2025-05/powerpnt-vzyosdwb6g.png) |
| *Visualization of the export / orders list section* |
| [](https://knowledge.tauceti-digital.com/uploads/images/gallery/2025-05/powerpnt-vzrn4ijb9y.png) |
| *Visualization of the exported orders=s* |
|  |
| *Visualization of the default alt shop on CZ PROD (Desktop version)* |
|  |
| *Visualization of the default alt shop on CZ PROD (Mobile version)* |
| 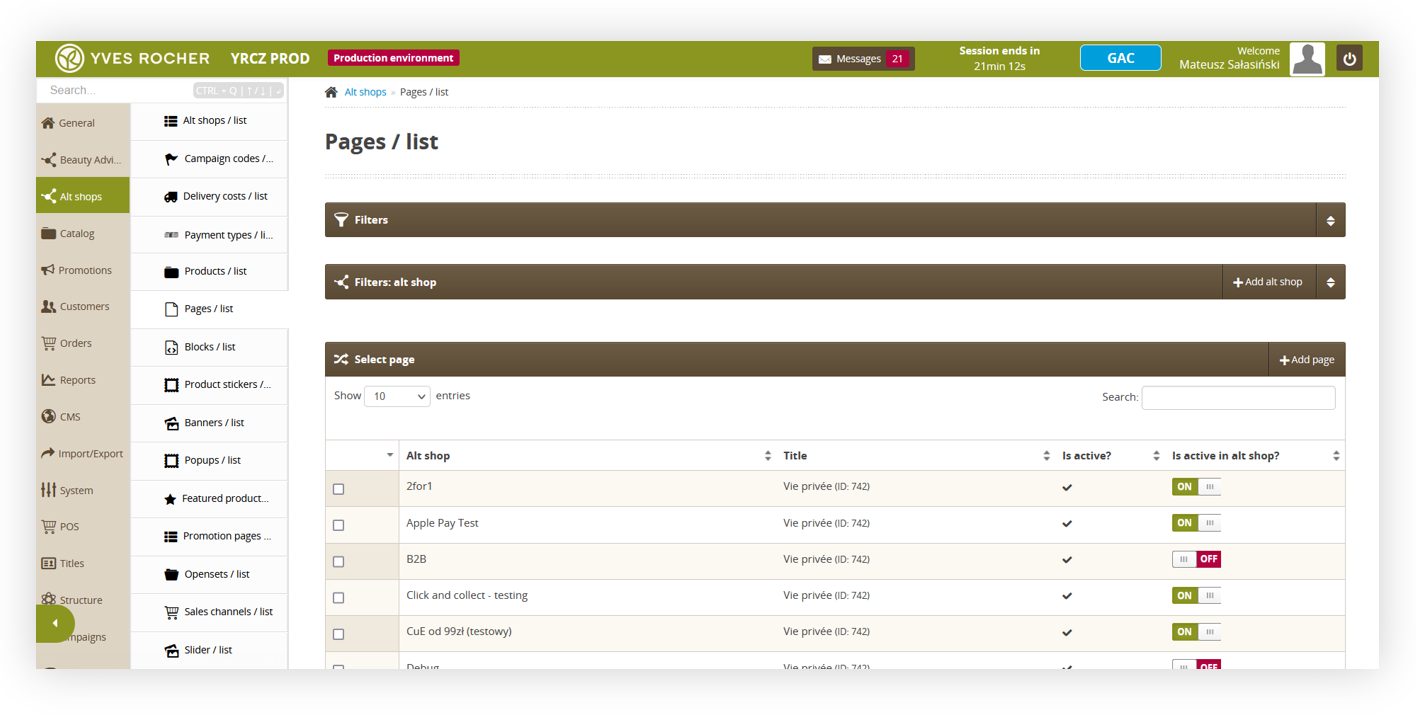 |
| *Visualization of the alt shops > pages / list section in the admin panel* |
|  |
| *Visualization of the pages / list in the alt shops module* |
|  |
| *Wizualizacja bloku CMS na stronie głównej sklepu Yves Rocher (wersja desktop)* |
|  |
| *Wizualizacja bloku CMS na stronie głównej sklepu Yves Rocher (wersja mobile)* |
| 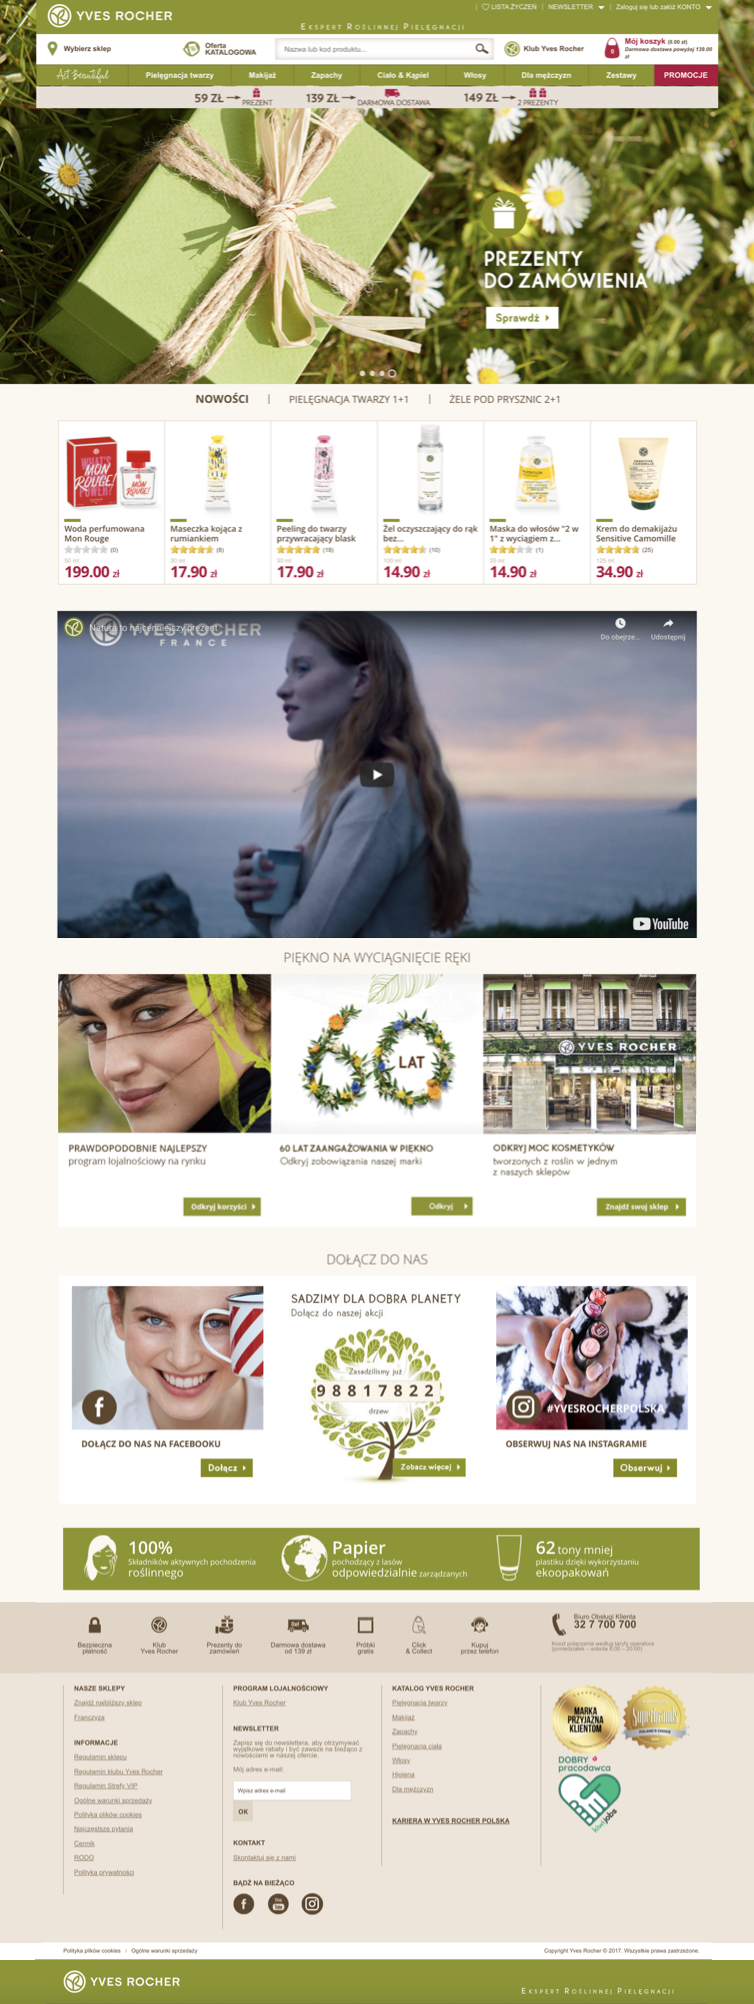 |
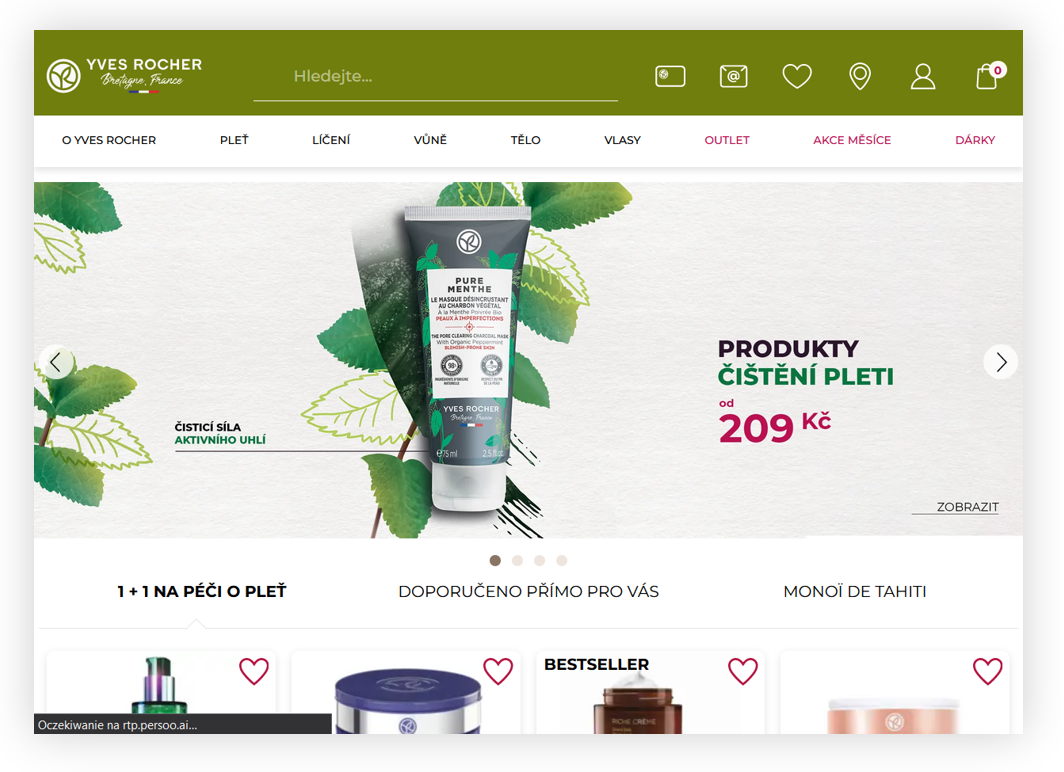
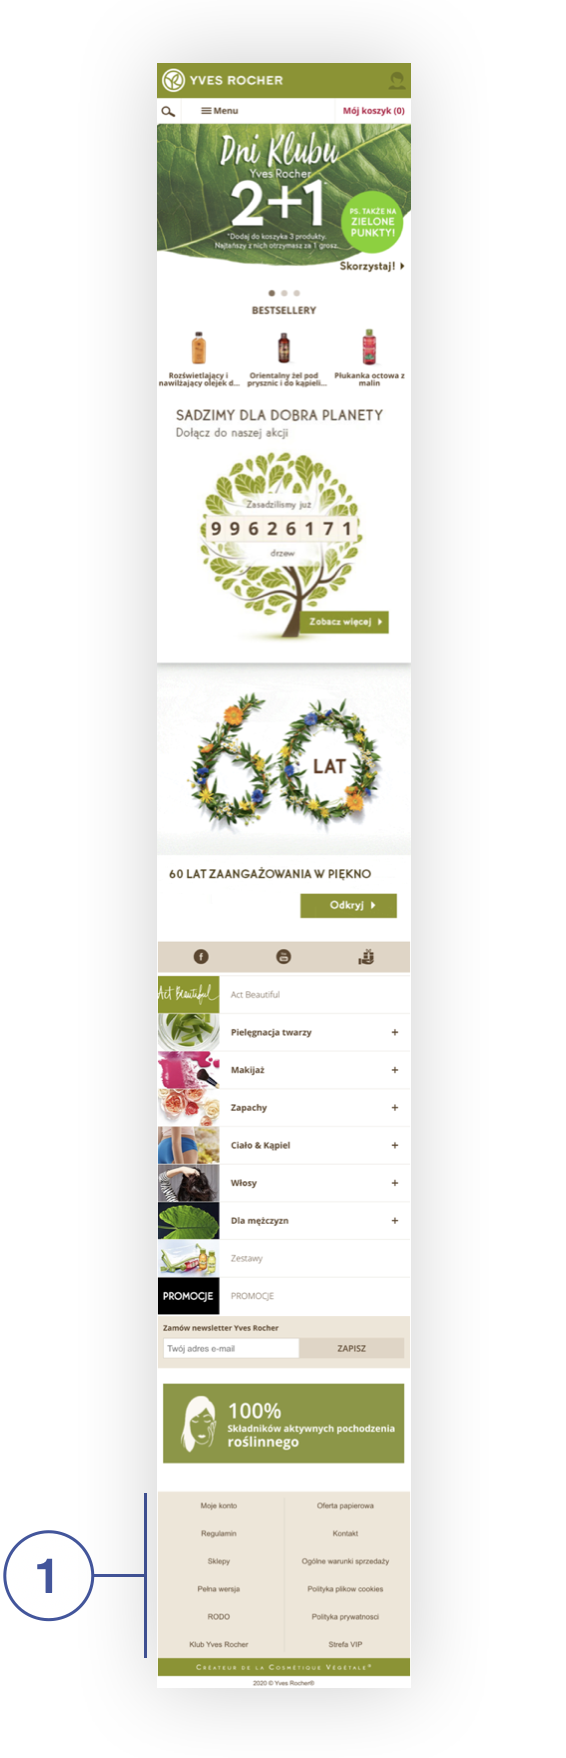
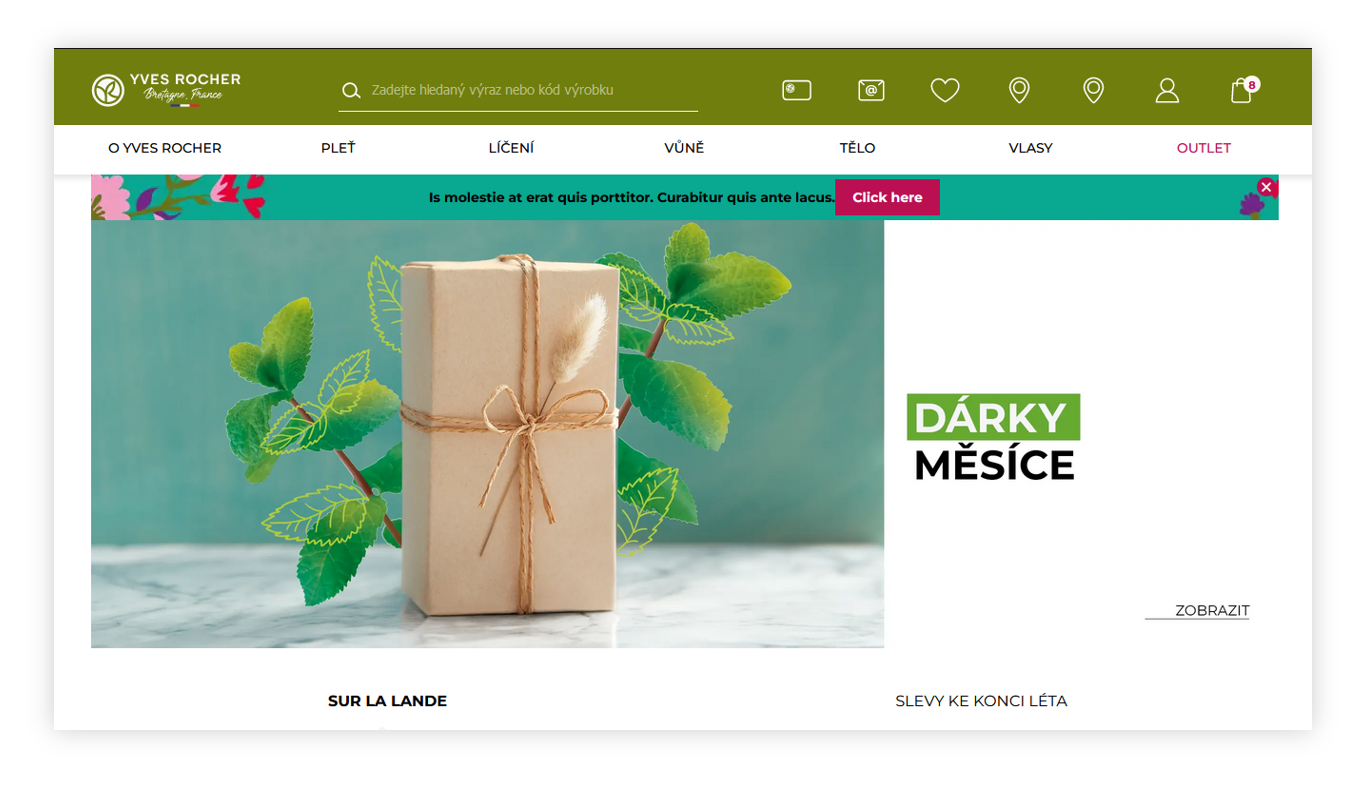
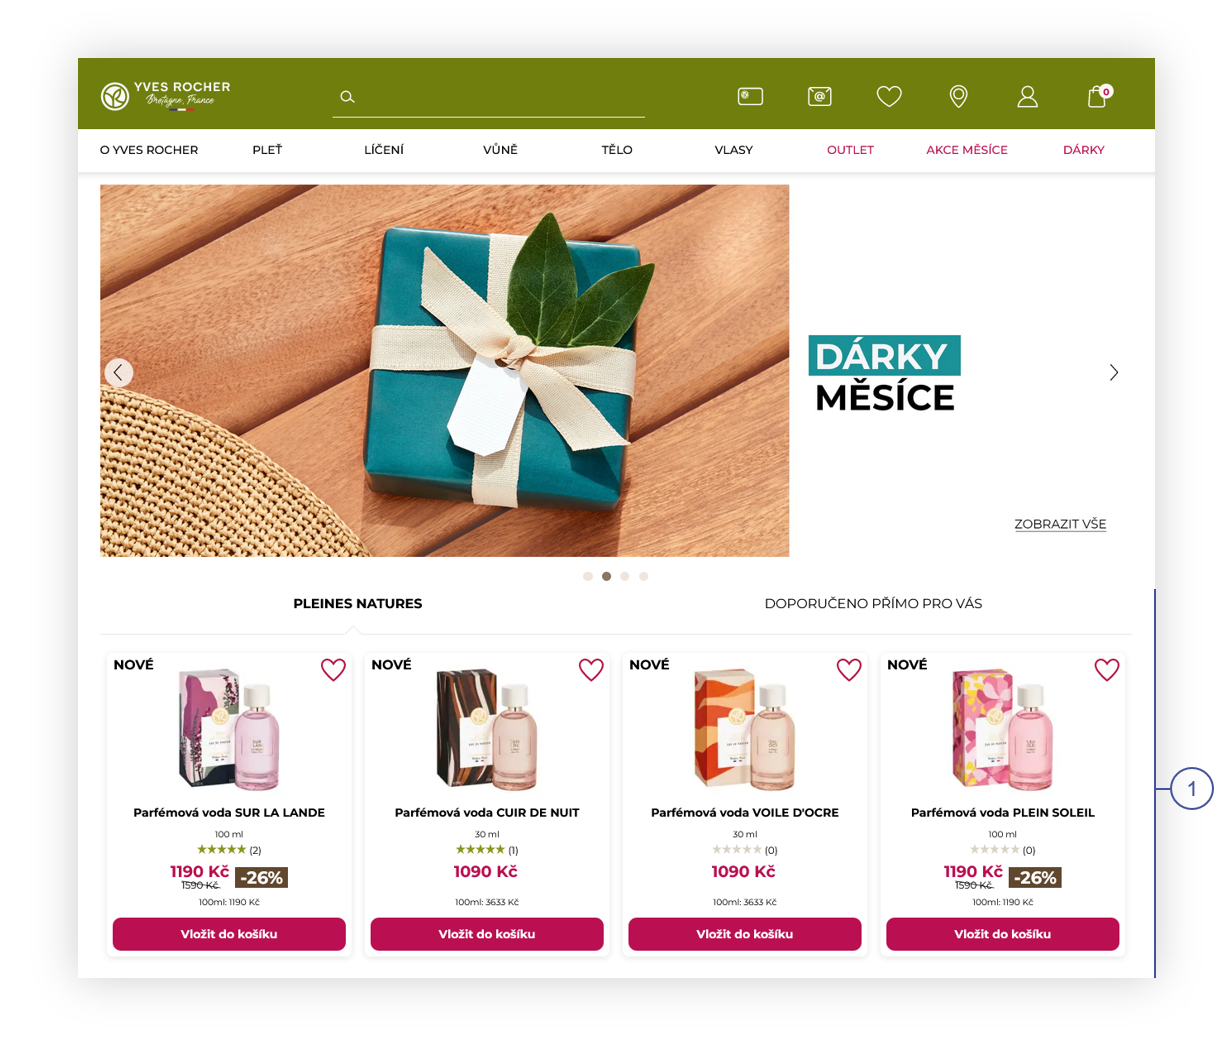
| *Wizualizacja strony głównej Yves Rocher (wersja desktop)* |
|  |
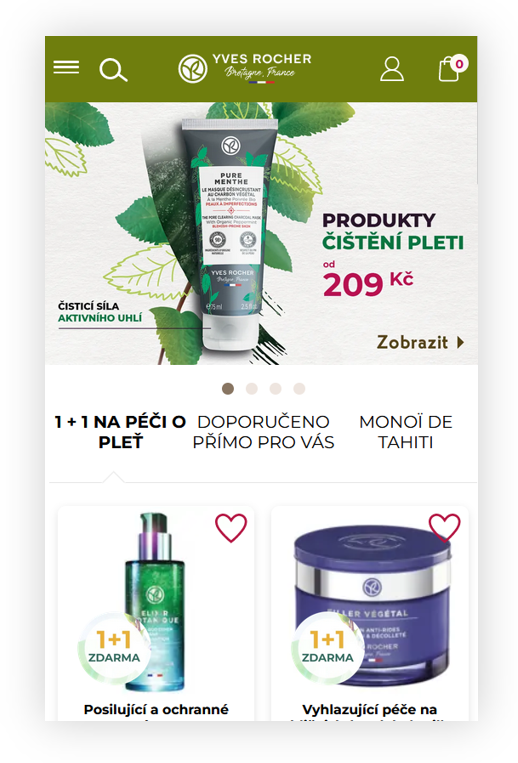
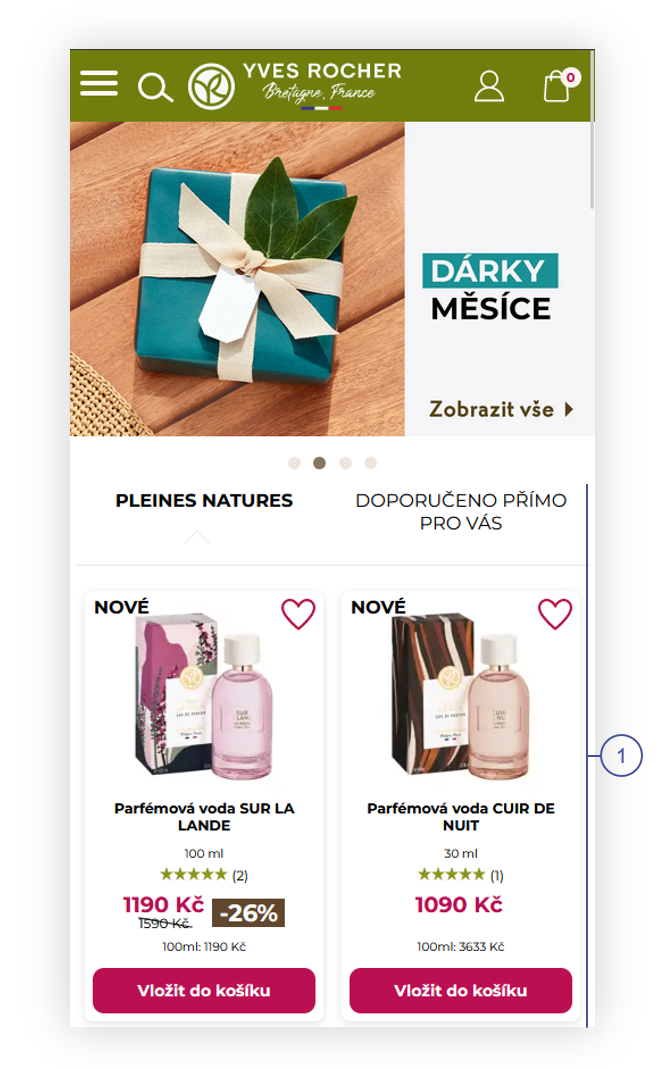
| *Wizualizacja strony głównej Yves Rocher (wersja mobile)* |
|  |
| *Wizualizacja strony głównej Yves Rocher (wersja desktop)* |
|  |
| *Wizualizacja strony głównej Yves Rocher (wersja mobile)* |
| 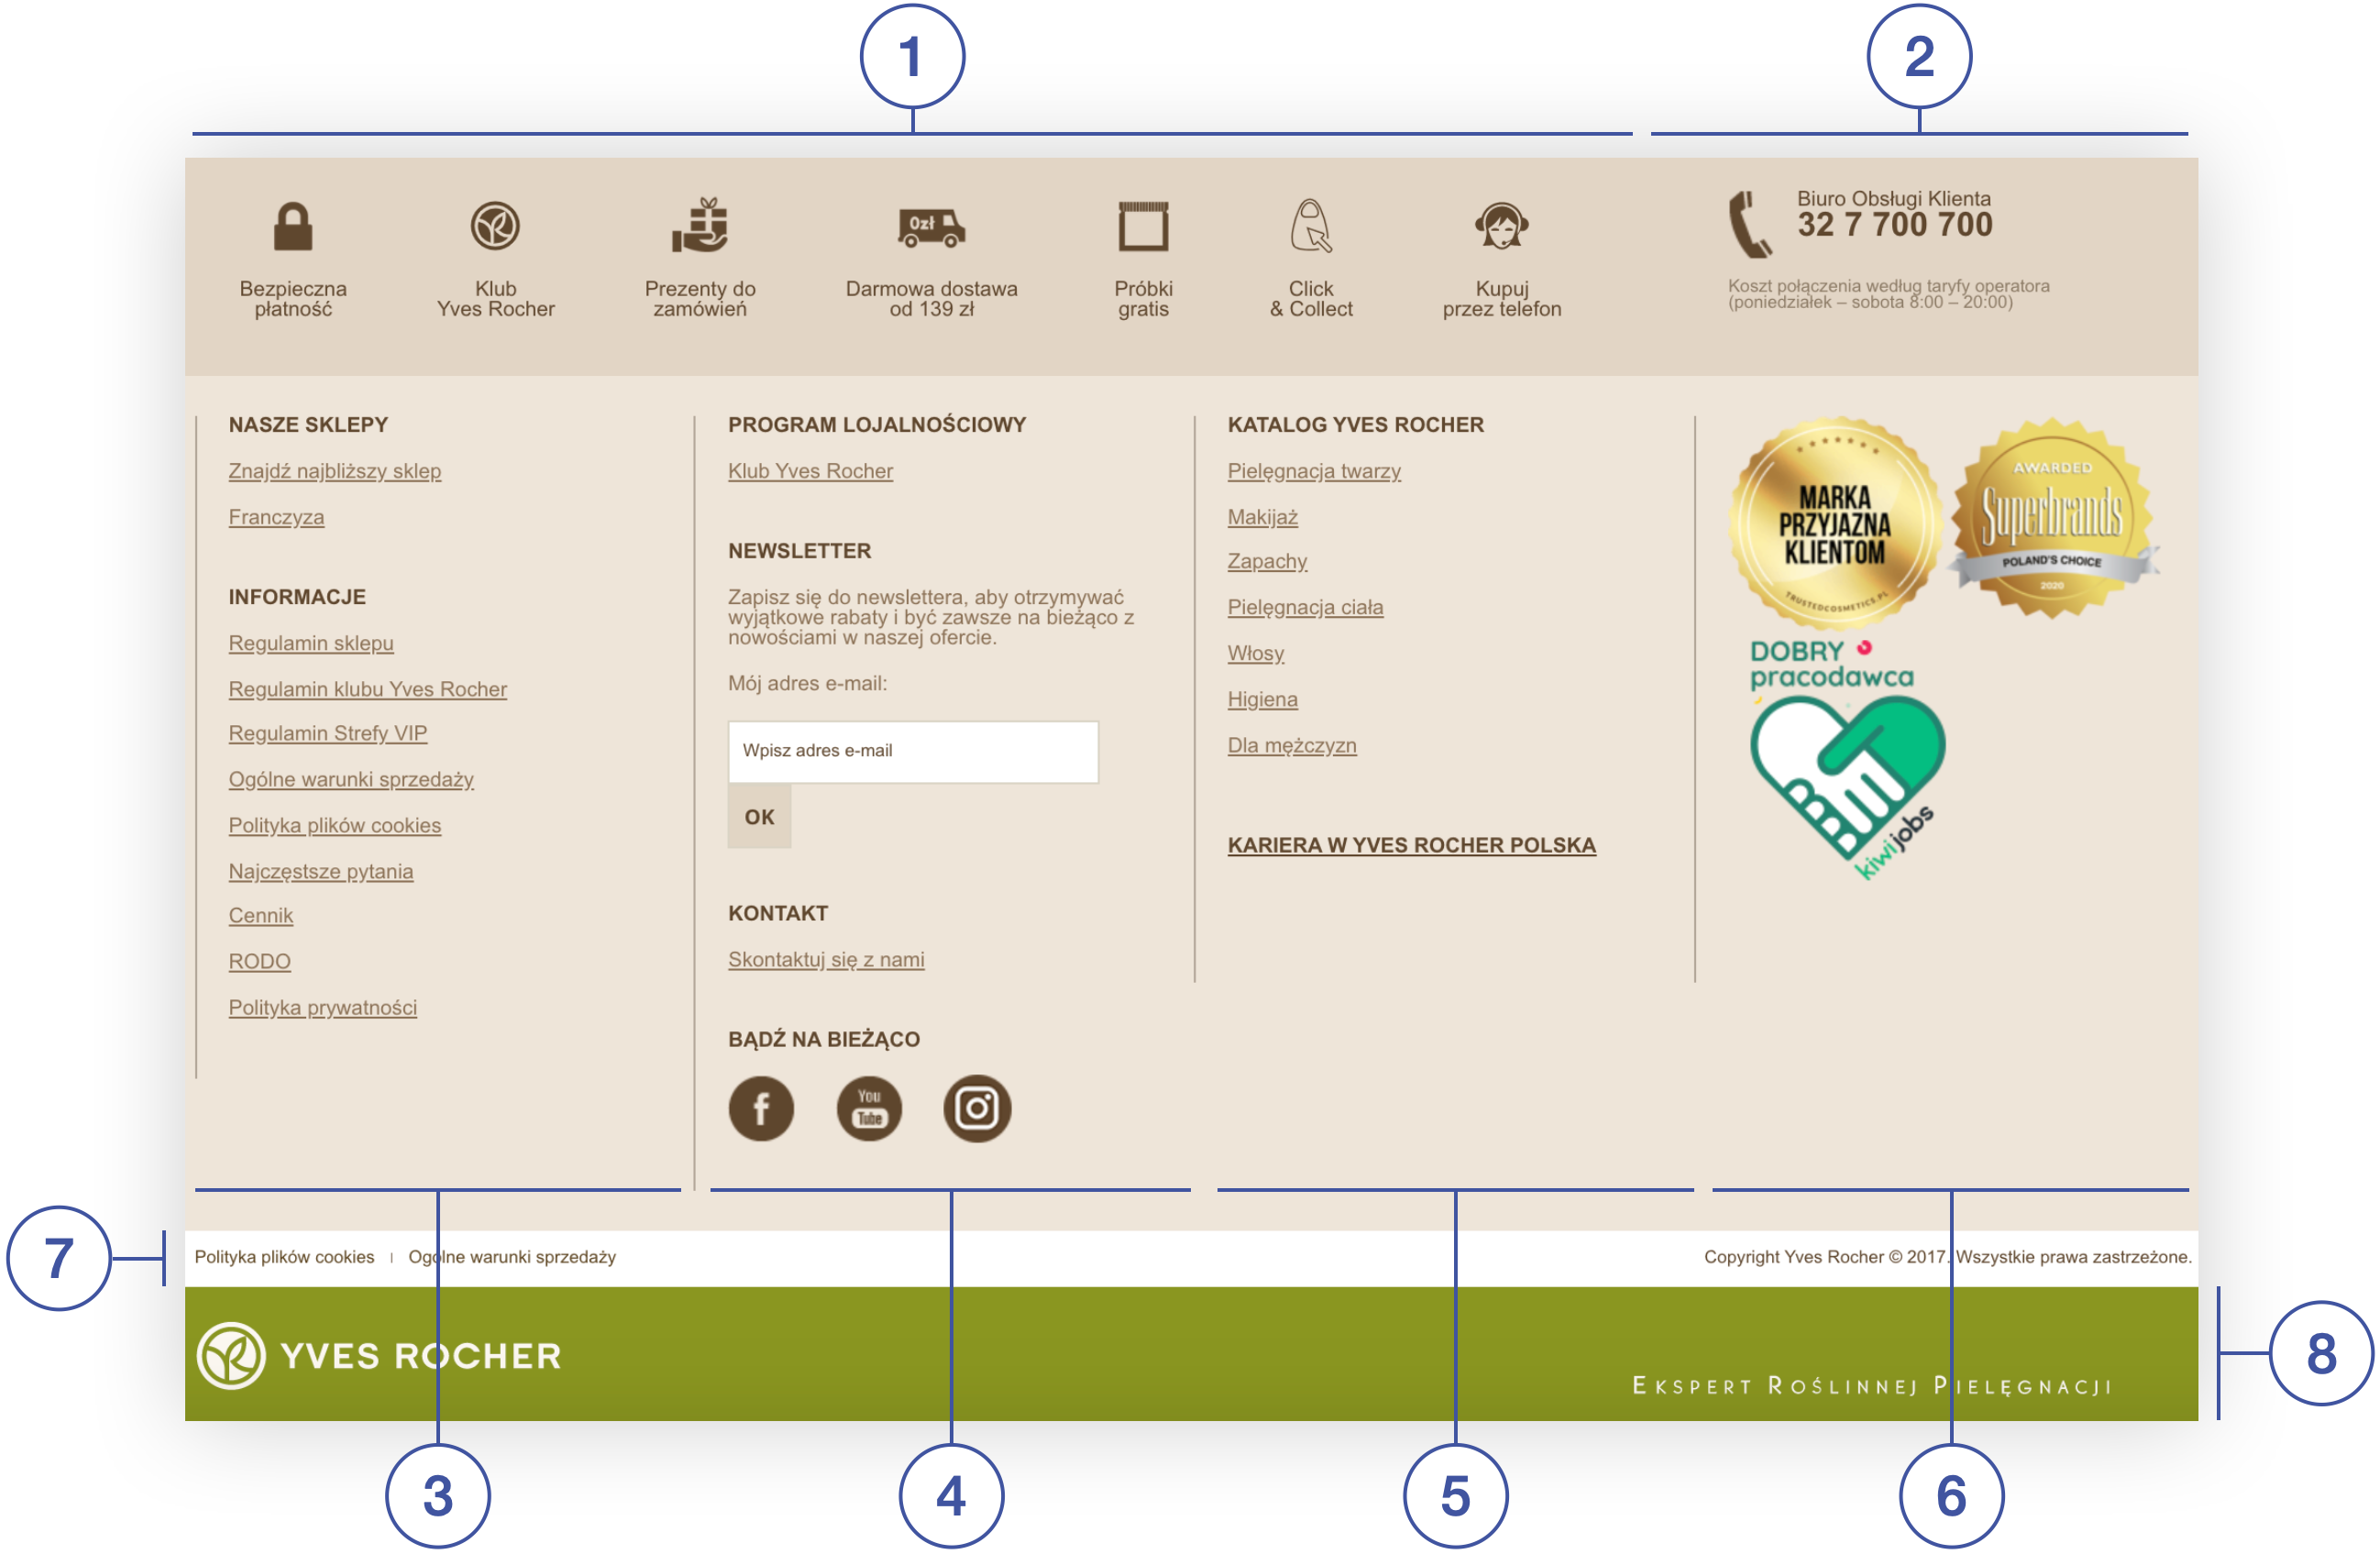 |
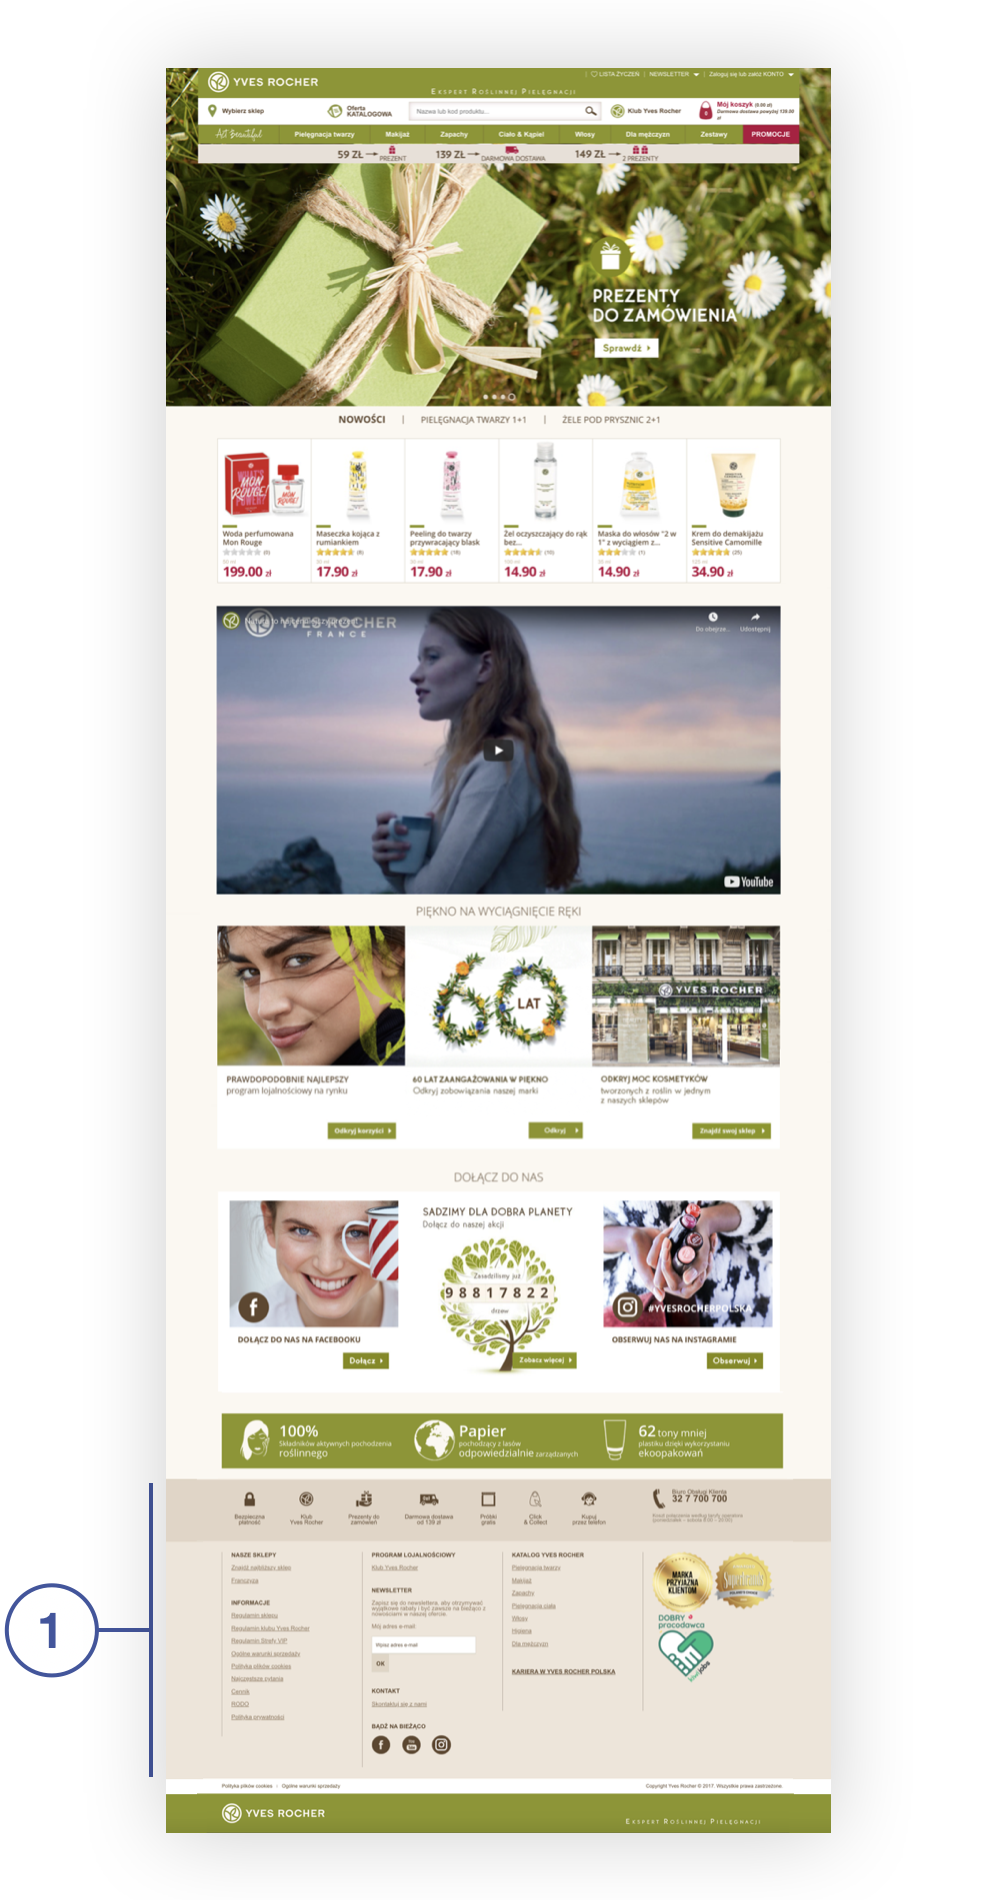
| *Wizualizacja stopki na stronie głównej sklepu Yves Rocher (wersja desktop)* |
| 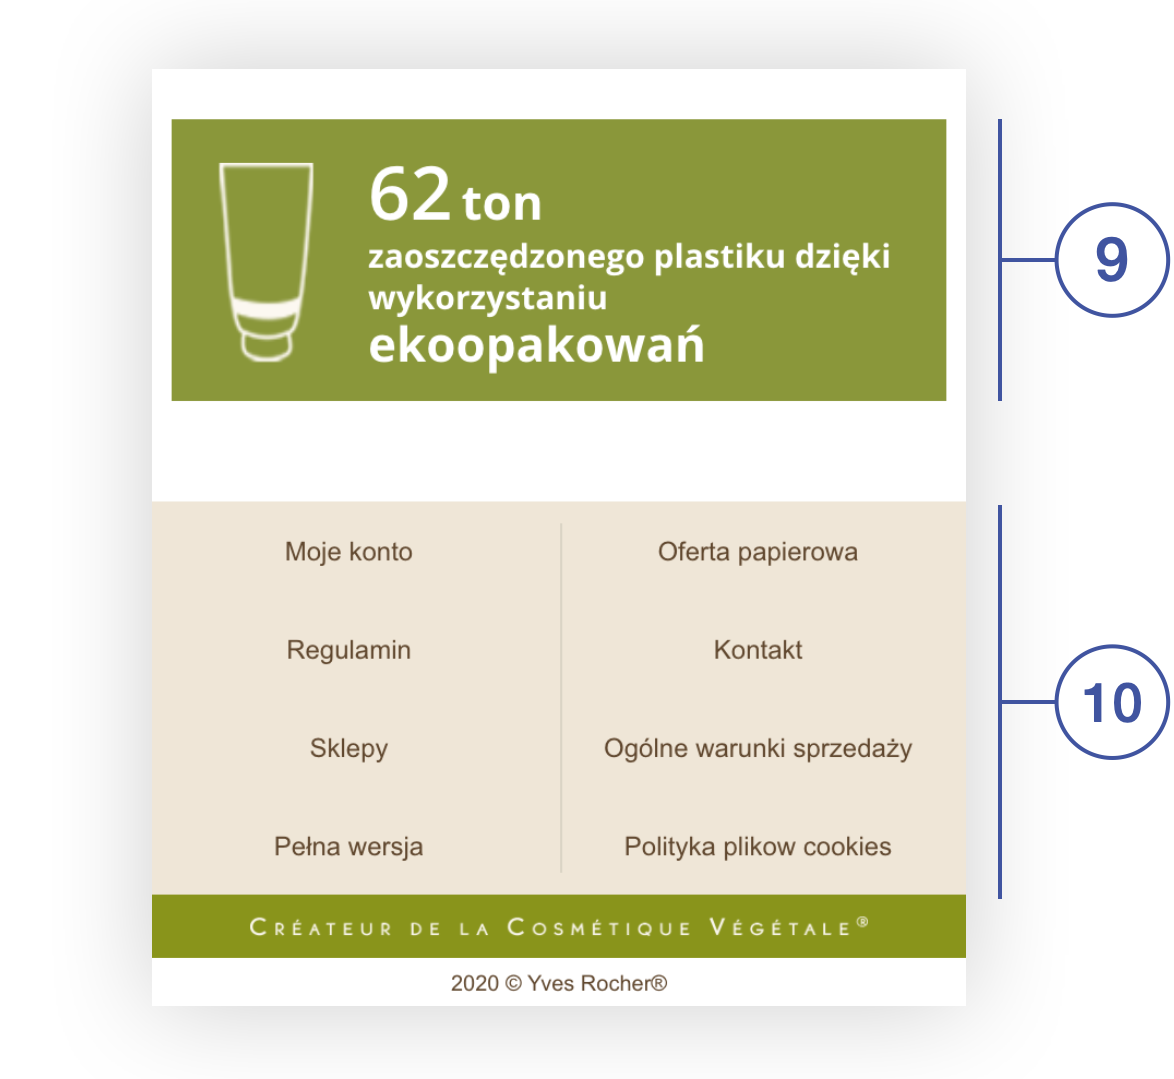 |
| *Wizualizacja stopki na stronie głównej sklepu Yves Rocher (wersja mobile)* |
|  |
| *Wizualizacja CMS bloku (new layout footer / advantages icons) na witrynie sklepu* |
| 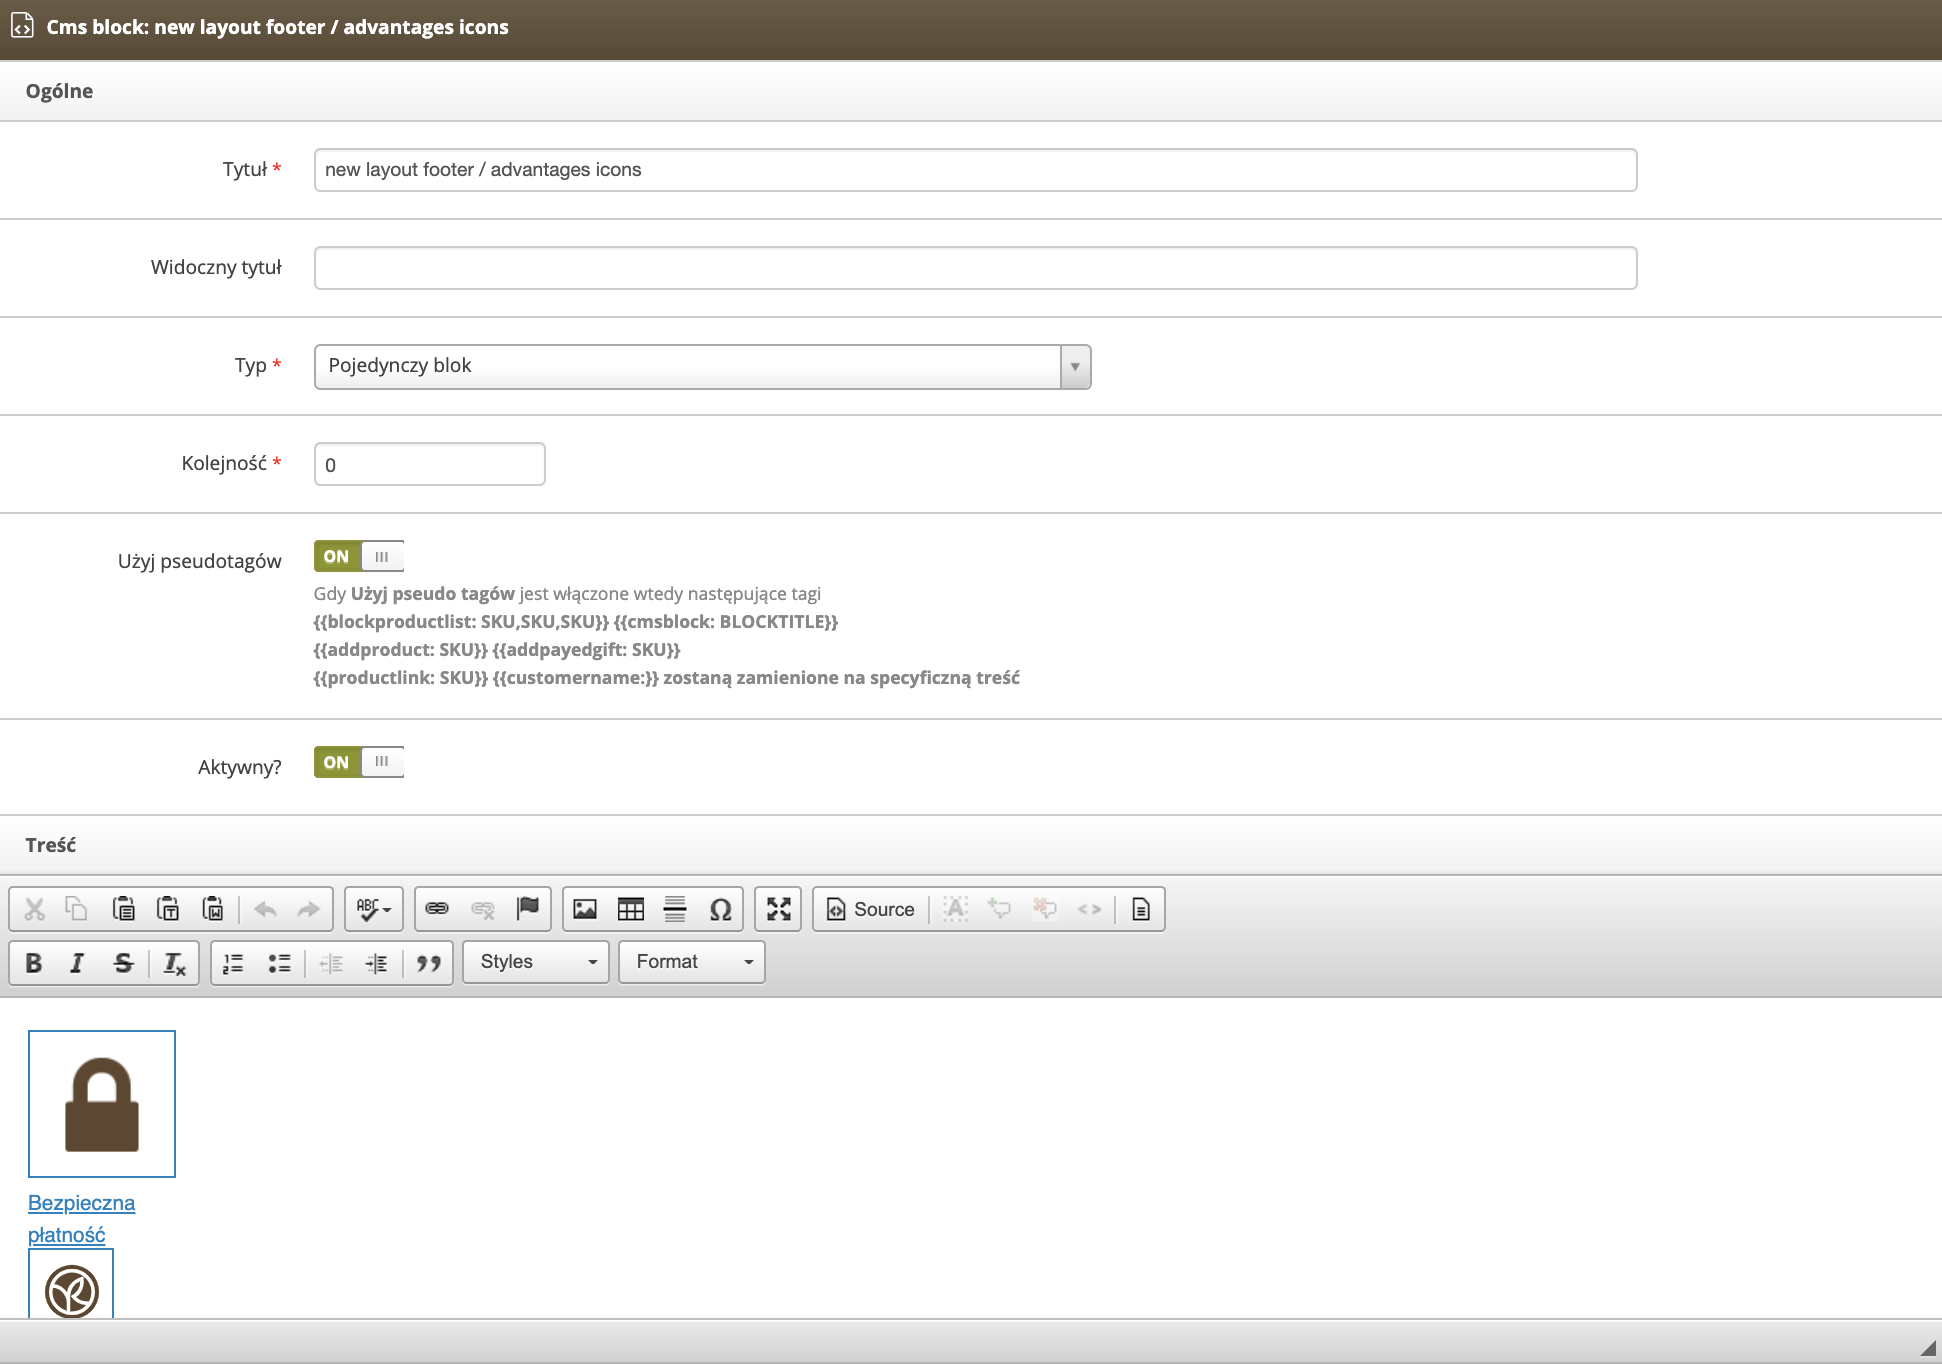 |
| *Wizualizacja widoku Popraw blok (new layout footer / advantages icons) w panelu administracyjnym* |
|  |
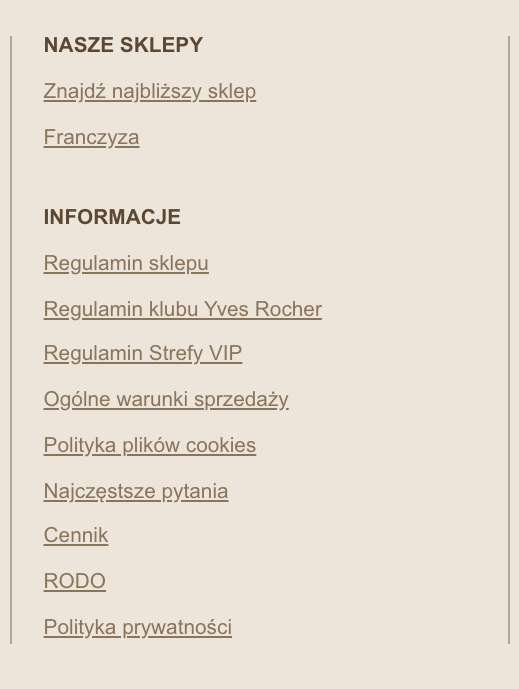
| *Wizualizacja CMS bloku (new layout footer / client services) na witrynie sklepu* |
| 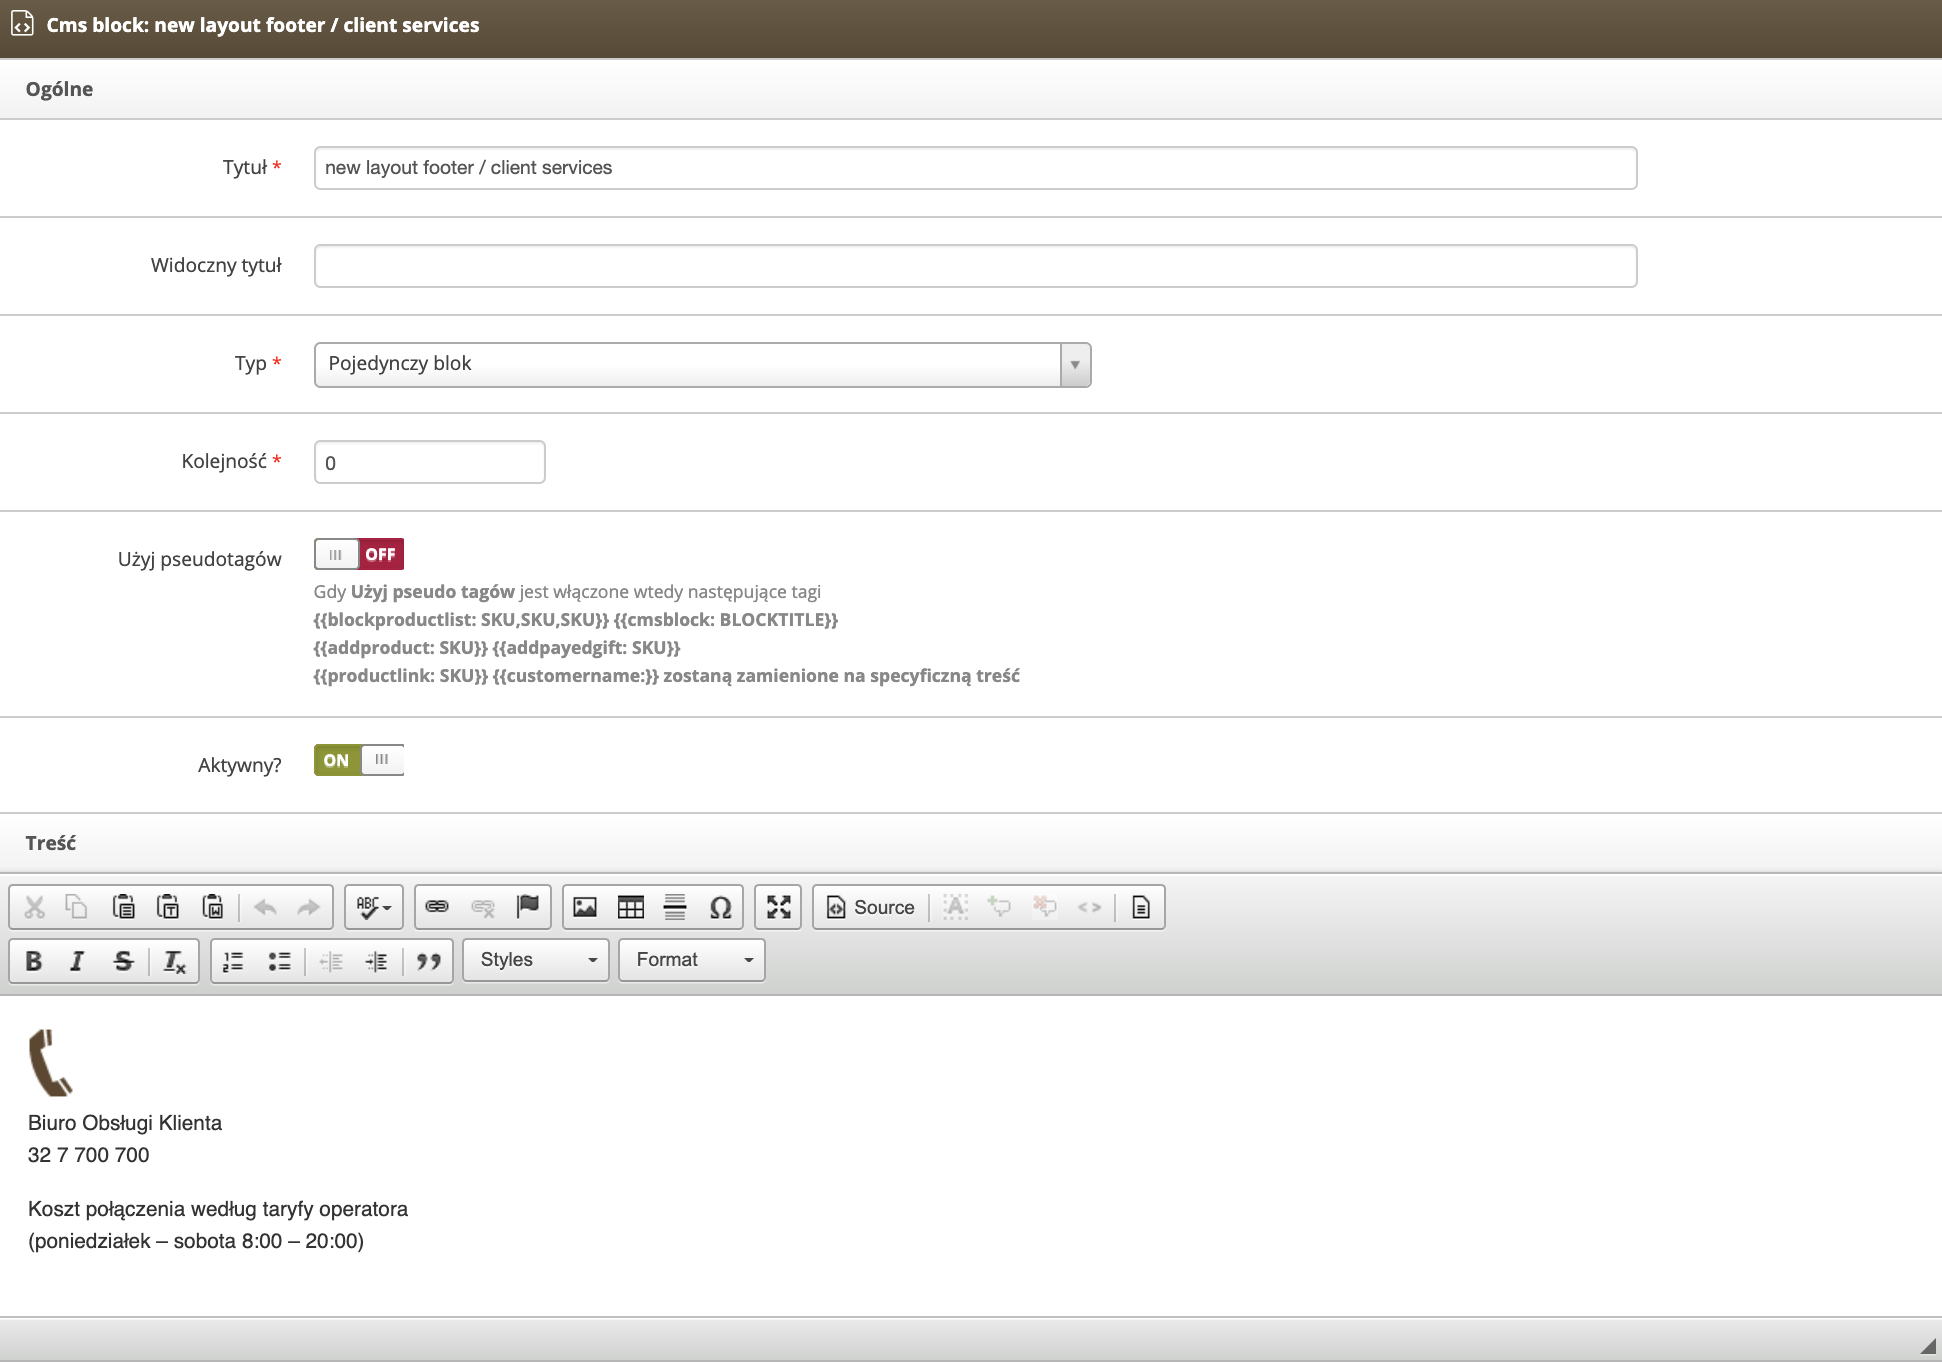 |
| *Wizualizacja widoku Popraw blok (new layout footer / client services) w panelu administracyjnym* |
|  |
| *Wizualizacja CMS bloku (new layout footer / column 1) na witrynie sklepu* |
|  |
| *Wizualizacja widoku Popraw blok (new layout footer / column 1) w panelu administracyjnym* |
| 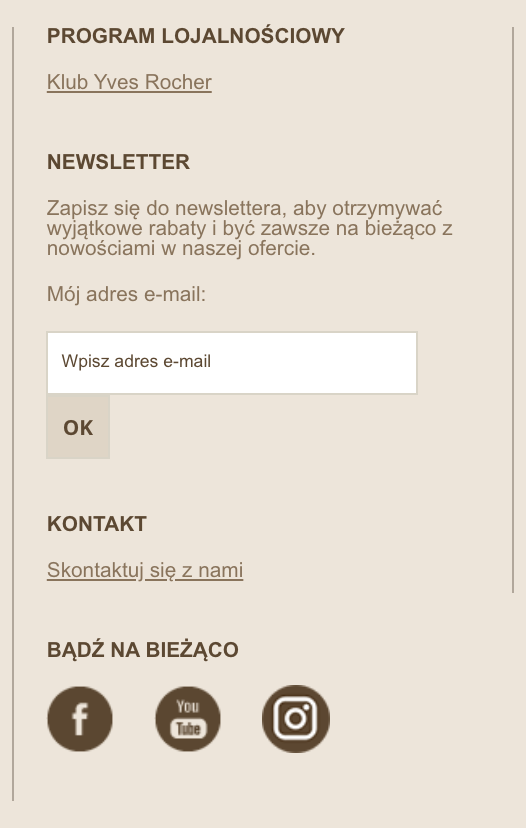 |
| *Wizualizacja CMS bloku (new layout footer / column 2) na witrynie sklepu* |
| 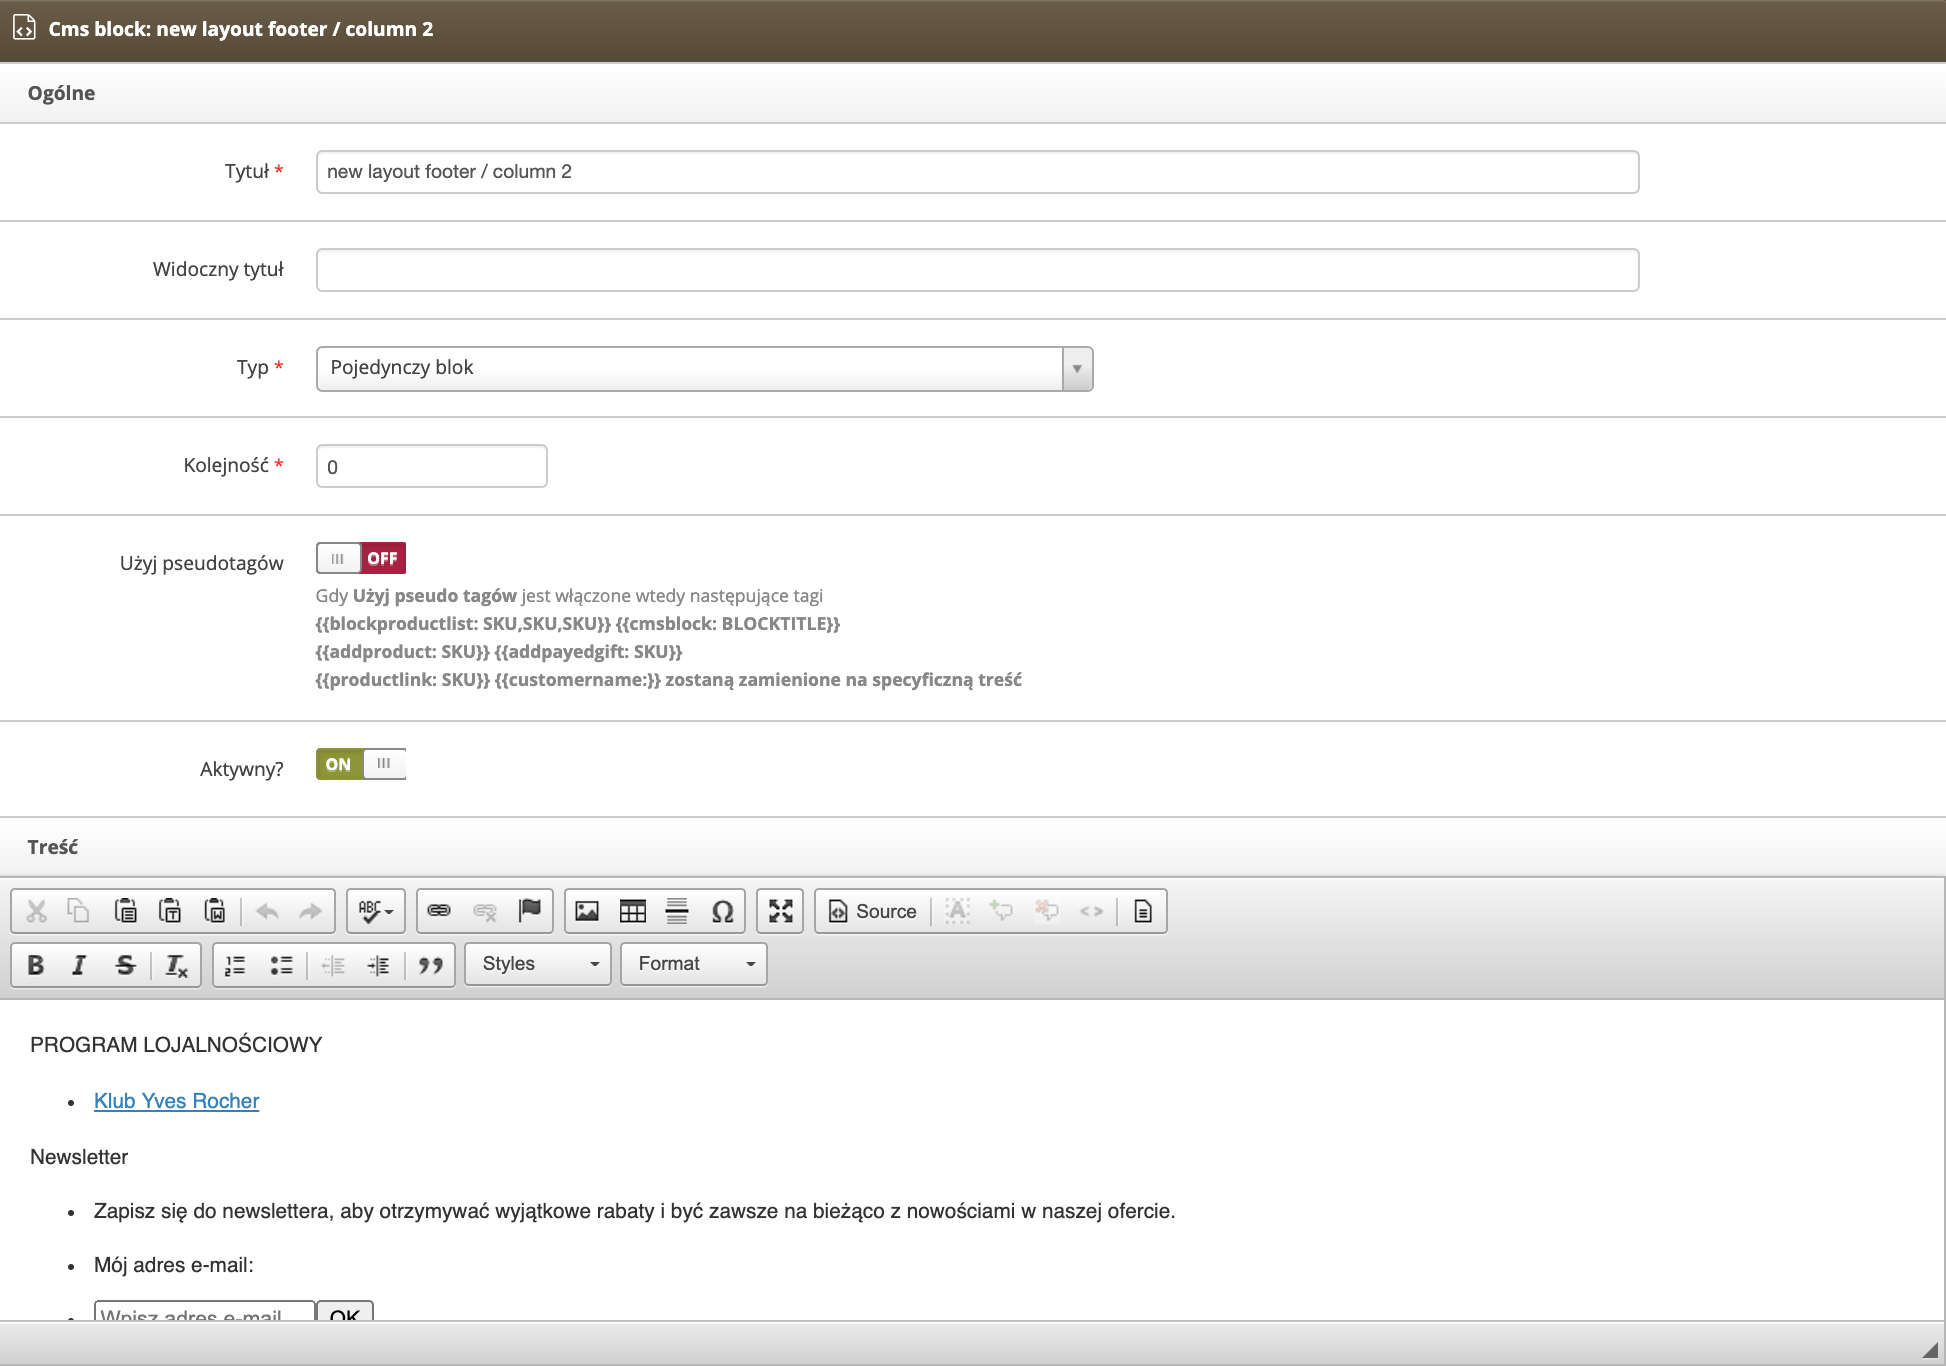 |
| *Wizualizacja widoku Popraw blok (new layout footer / column 2) w panelu administracyjnym* |
| 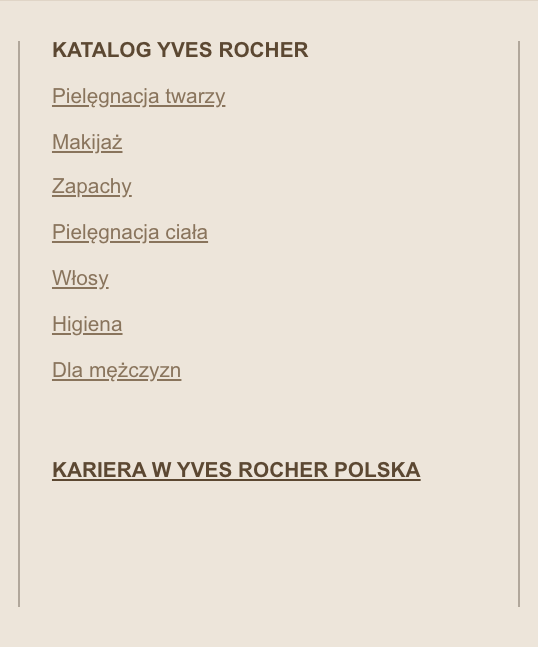 |
| *Wizualizacja CMS bloku (new layout footer / column 3) na witrynie sklepu* |
| 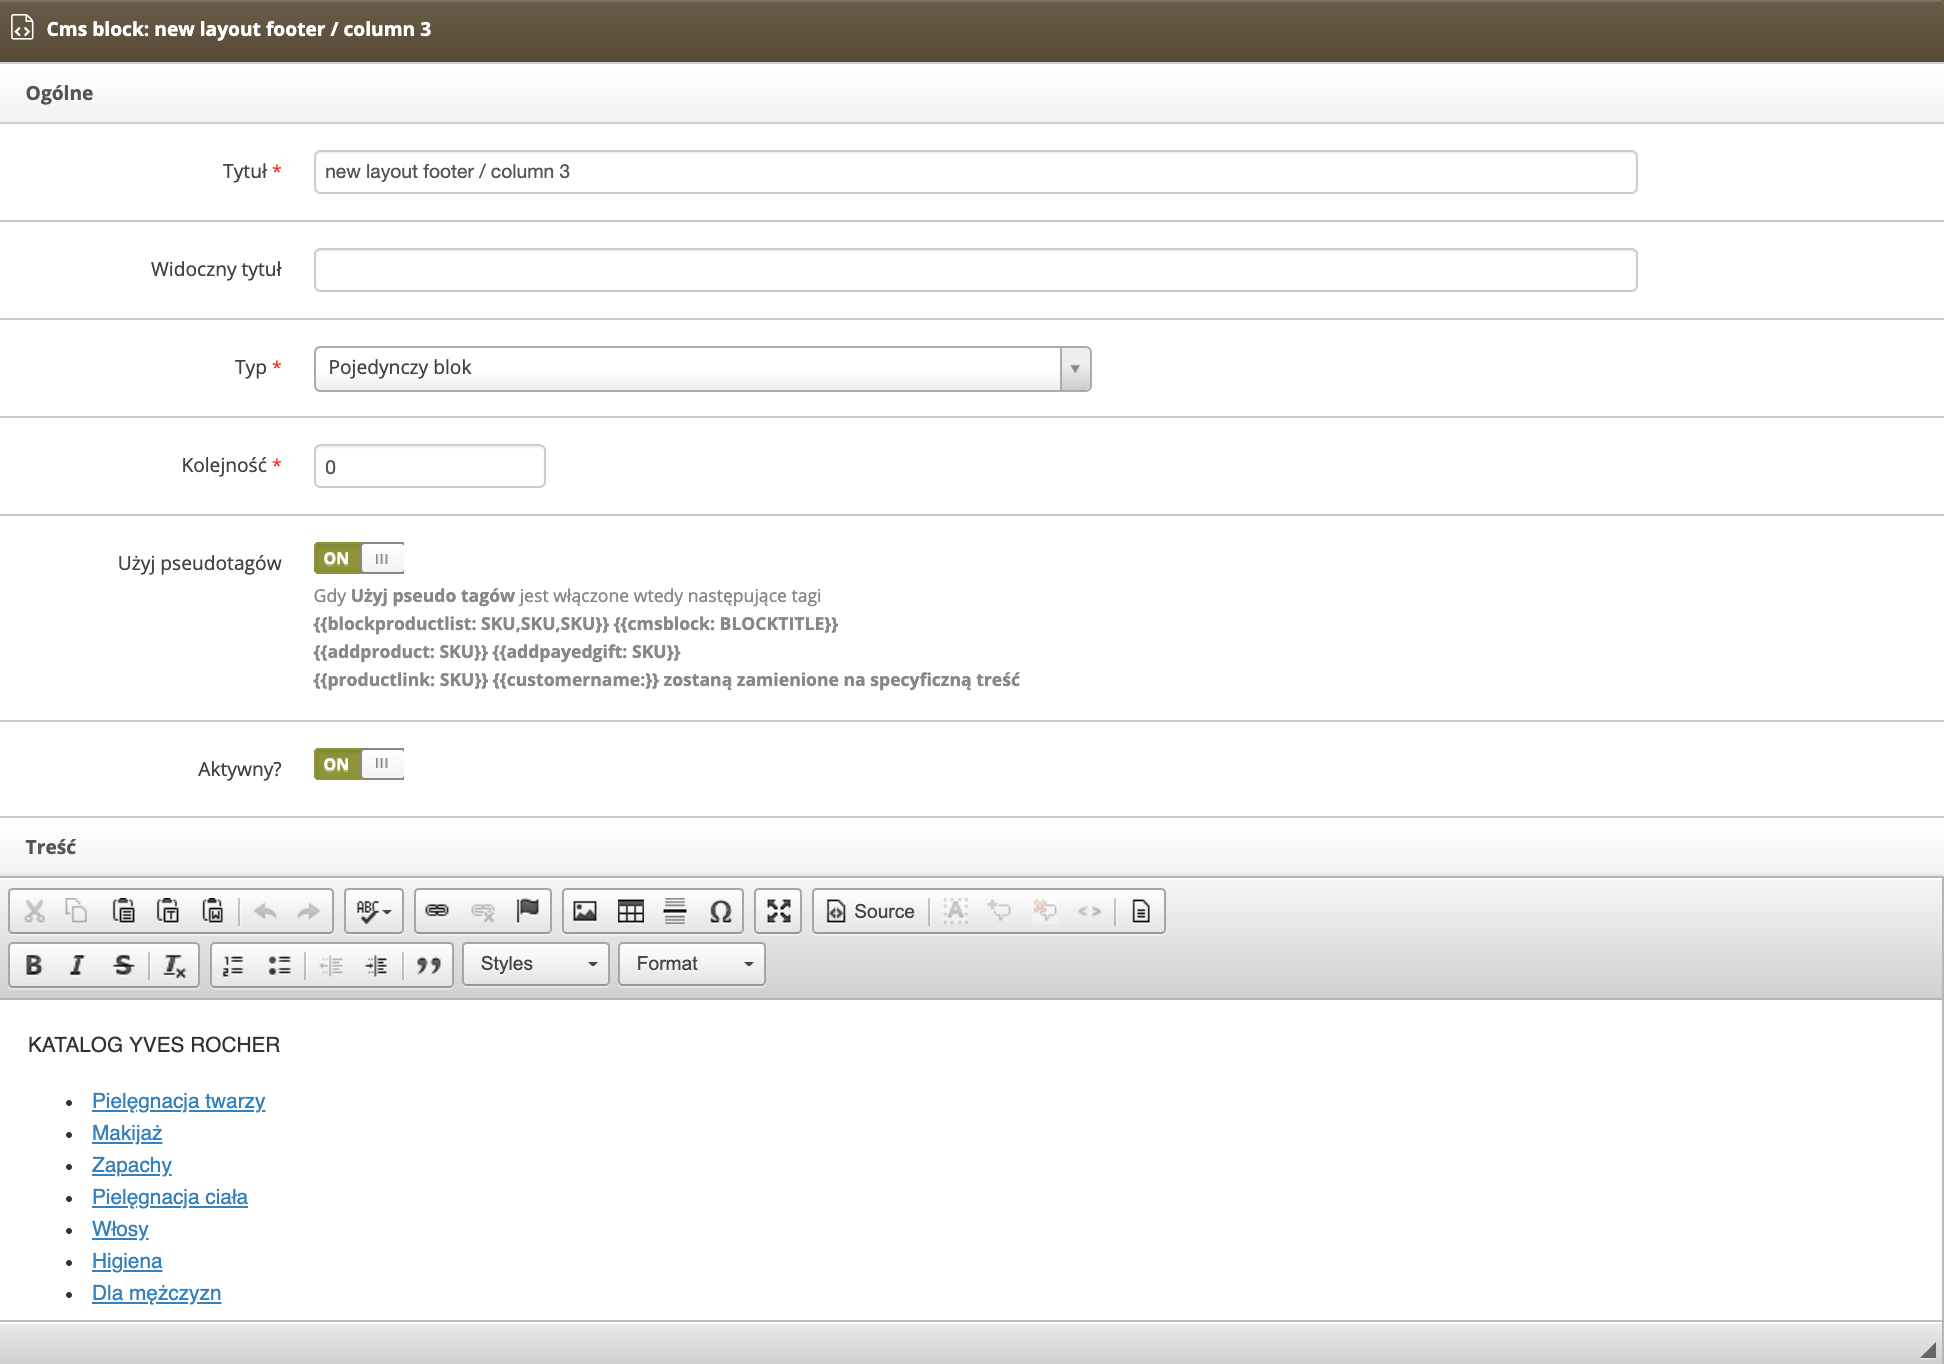 |
| *Wizualizacja widoku Popraw blok (new layout footer / column 3) w panelu administracyjnym* |
|  |
| *Wizualizacja CMS bloku (new layout footer / column 4) na witrynie sklepu* |
| 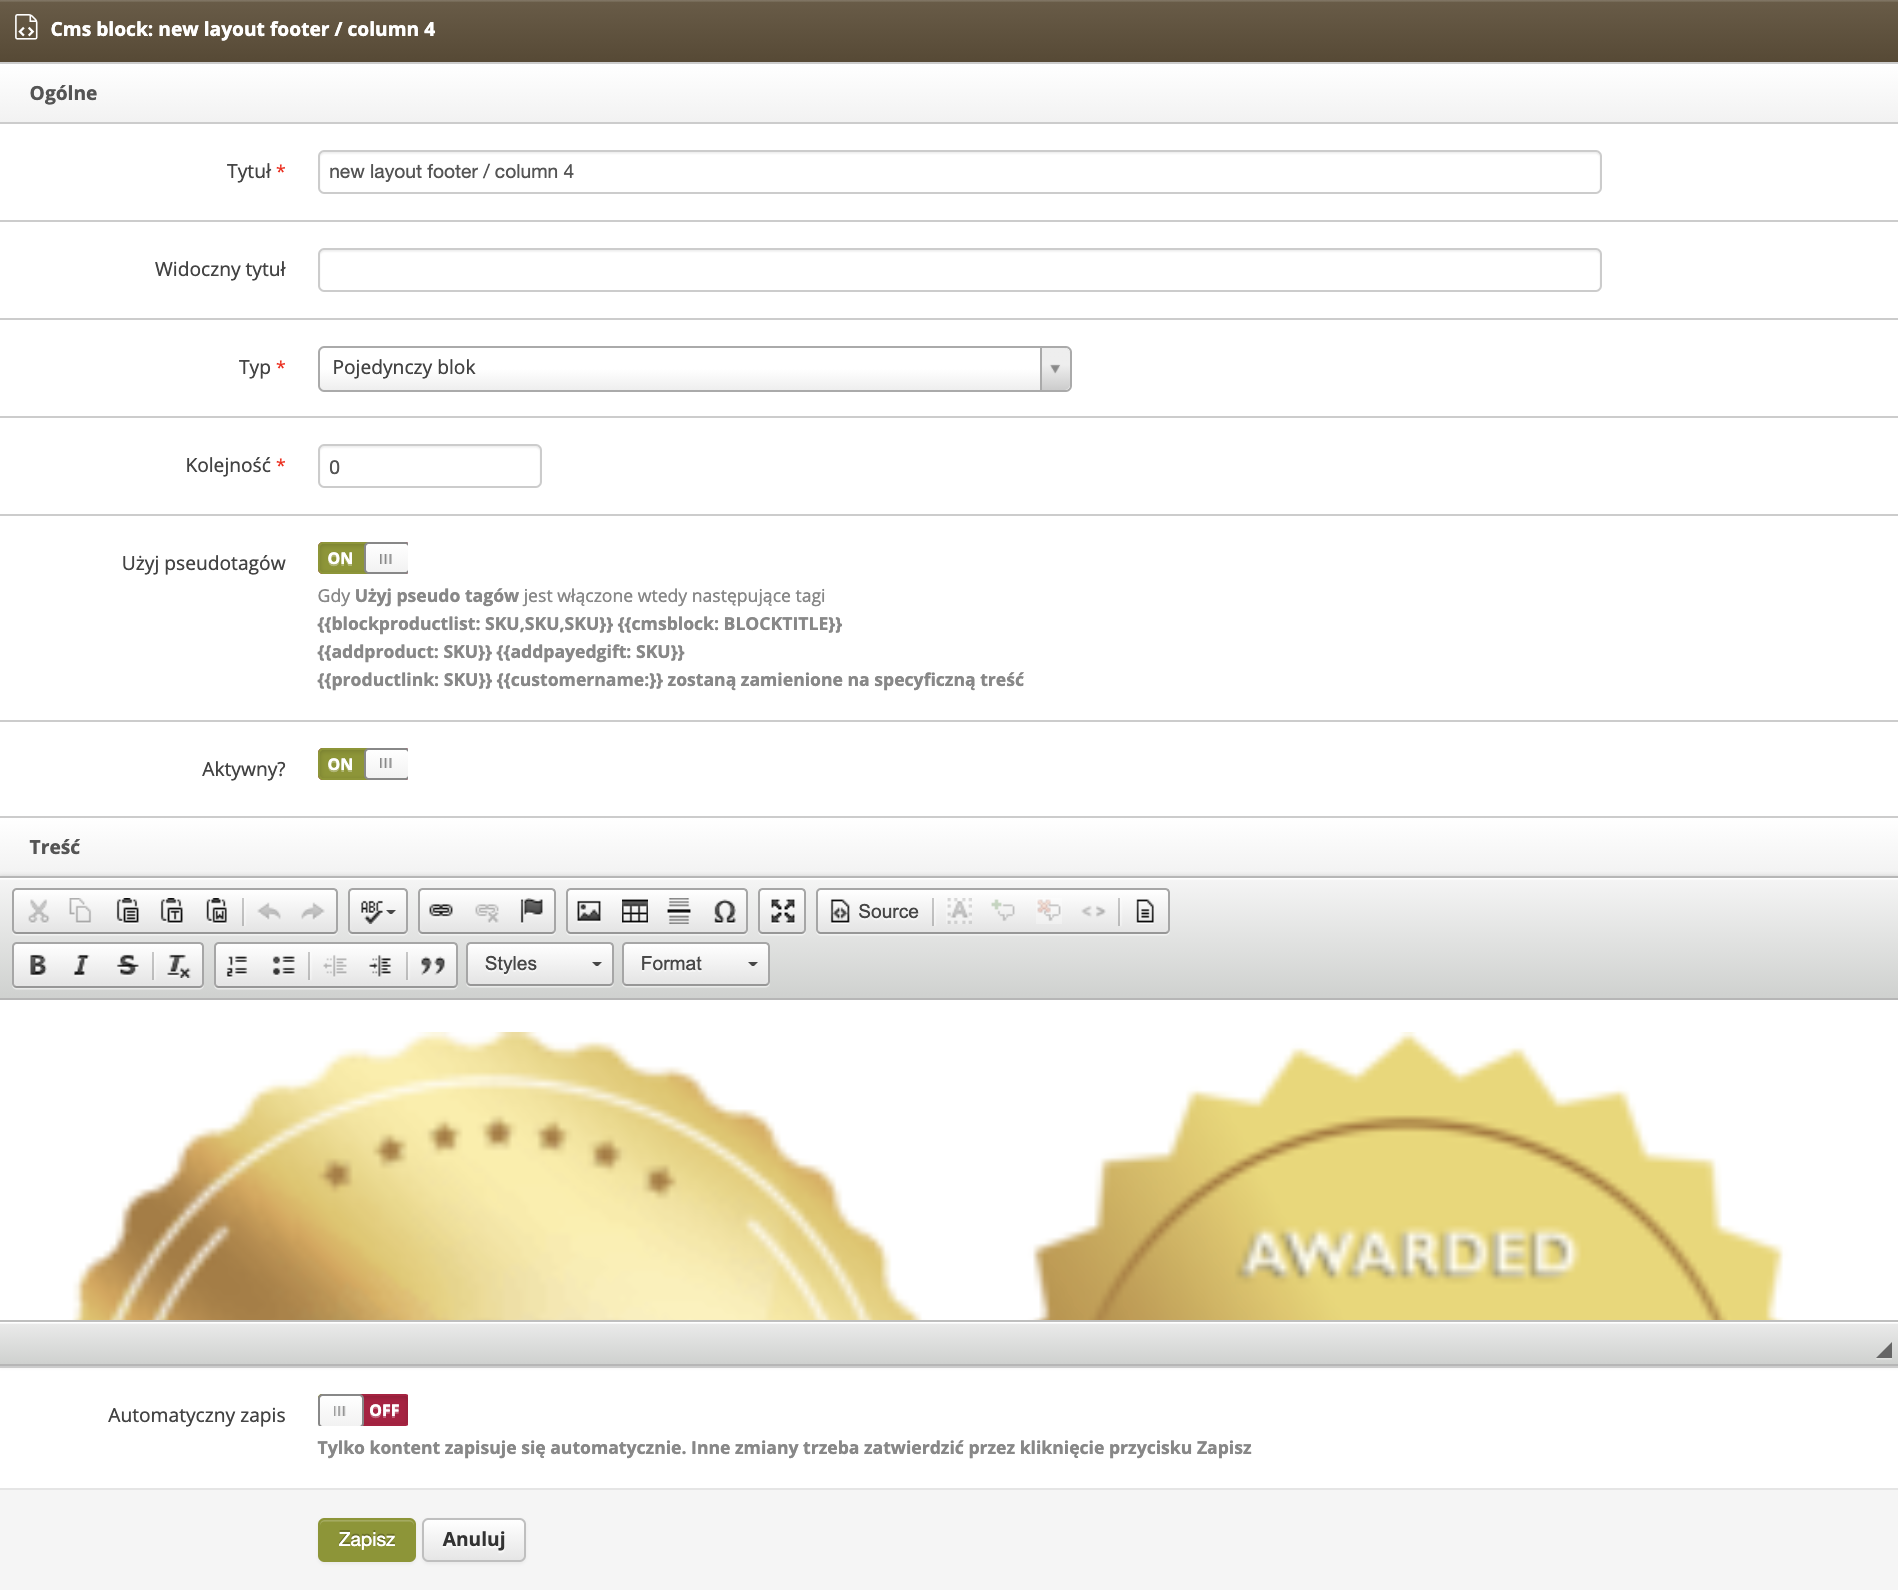 |
| *Wizualizacja widoku Popraw blok (new layout footer / column 4) w panelu administracyjnym* |
|  |
| *Wizualizacja CMS bloku (new layout footer / legal info) na witrynie sklepu* |
| 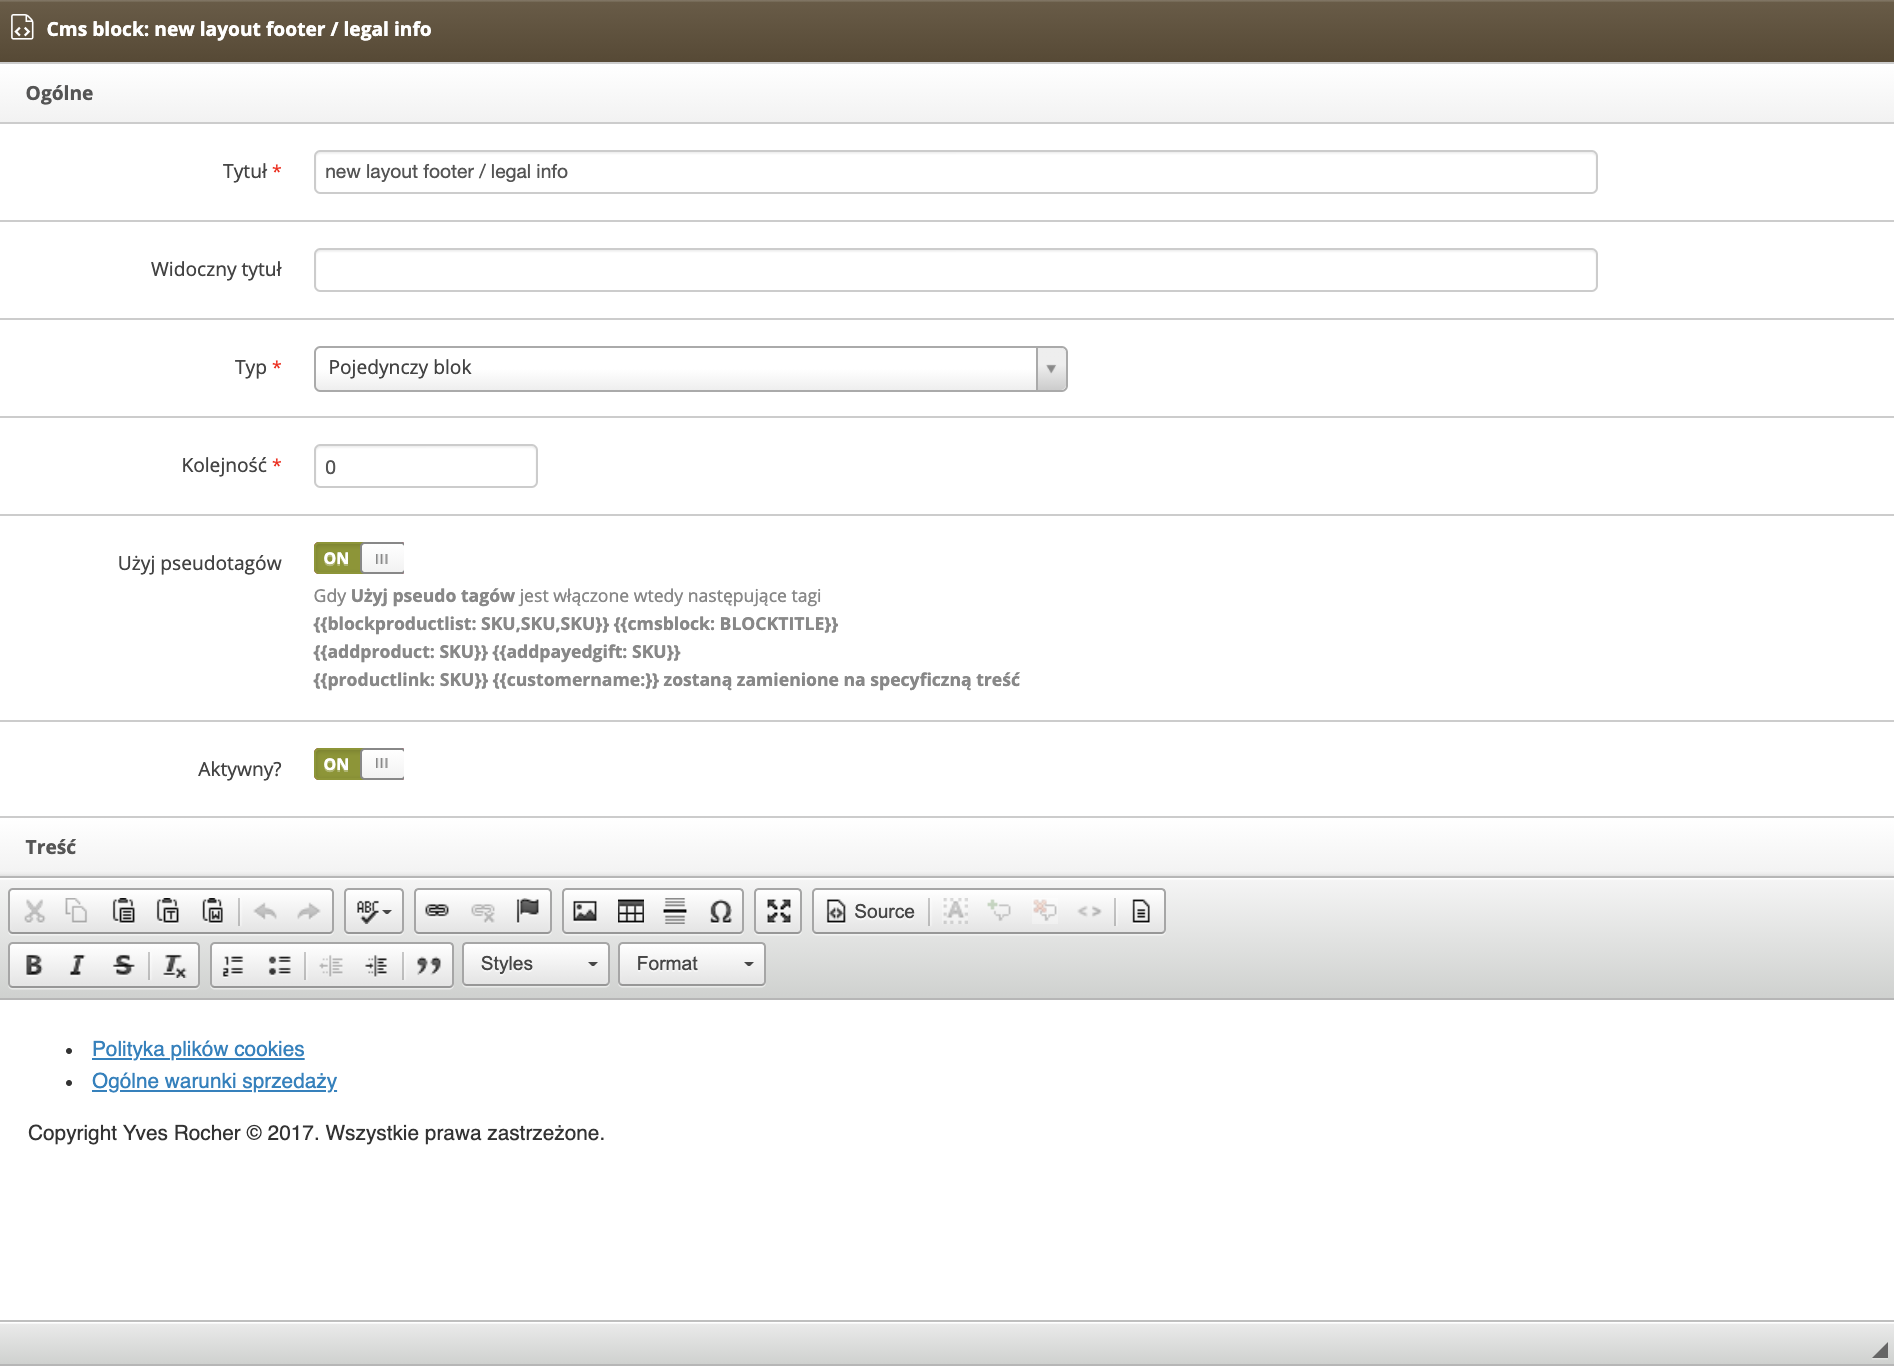 |
| *Wizualizacja widoku Popraw blok (new layout footer / legal info) w panelu administracyjnym* |
|  |
| *Wizualizacja CMS bloku (desktop / footer / green footer) na witrynie sklepu* |
|  |
| *Wizualizacja widoku Popraw blok (desktop / footer / green footer) w panelu administracyjnym* |
|  |
| *Wizualizacja CMS bloku (desktop / footer / green footer) na witrynie sklepu* |
|  |
| *Wizualizacja widoku Popraw blok (desktop / footer / green footer) w panelu administracyjnym* |
|  |
| *Wizualizacja CMS bloku (mobile / footer / green footer) na witrynie sklepu* |
| 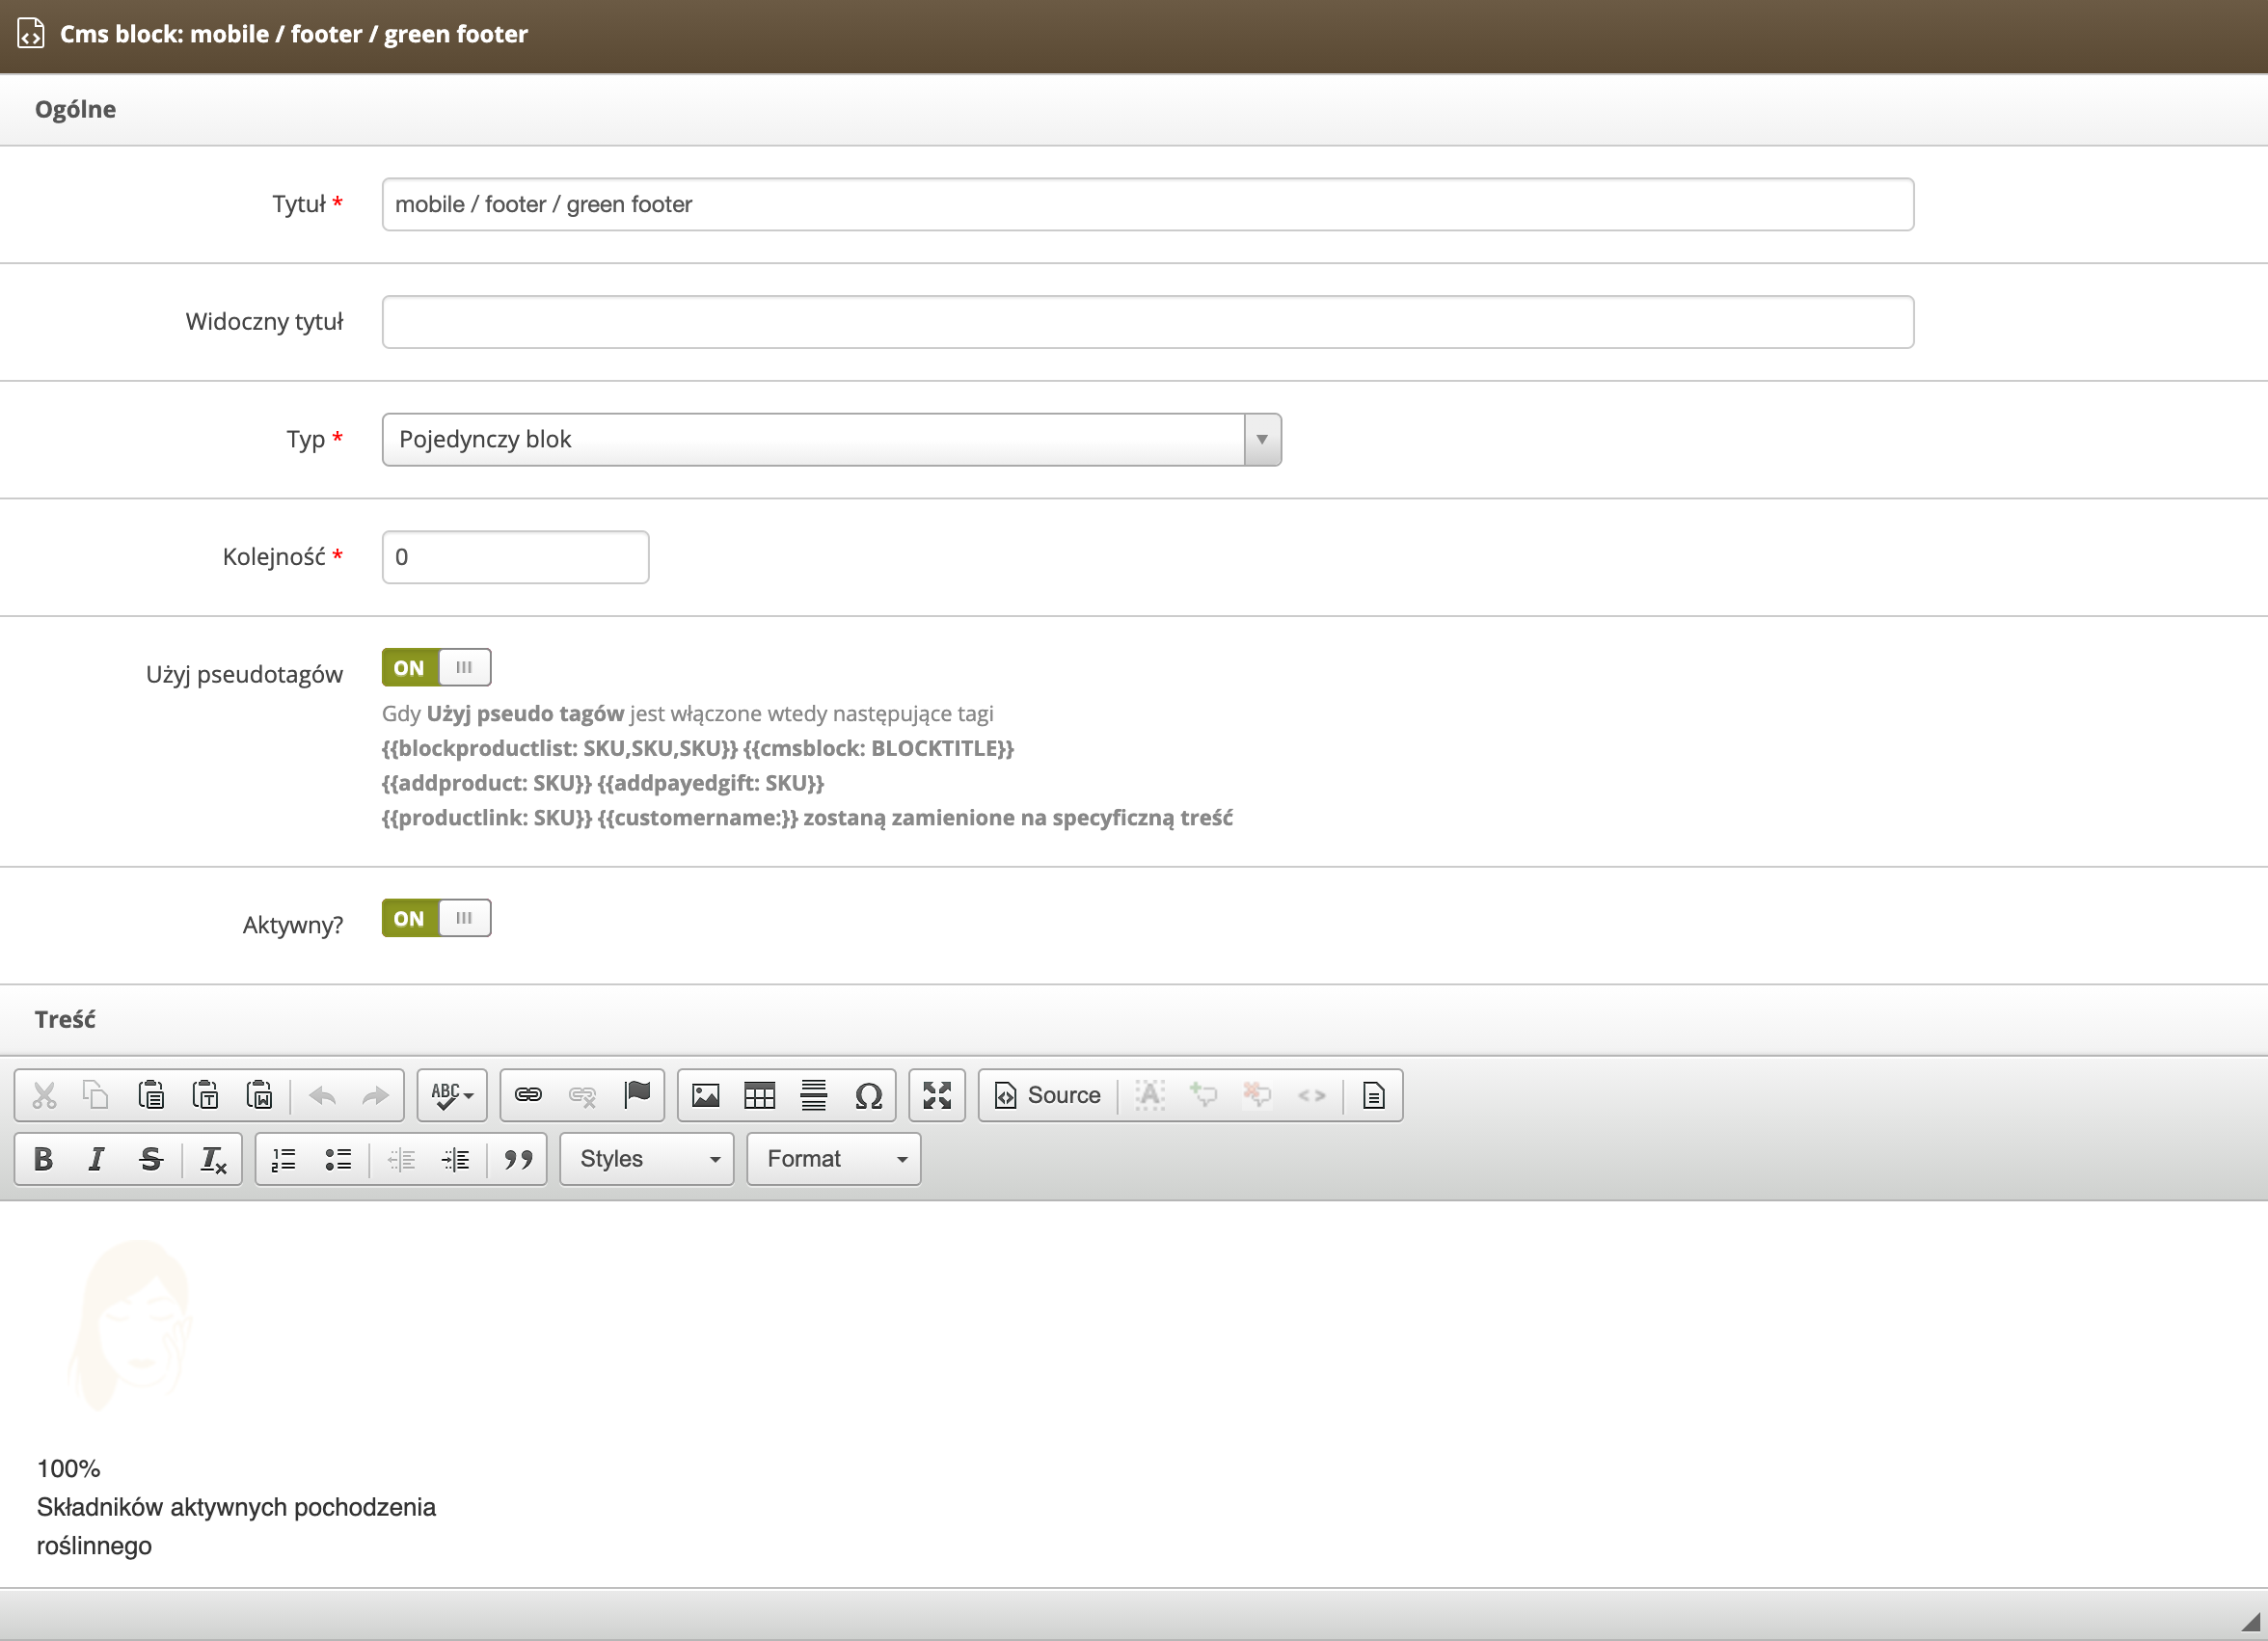 |
| *Wizualizacja widoku Popraw blok (mobile / footer / green footer) w panelu administracyjnym* |
| 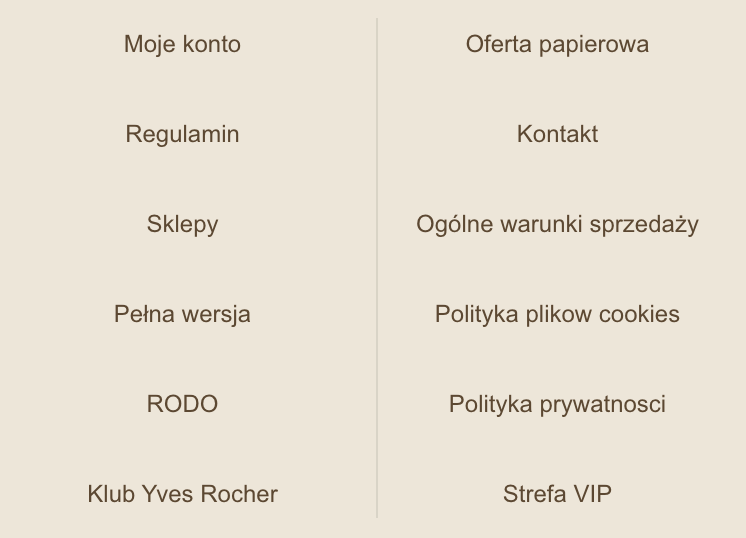 |
| *Wizualizacja CMS bloku (mobile footer navigation) na witrynie sklepu* |
| 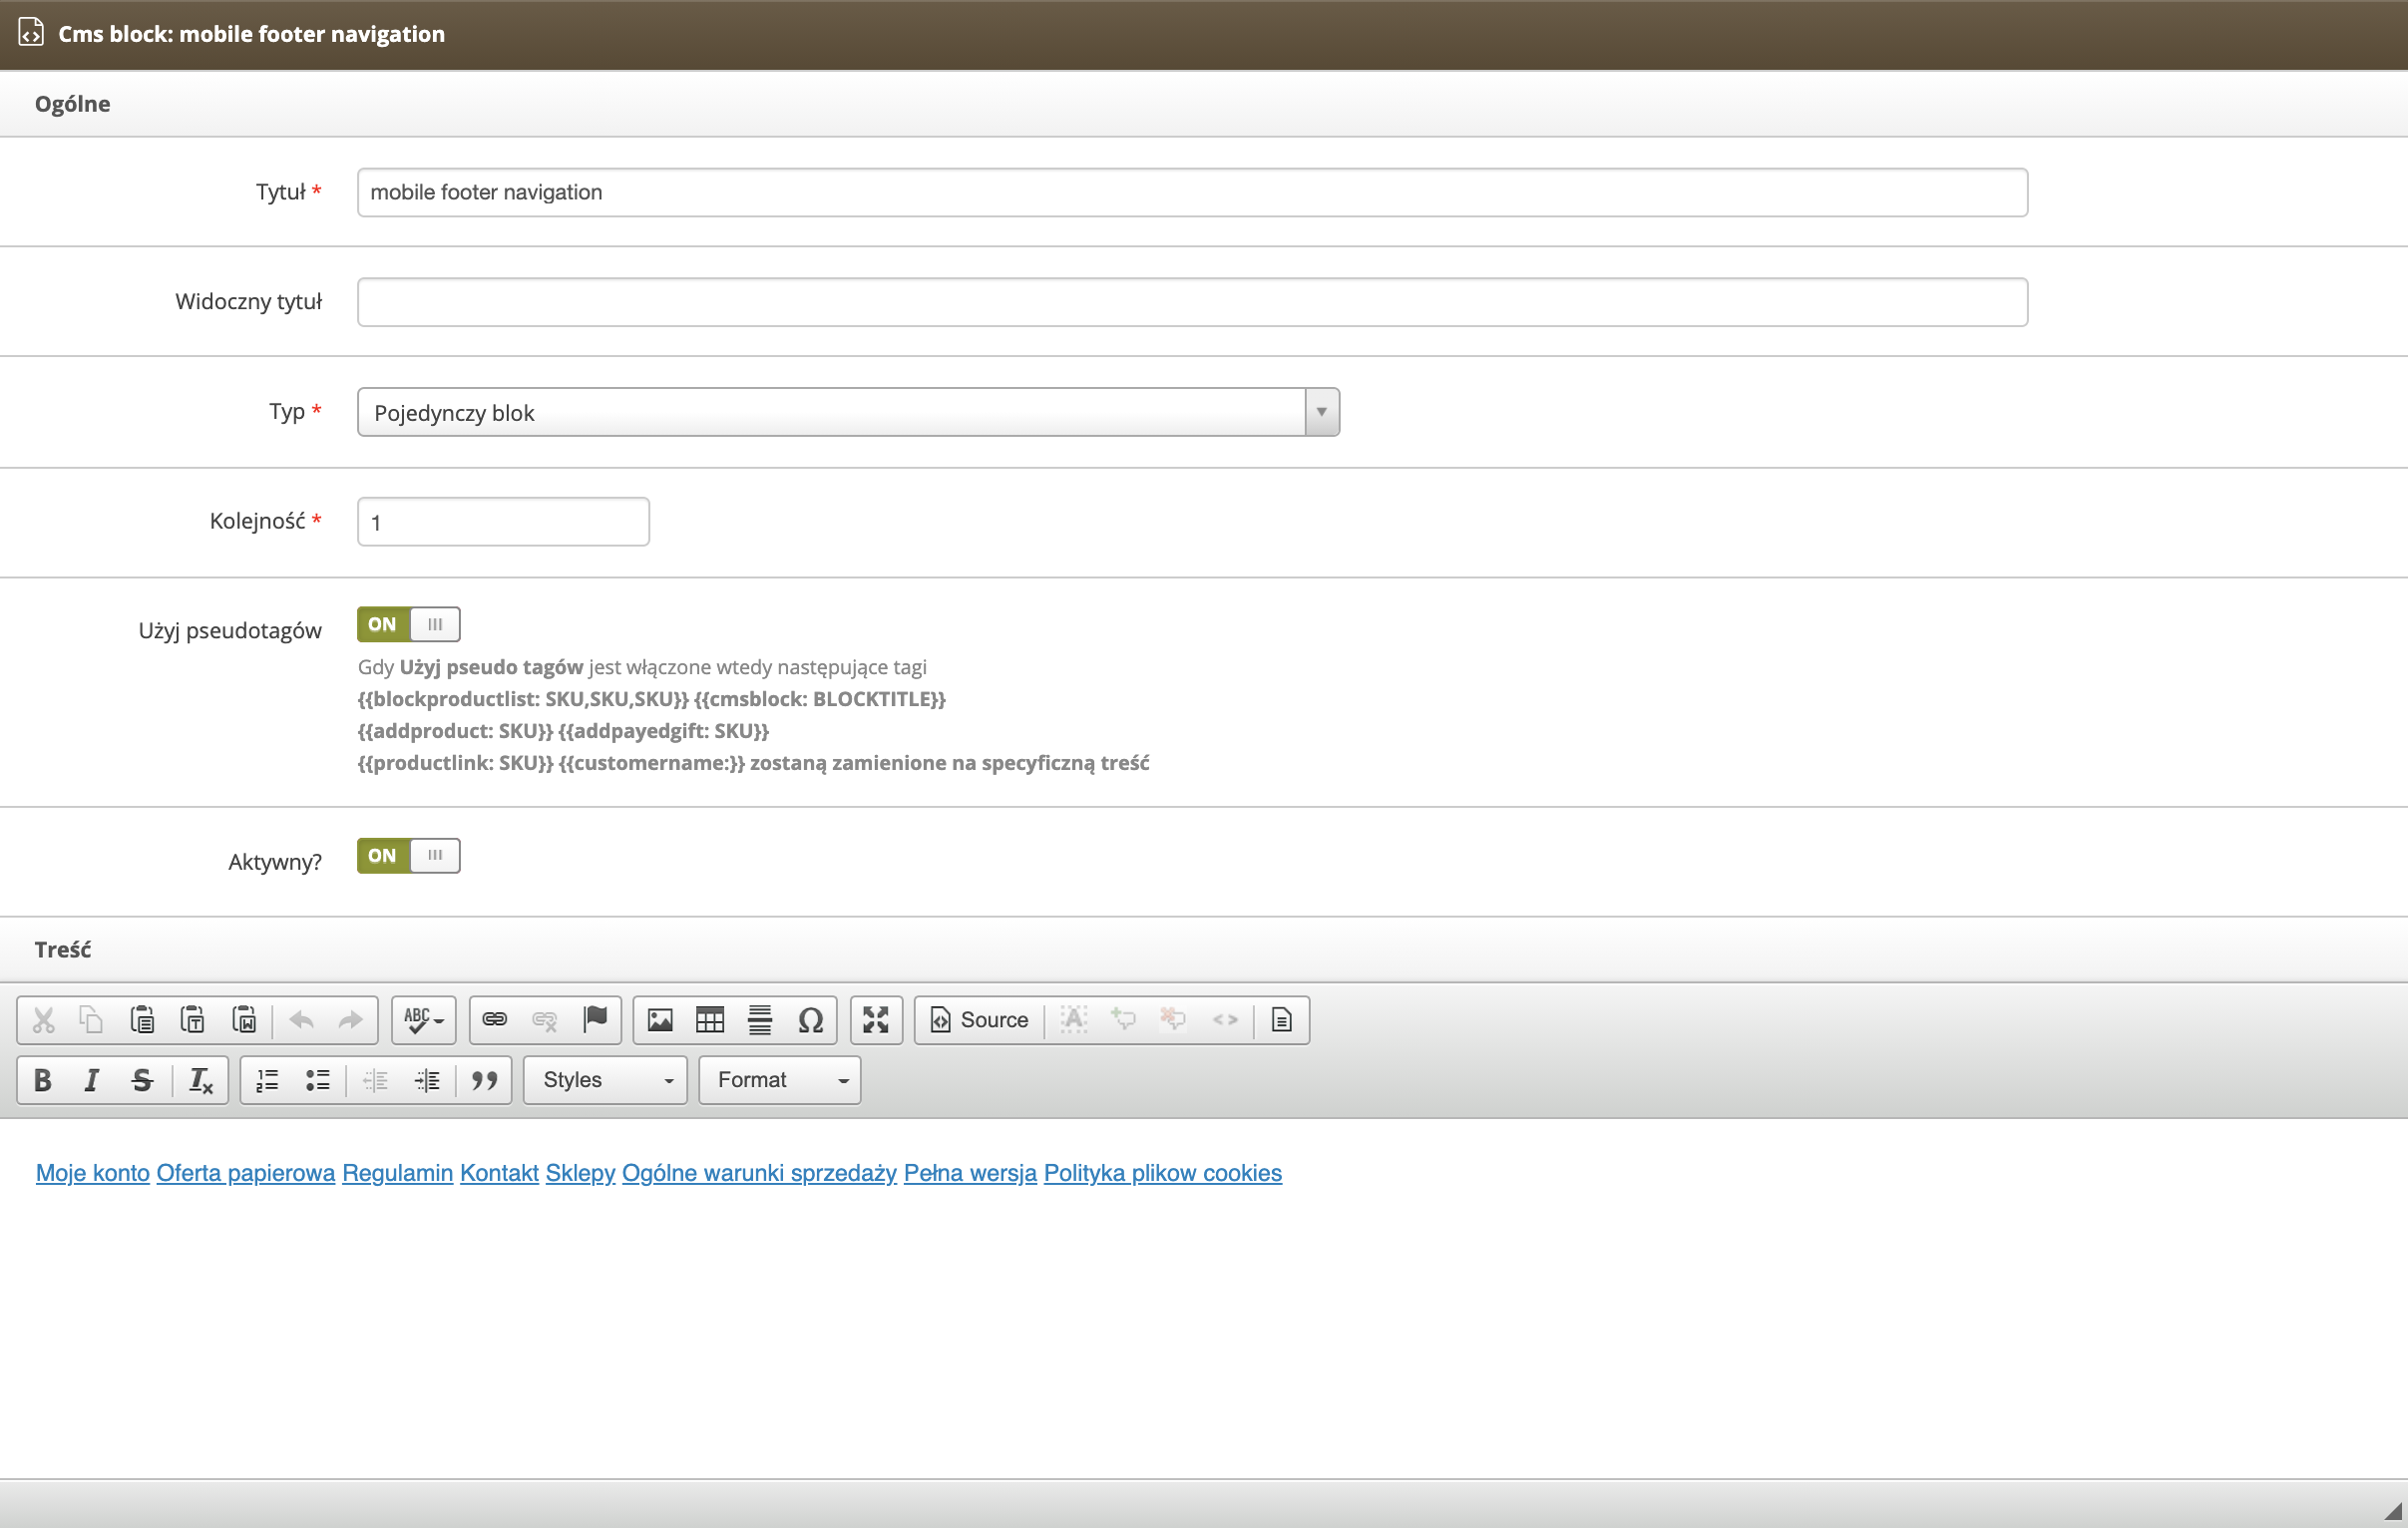 |
| *Wizualizacja widoku Popraw blok (mobile footer navigation) w panelu administracyjnym* |
| 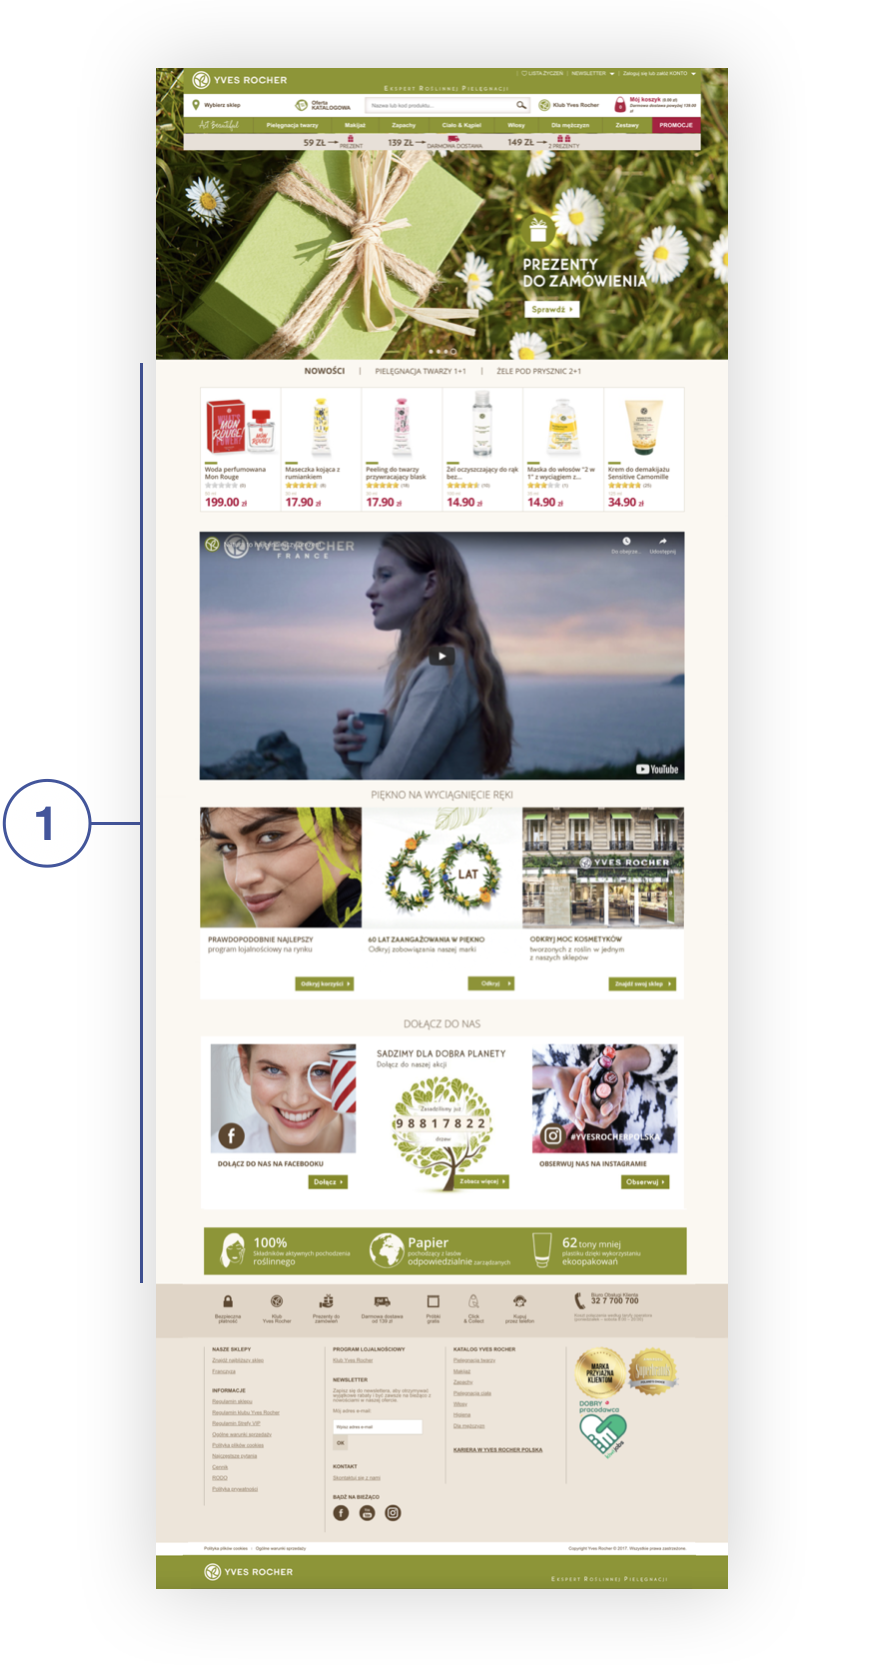 |
| *Wizualizacja strony głównej Yves Rocher (wersja desktop)* |
|  |
| *Wizualizacja strony głównej Yves Rocher (wersja mobile)* |
|  |
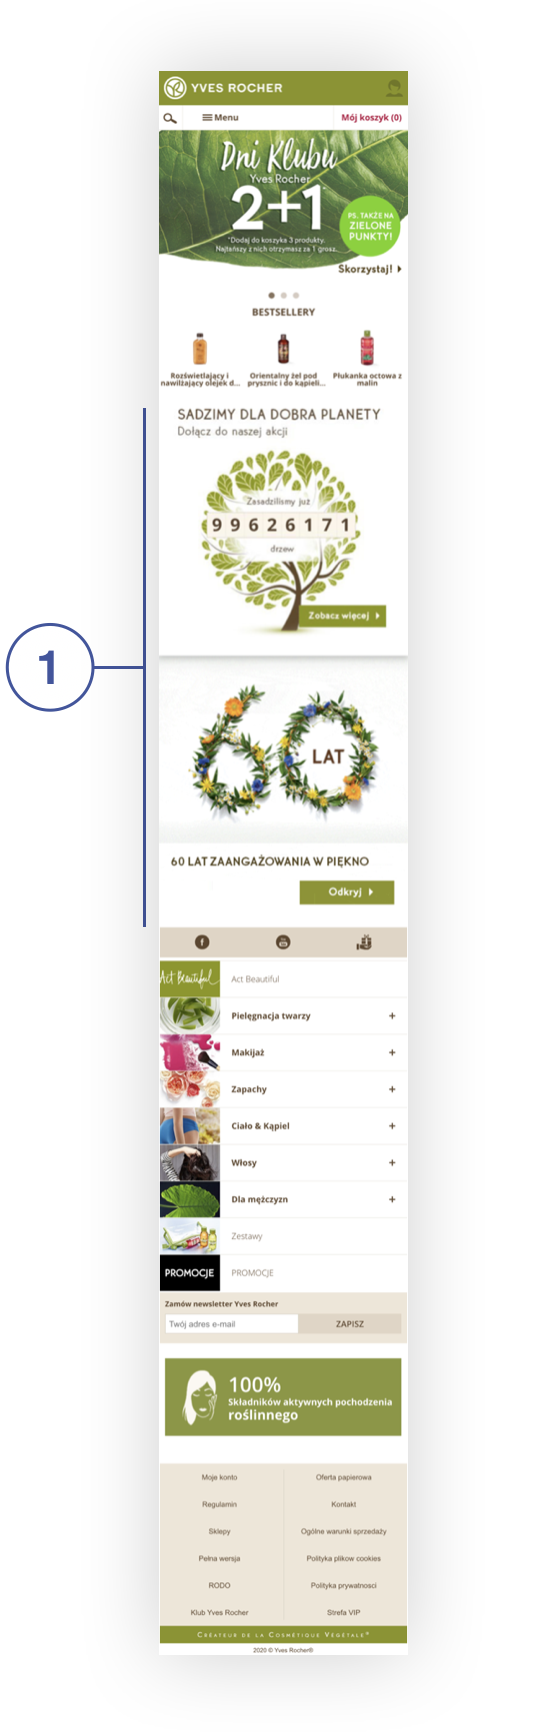
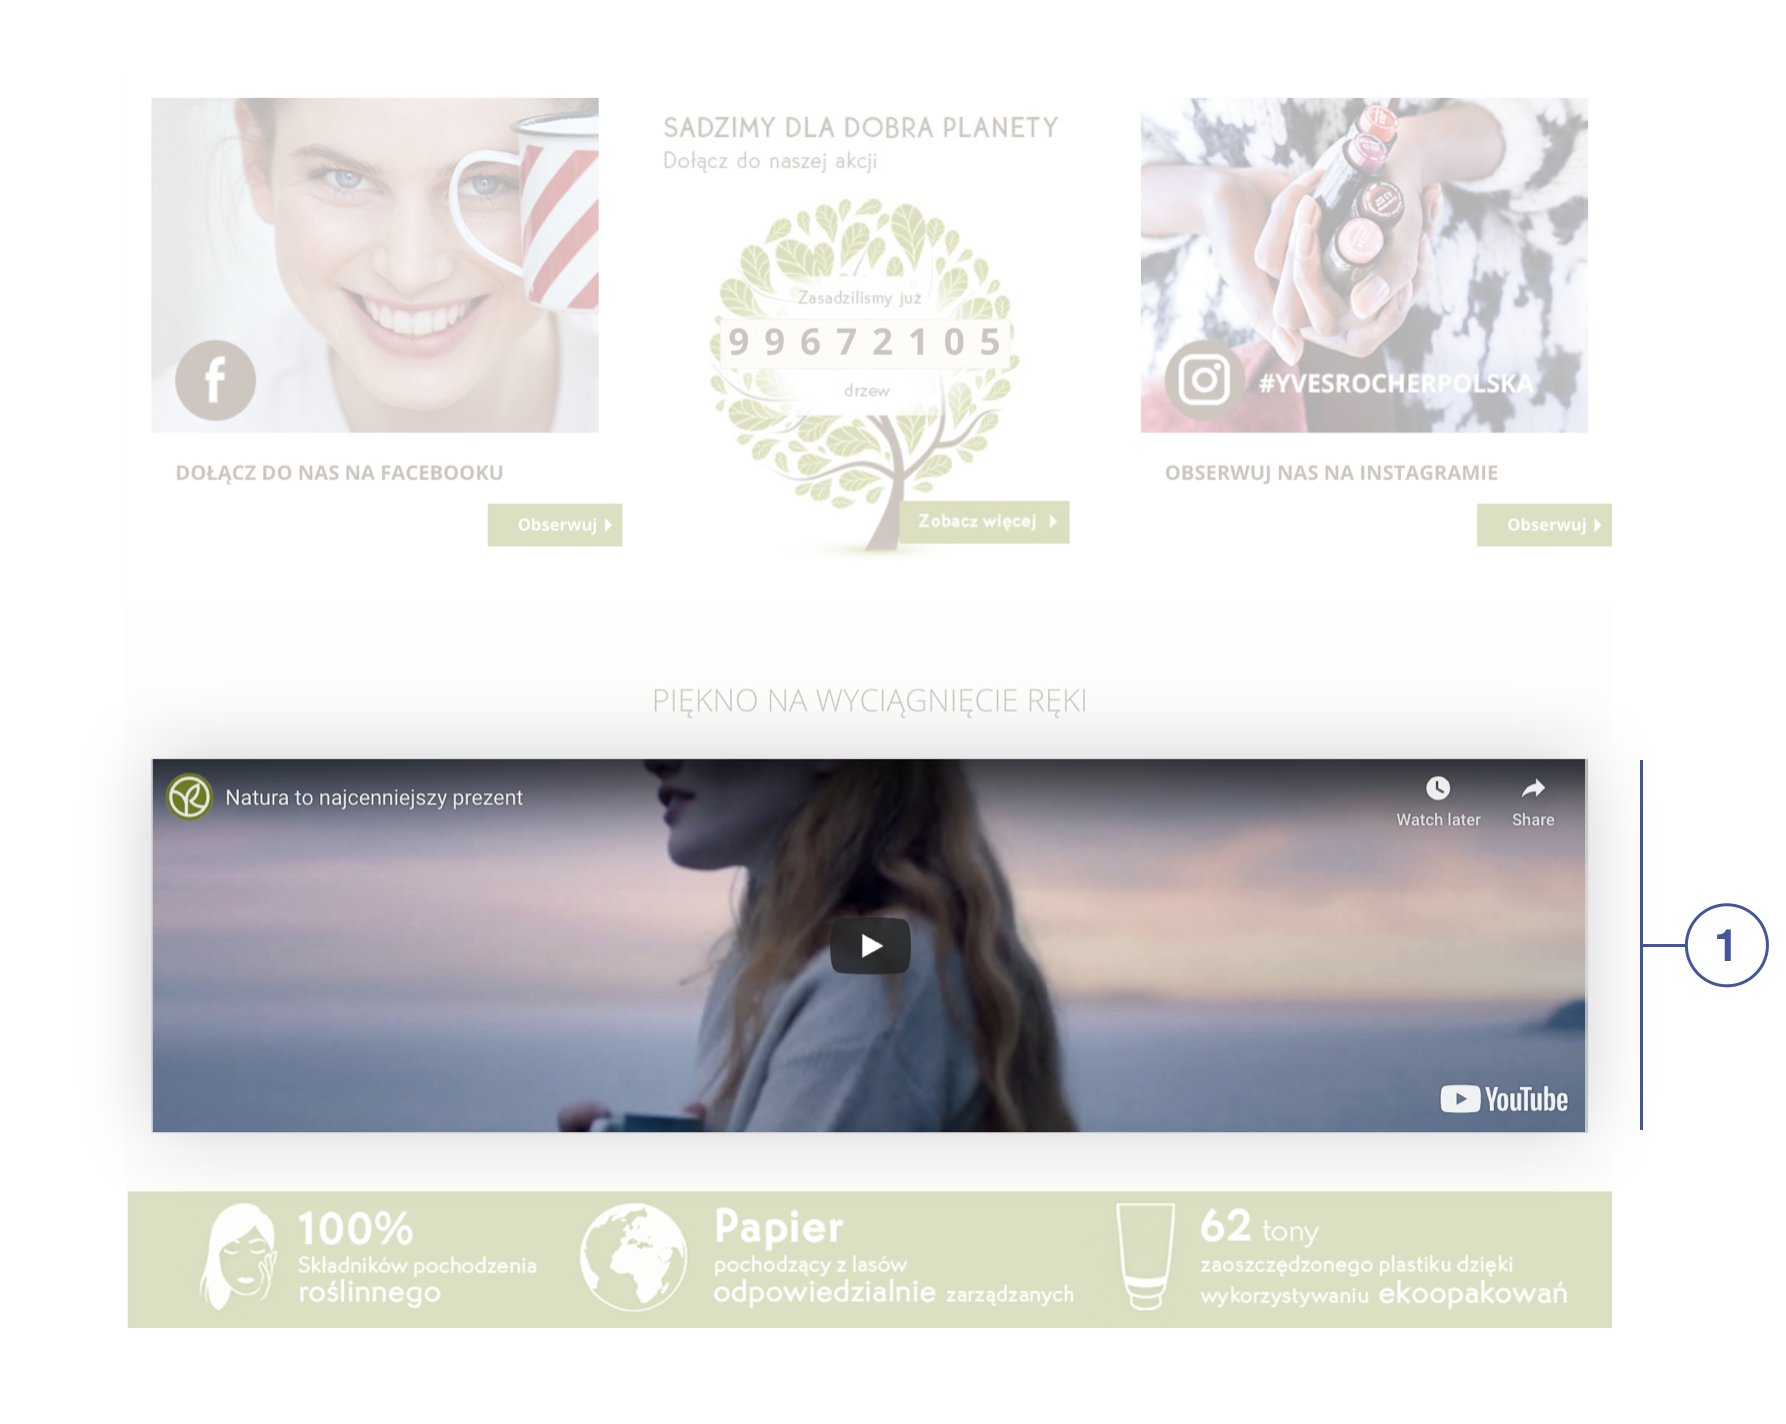
| *Wizualizacja CMS bloku (new layout index / below bestsellers 1) na witrynie sklepu* |
| 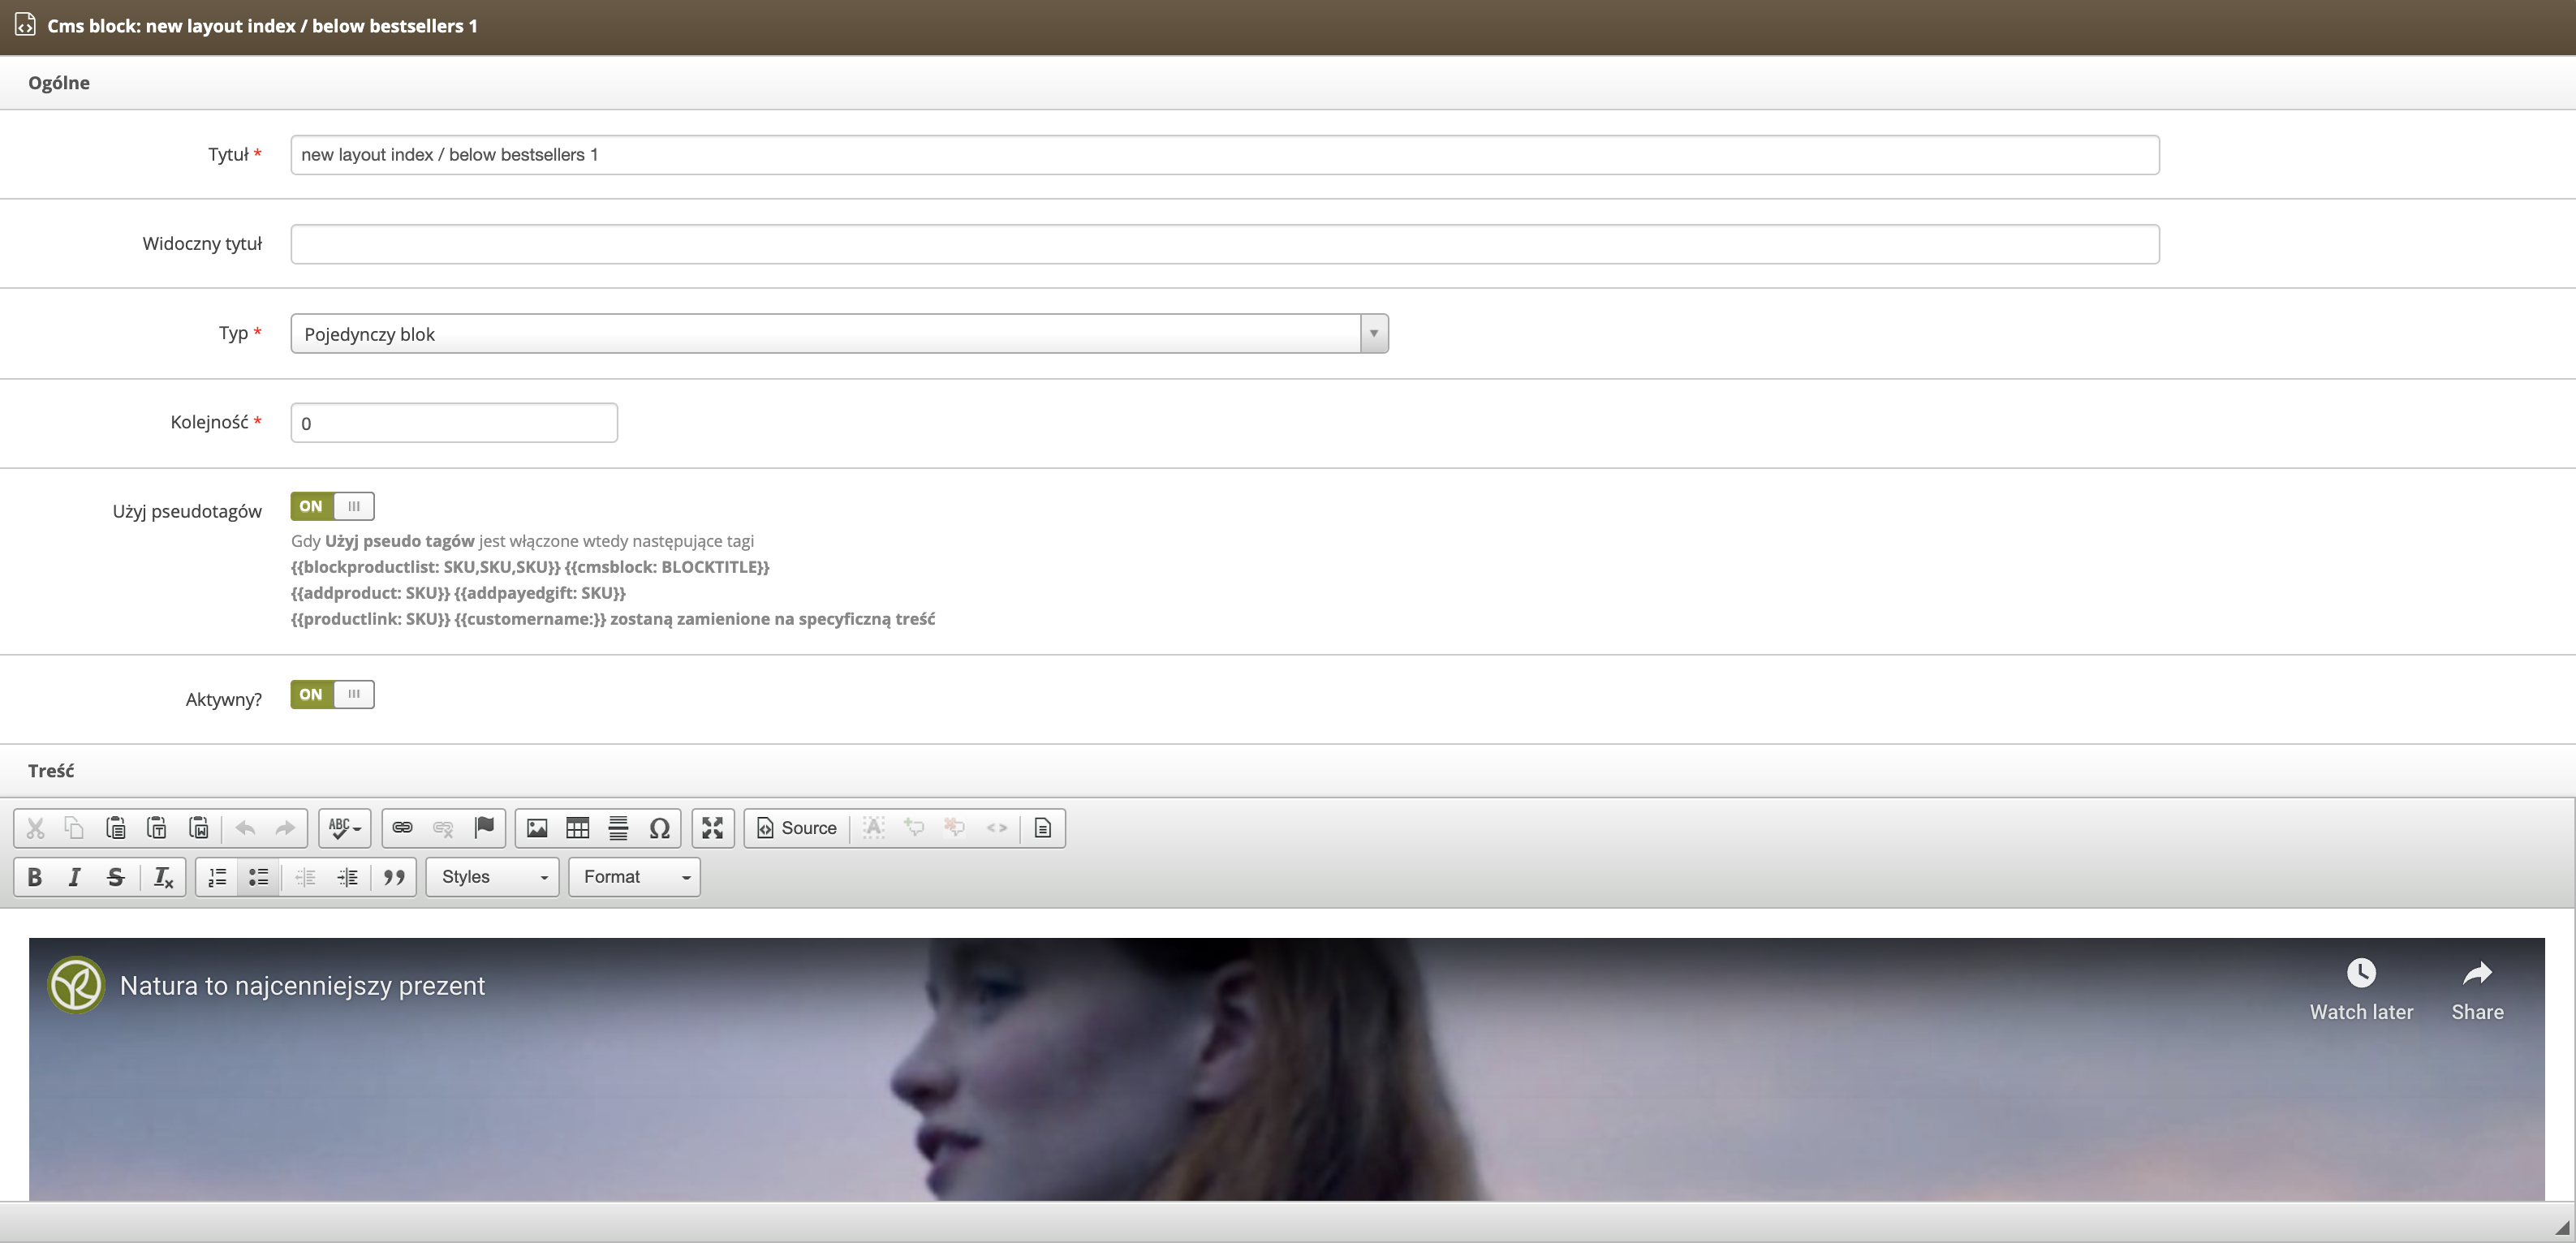 |
| *Wizualizacja widoku Popraw blok (new layout index / below bestsellers 1) w panelu administracyjnym* |
|  |
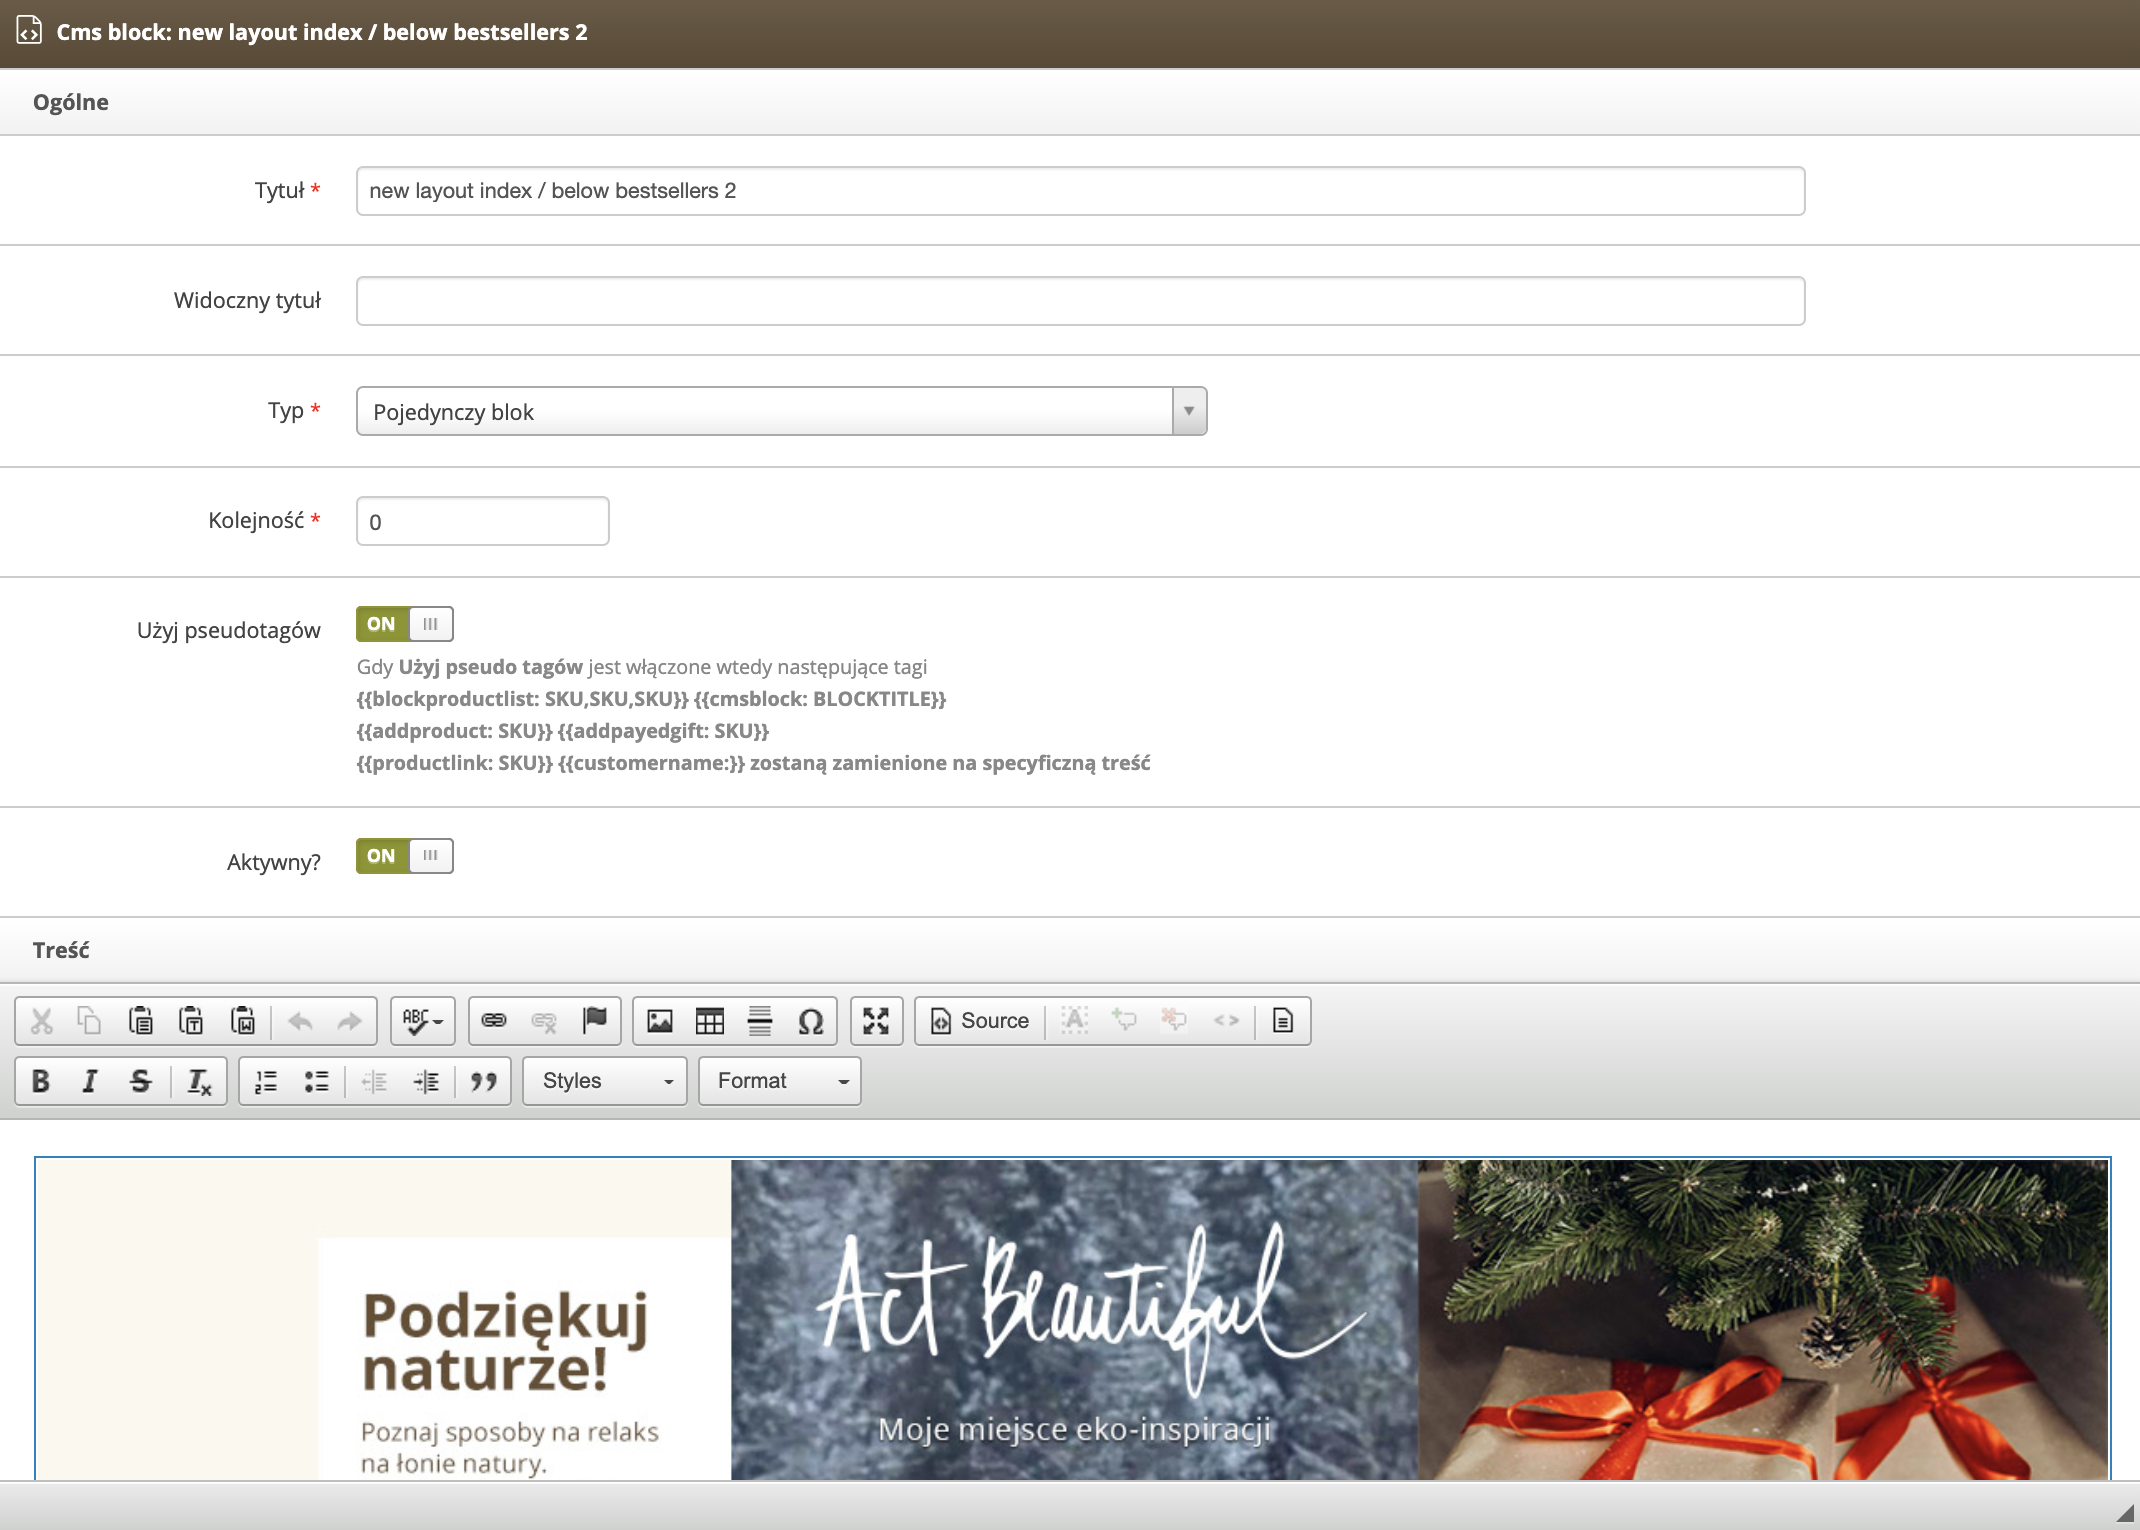
| *Wizualizacja CMS bloku (new layout index / below bestsellers 2**) na witrynie sklepu* |
|  |
| *Wizualizacja widoku Popraw blok (new layout index / below bestsellers 2) w panelu administracyjnym* |
|  |
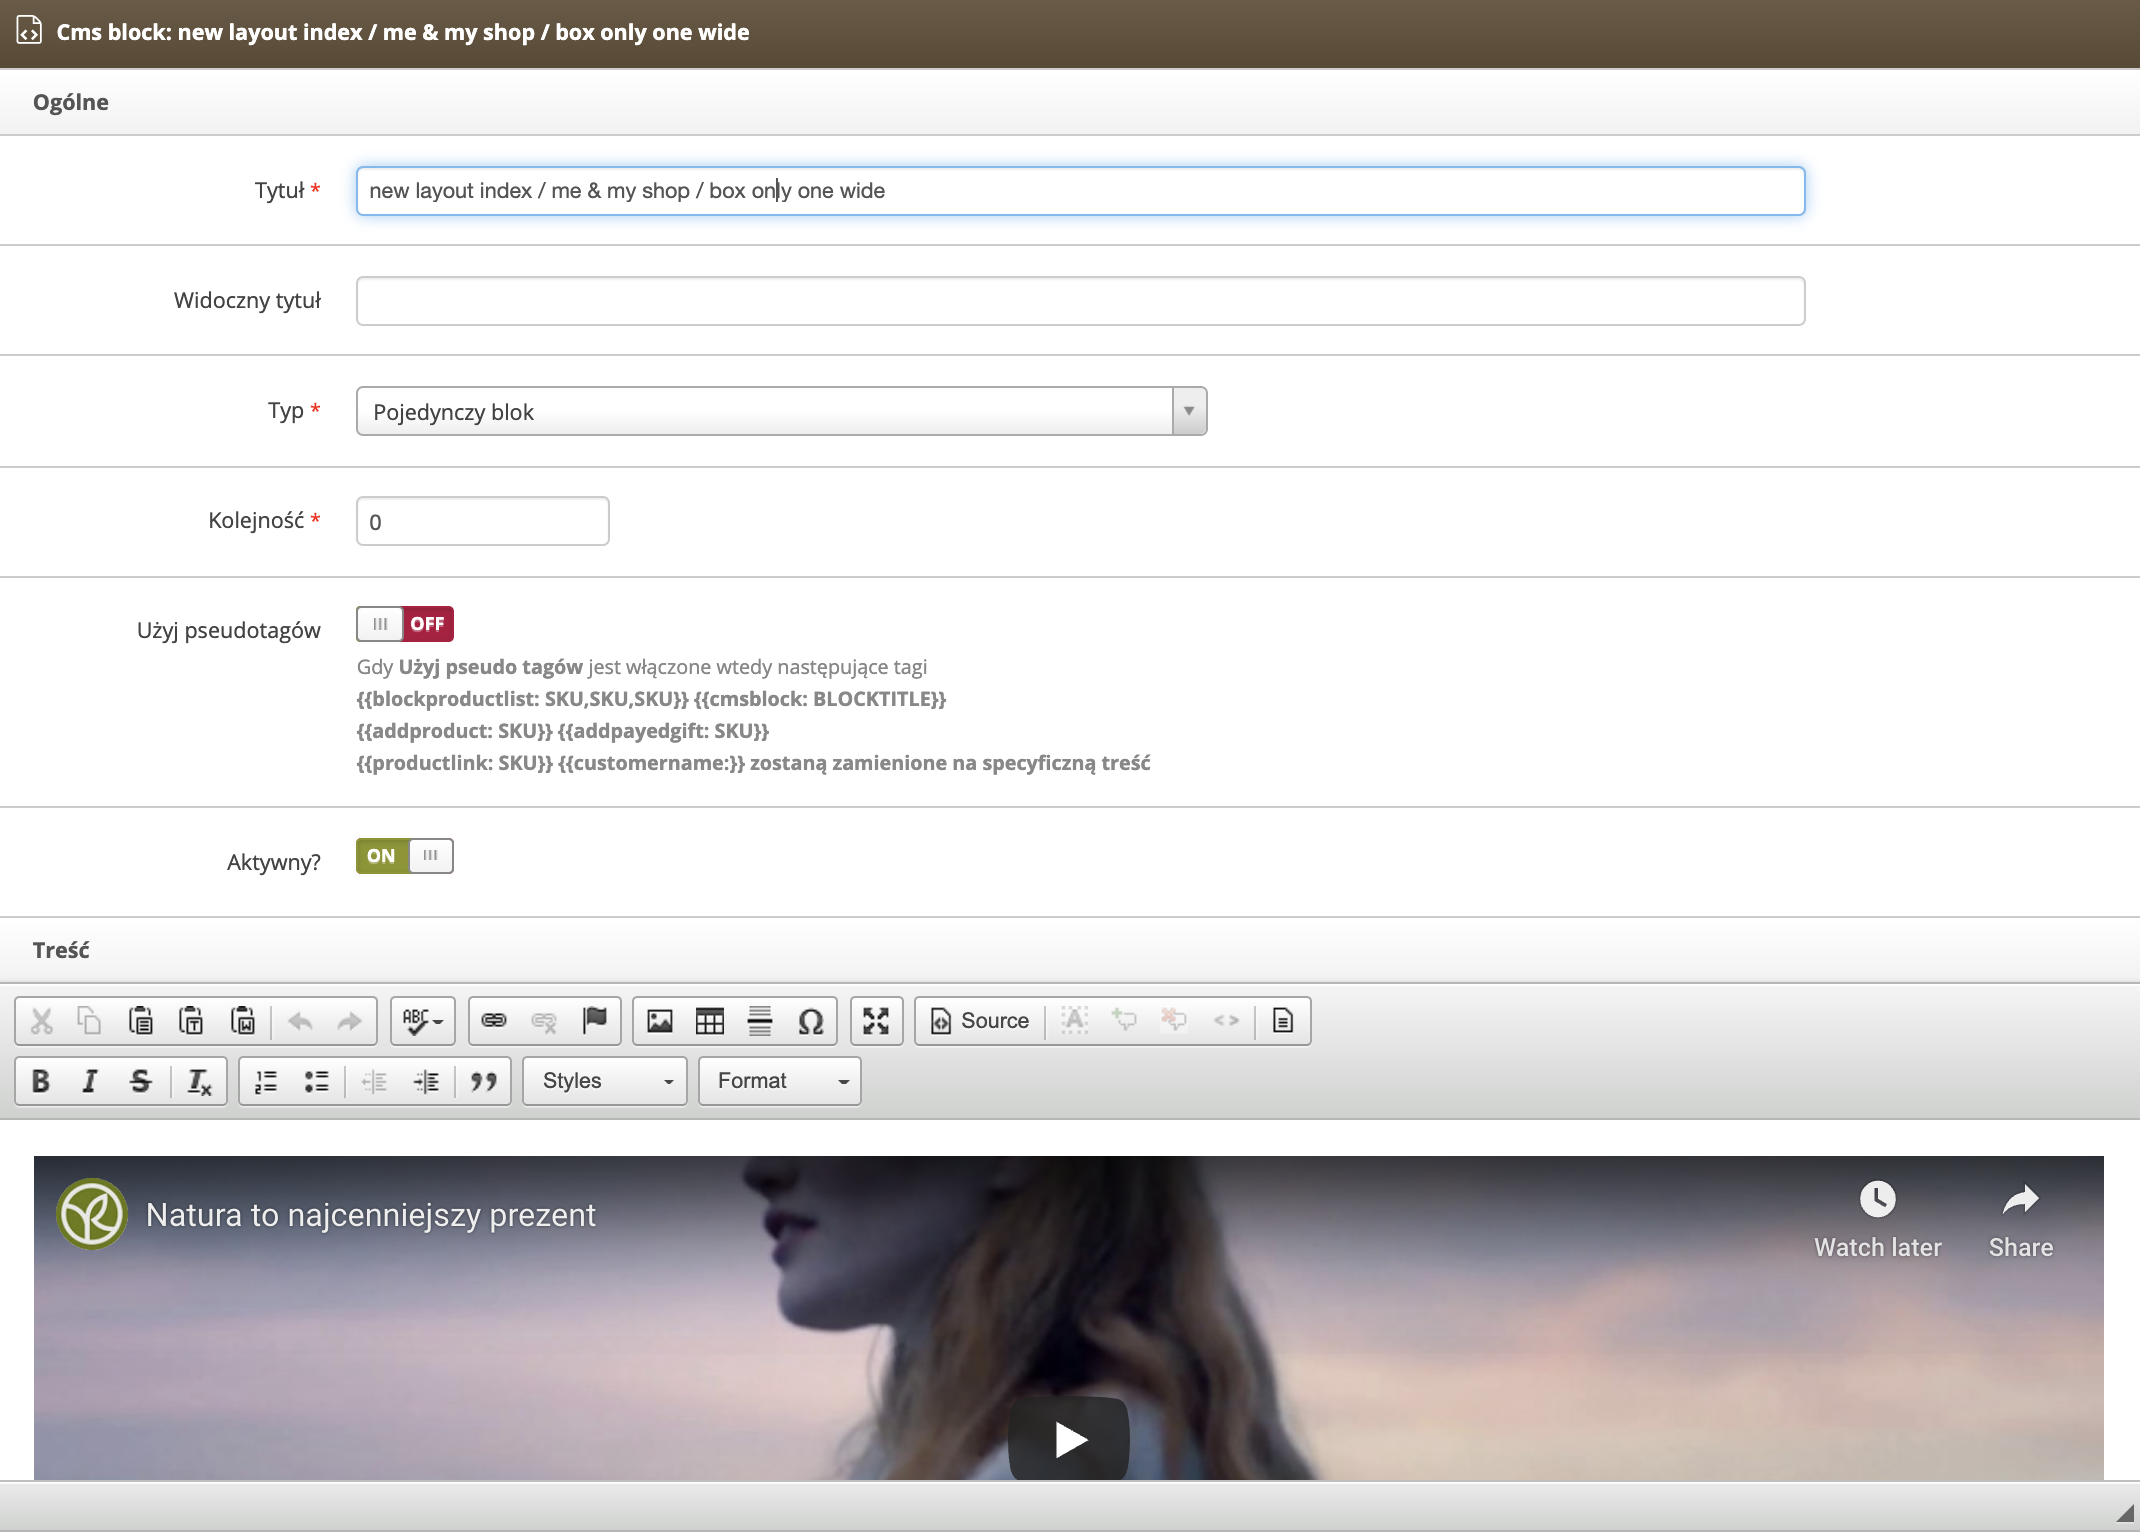
| *Wizualizacja CMS bloku (new layout index / me & my shop / box only one wide**) na witrynie sklepu* |
|  |
| *Wizualizacja widoku Popraw blok (new layout index / me & my shop / box only one wide) w panelu administracyjnym* |
|  |
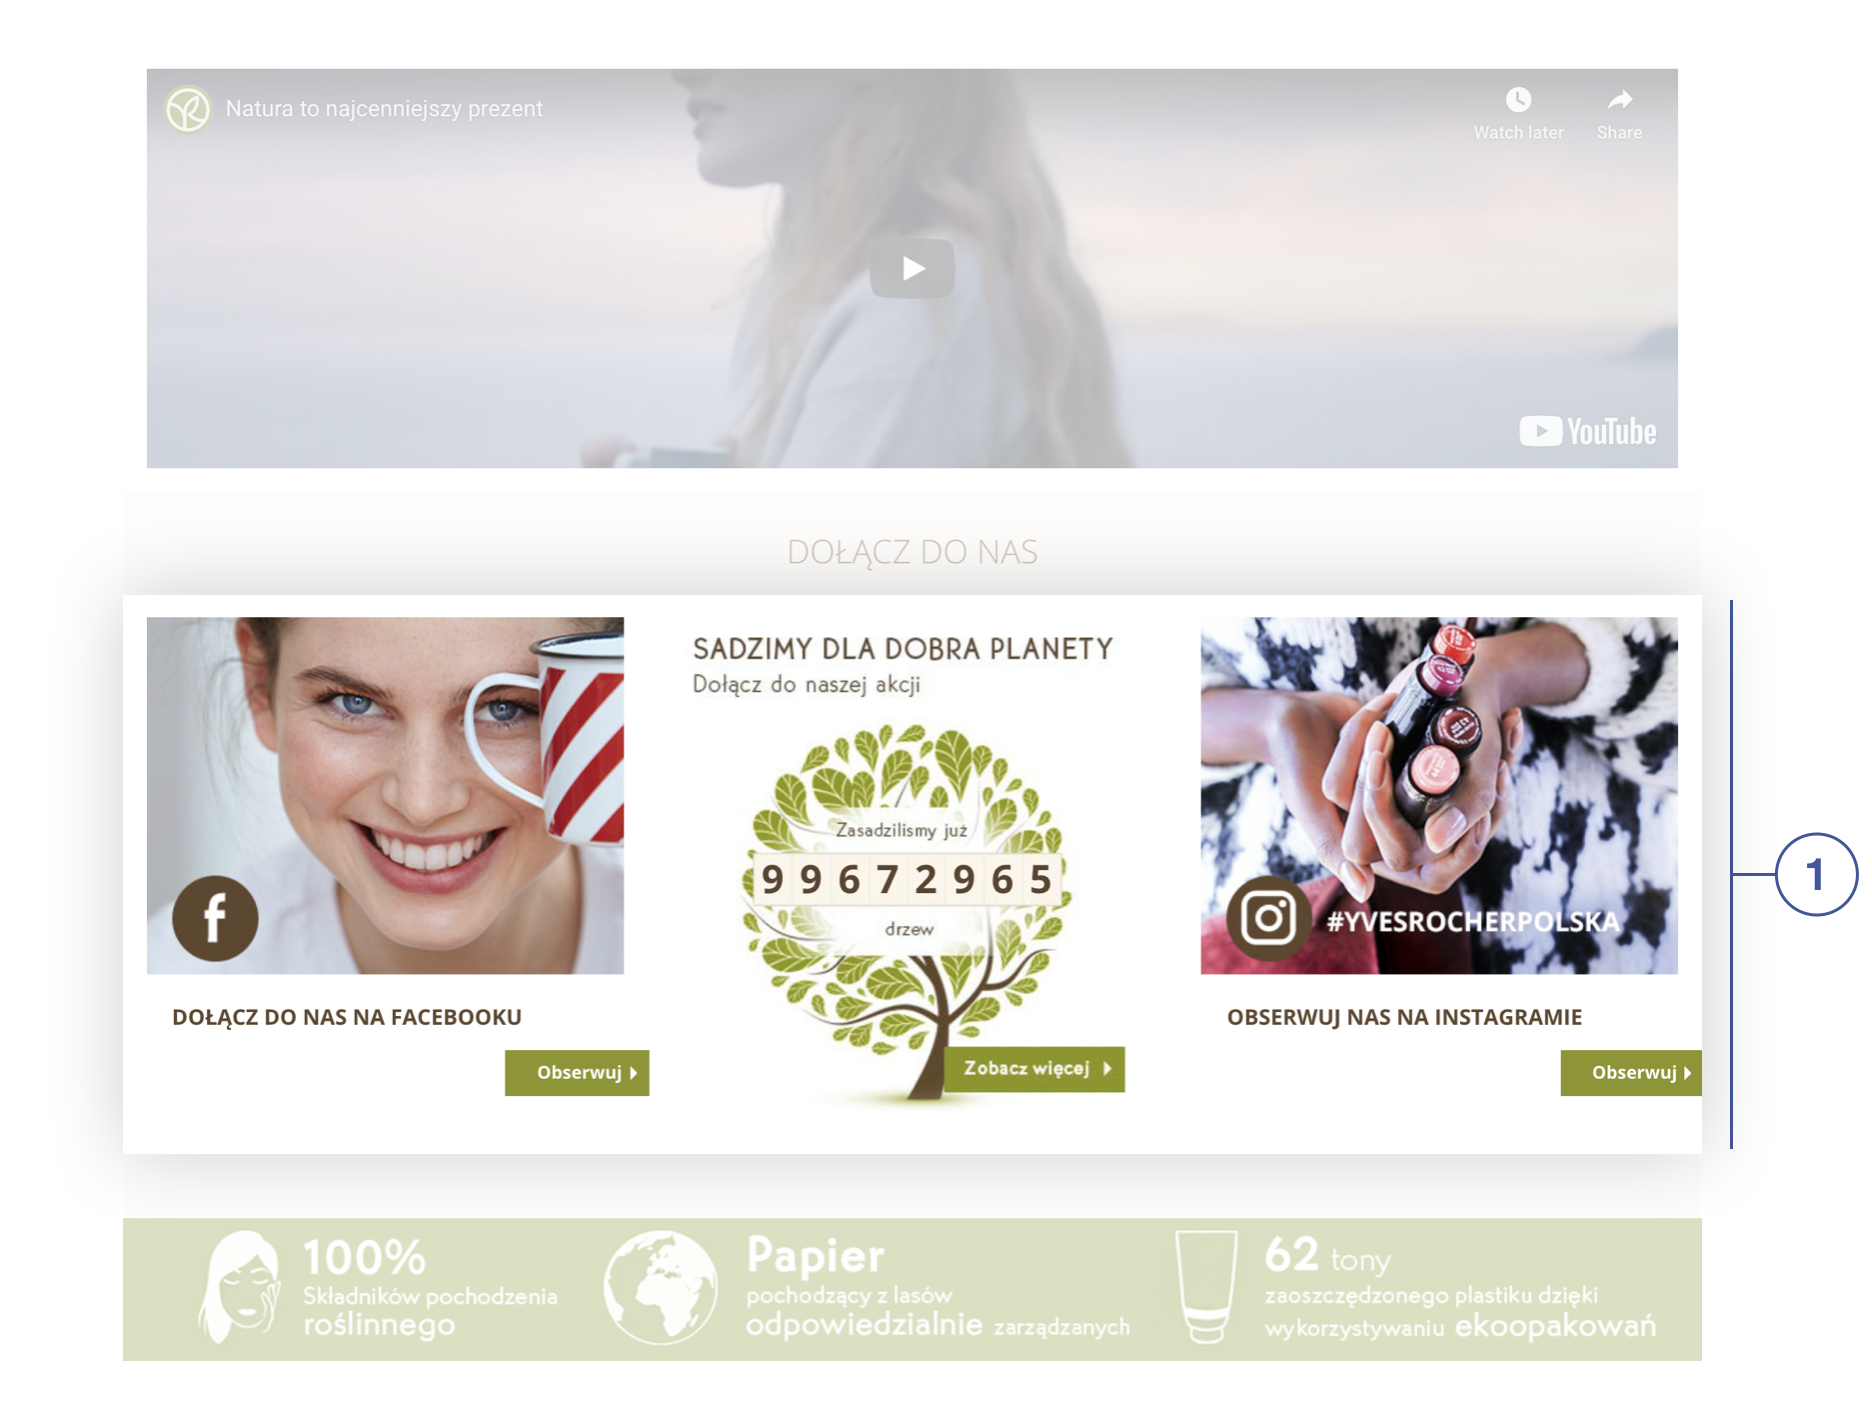
| *Wizualizacja CMS bloku (new layout index / below "my store and me"**) na witrynie sklepu* |
| 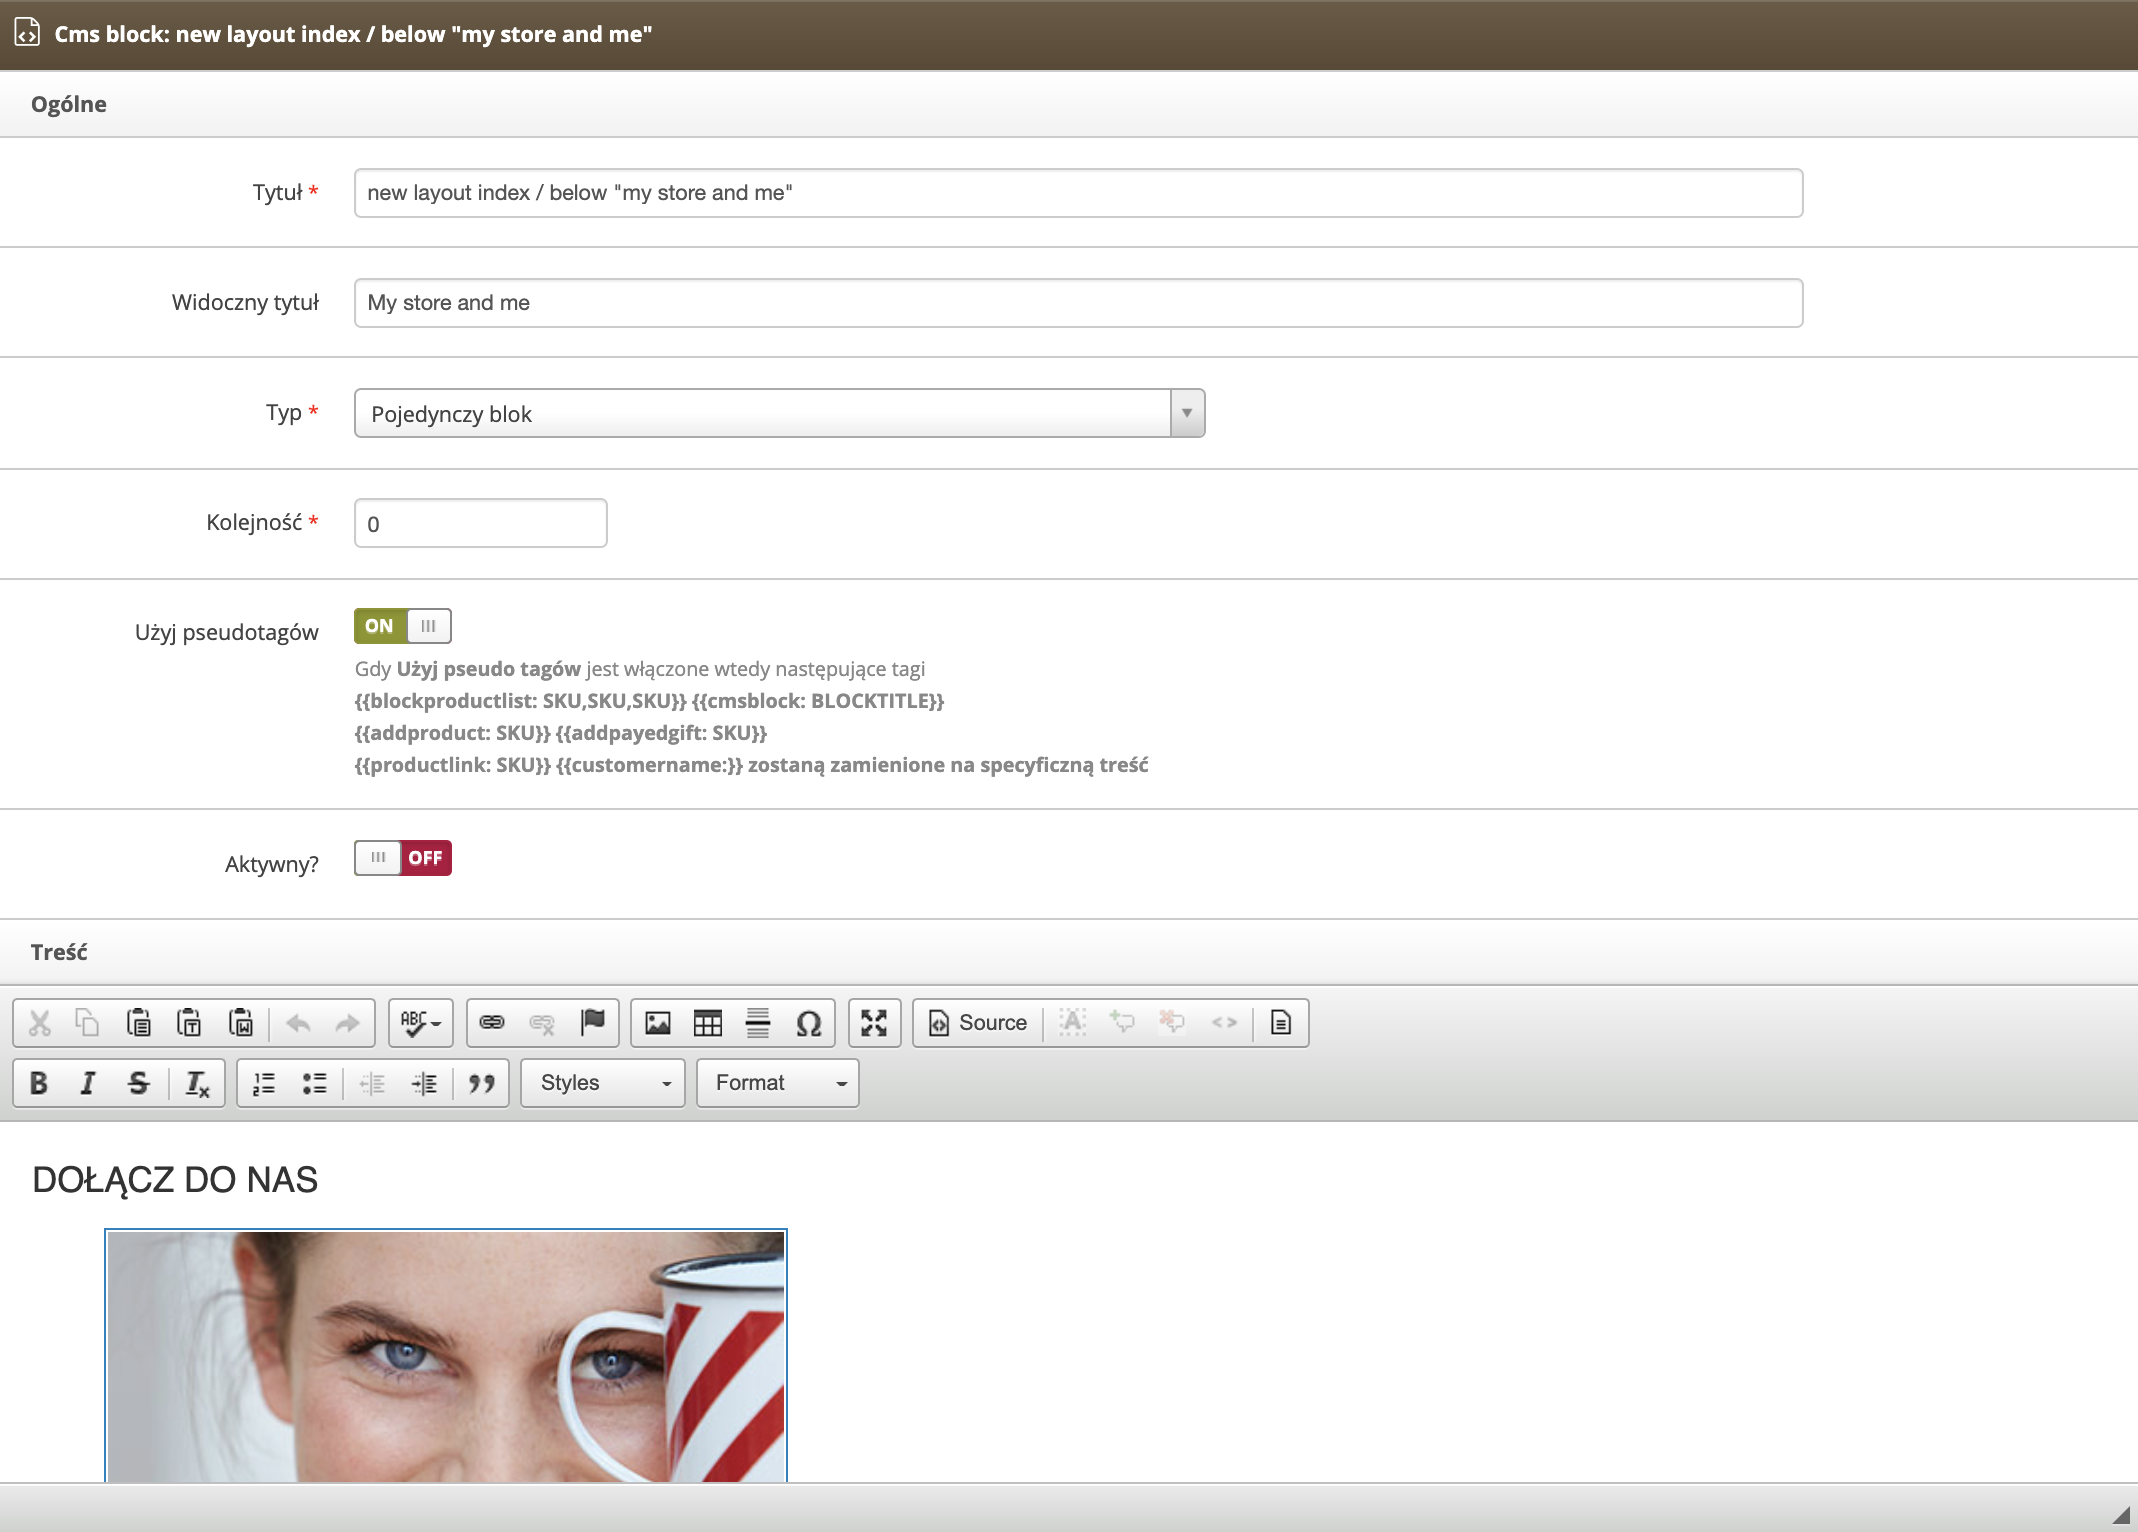 |
| *Wizualizacja widoku Popraw blok (new layout index / below "my store and me") w panelu administracyjnym* |
|  |
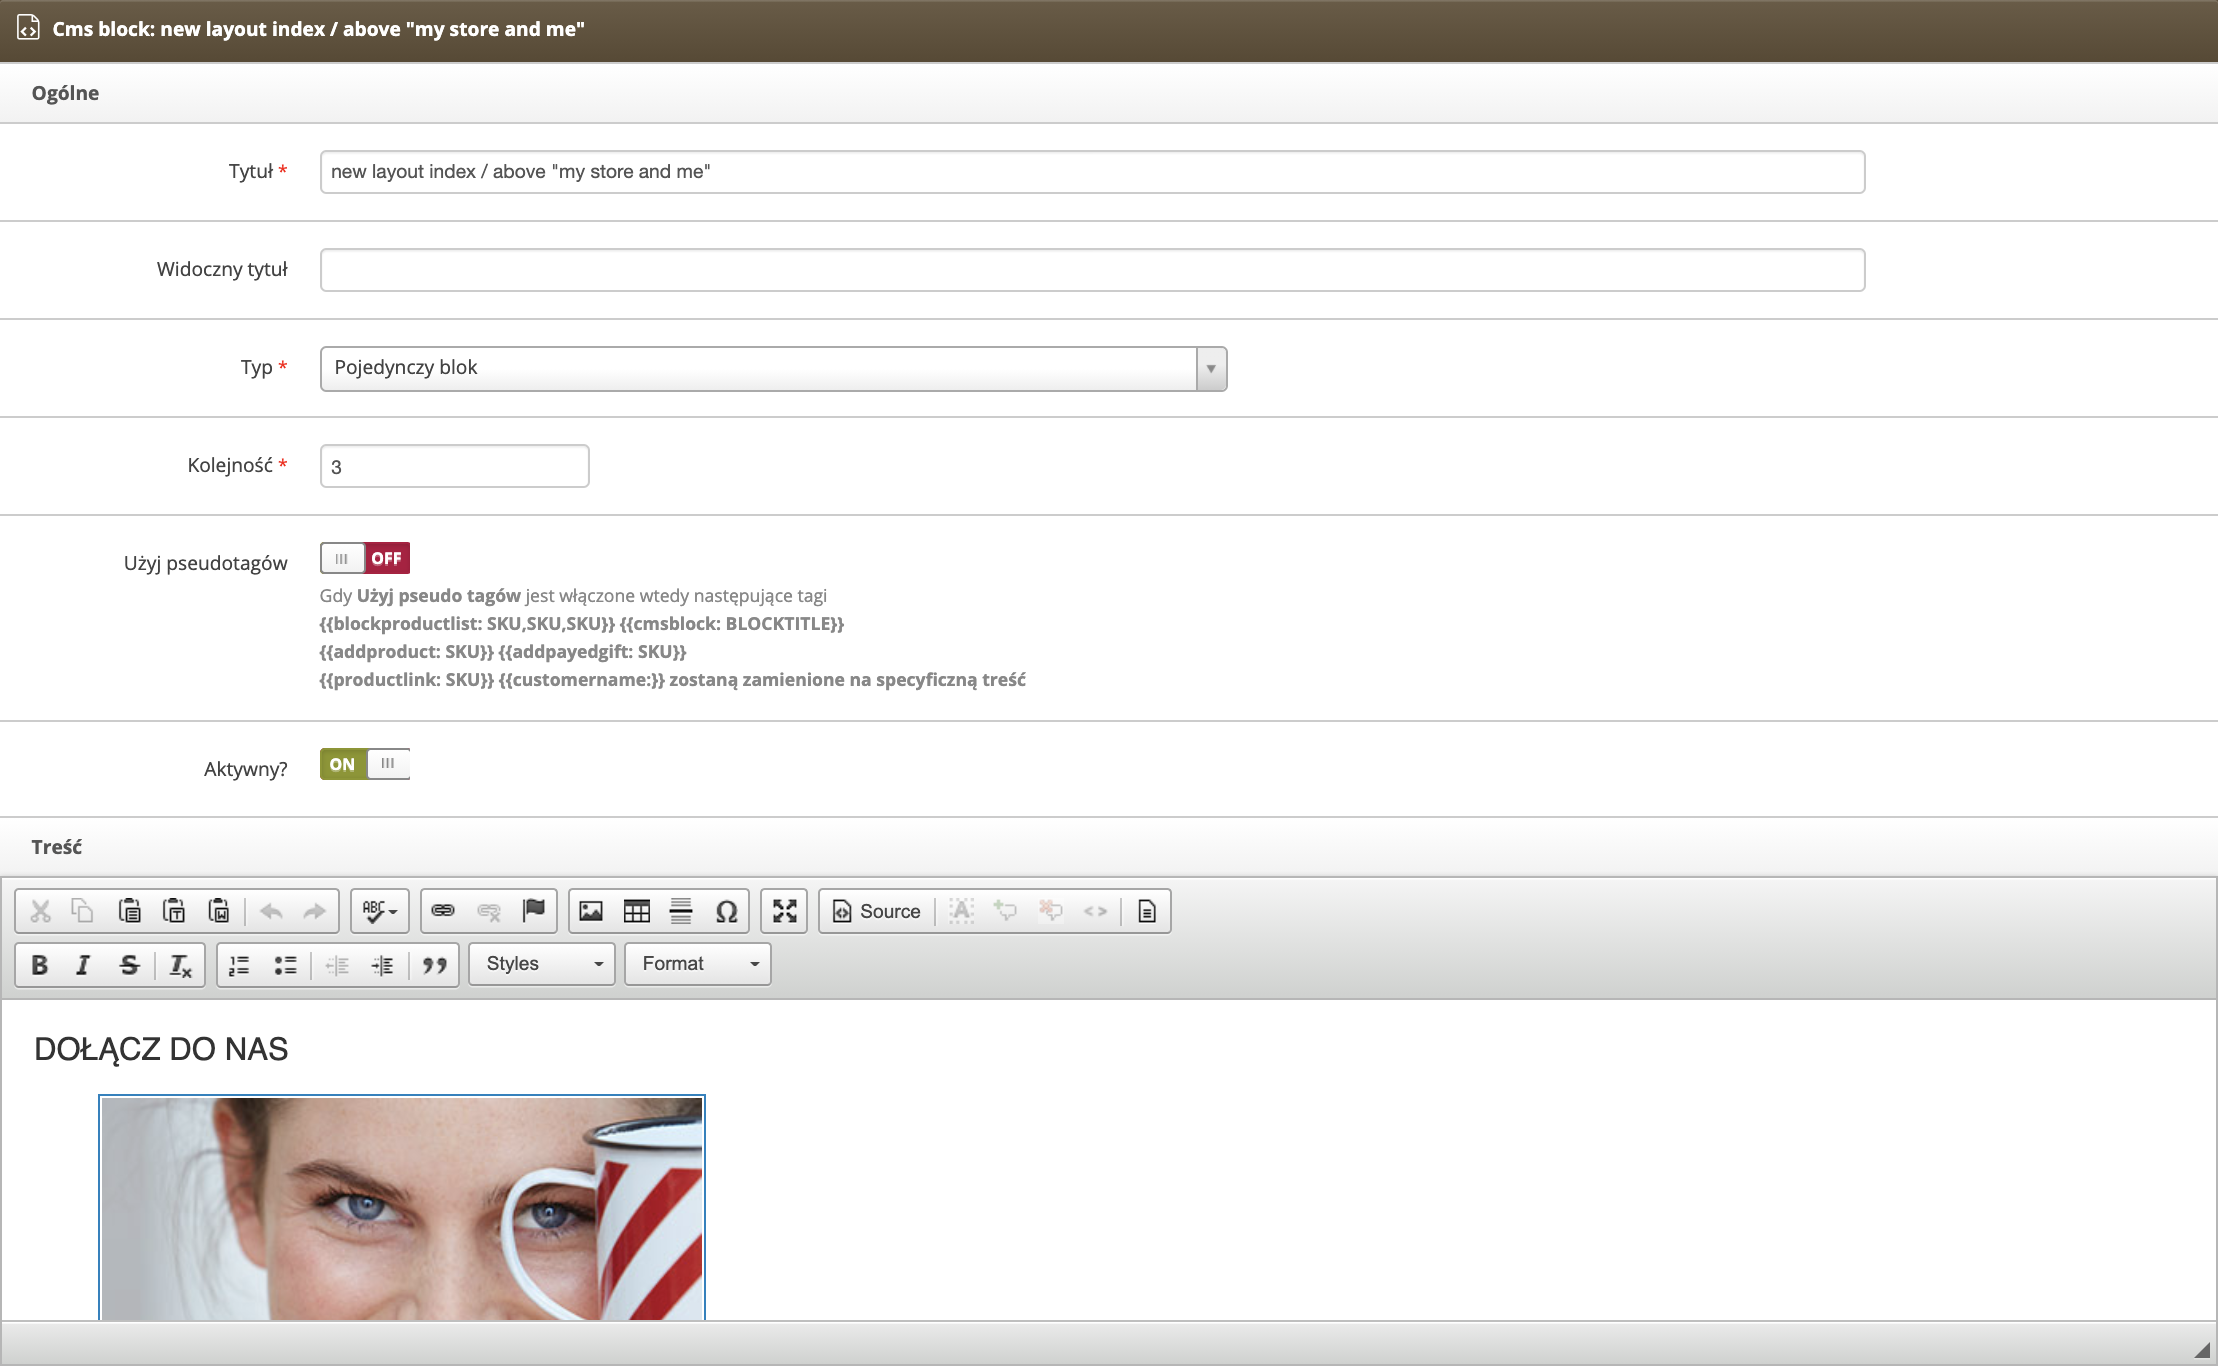
| *Wizualizacja CMS bloku (new layout index / above "my store and me"**) na witrynie sklepu* |
|  |
| *Wizualizacja widoku Popraw blok (new layout index / above "my store and me") w panelu administracyjnym* |
|  |
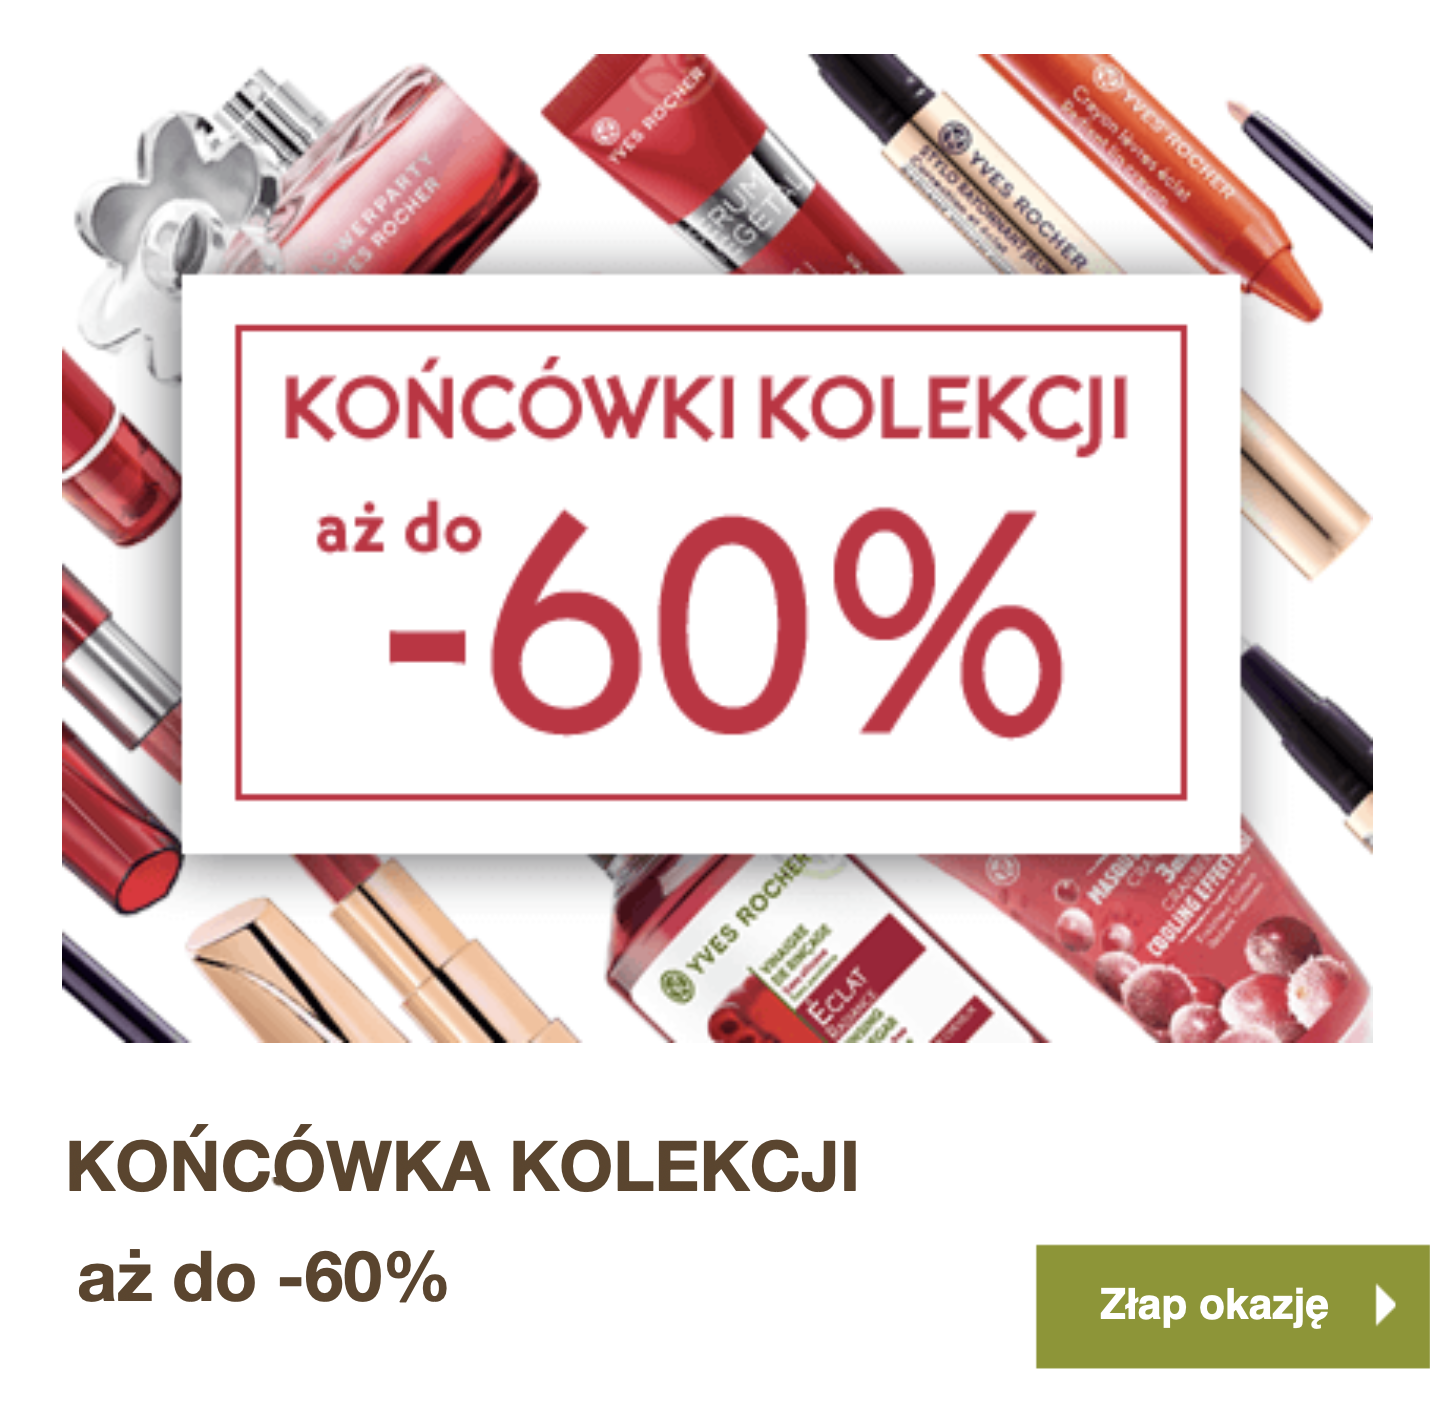
| *Wizualizacja CMS bloku (new layout index / me & my shop / box 1**) na witrynie sklepu* |
| 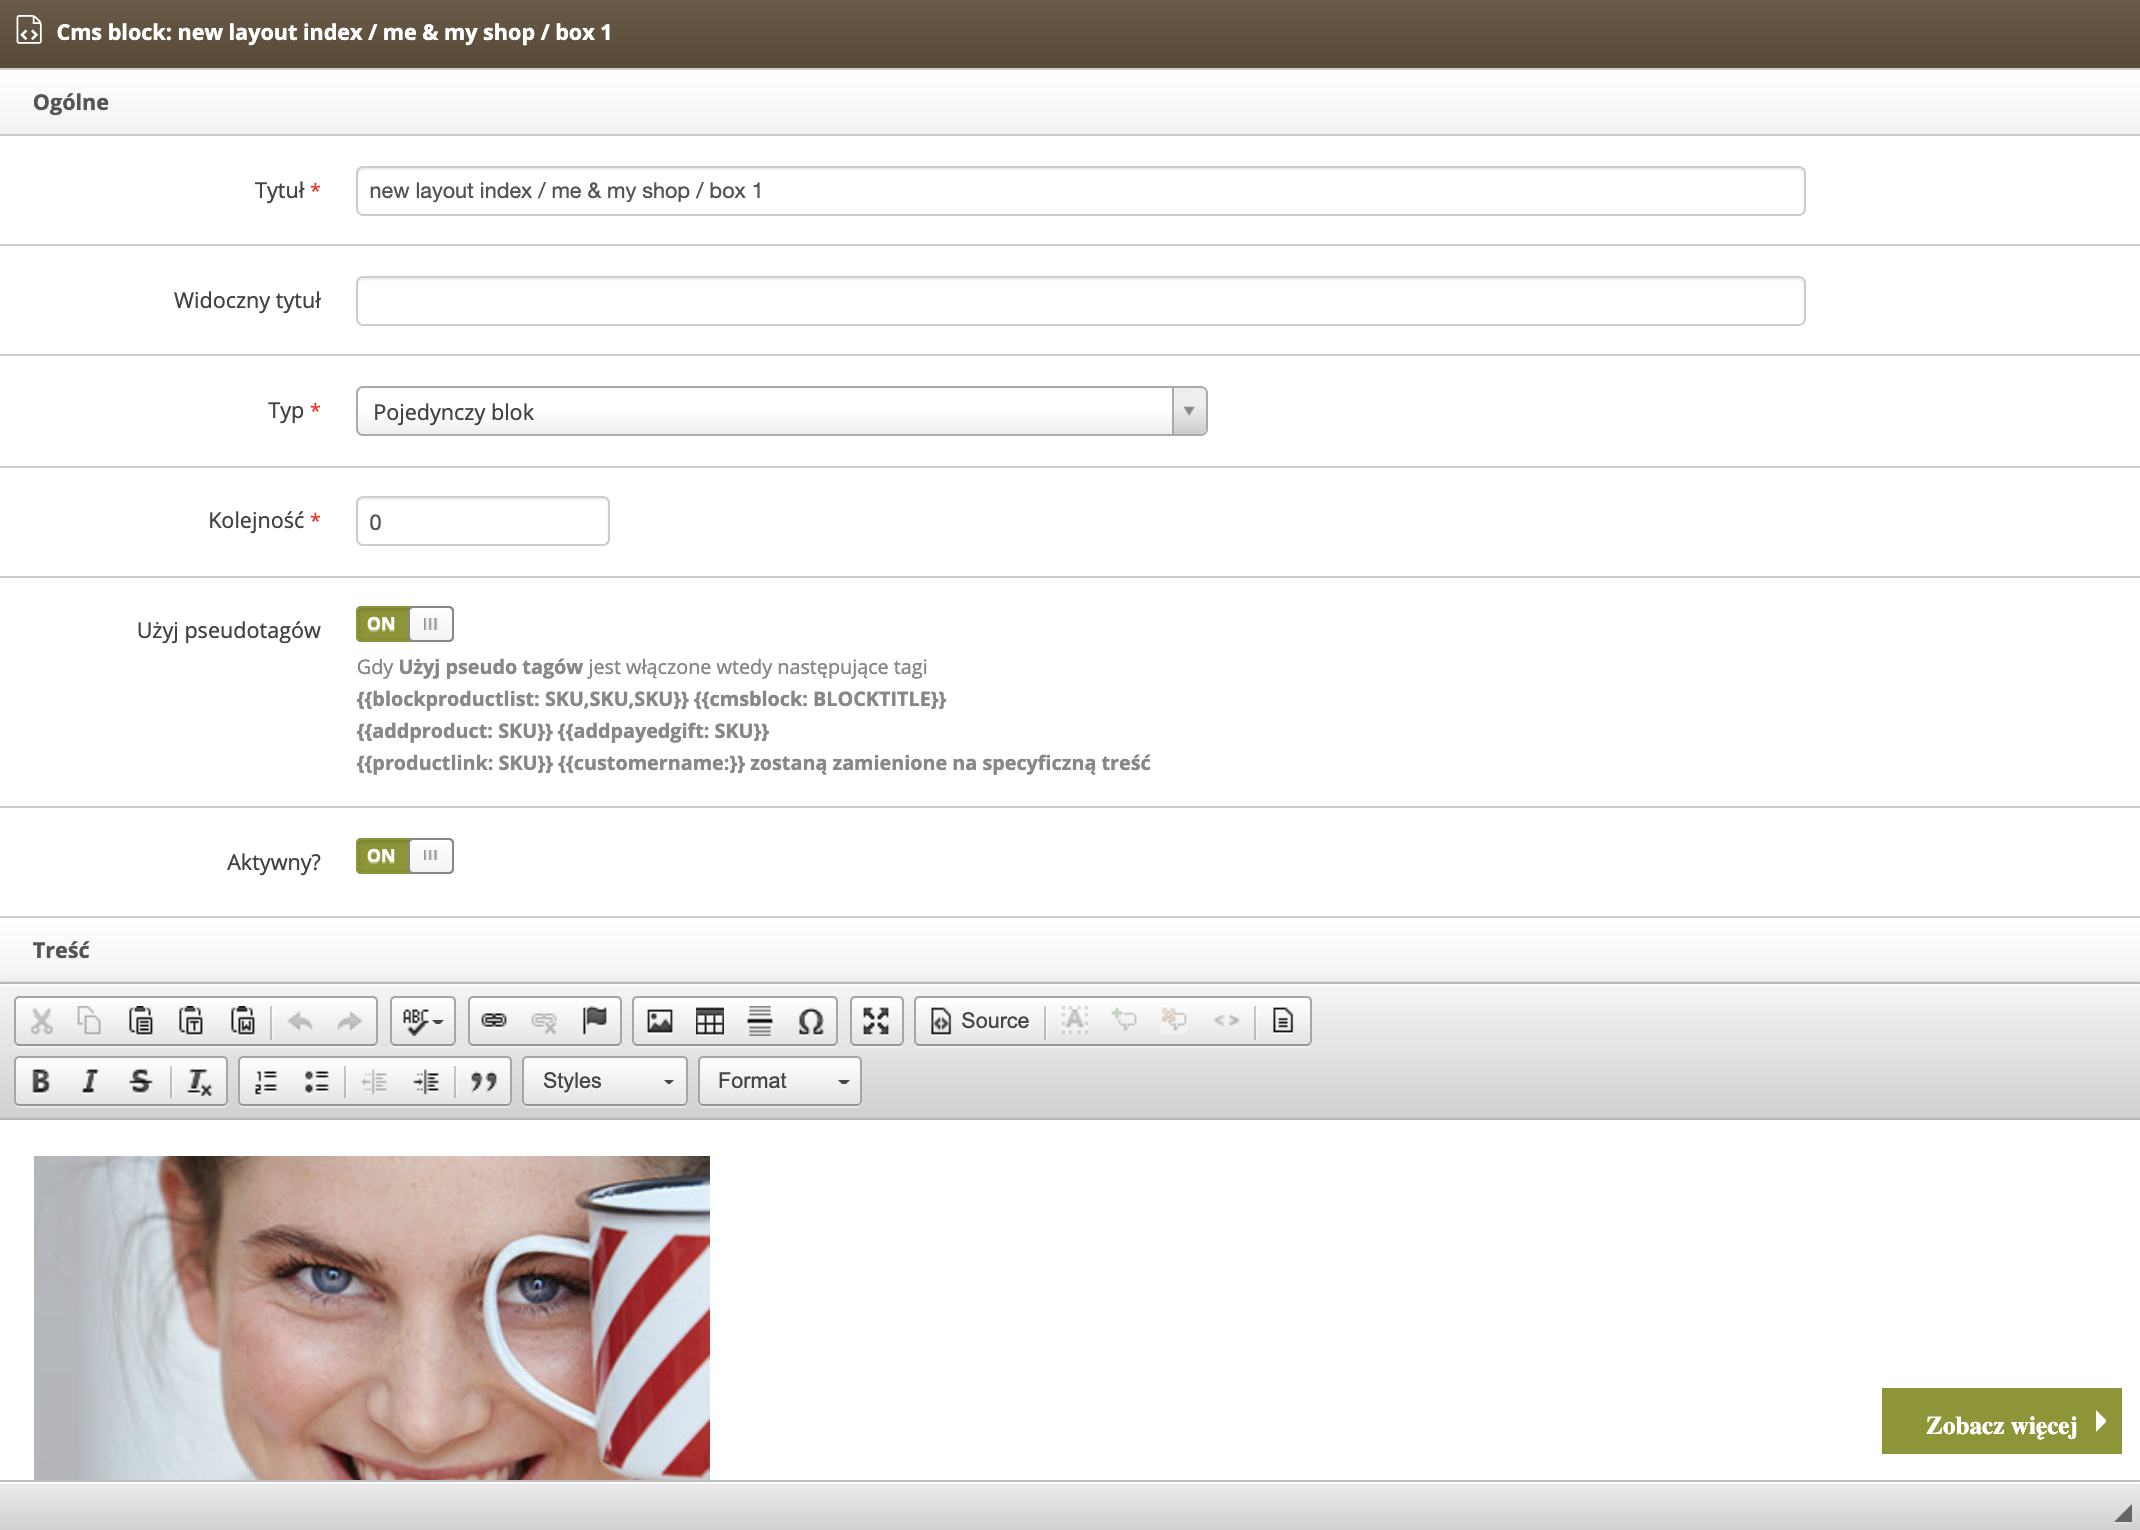 |
| *Wizualizacja widoku Popraw blok (new layout index / me & my shop / box 1) w panelu administracyjnym* |
|  |
| *Wizualizacja CMS bloku (new layout index / me & my shop / box 2**) na witrynie sklepu* |
| 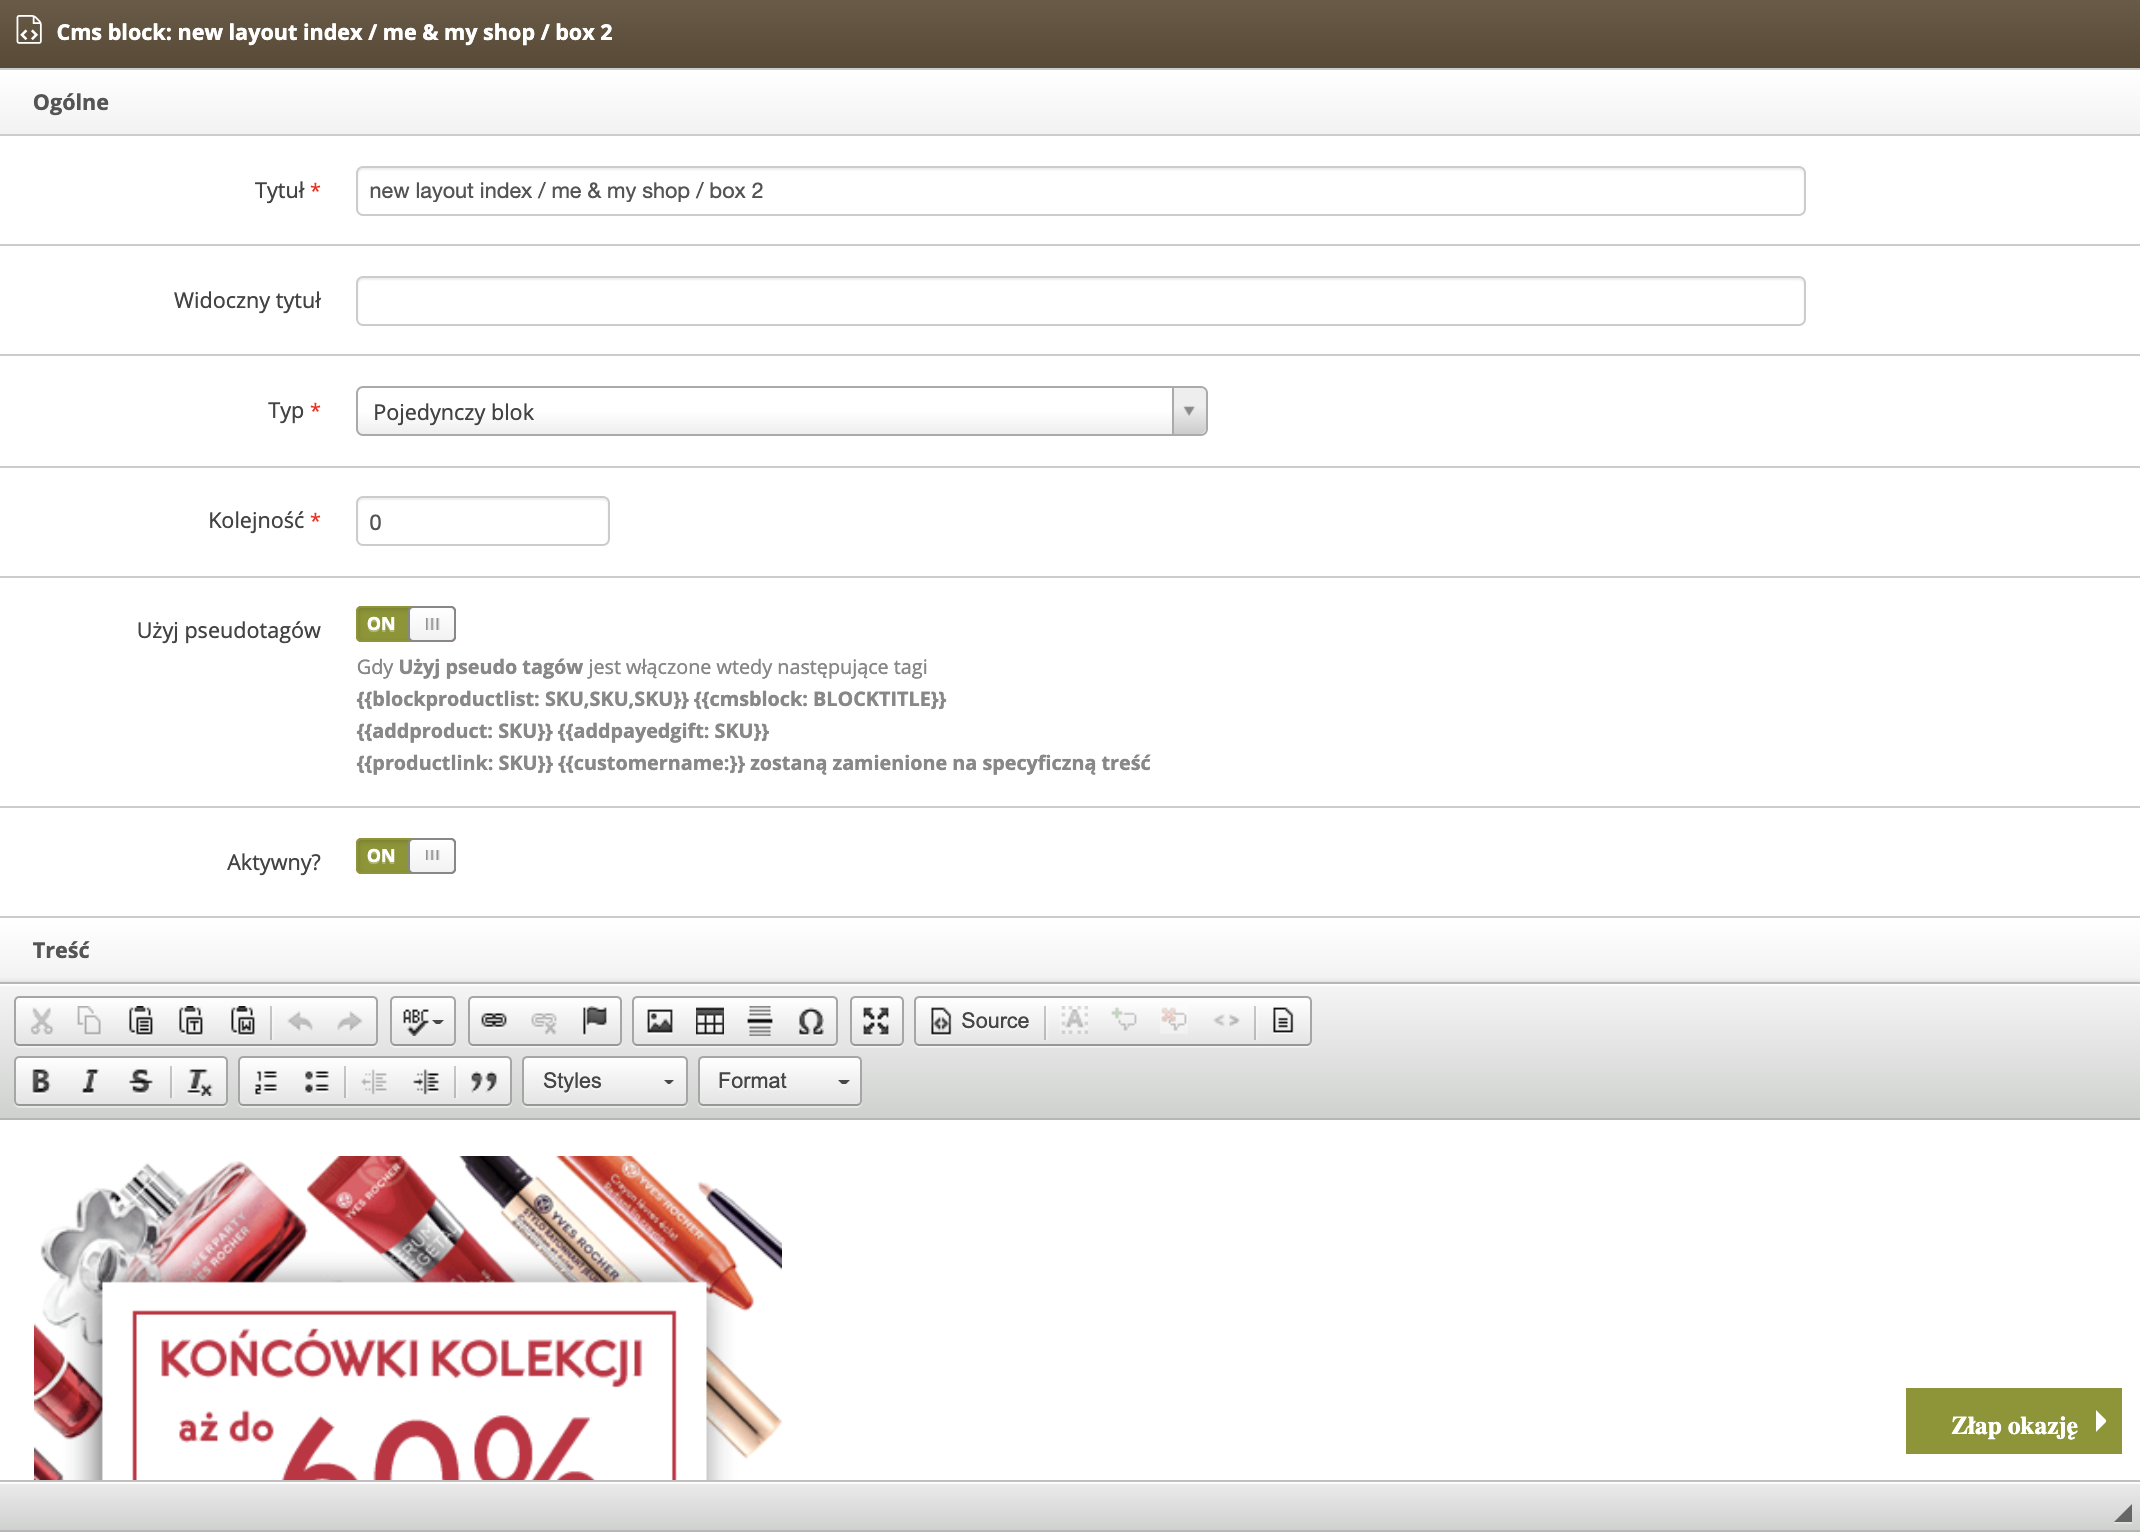 |
| *Wizualizacja widoku Popraw blok (new layout index / me & my shop / box 2) w panelu administracyjnym* |
|  |
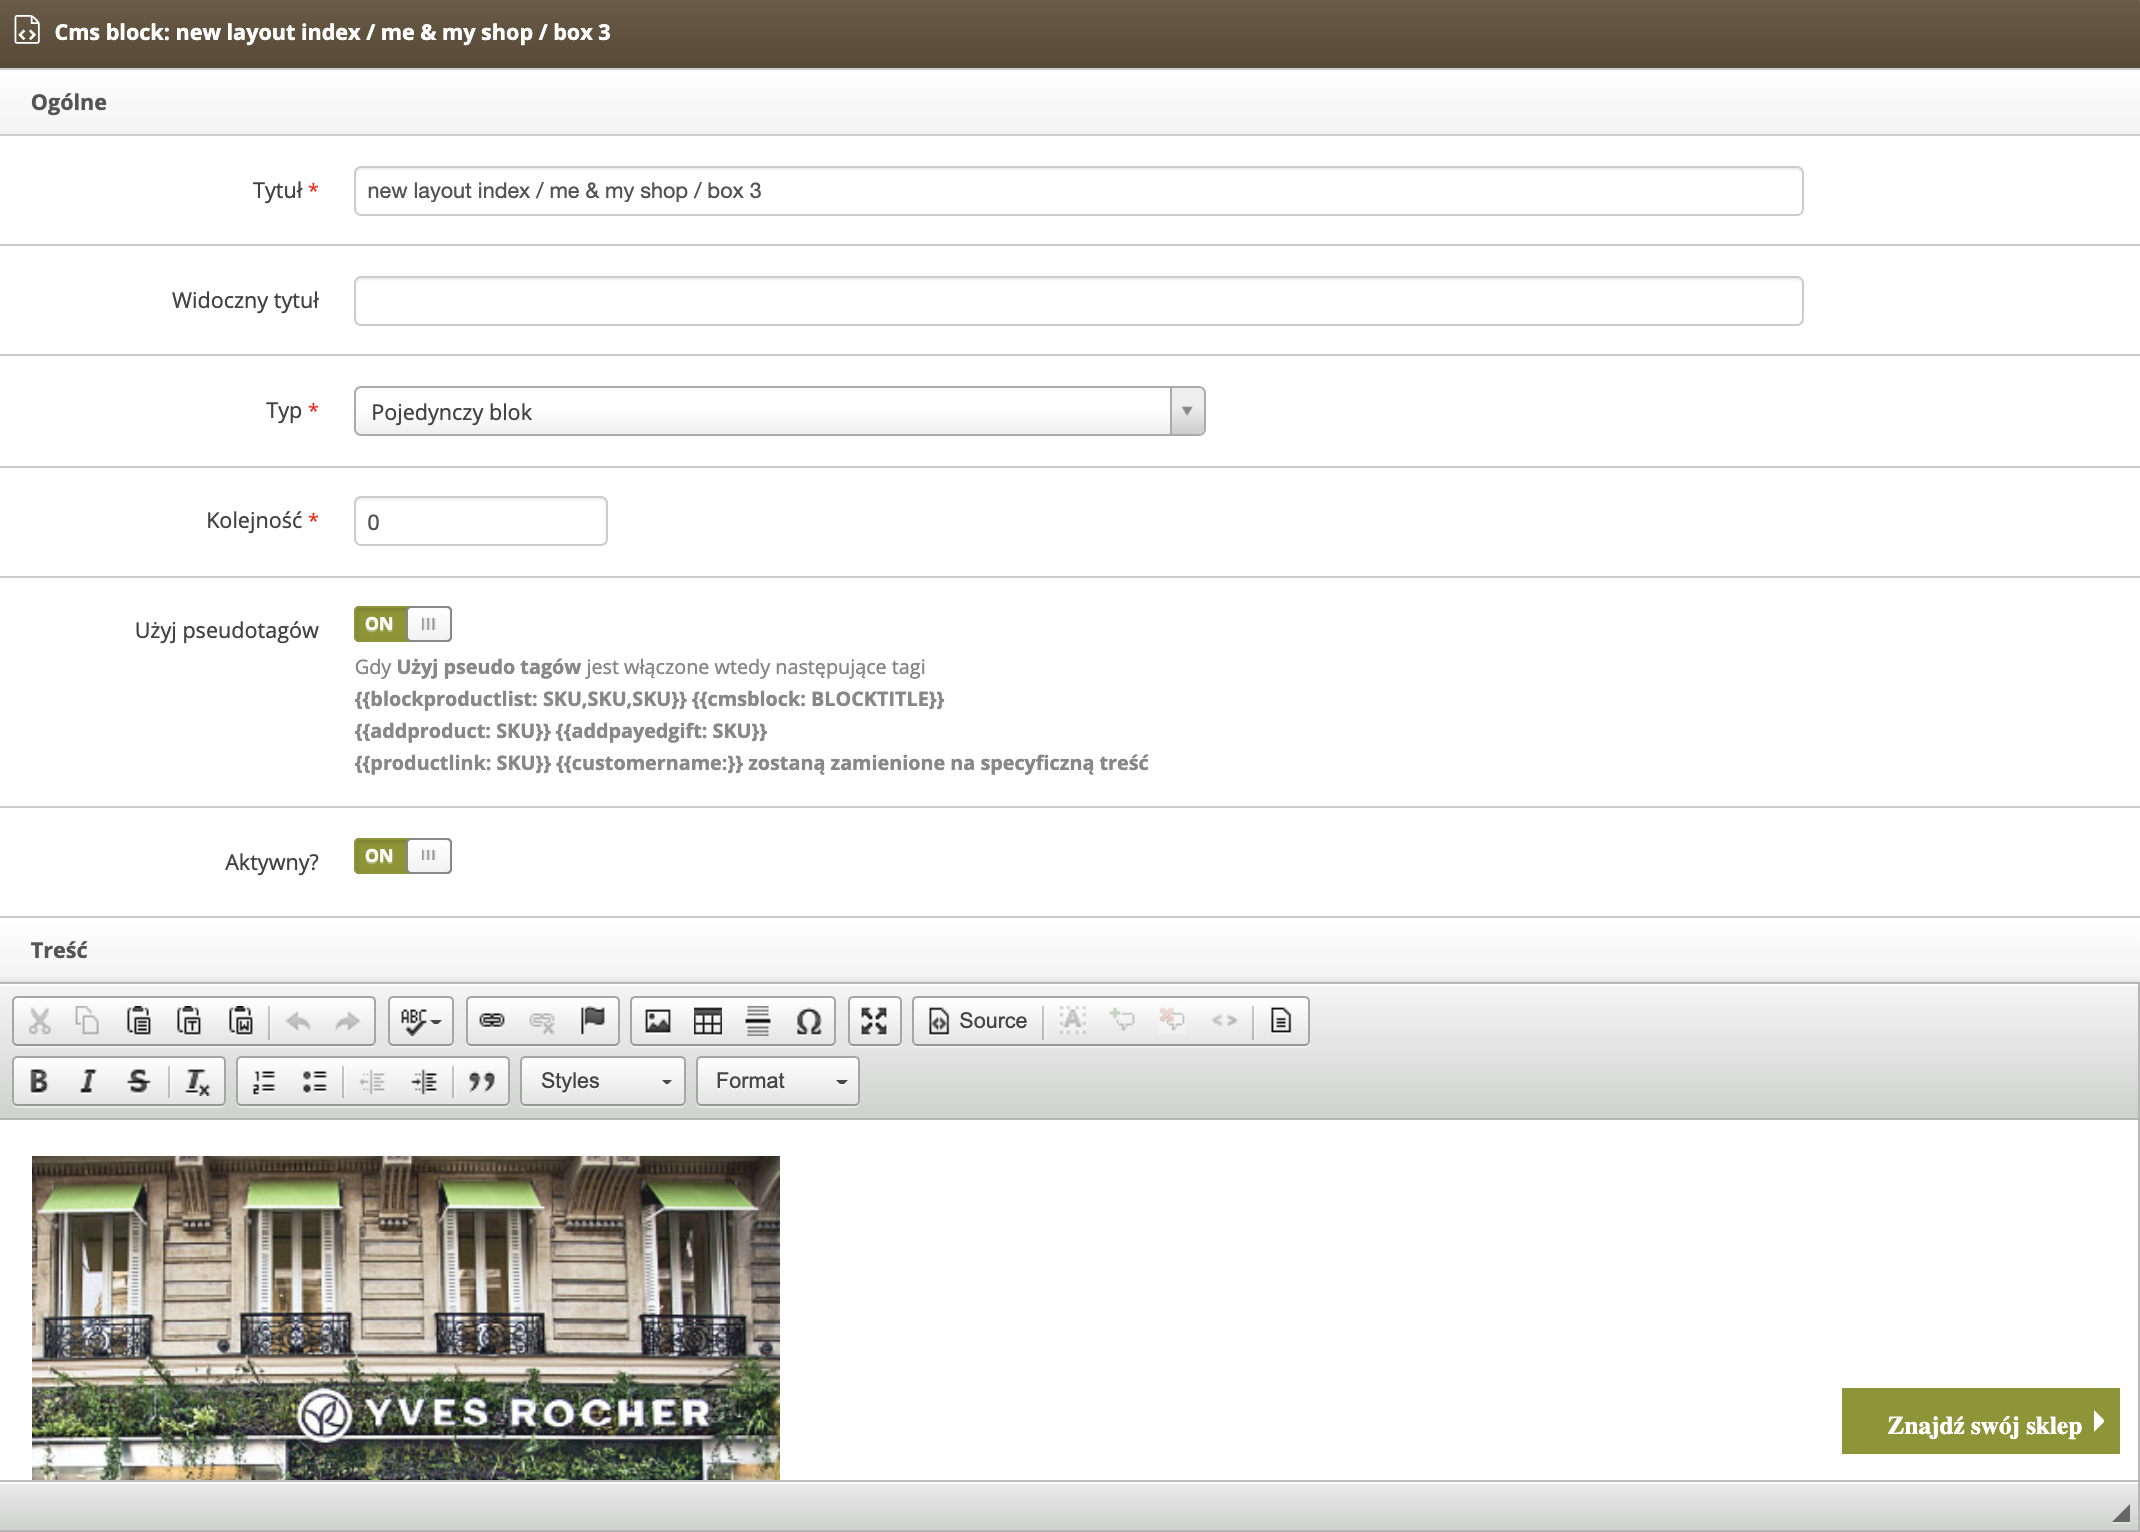
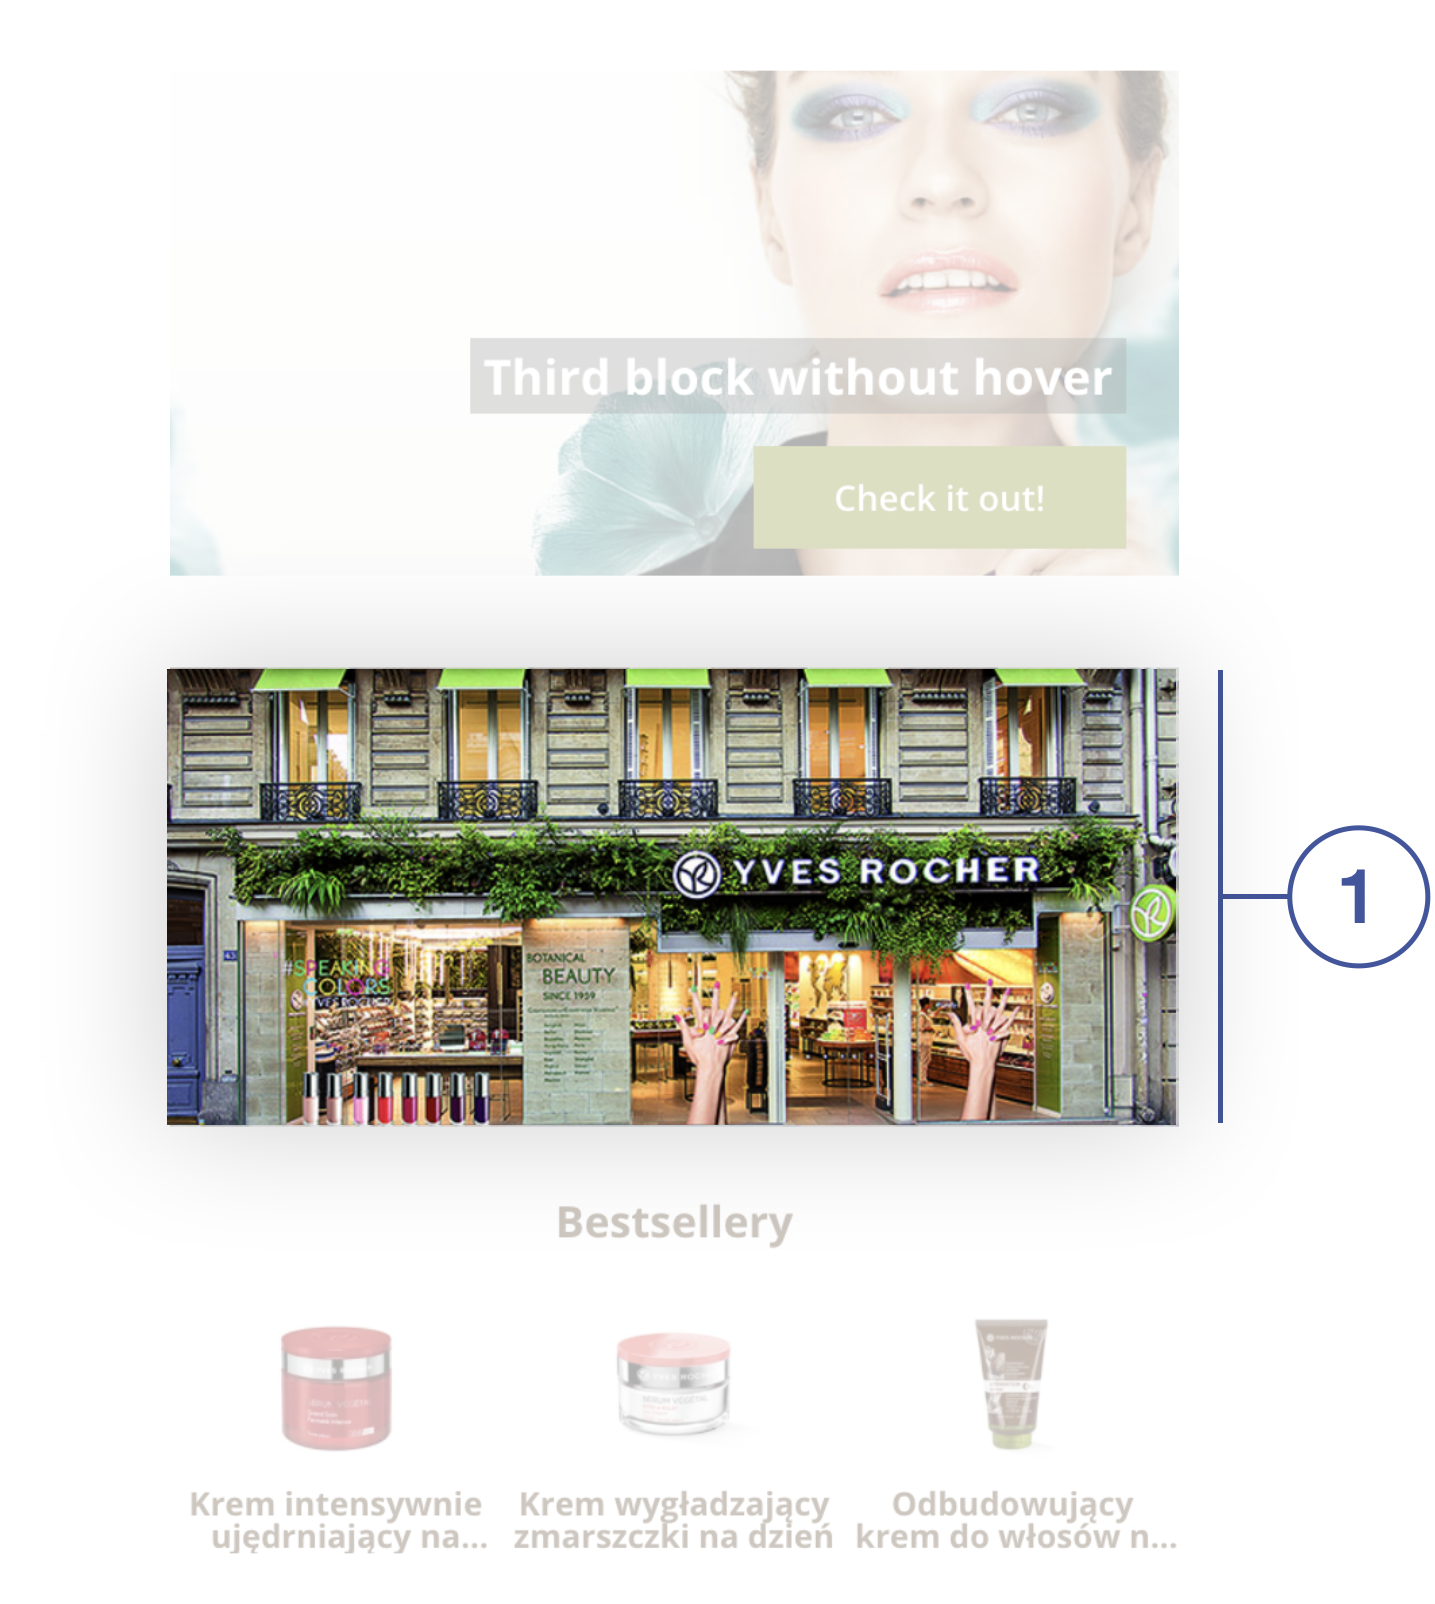
| *Wizualizacja CMS bloku (new layout index / me & my shop / box 3**) na witrynie sklepu* |
|  |
| *Wizualizacja widoku Popraw blok (new layout index / me & my shop / box 3) w panelu administracyjnym* |
|  |
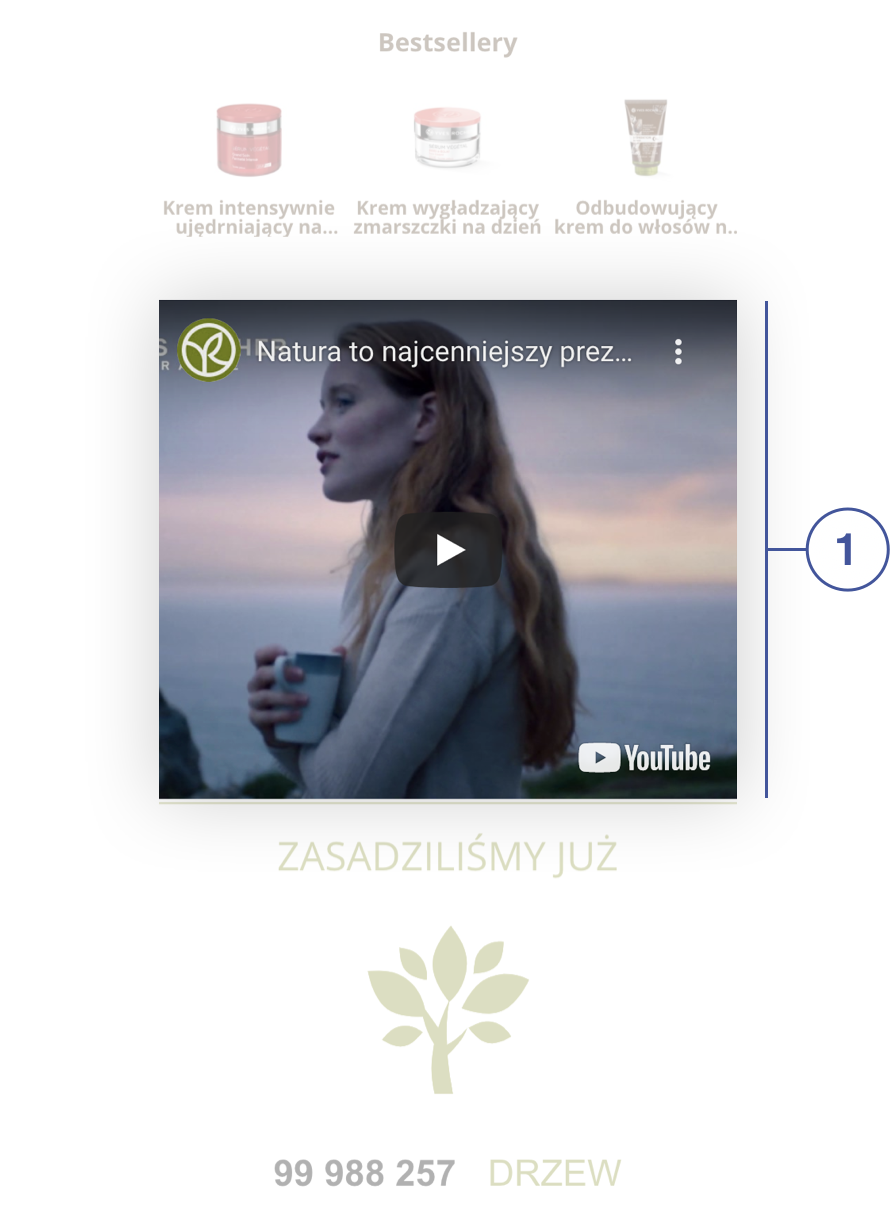
| *Wizualizacja CMS bloku (mobile / index / promotion dates info**) na witrynie sklepu* |
| 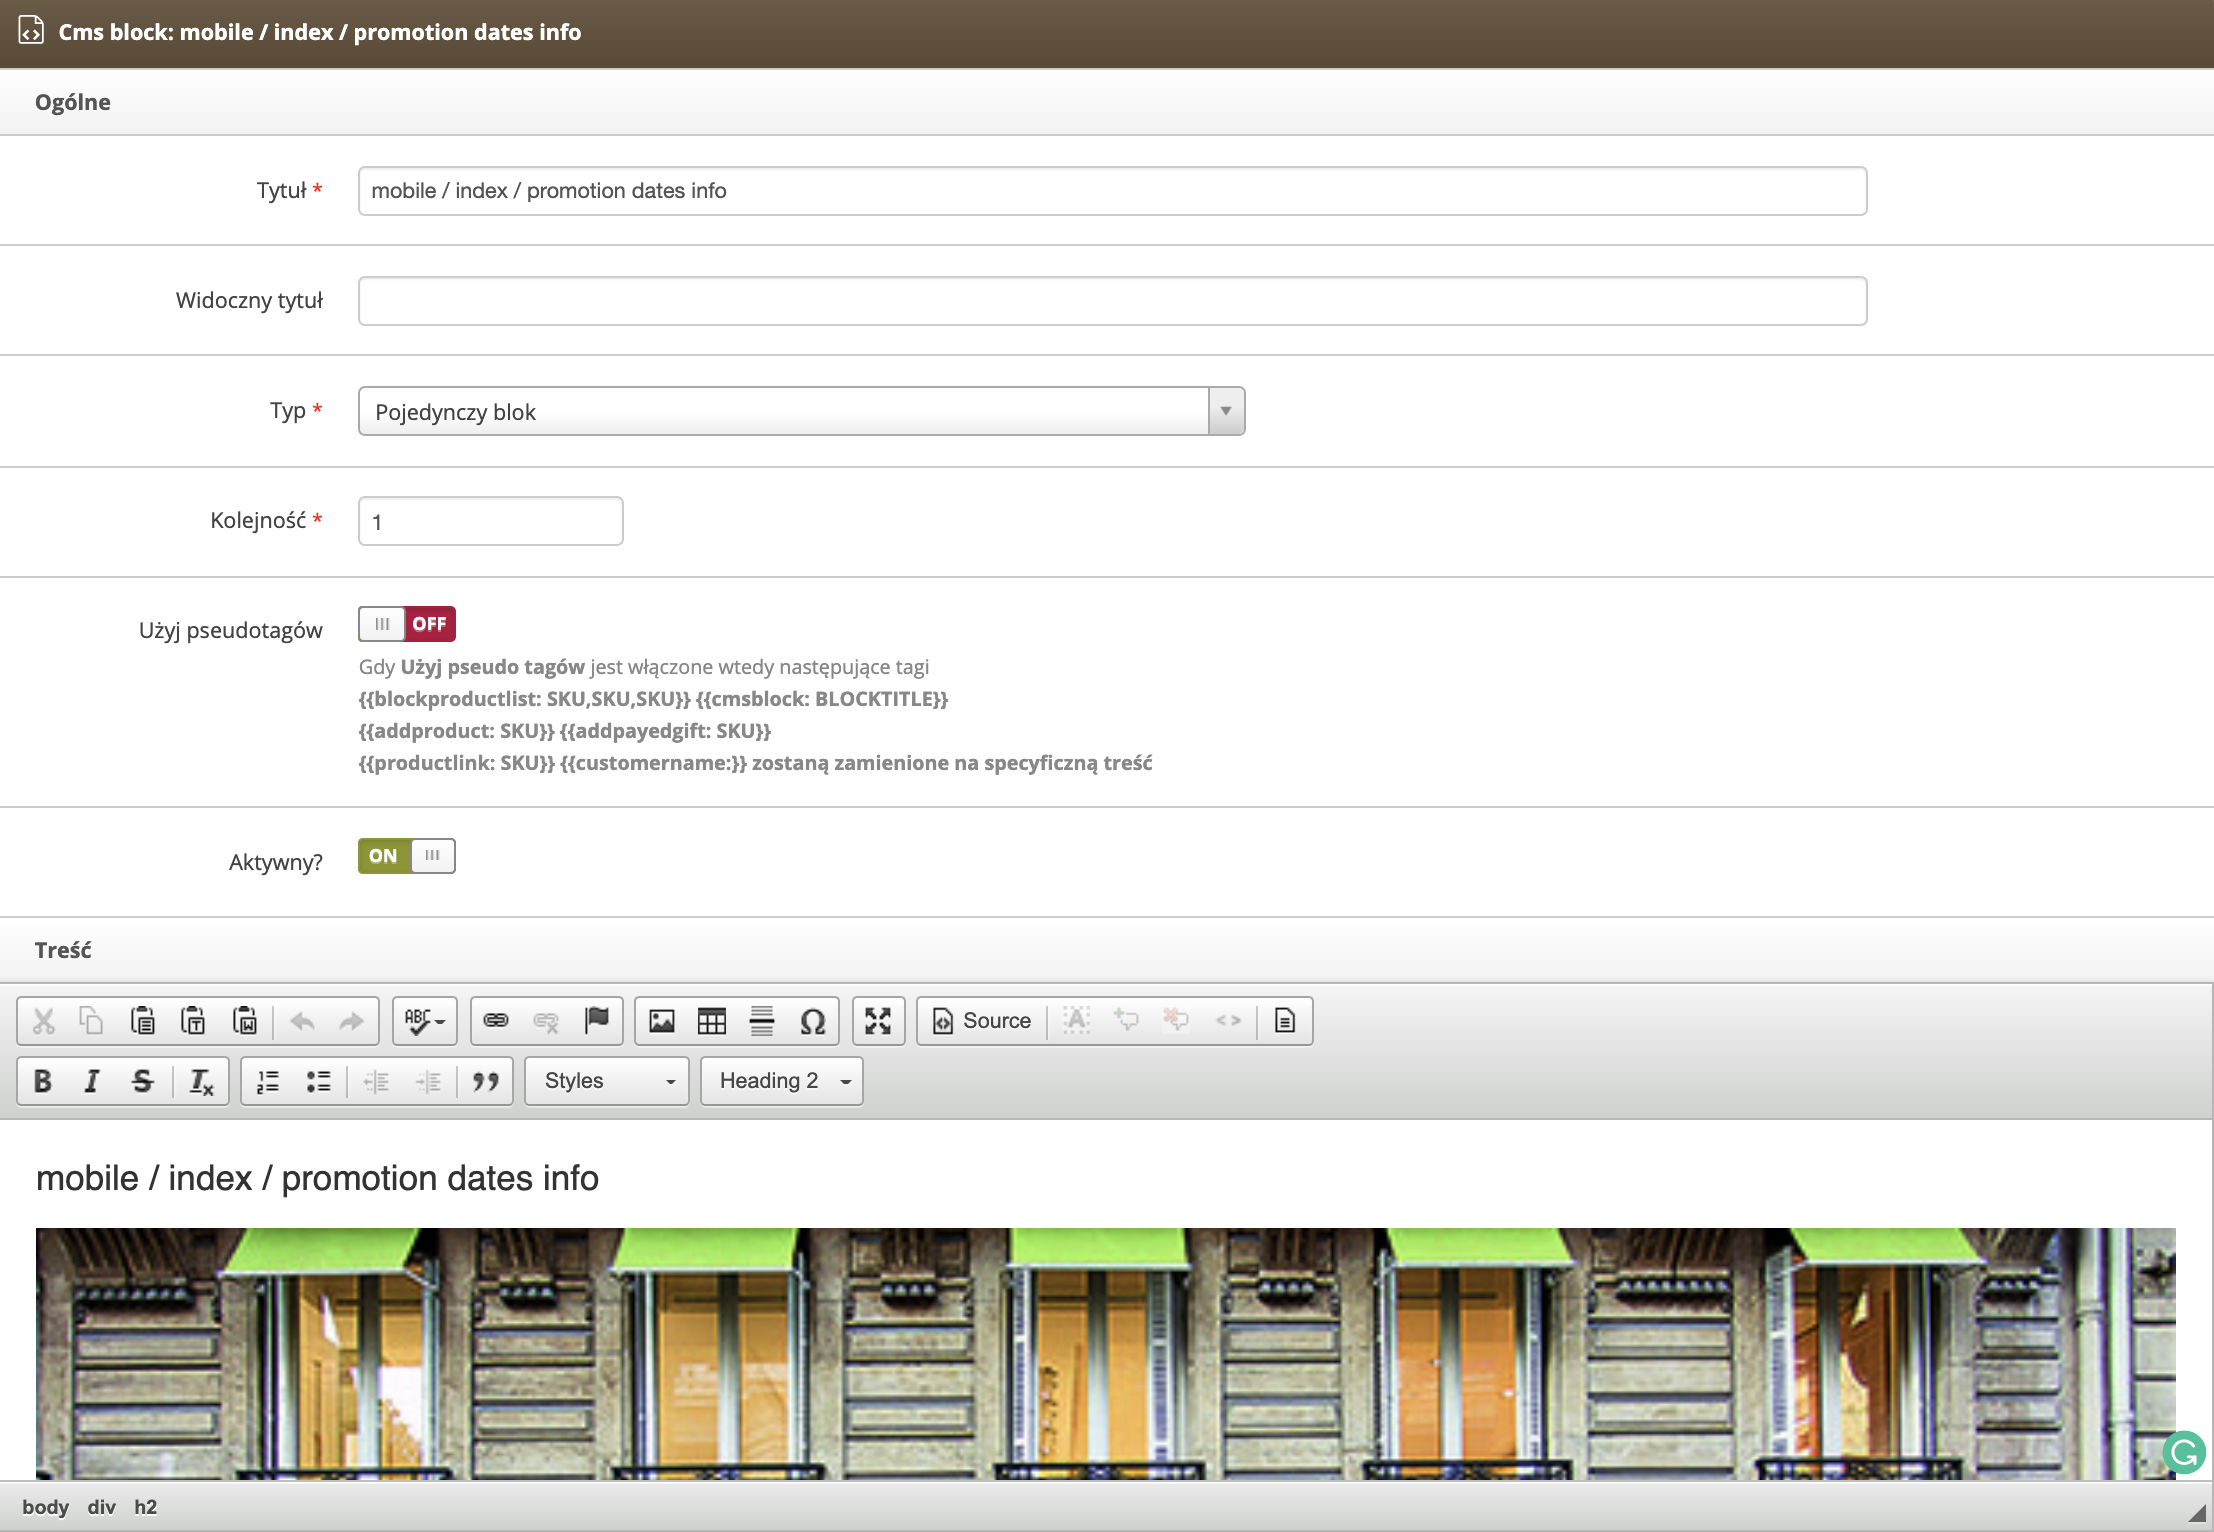 |
| *Wizualizacja widoku Popraw blok (mobile / index / promotion dates info) w panelu administracyjnym* |
|  |
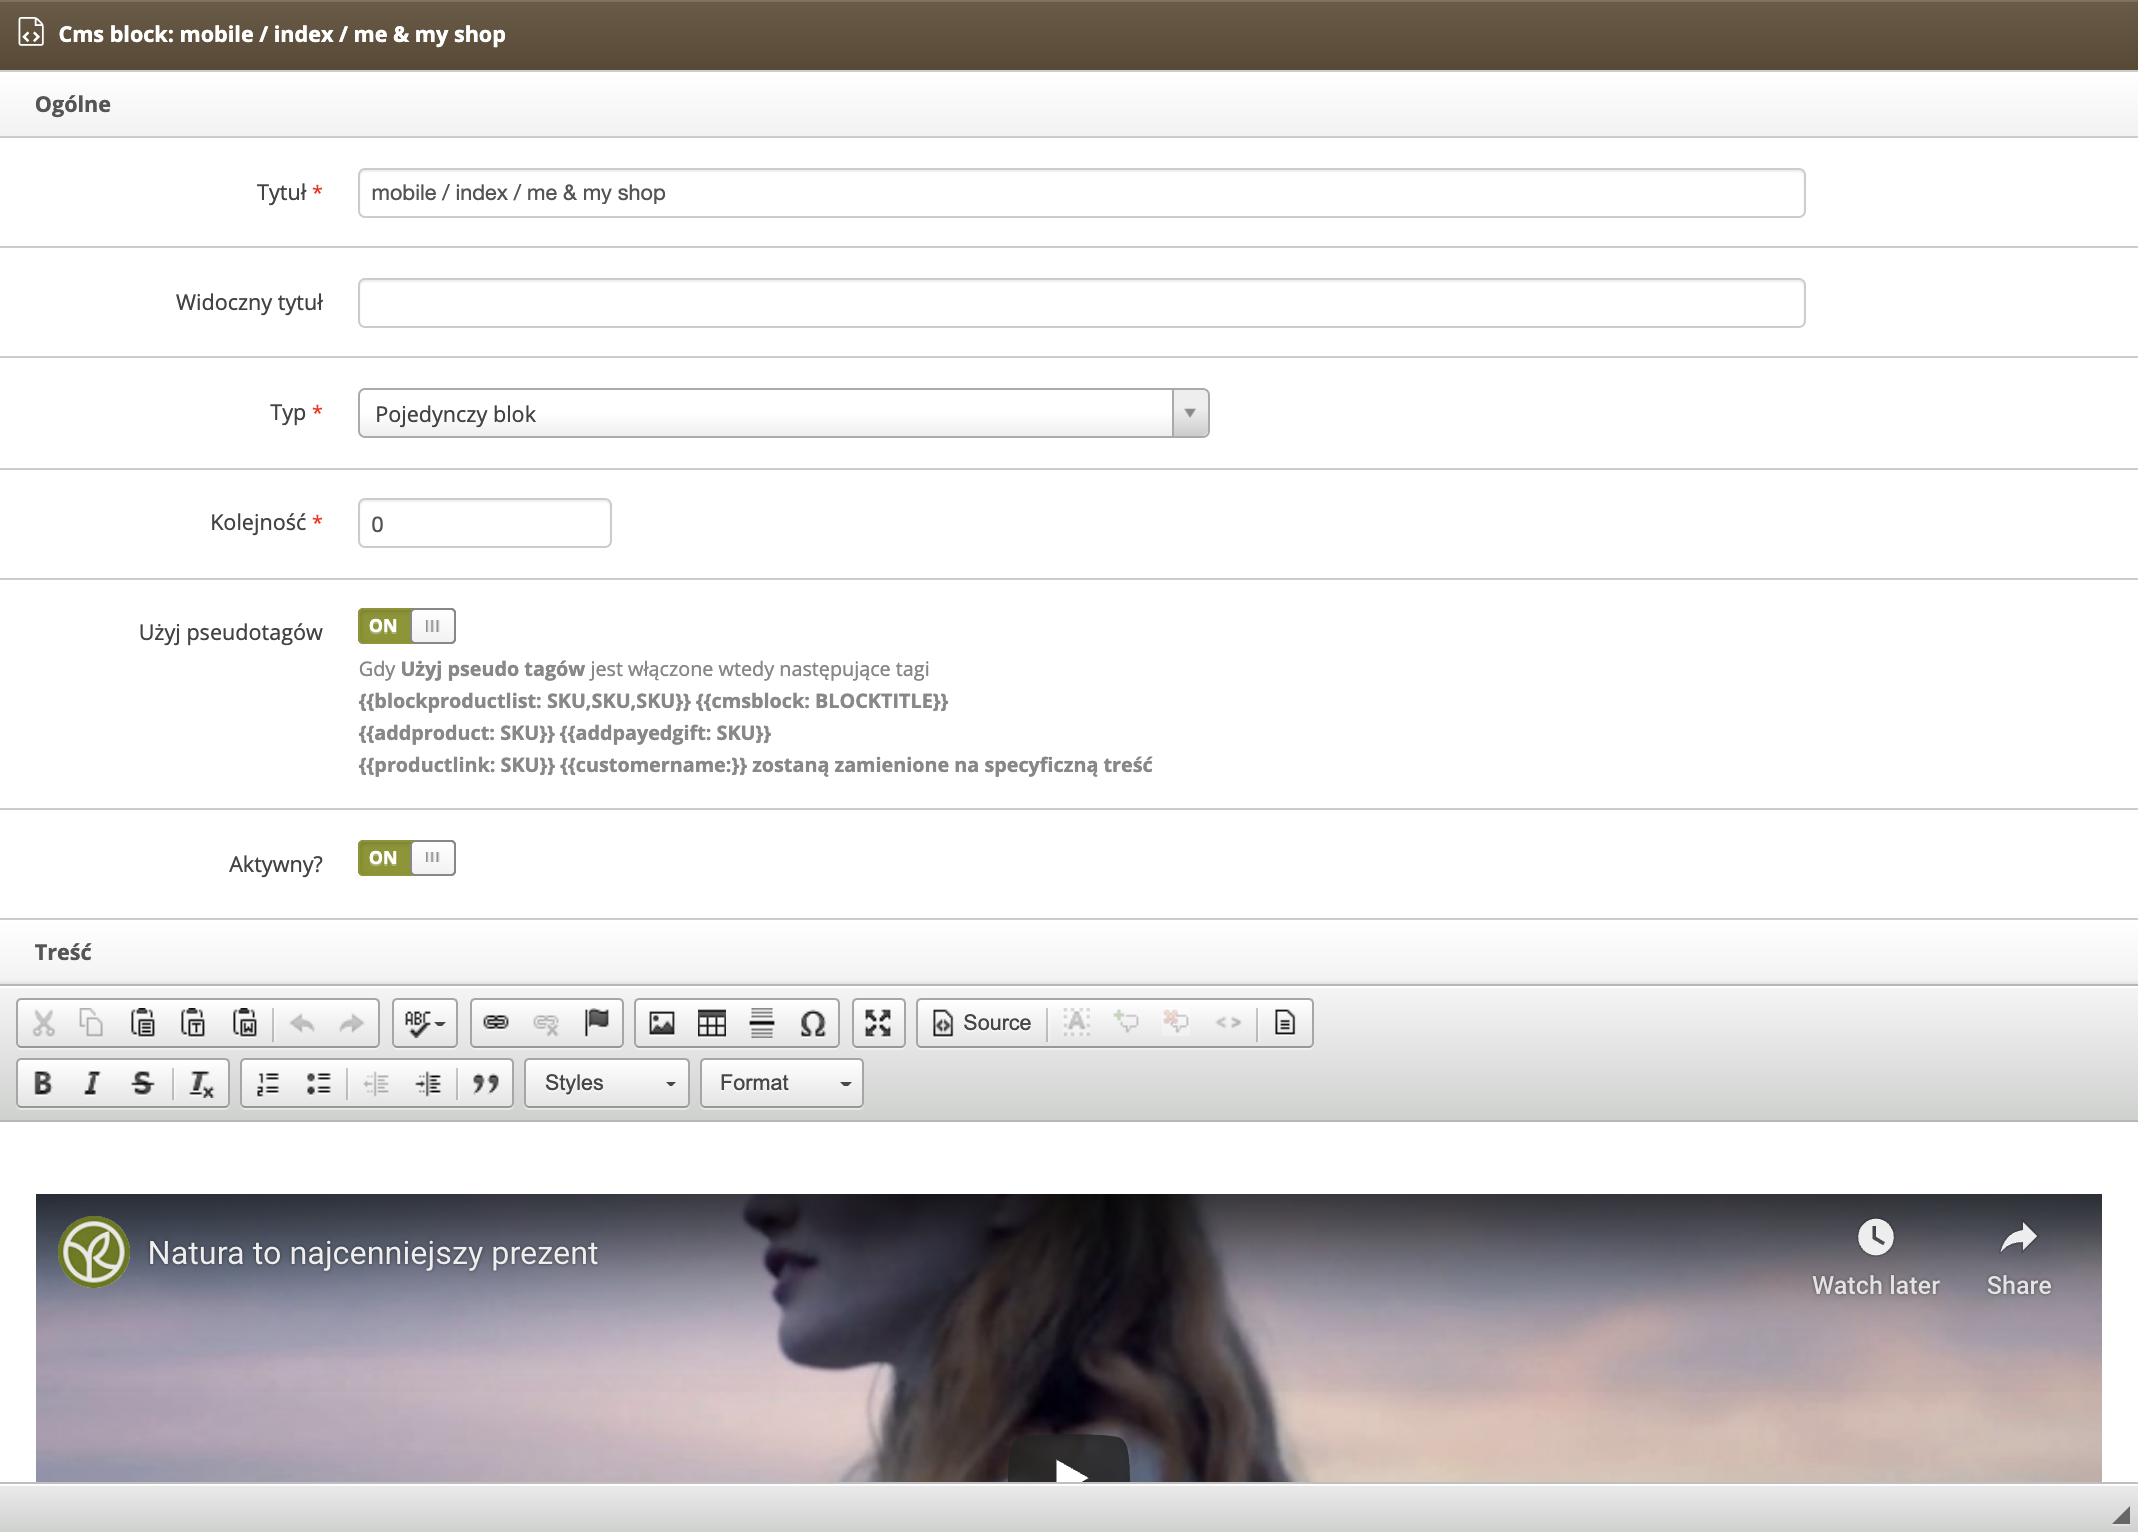
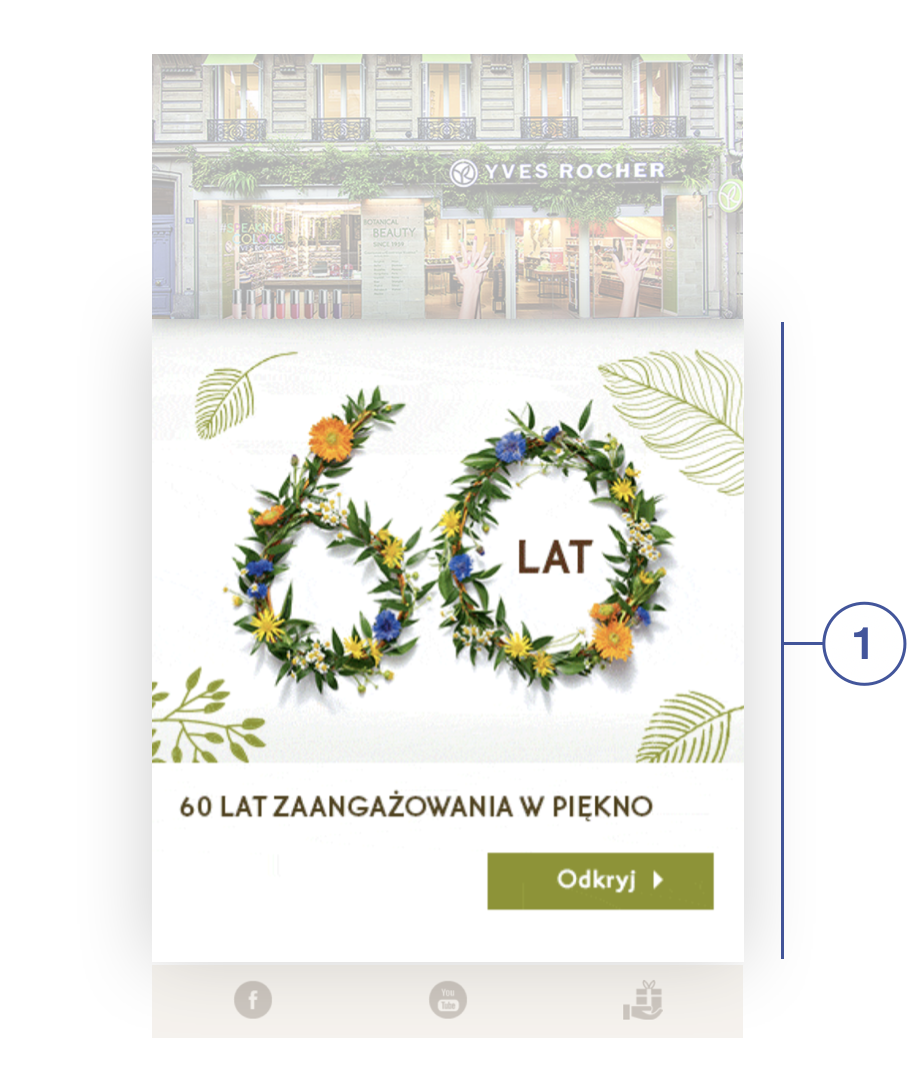
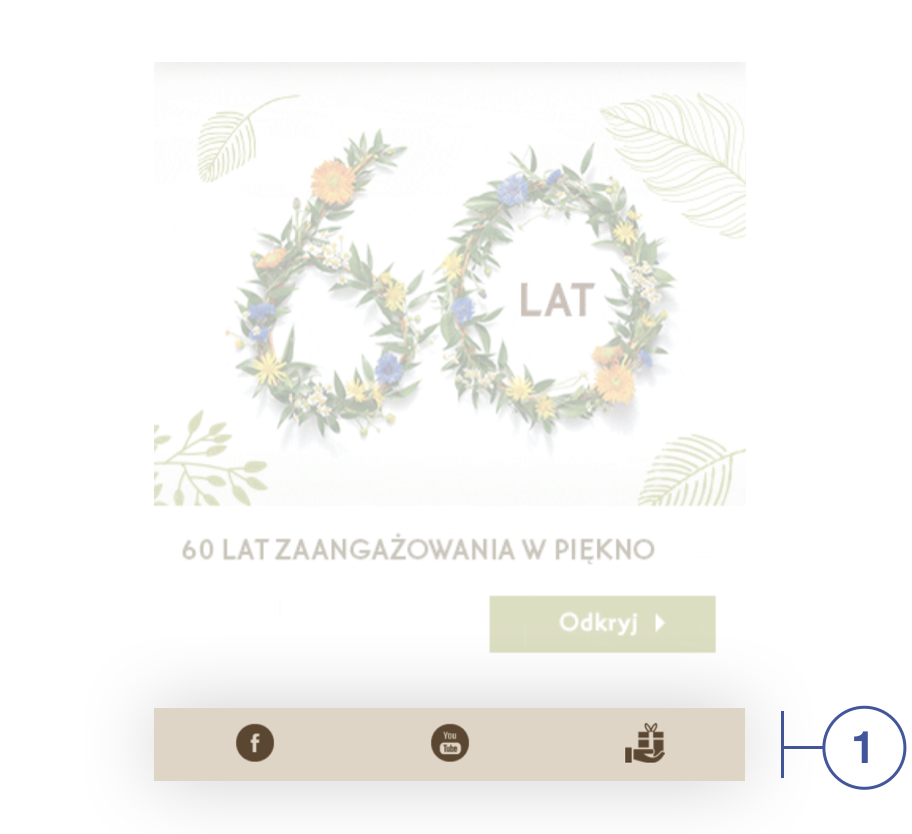
| *Wizualizacja CMS bloku (mobile / index / me & my shop**) na witrynie sklepu* |
|  |
| *Wizualizacja widoku Popraw blok (mobile / index / me & my shop) w panelu administracyjnym* |
|  |
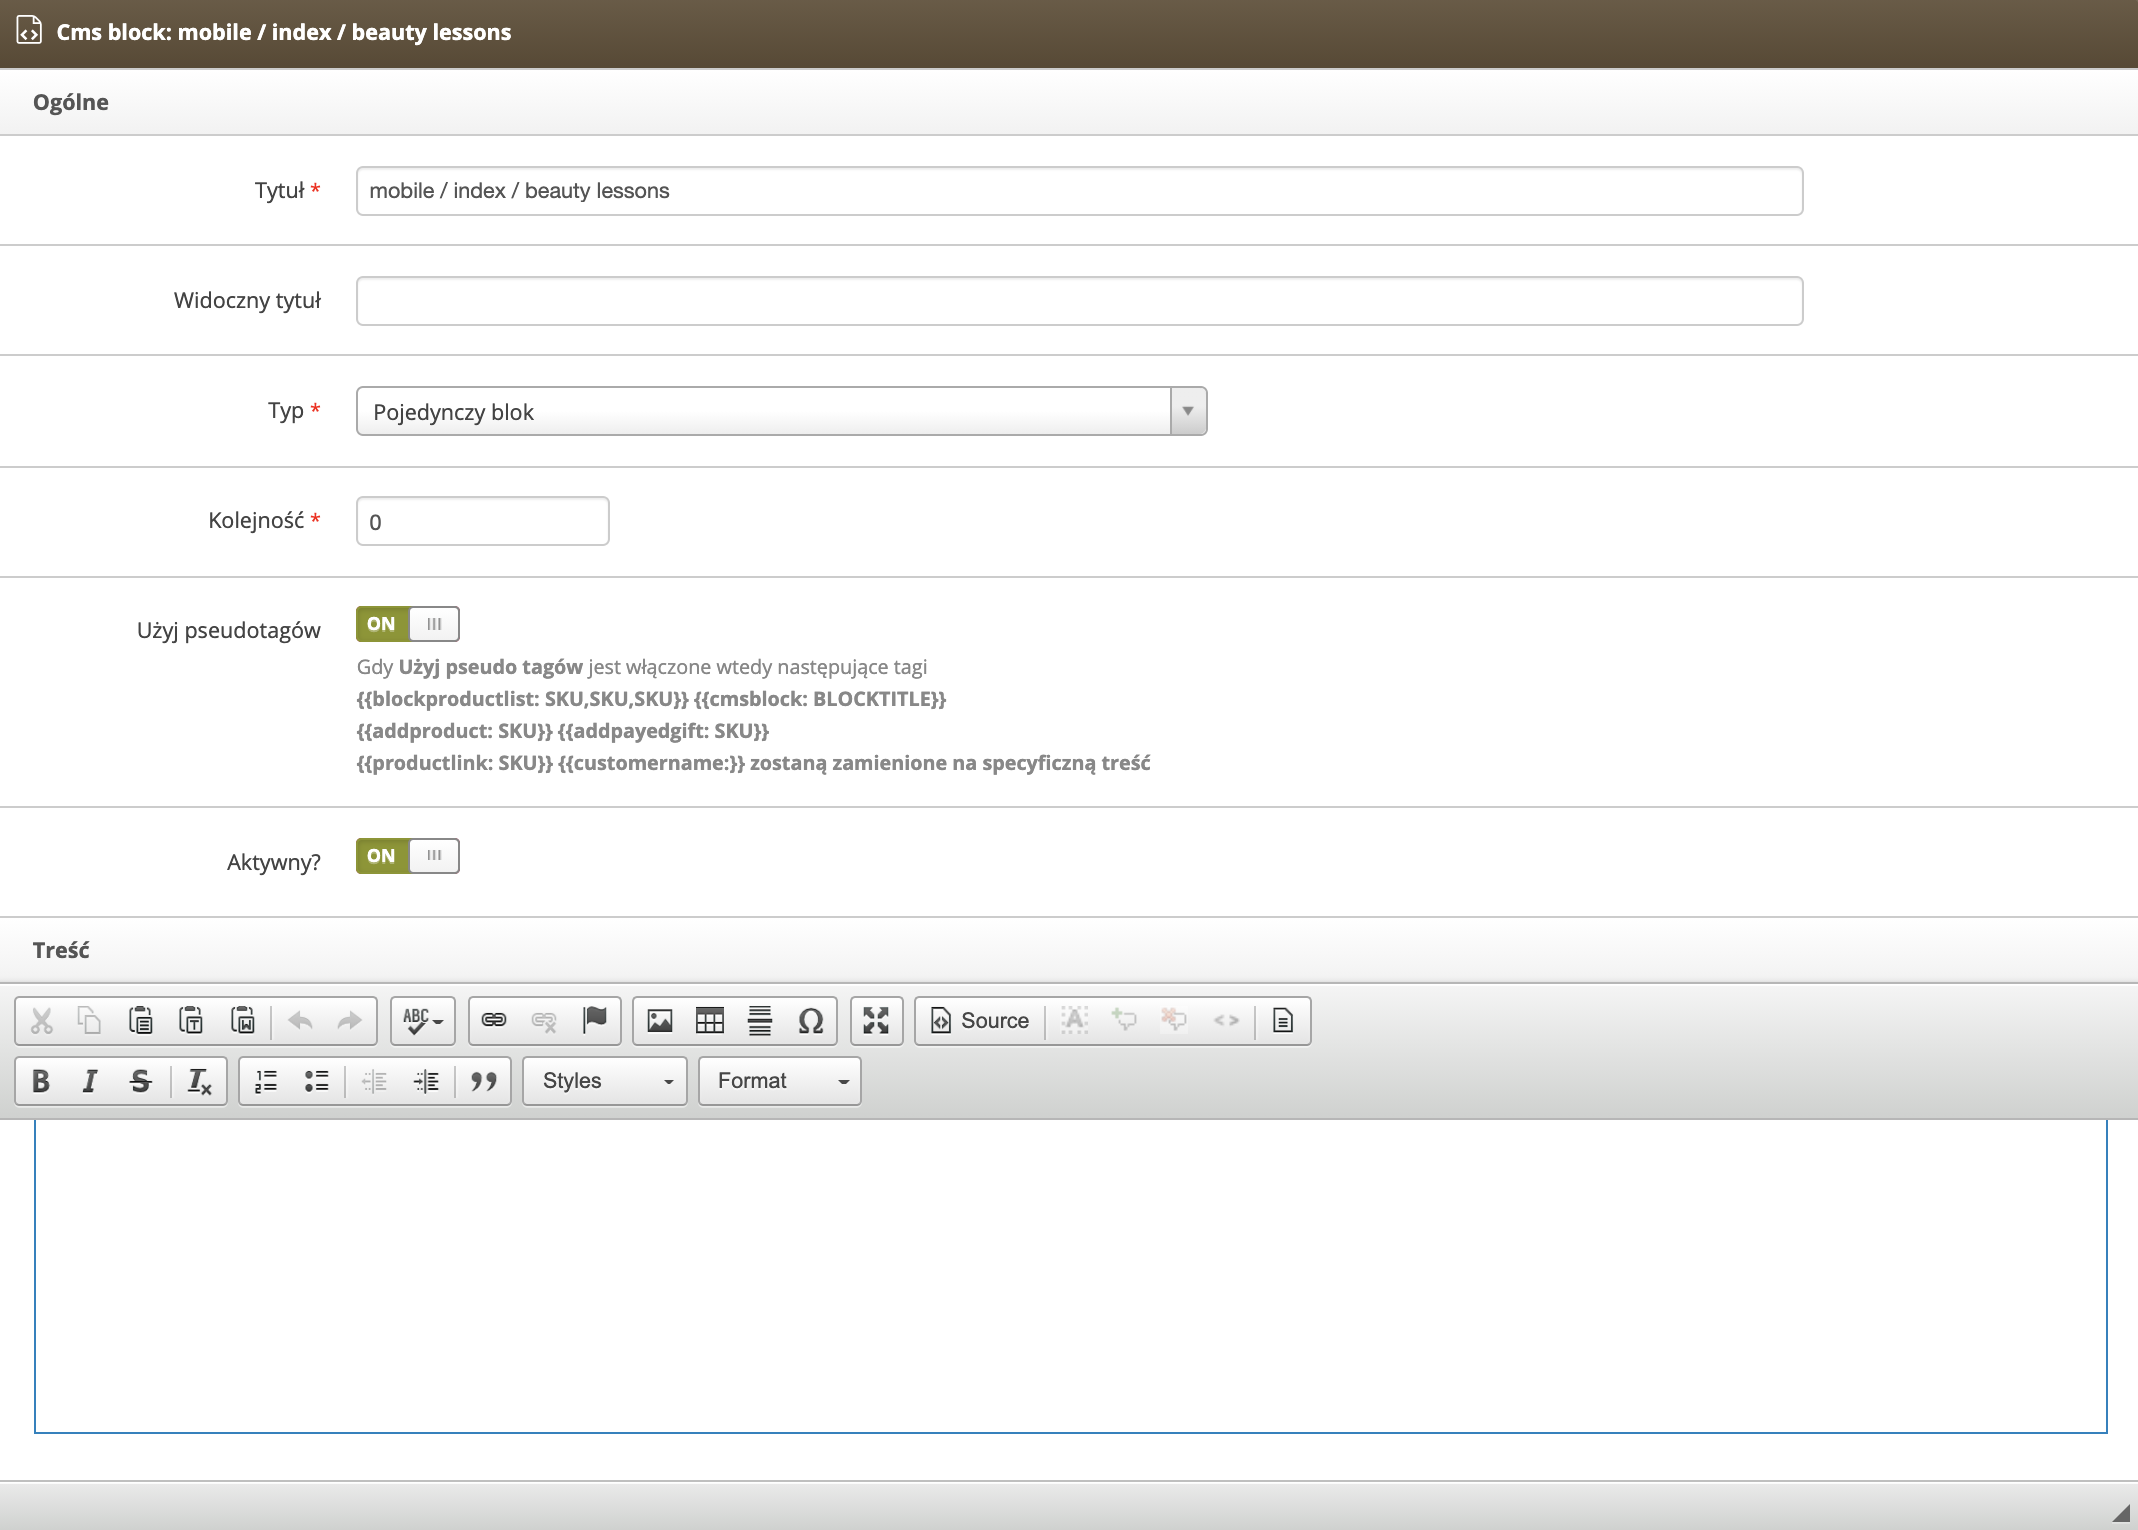
| *Wizualizacja CMS bloku (mobile / index / beauty lessons**) na witrynie sklepu* |
|  |
| *Wizualizacja widoku Popraw blok (mobile / index / beauty lessons) w panelu administracyjnym* |
|  |
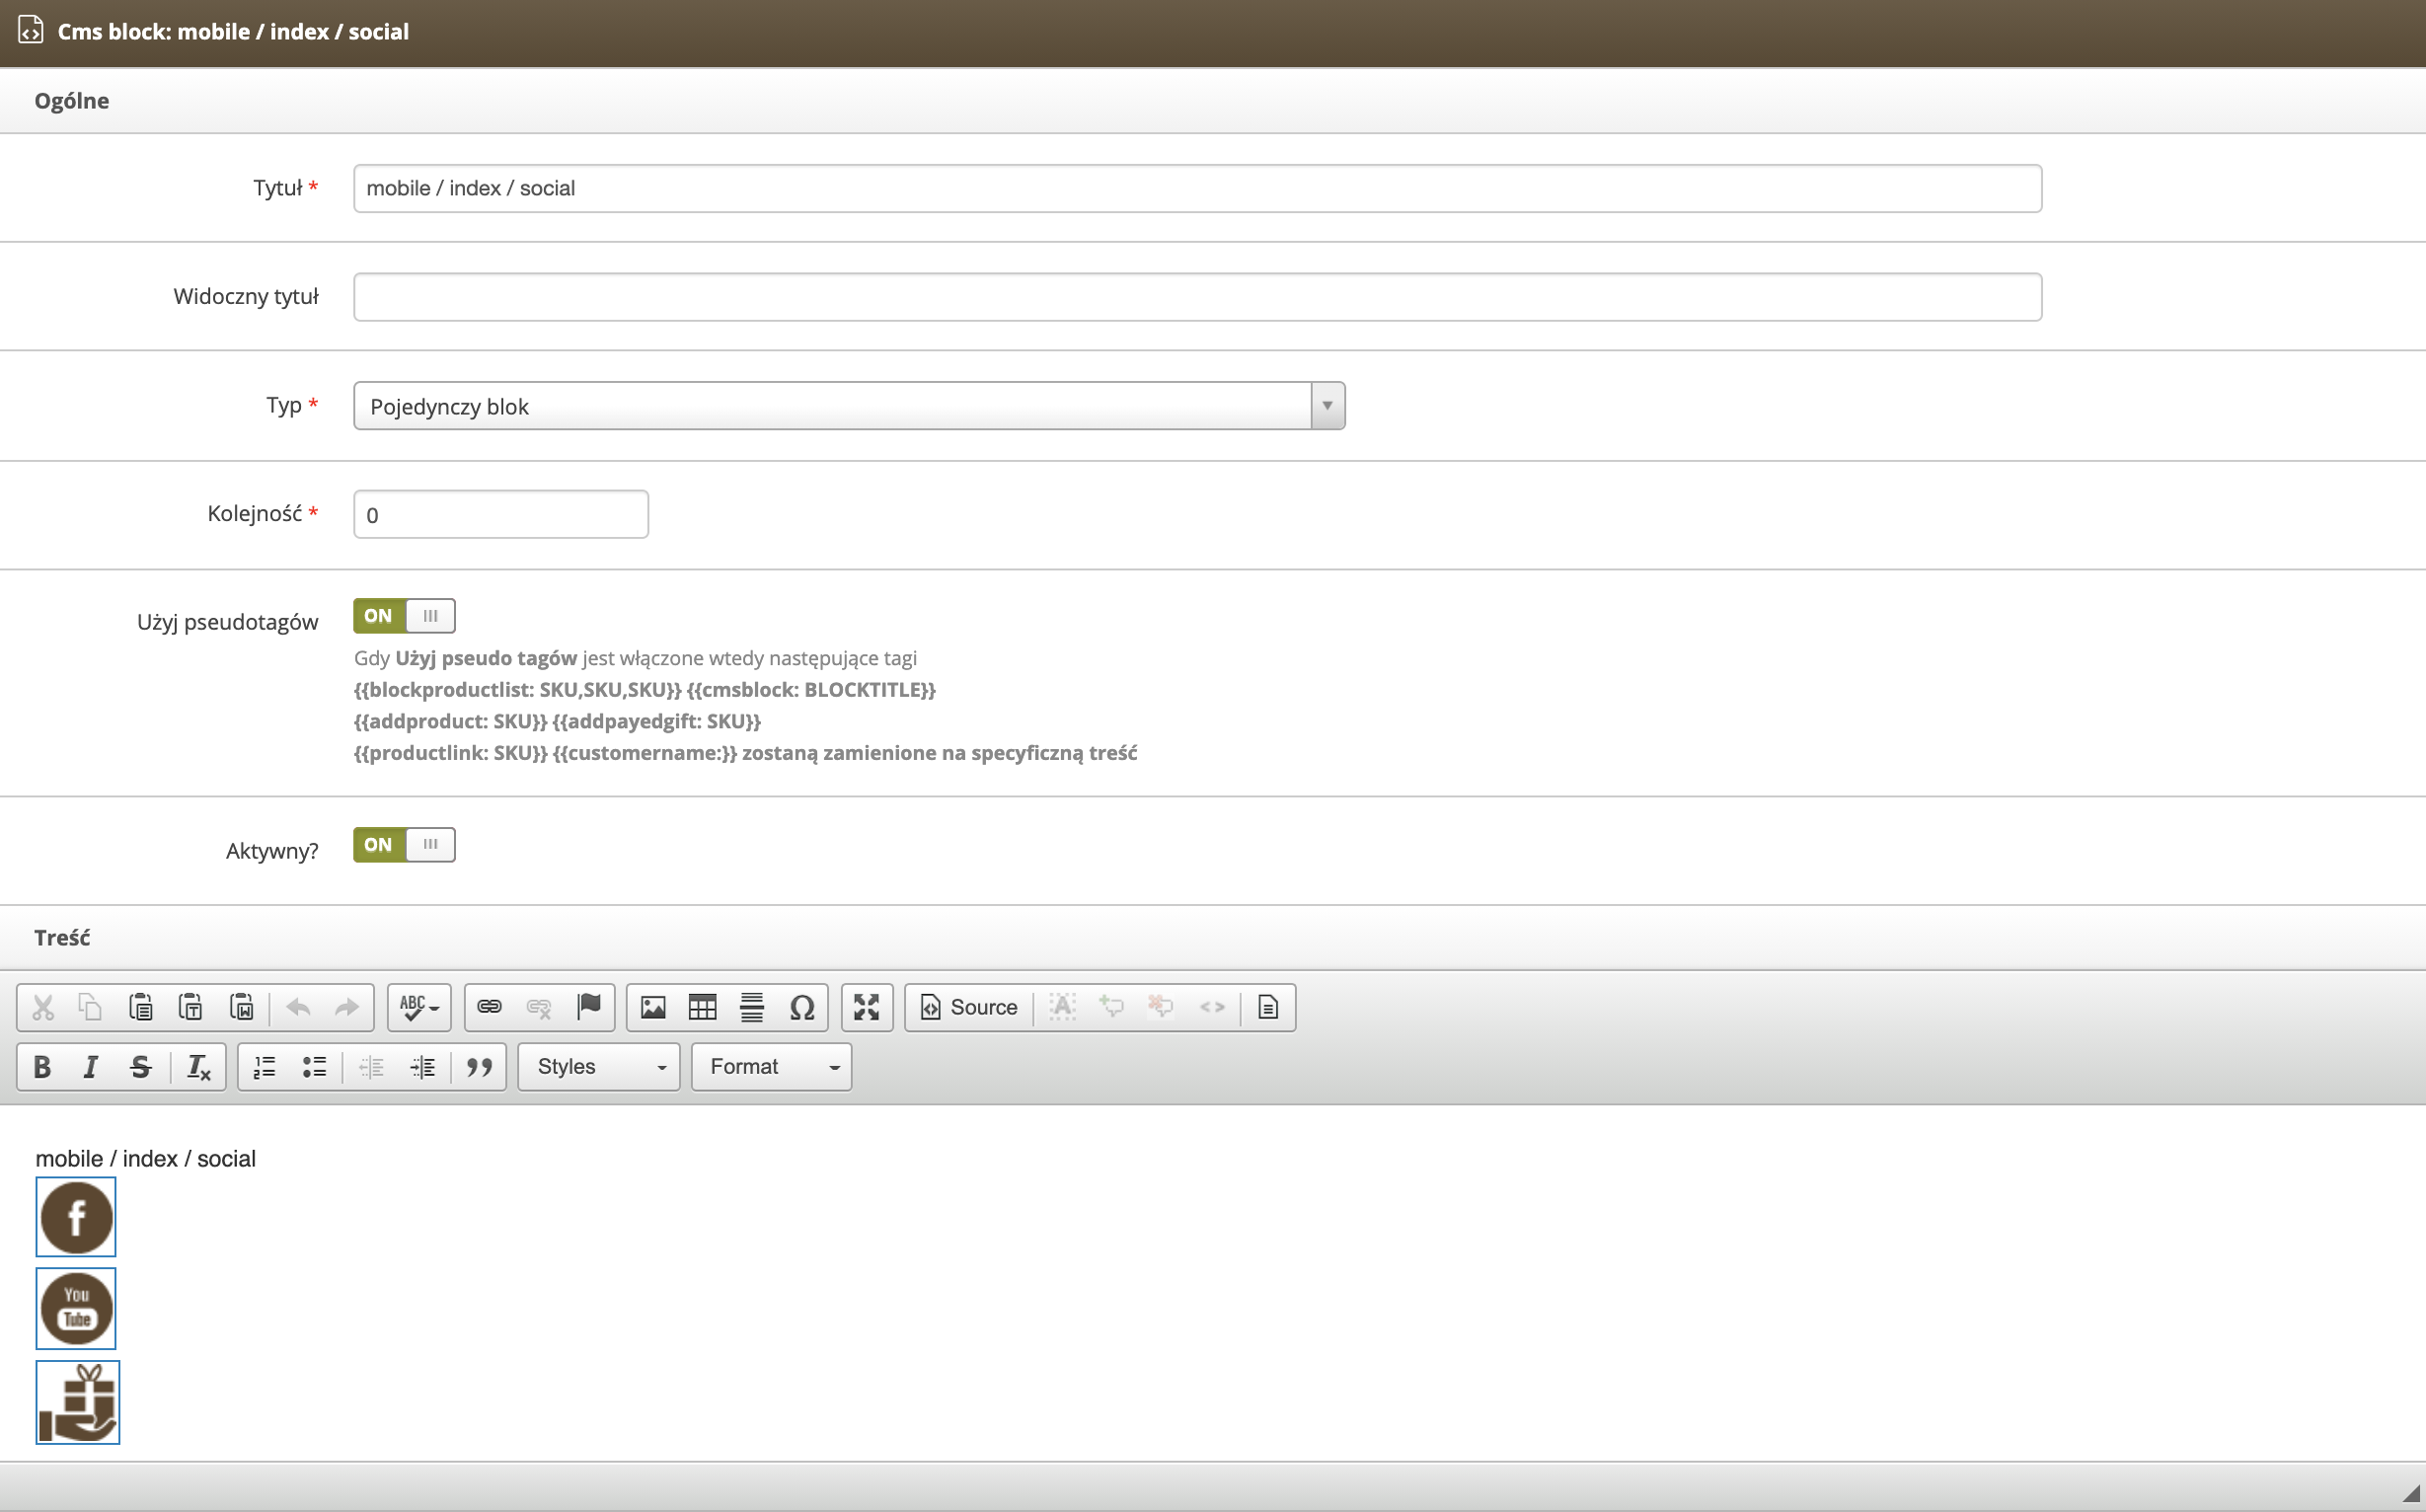
| *Wizualizacja CMS bloku (mobile / index / social**) na witrynie sklepu* |
|  |
| *Wizualizacja widoku Popraw blok (mobile / index / social) w panelu administracyjnym* |
| 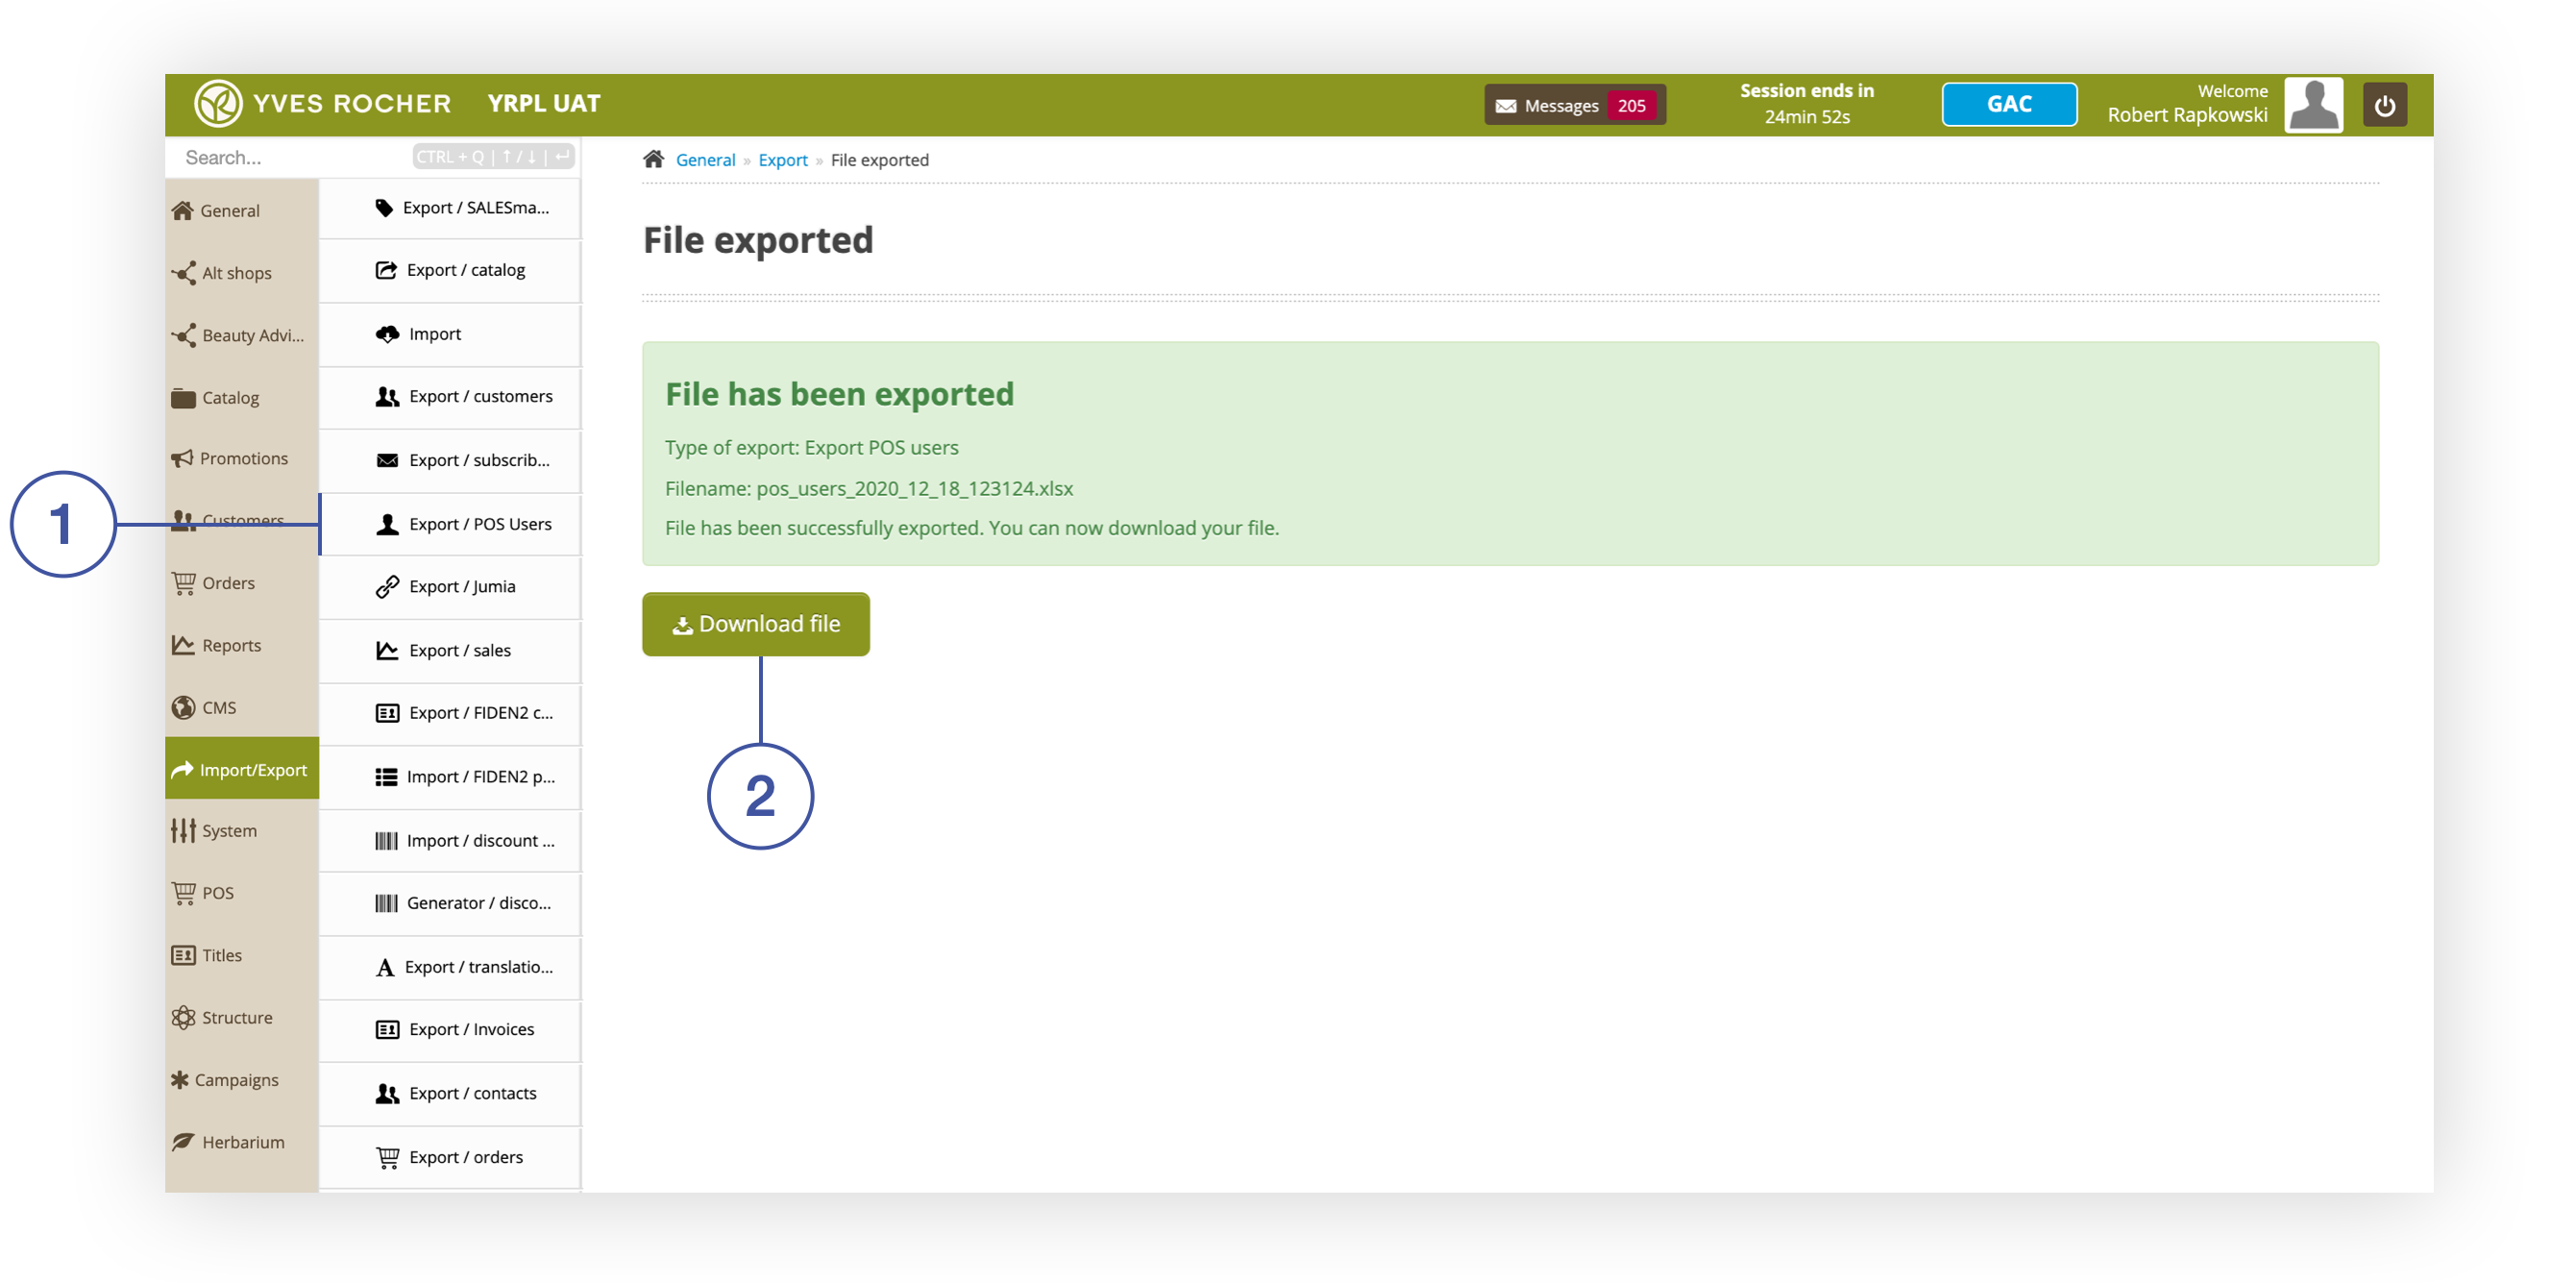 |
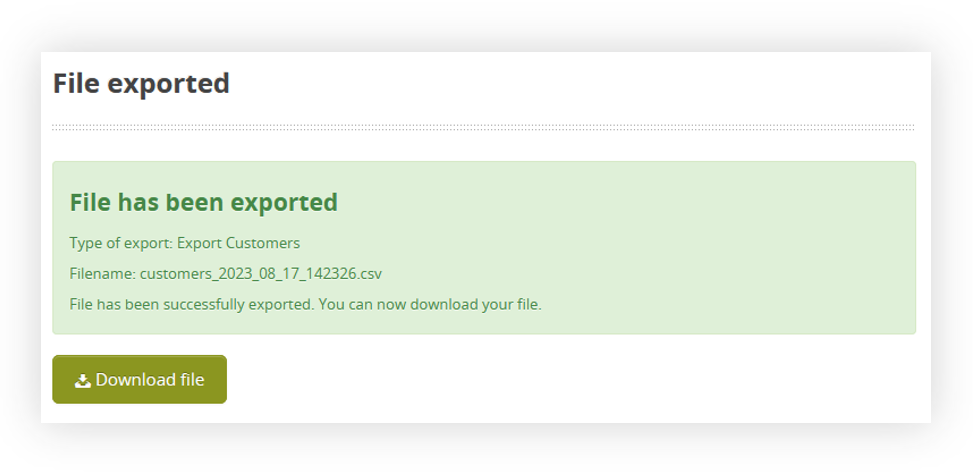
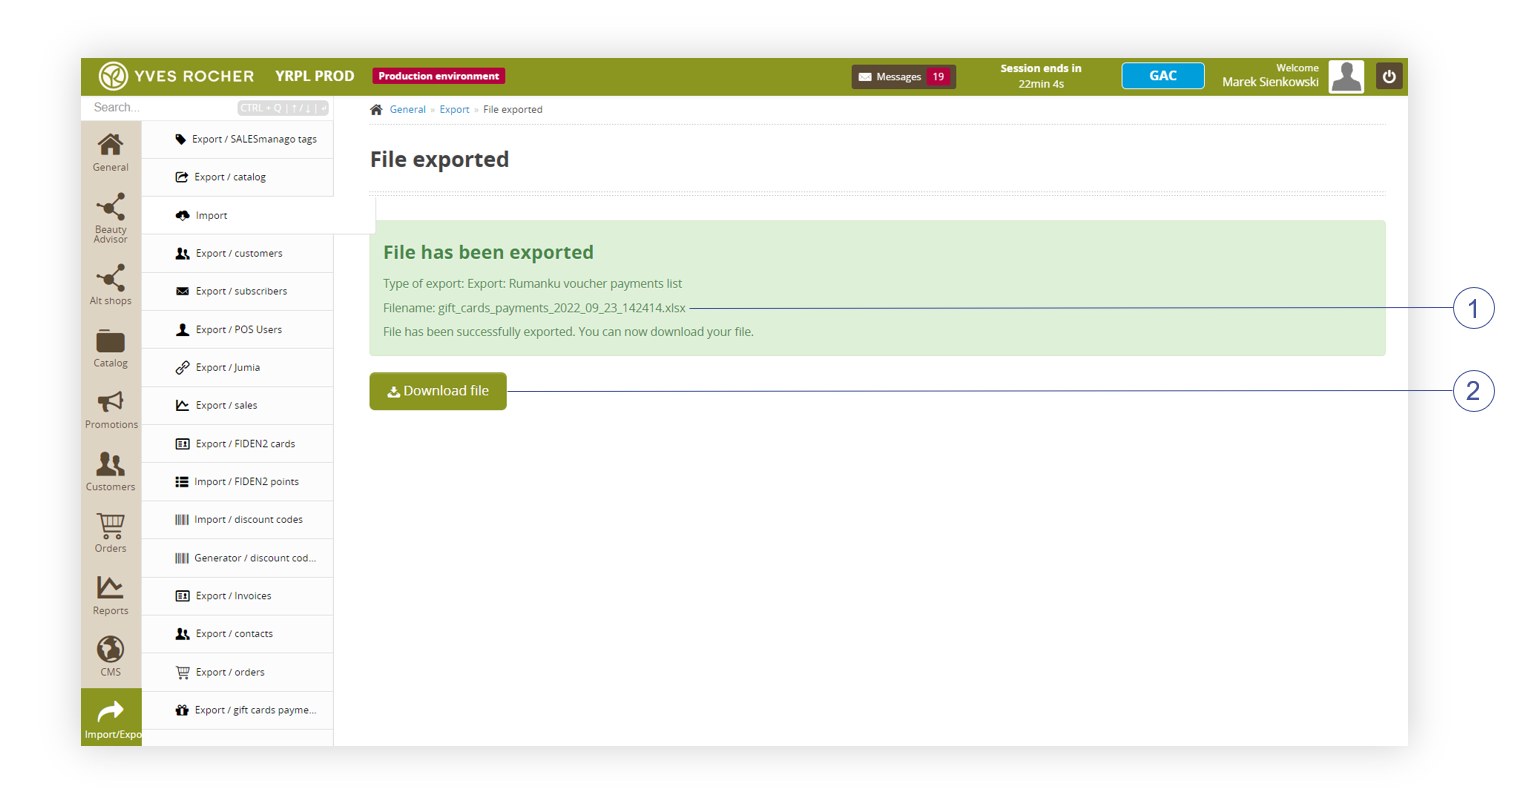
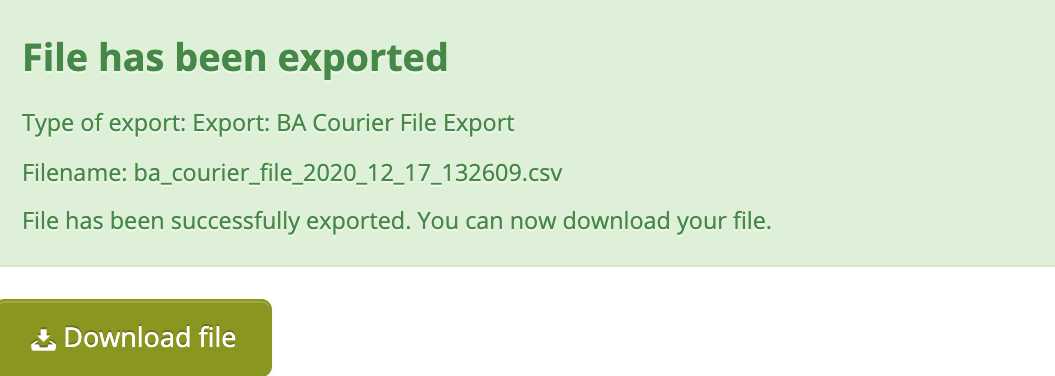
| *Screen with a summary of the export operation* |
| 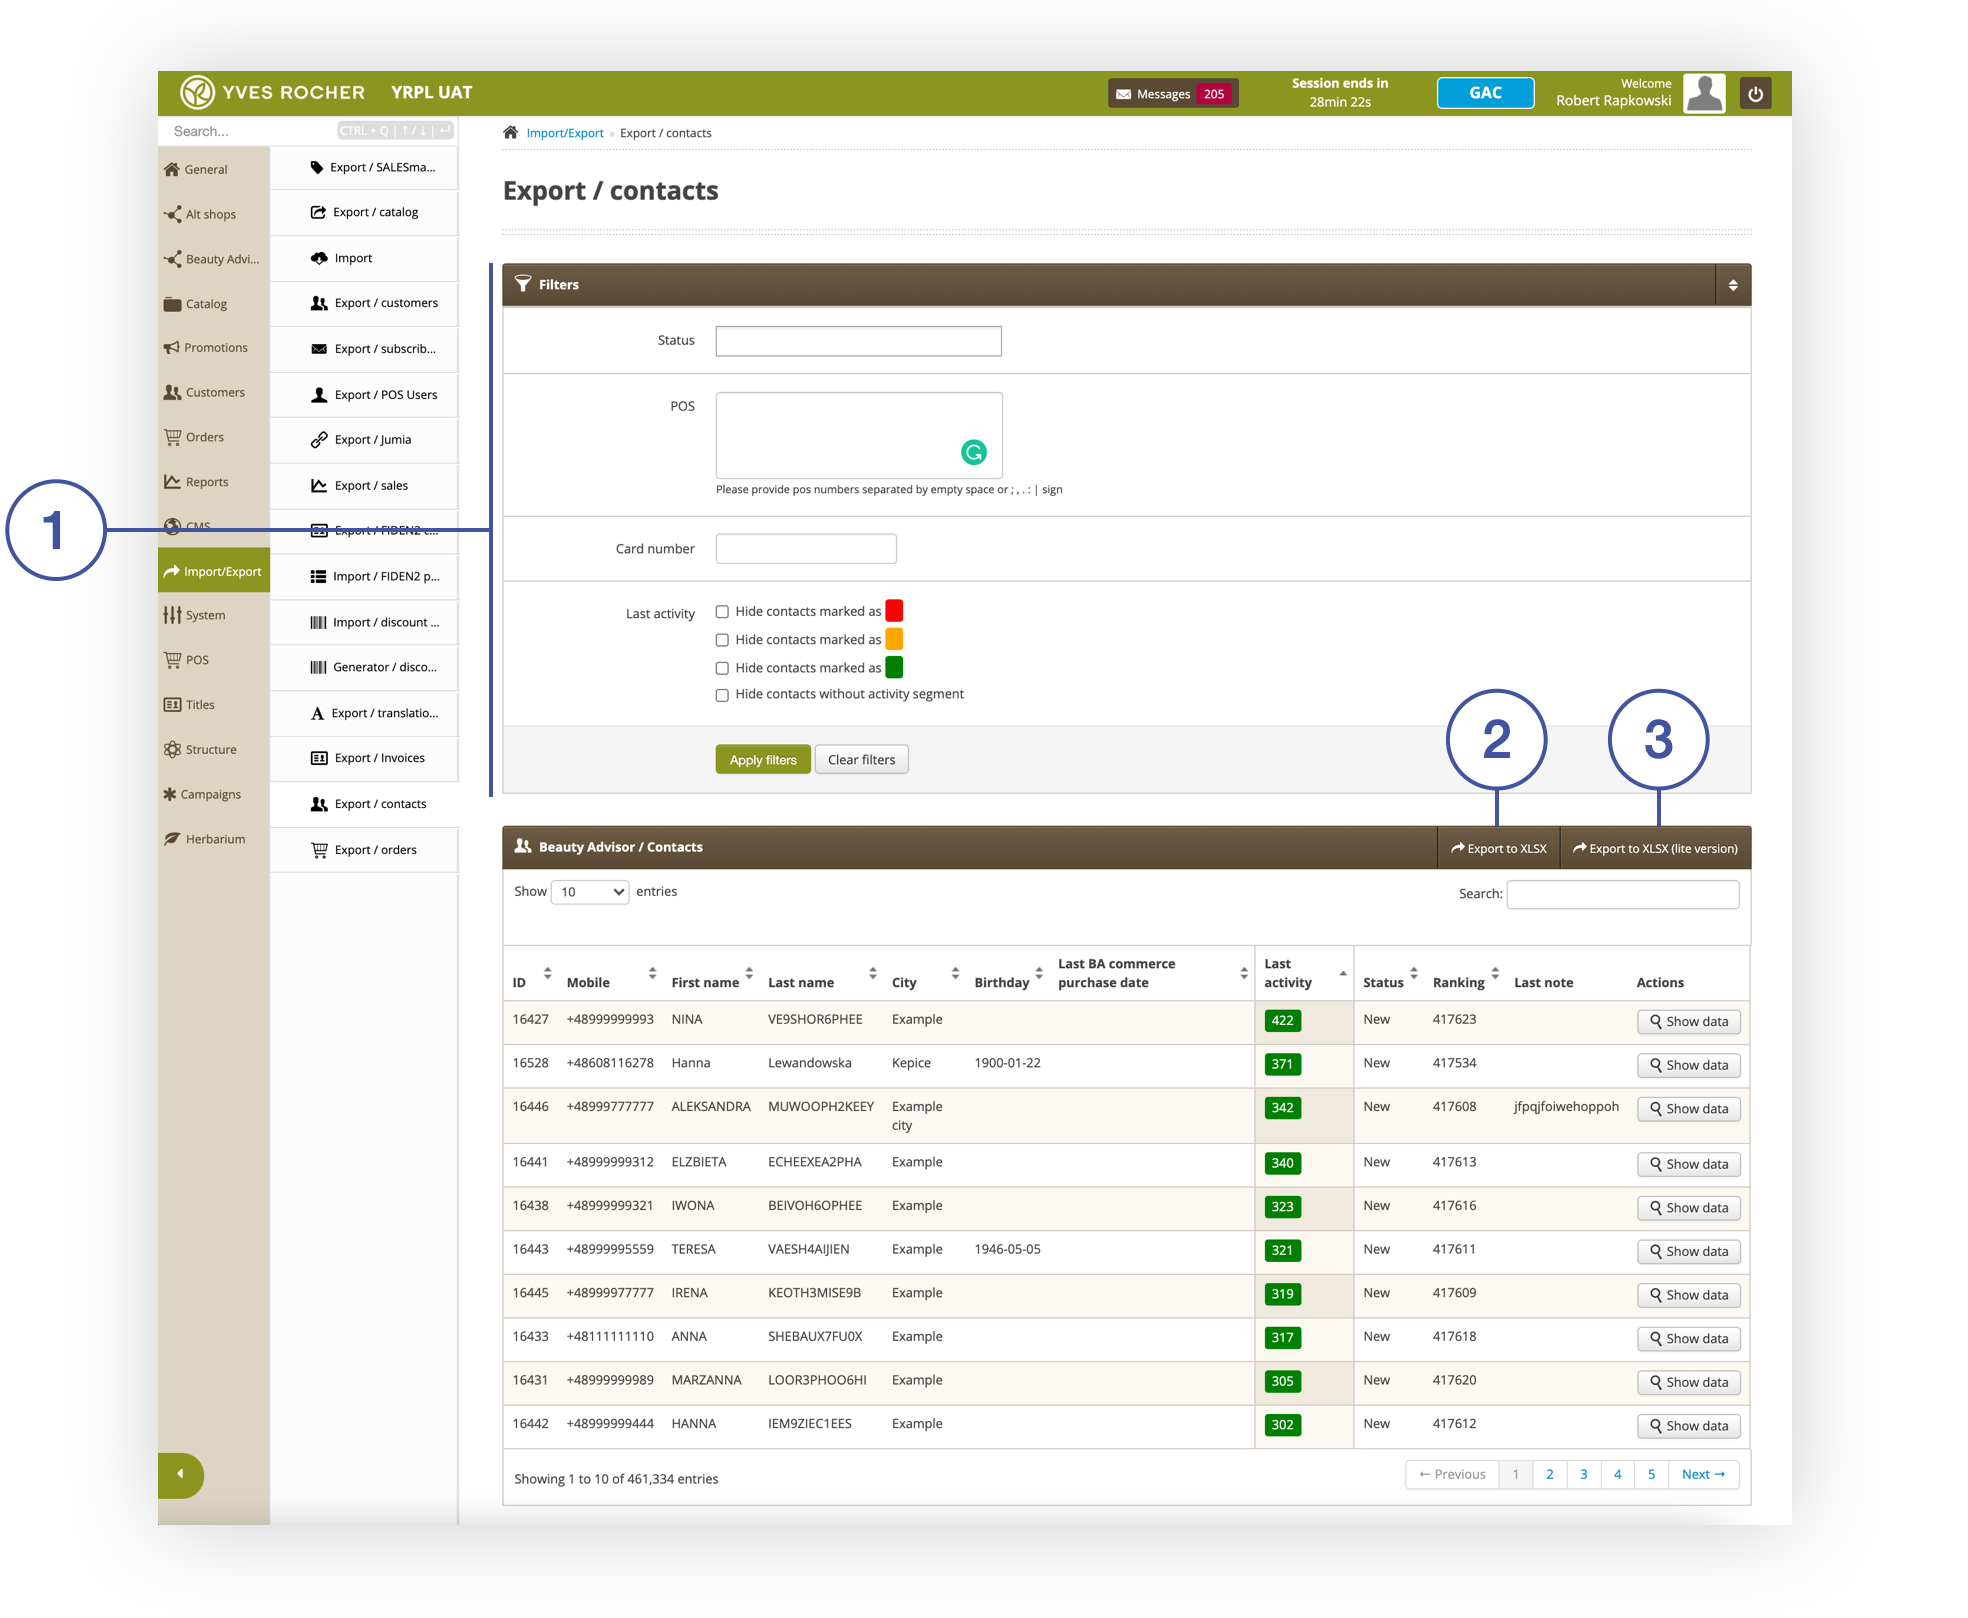 |
| *Section Import/Export > Export / contacts* |
| 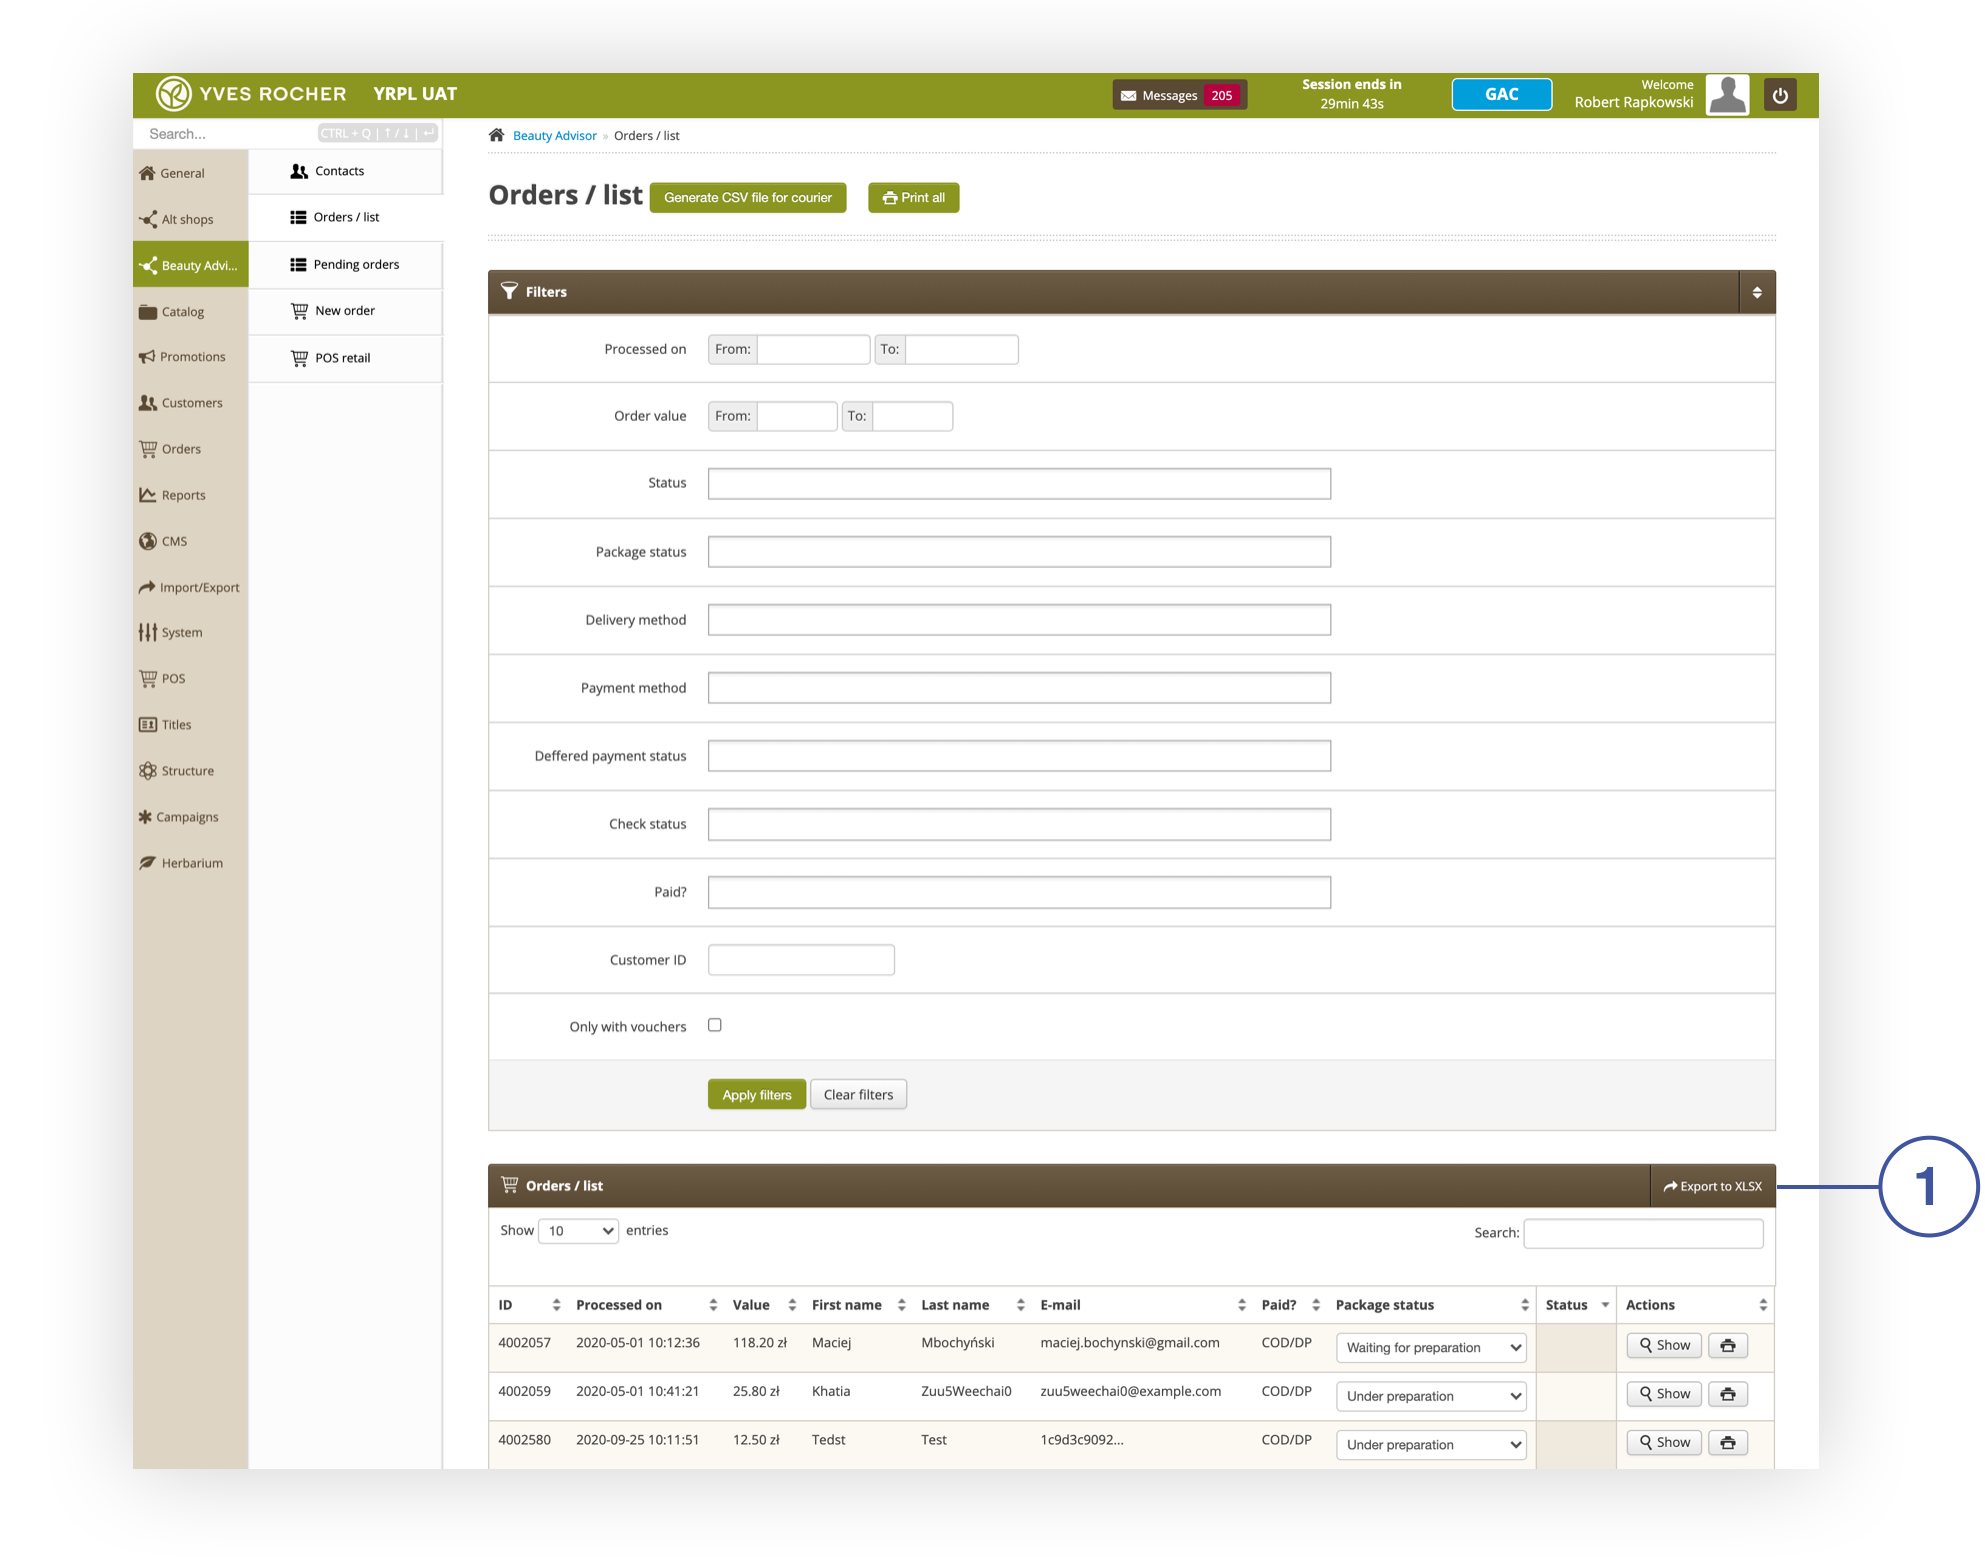 |
| *Section Beauty Advisor > Orders / list* |
| 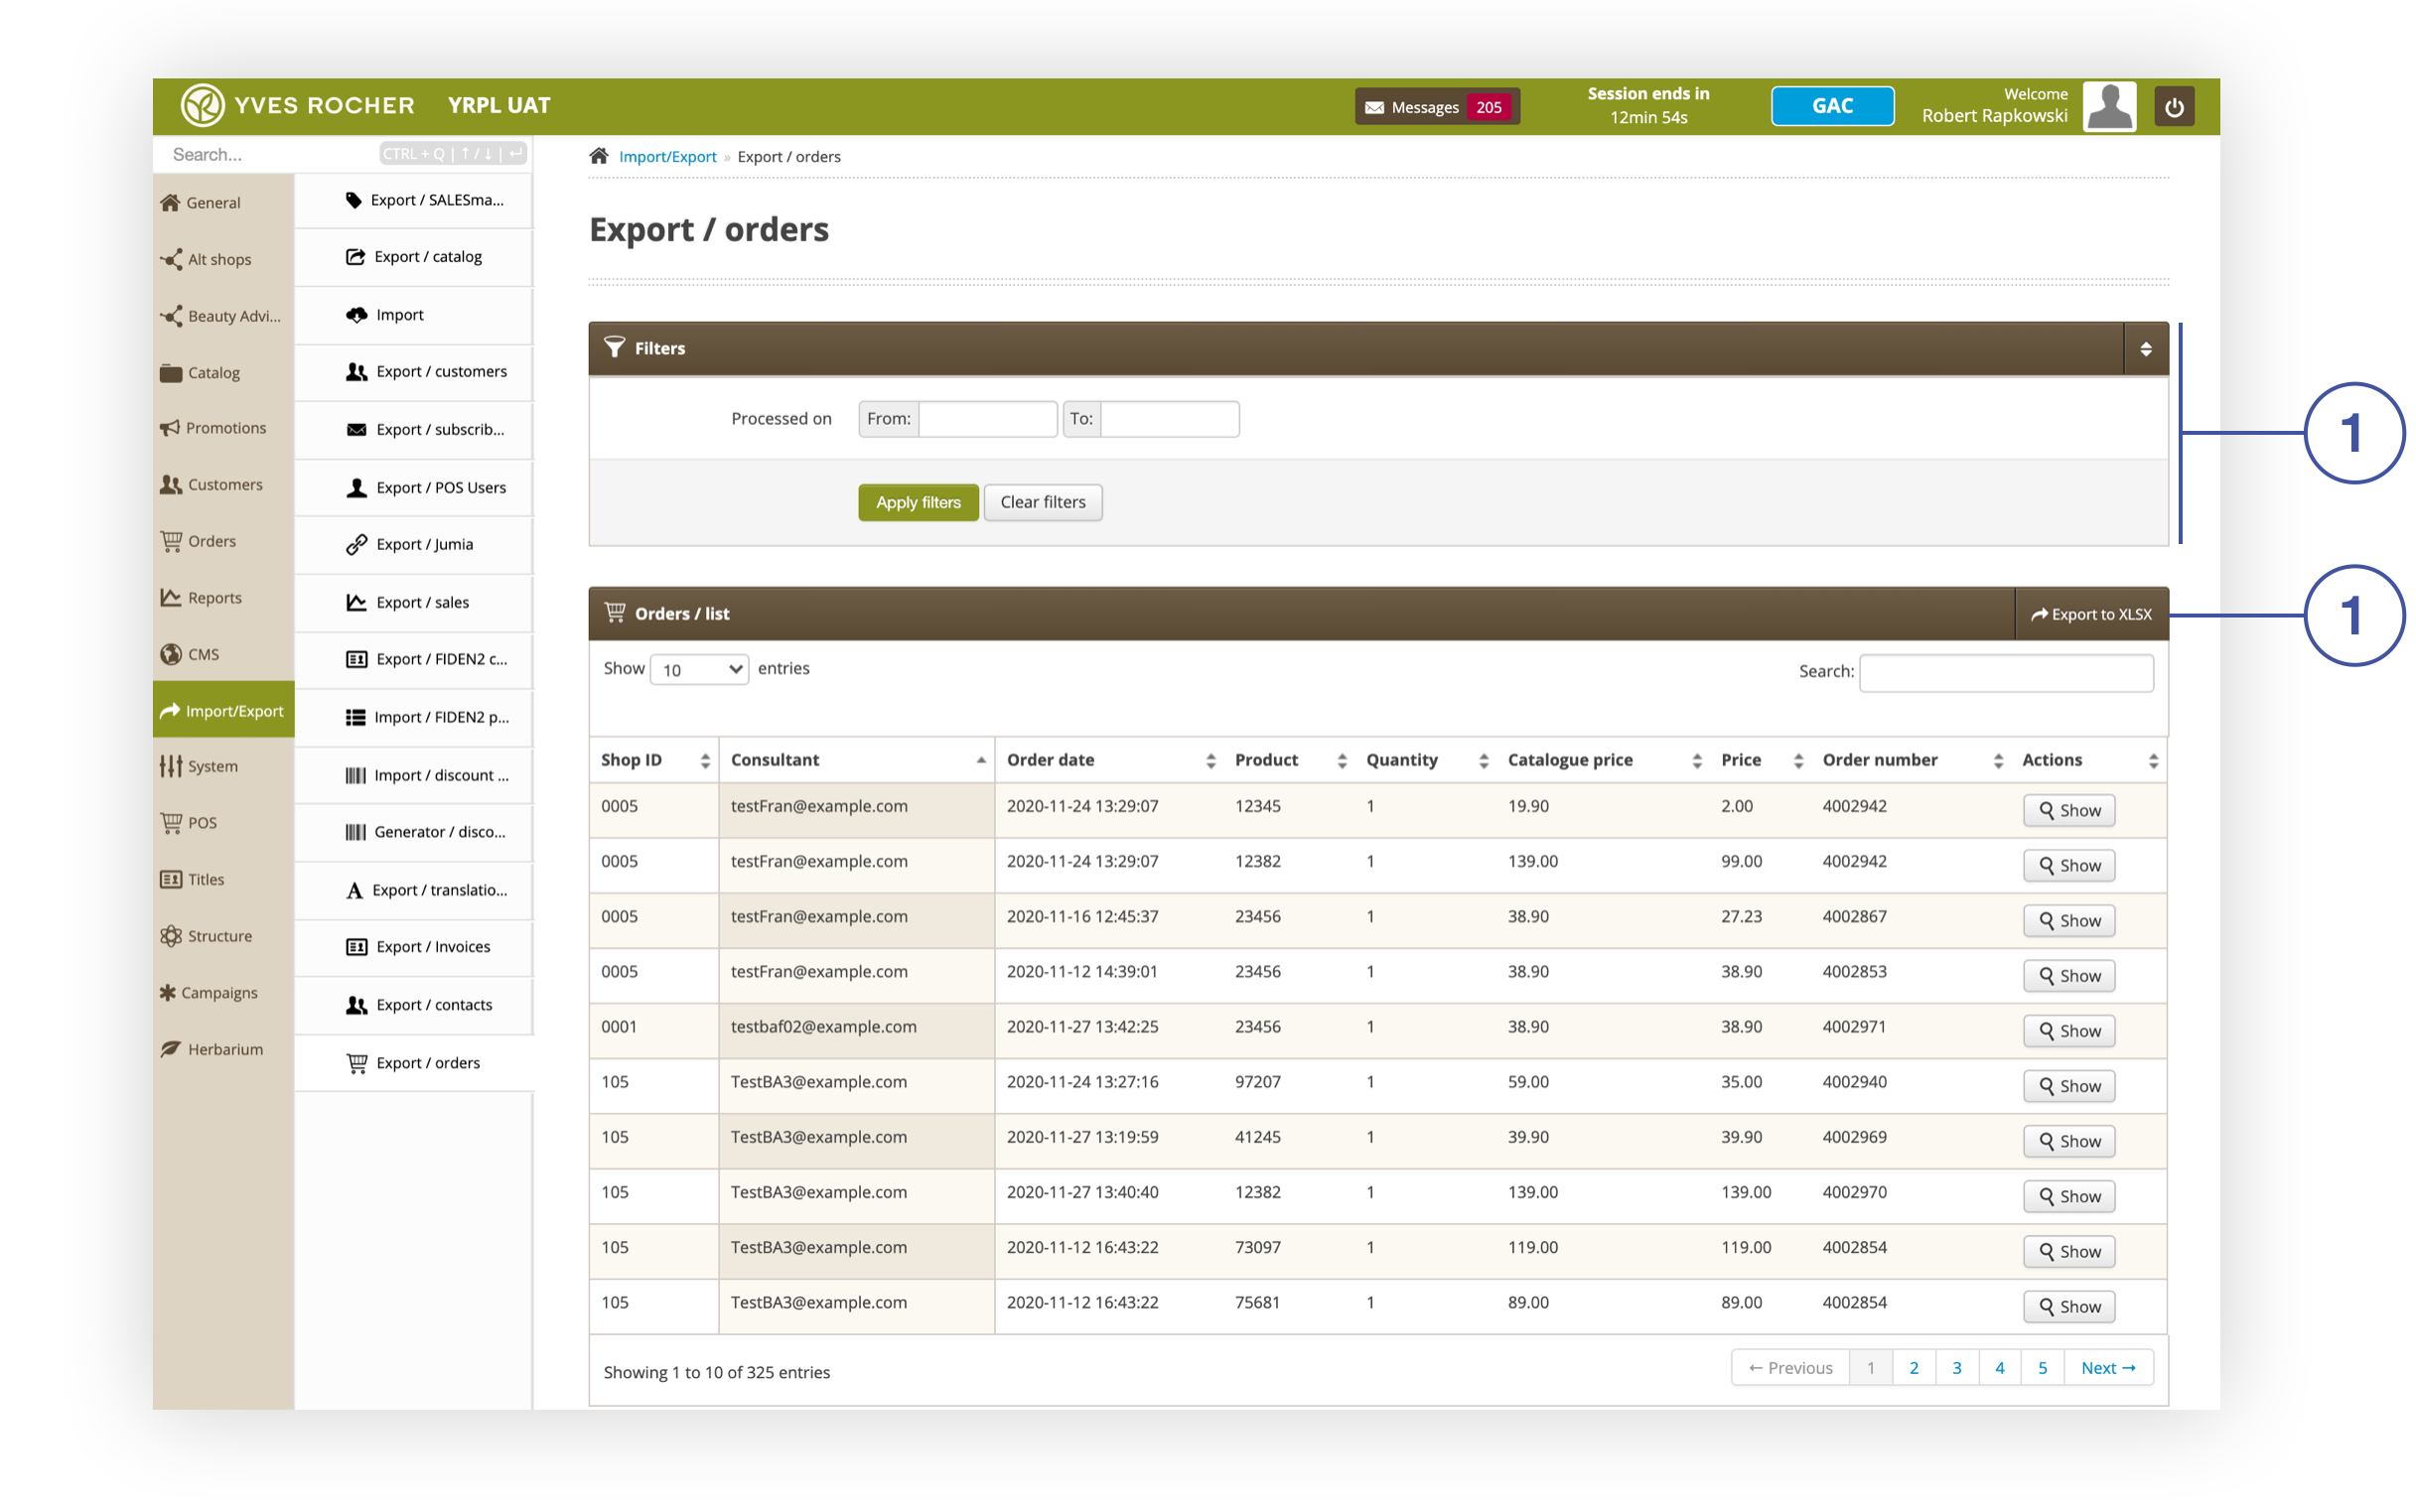 |
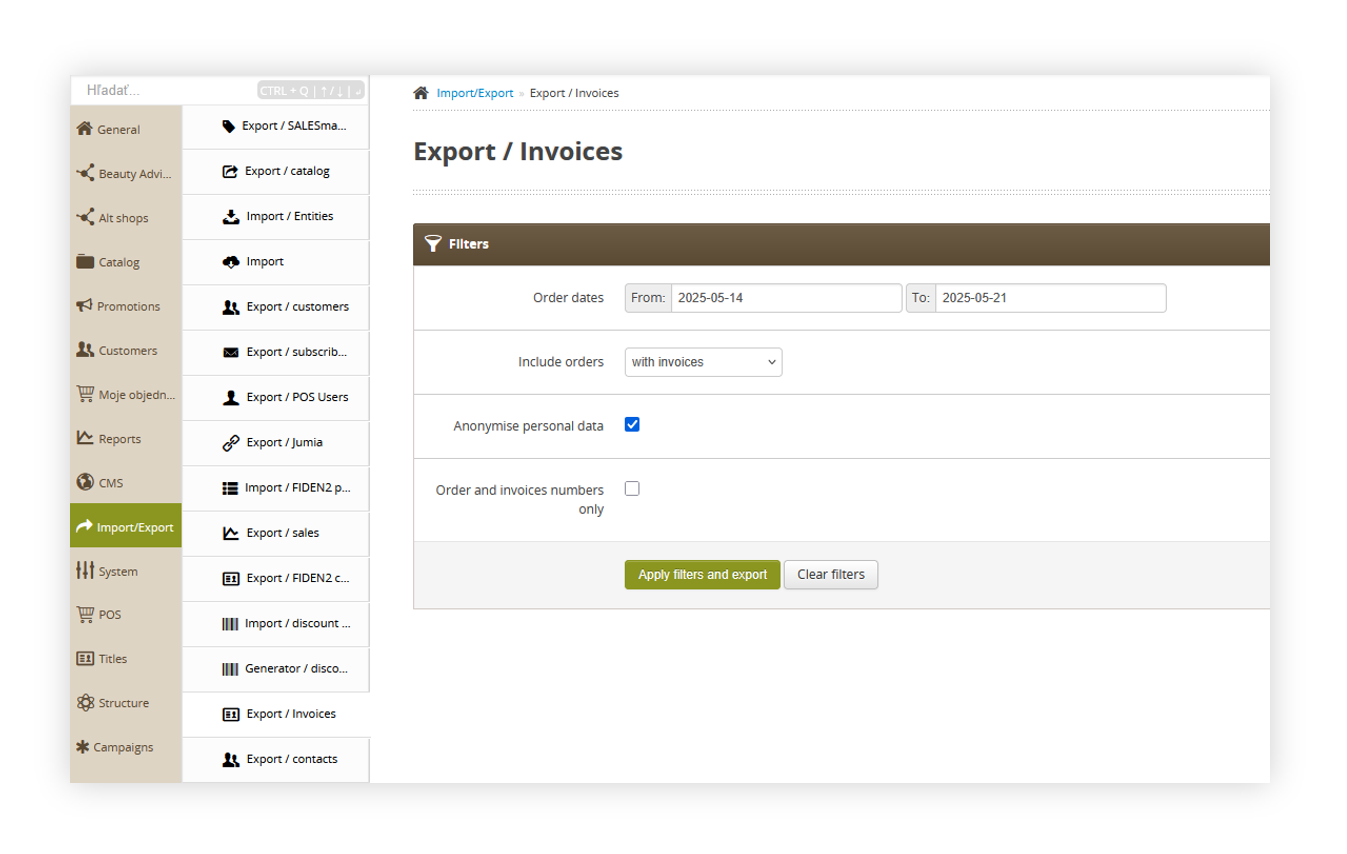
| *Section Import / Export> Export / orders* |
|  |
| *SMS Templates section in the Beauty Advisor module* |
| 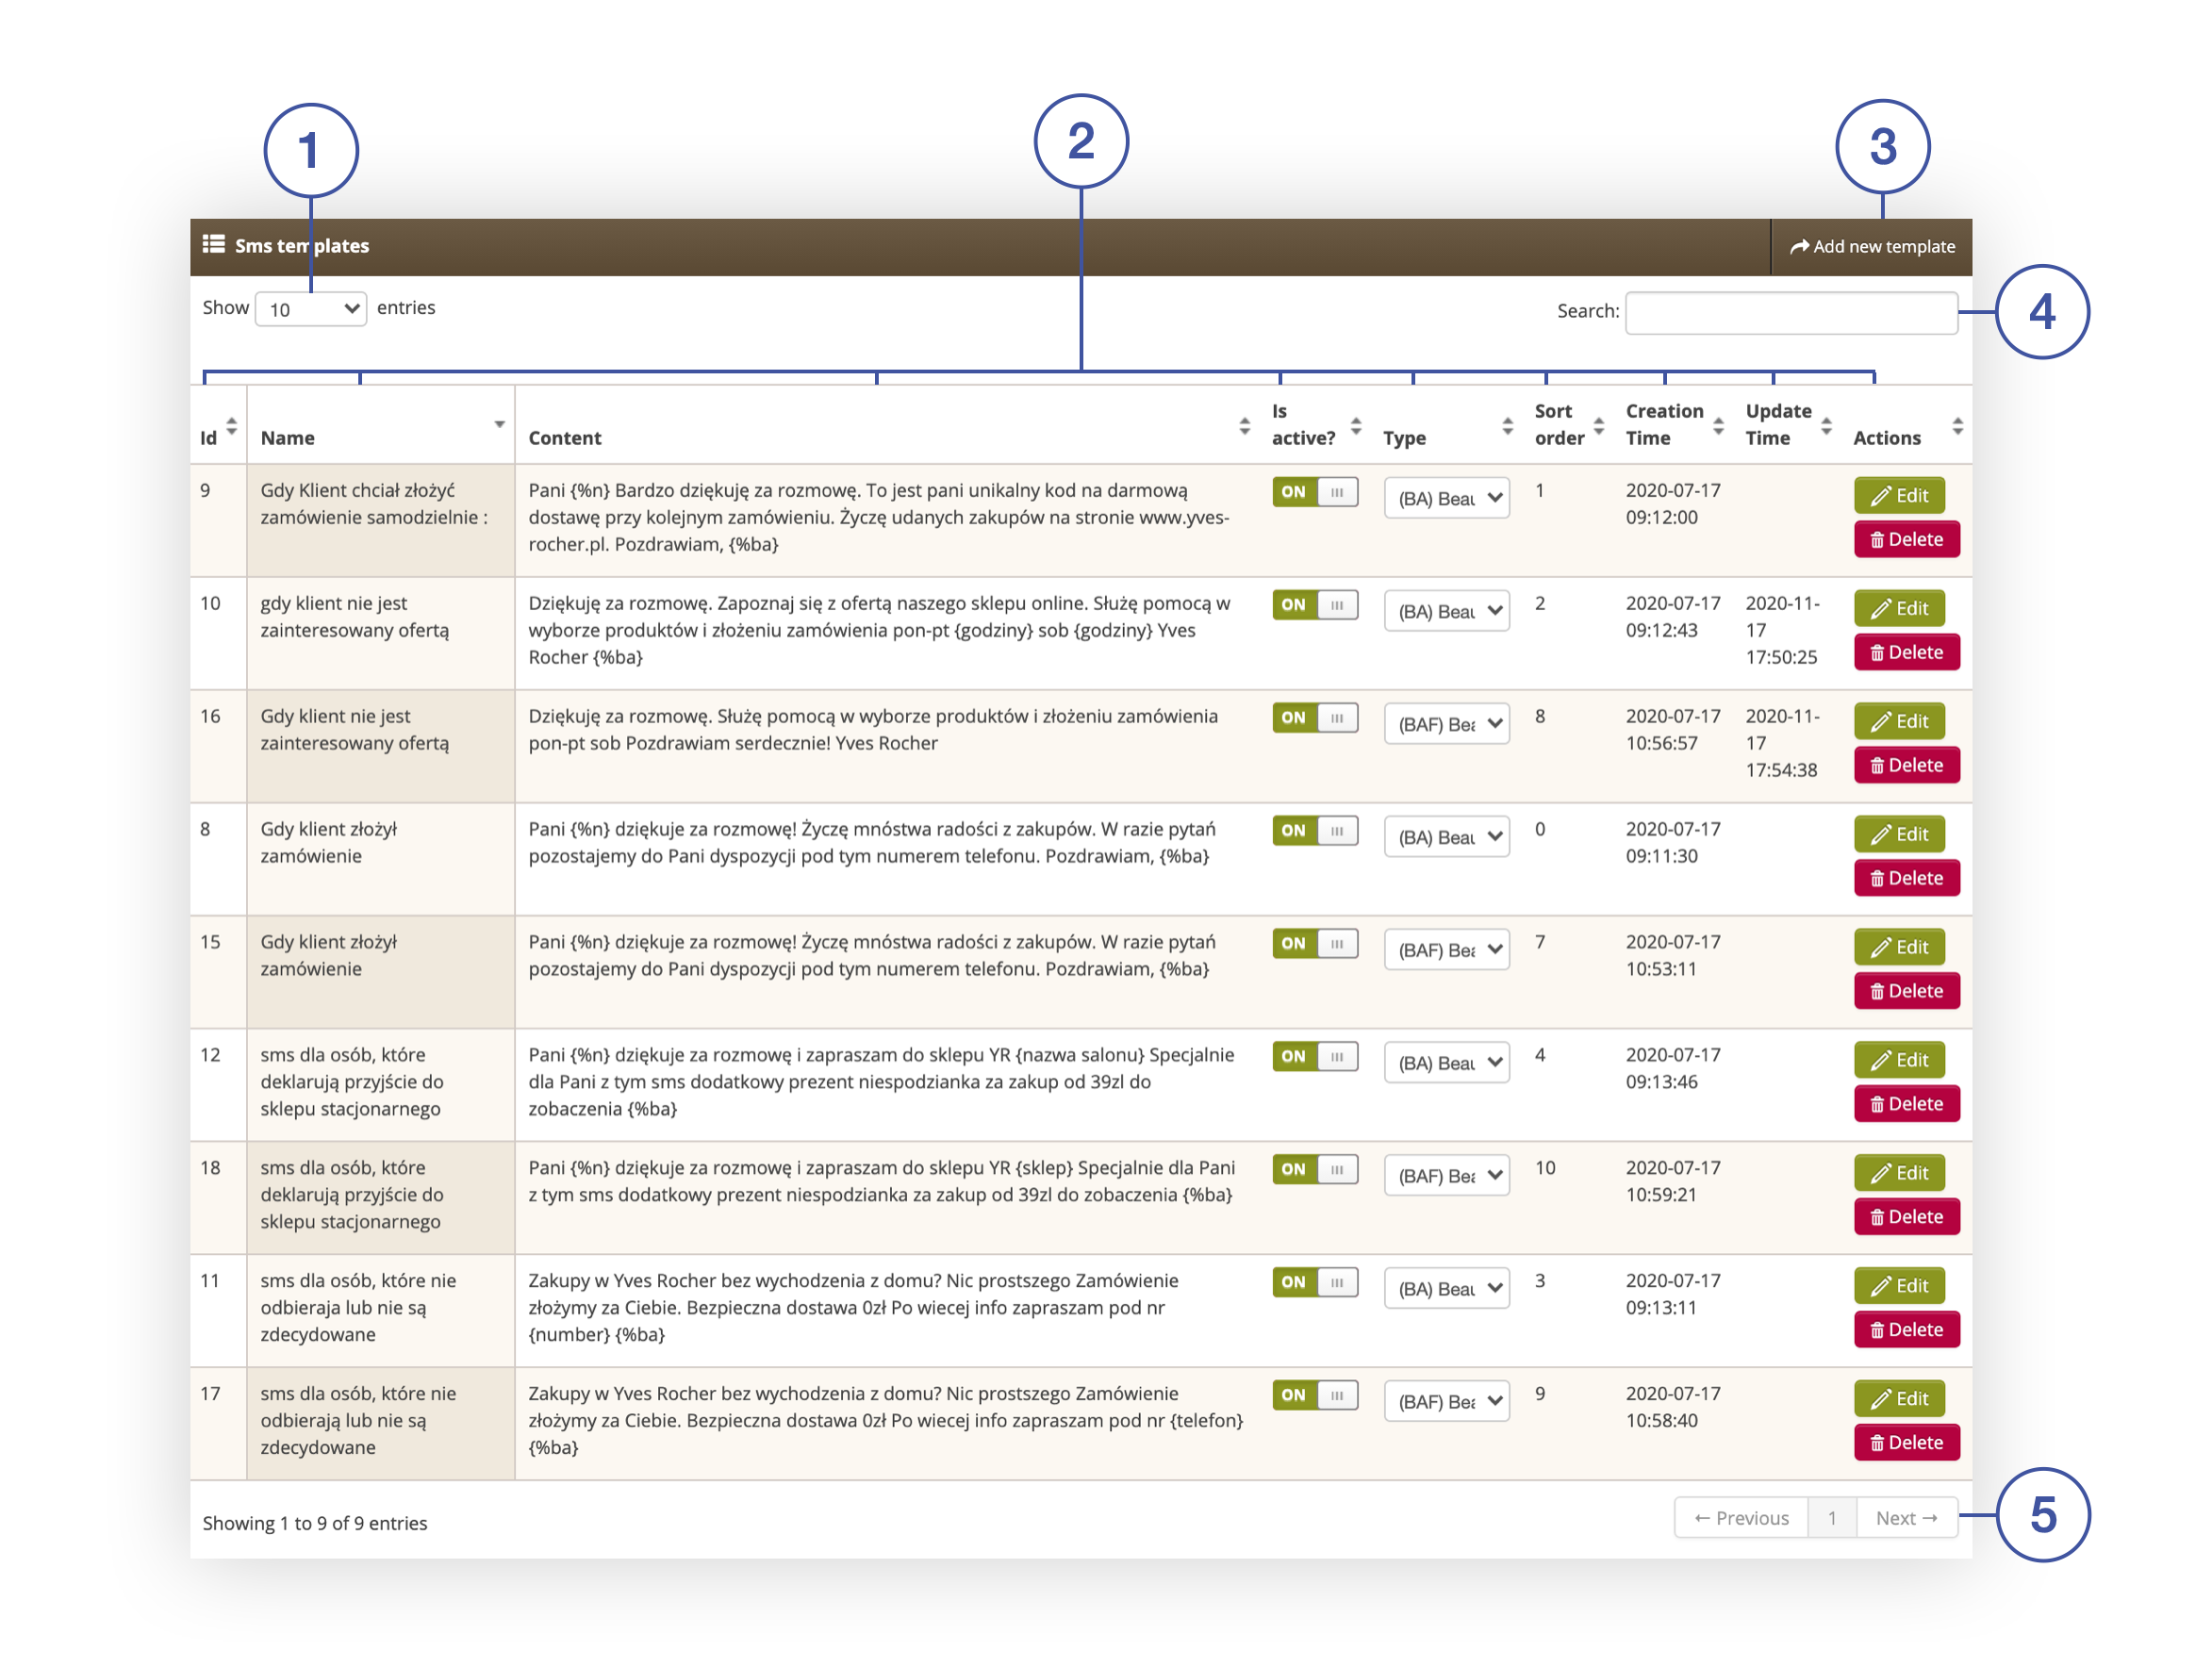 |
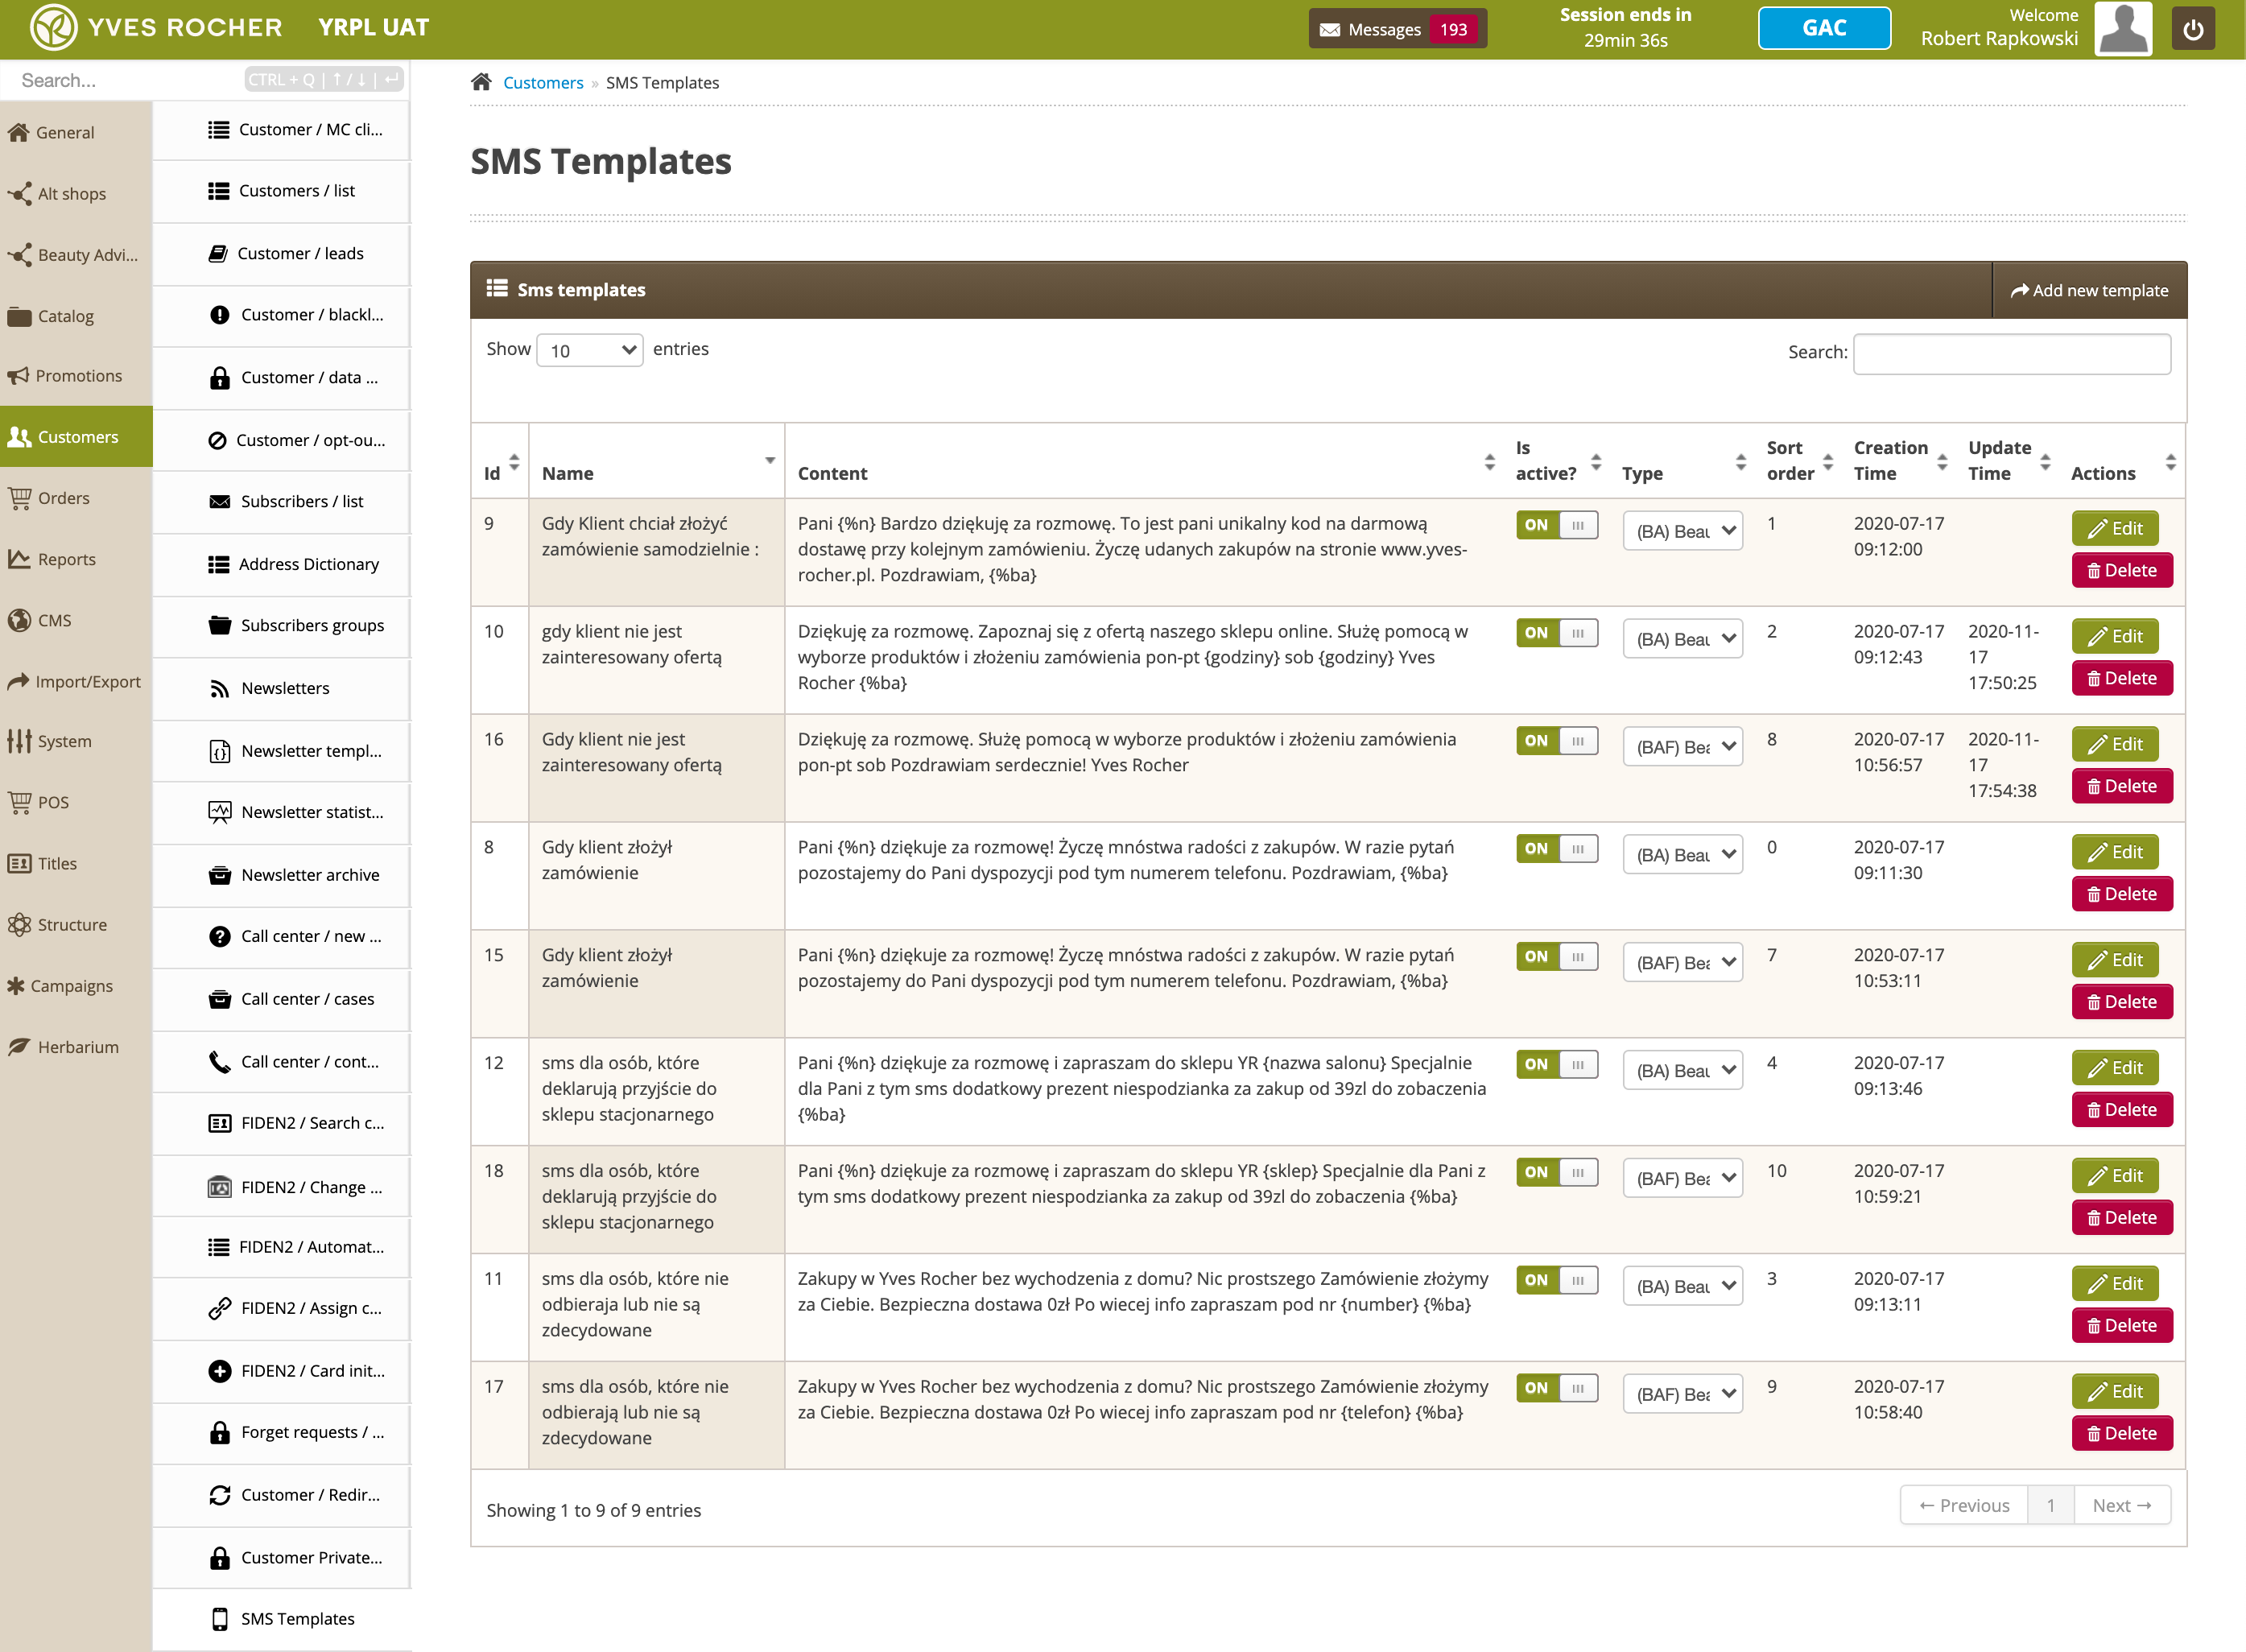
| *SMS templates tab in the Customers > SMS templates section* |
| 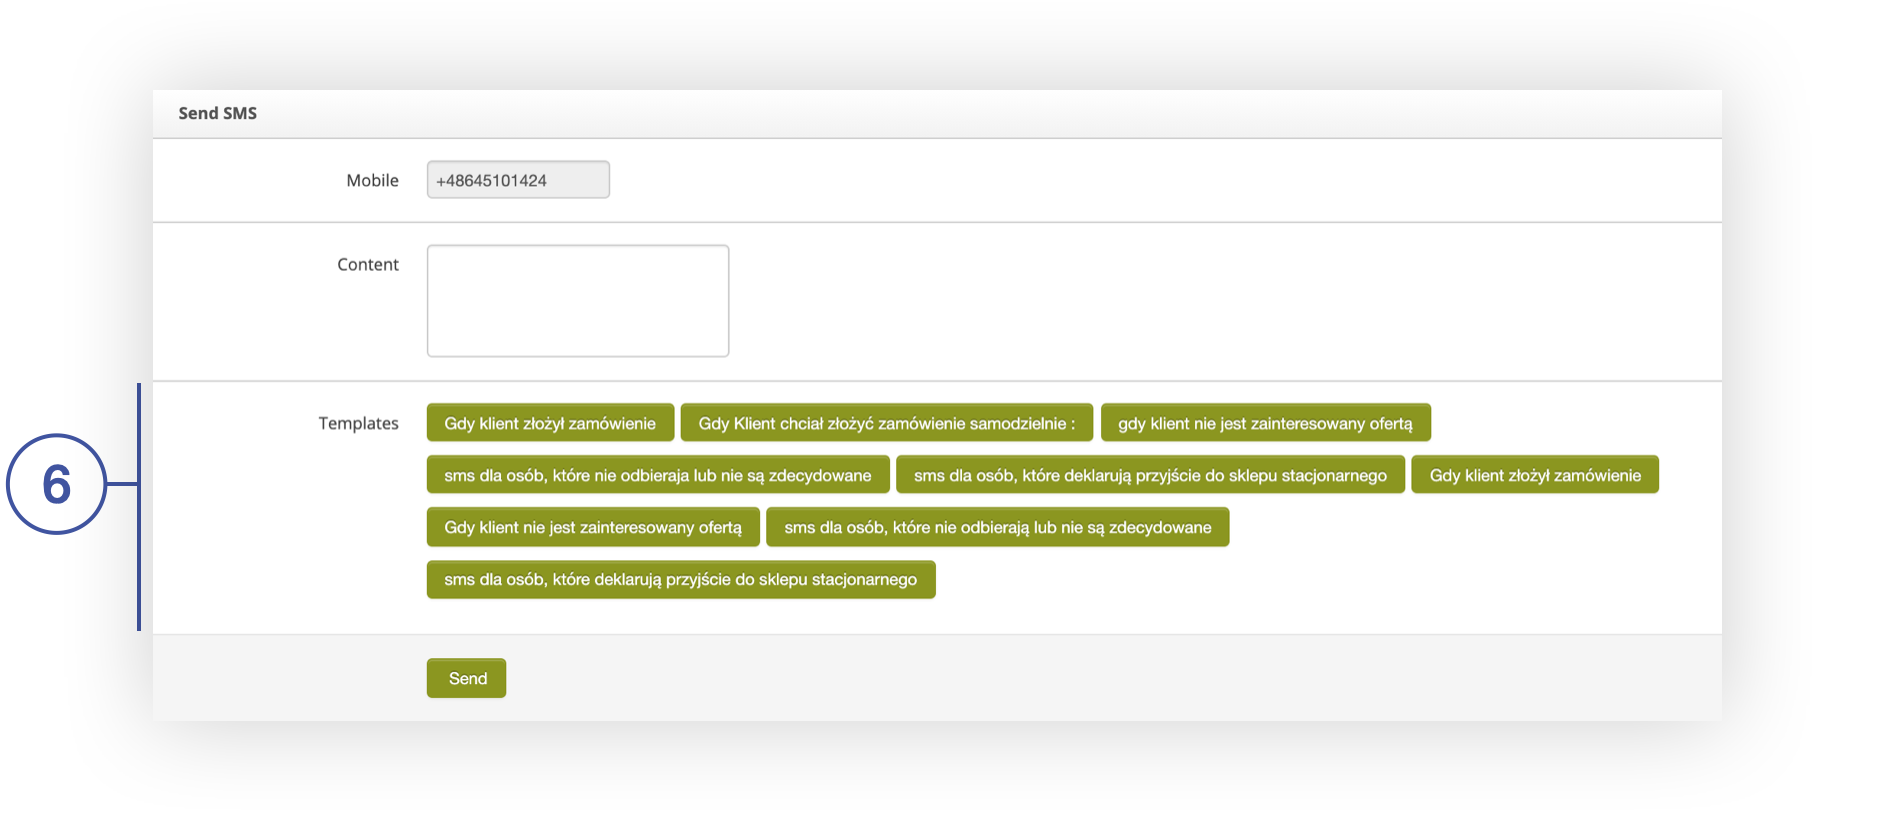 |
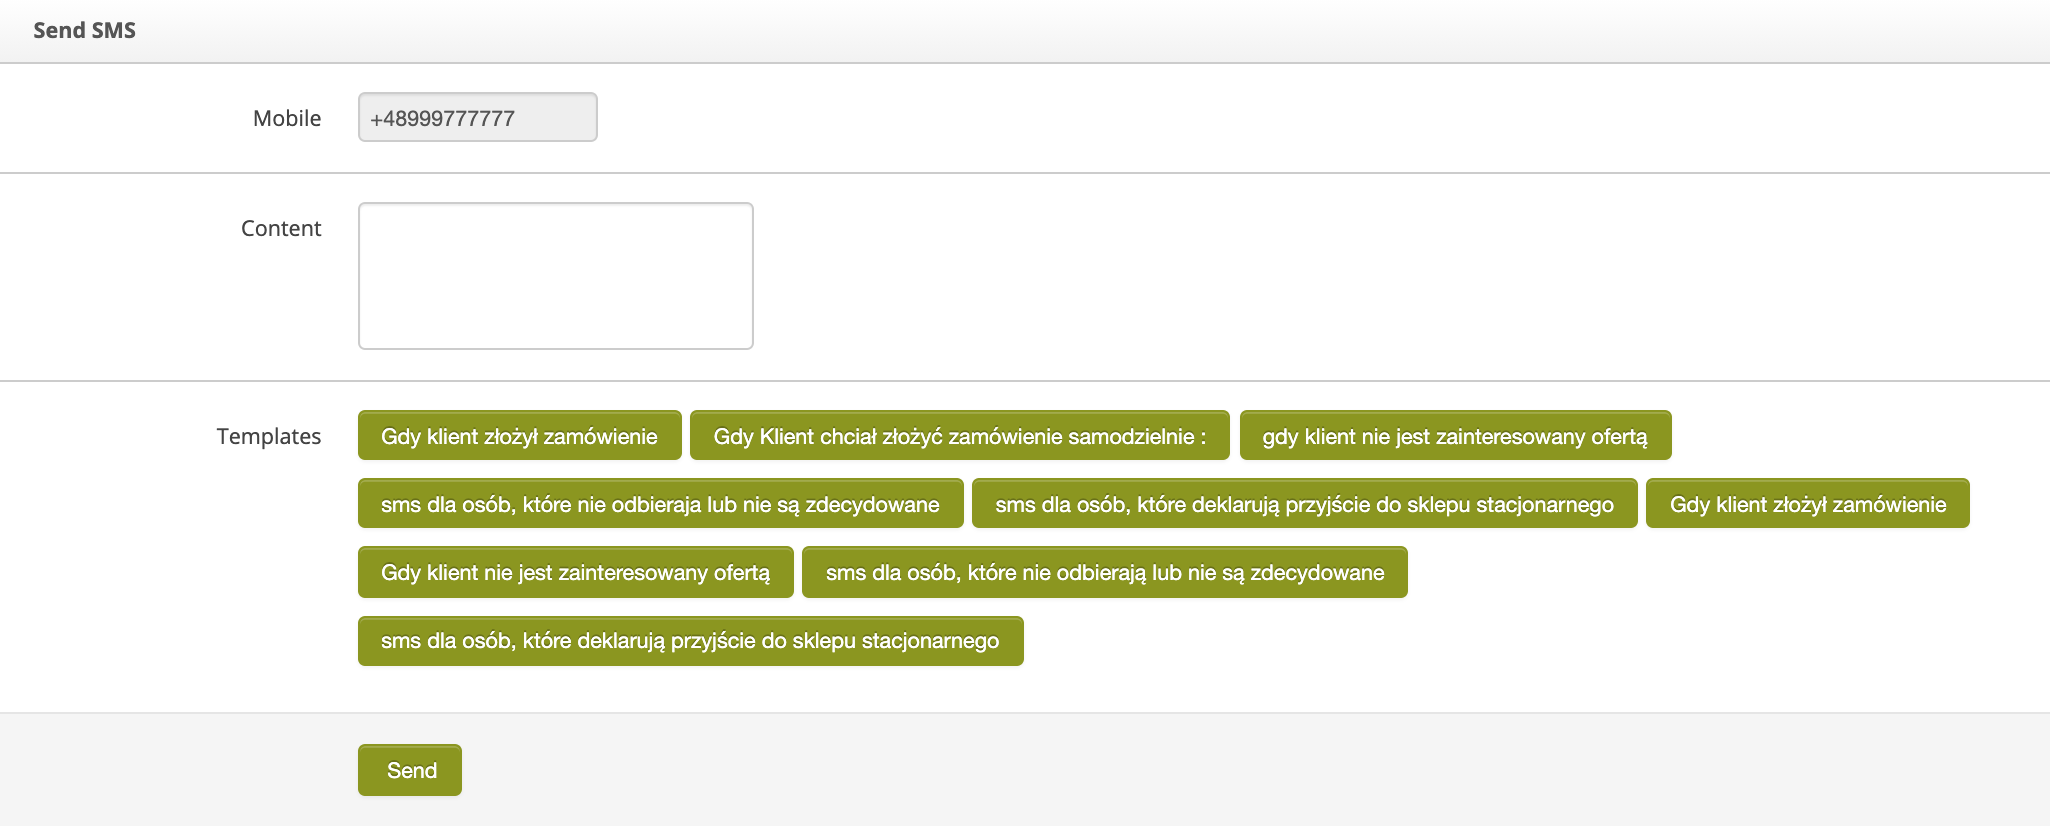
| *Send SMS column on the BA customer preview screen* |
| 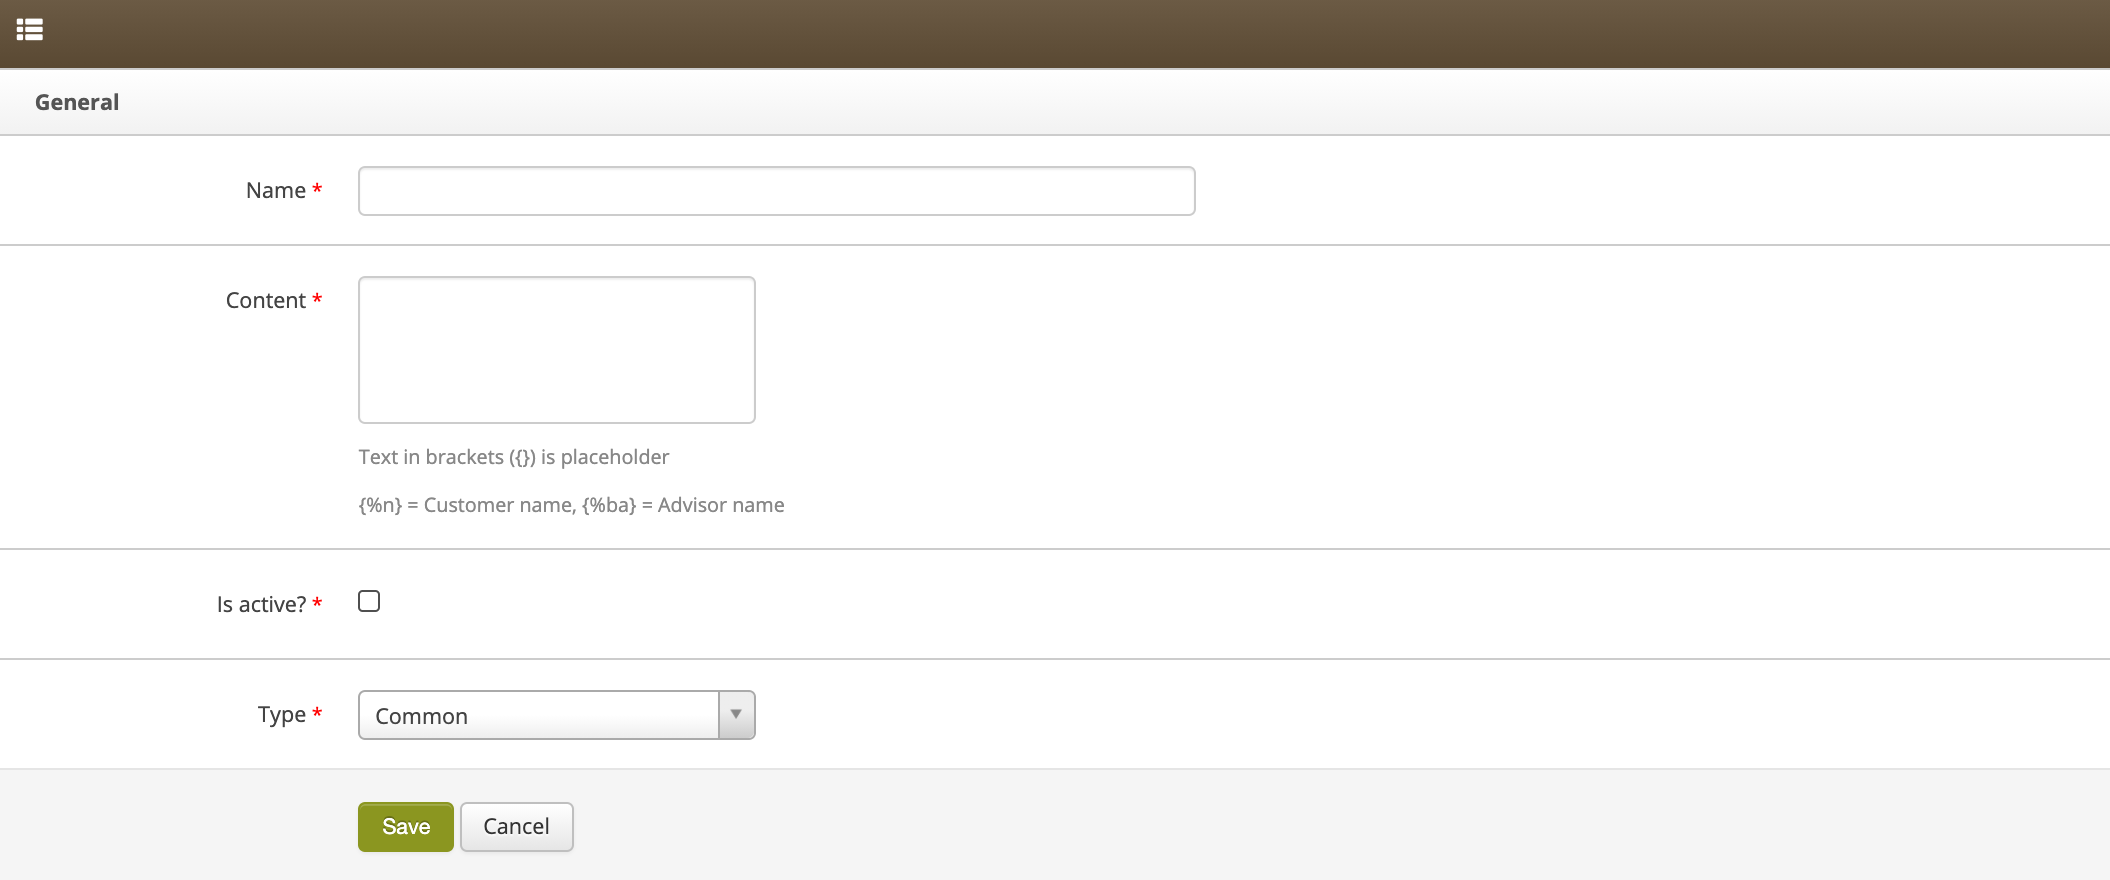 |
| *Screen for adding a new CMS template* |
| 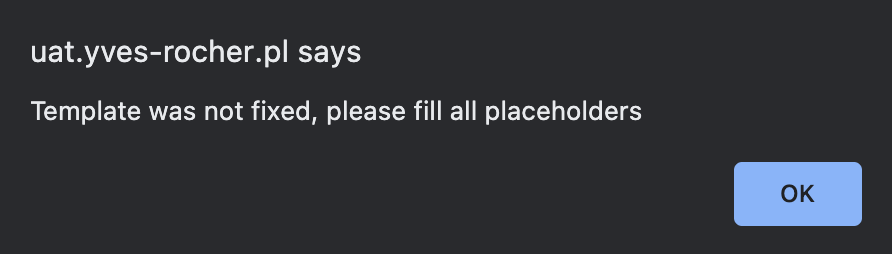 |
| *Warning about incomplete template* |
| 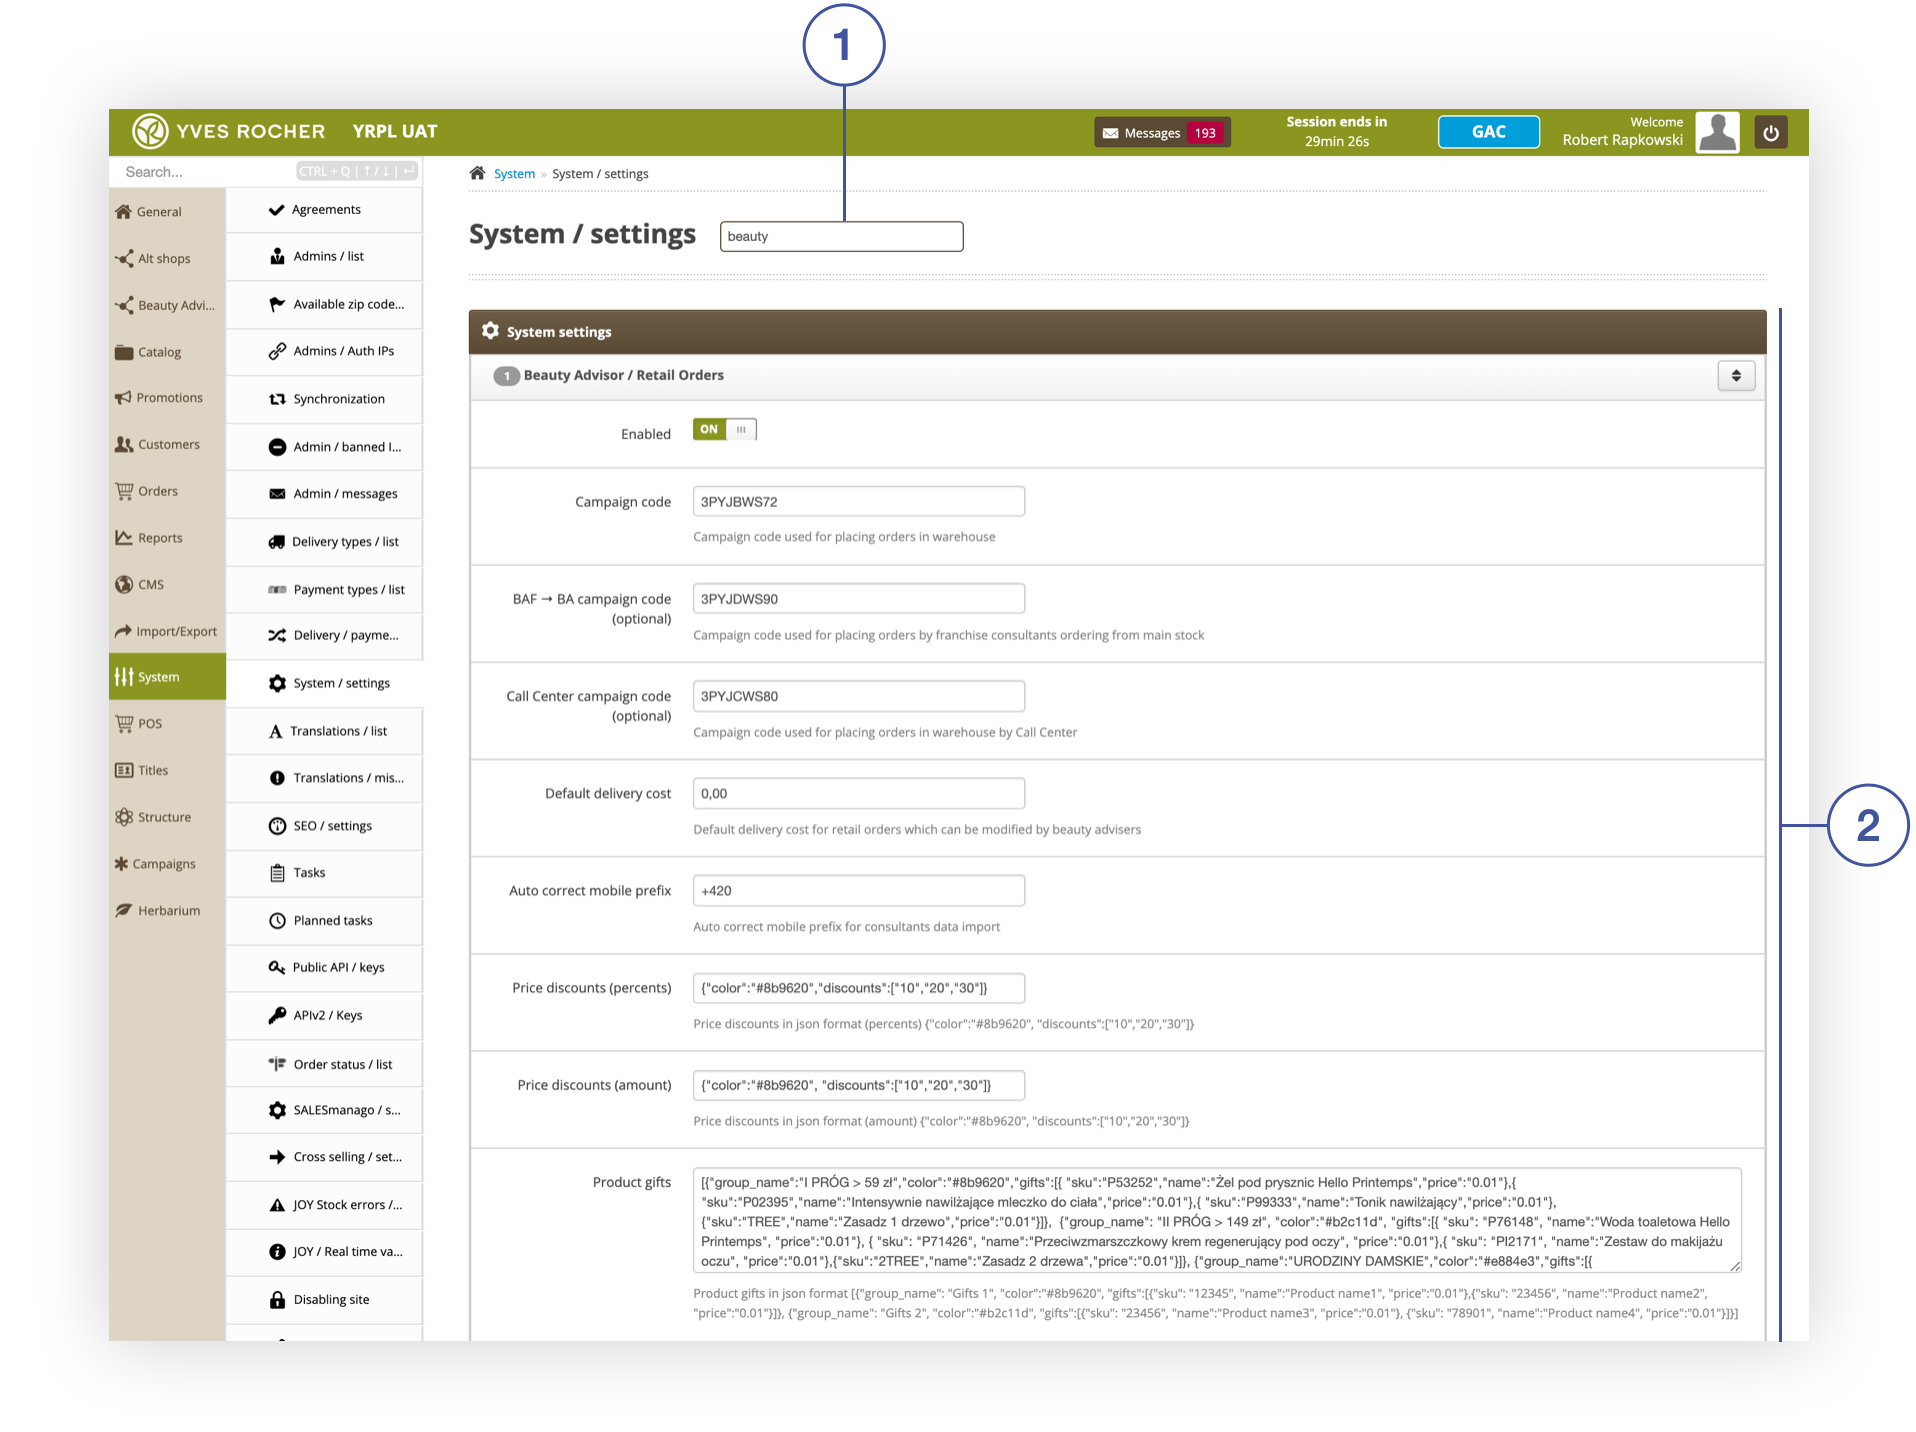 |
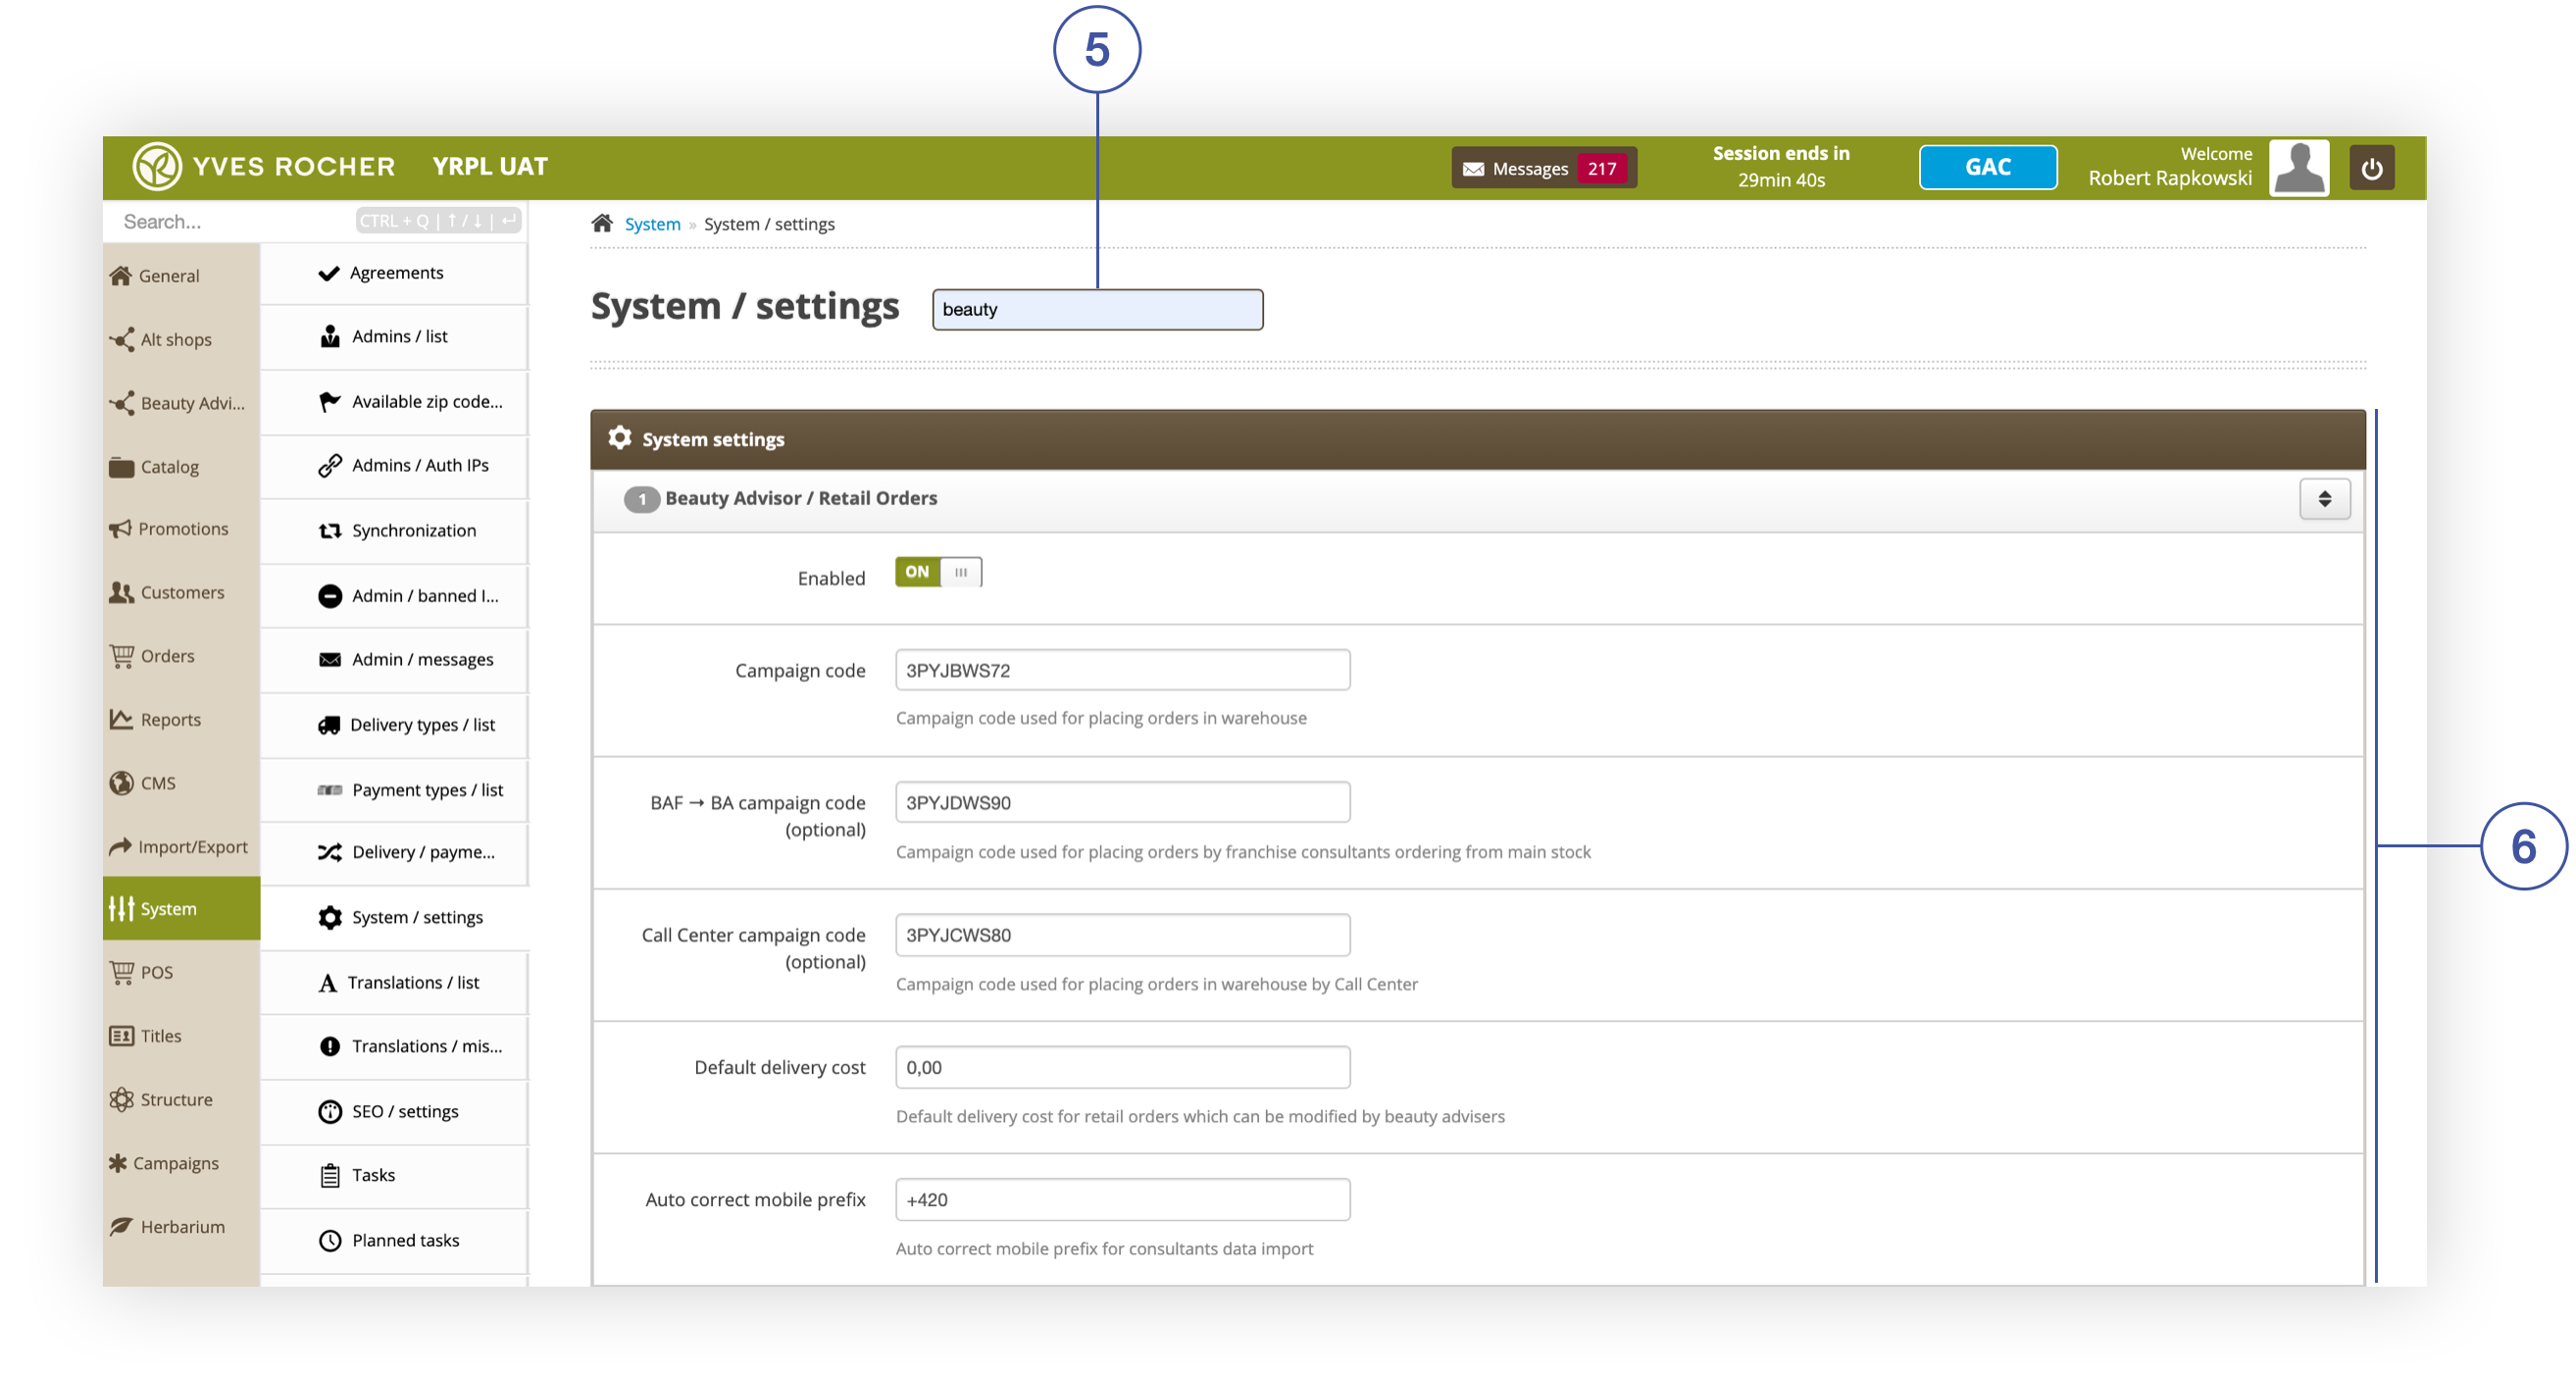
| *System> System Settings section* |
|  |
| *Beauty Advisor / Retail Orders tab in System> System settings* |
| 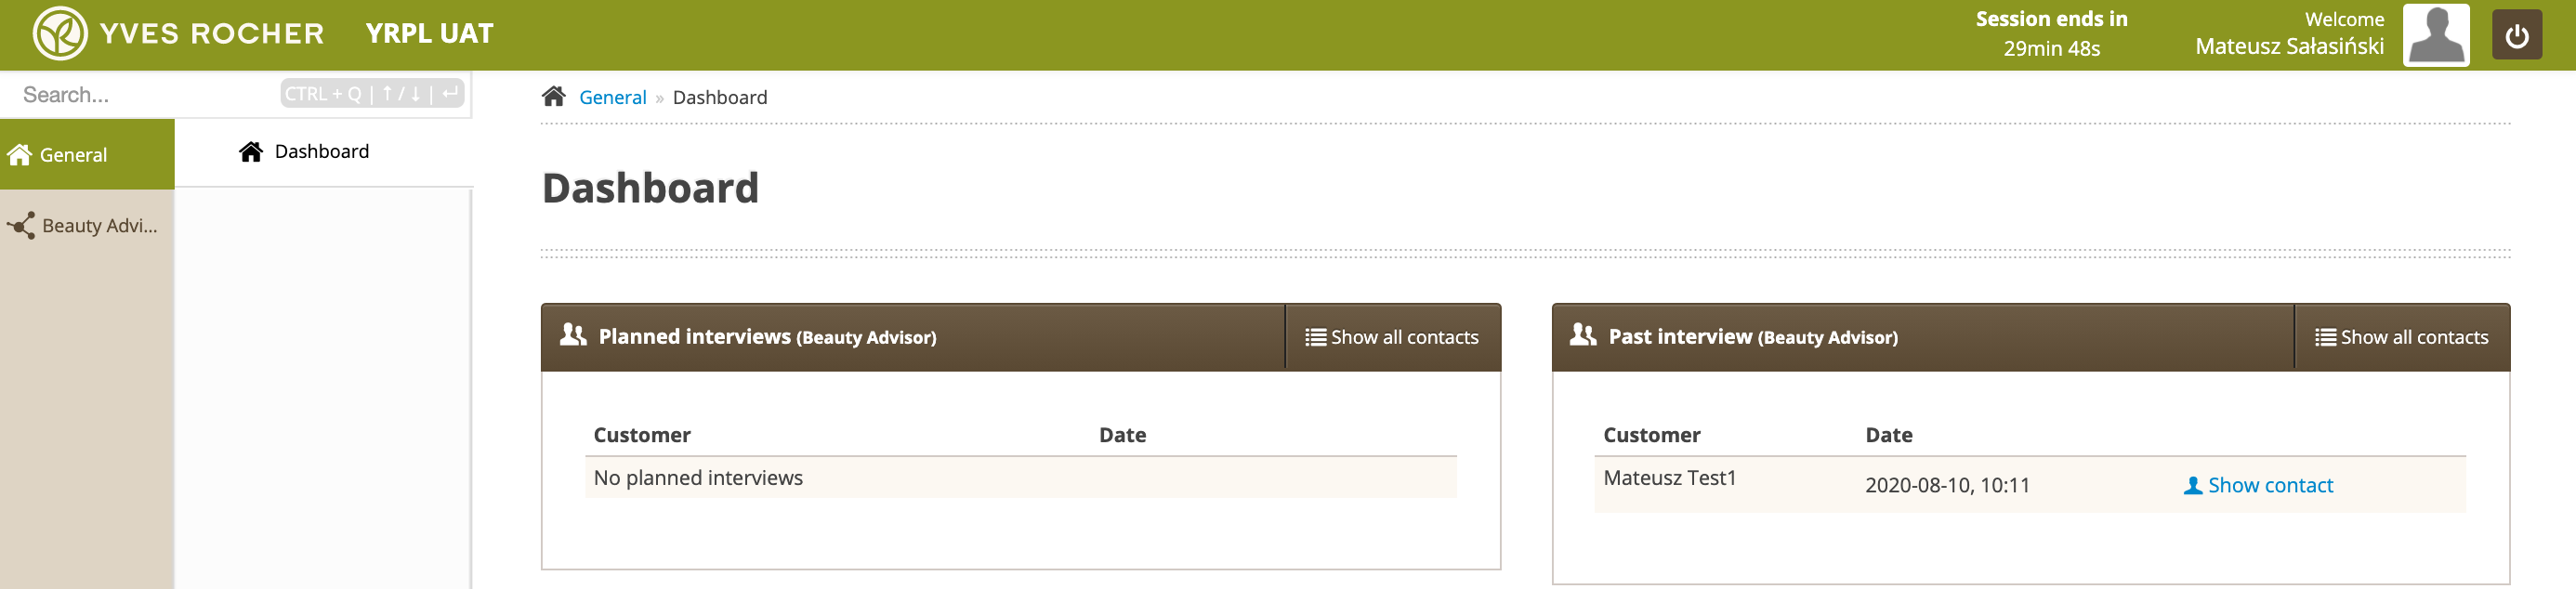 |
| *Section Dashboard* |
| 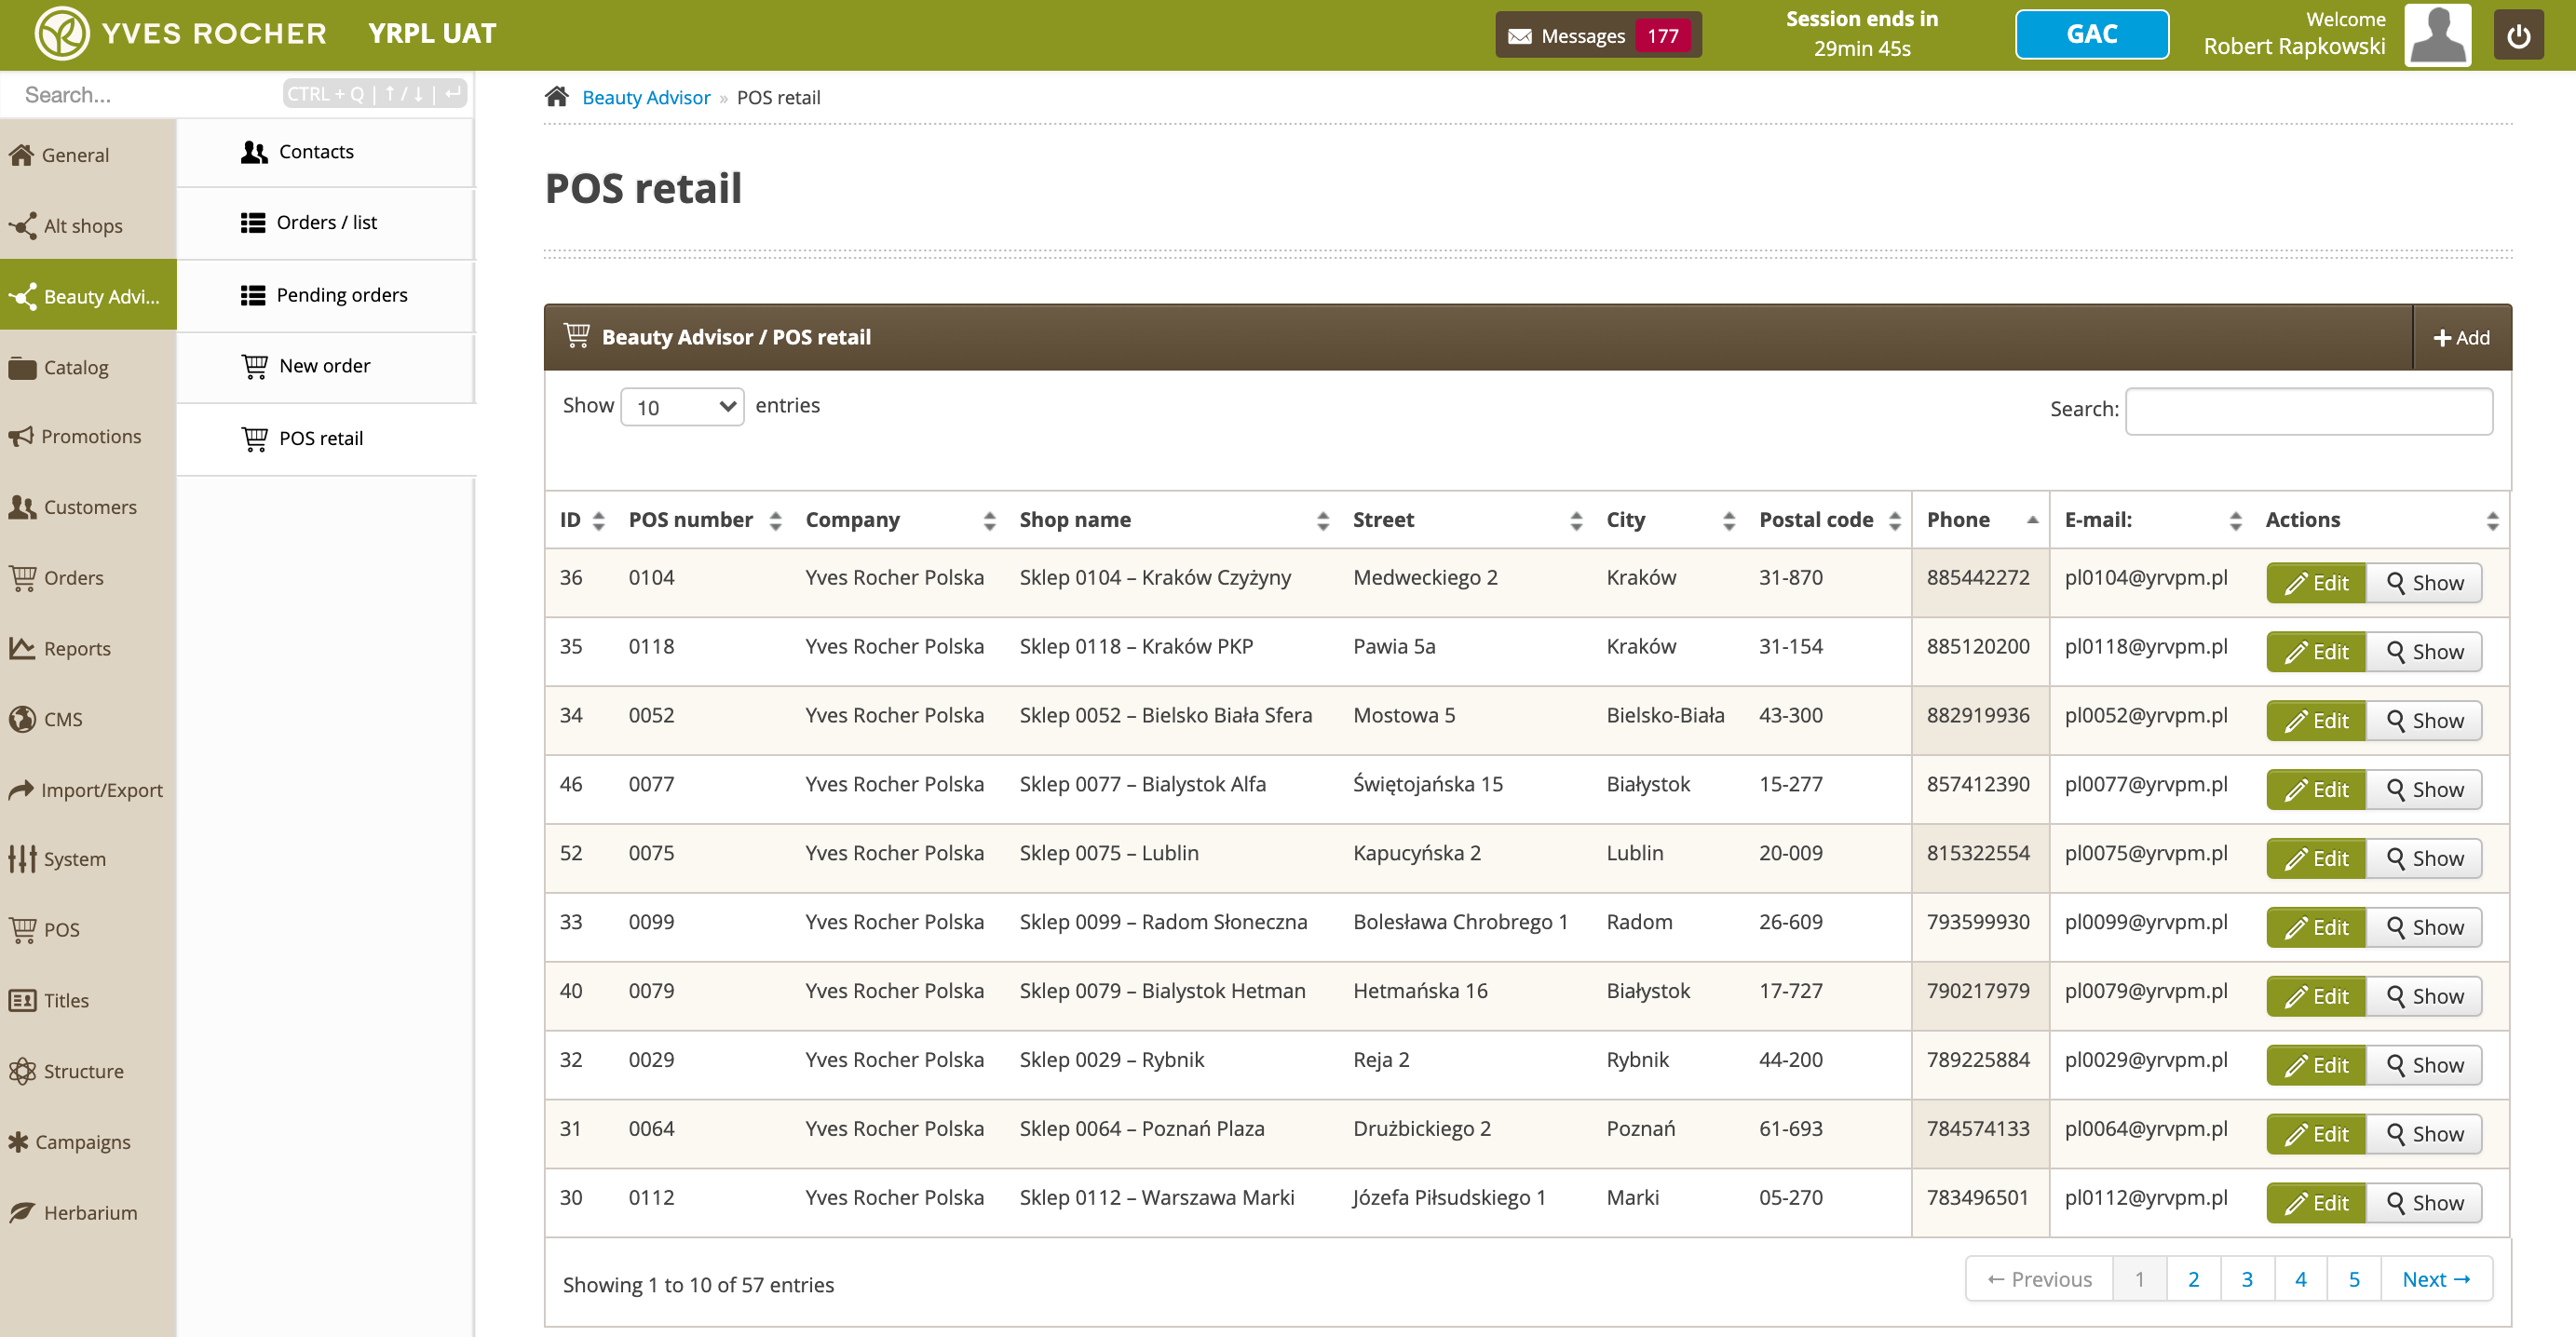 |
| *POS retail section in the Beauty Advisor module* |
| 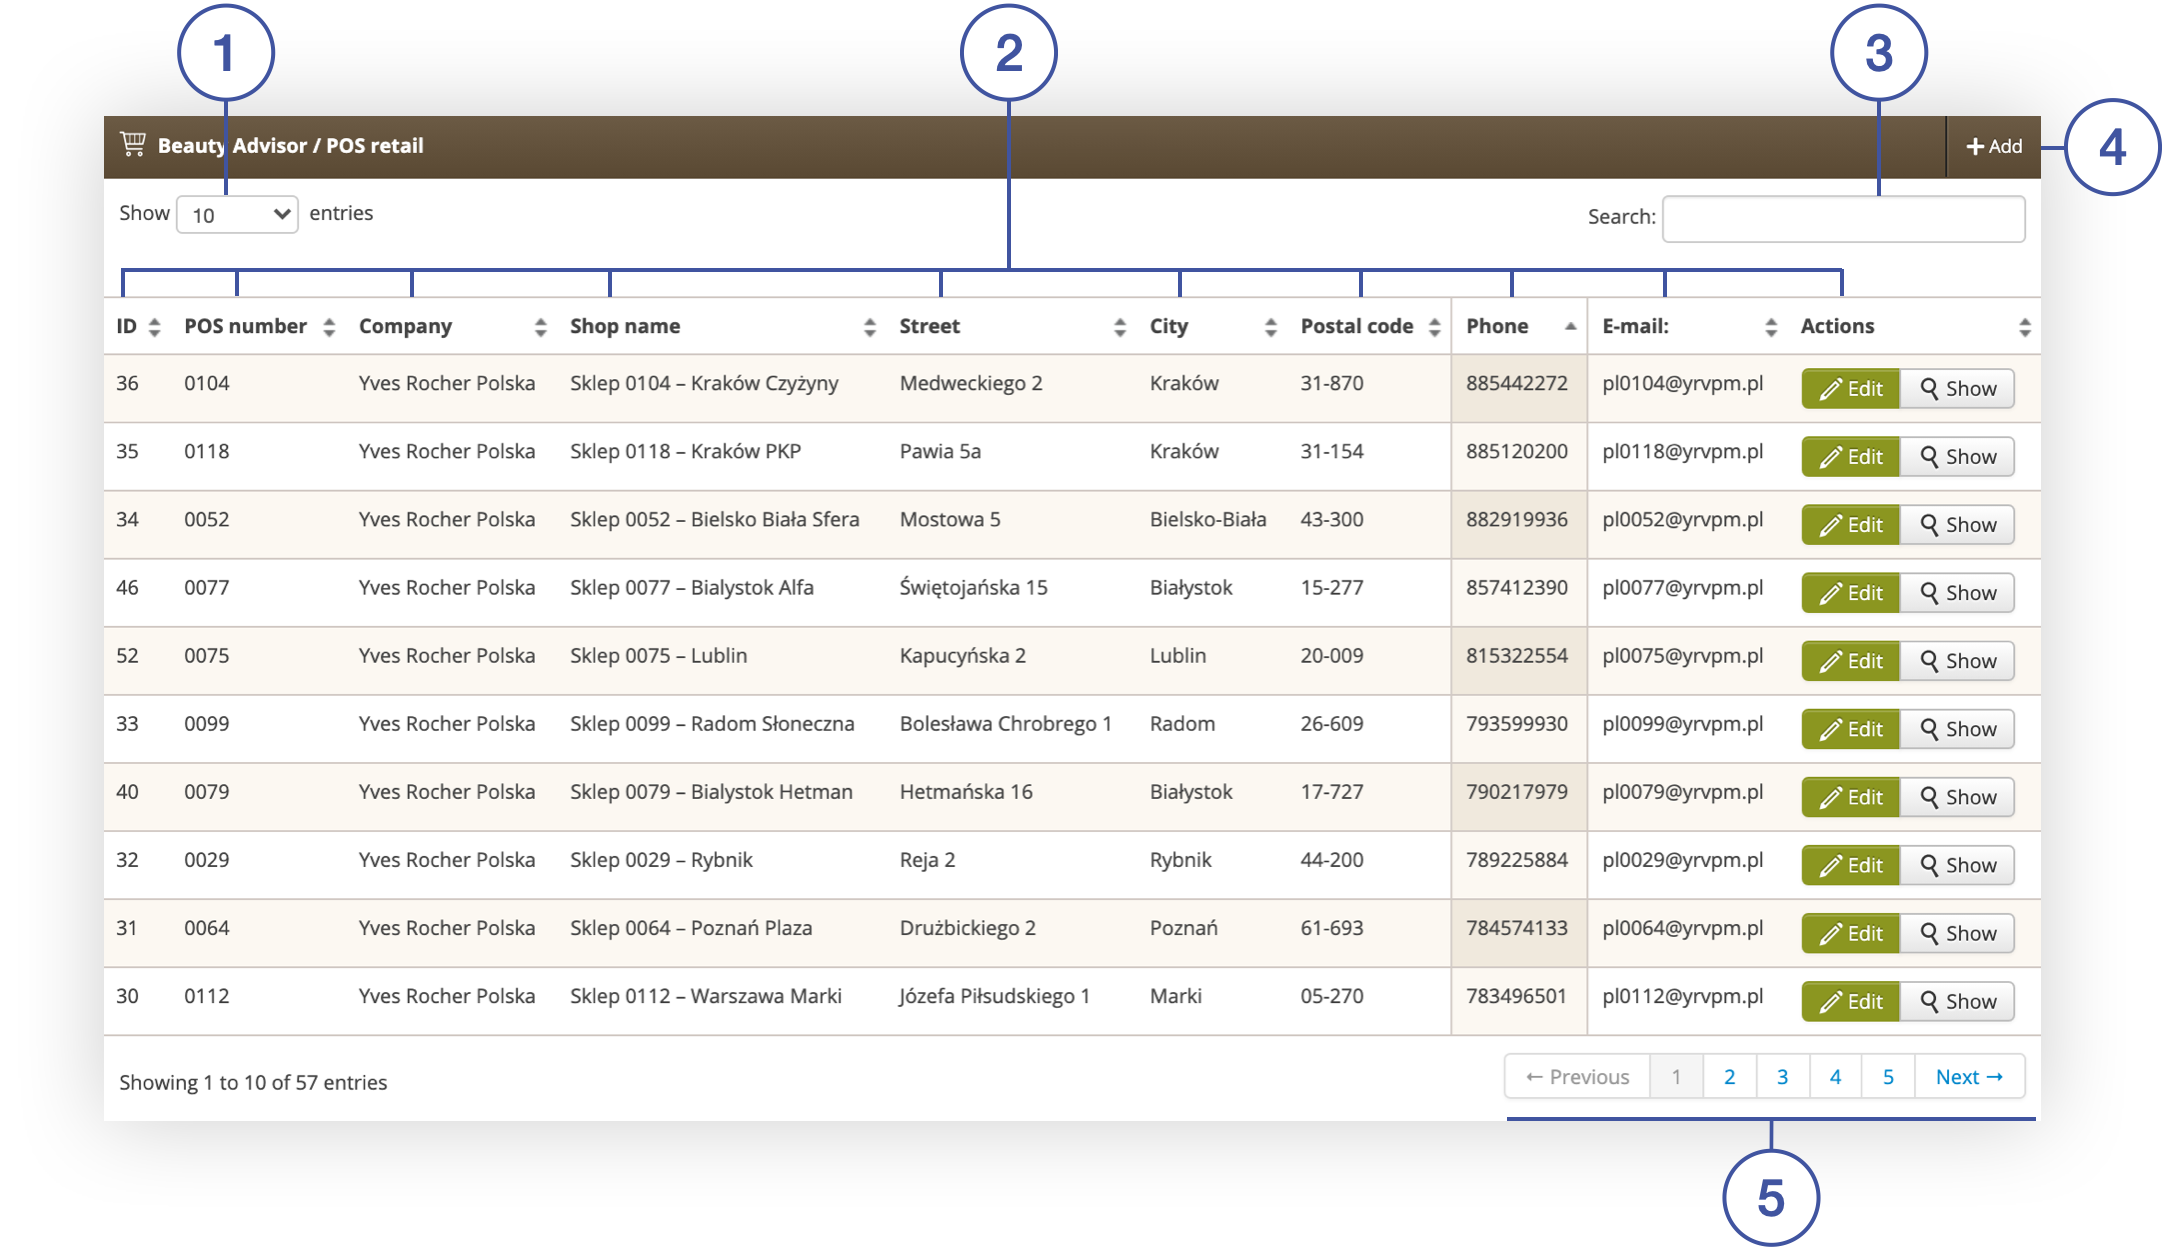 |
| *Beauty Advisor / POS retail tab in the POS retail section* |
|  |
| *Window for editing store data* |
| 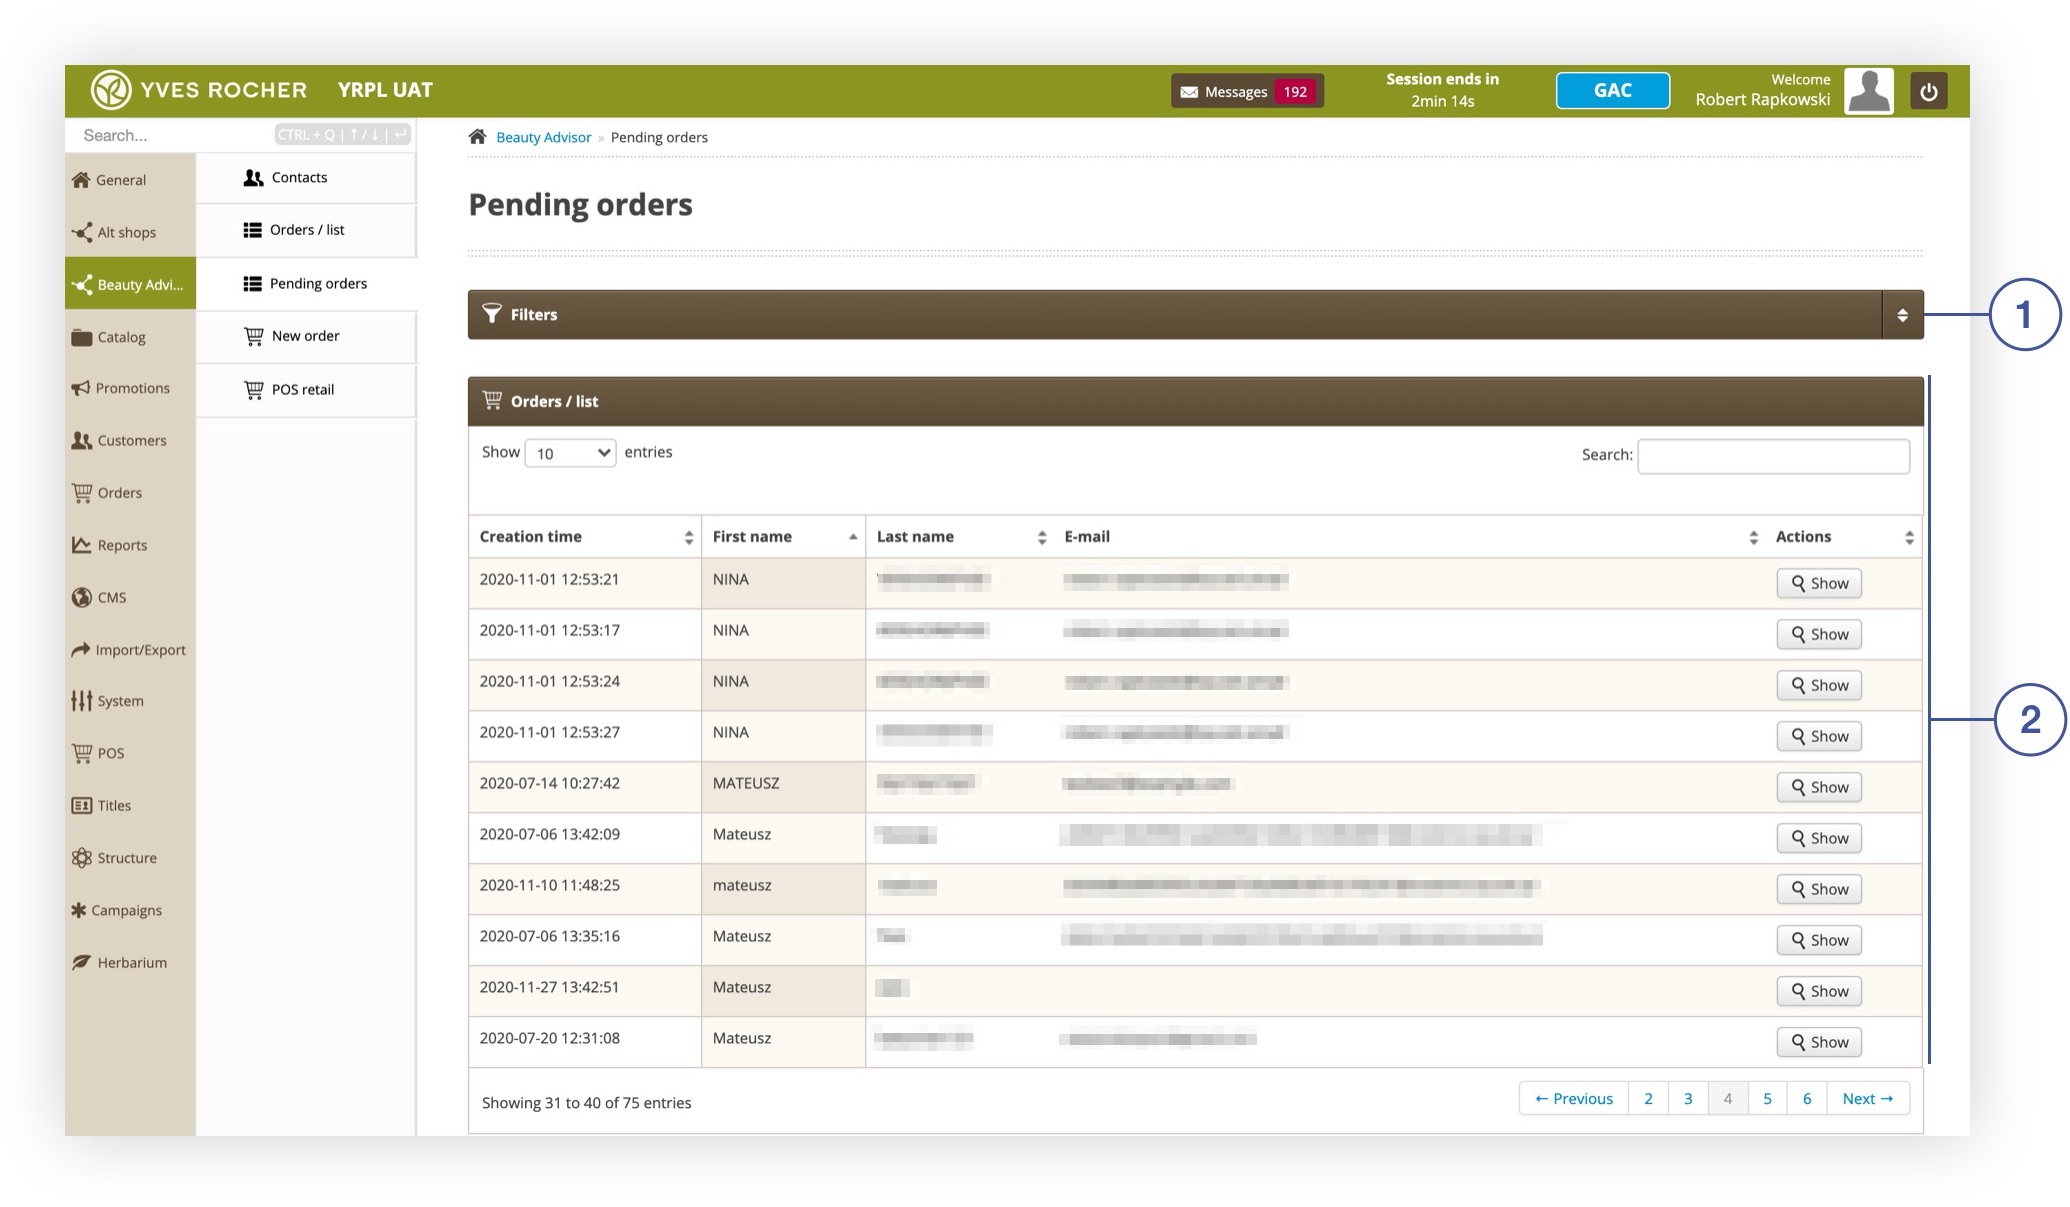 |
| *Pending orders section in the Beauty Advisor module* |
| 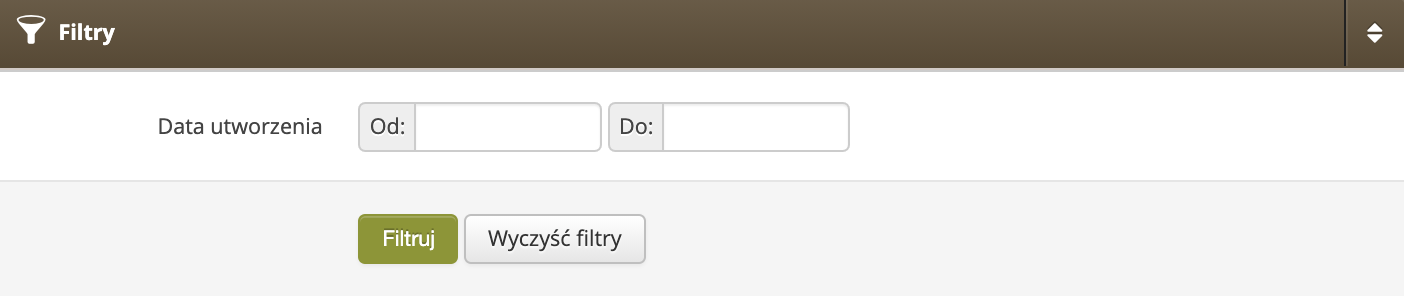 |
| *Filters tab in section Beauty Advisor> Pending Orders* |
| 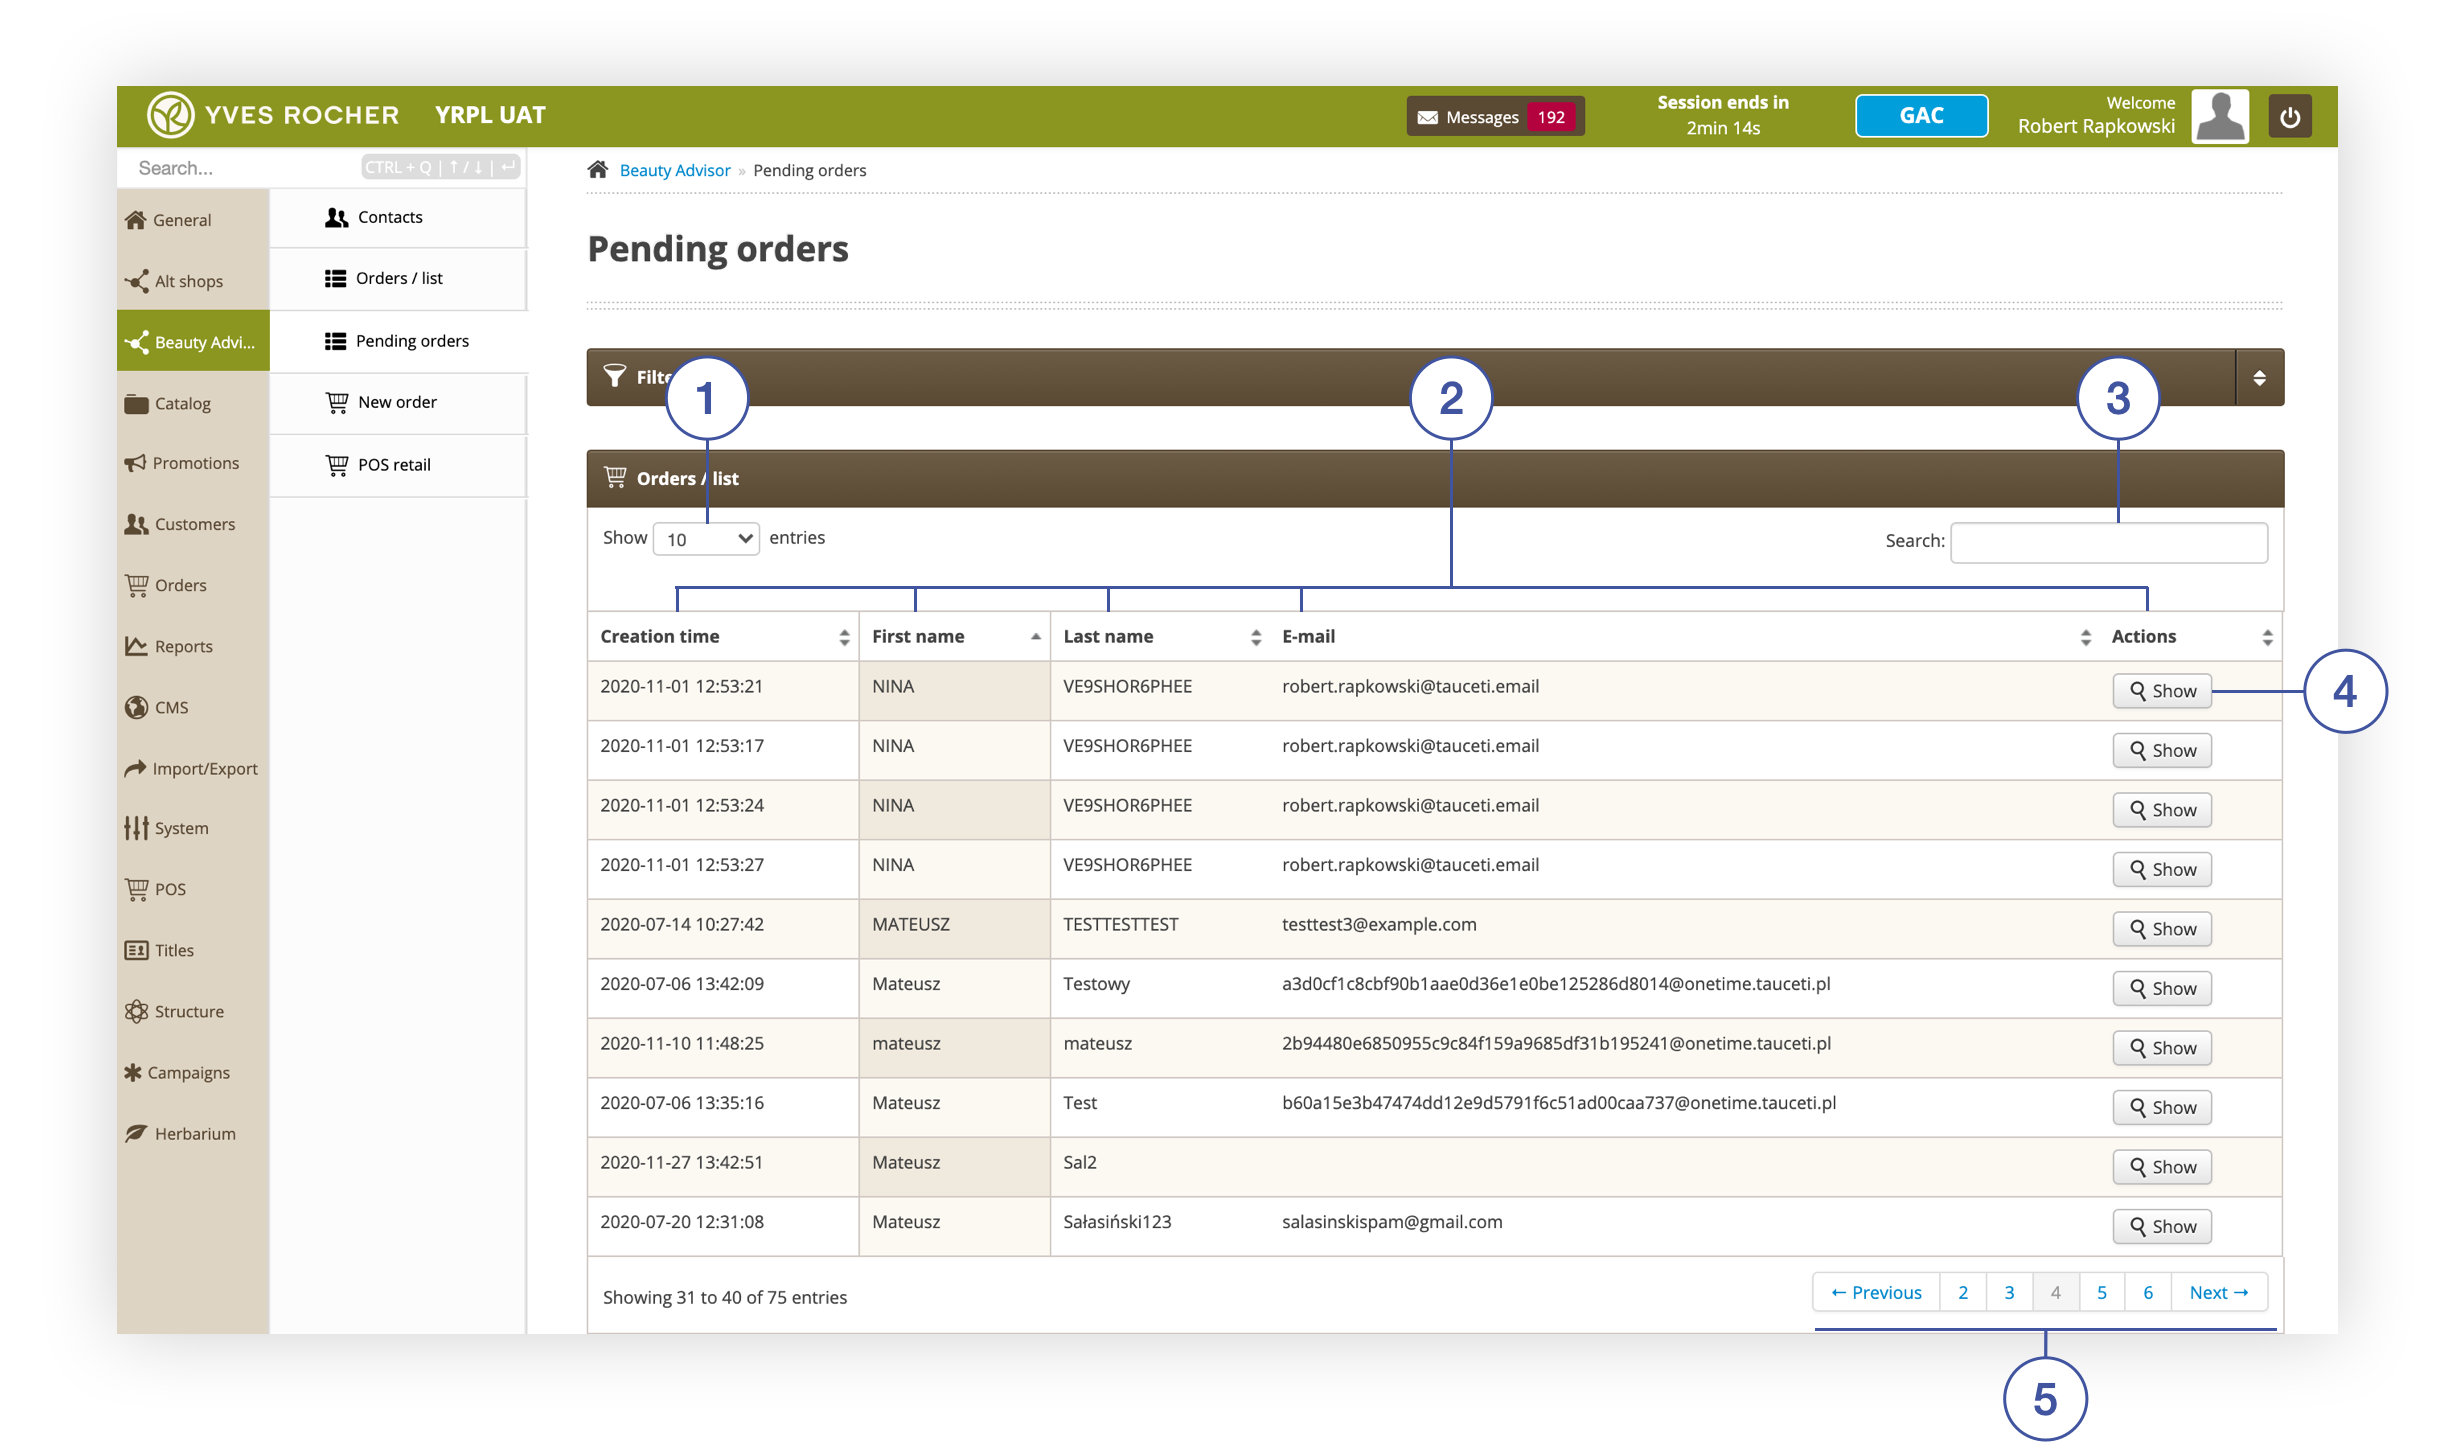 |
| Orders / list tab in Pending orders section |
| 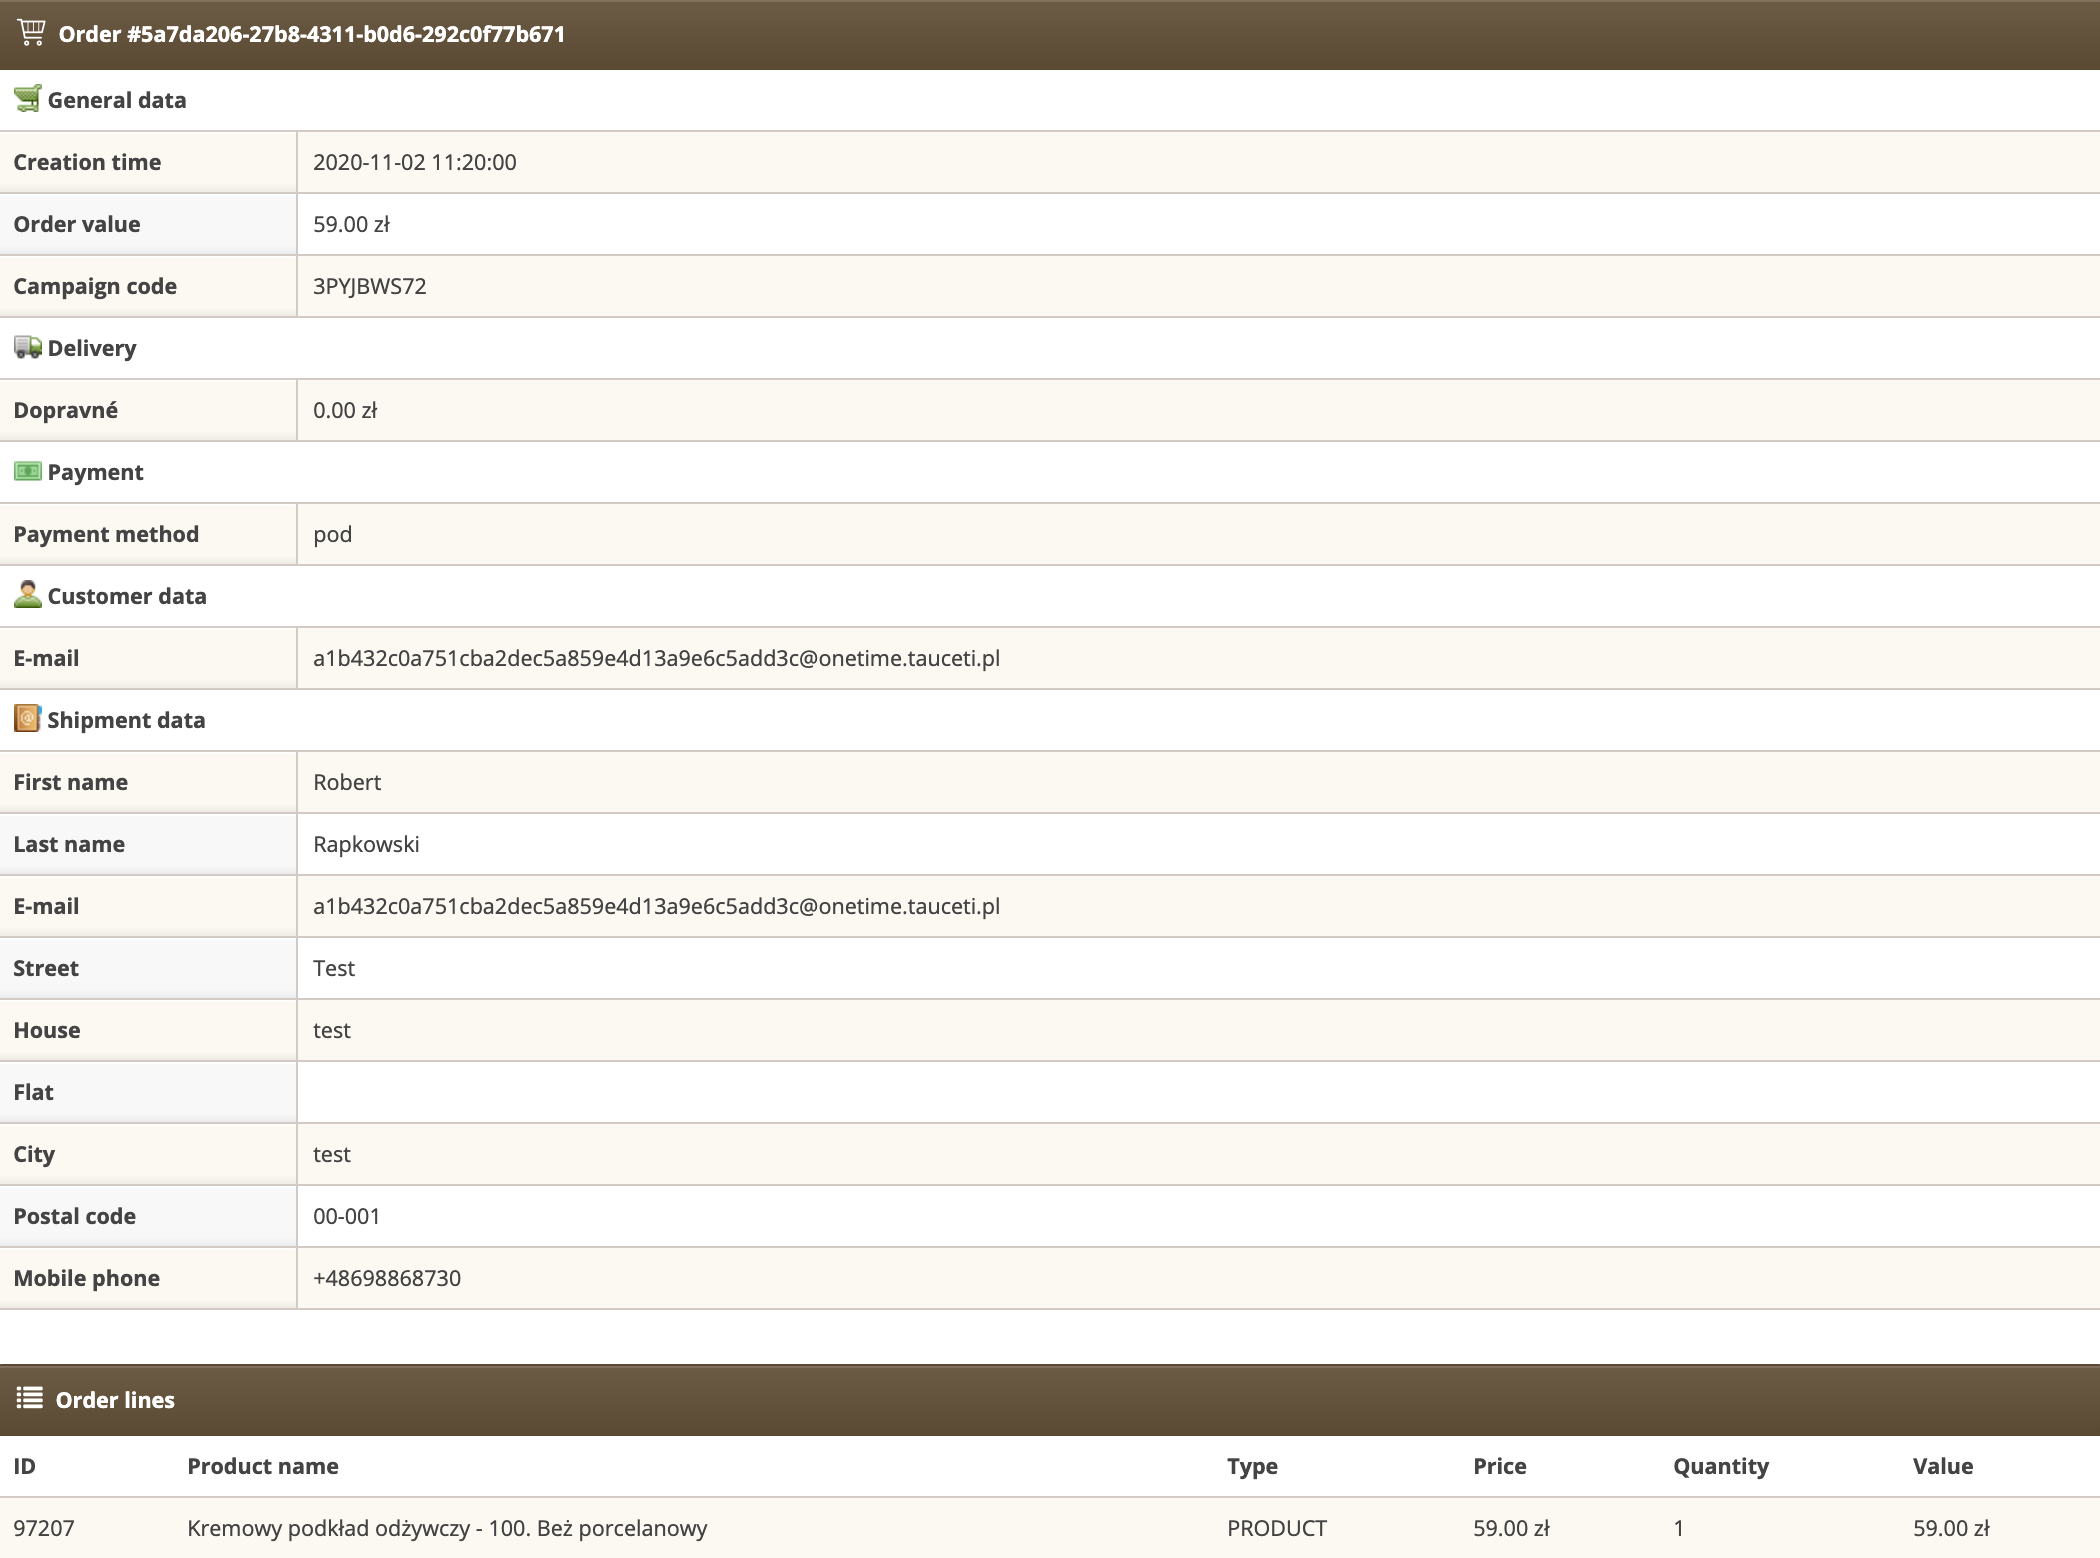 |
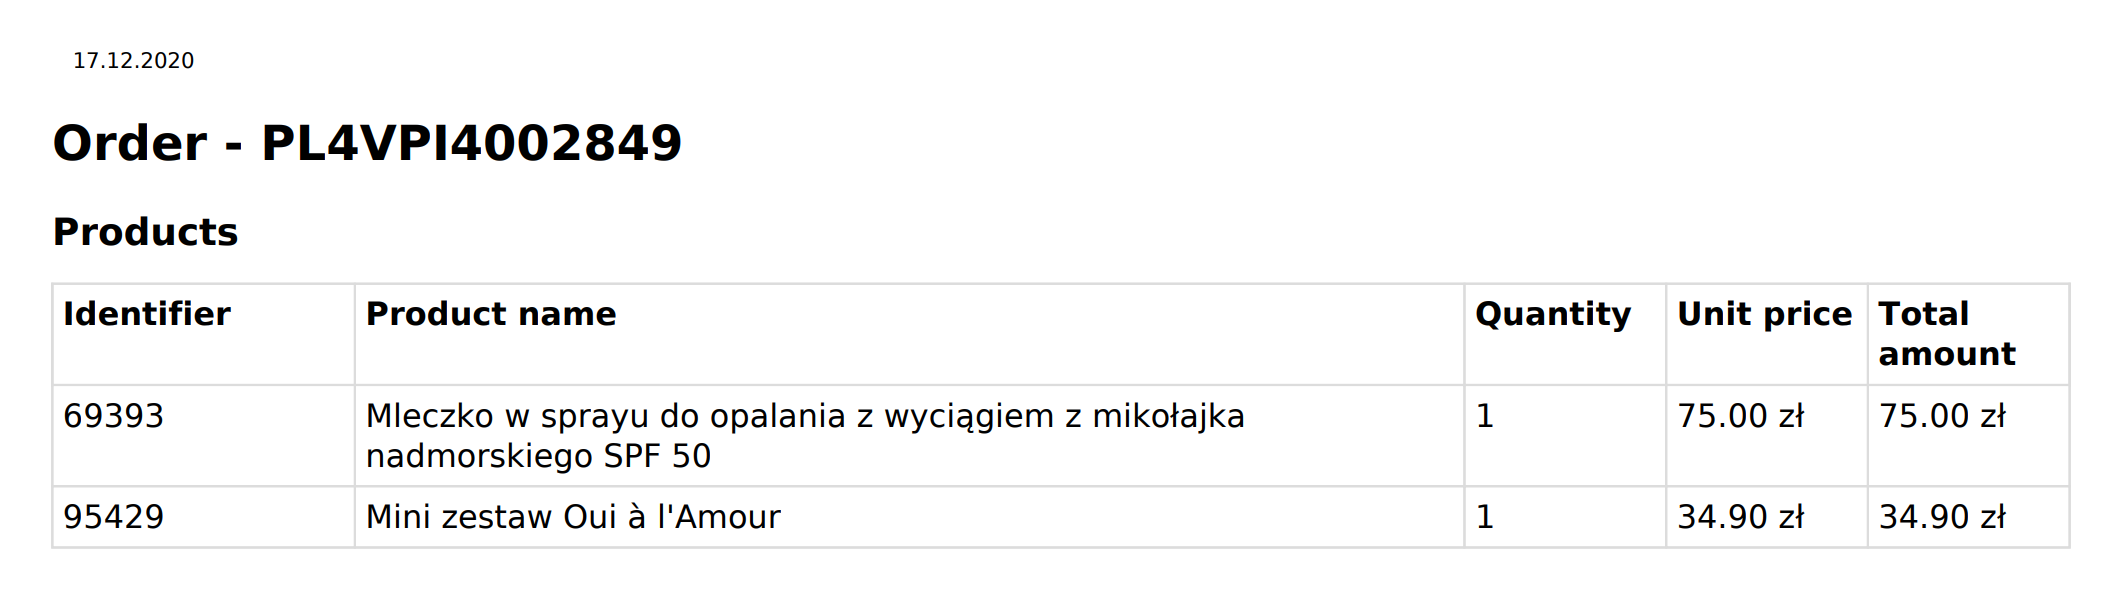
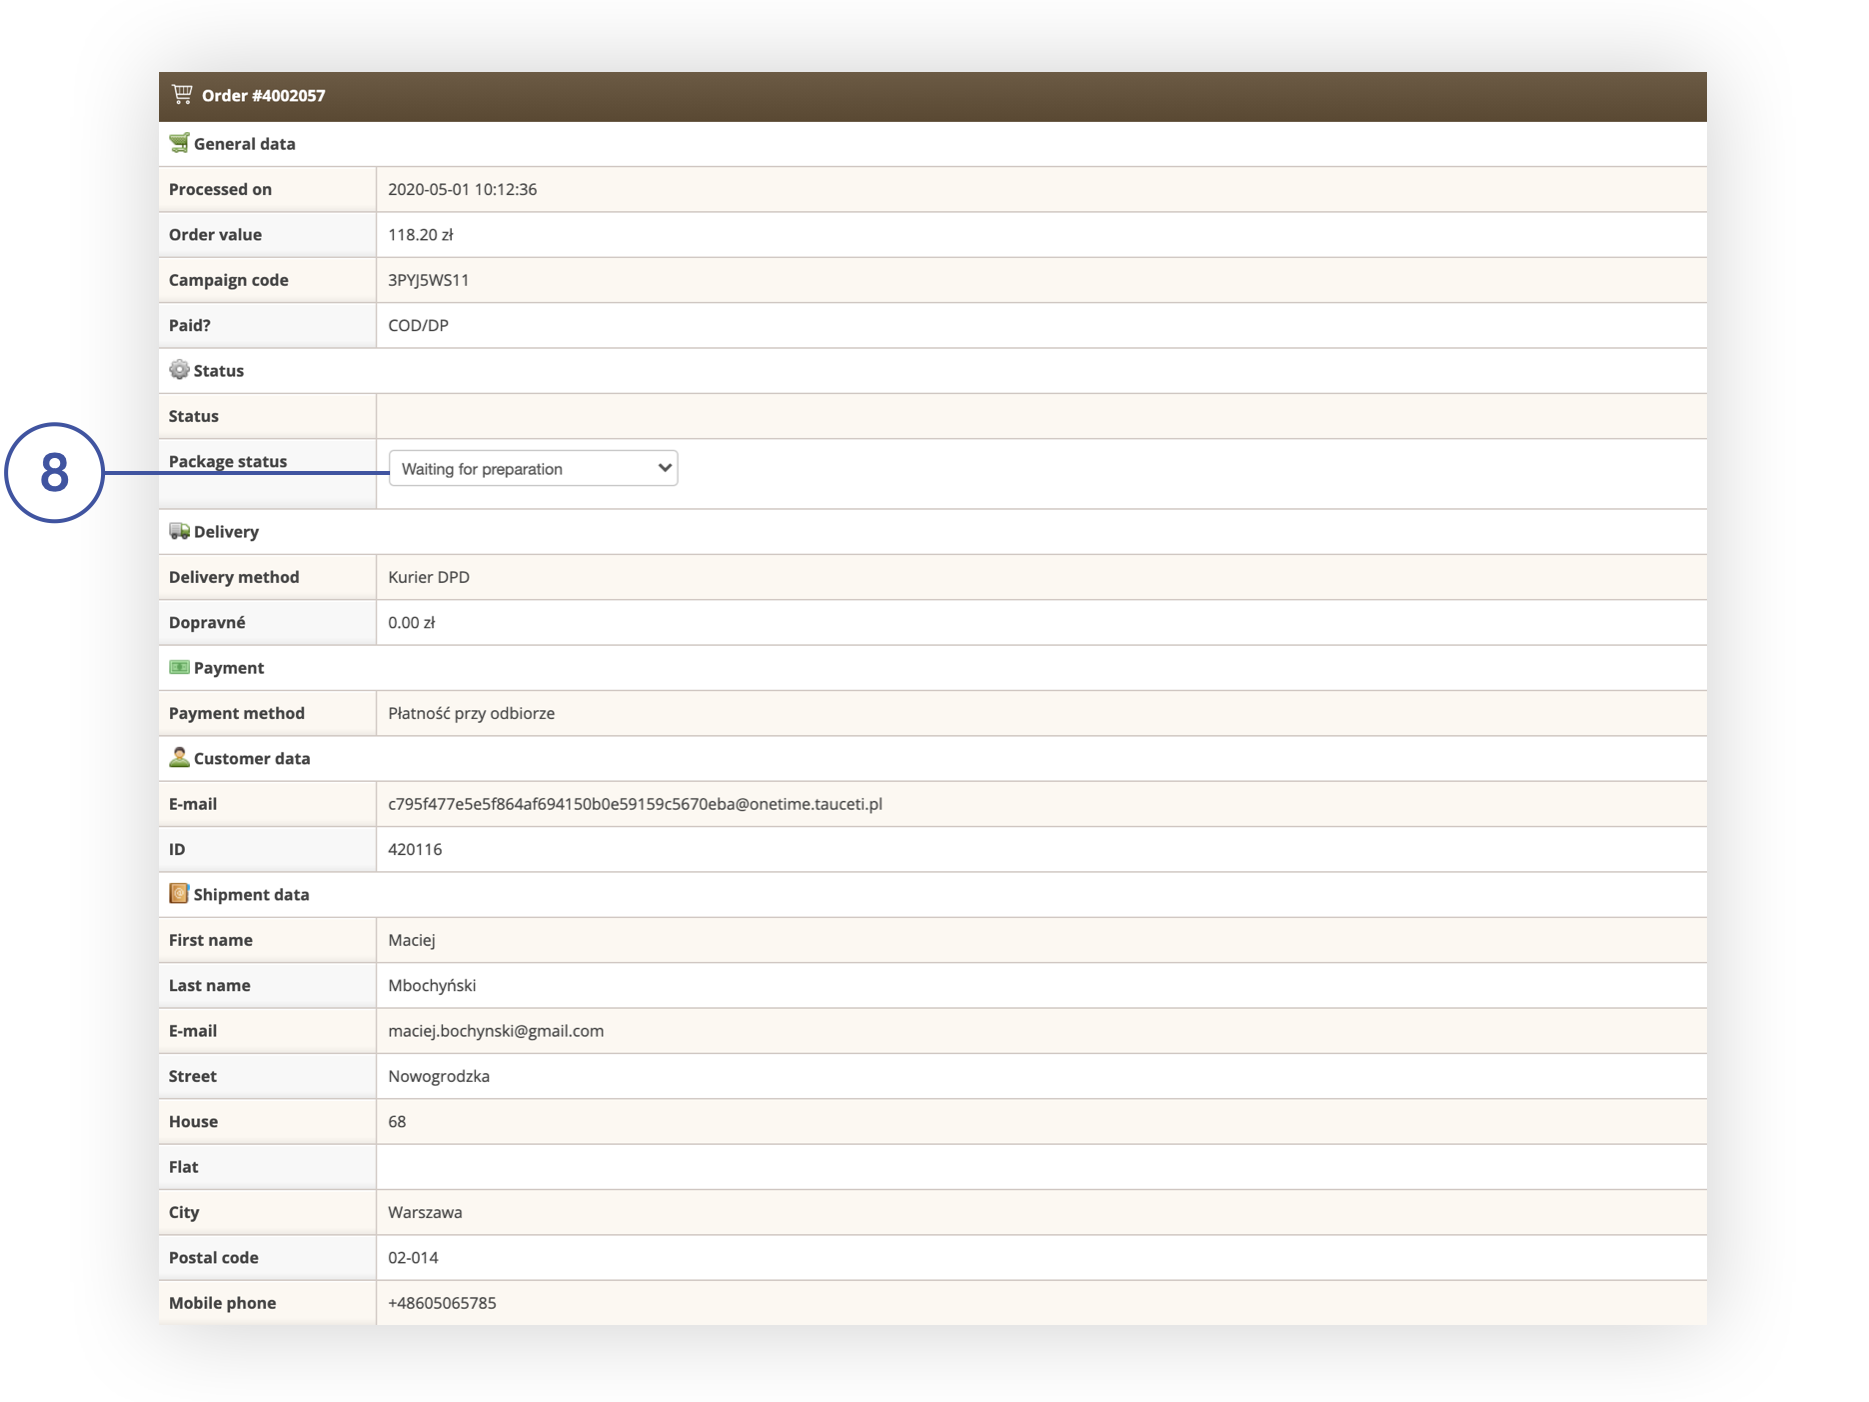
| *Detailed order view* |
| 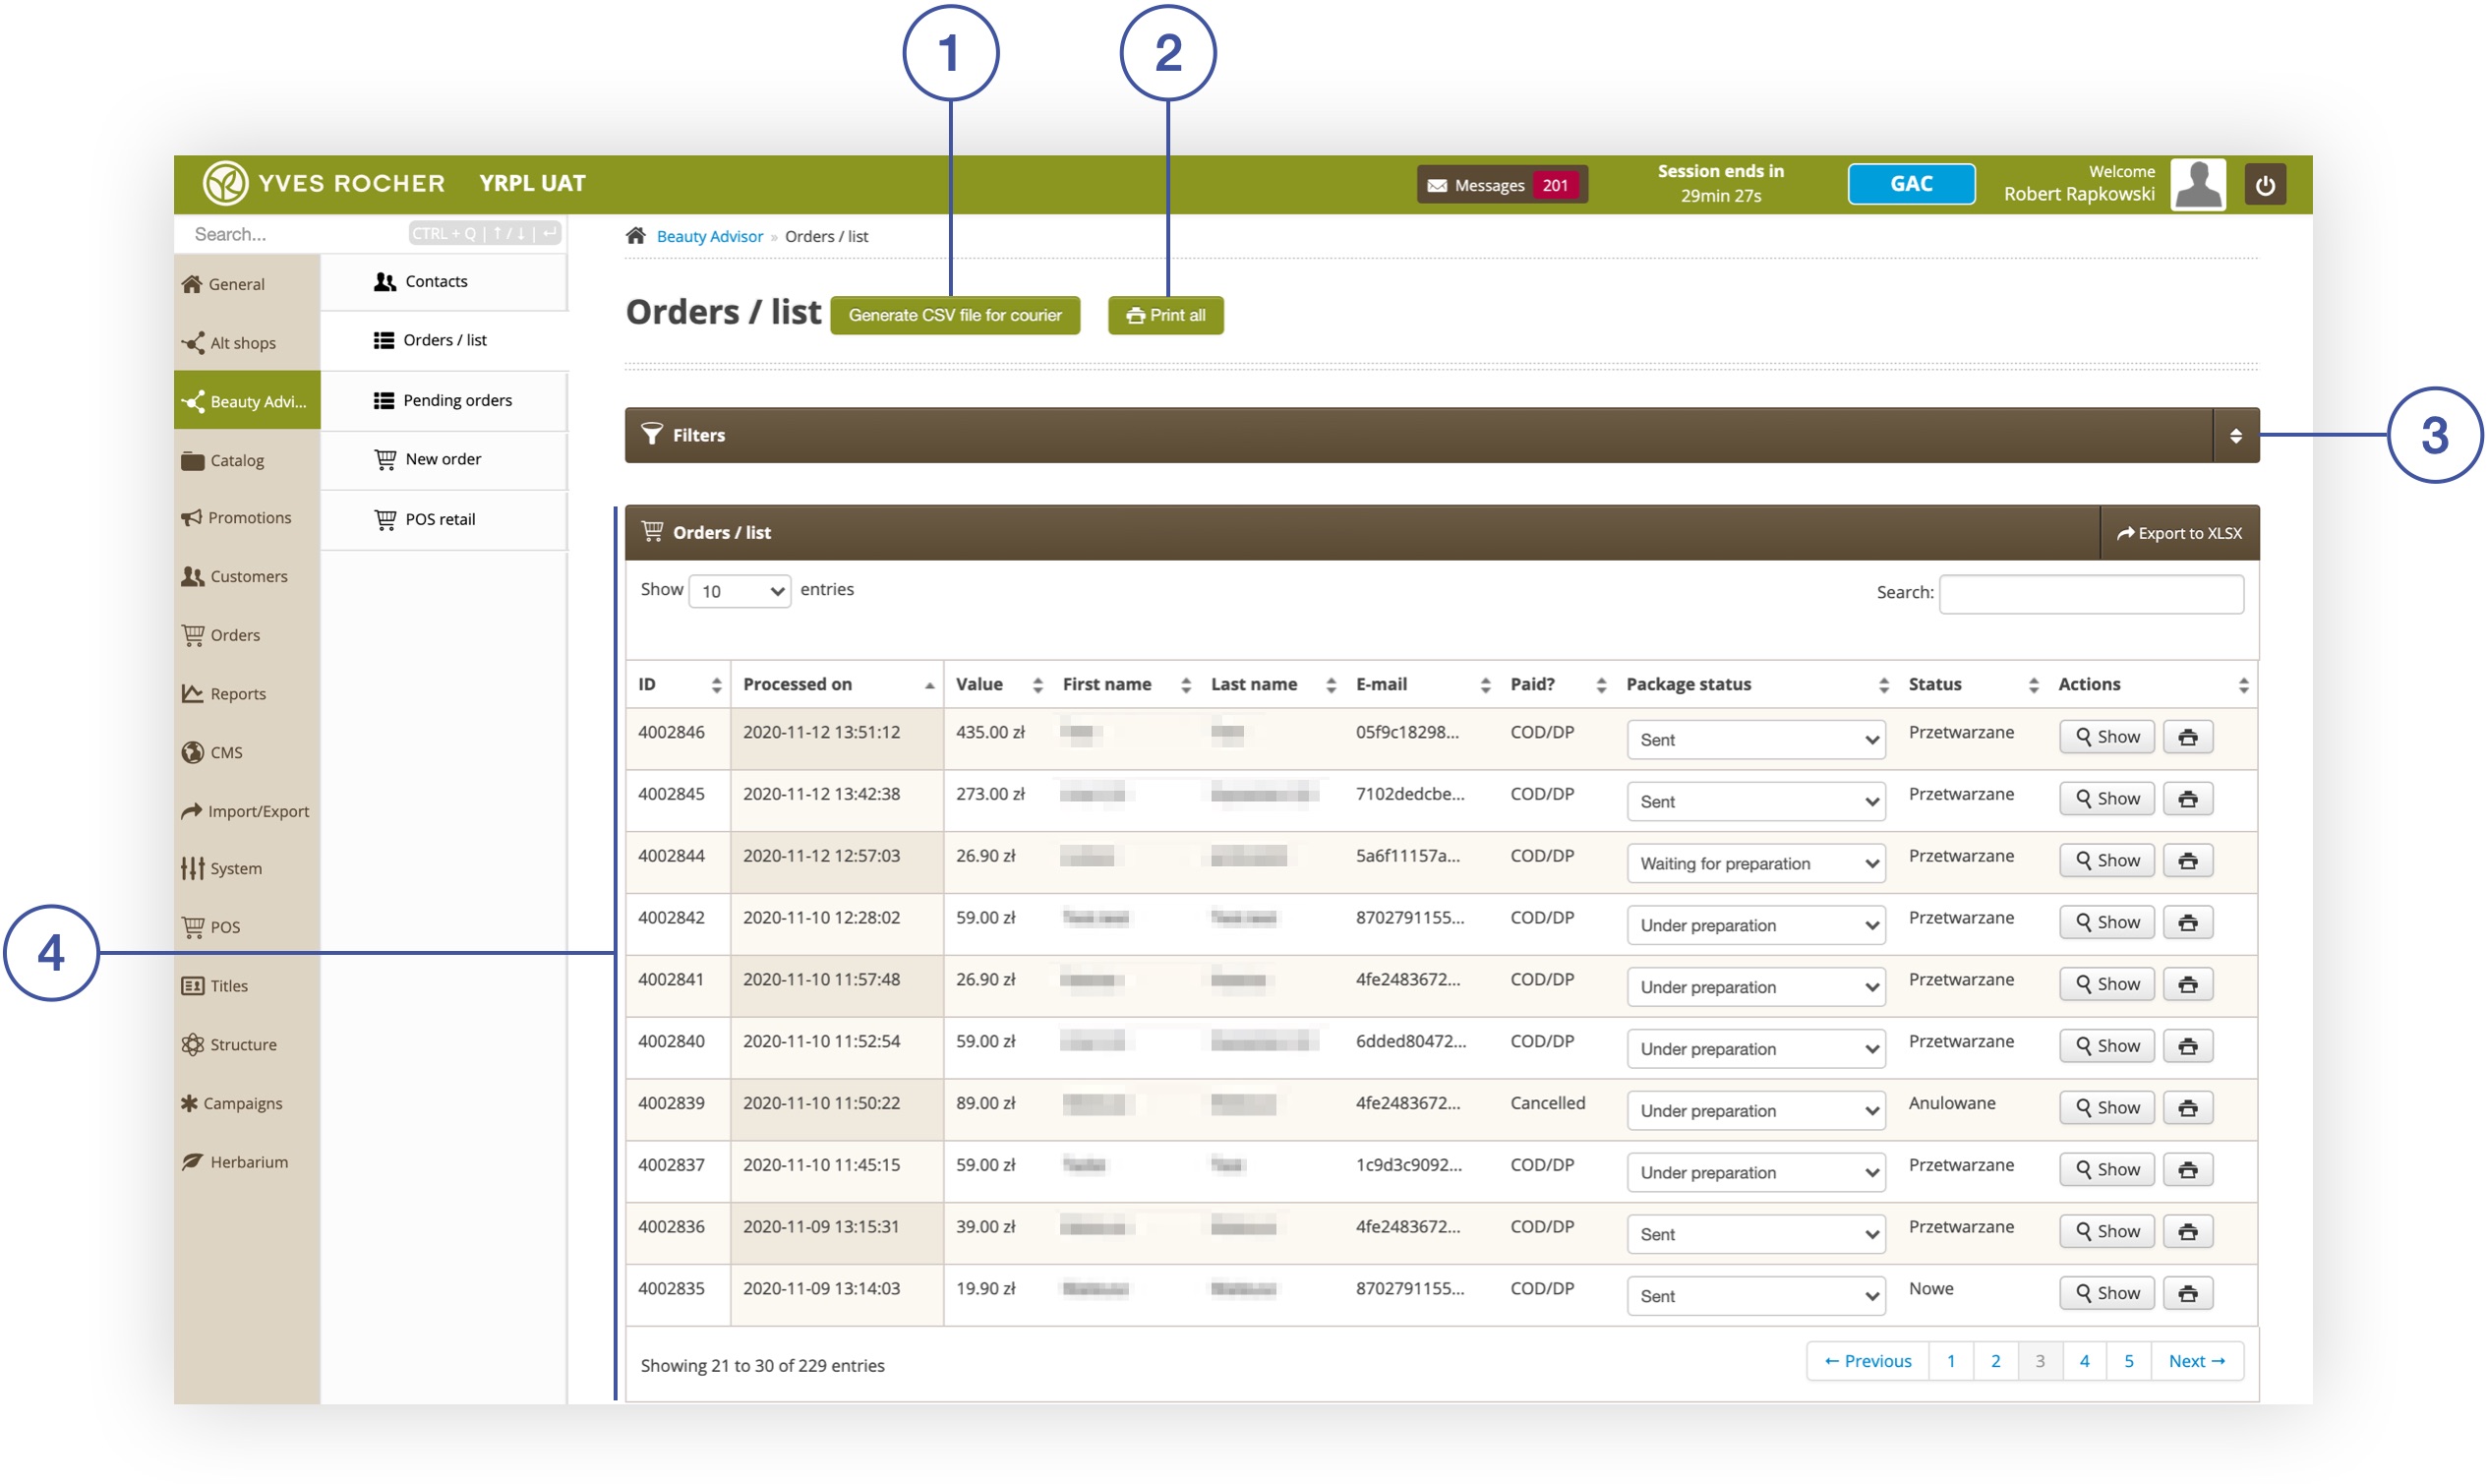 |
| *Orders / list section in Beauty Advisor module* |
|  |
| *A message with a summary of the operation* |
|  |
| *Generated label* |
| 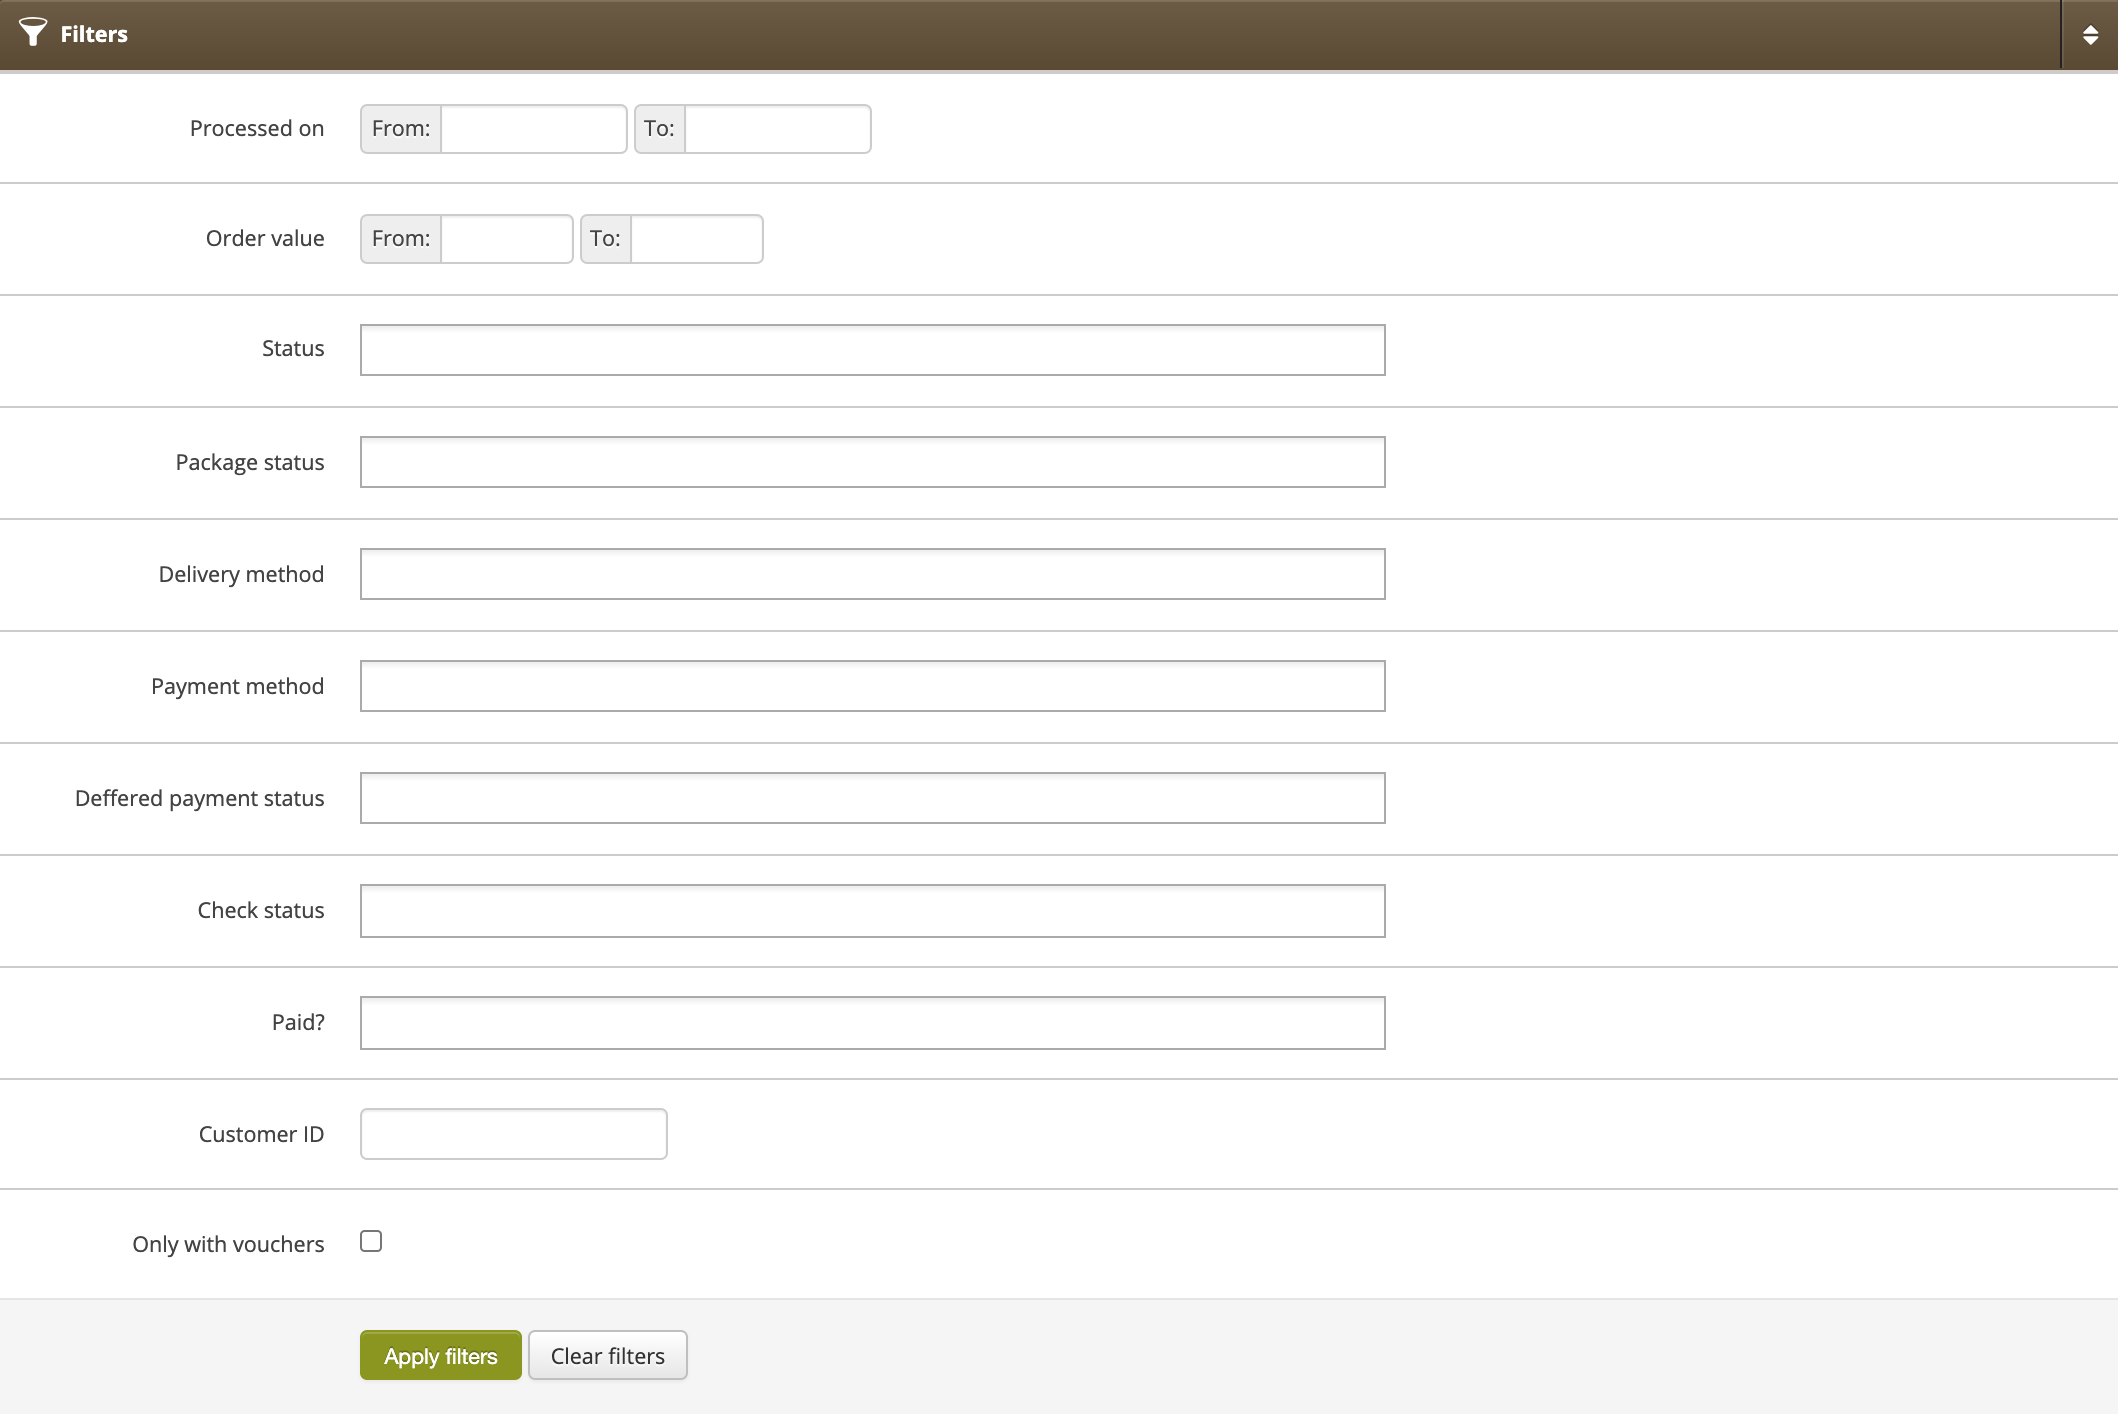 |
| *Filters tab in section Beauty Advisor> Orders / list* |
| 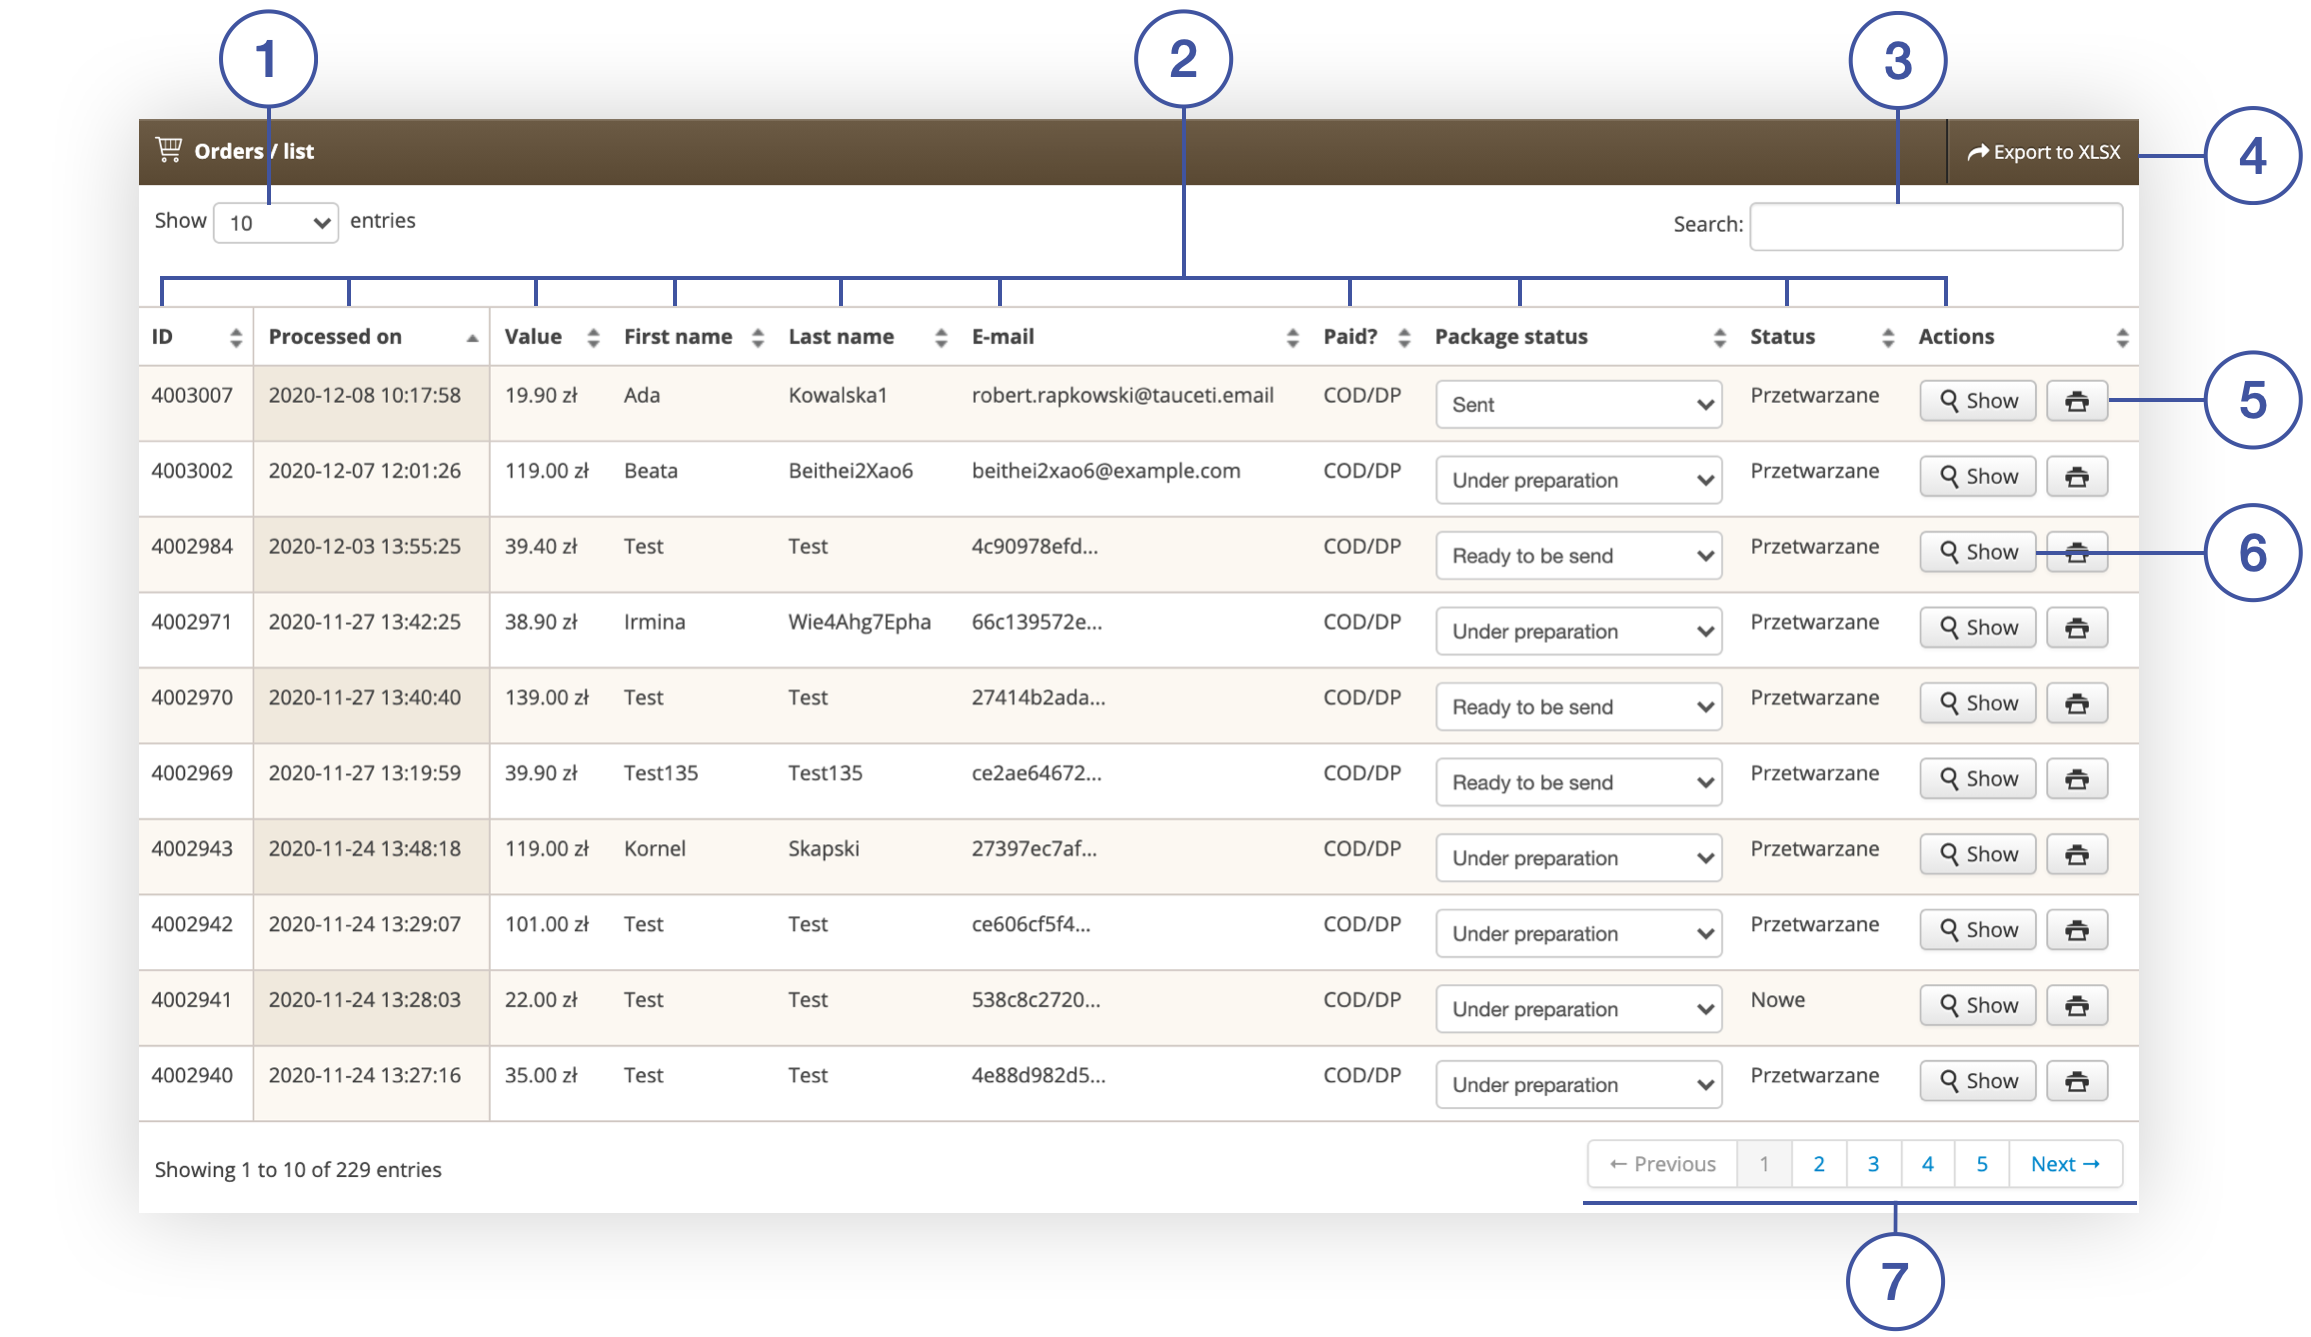 |
| *Orders / list tab in section Beauty Advisor> Orders / list* |
| 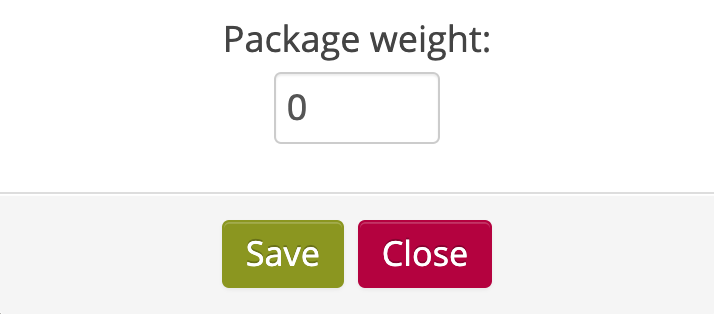 |
| *Pop-up with the option to enter the weight of the package* |
|  |
| *Order details in Beauty Advisor> Orders / list* |
| 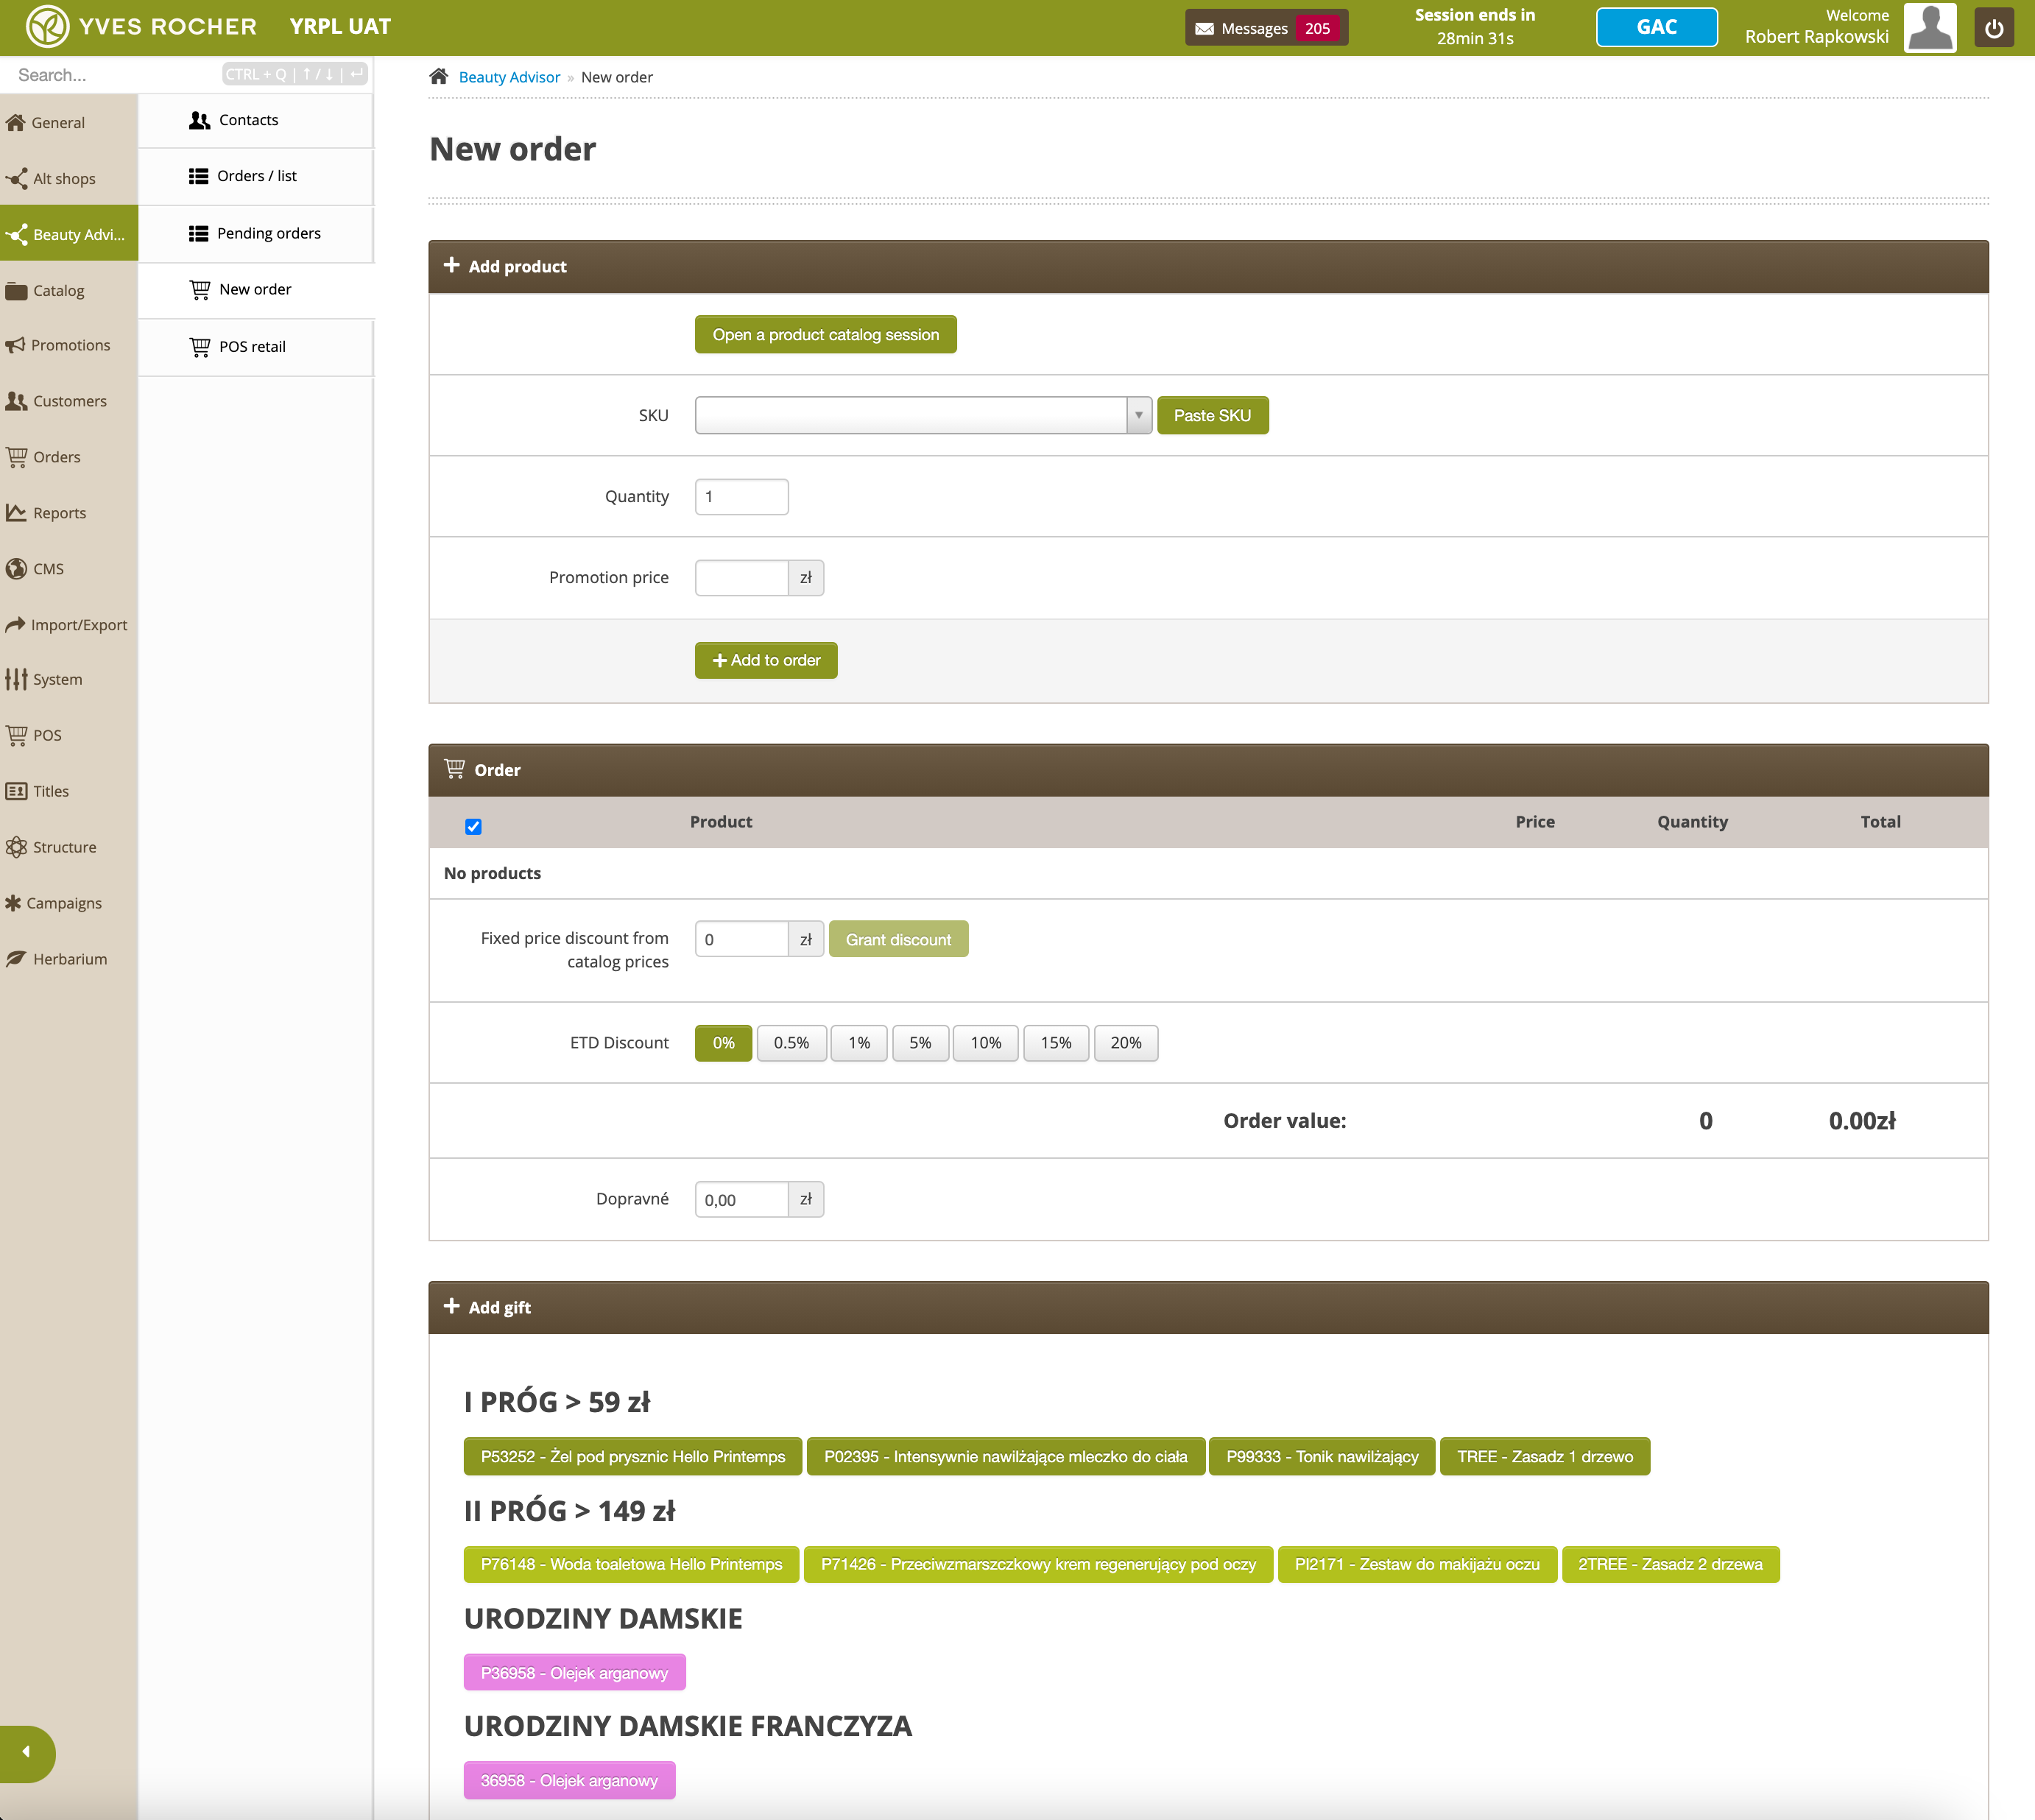 |
| *New Order section in Beauty Advisor module* |
| 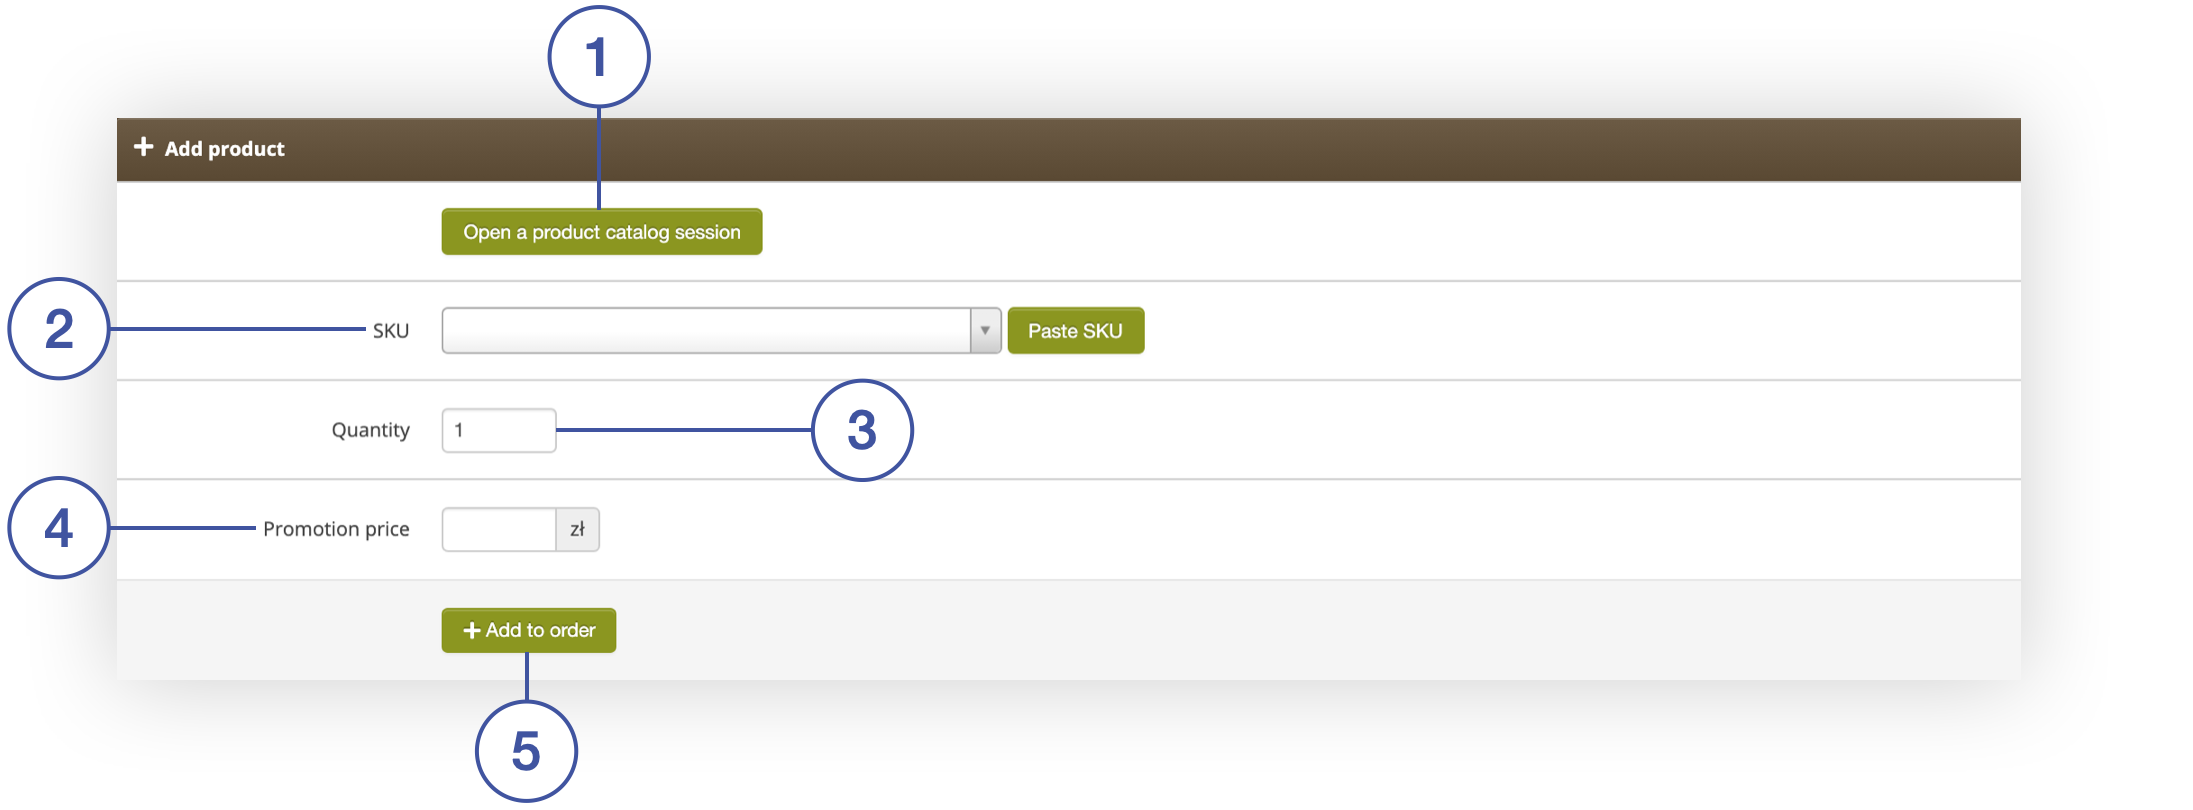 |
| *Add Product tab in Beauty Advisor> New Order* |
| 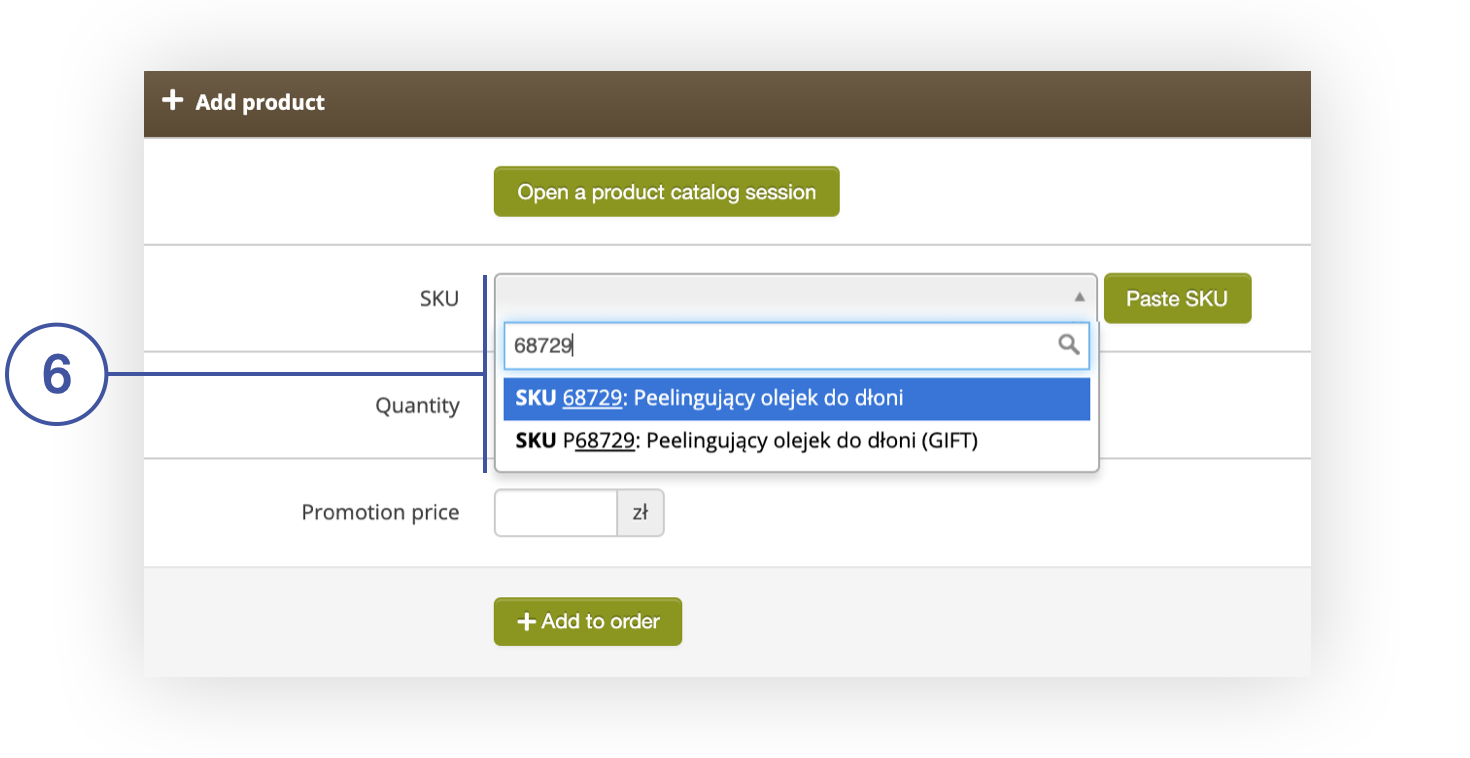 |
| *Add a product in the Add Product tab in Beauty Advisor> New Order* |
| 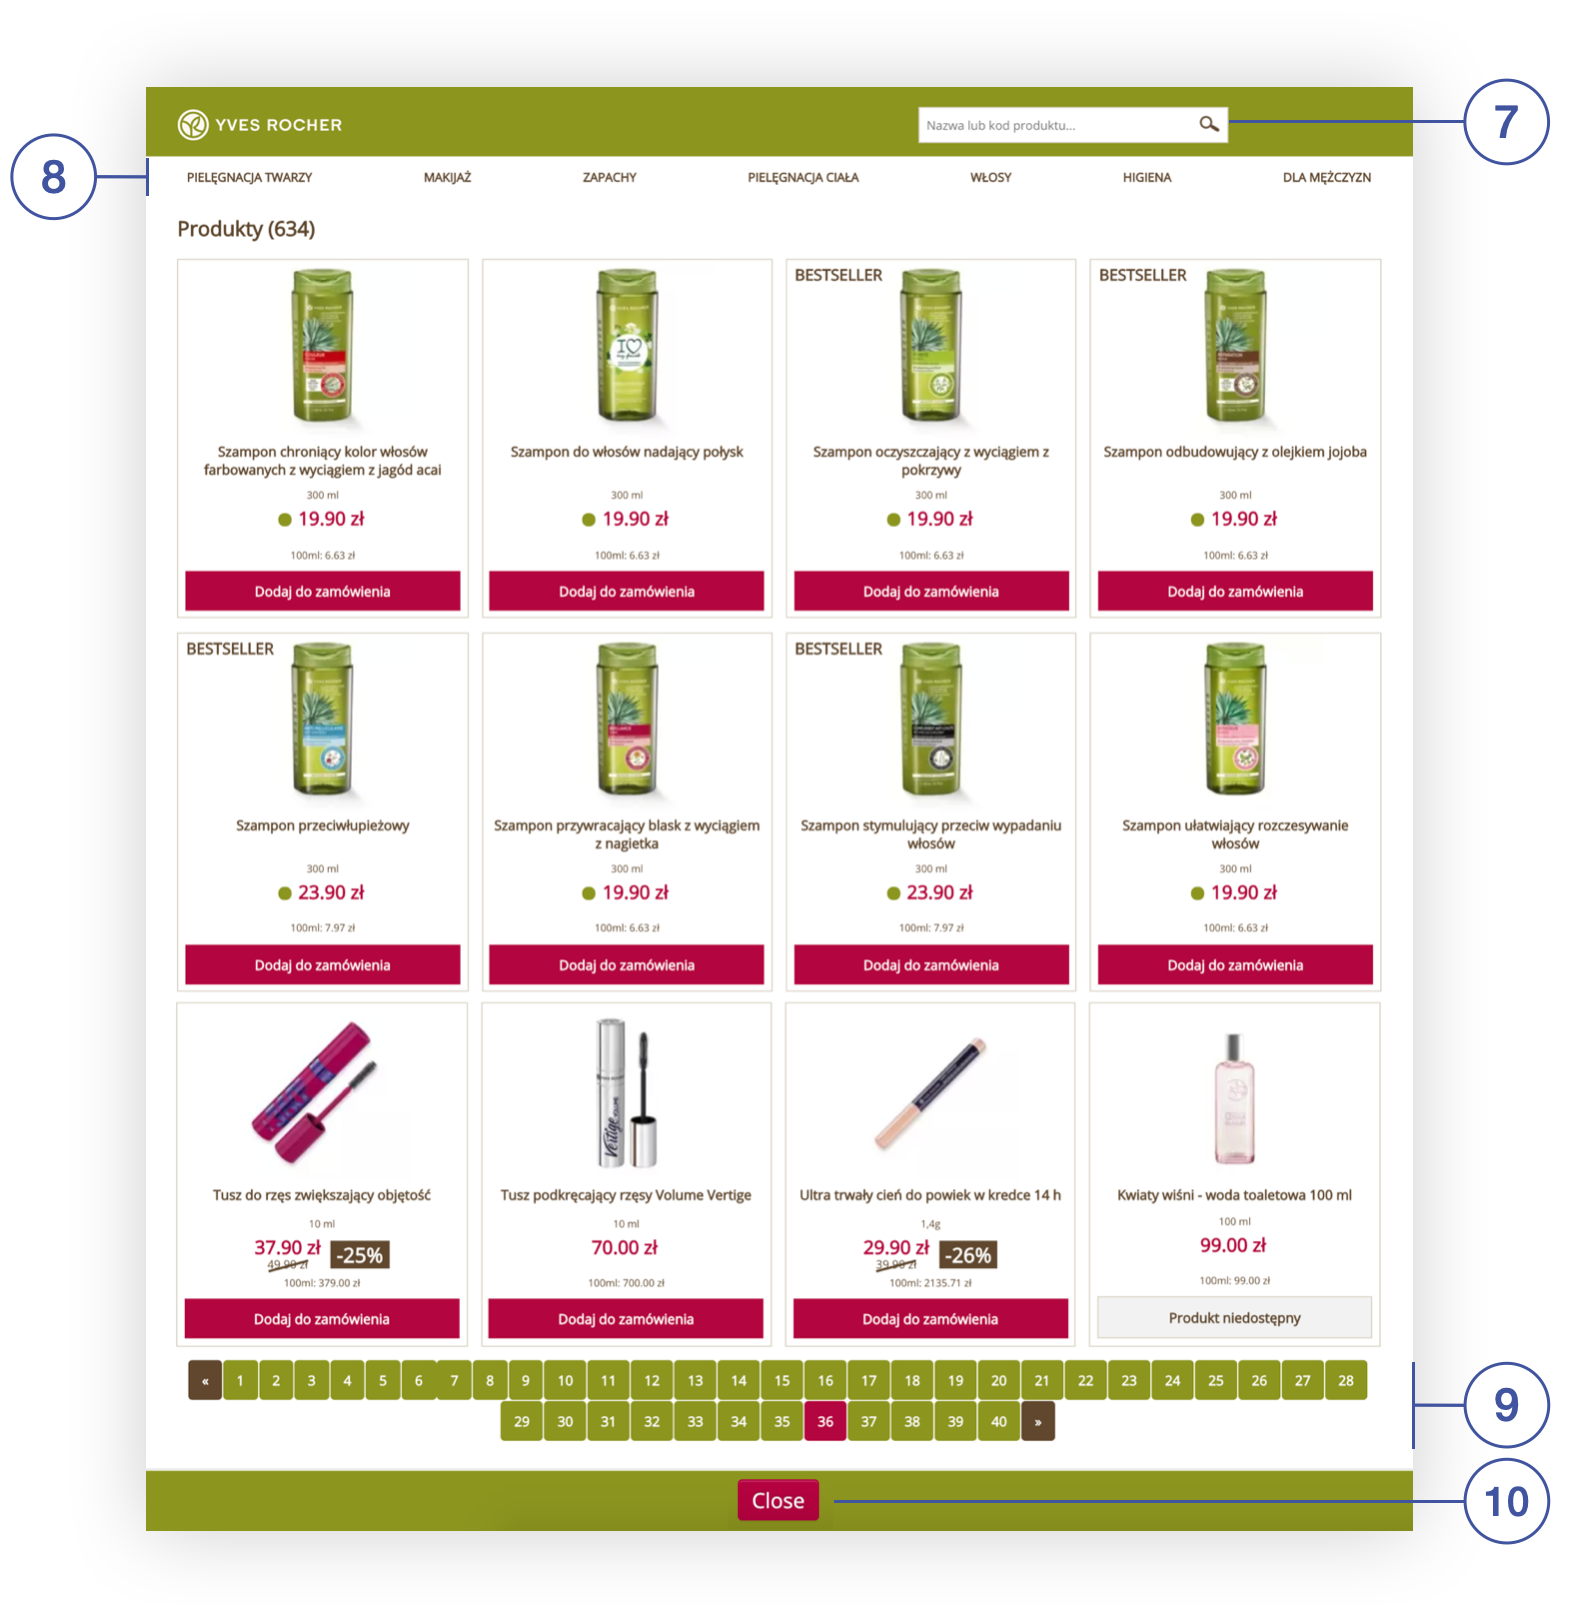 |
| *An open session of the product catalog in the Beauty Advisor module* |
|  |
| *A message confirming that the product has been added to the order from the open session of the product catalog* |
| 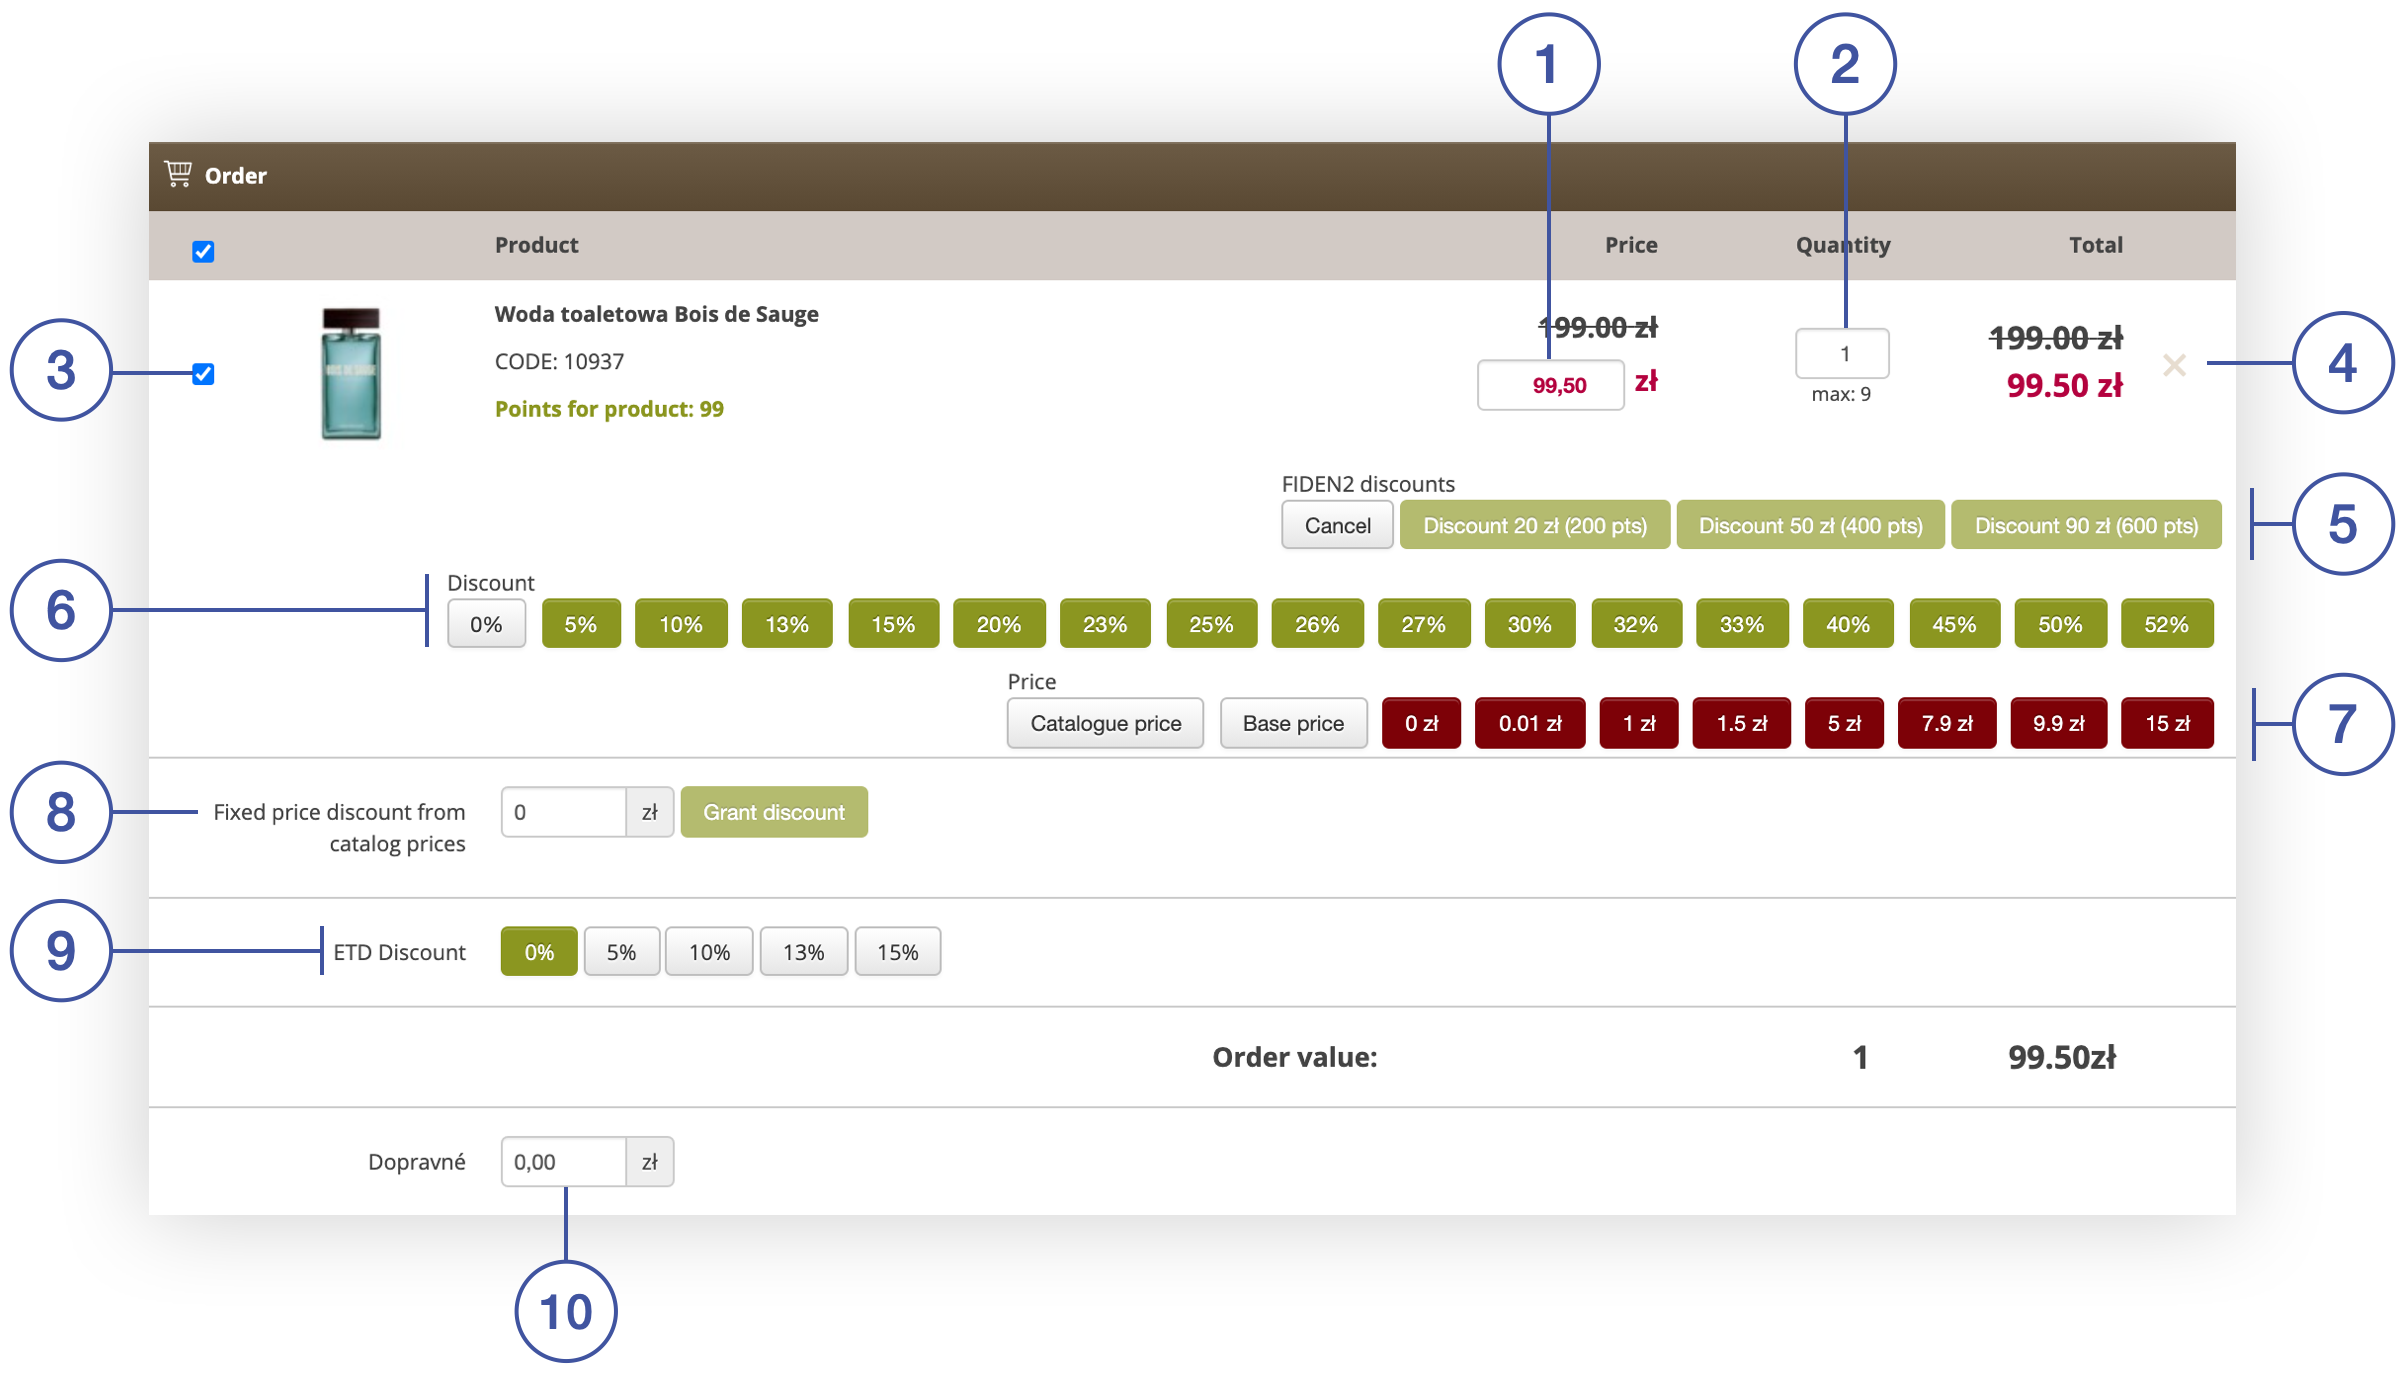 |
| *Order tab in section Beauty Advisor> New order* |
| 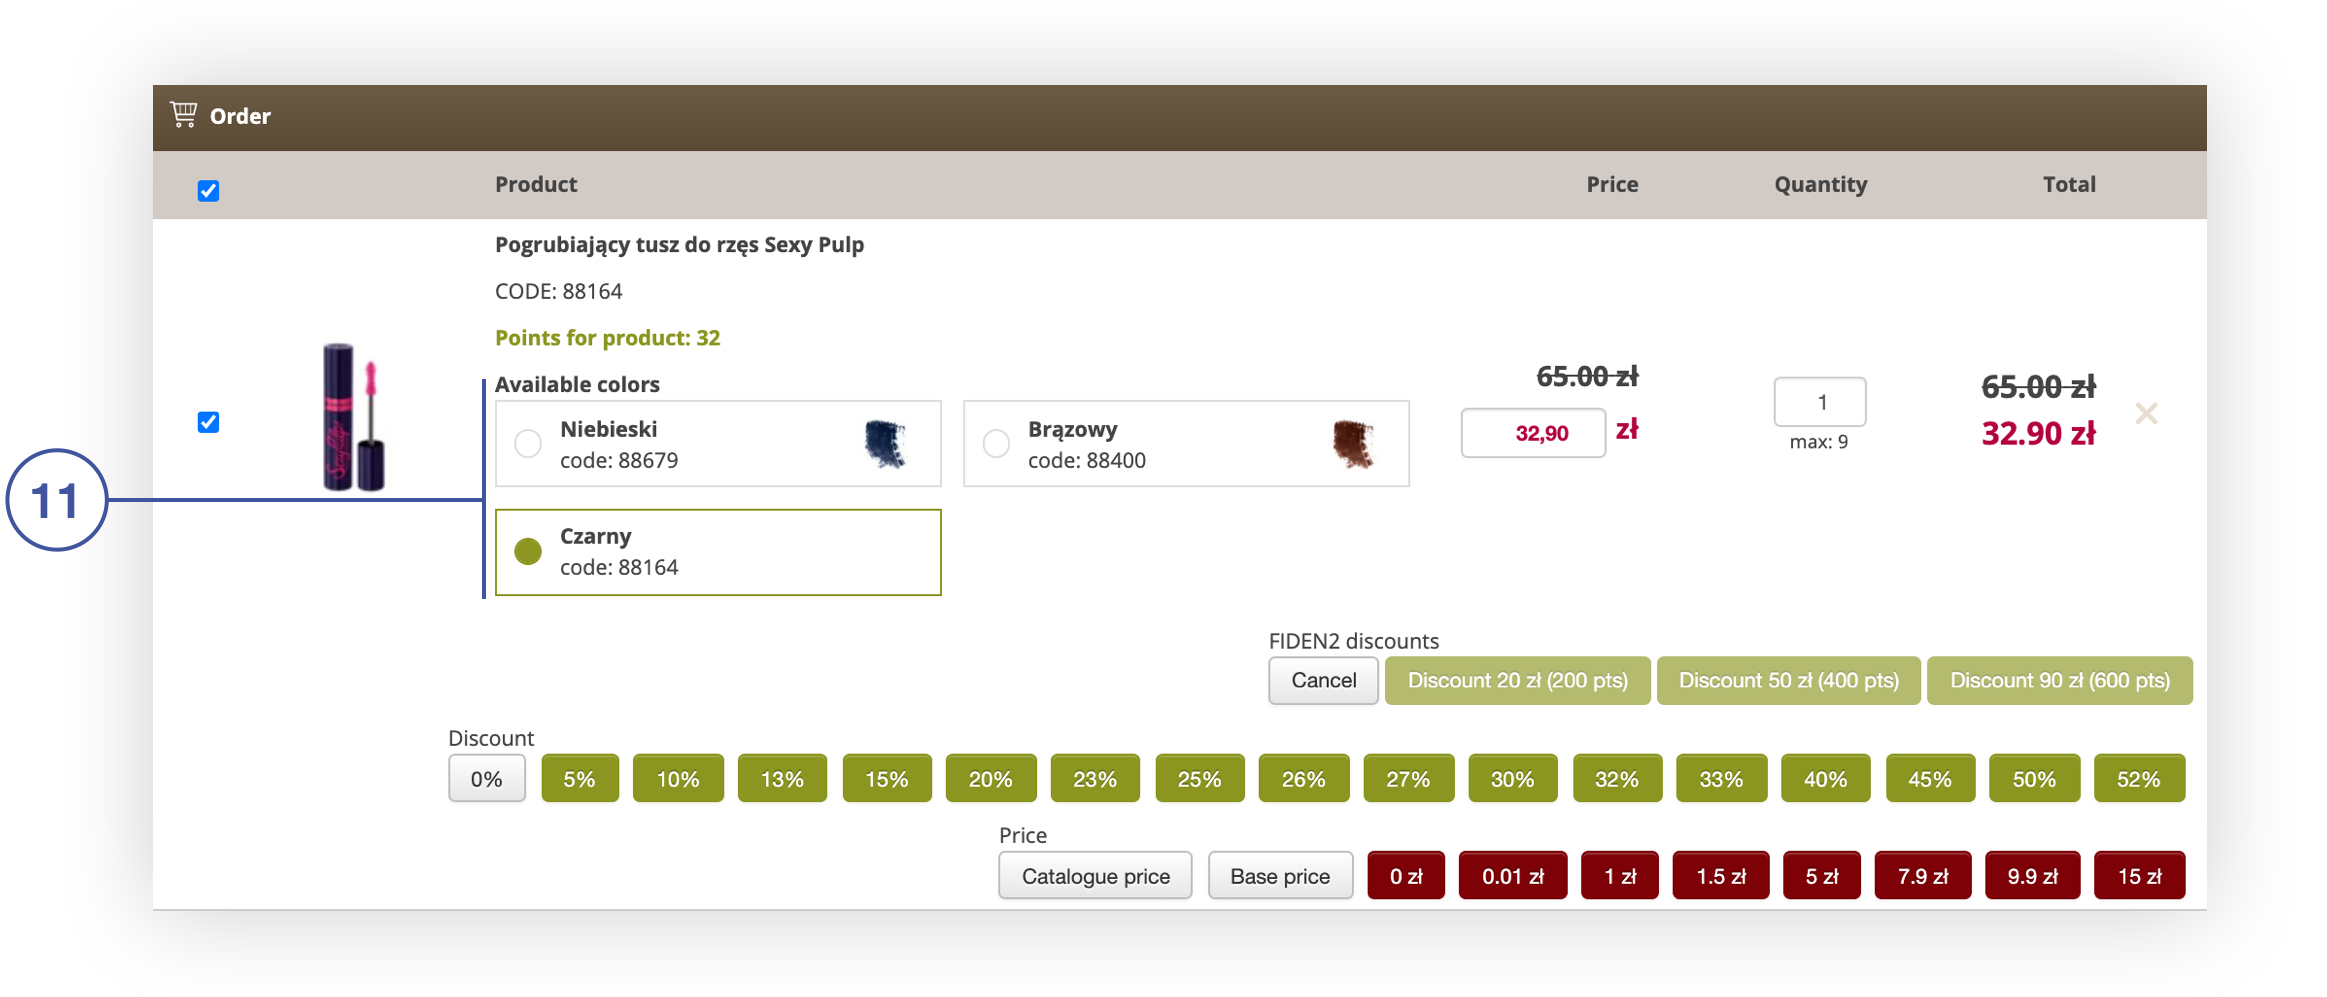 |
| *The ability to choose the color of the product in the Order tab* |
|  |
| *Add gift tab in section Beauty Advisor> New order* |
| 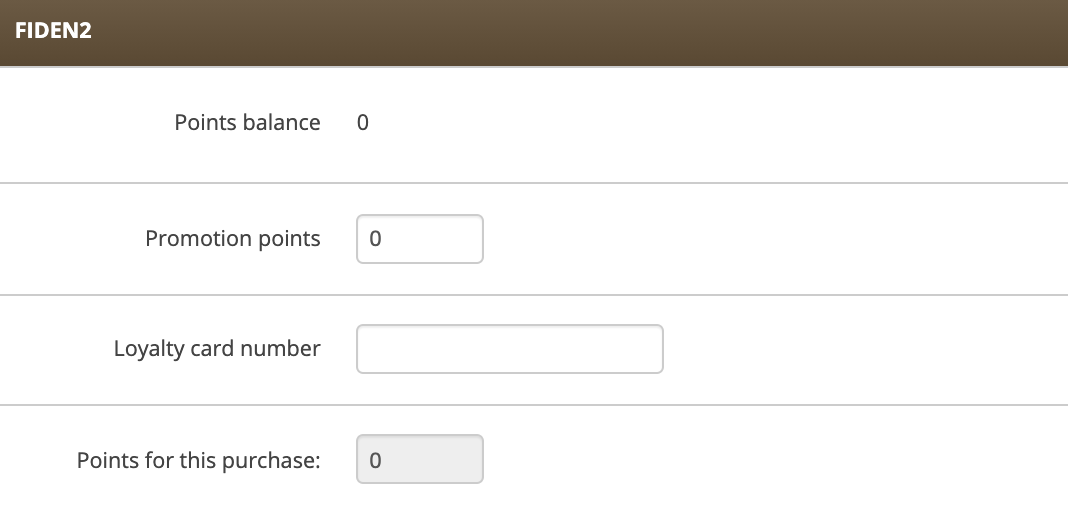 |
| *FIDEN2 tab in section Beauty Advisor> New Order* |
| 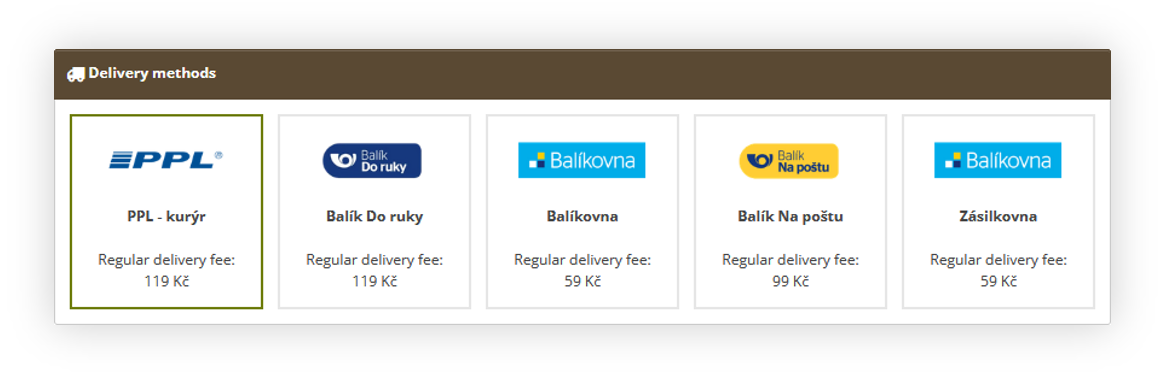 |
| *Delivery method tab visualization* |
| 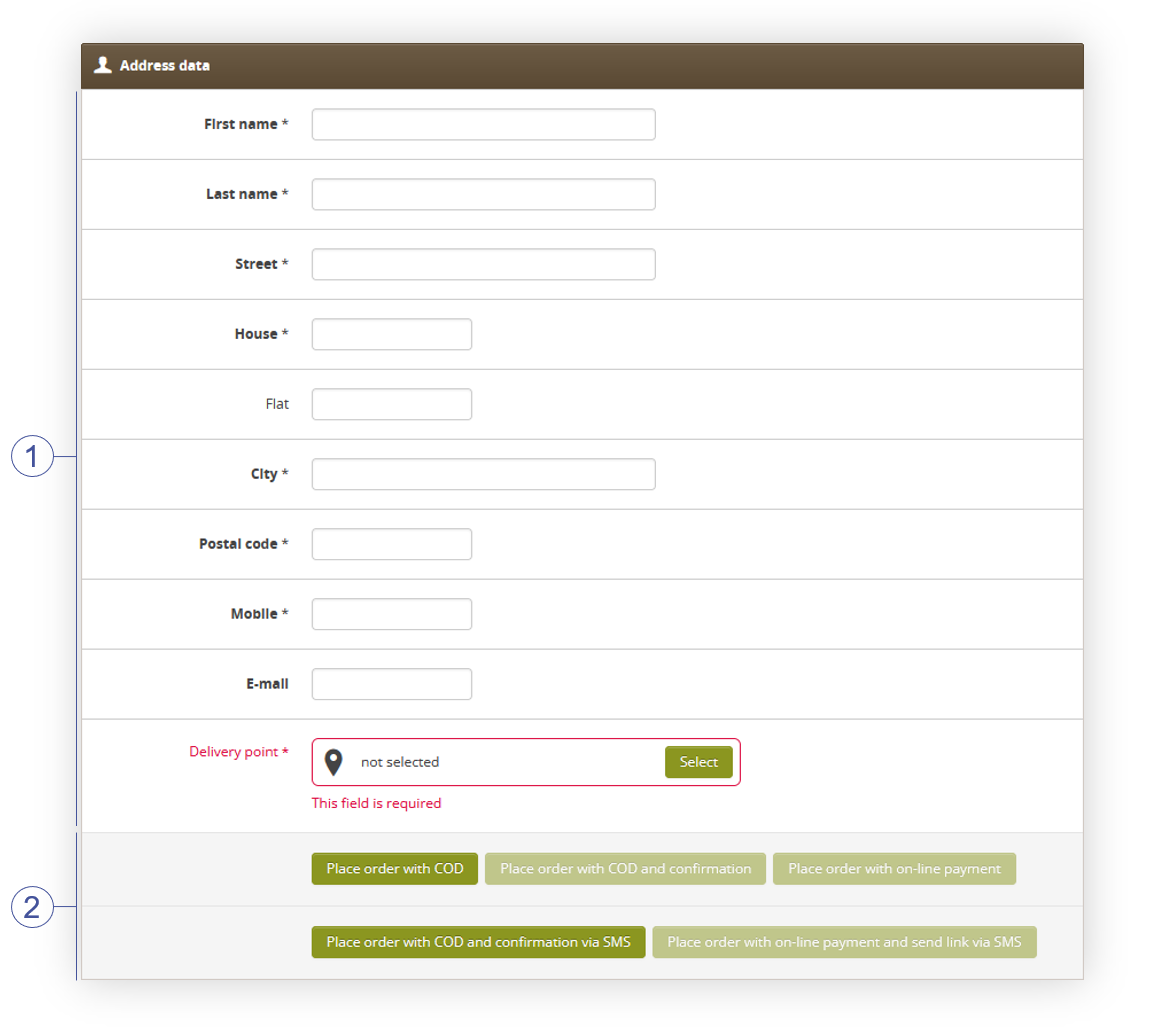 |
| *Address data tab in section Beauty Advisor> New order* |
| 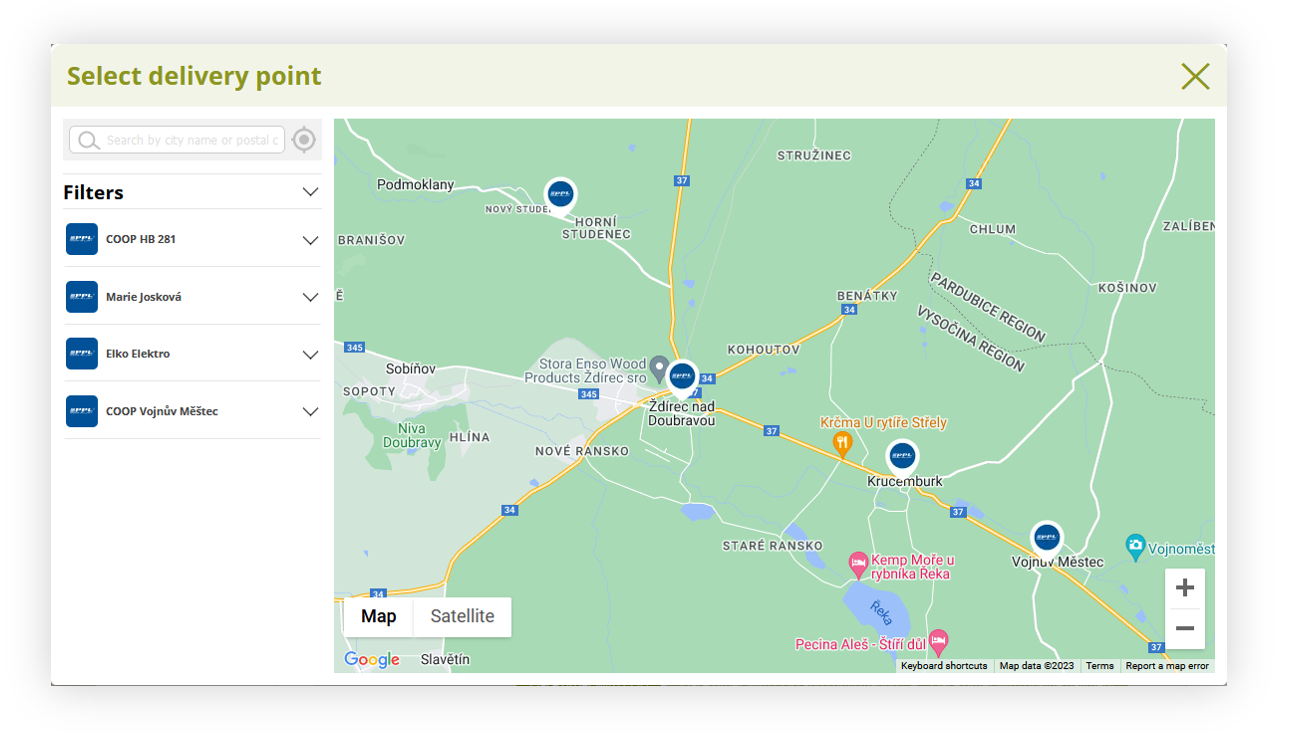 |
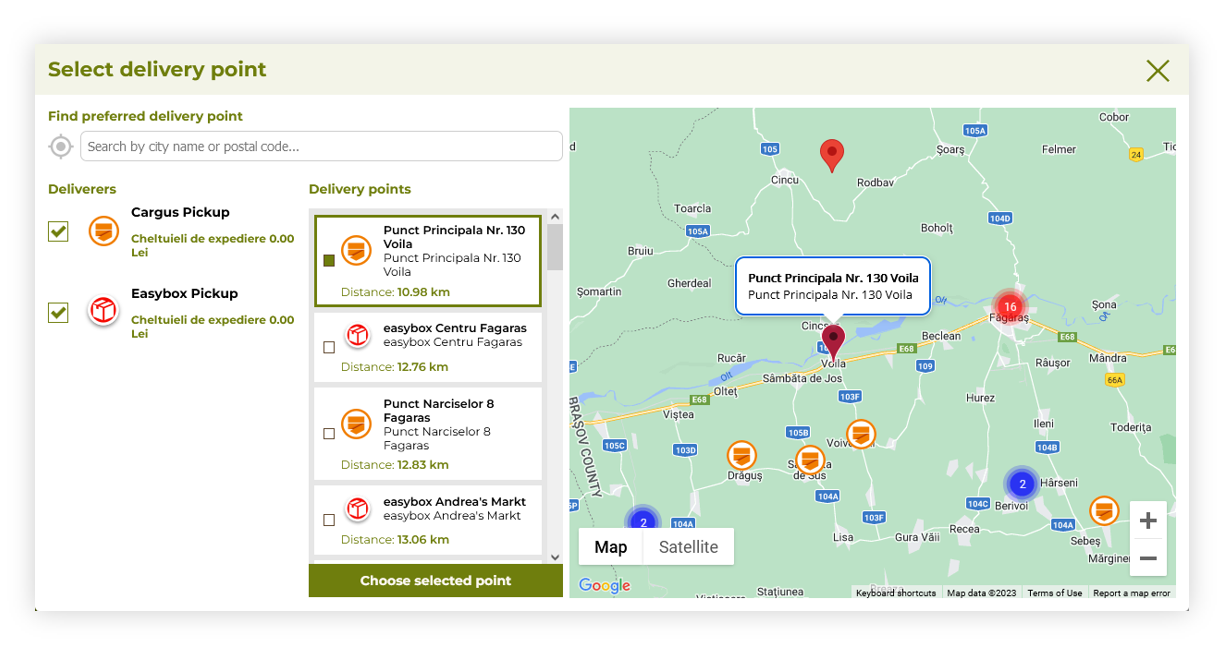
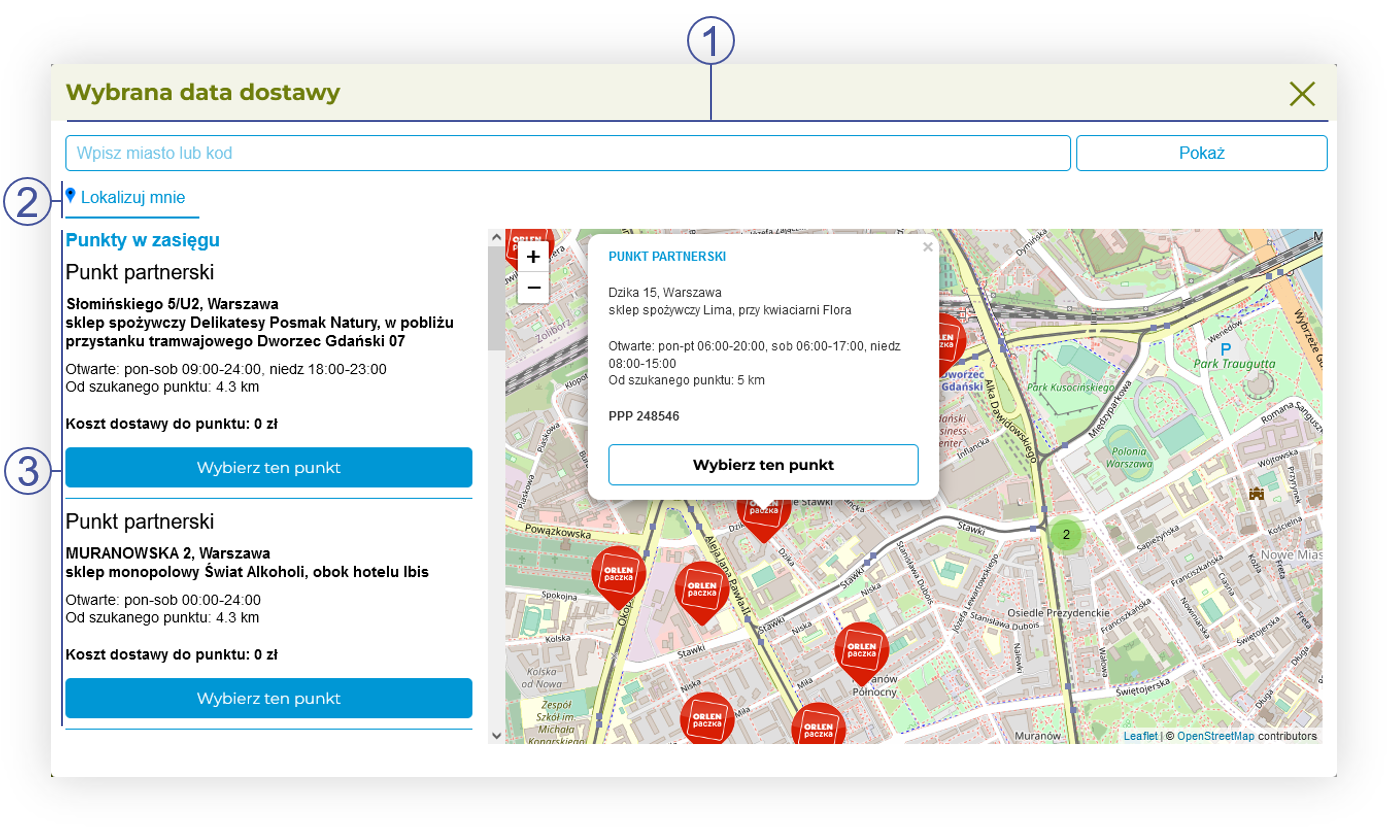
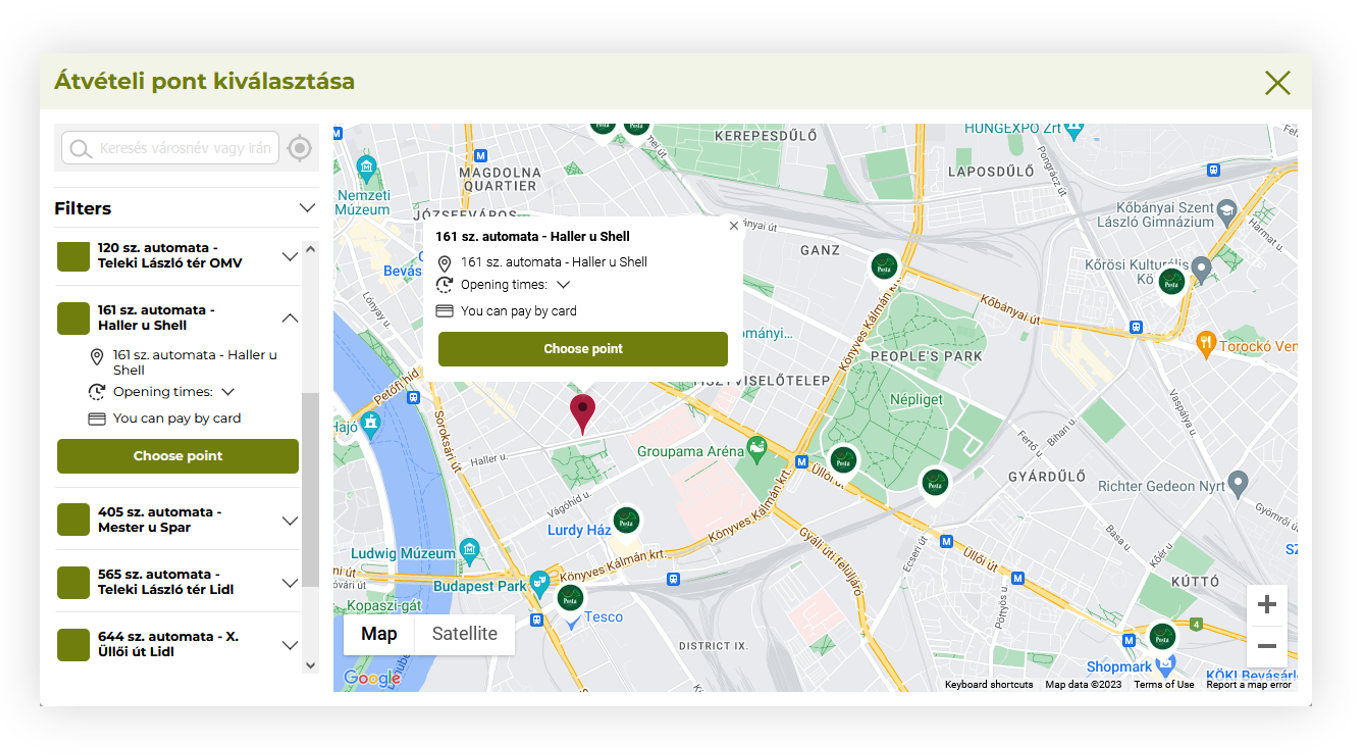
| Visualization of the delivery point map |
| 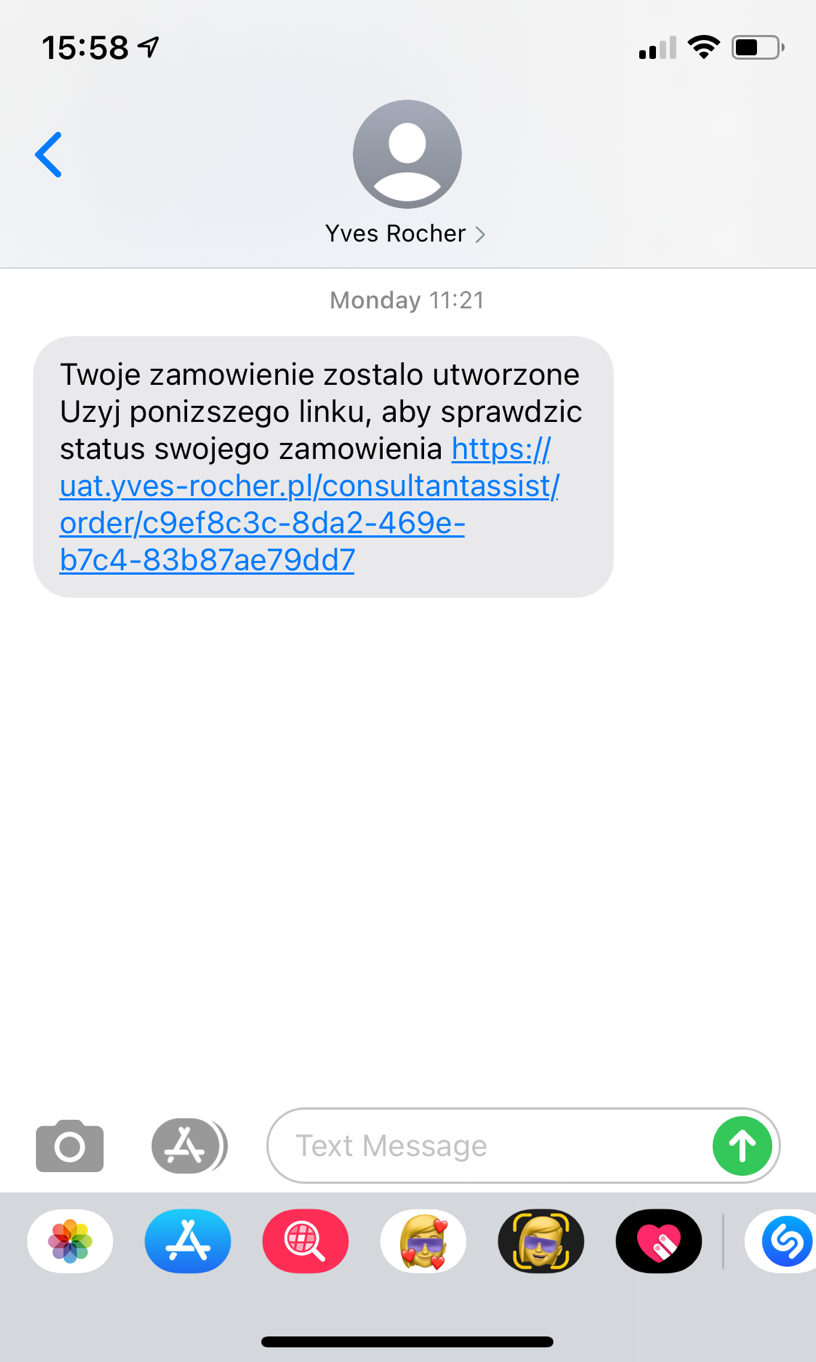 |
| *SMS message with the option to confirm the order* |
| 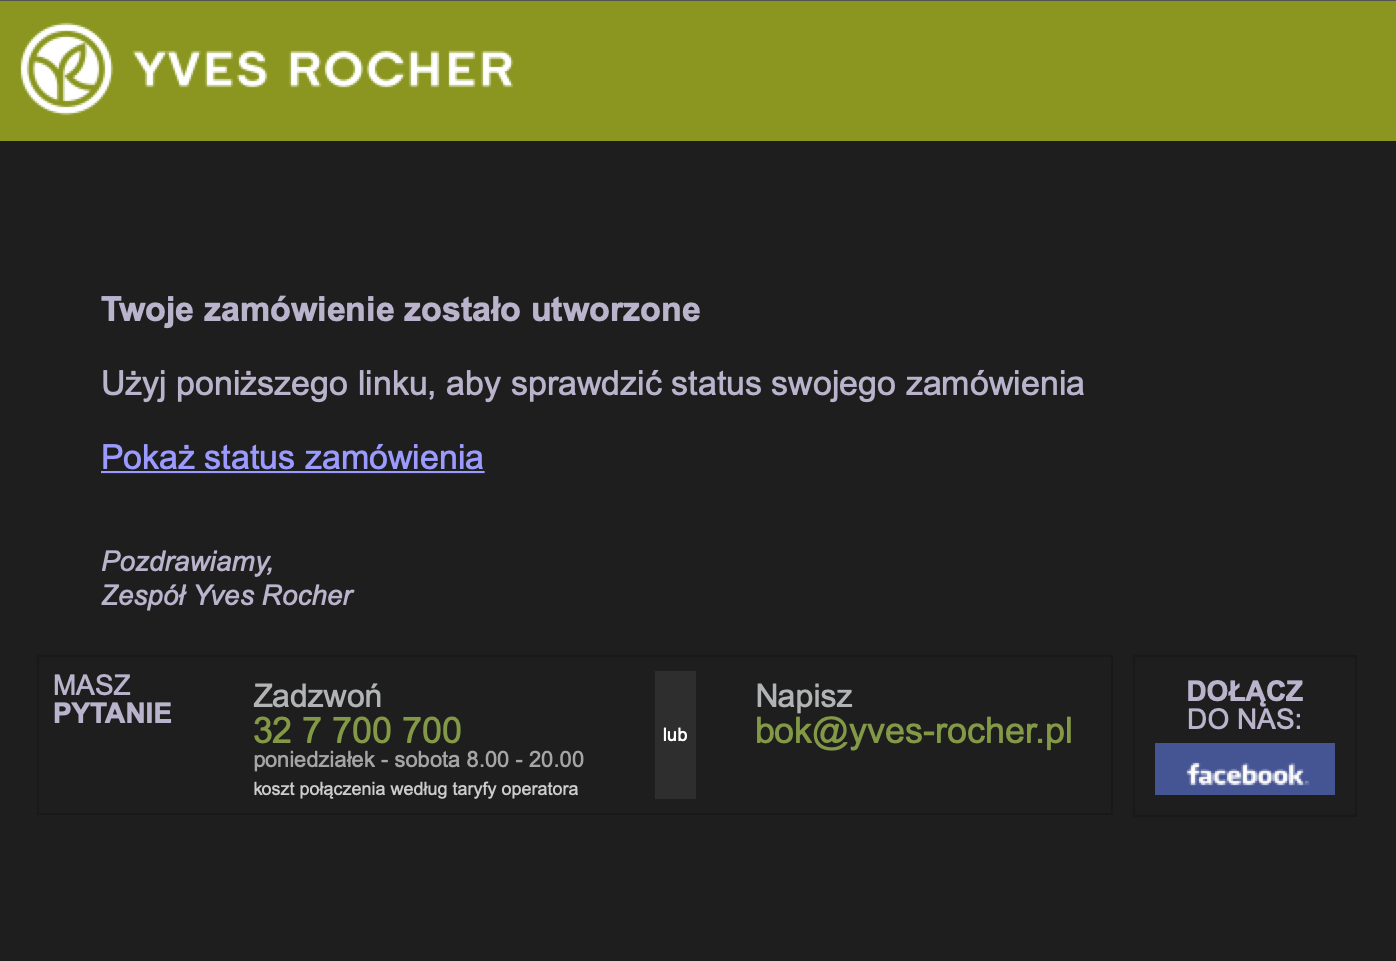 |
| *E-mail confirming the submitted order* |
| 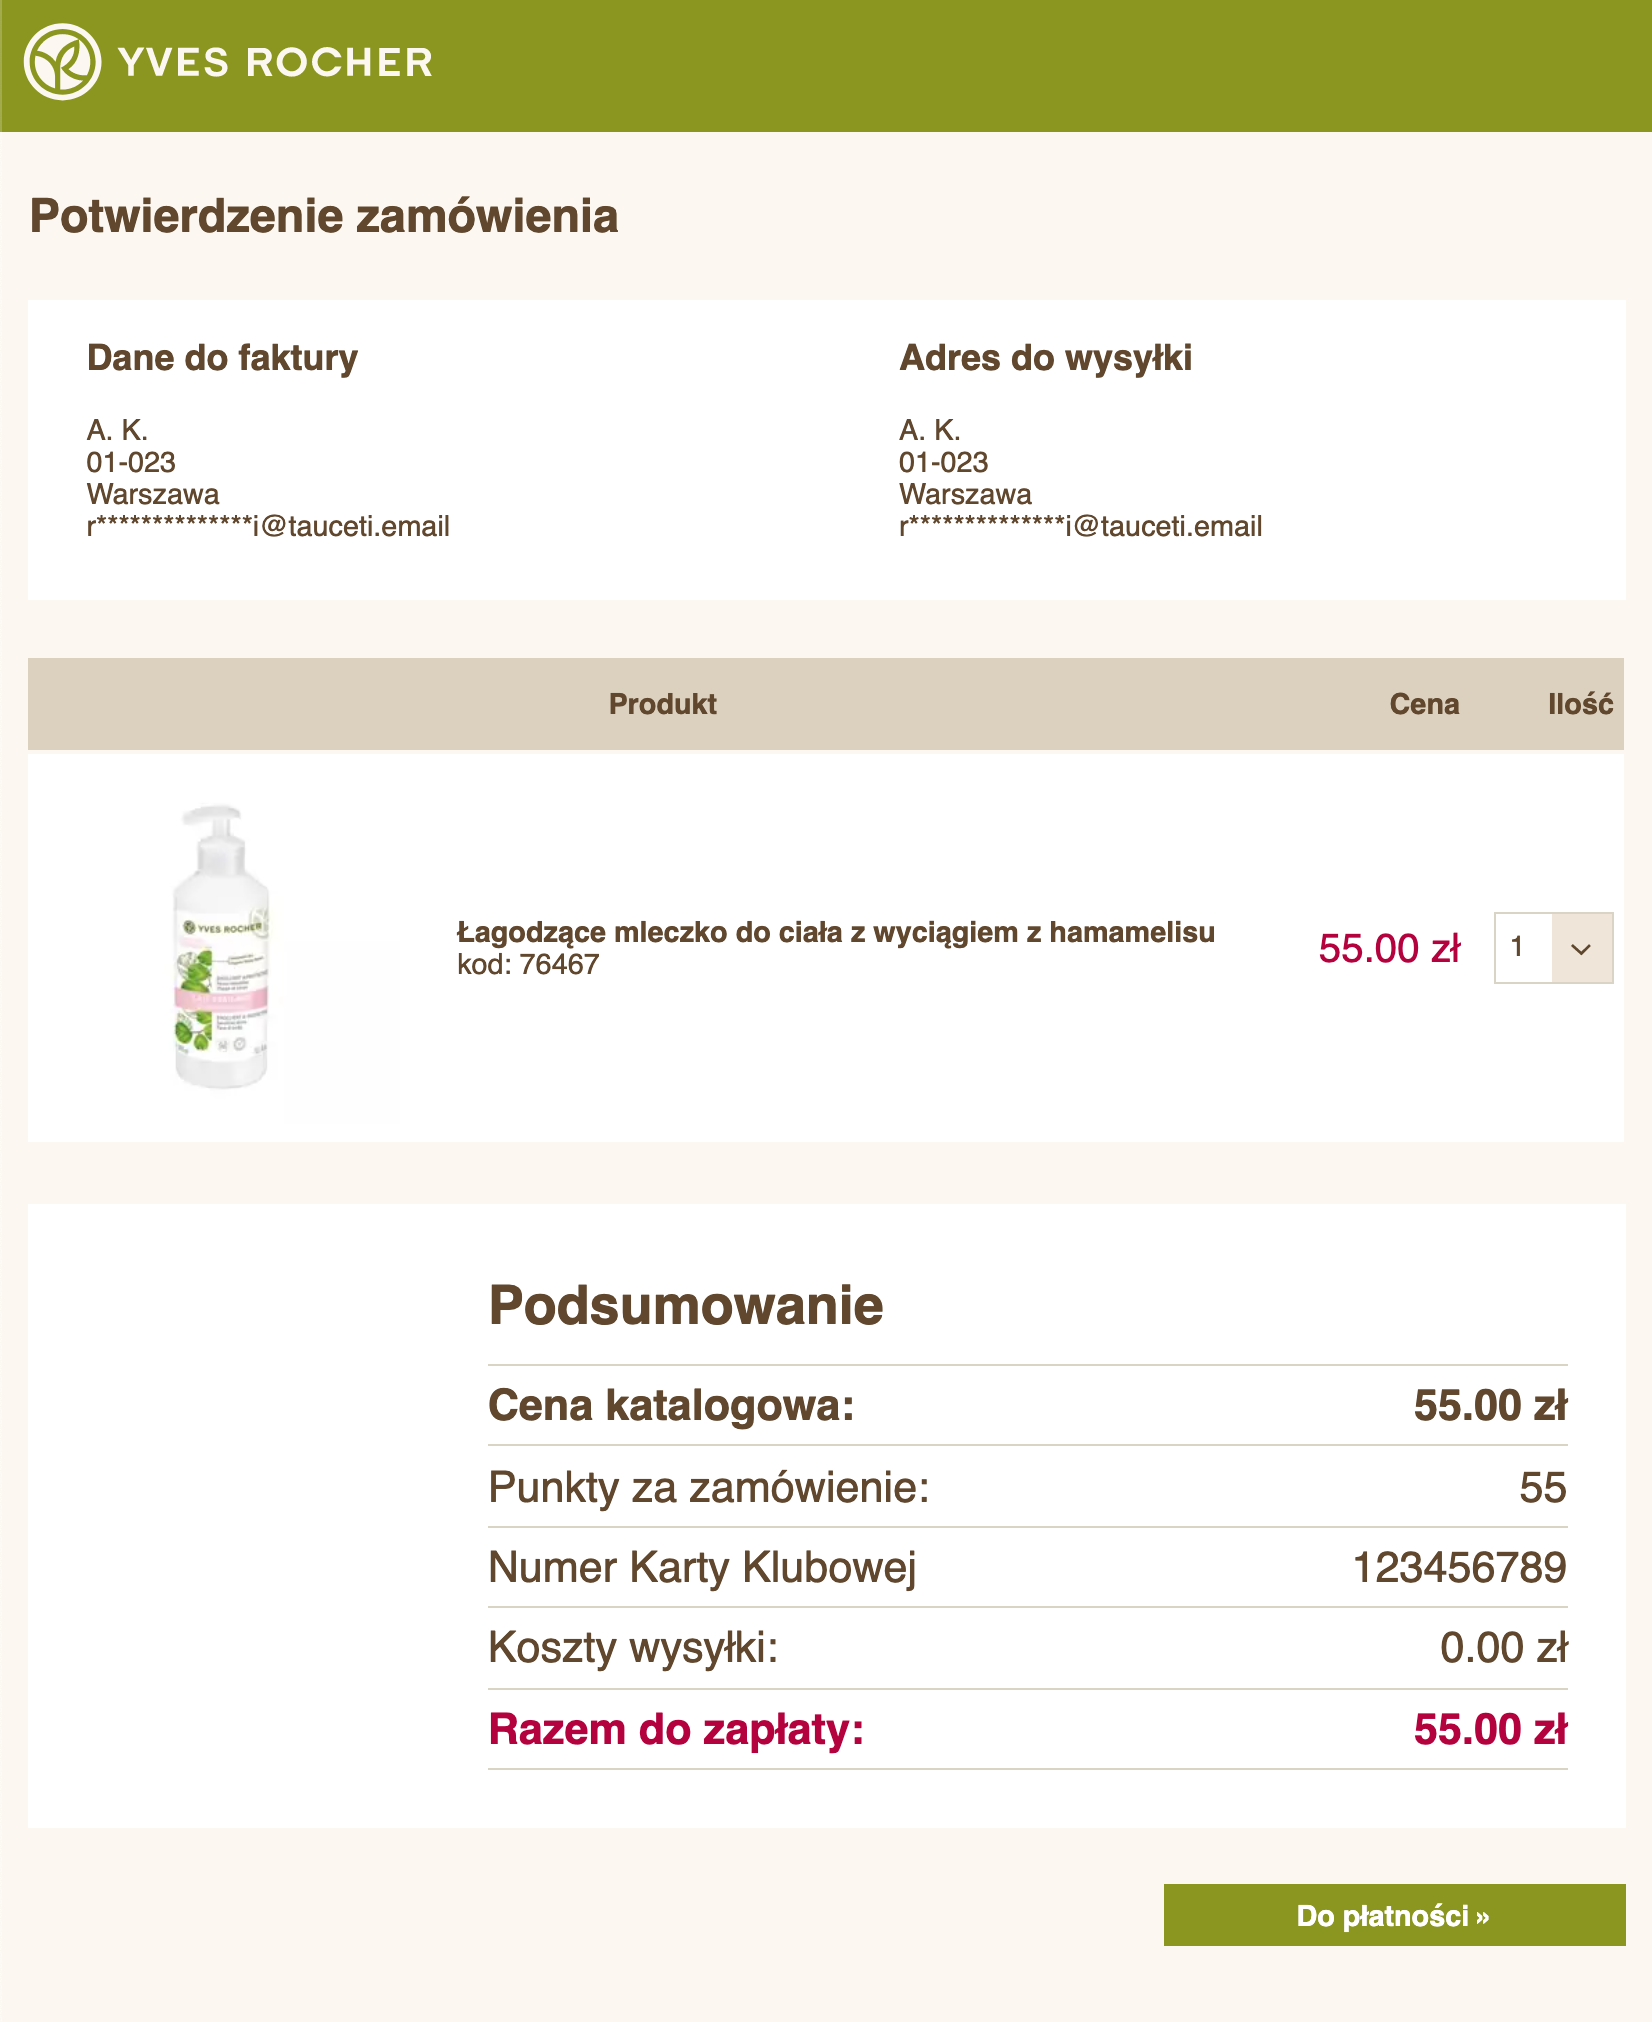 |
| *Order summary page* |
|  |
| *The Consumer Details tab in section Beauty Advisor> New Order* |
|  |
| *Orders tab in section Beauty Advisor> New order* |
|  |
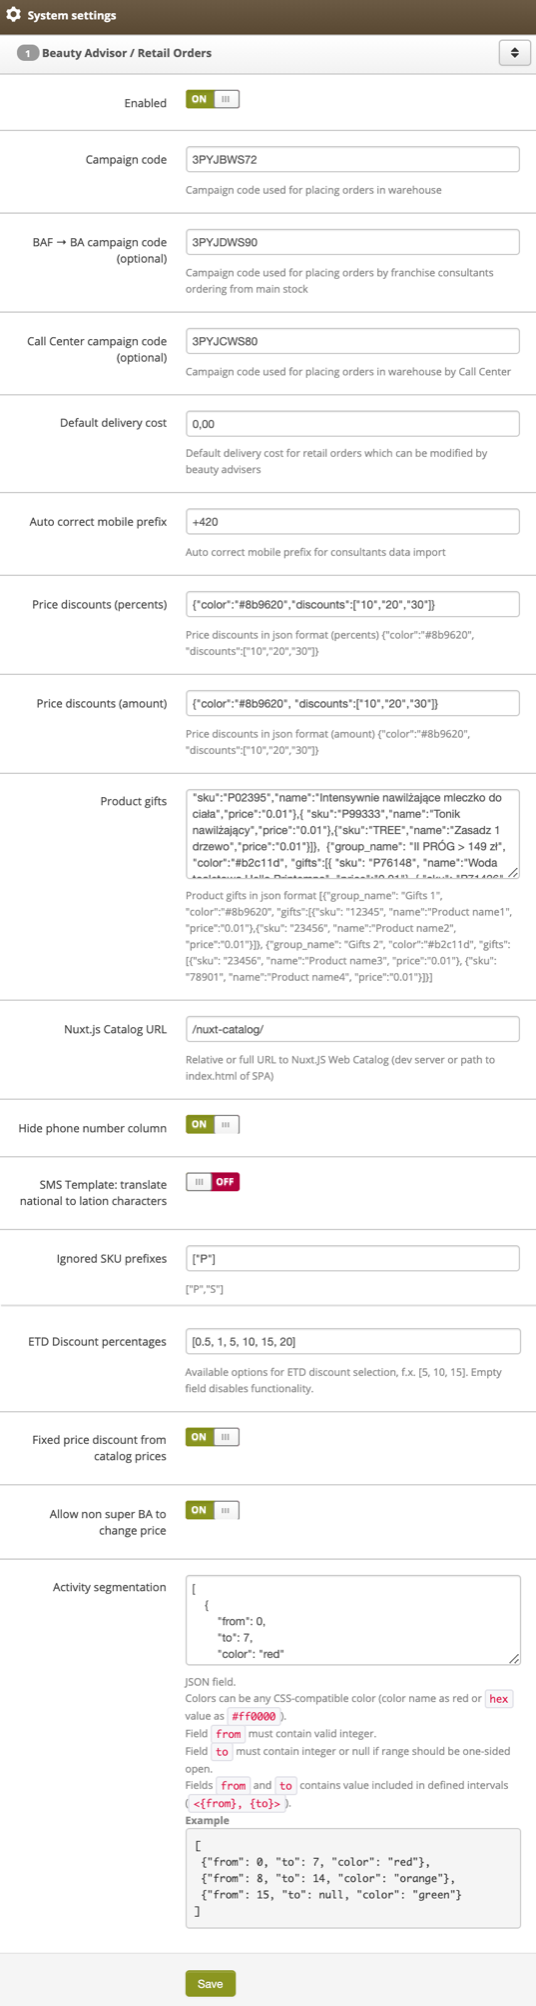
| *The Beauty Advisor / Retail Orders Activity tab in the section System / Settings of the module Beauty Advisor* |
| 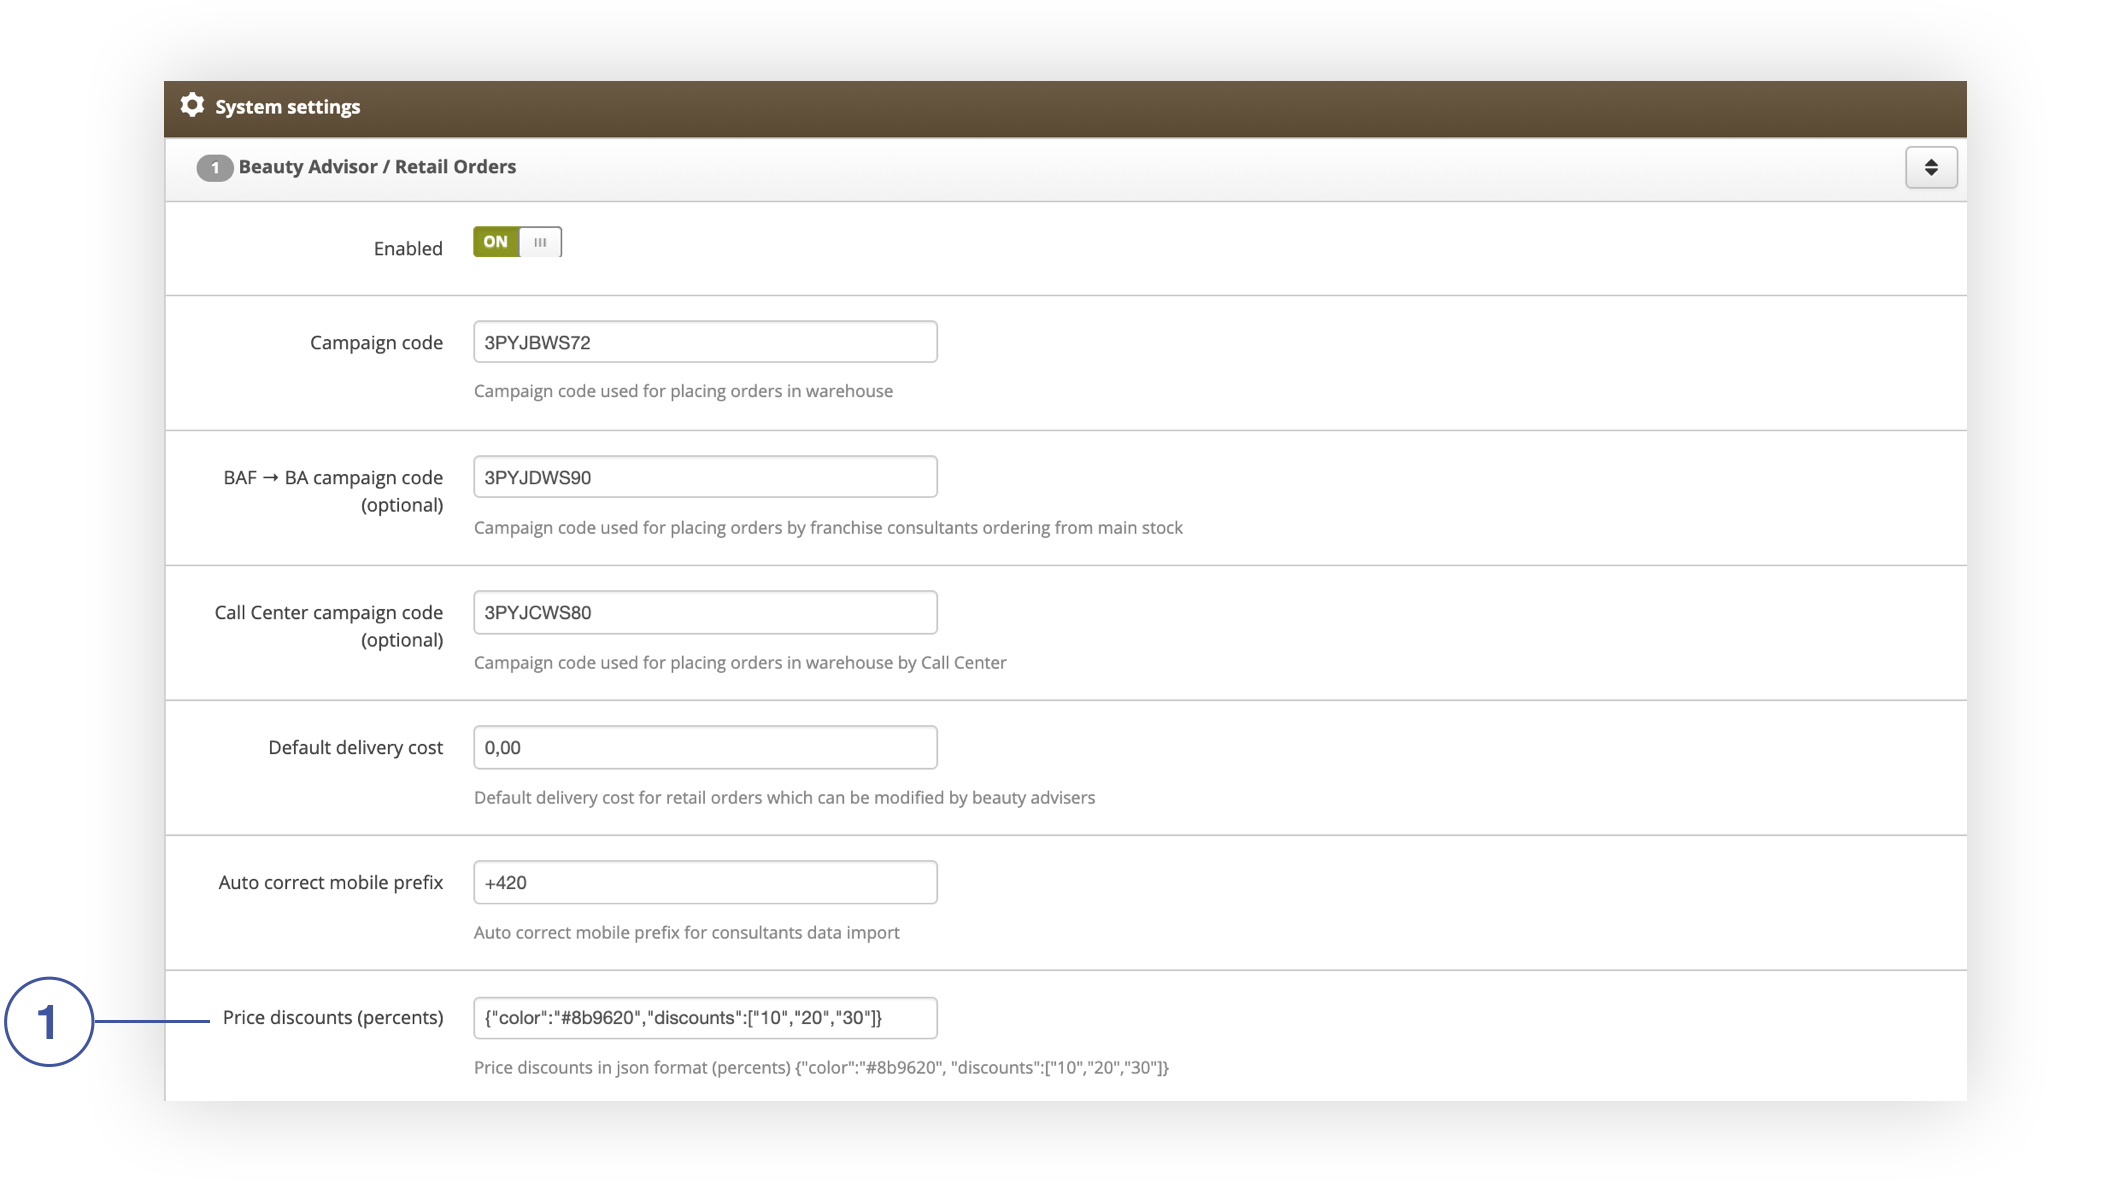 |
| *Price discounts (percentage) field in the Beauty Advisor / Retail Orders tab in the System / Settings section* |
|  |
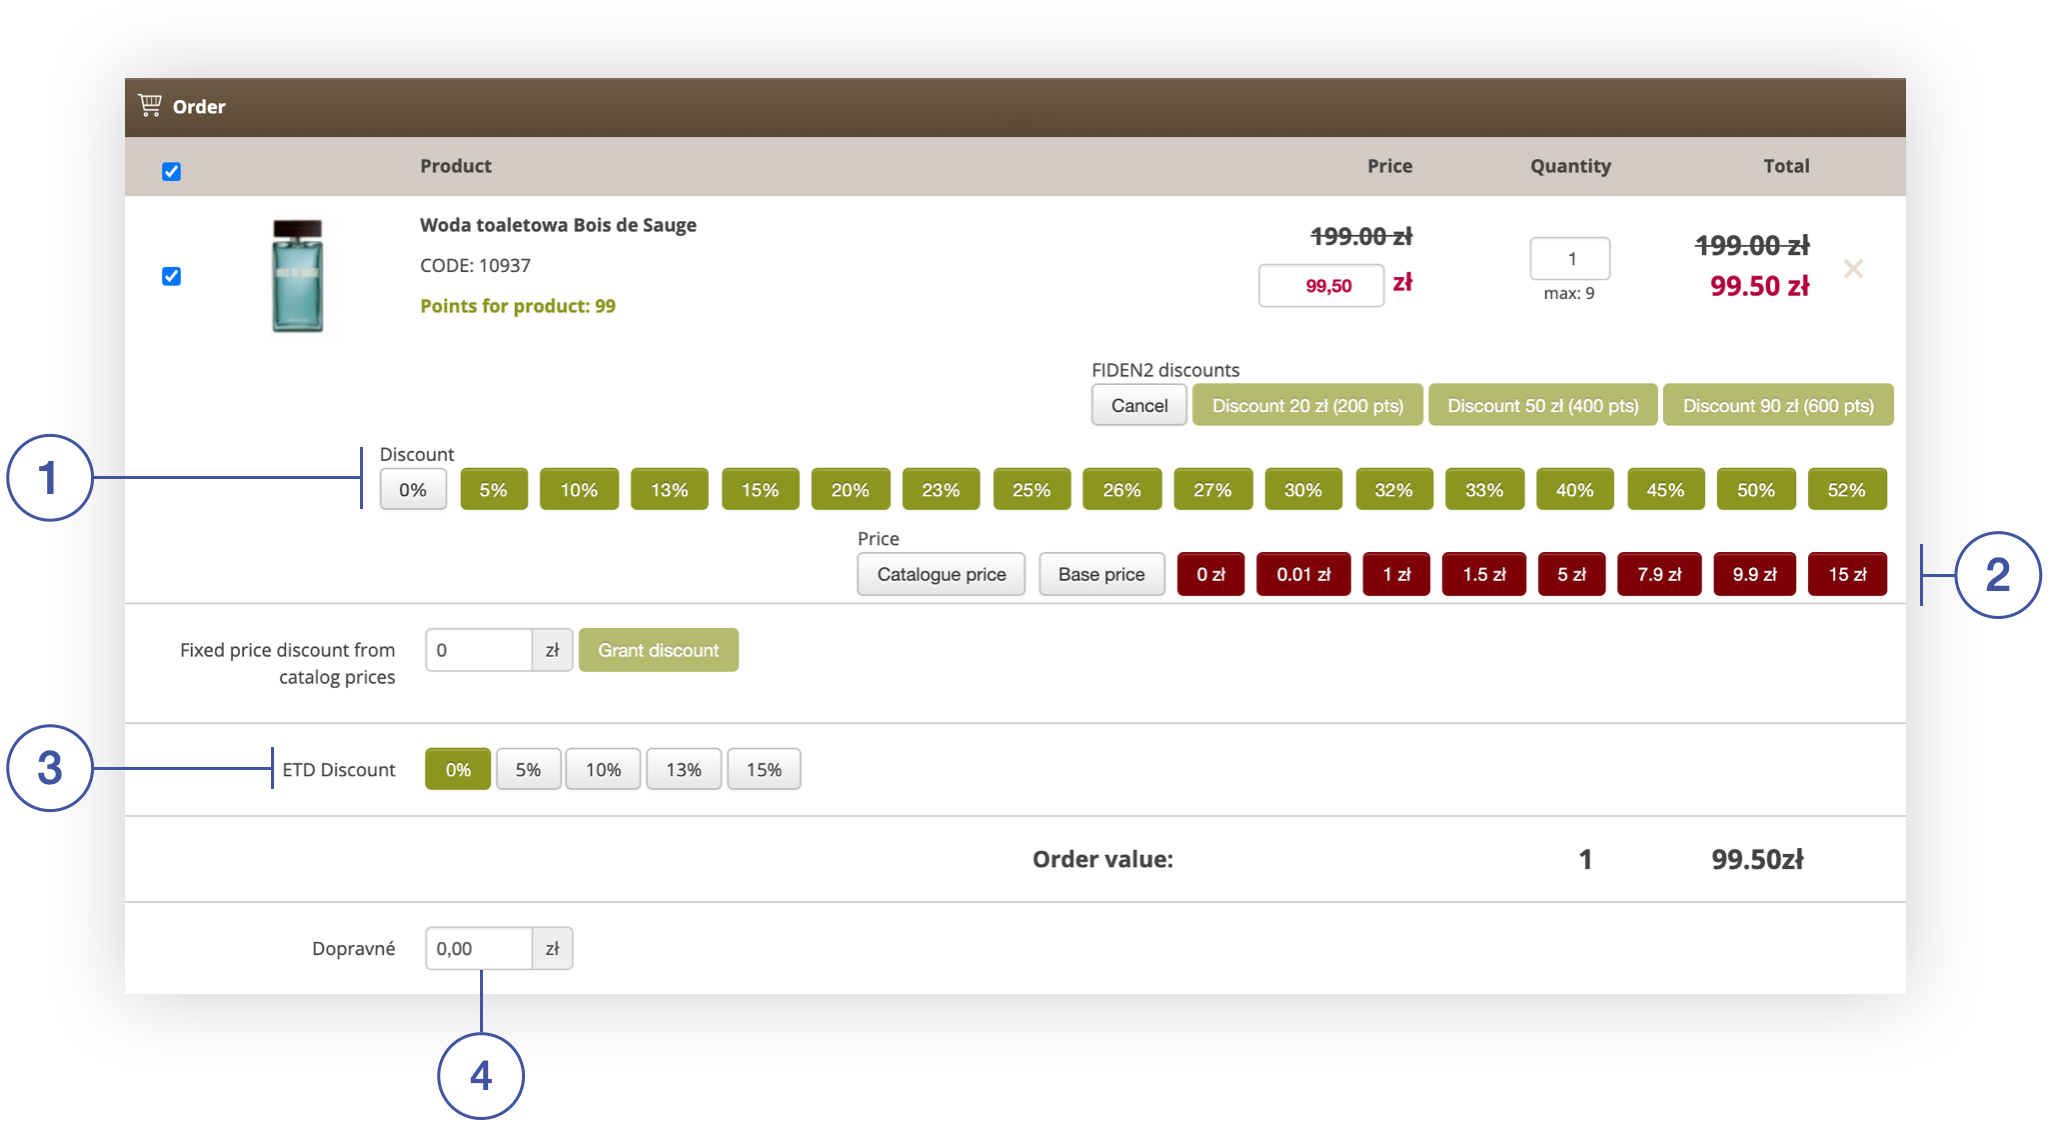
| *Buttons assigned to the Discount parameter in the Order tab* |
| 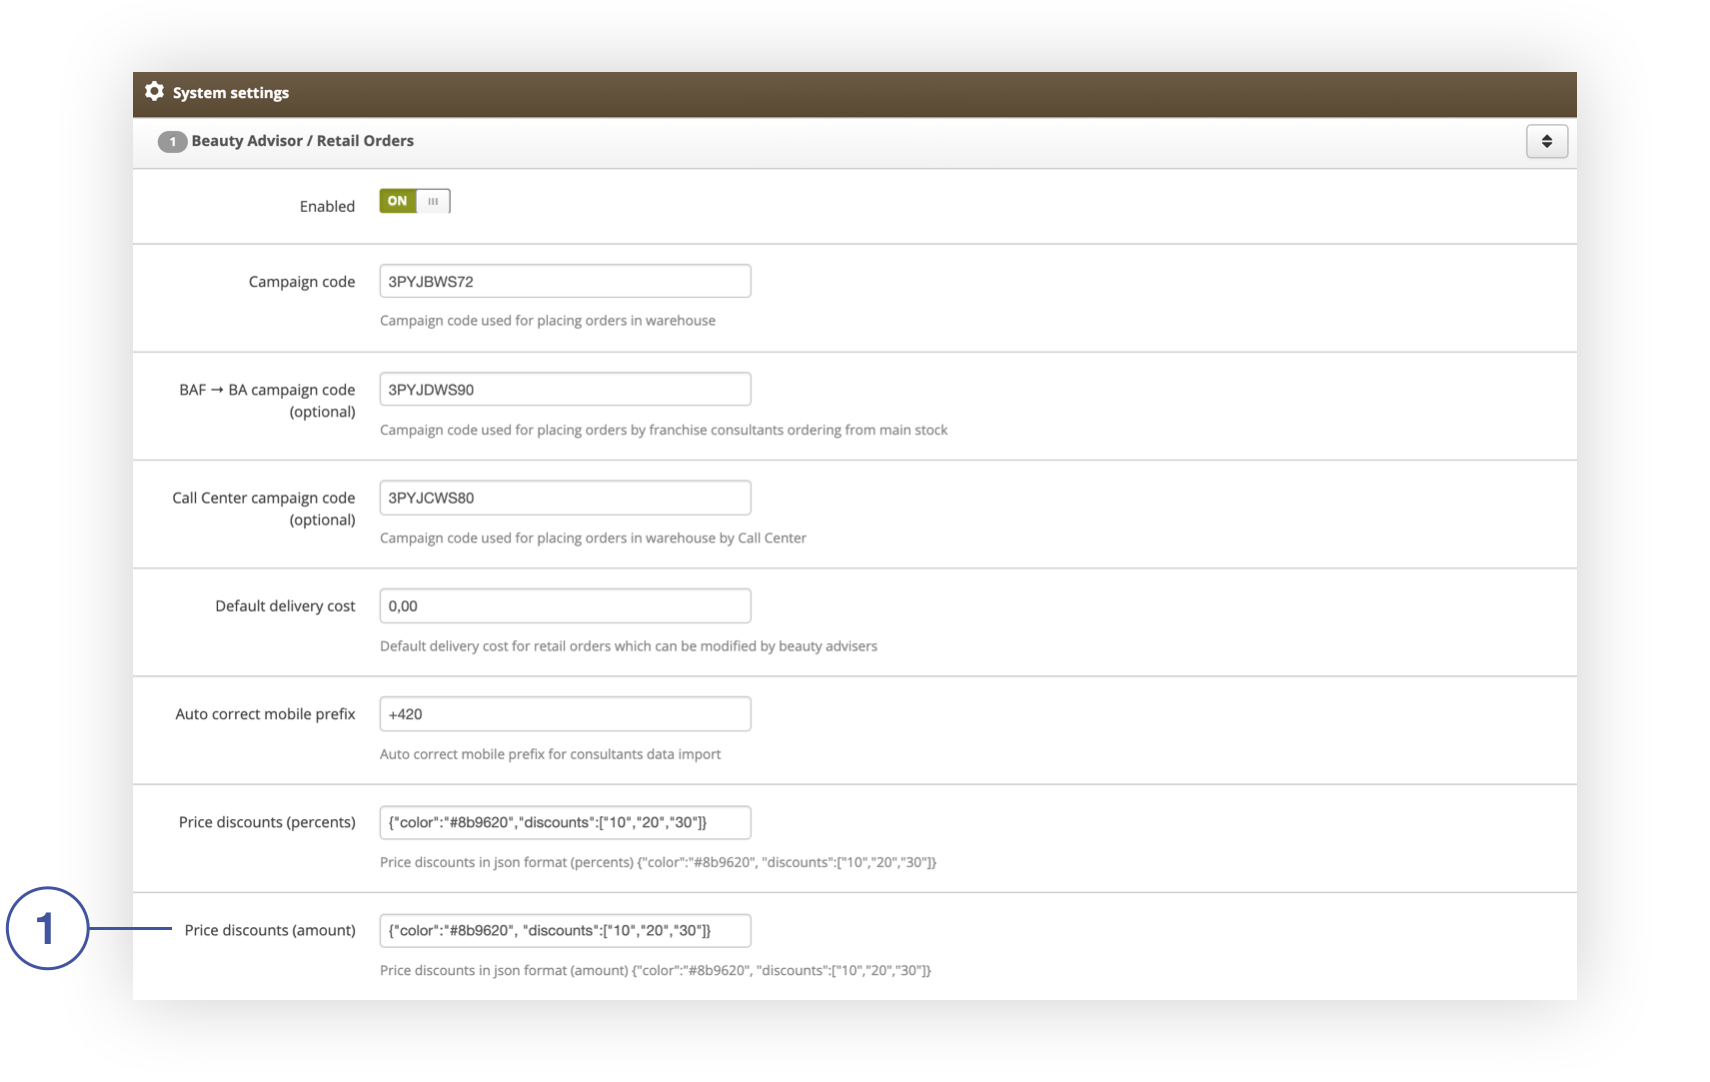 |
| *The Price discounts (amount) field in the Beauty Advisor / Retail Orders tab in the System / Settings section* |
|  |
| *The ETD Discount percentages field in the Beauty Advisor / Retail Orders tab in the System / Settings section* |
|  |
| Buttons assigned to the ETD discount parameter in the Order tab |
| 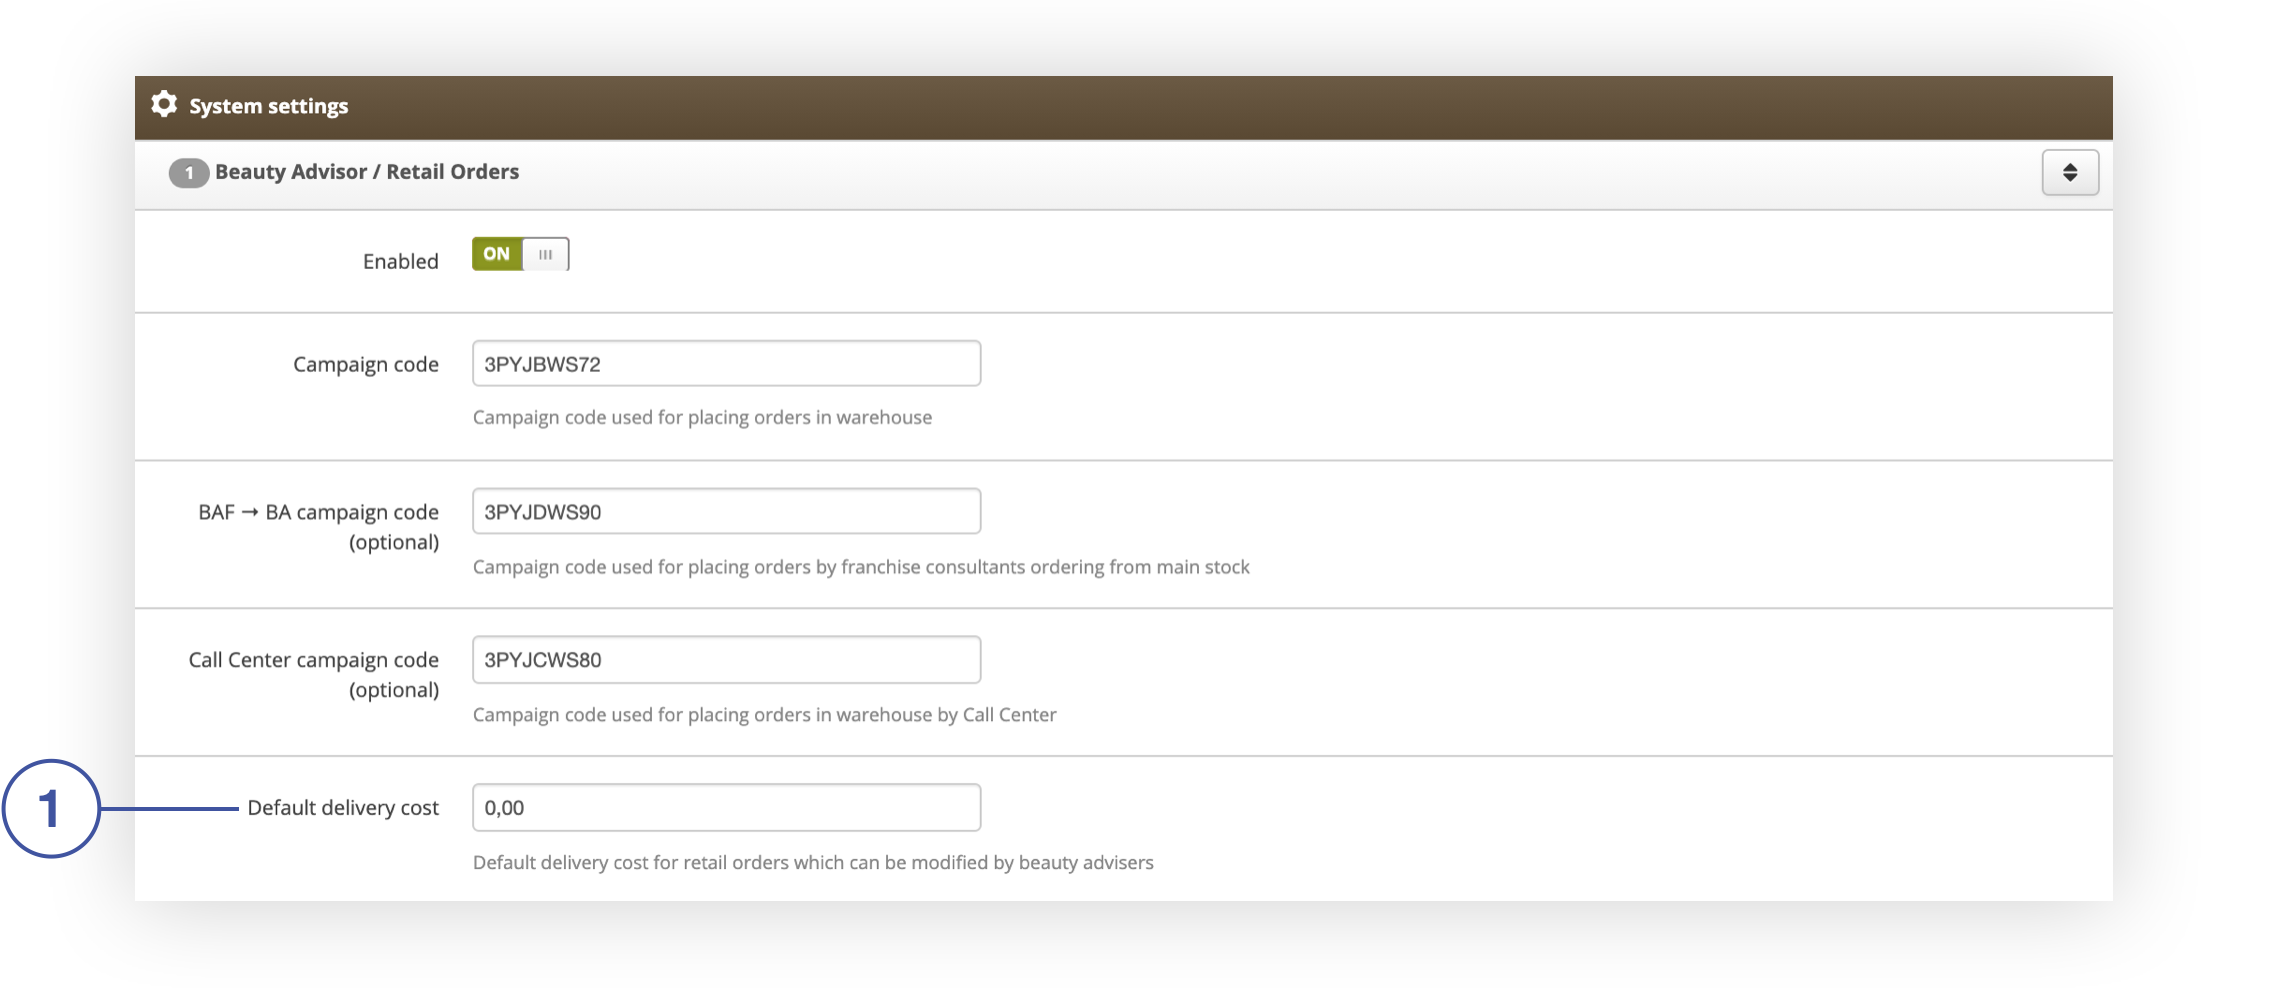 |
| *Default delivery cost field in the Beauty Advisor / Retail Orders tab in the System / settings section* |
|  |
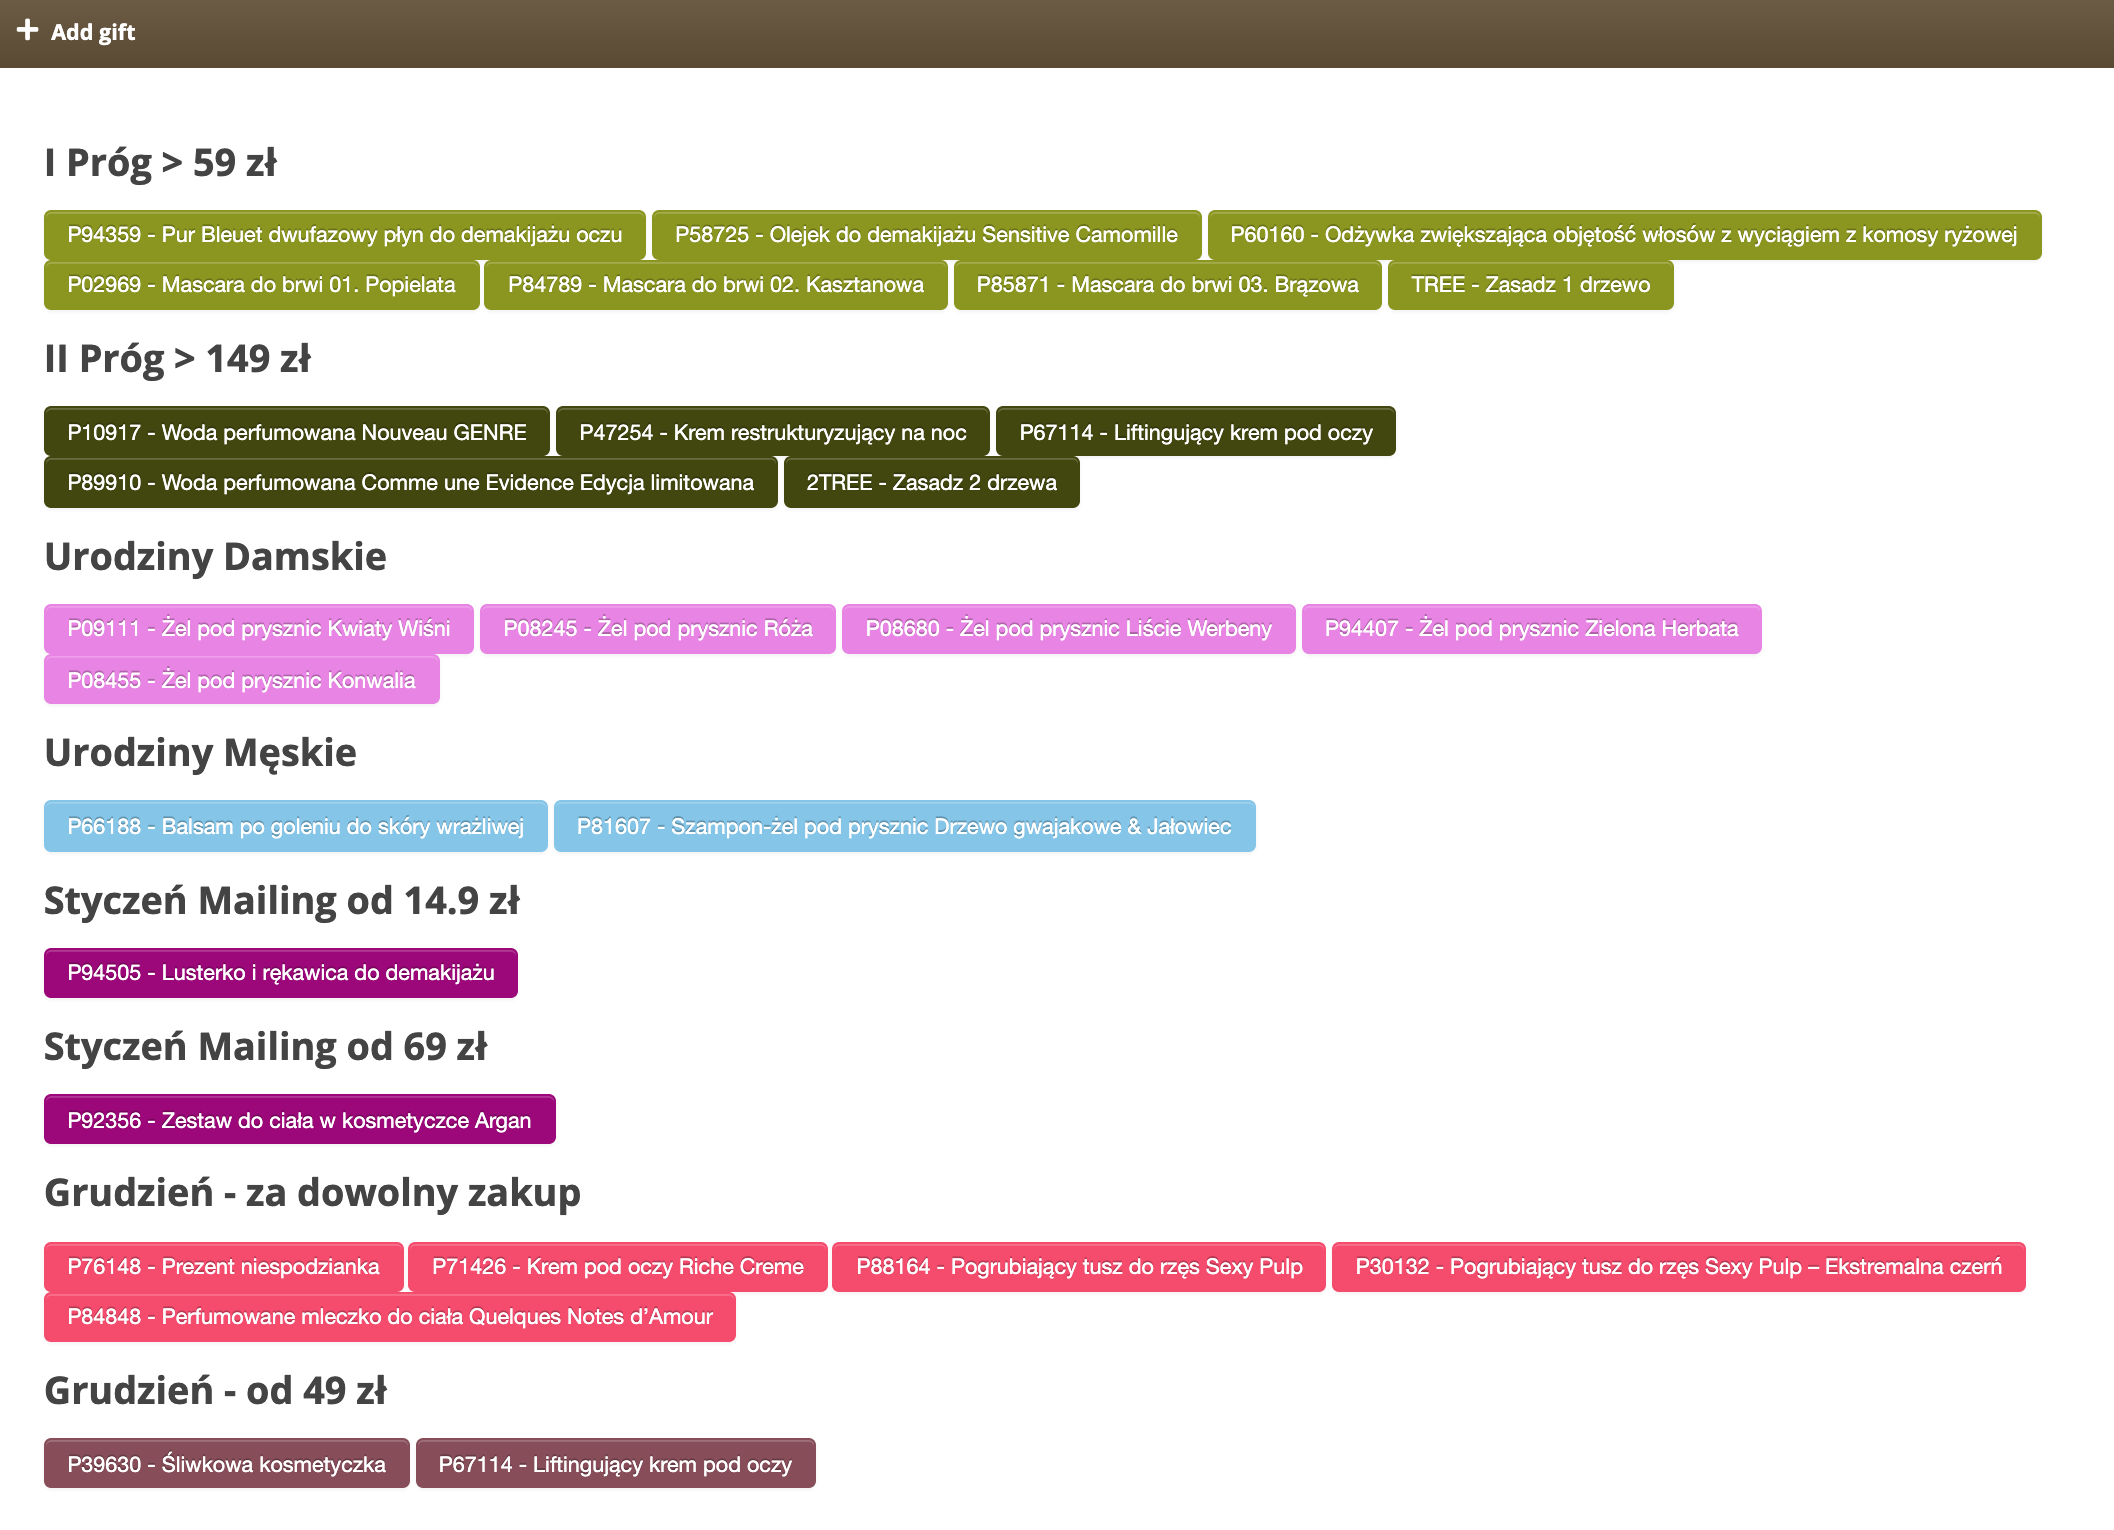
| *Tab + Add gift in section Beauty Advisor> New order* |
| 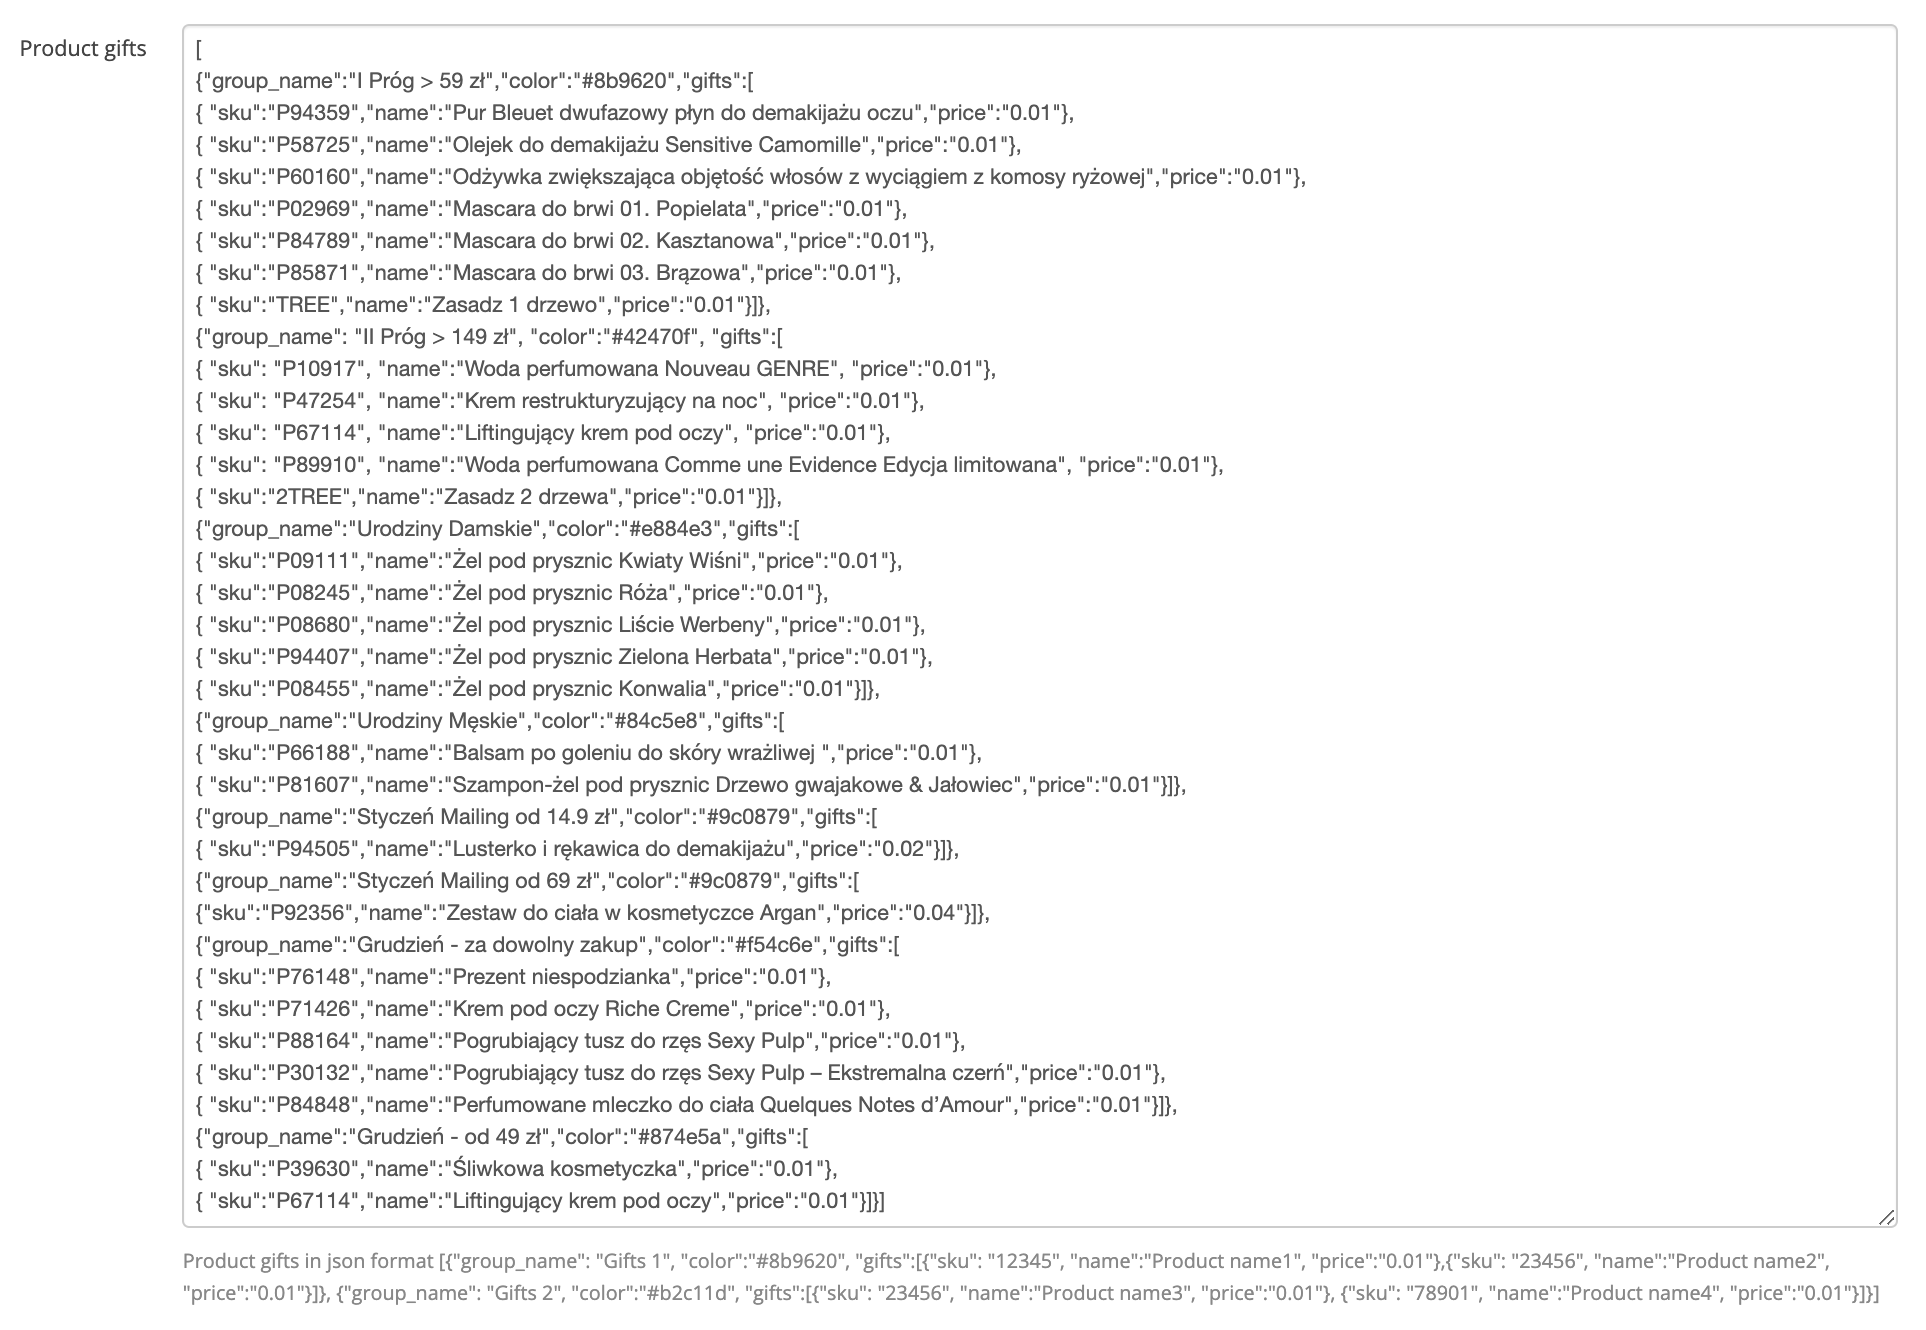 |
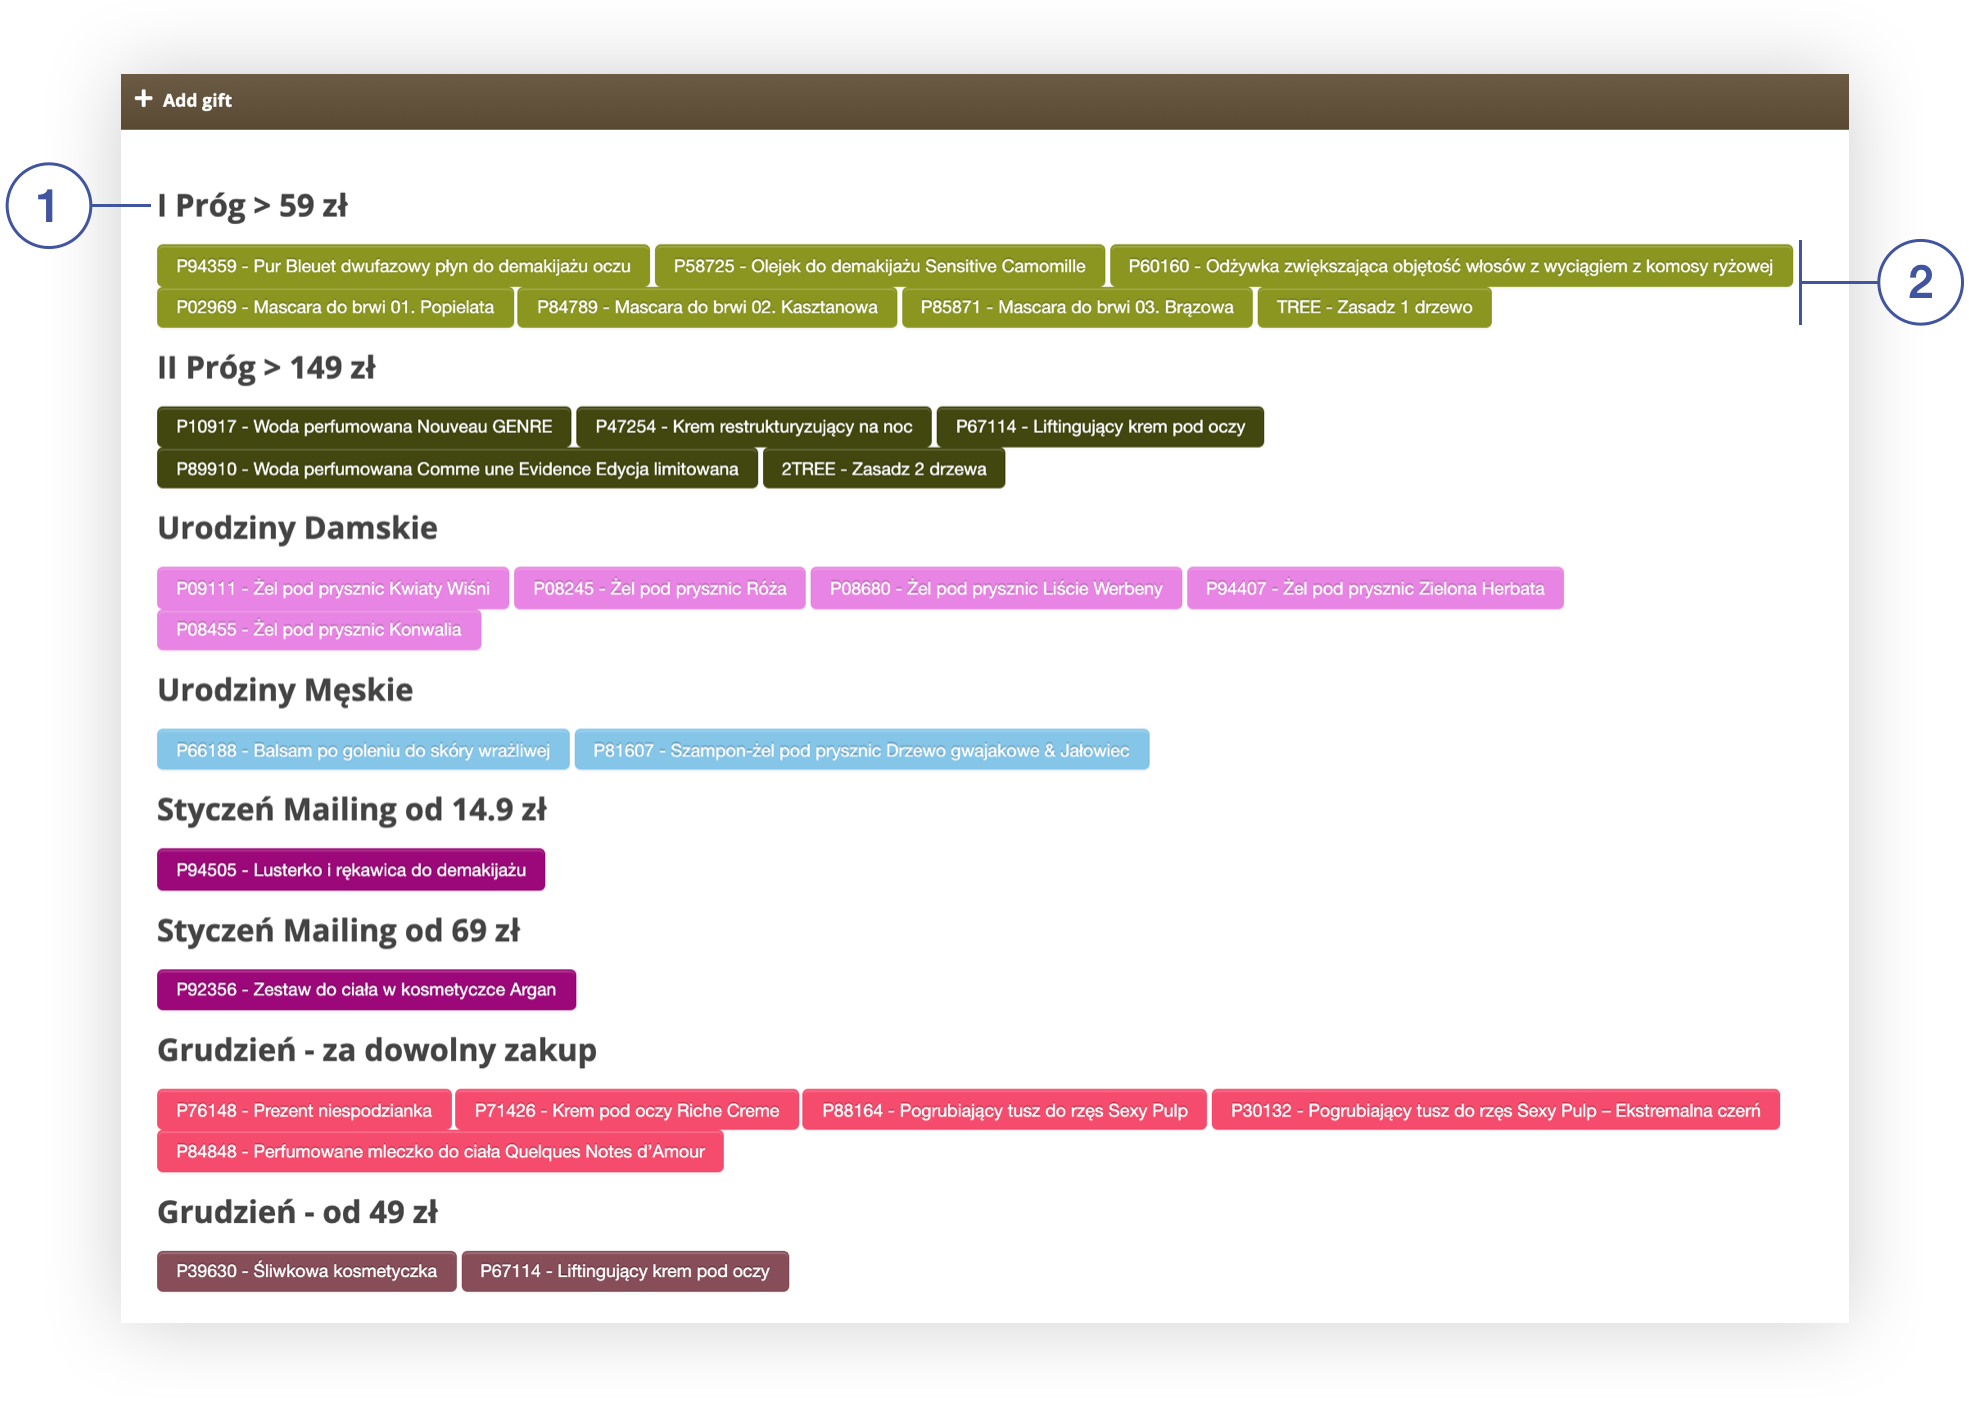
| *The Gifts field in the Beauty Advisor / Retail Orders tab in the System / Settings section* |
|  |
| *The name of the group and the gifts assigned to it in the + Add gift tab* |
| 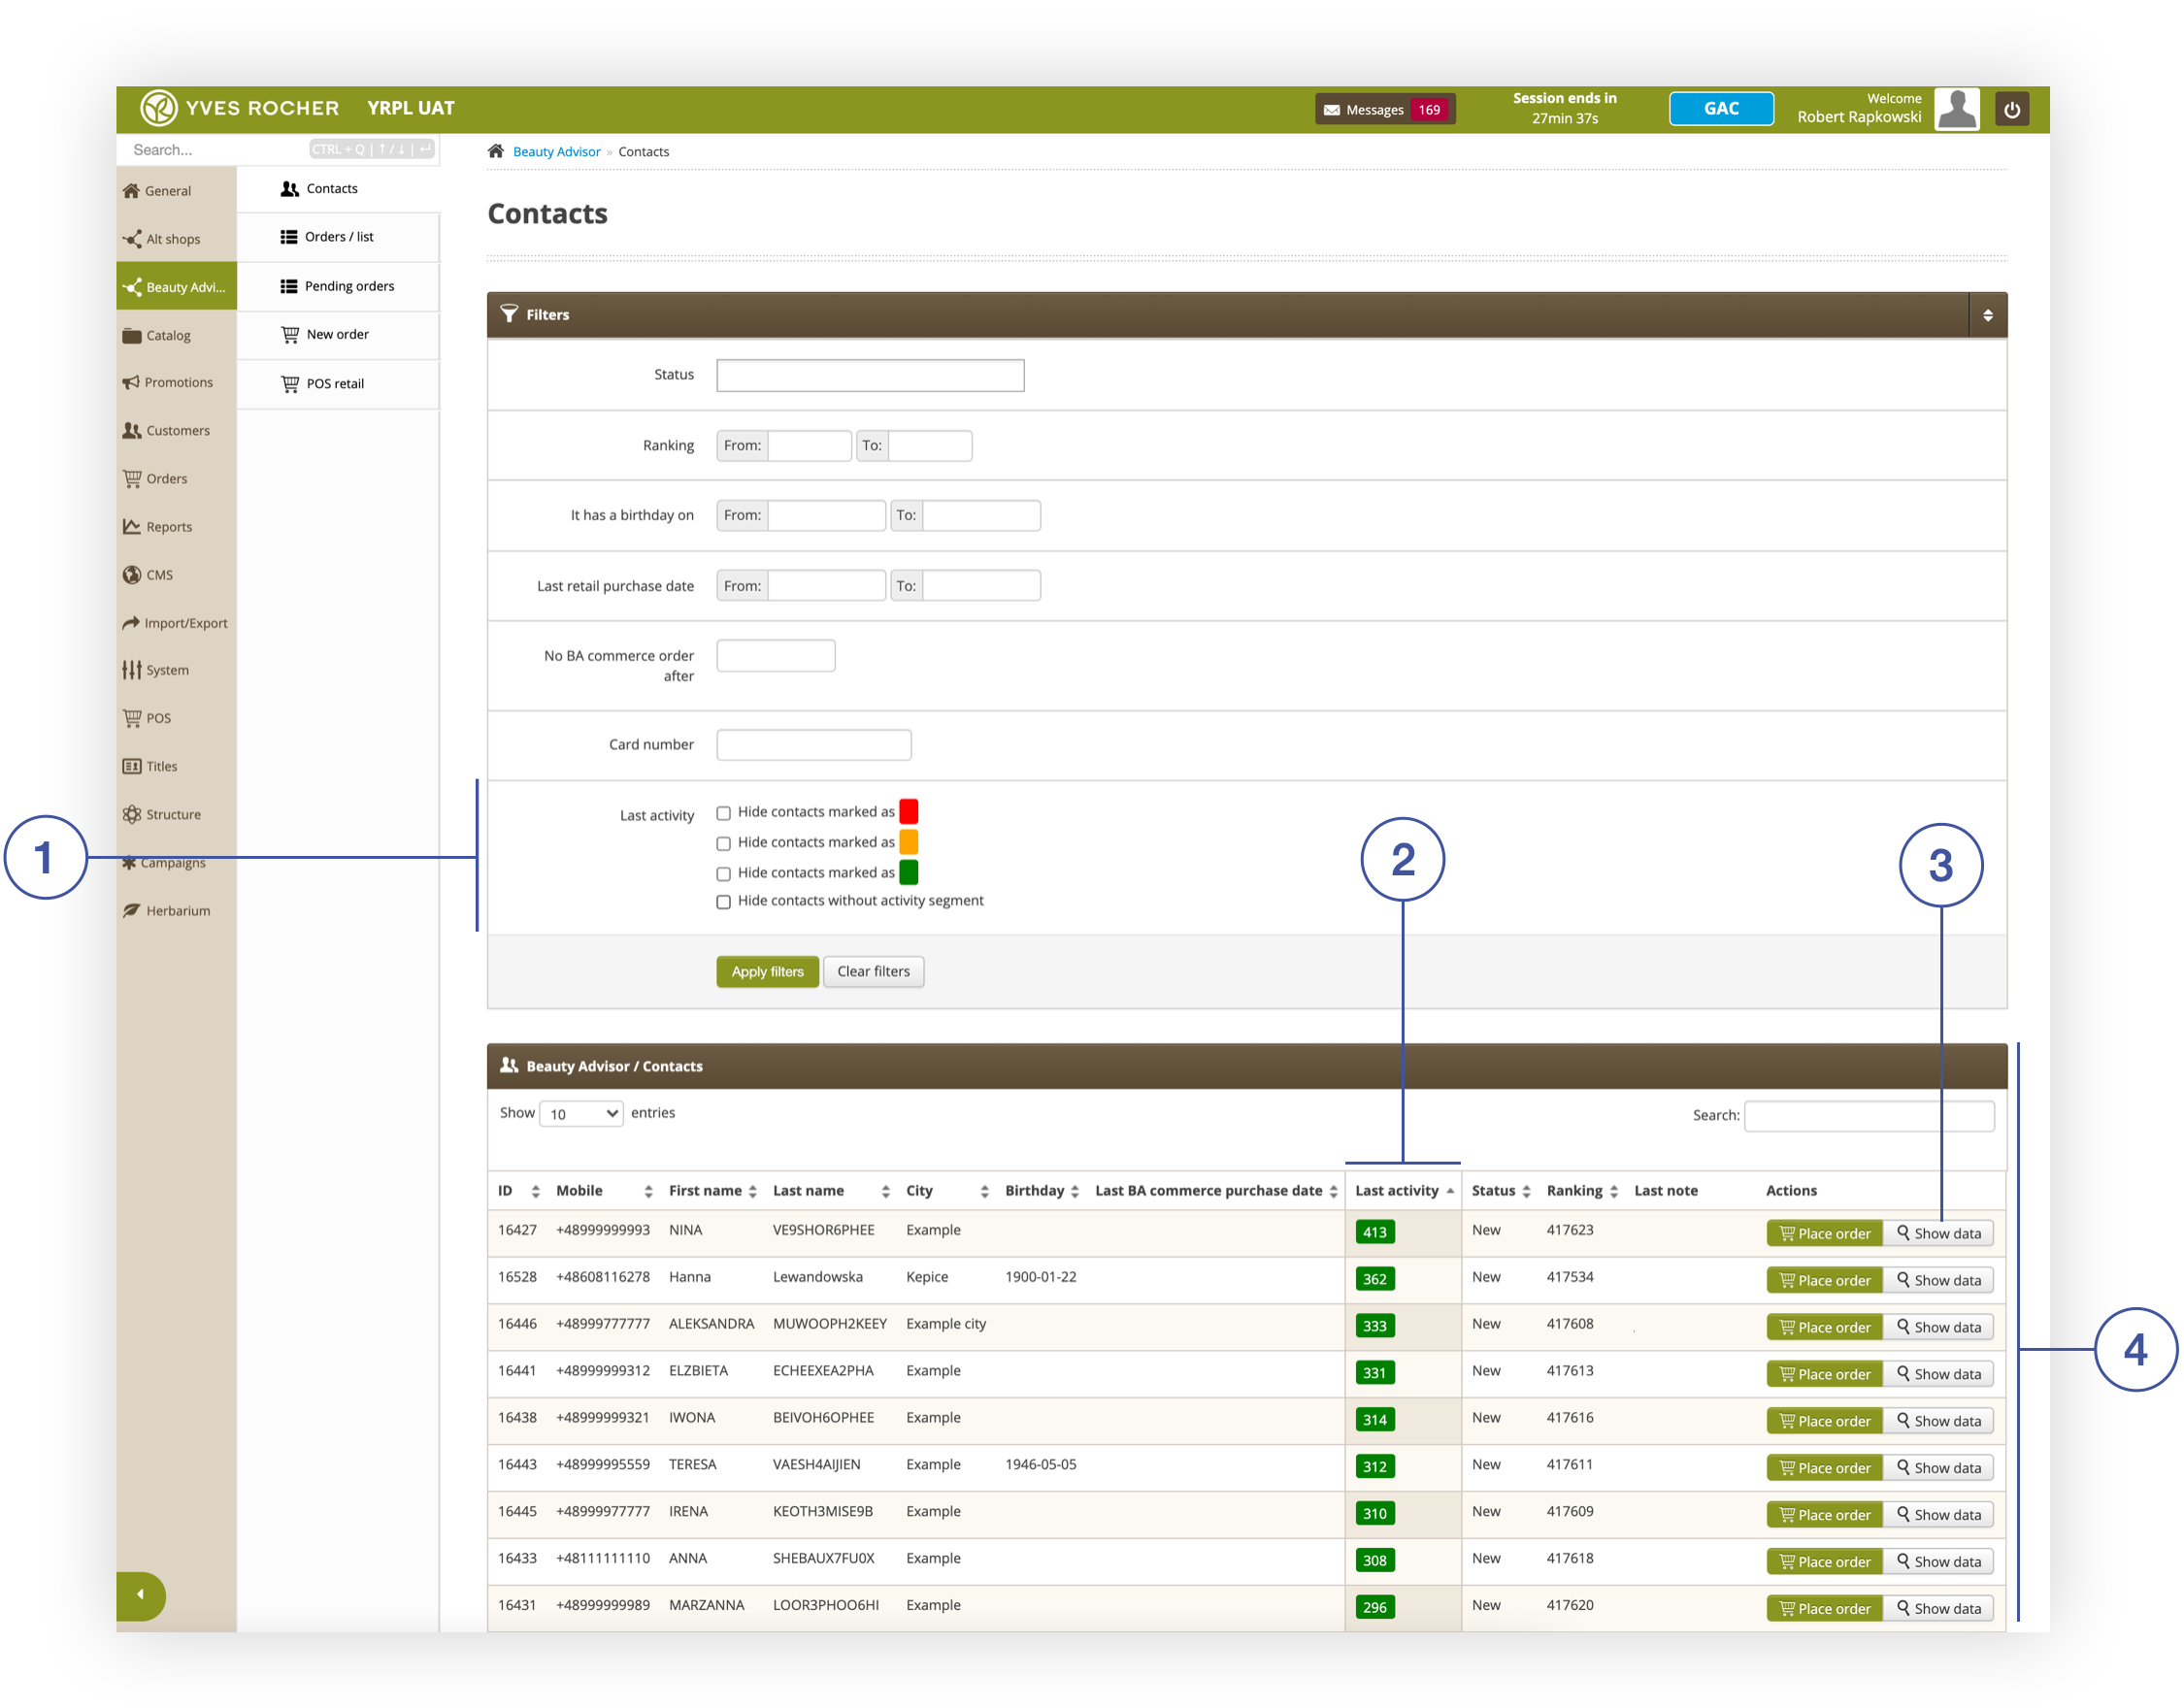 |
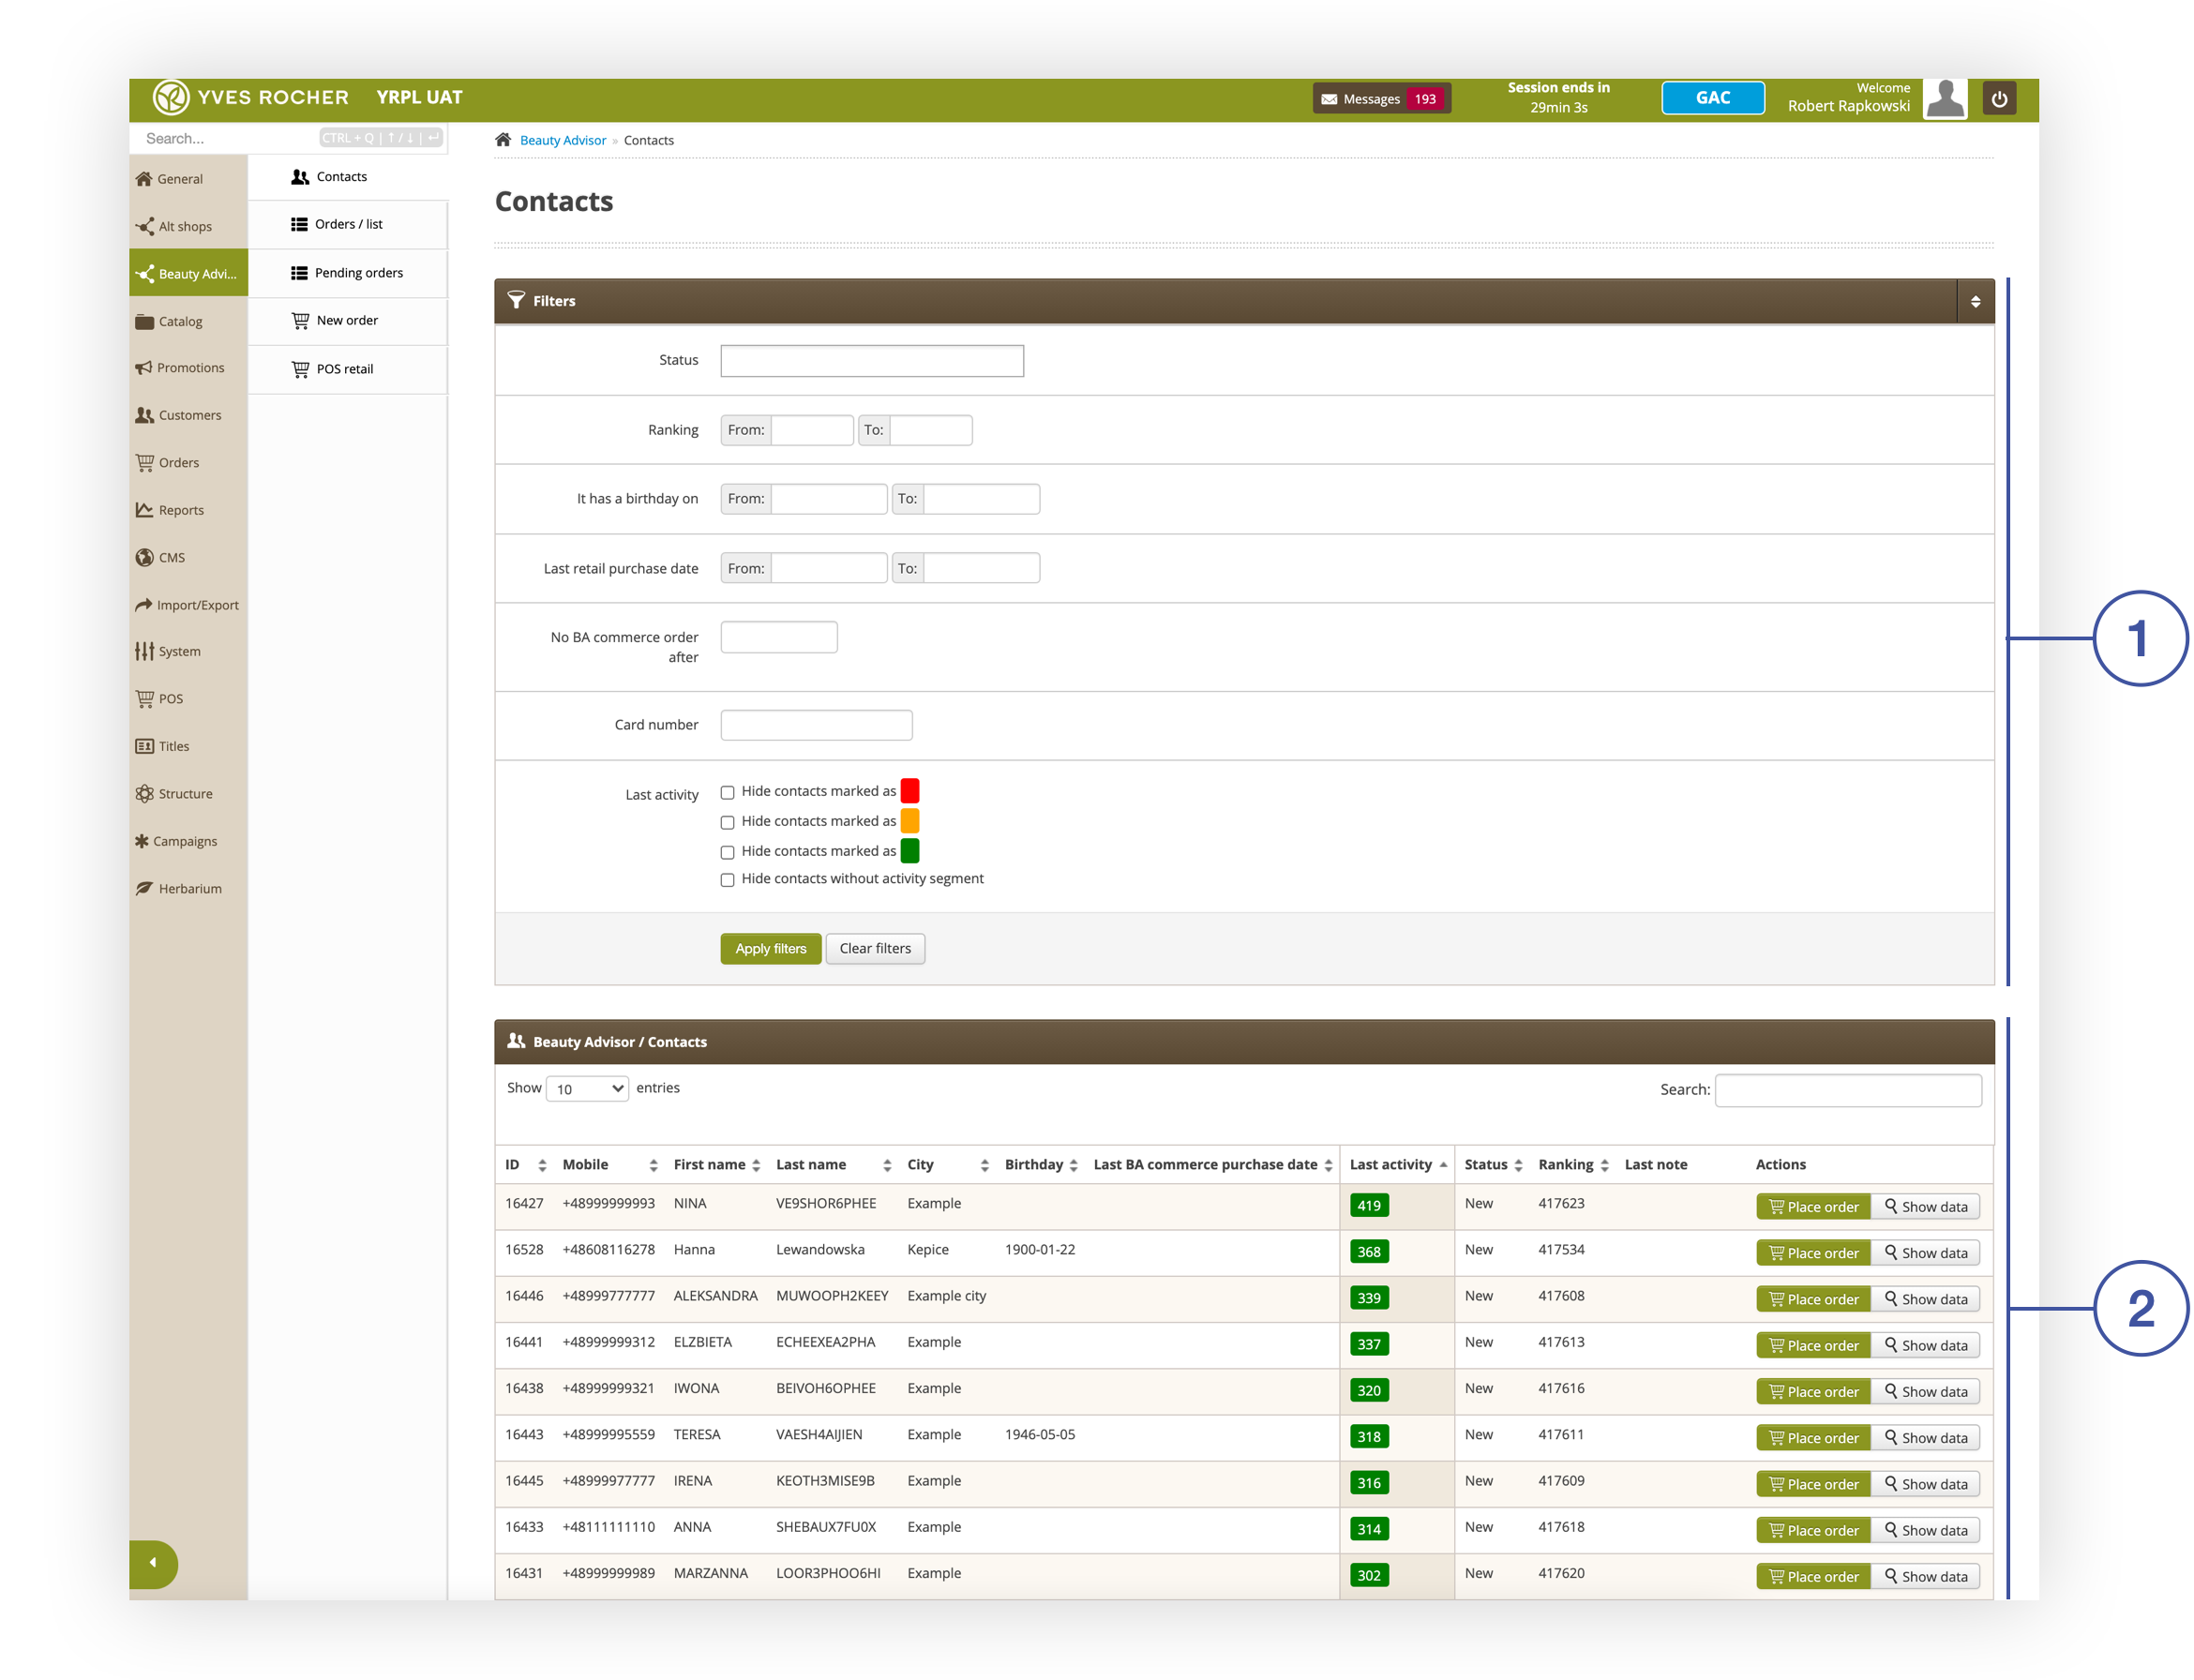
| *Contacts section in the Beauty Advisor module* |
| 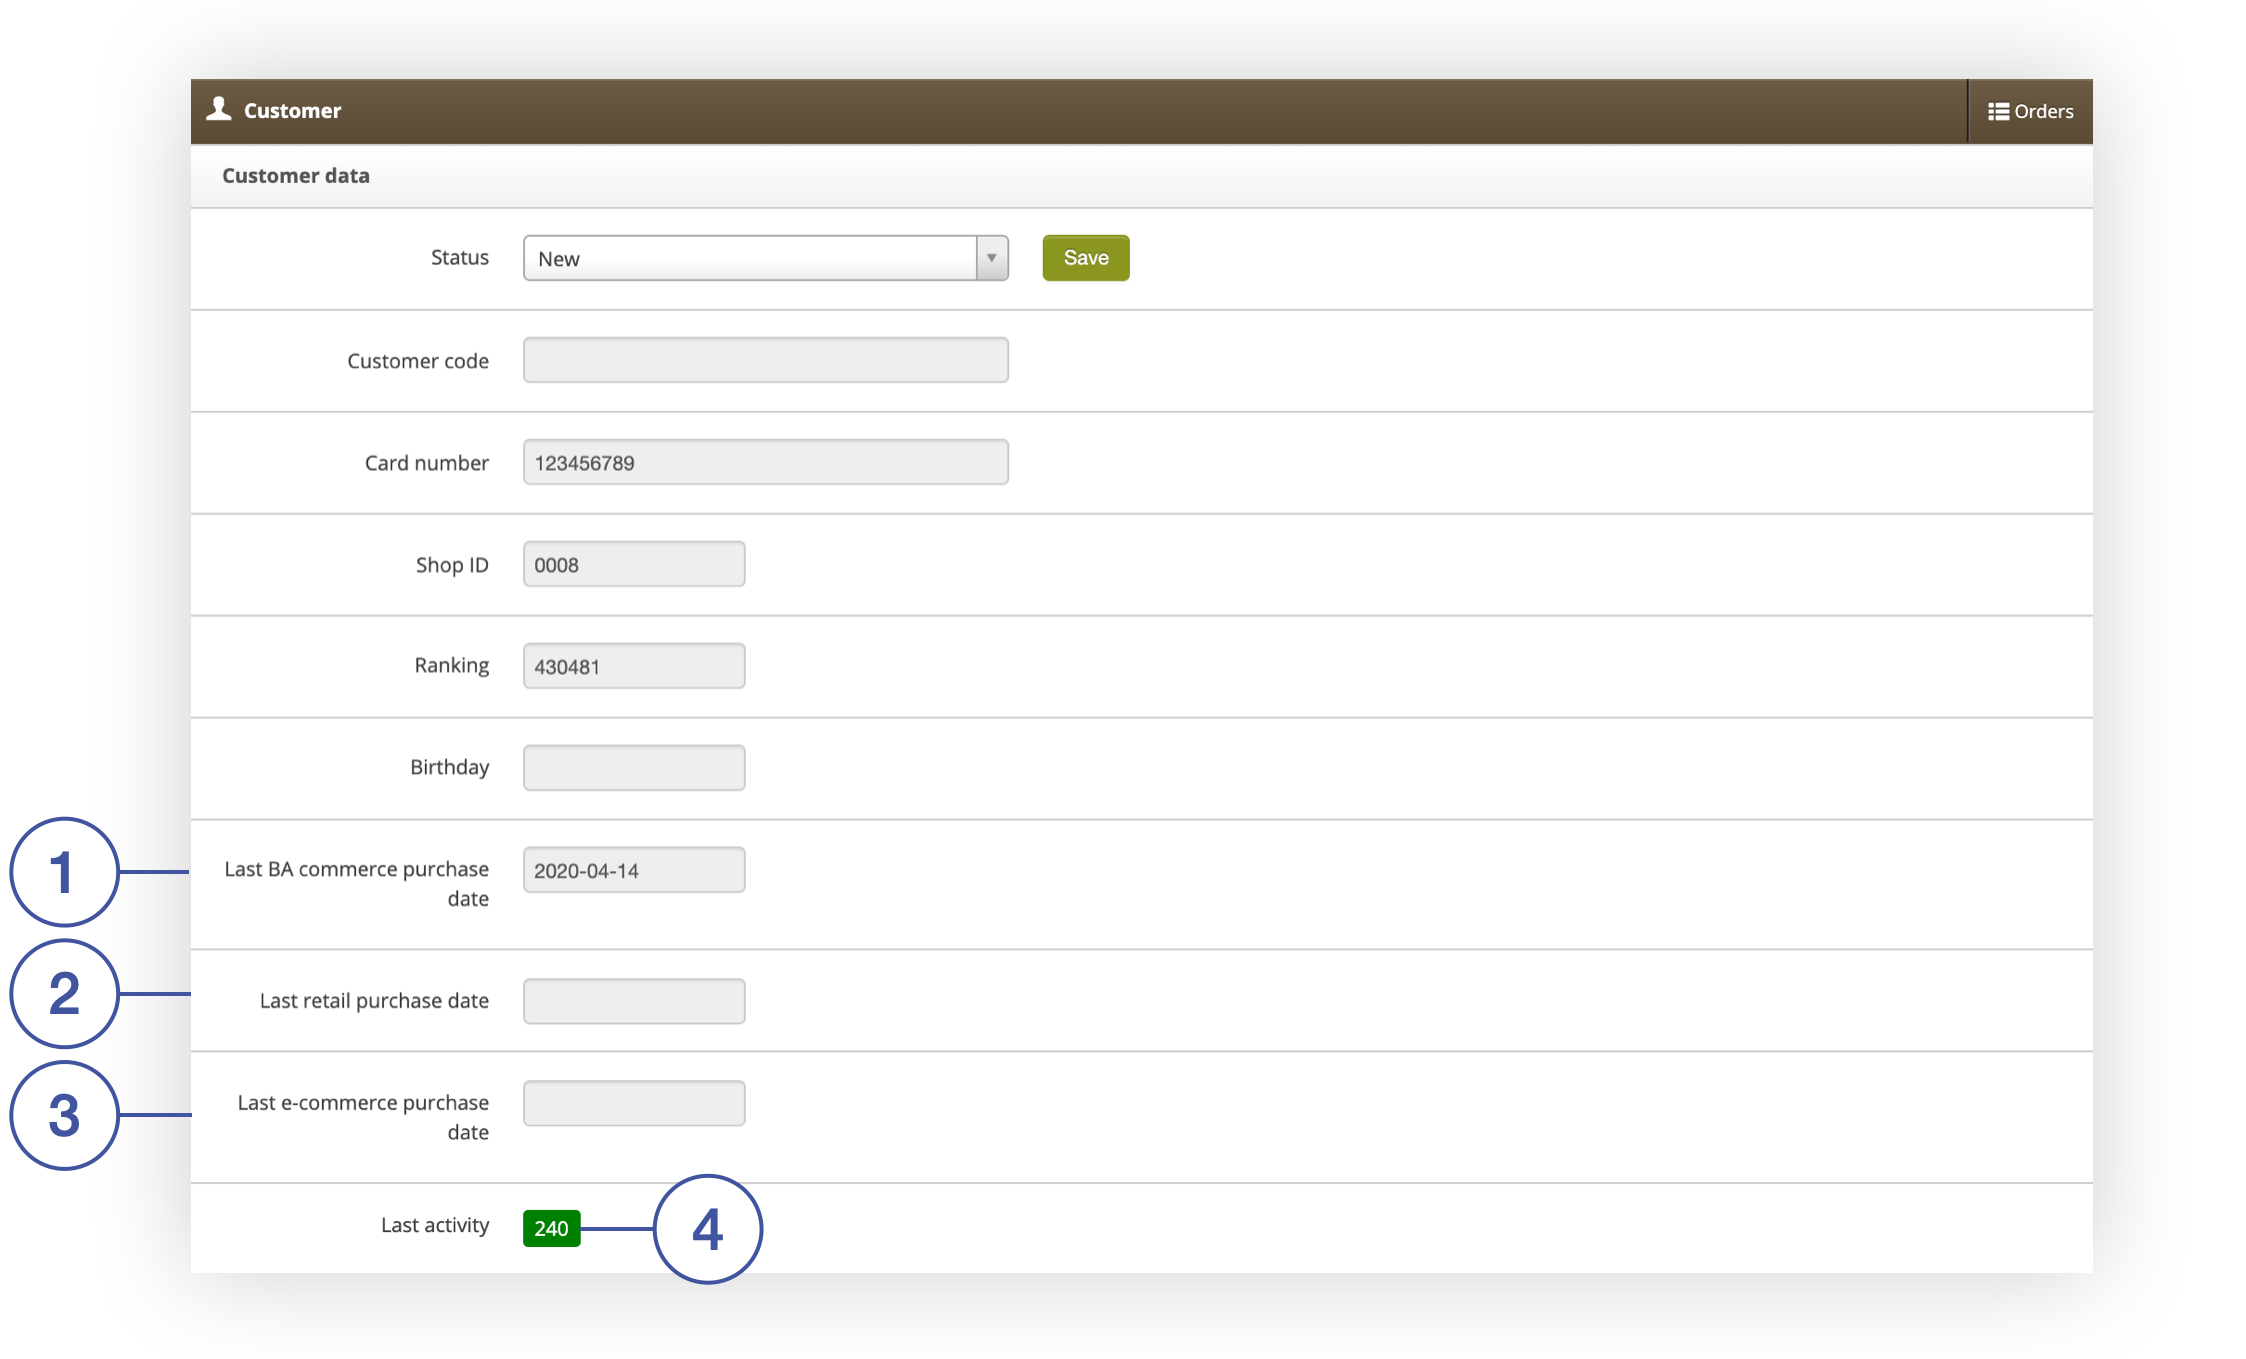 |
| *Window with BA client data and information about his Last activity* |
| 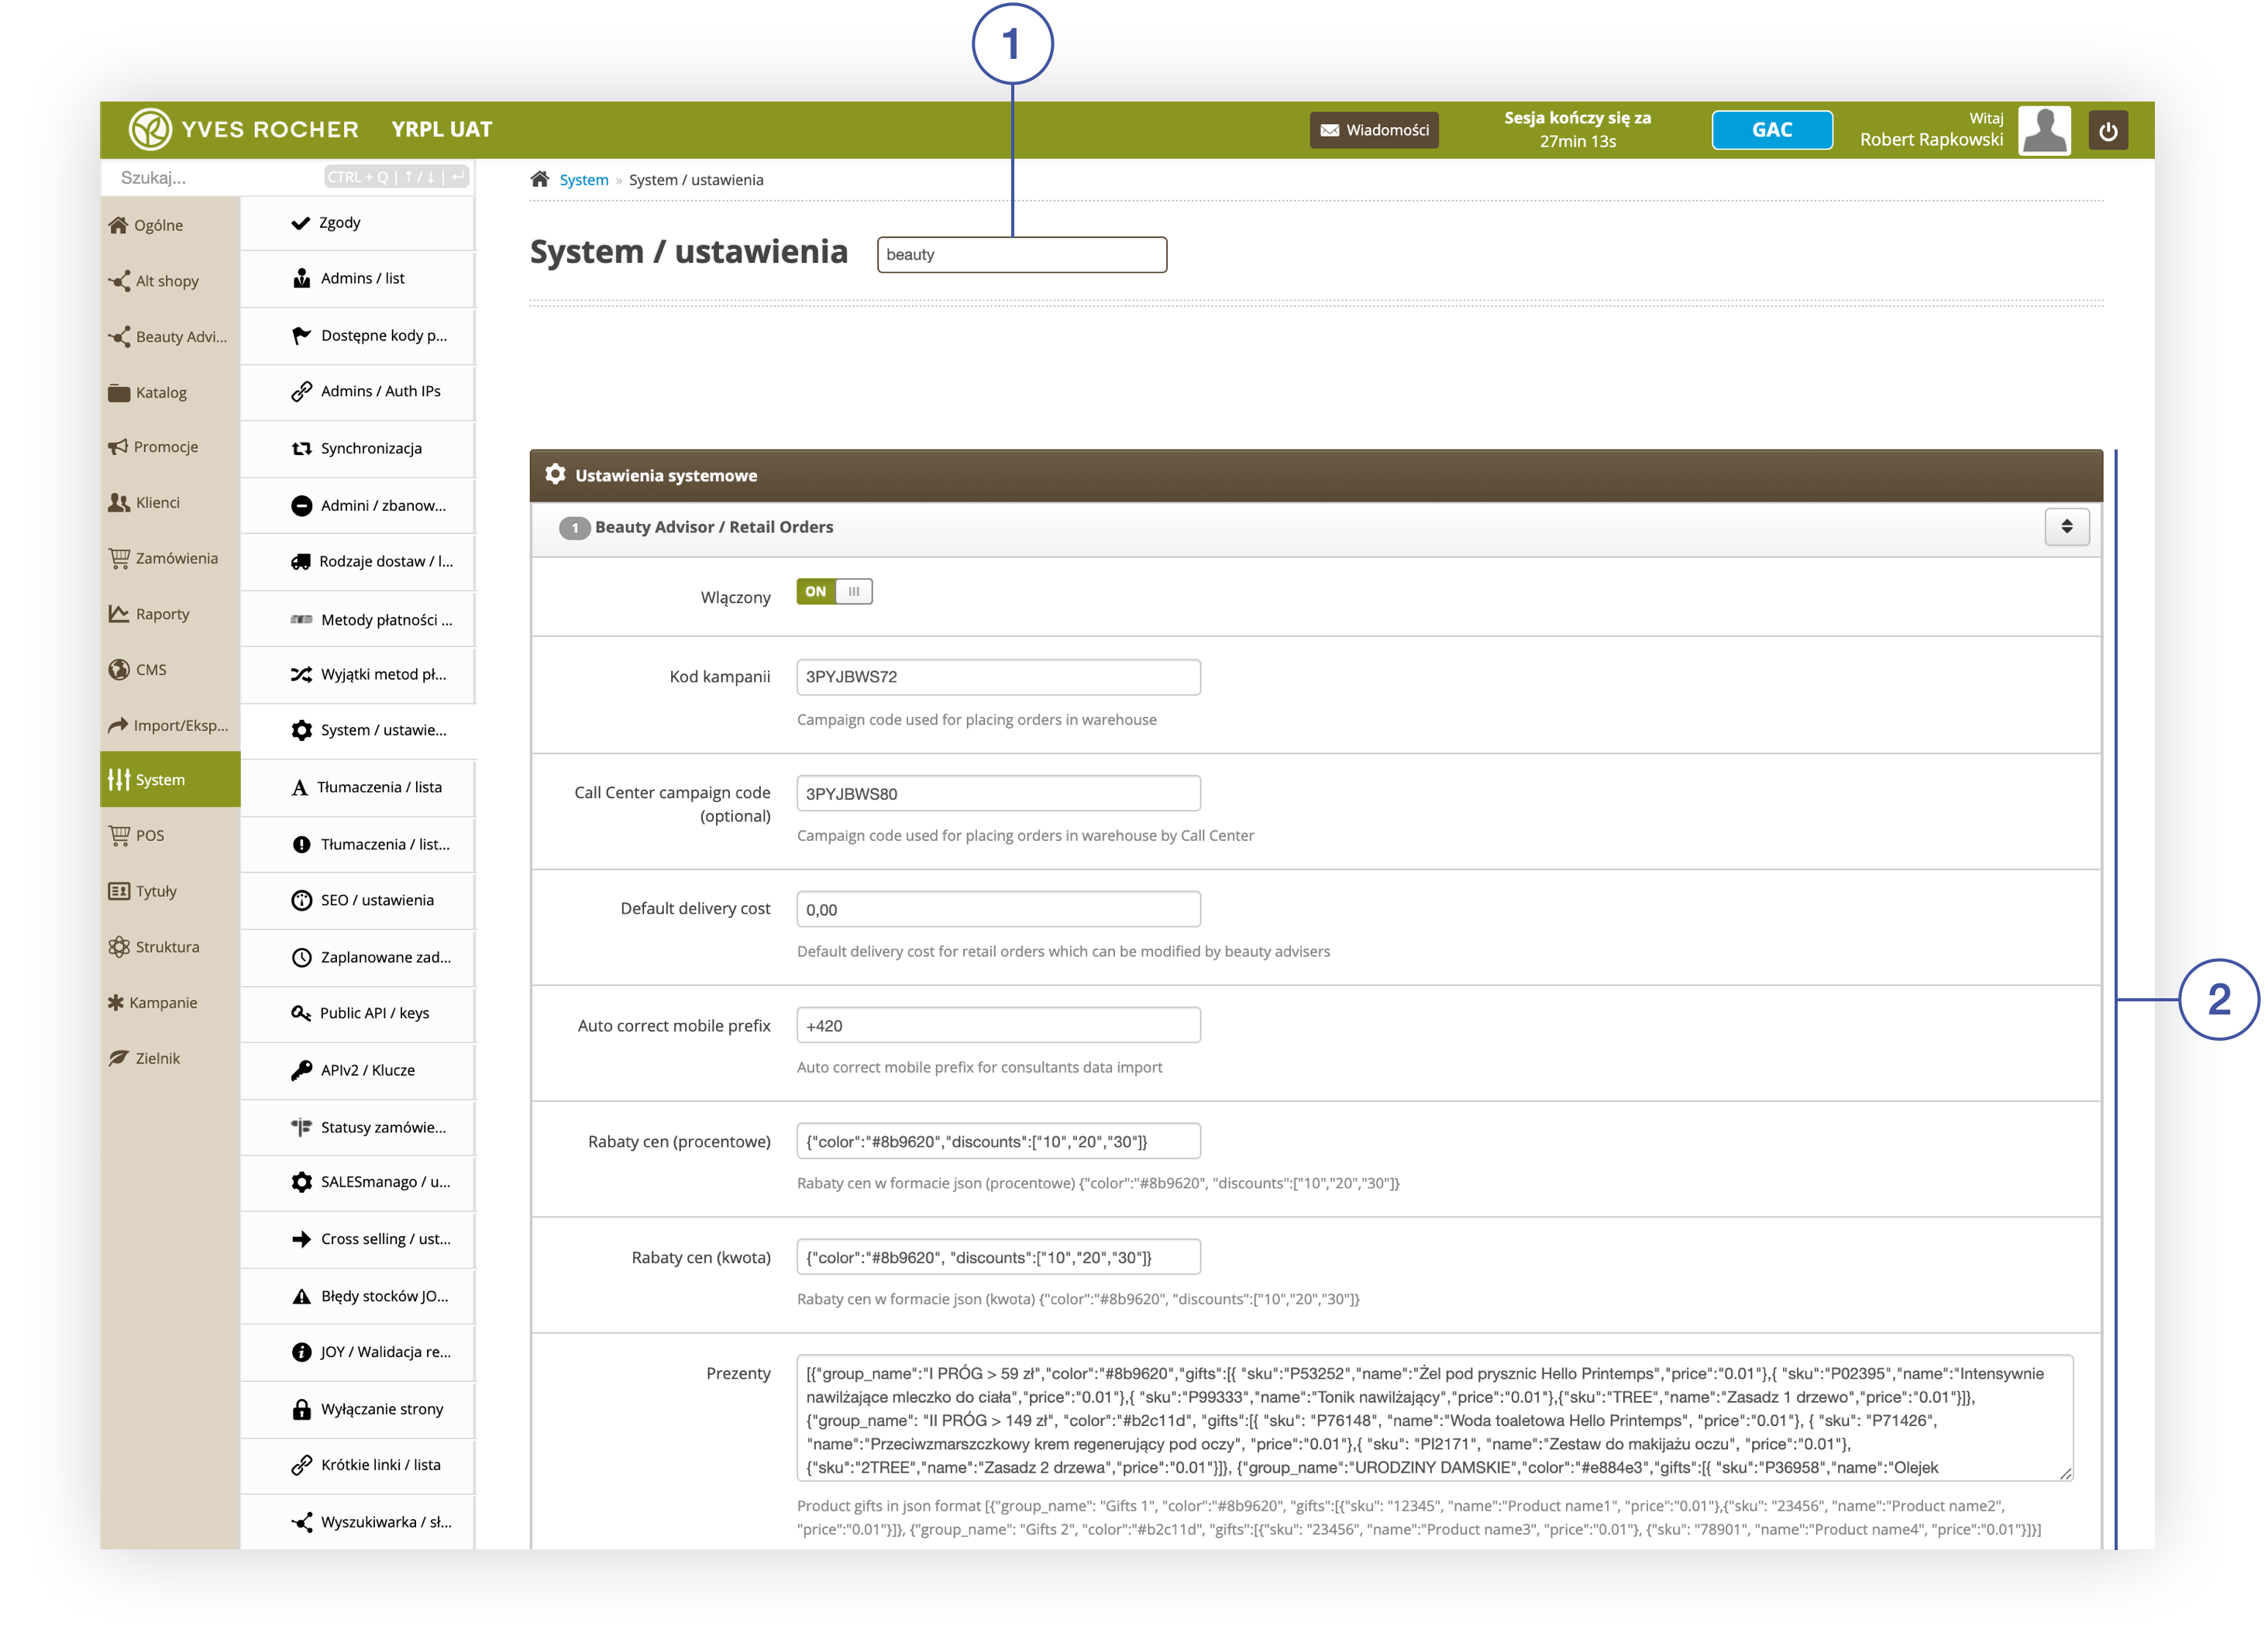 |
| *Beauty Advisor / Retail Orders Activity tab in the System / Settings section of the Beauty Advisor module* |
| 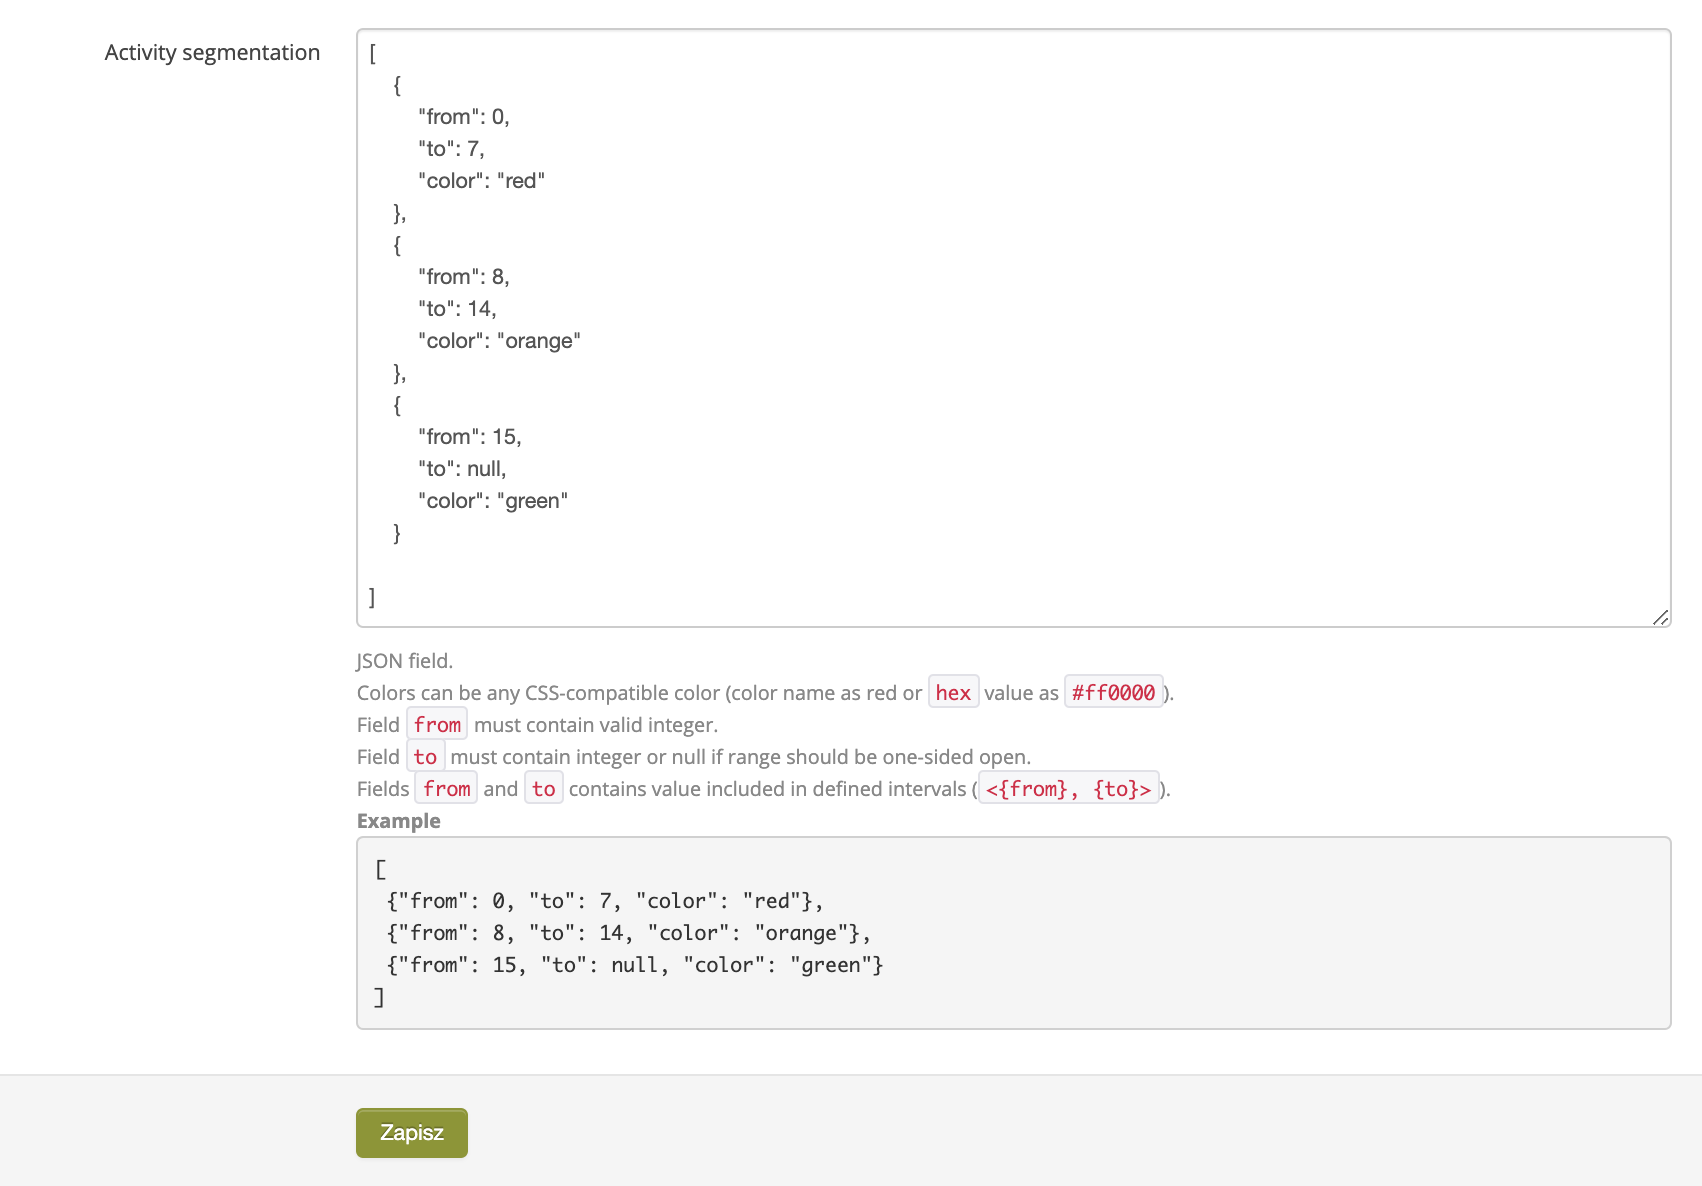 |
| *Activity segmentation parameter settings in the Beauty Advisor / Retail Orders tab in the System / Settings section* |
|  |
| *Beauty Advisor / Contacts tab in Beauty Advisor> Contacts* |
| 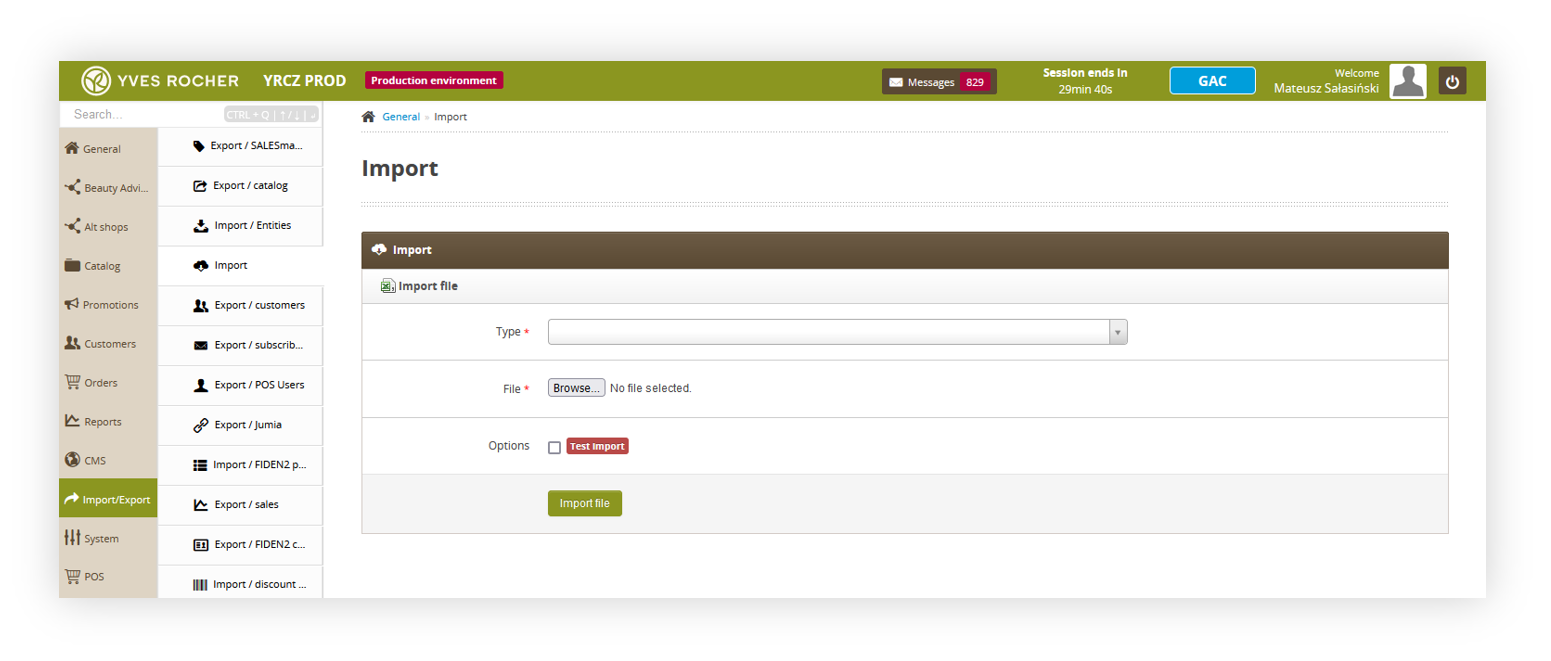 |
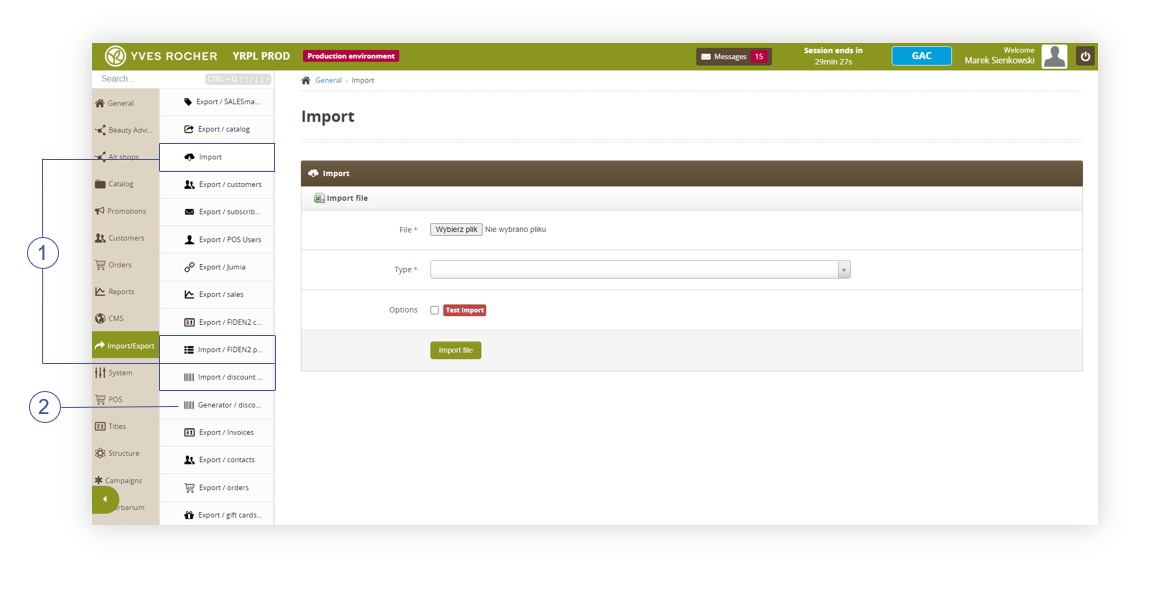
| *Import / Export> Import section* |
|  |
| *Import tab in the Import / Export> Import section* |
|  |
| *Import file content (file type) : „Customer contact database for Consultant update”* |
|  |
| *Import file content (file type): "Customer contact database for Consultant update (lite version)"* |
|  |
| *Import file content (file type): “POS Users”* |
|  |
| *Import file content (file type): "Admin user import XLSX"* |
|  |
| *Visualization of the example BA customer anonymization xlsx file* |
|  |
| *Contacts section in the Beauty Advisor module* |
| 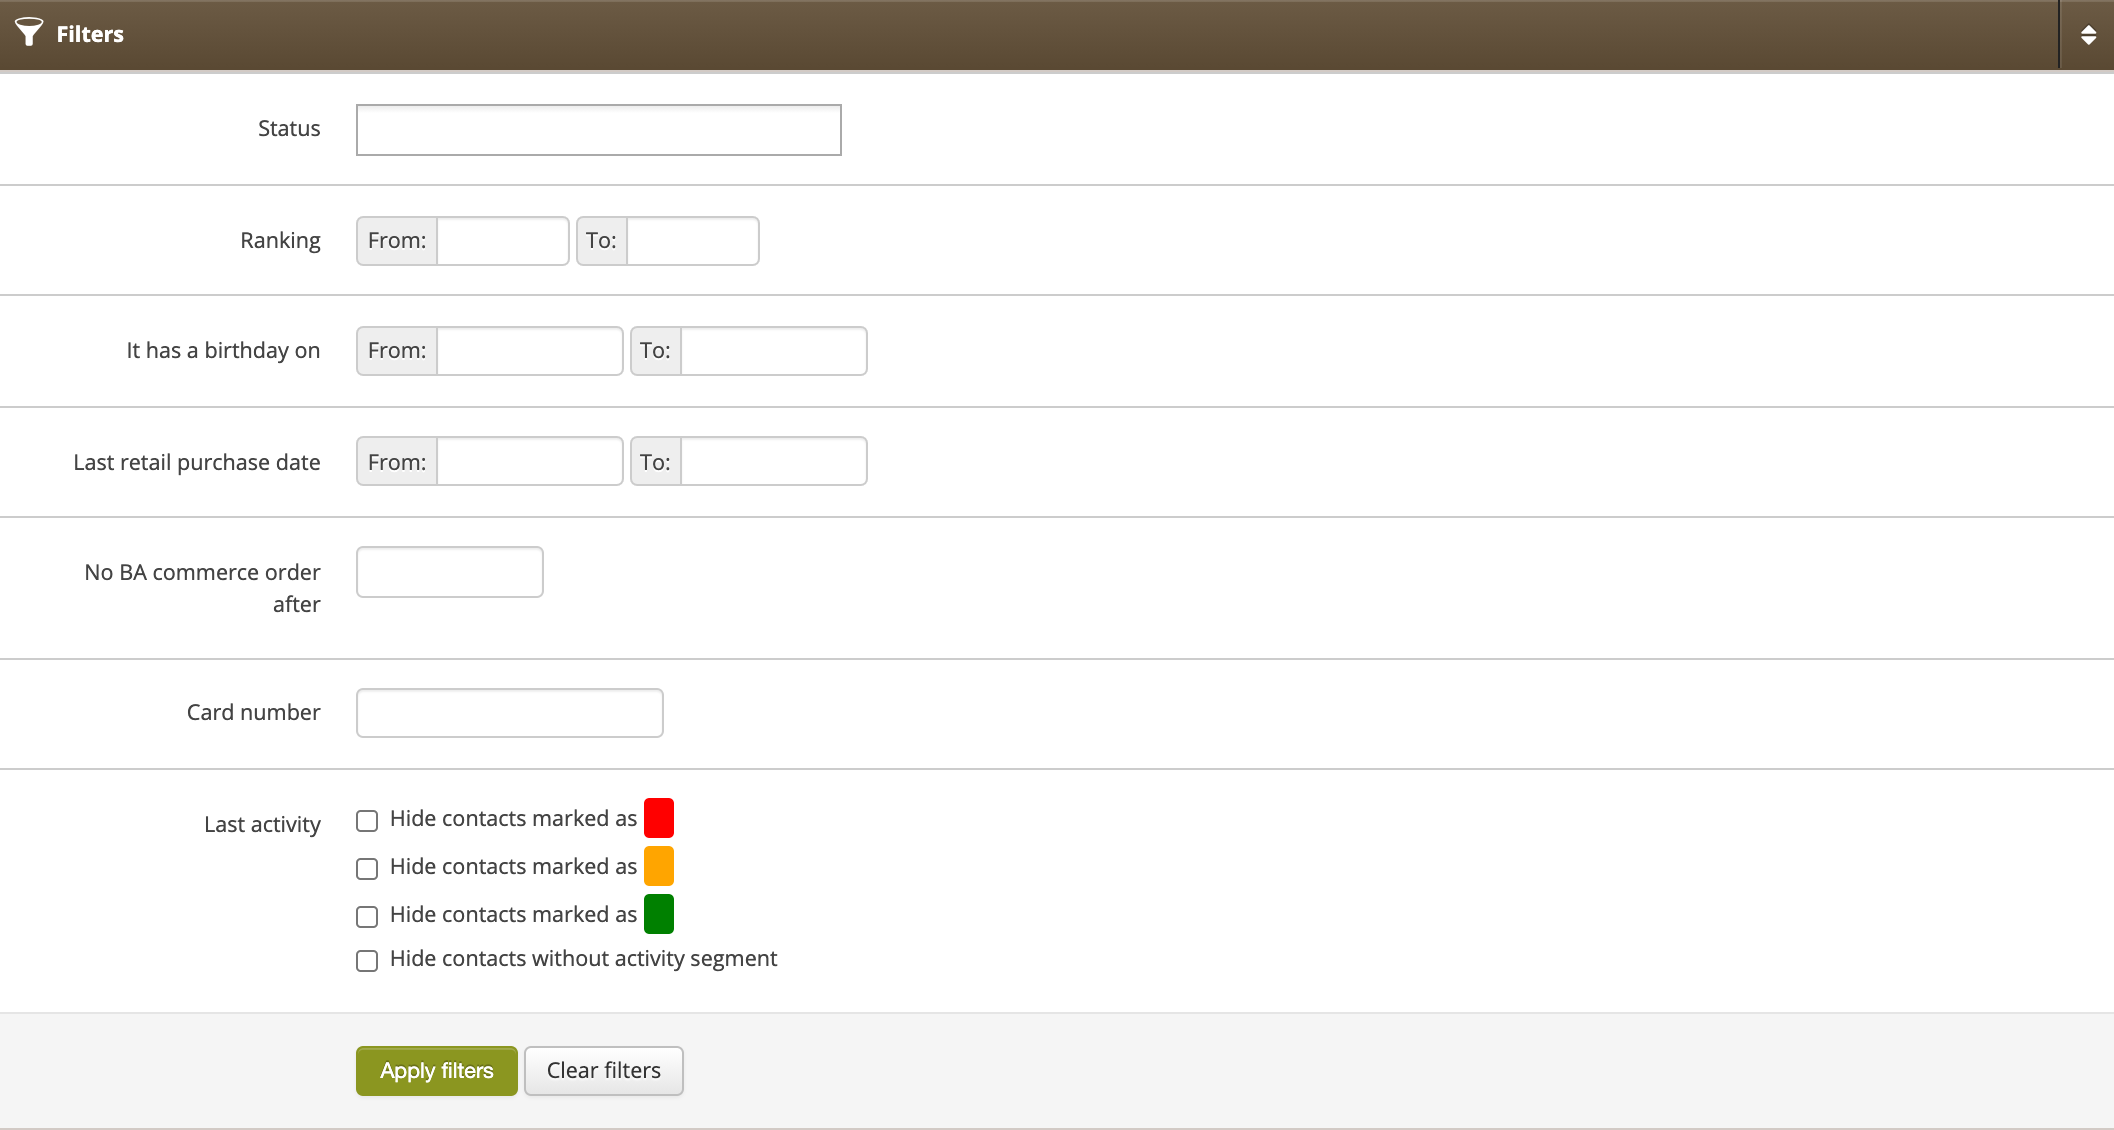 |
| *Filters tab in Beauty Advisor > Contacts* |
| 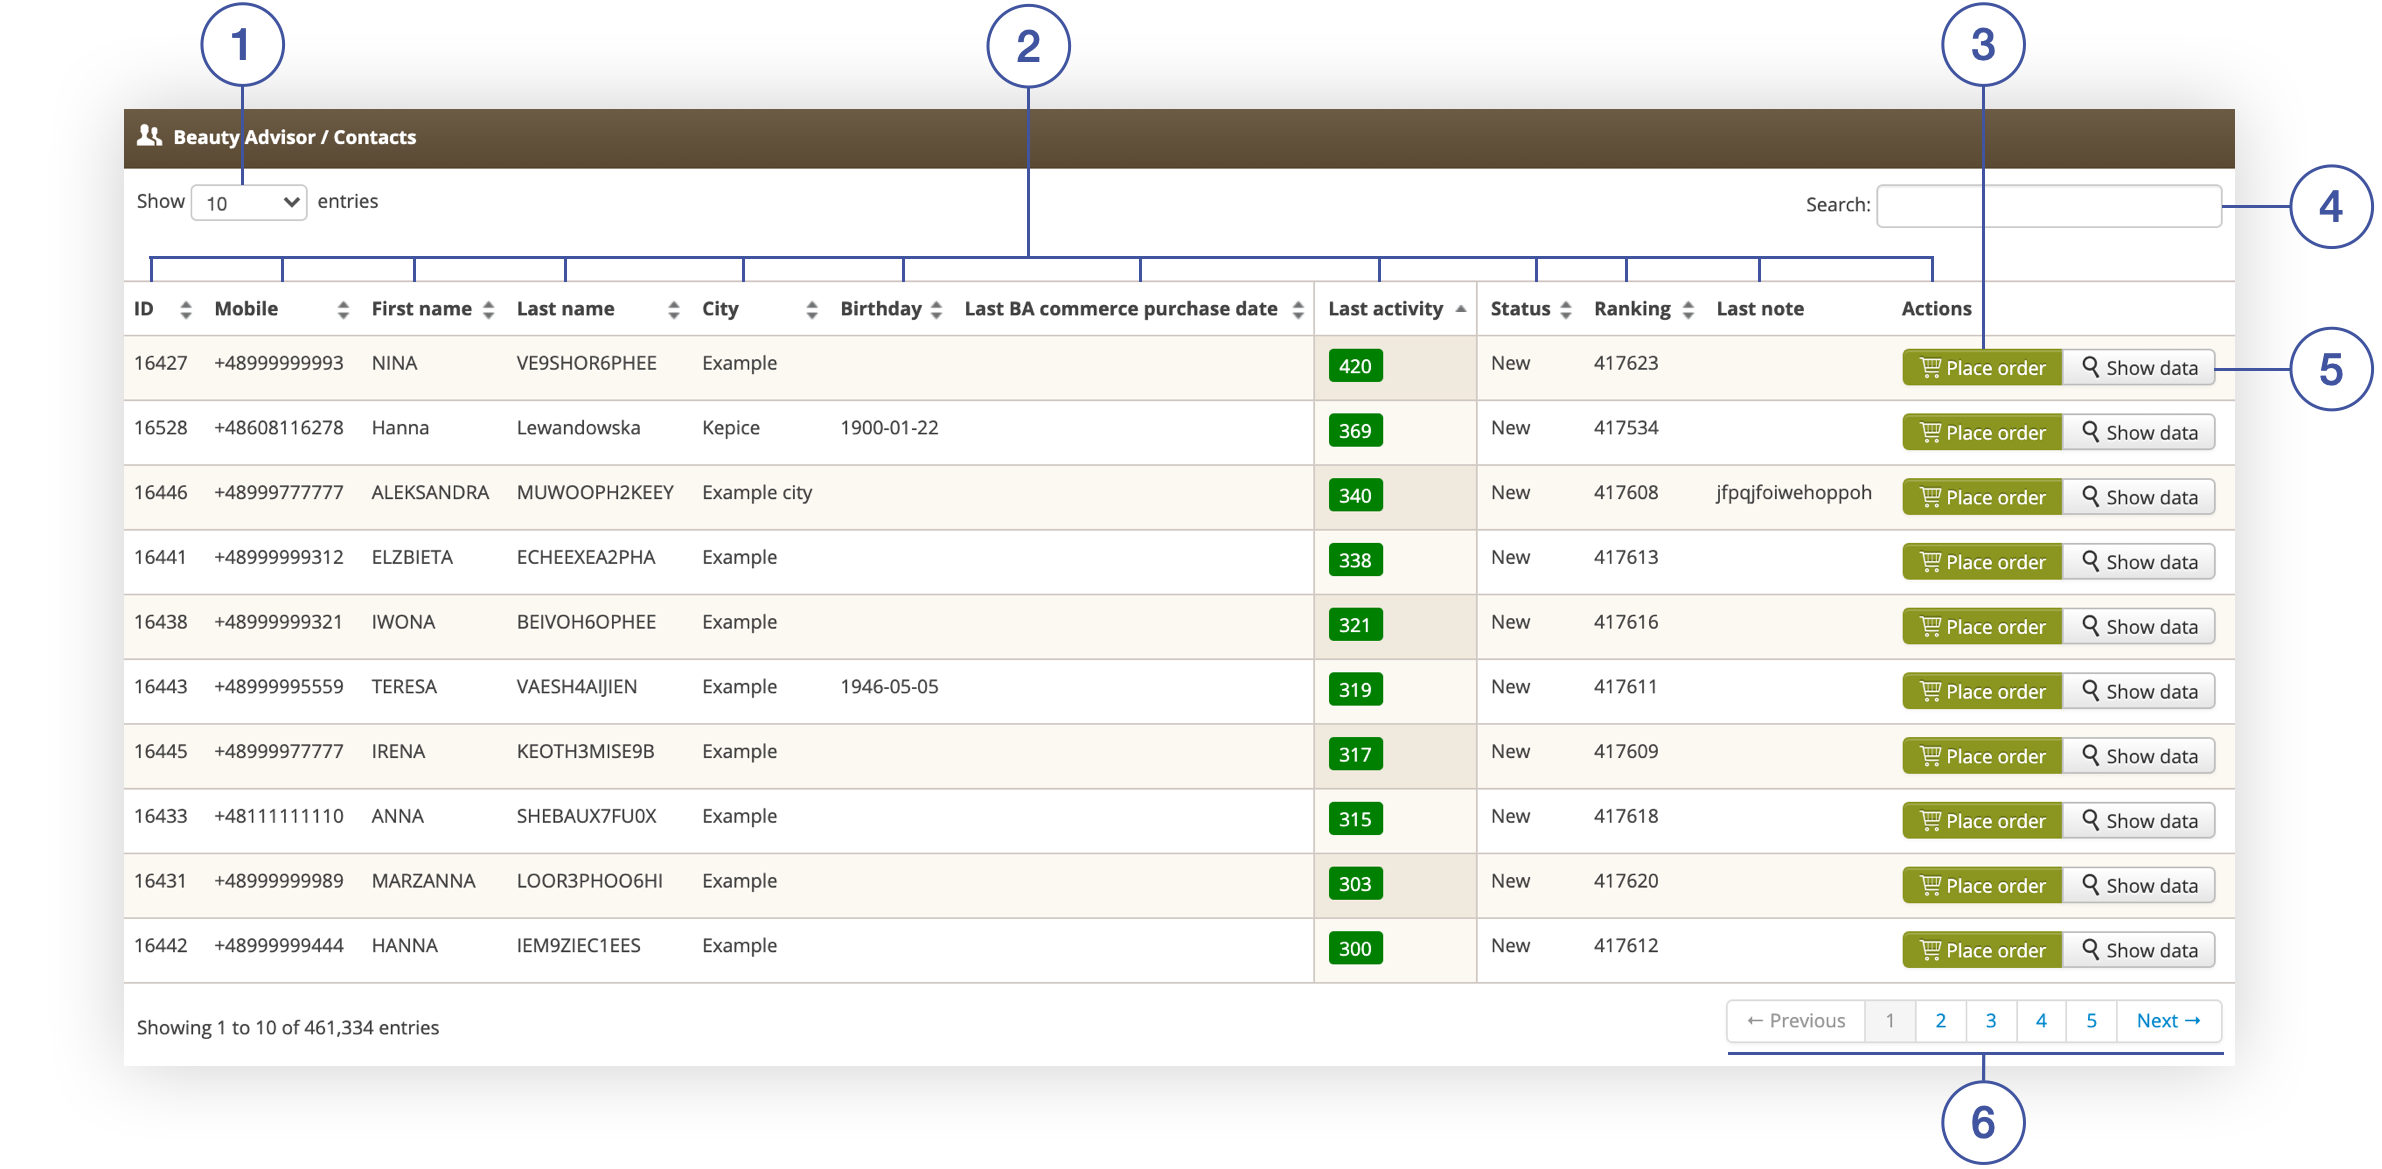 |
| *Beauty Advisor / Contacts tab in Beauty Advisor> Contacts* |
| 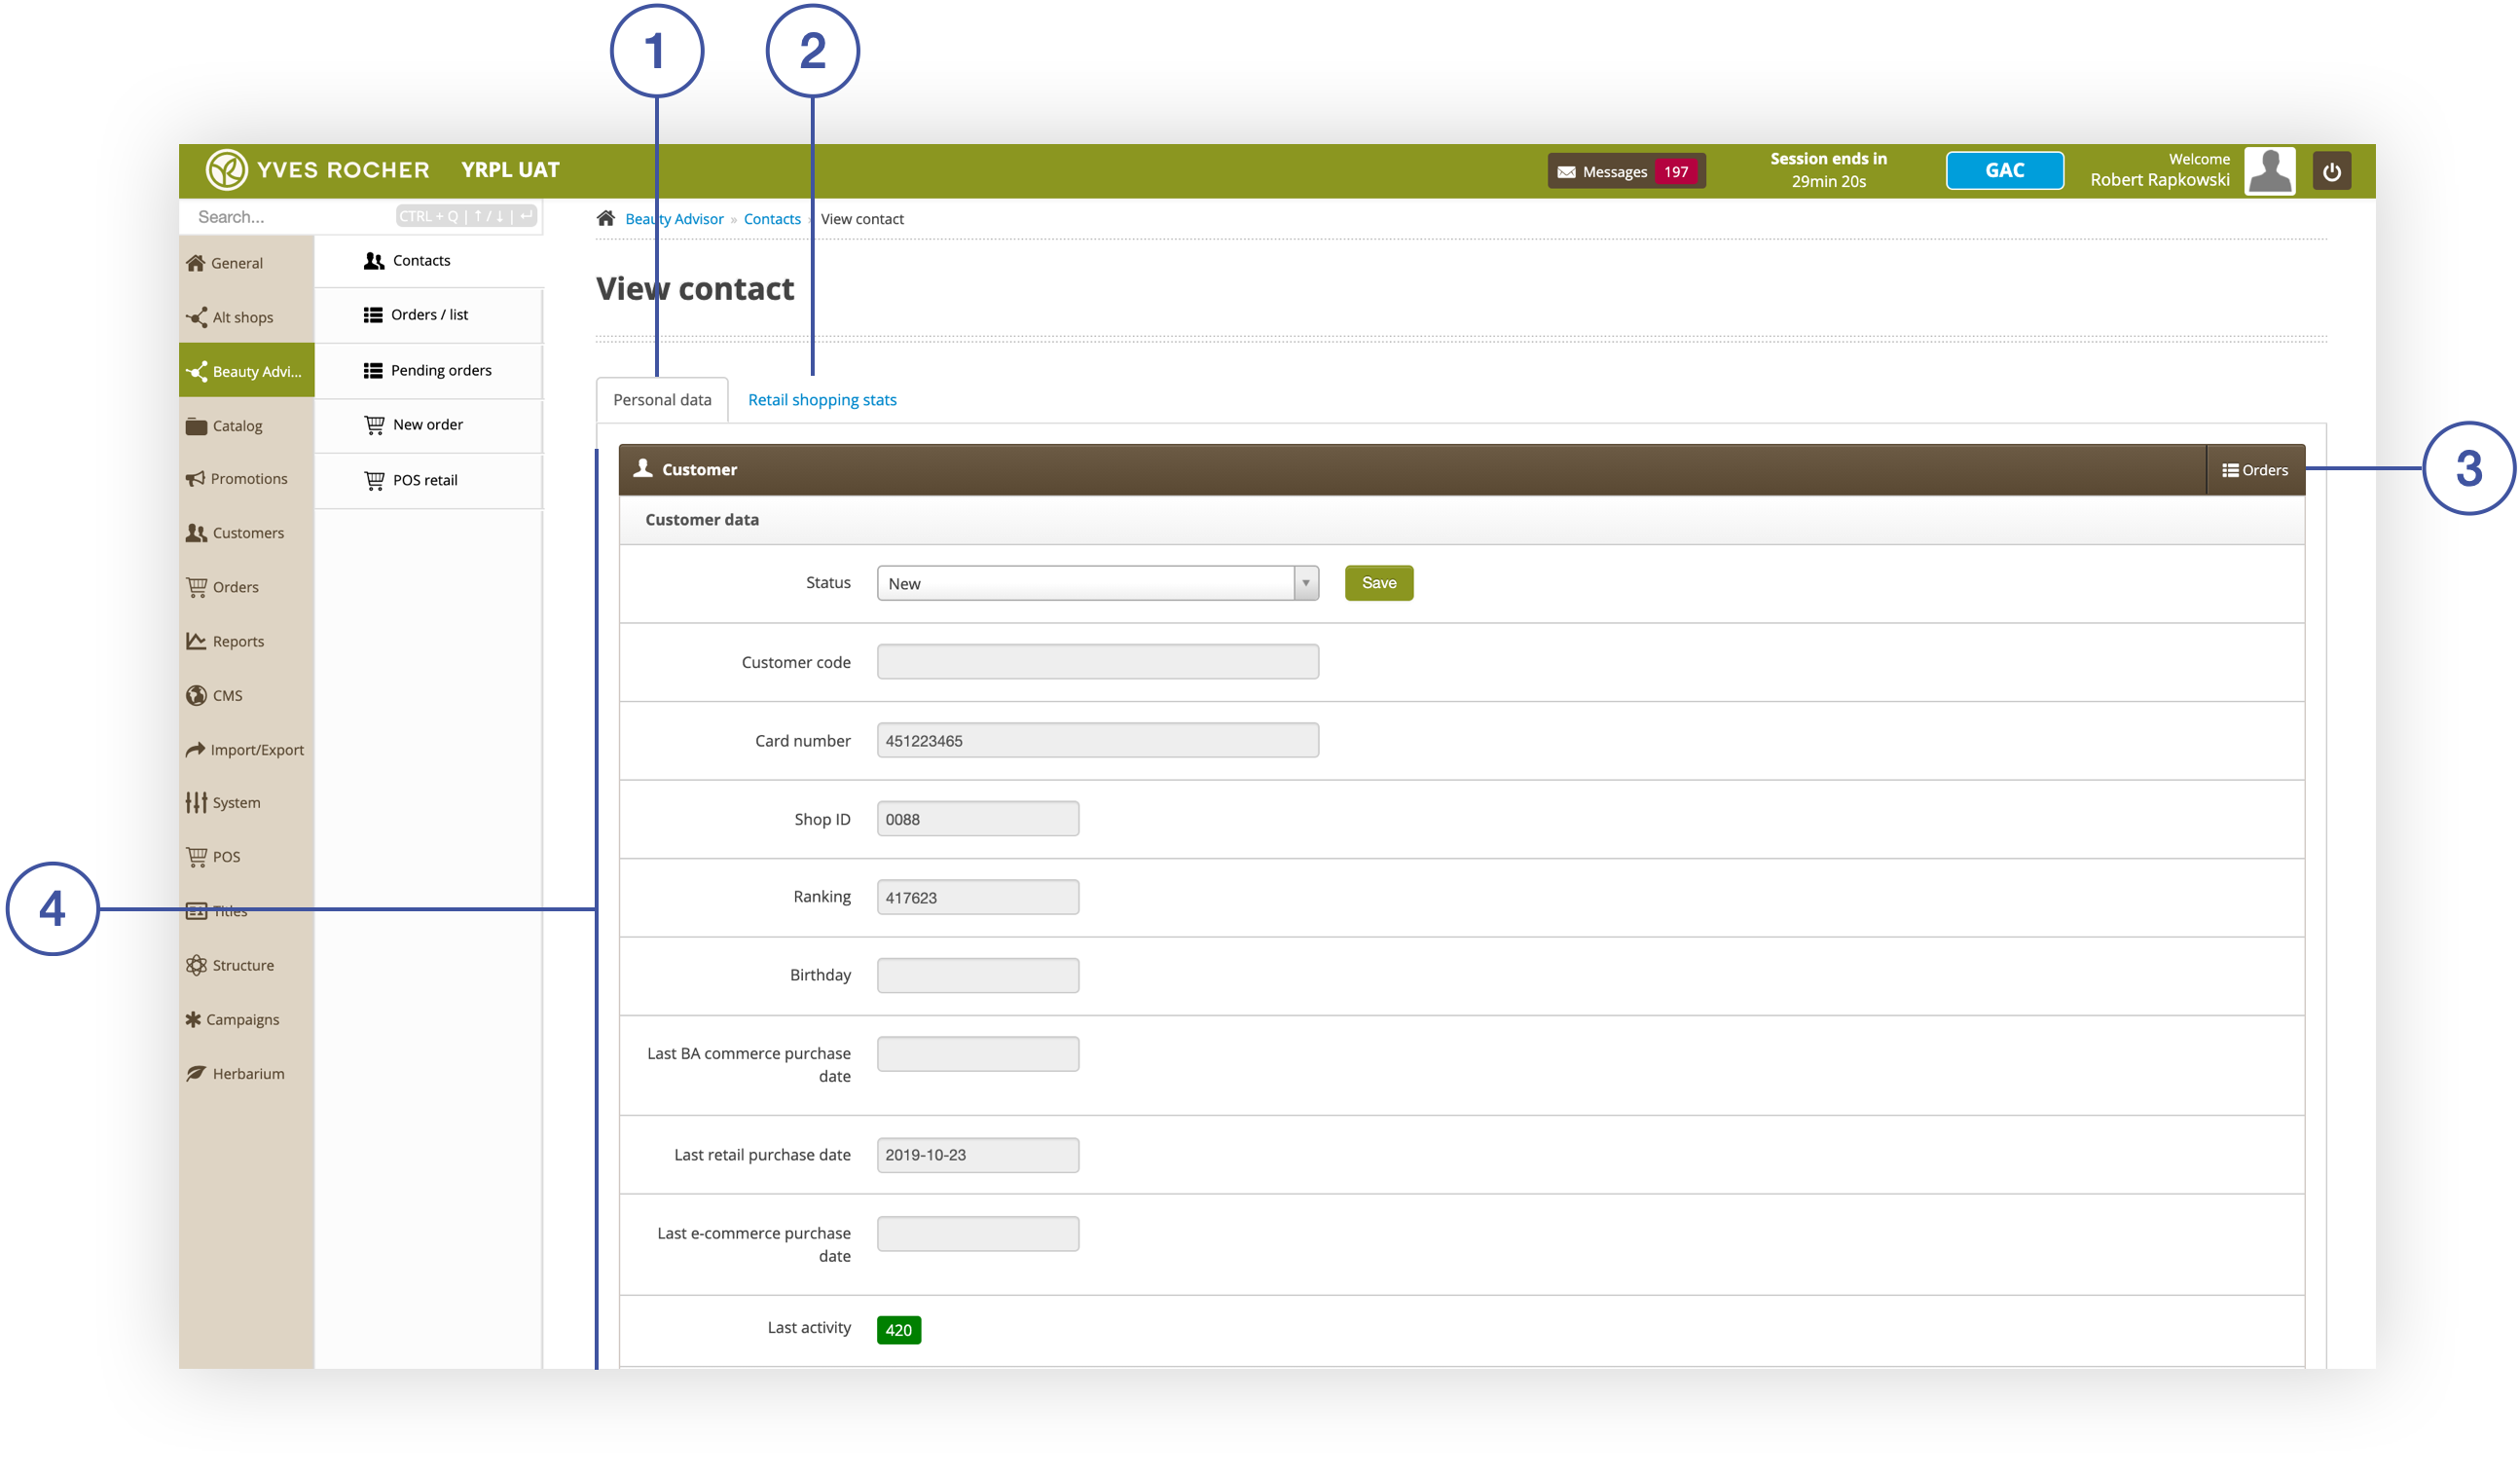 |
| *Sekcja View contact w module Beauty Advisor* |
| 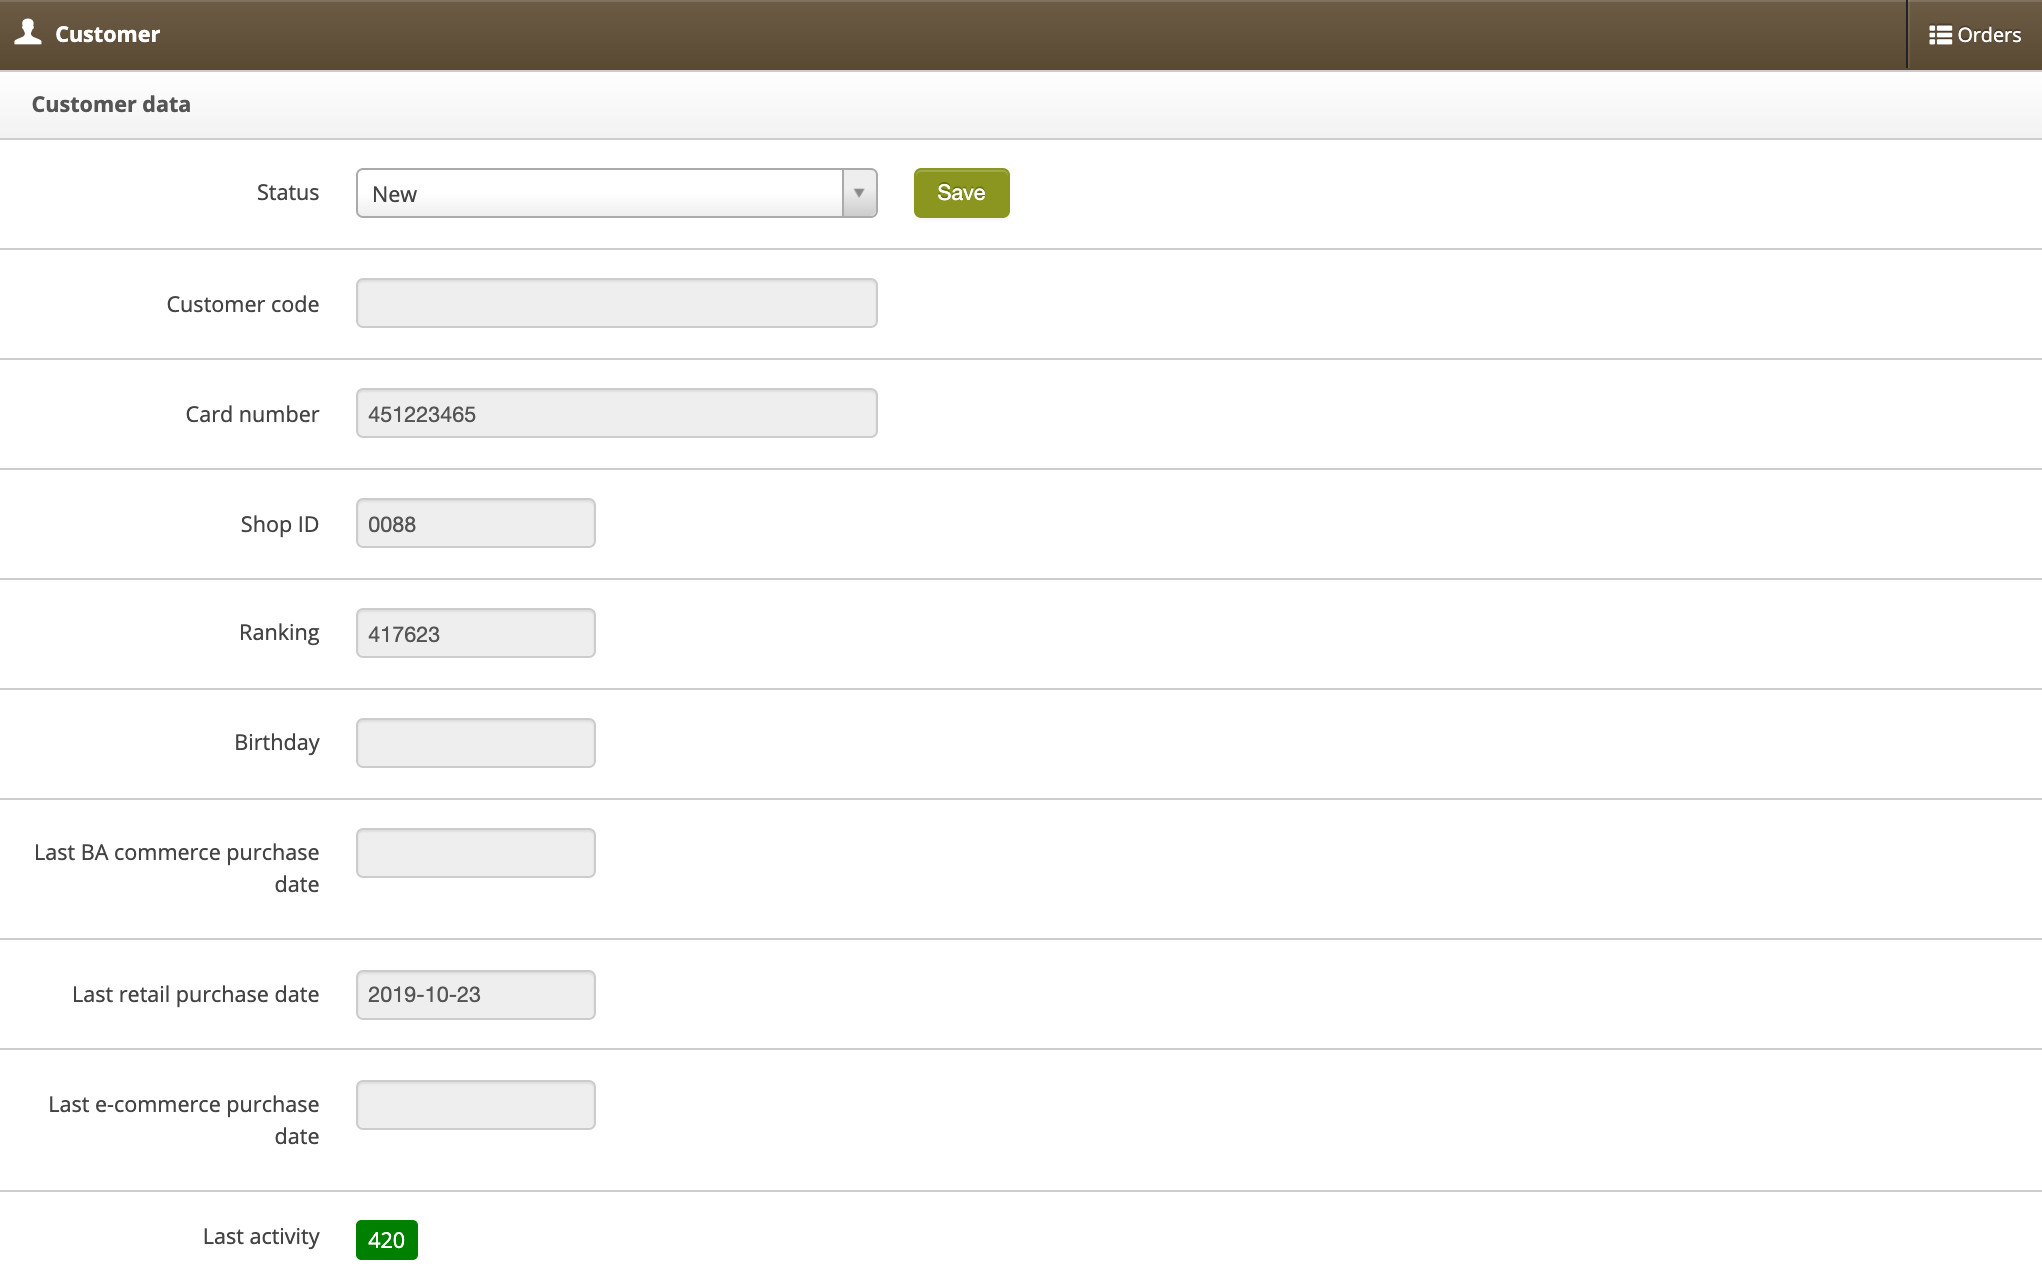 |
| *The Consumer data column in the Customer tab* |
| 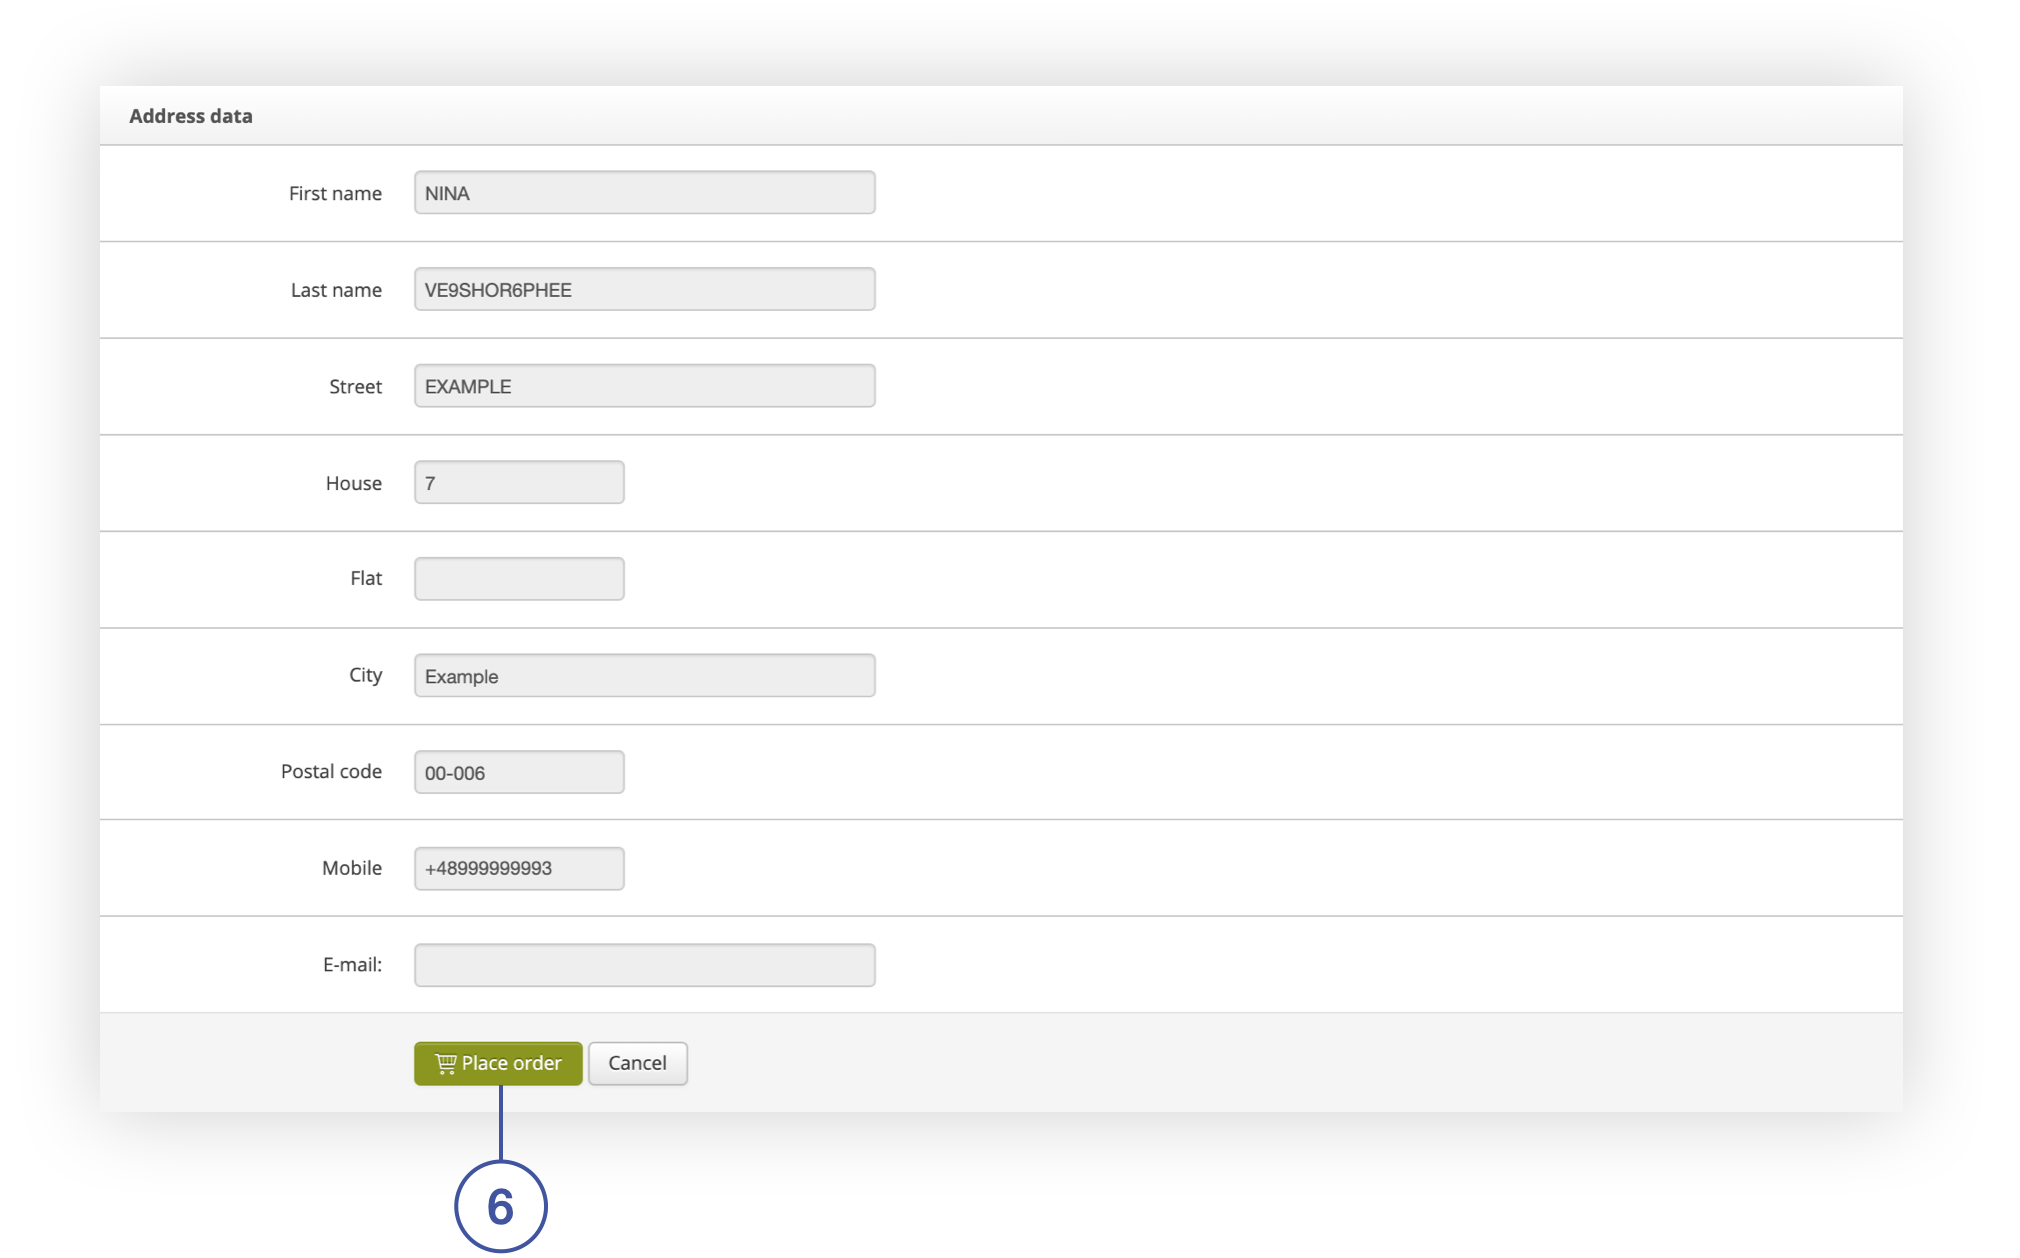 |
| *Address data column in the Customer tab* |
| 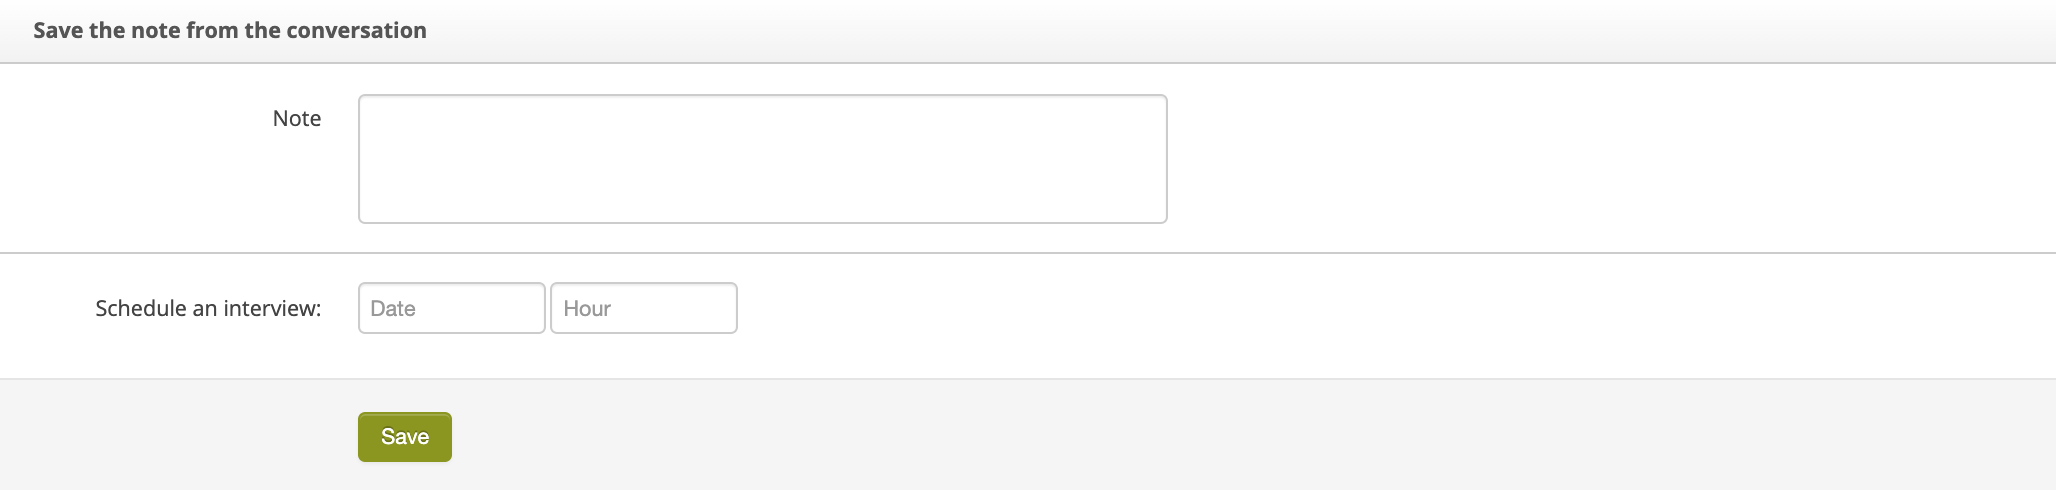 |
| *Save note from the conversation column in the Customer tab* |
| 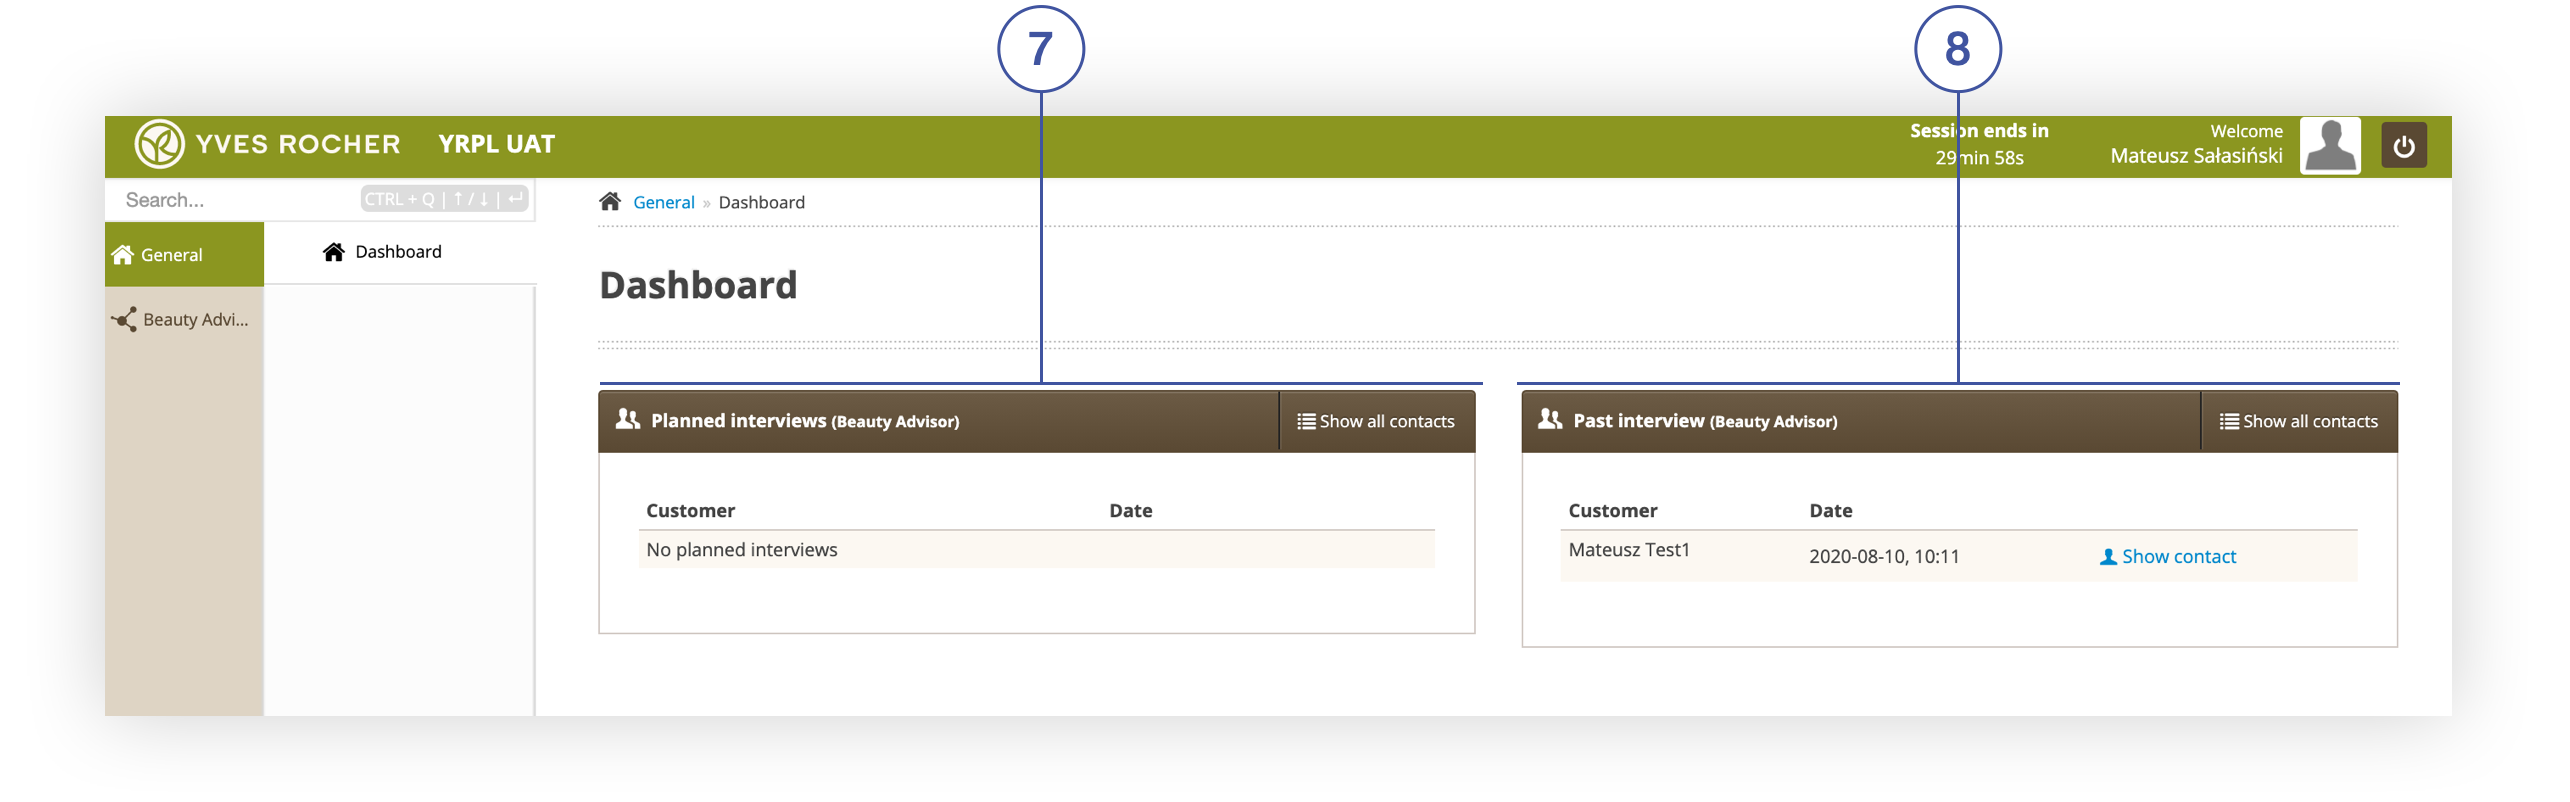 |
| *List of planned contacts and past interviews in the BA Consultant’s Cockpit* |
|  |
| *Last notes column in the Customer tab* |
|  |
| *Recent notes column in the Customer tab* |
|  |
| *Retail shopping stats screen in the Customer section* |
|  |
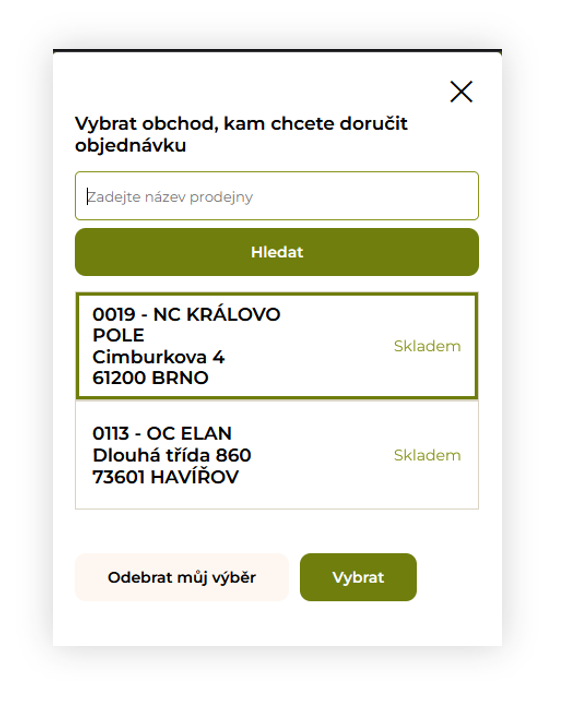
| *Visualization of the store locator* |
| 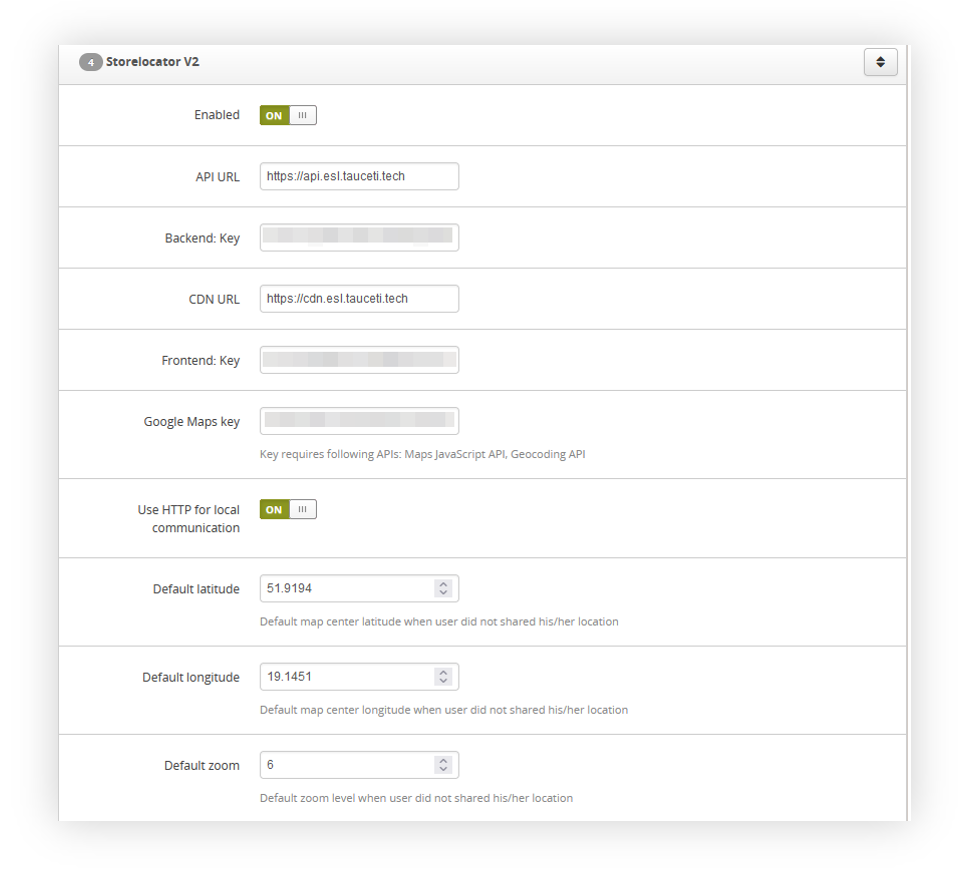 |
| *Visualization of the storelocator system settings* |
| 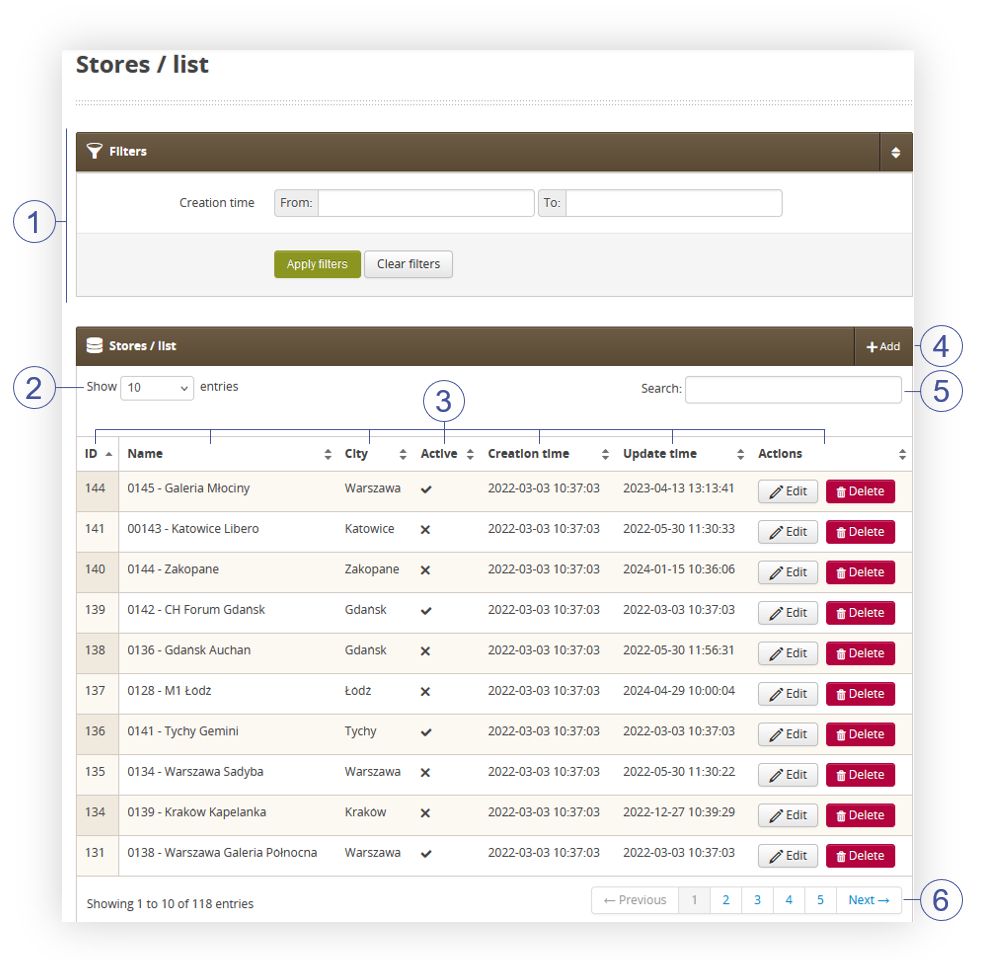 |
| *Visualization of stores in stores / list* |
| 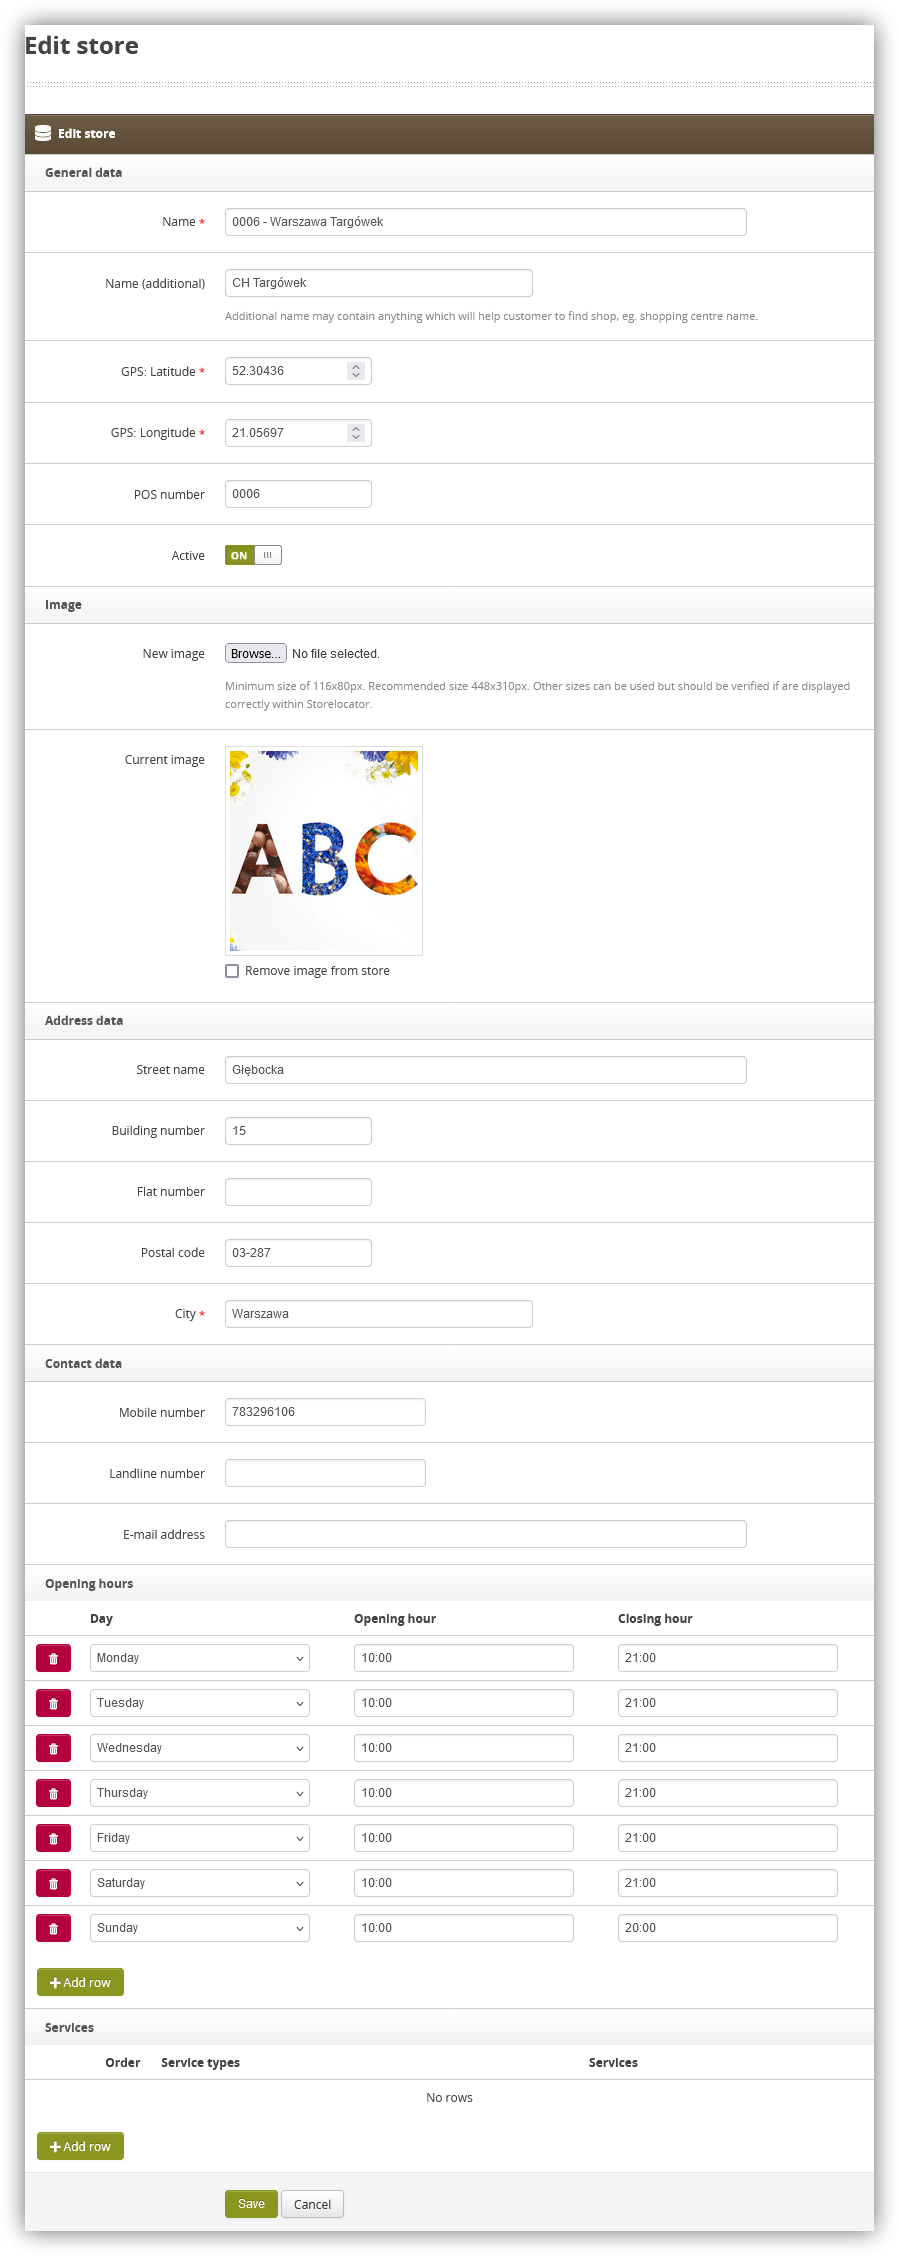 |
| *Visualization of the store creation* |
|  |
| *Visualization of the store locator* |
| 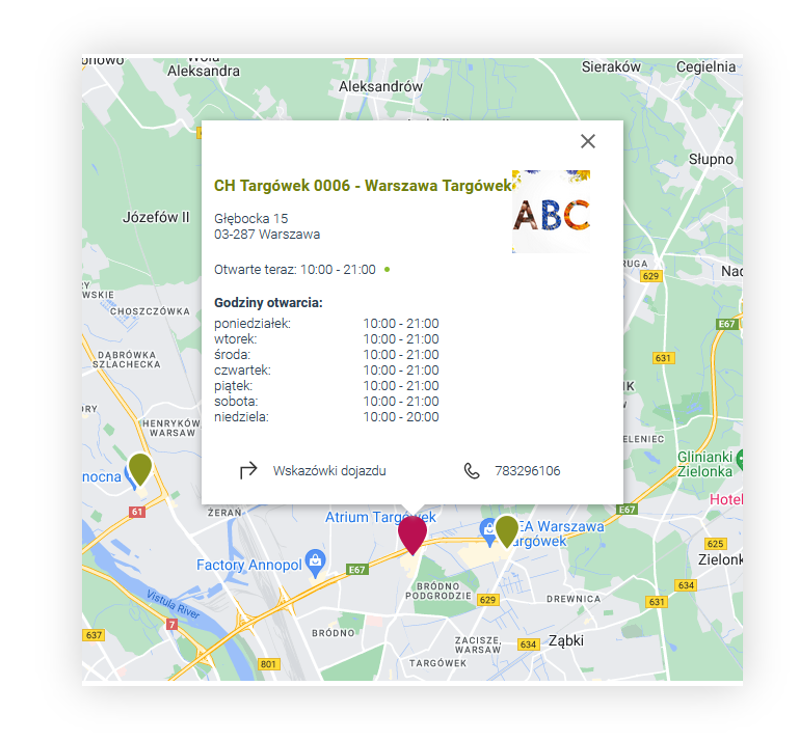 |
| *Visualization of the store locator* |
| 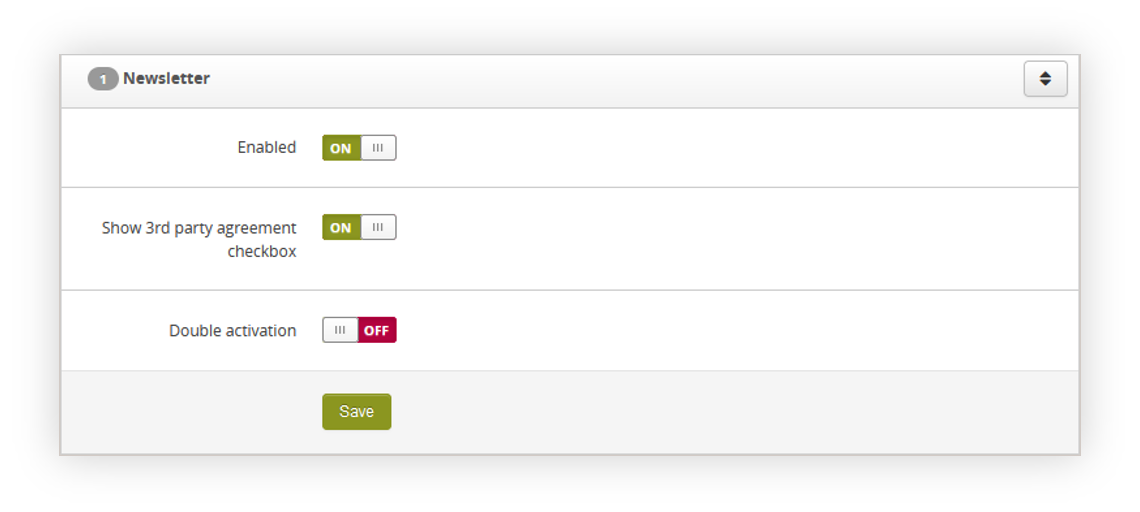 |
| *Visualization of the newsletter functionality system settings* |
| 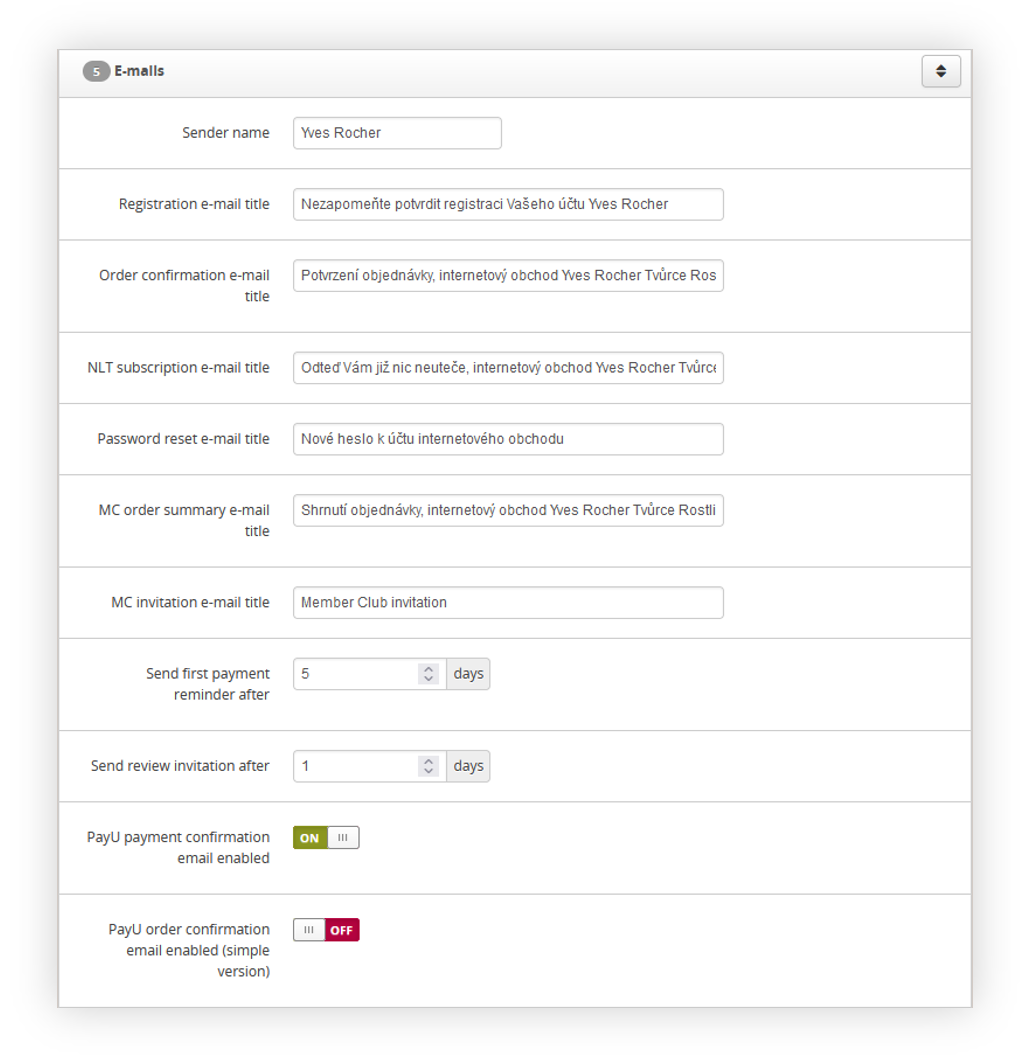 |
| *Visualization of the E-mails tab in the System / Settings* |
| 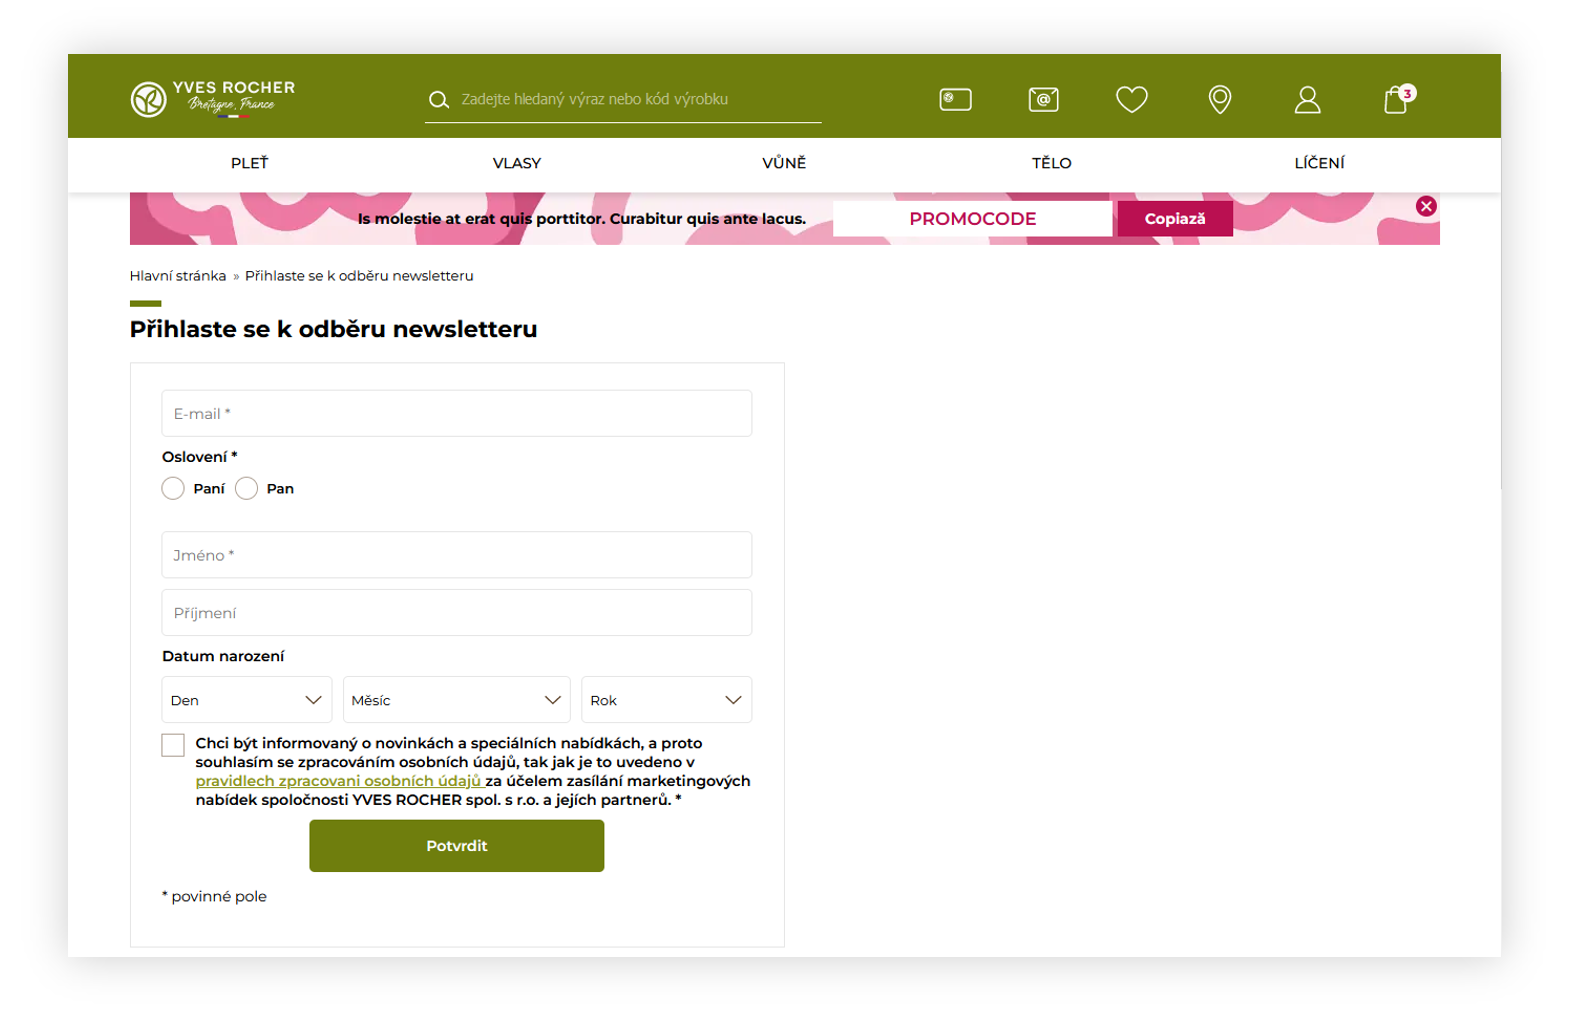 |
| *Visualization of the /newsletter page* |
|  |
| *Visualization of the registration form* |
| 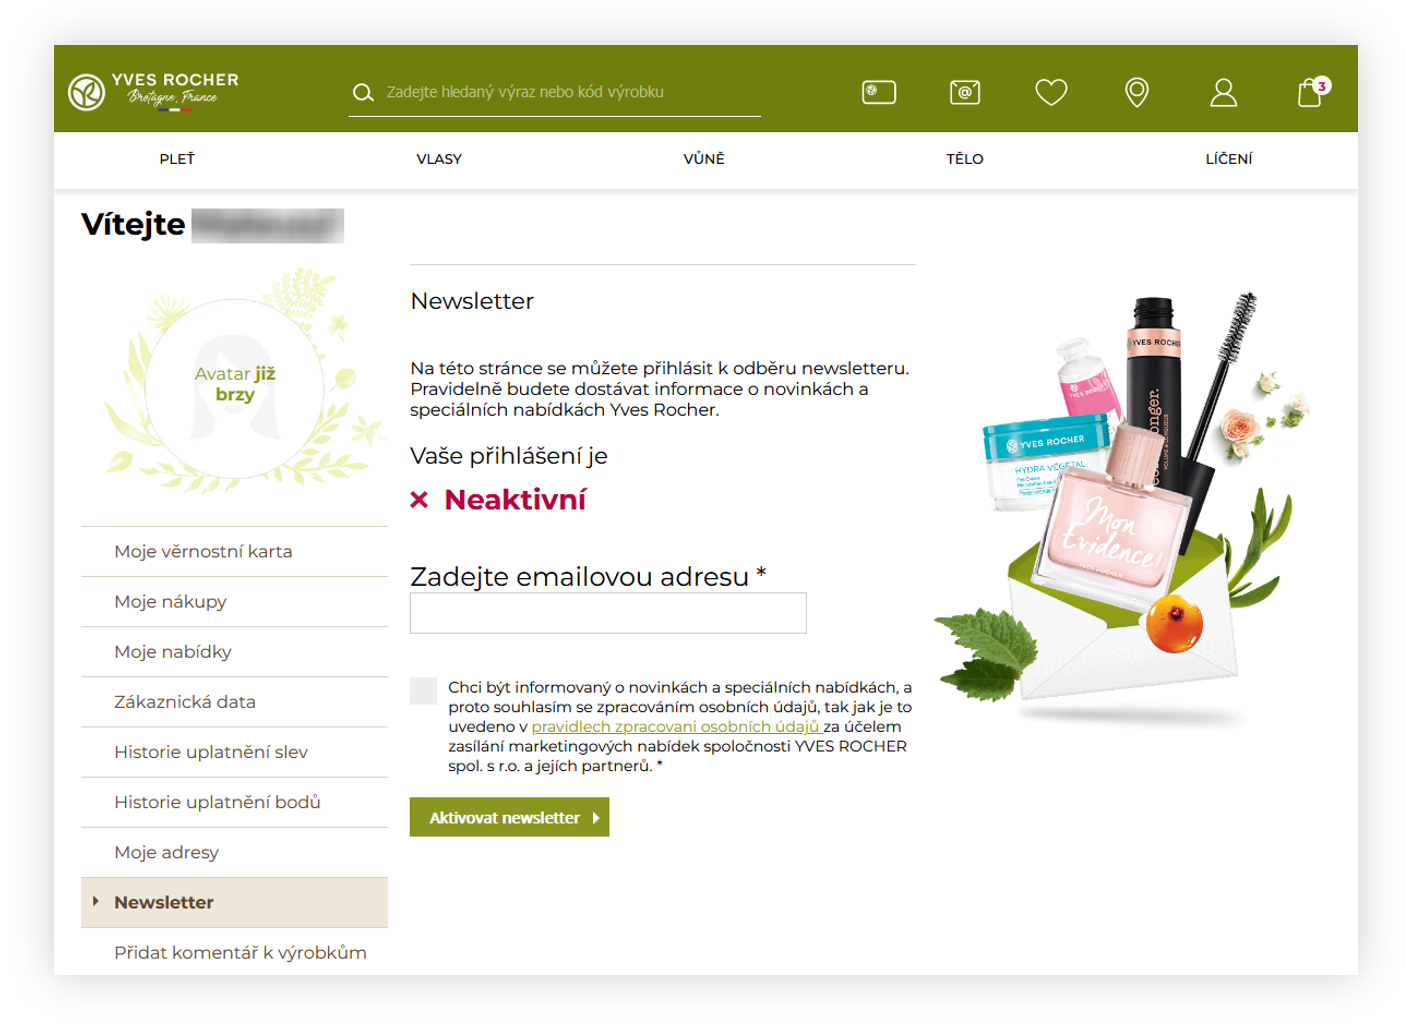 |
| *Visualization of the /customer/newsletter page* |
| 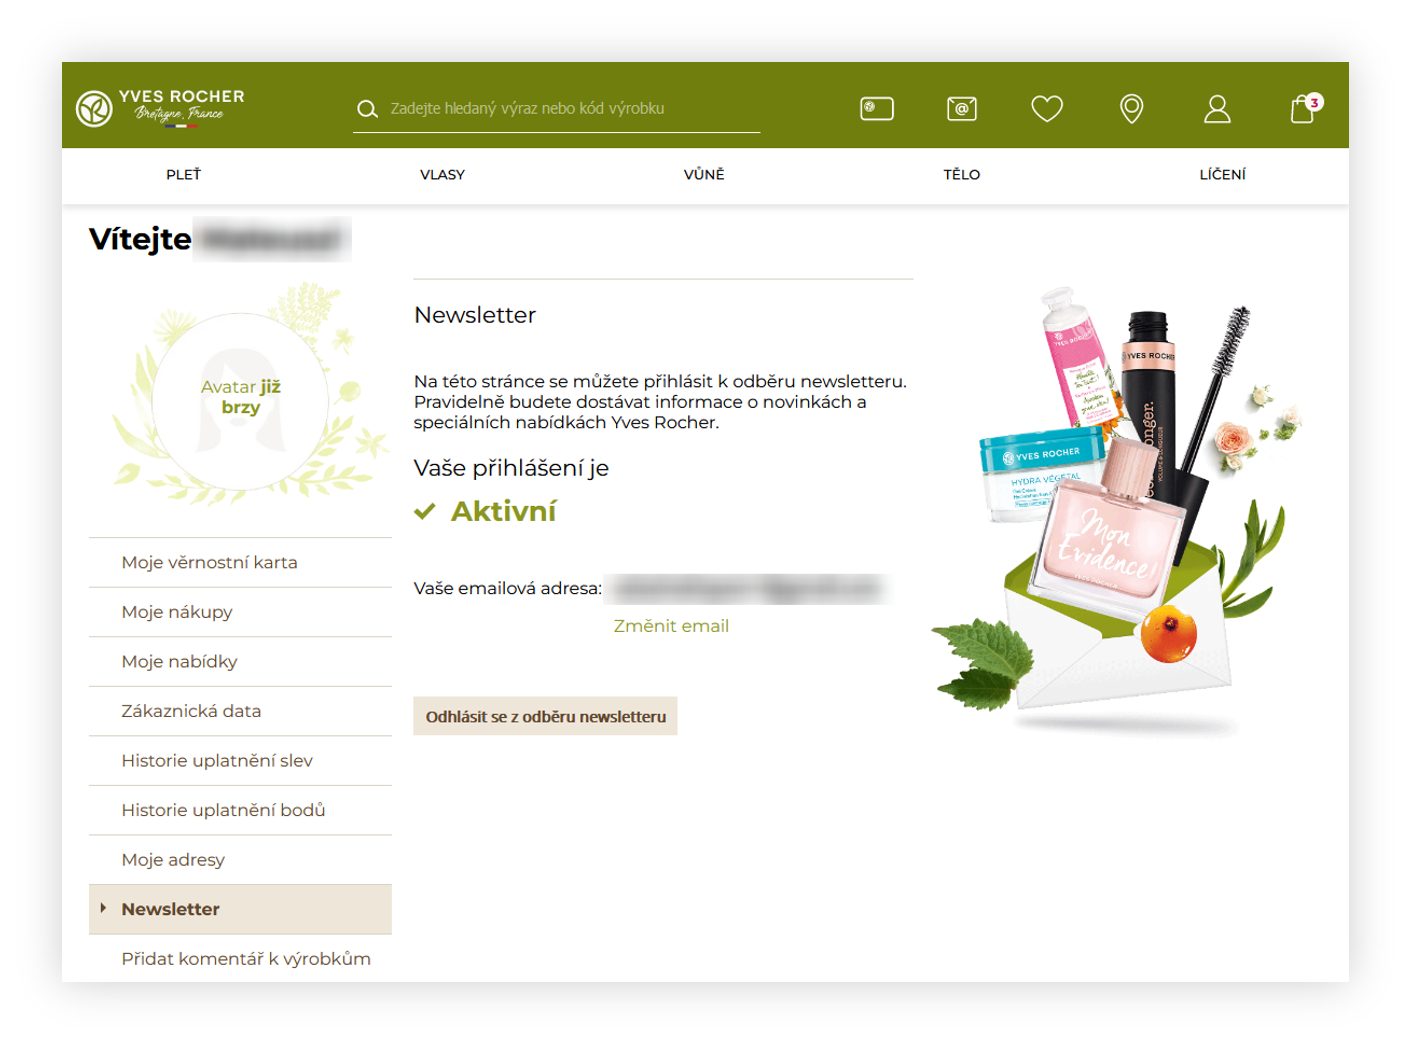 |
| *Visualization of the /customer/newsletter page* |
| 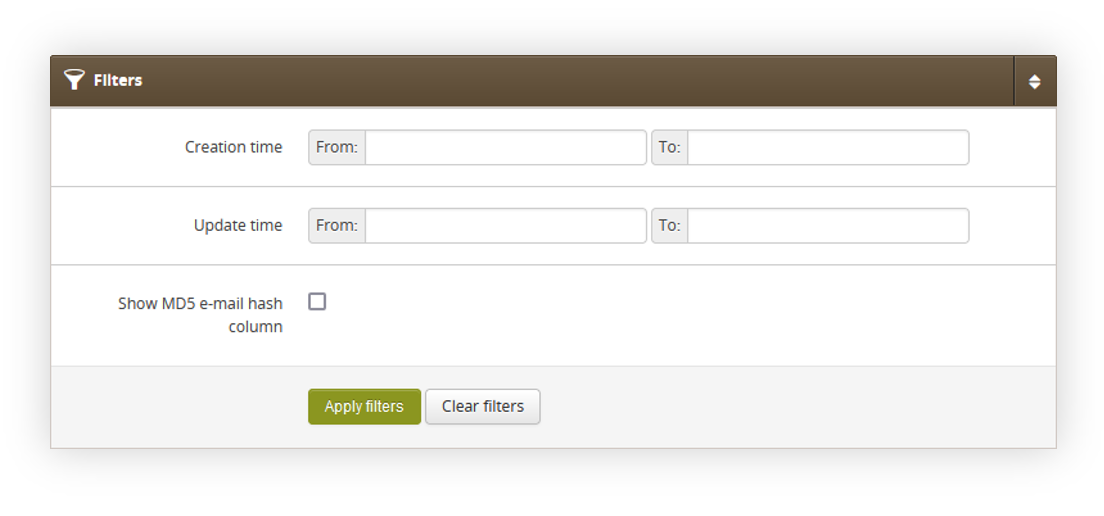 |
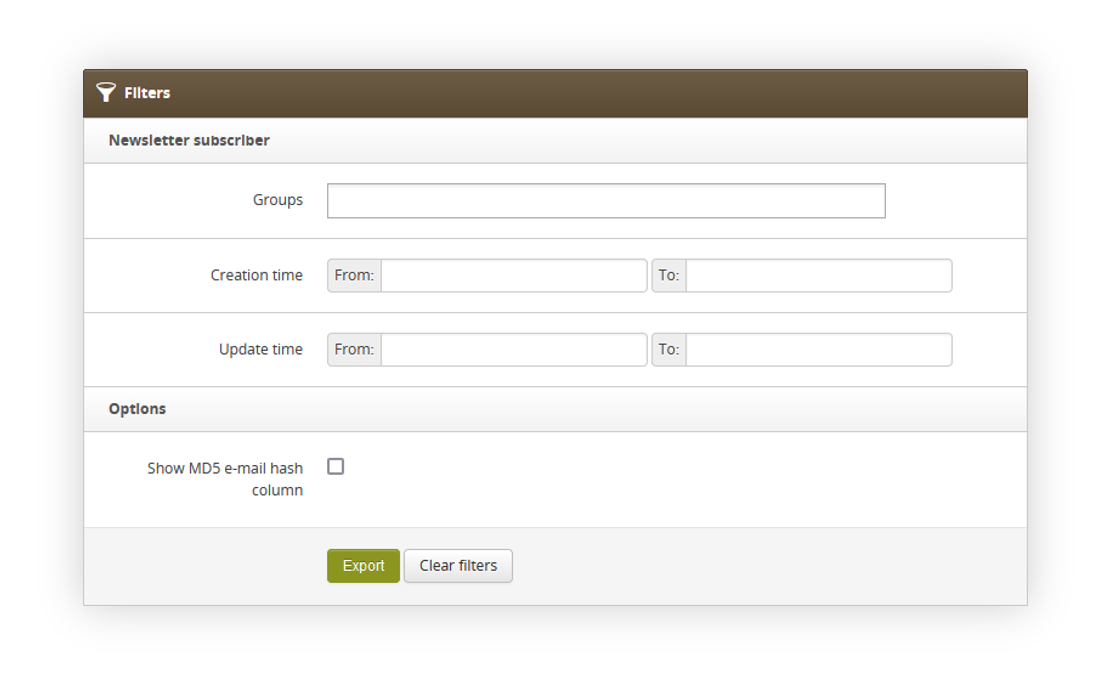
| *Visualization of the Subscribers / list filters* |
| 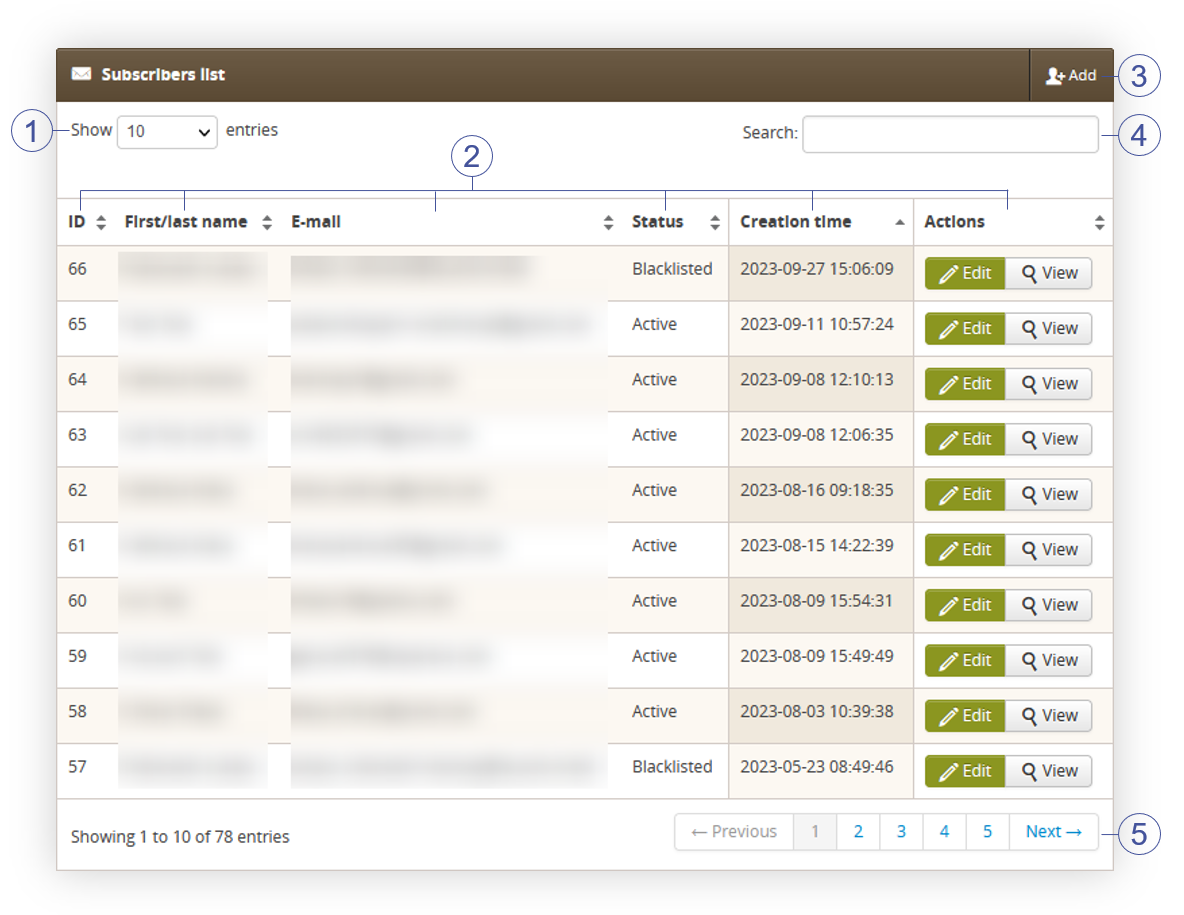 |
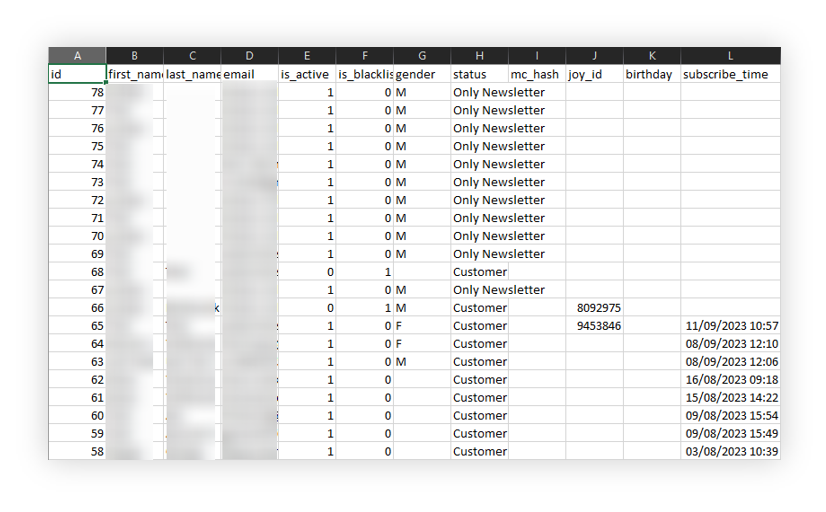
| *Visualization of the Subscribers list tab* |
| 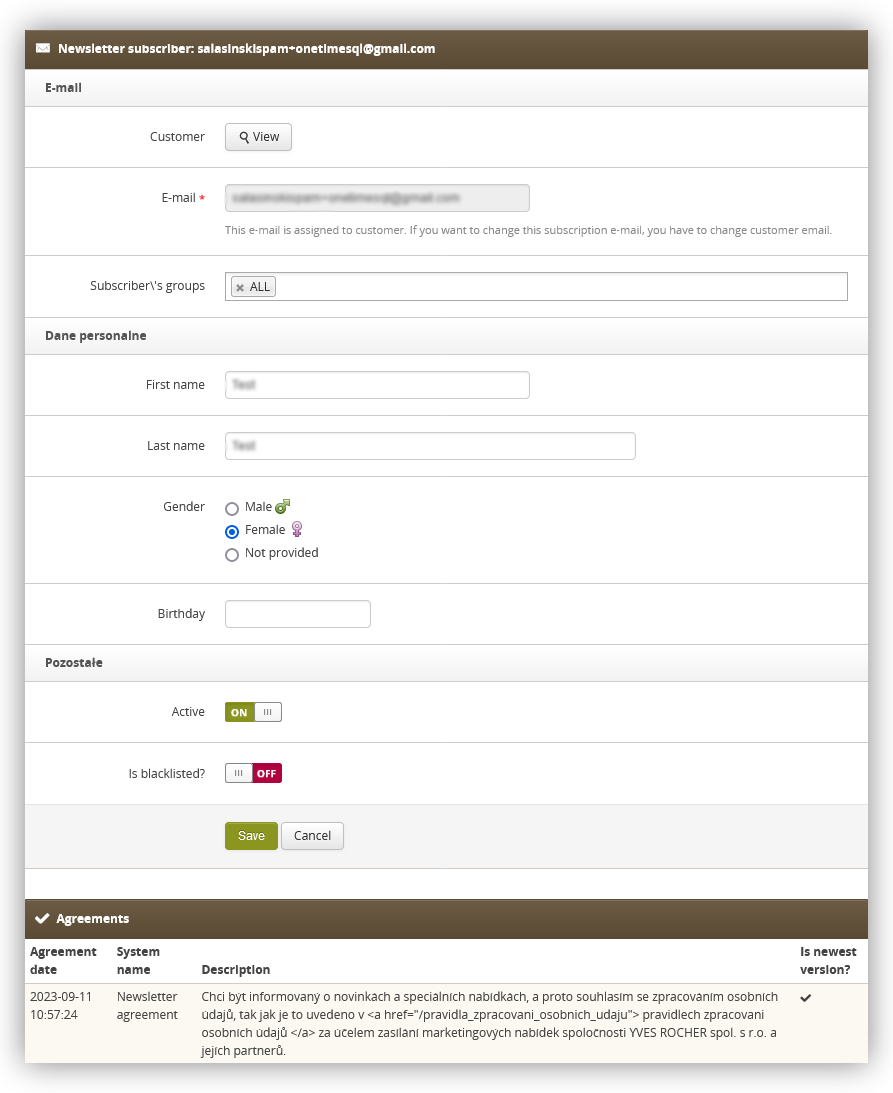 |
| *Visualization of the customer in the subscribers / list* |
| 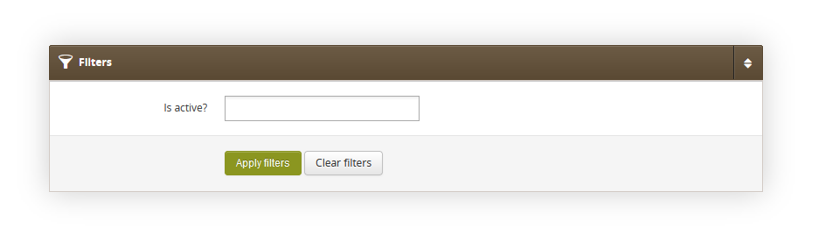 |
| *Visualization of the filters in subscribers groups.* |
| 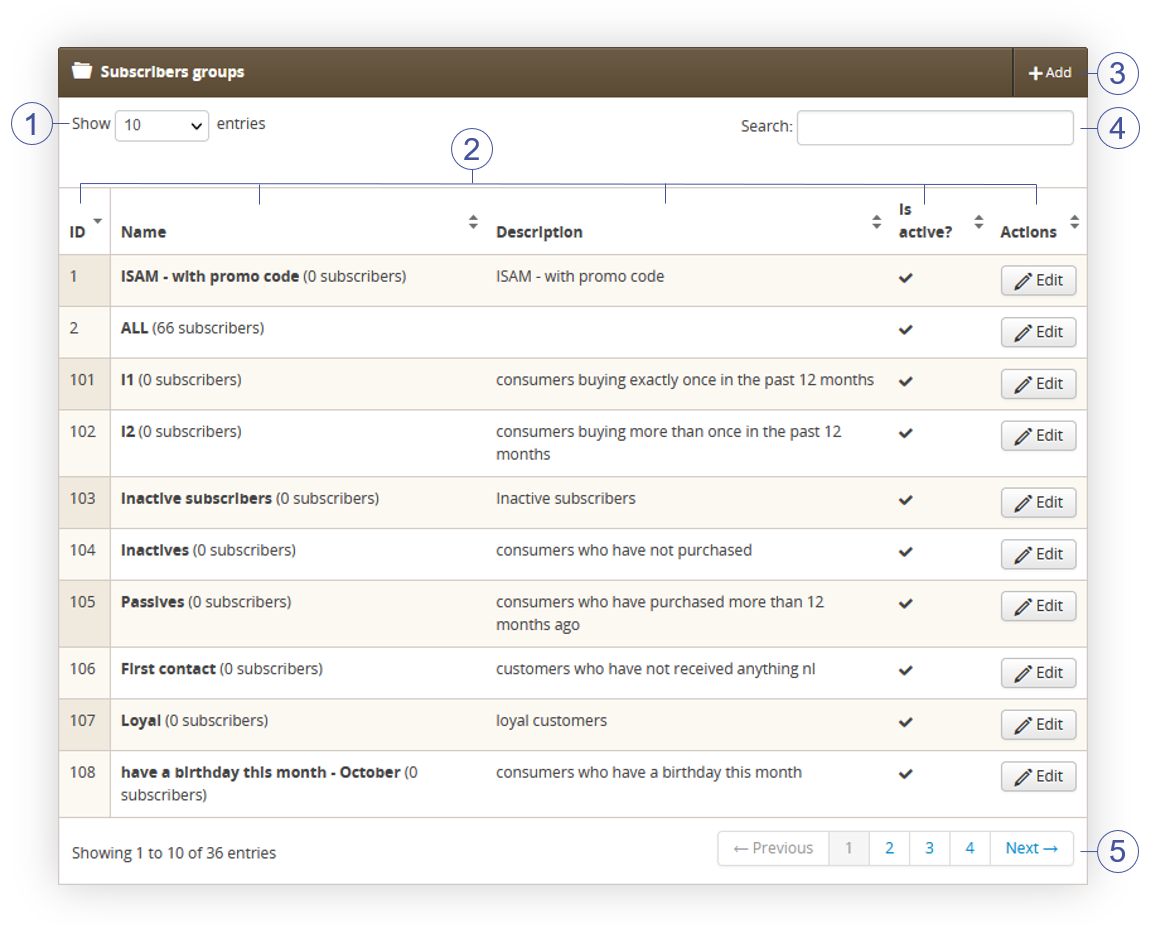 |
| *Visualization of the subscribers groups* |
| 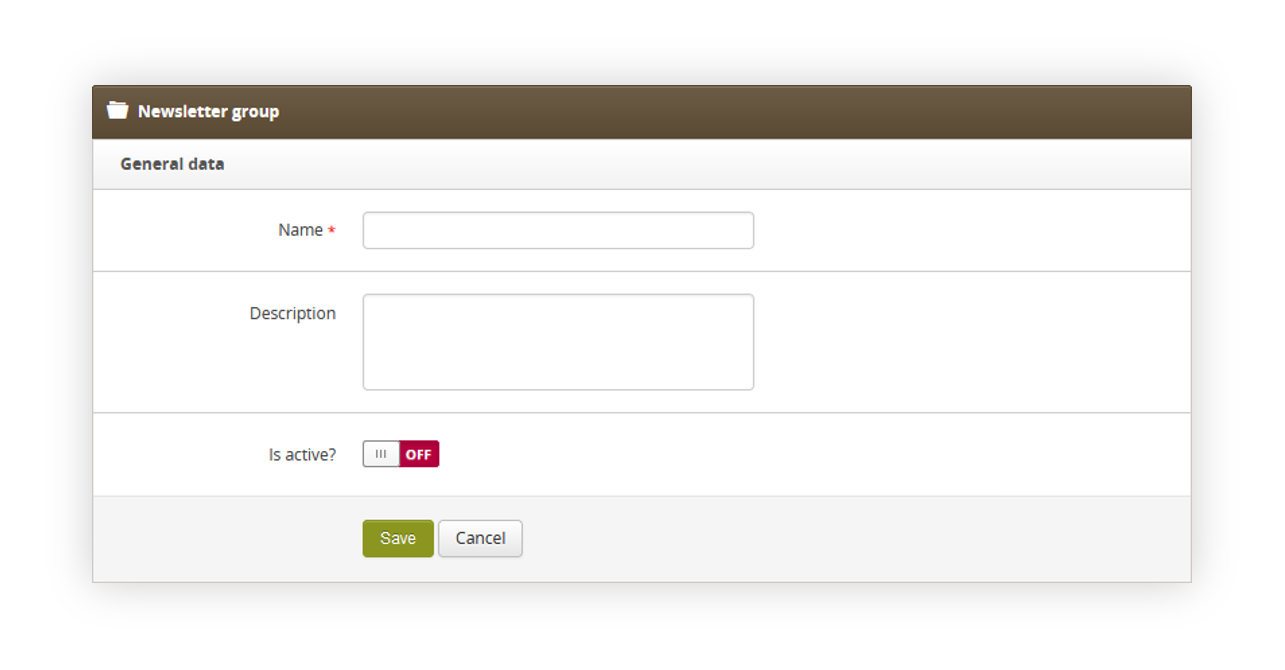 |
| *Visualization of the subscriber group creation* |
| 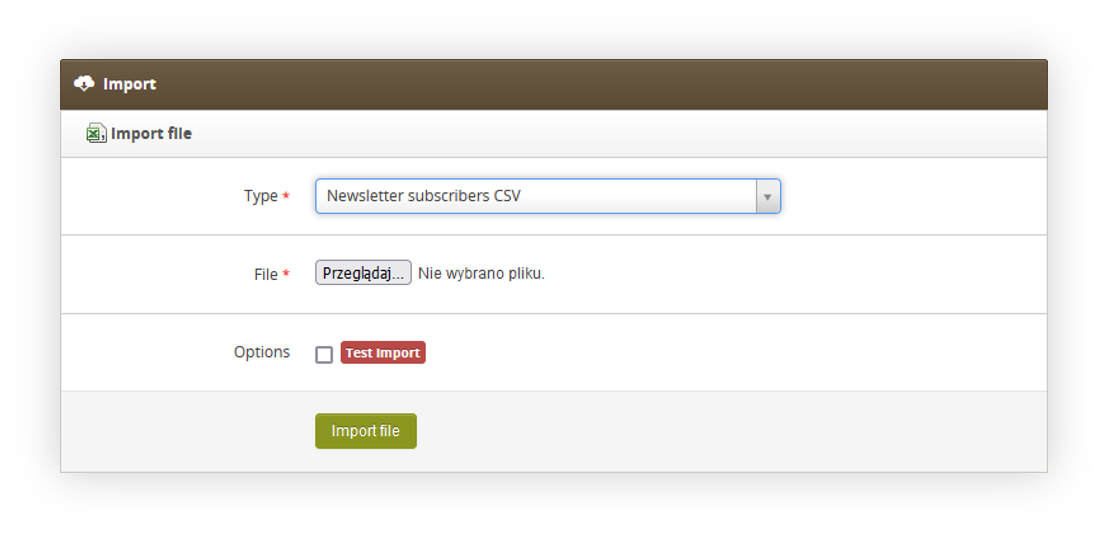 |
| *Visualization of the subscribers import* |
| 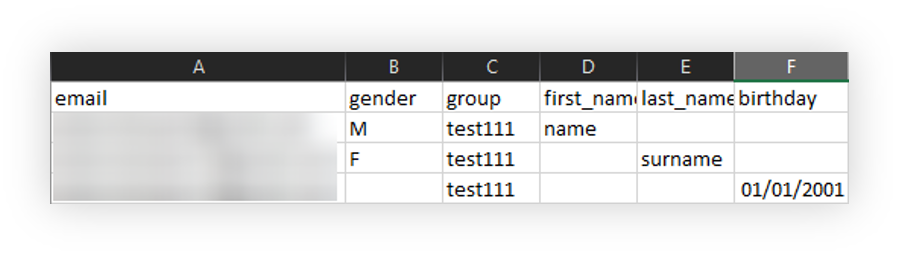 |
| *Visualization of the subscribers csv file* |
|  |
| *Visualization of the subscribers csv file* |
|  |
| *Visualization of the exported subscribers file* |
|  |
| *Visualization of the invitation e-mail* |
|  |
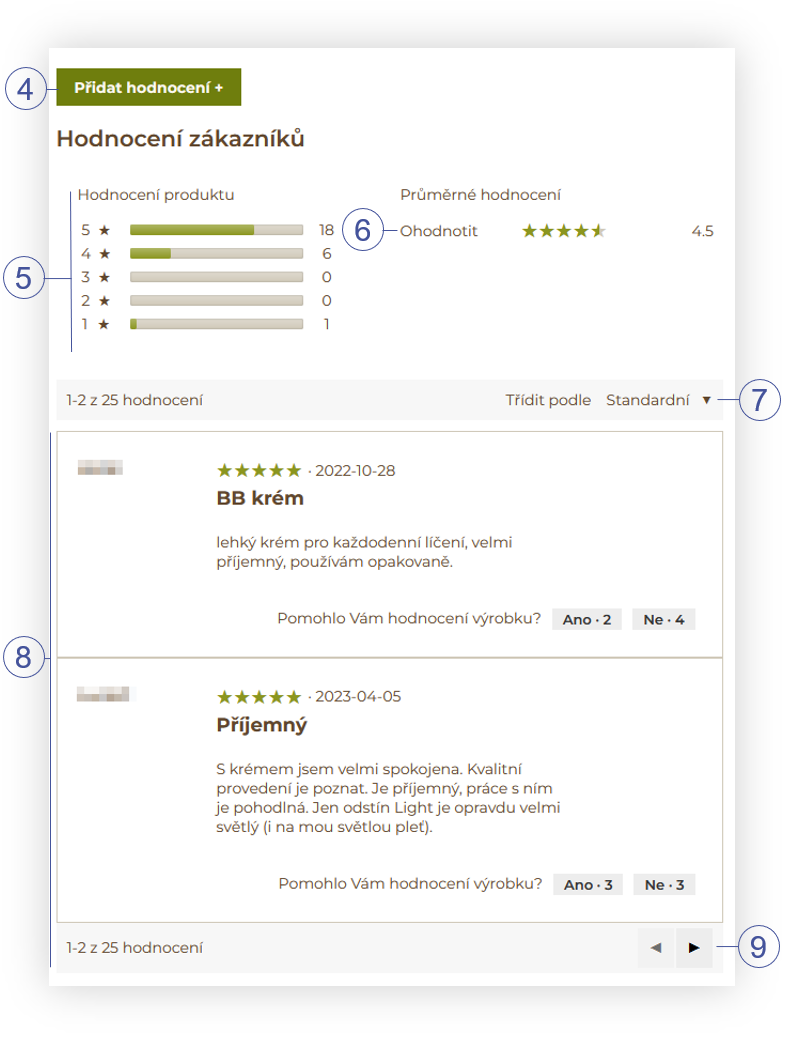
| *Visualization of the customer panel reviews page* |
| 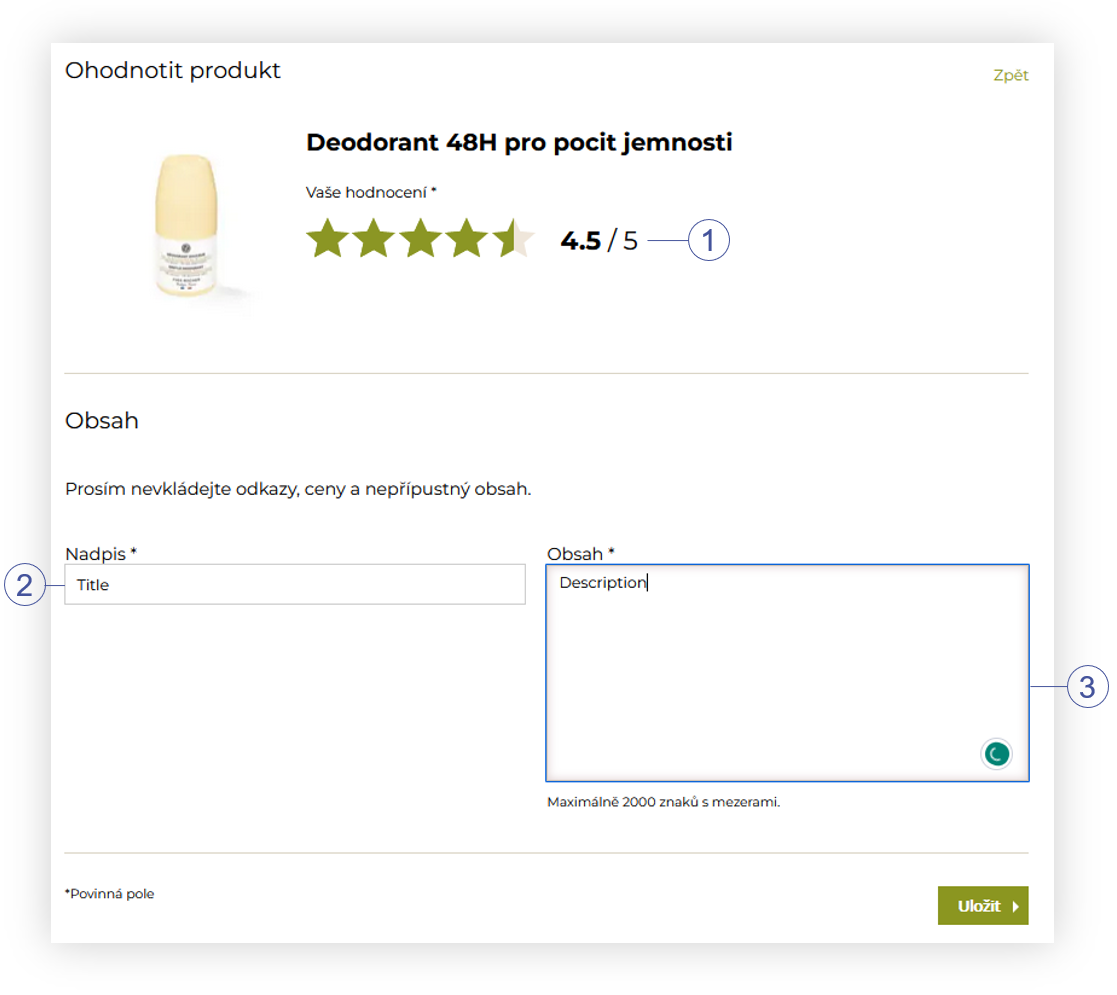 |
| *Visualization of the review creation page* |
|  |
| *Visualization of the reviews on the product page* |
| 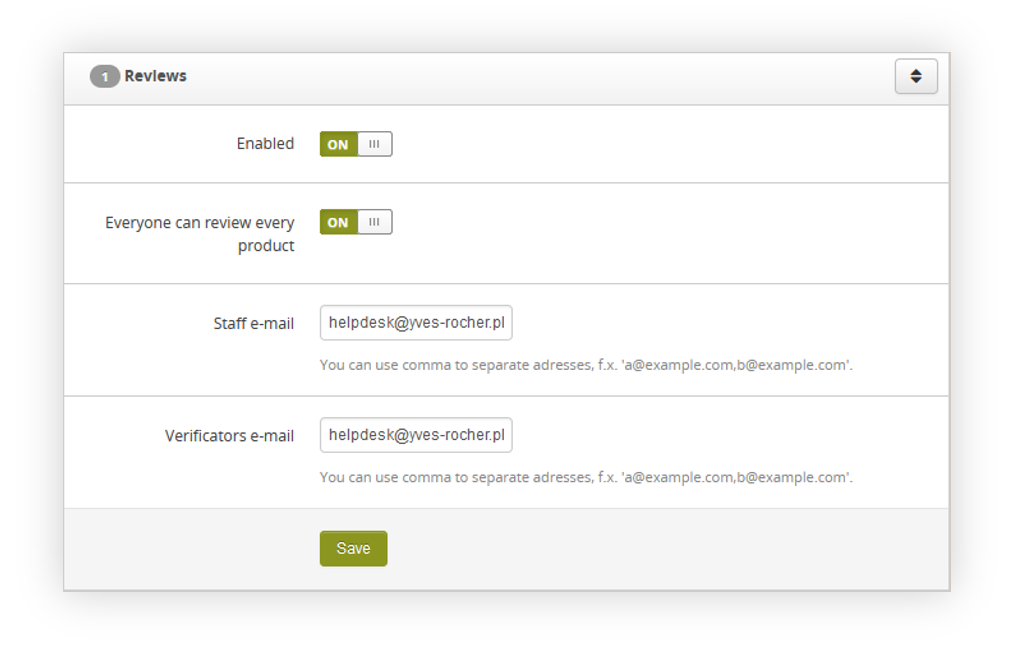 |
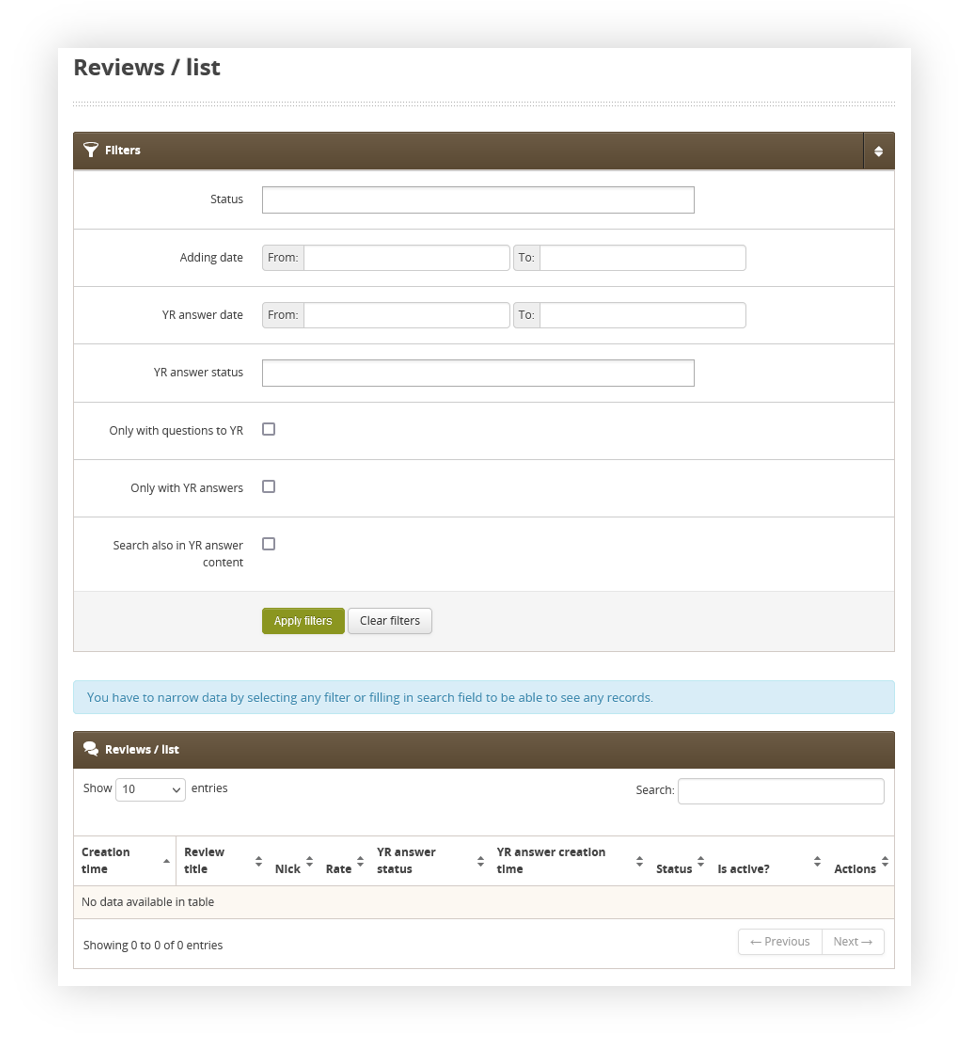
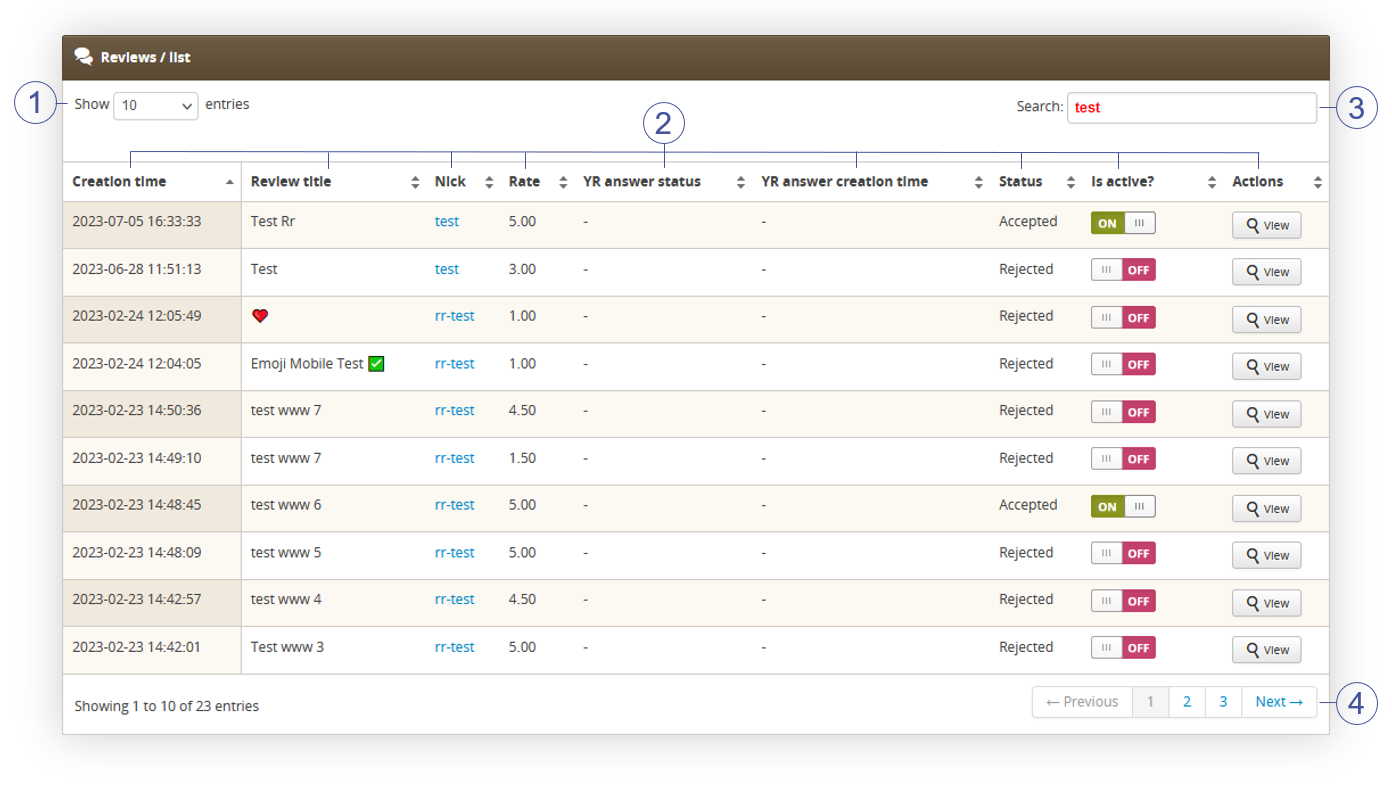
| *Visualization of the reviews tab* |
| 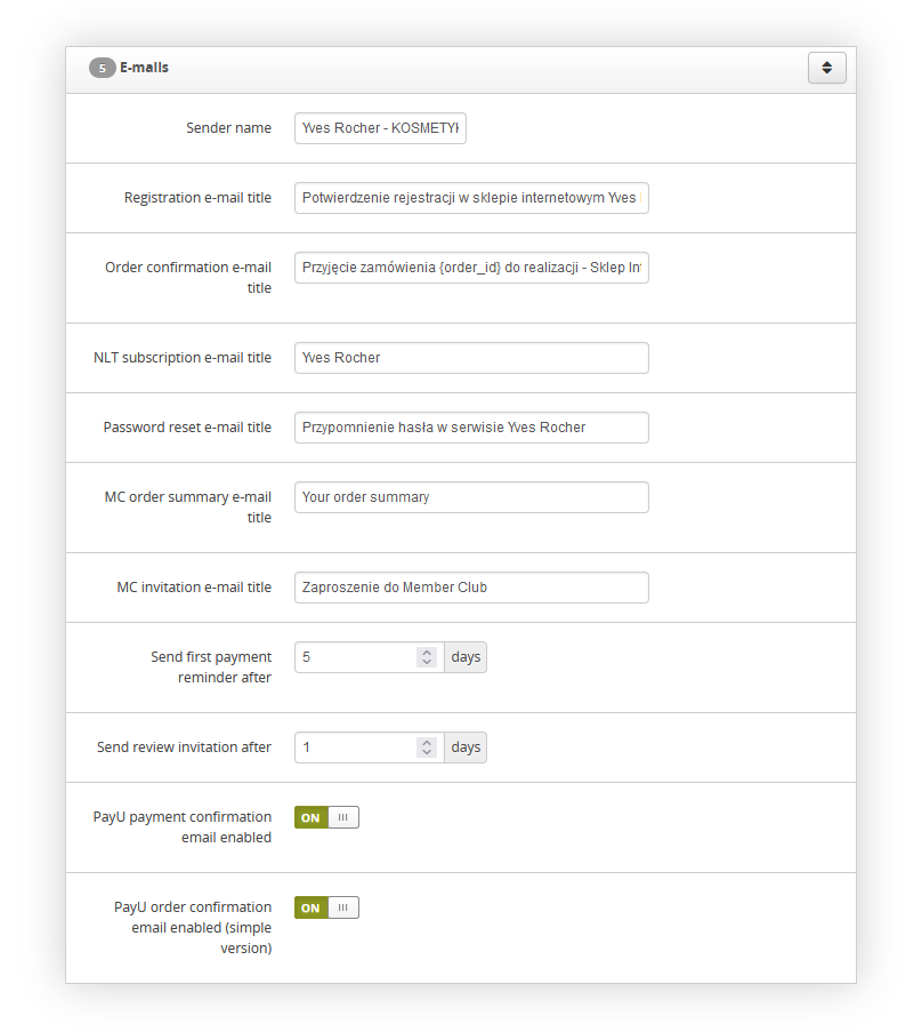 |
| *Visualization of the e-mails tab* |
|  |
| *Visualization of the loyalty points tab* |
| 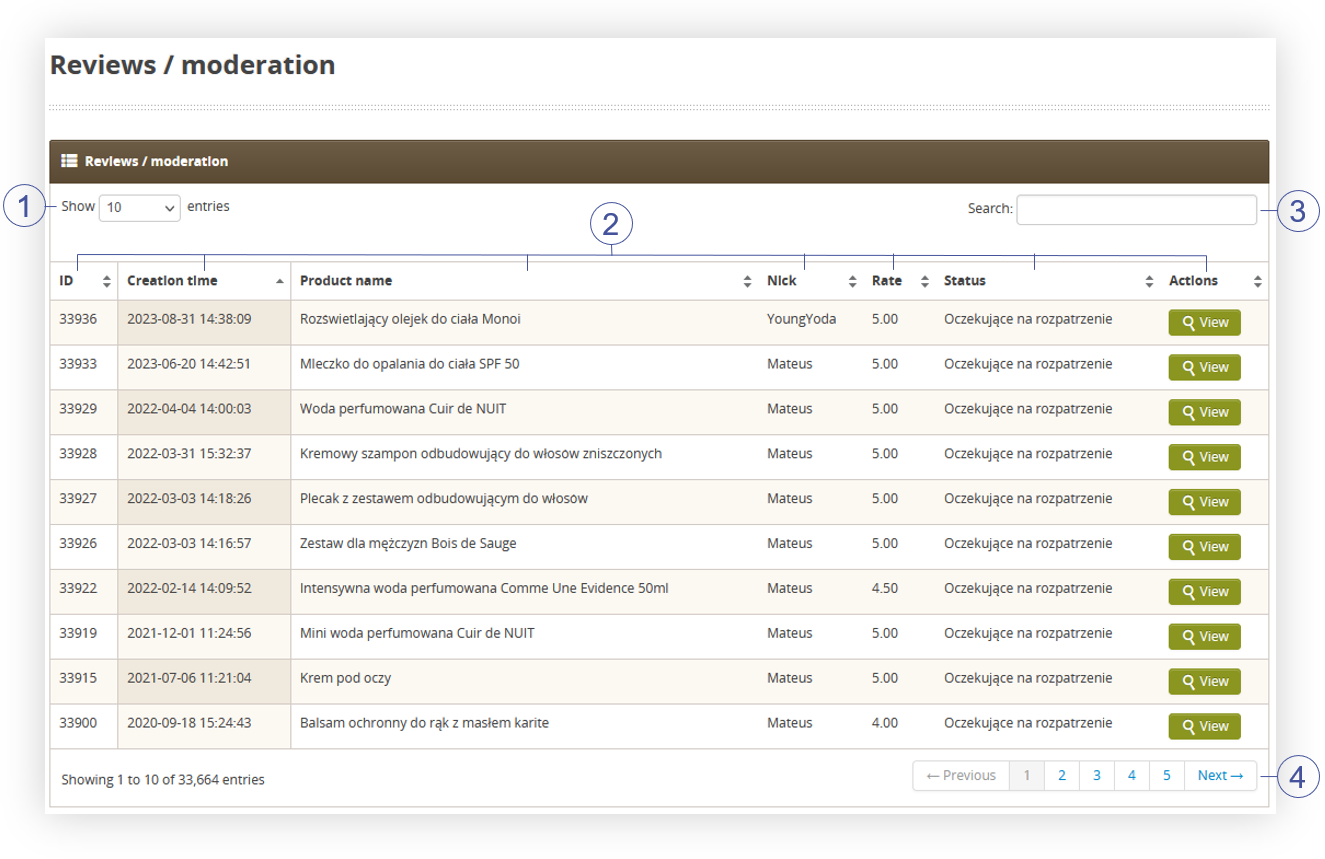 |
| *Visualization of the reviews moderation page* |
| 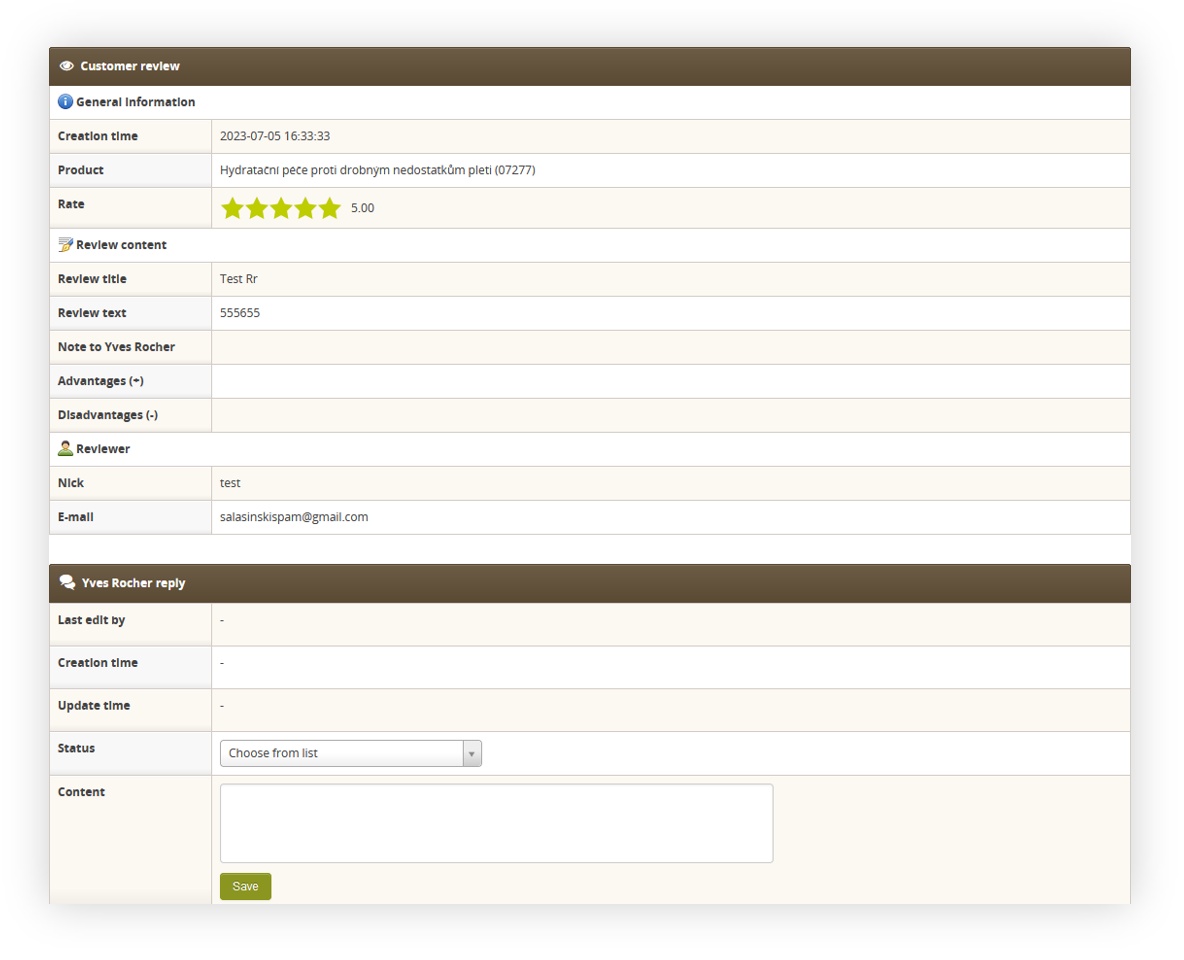 |
| *Visualization of the review details* |
|  |
| *Visualization of the* |
|  |
| *Visualization of the* |
|  |
| *Visualization of the review details* |
| 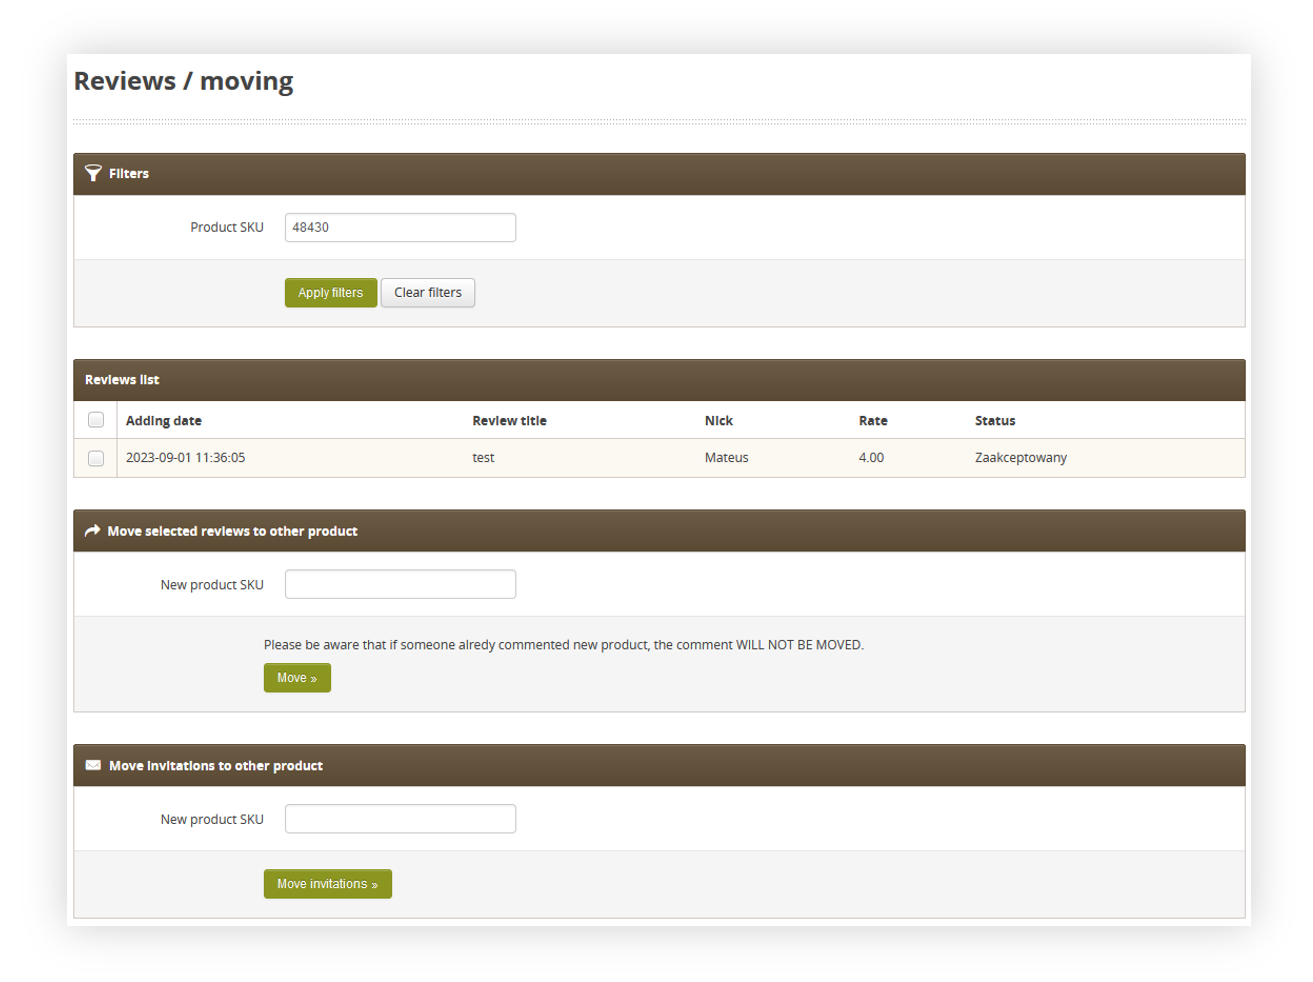 |
| *Visualization of the reviews moving page* |
|  |
| *R&R diagram* |
|  |
| *Visualization of the product category page* |
| 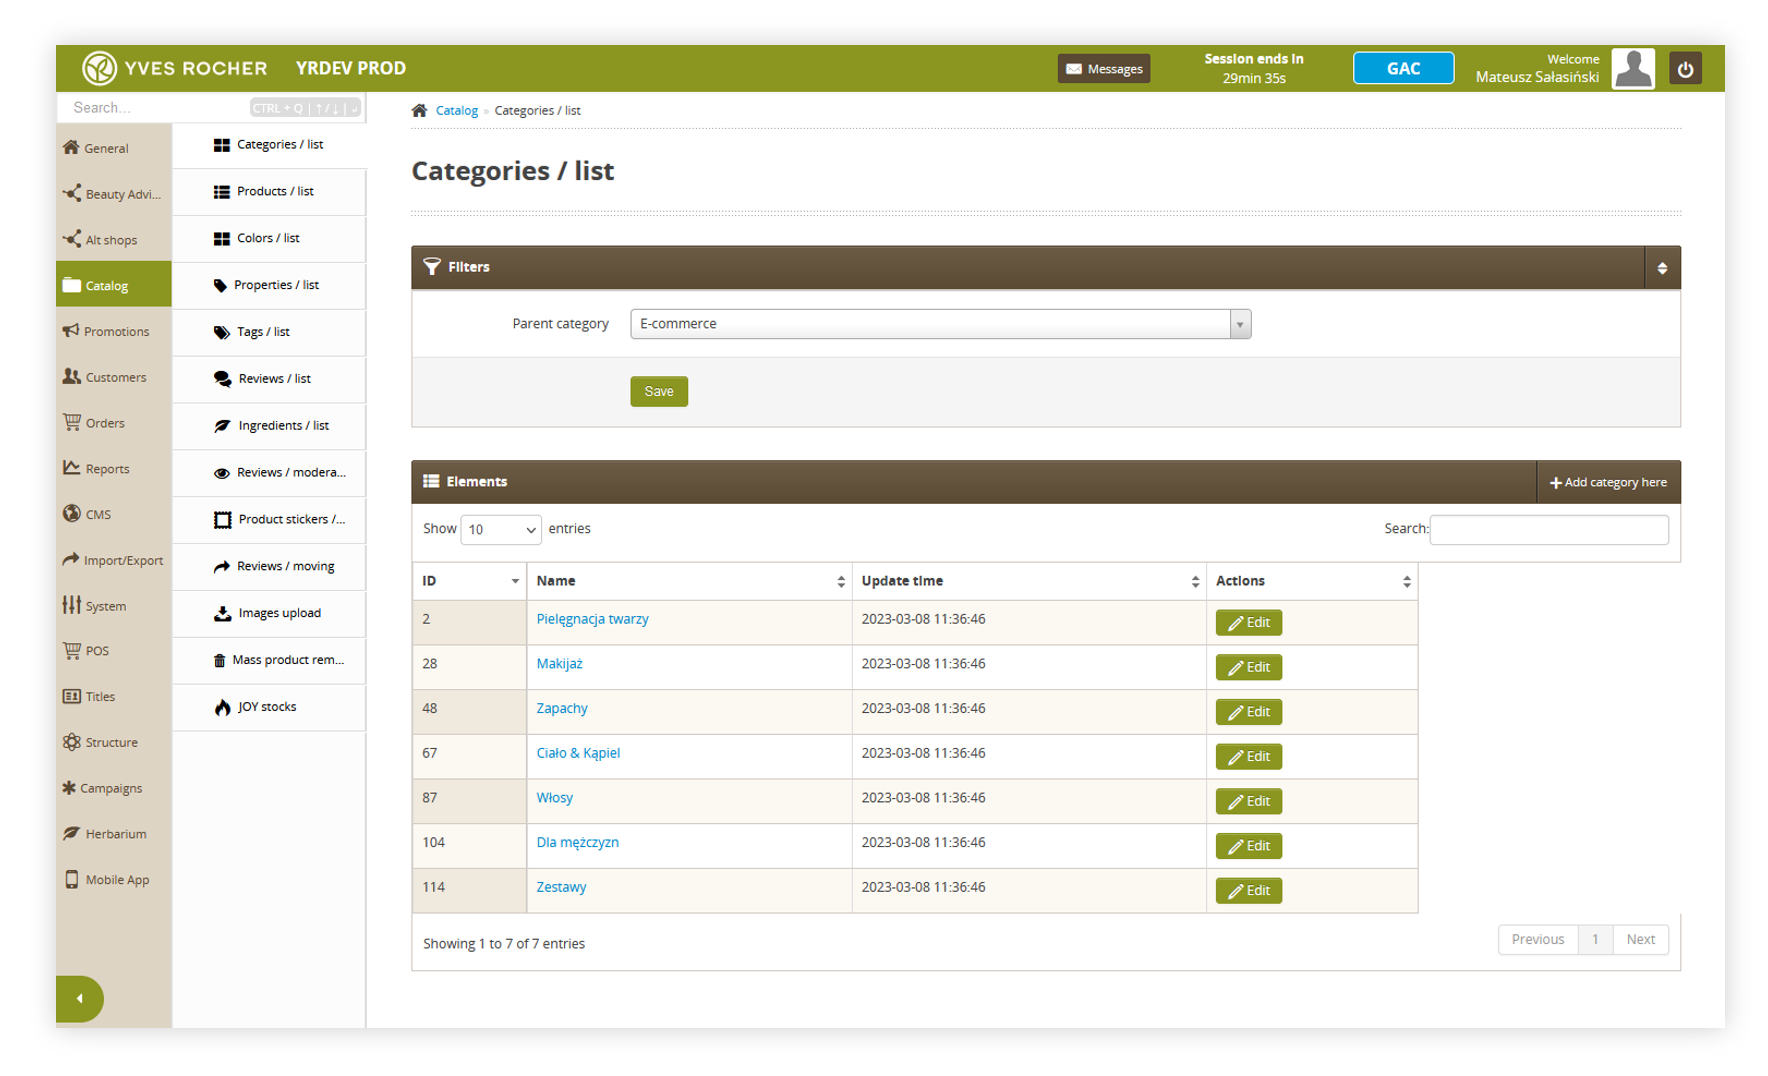 |
| *Visualization of the categories / list tab* |
| 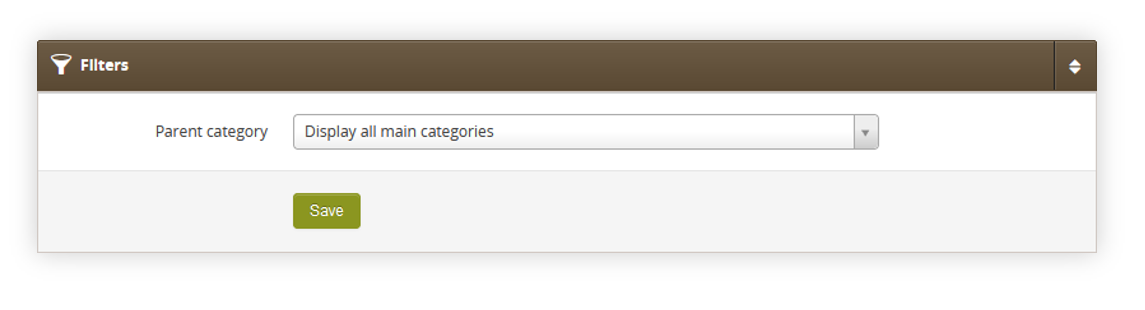 |
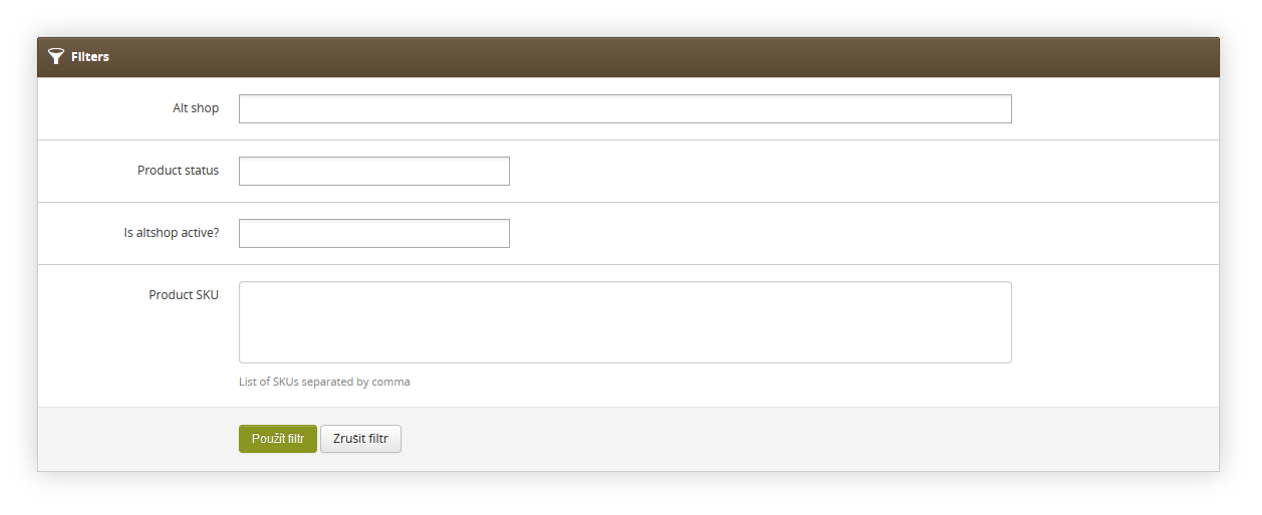
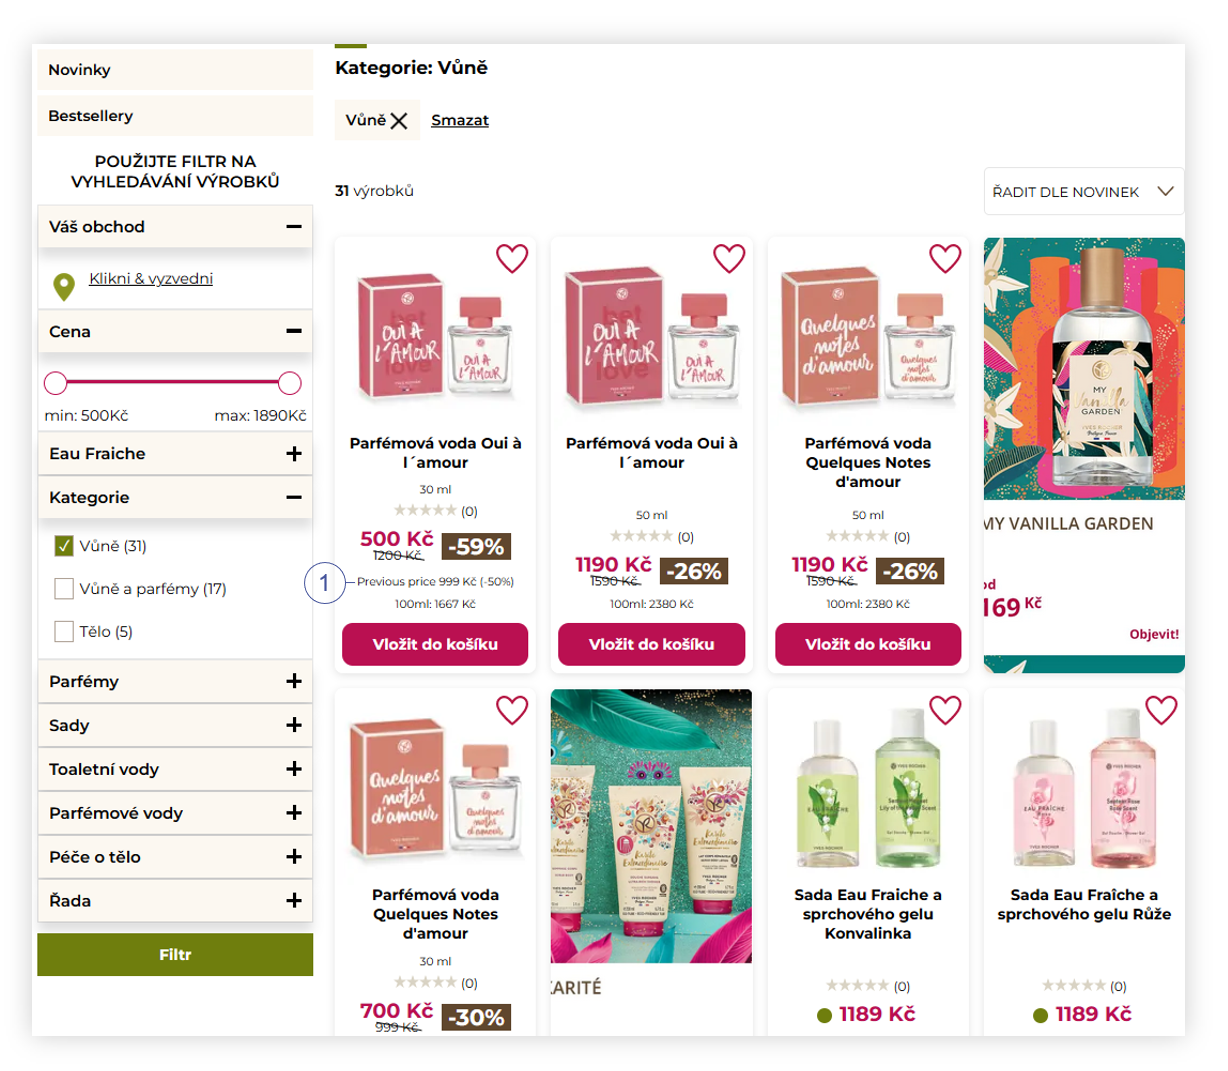
| *Visualization of the filters section* |
| 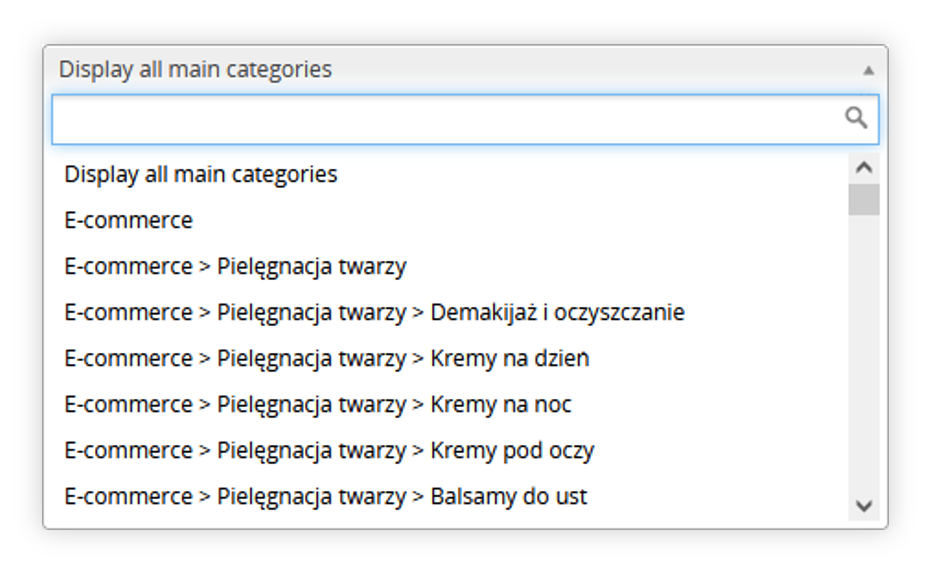 |
| *Visualization of the categories drop-down menu* |
| 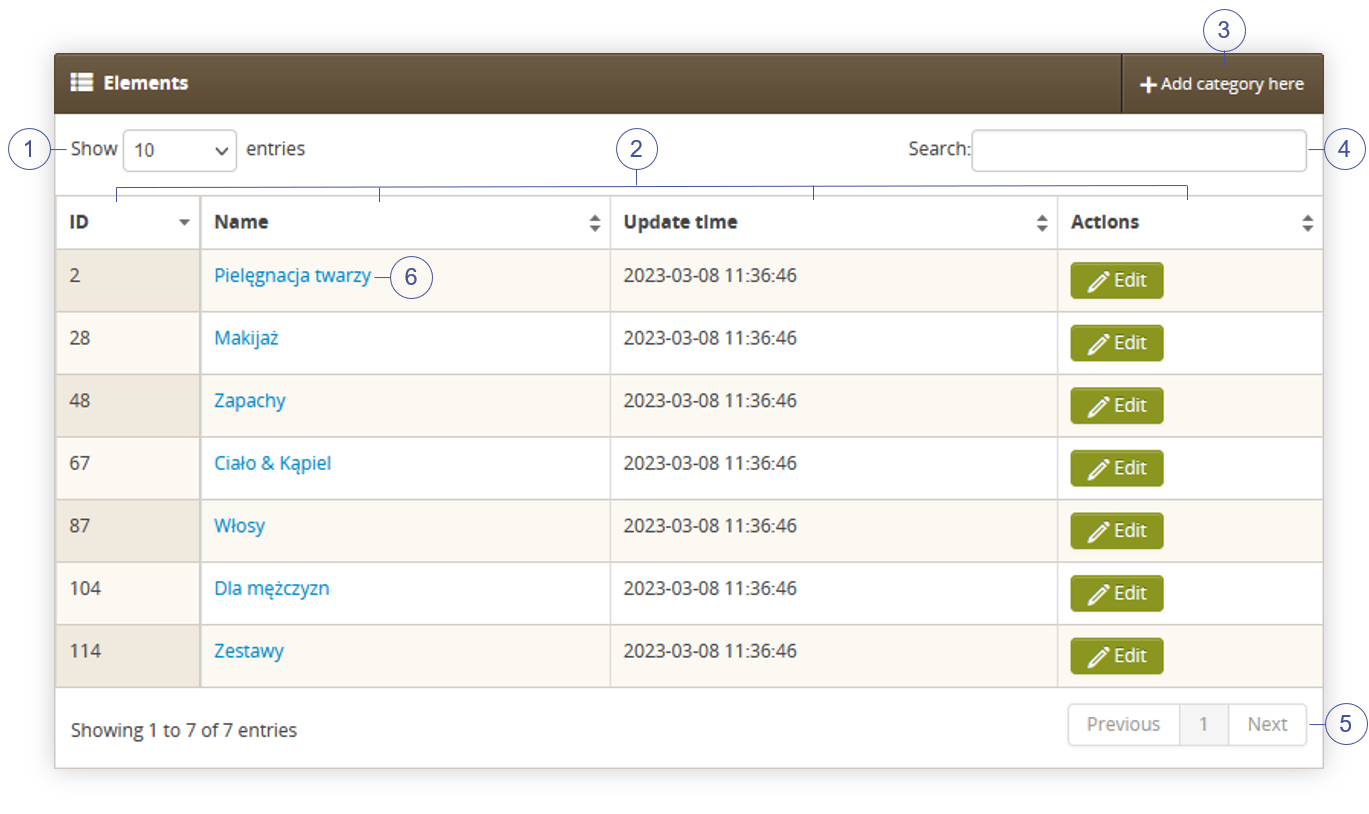 |
| *Visualization of the elements section* |
| 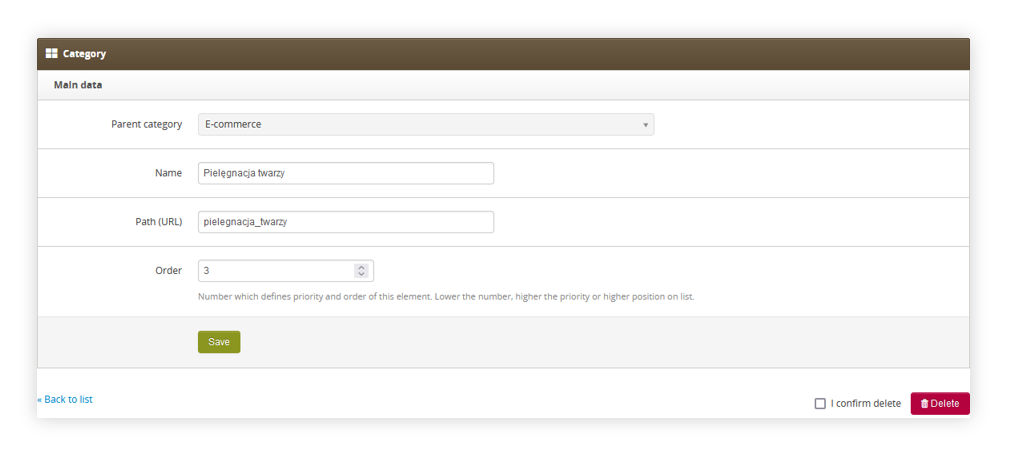 |
| *Visualization of the editing of a category* |
|  |
| *Visualization of the functionality system settings* |
|  |
| *Visualization of the delivery point widget functionality* |
|  |
| *Visualization of the delivery types / list* |
| 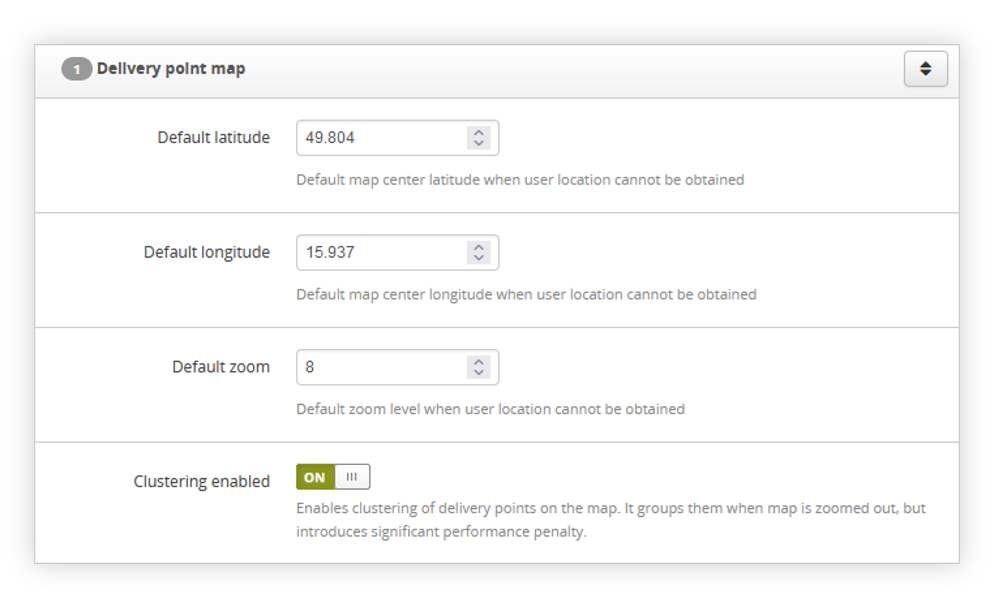 |
| *Visualization of the delivery point map settings* |
| 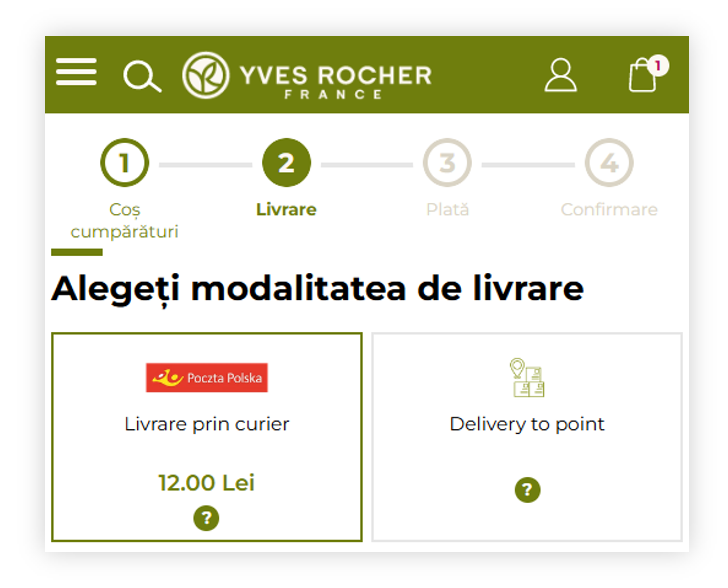 |
| *Visualization of the delivery method step in the cart process* |
|  |
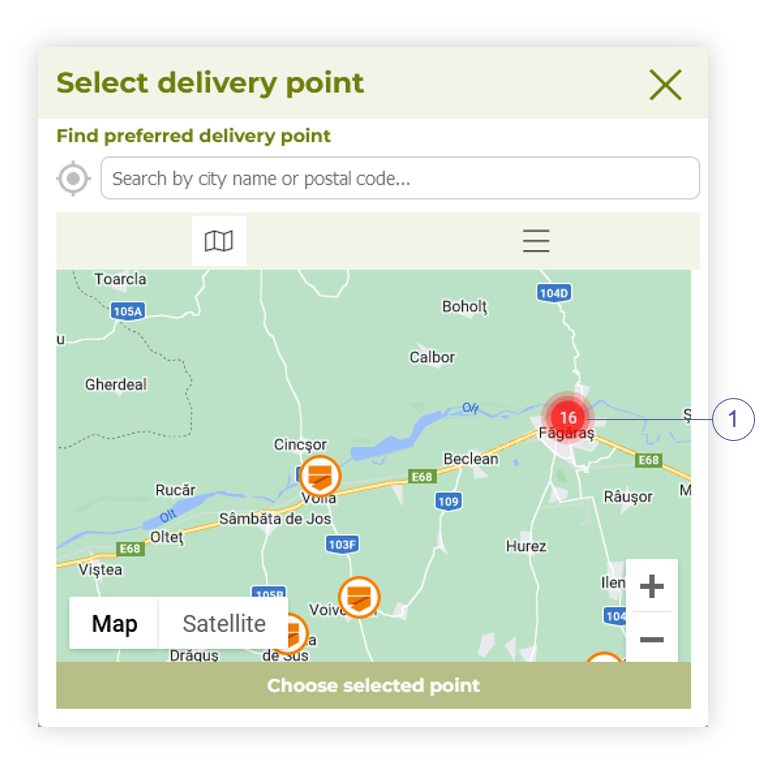
| *Visualization of the delivery point map (desktop)* |
|  |
| *Visualization of the delivery point map (mobile)* |
| 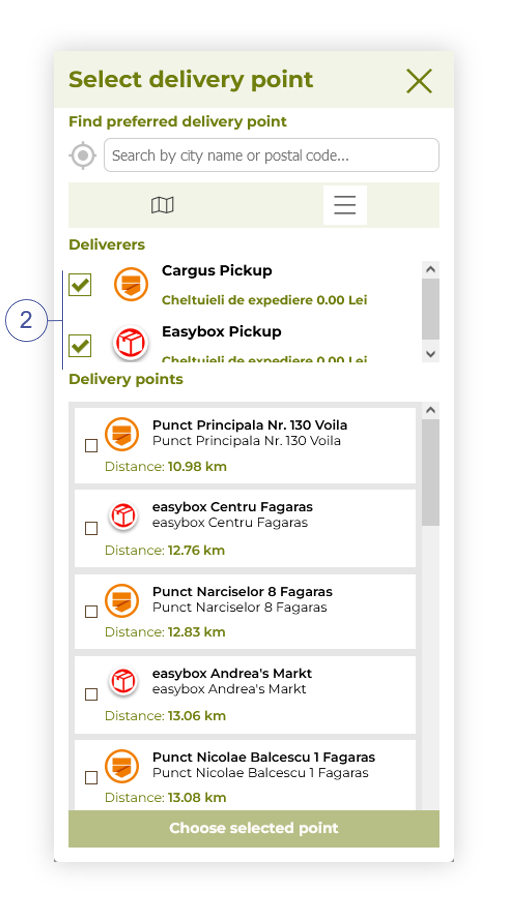 |
| *Visualization of the delivery points (mobile)* |
| 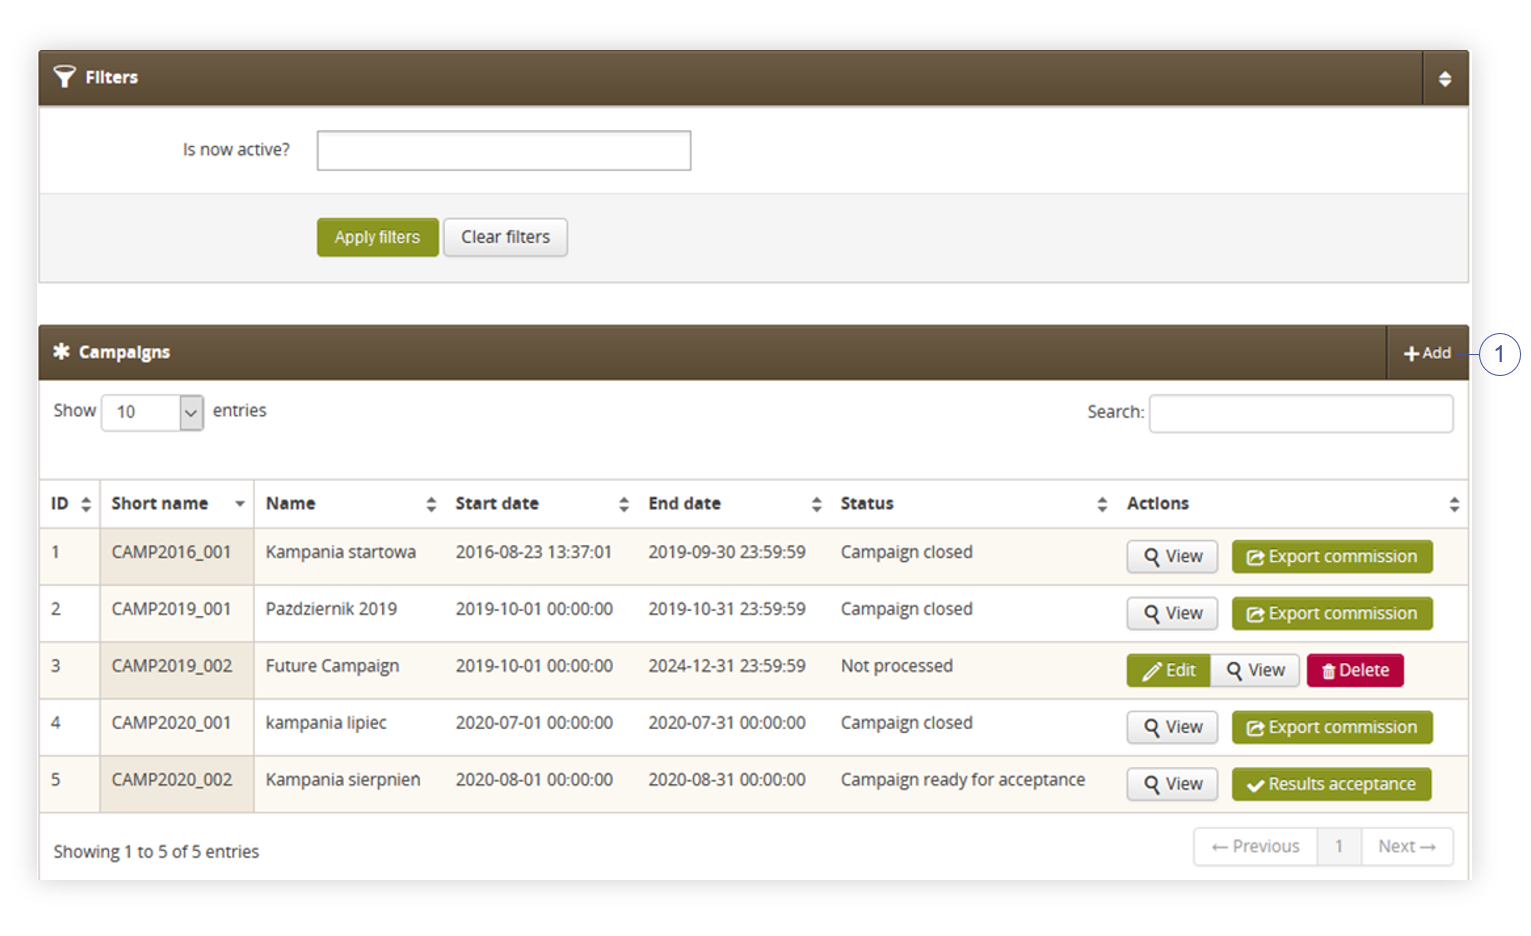 |
| *Visualization of the campaigns list* |
| 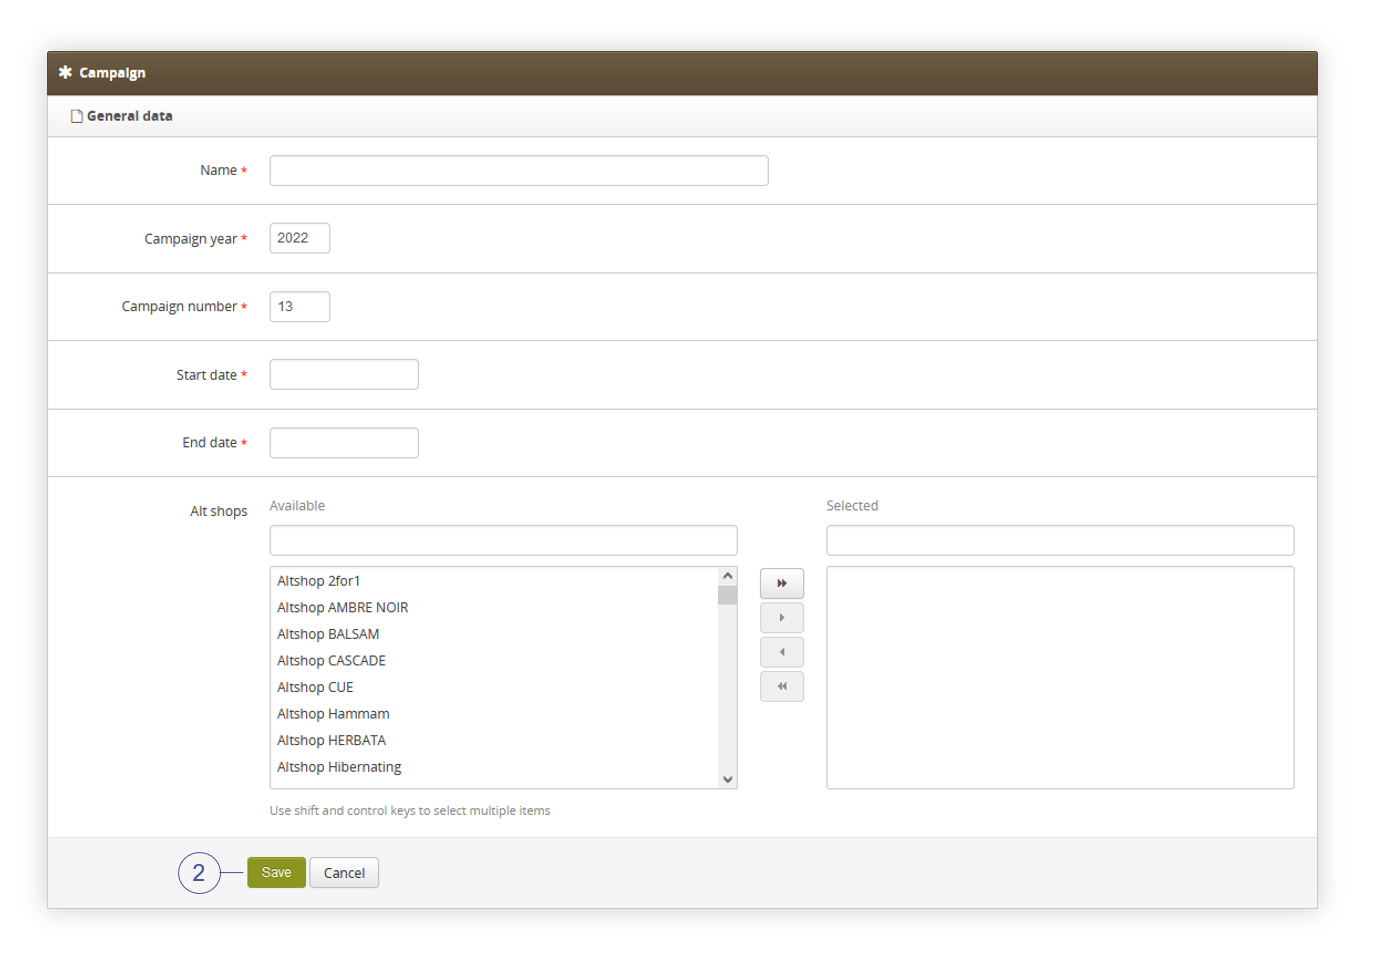 |
| *Visualization of the creating of the new campaign* |
| 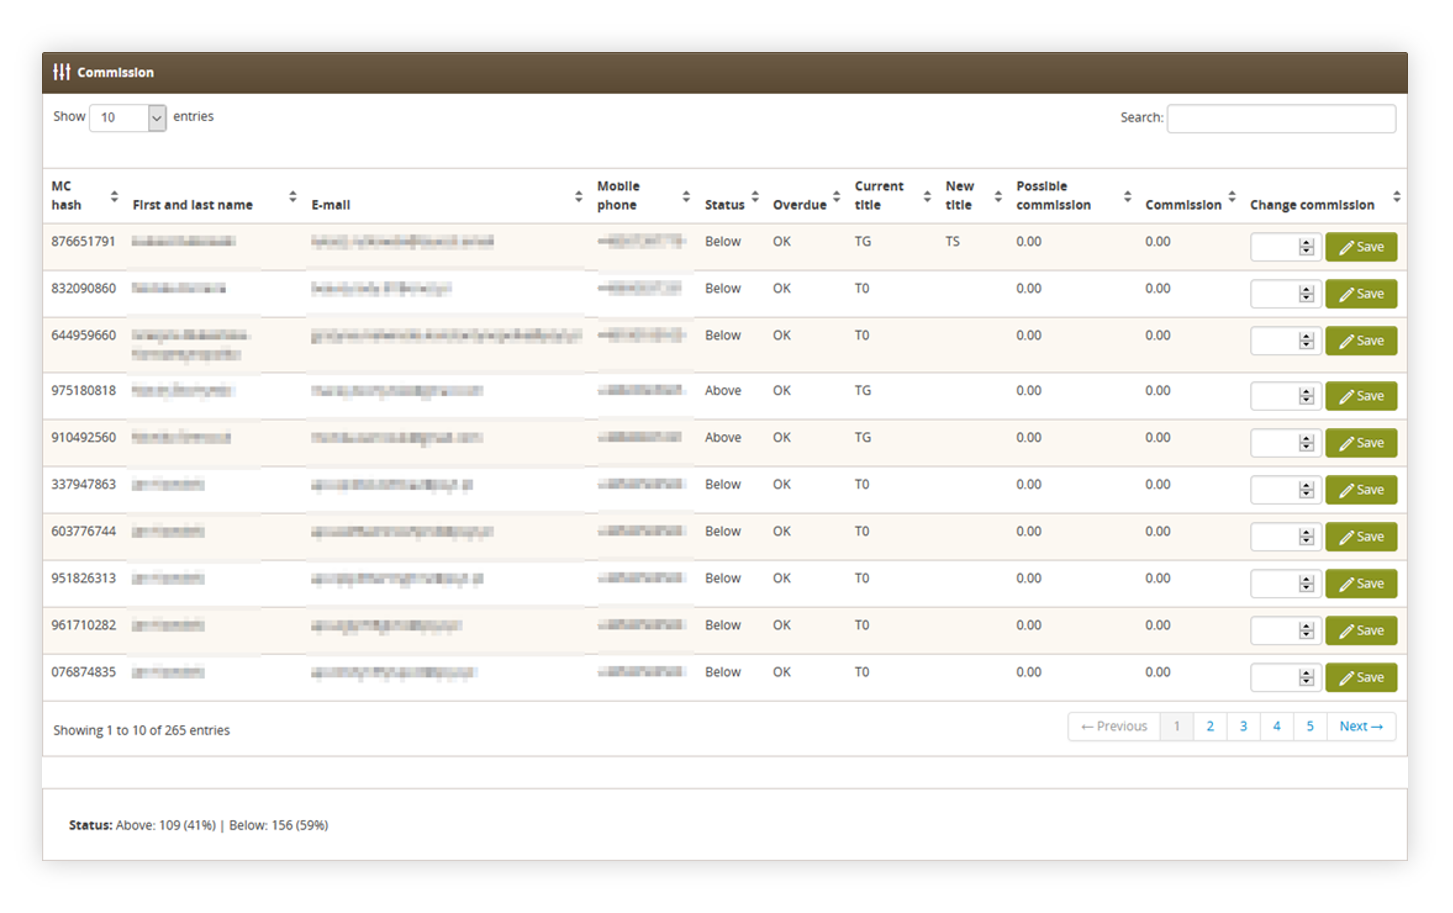 |
| *Visualization of the commision view* |
| 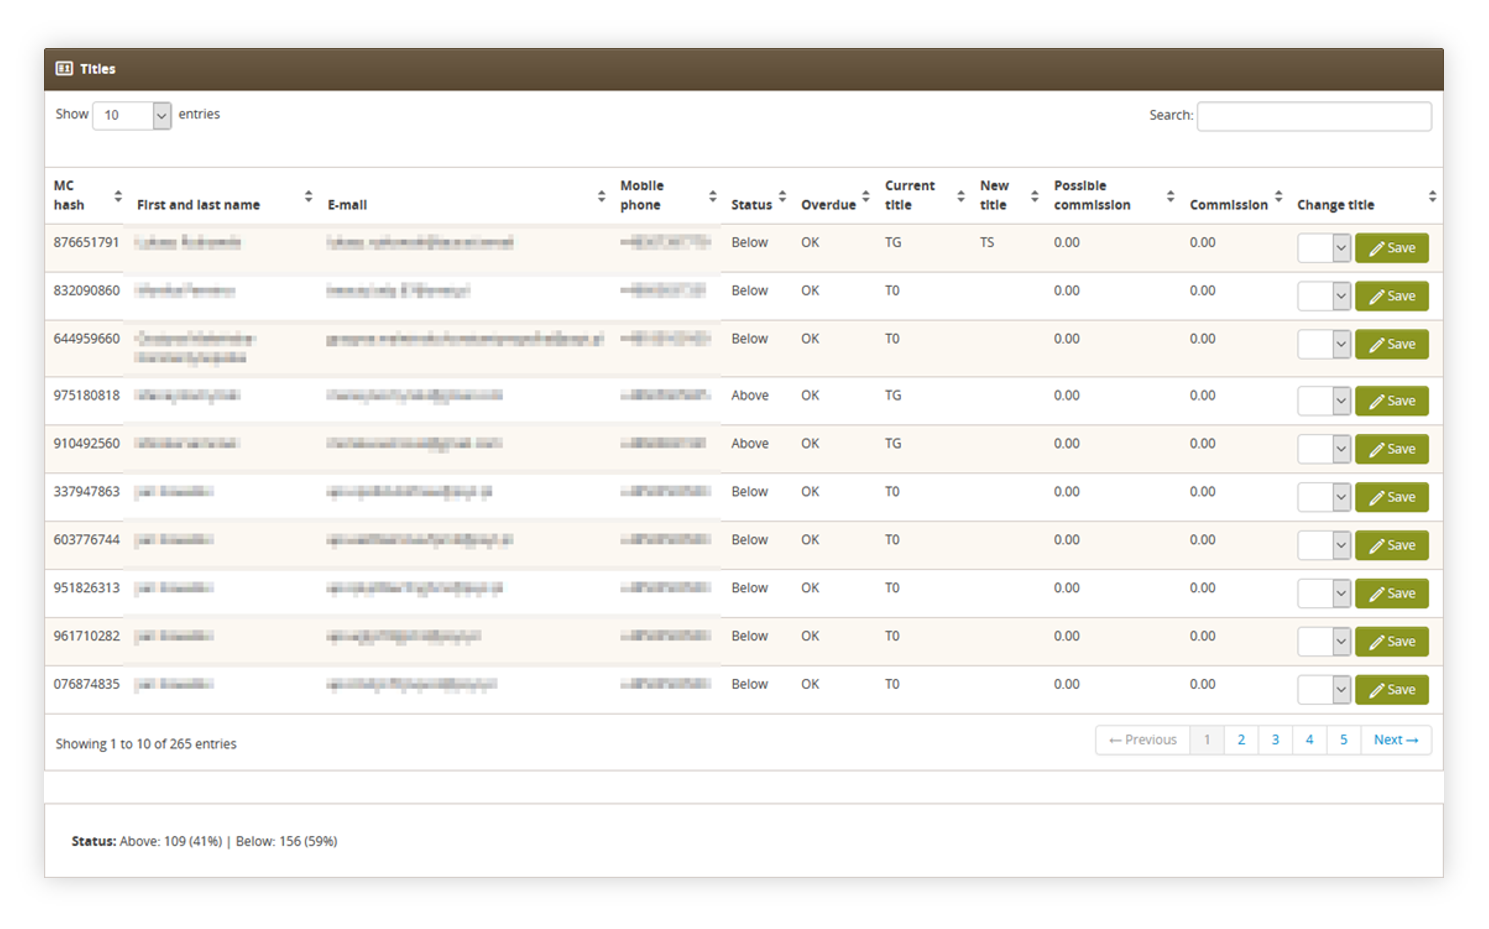 |
| *Visualization of the titles view* |
| 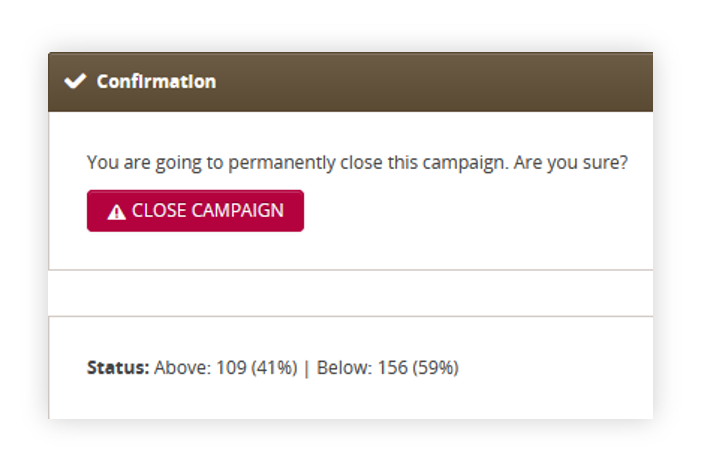 |
| *Visualization of the confirmation view* |
| 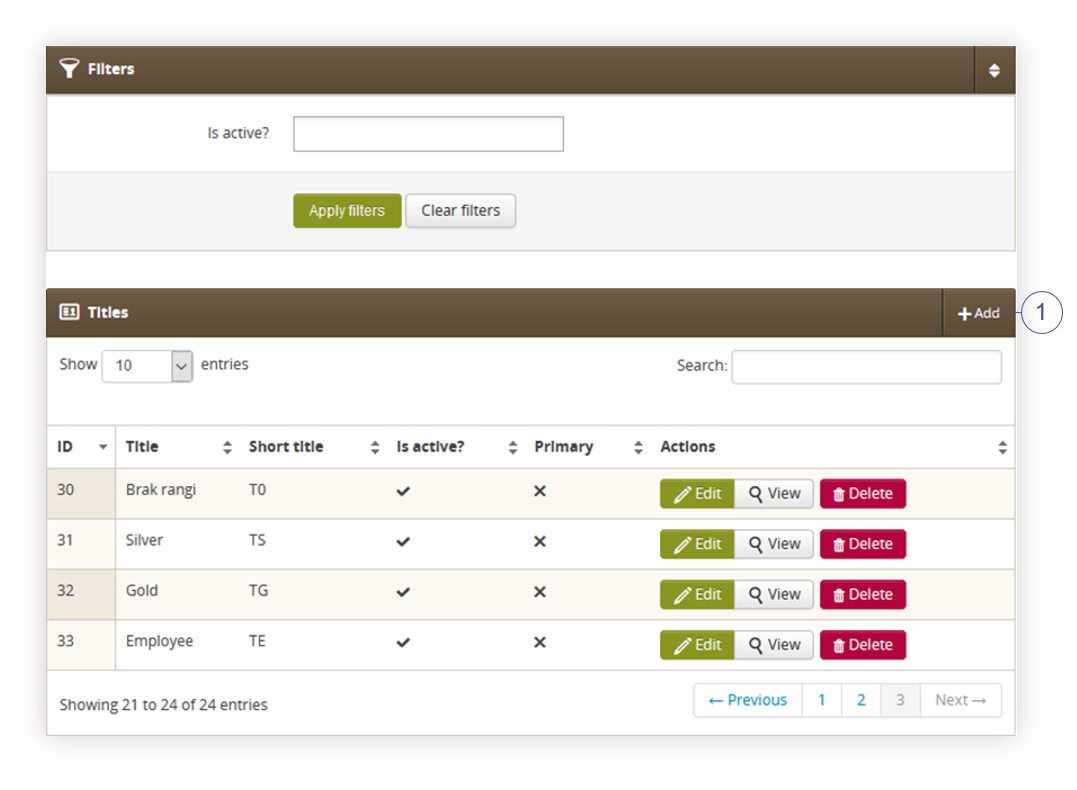 |
| *Visualization of the titles section* |
| 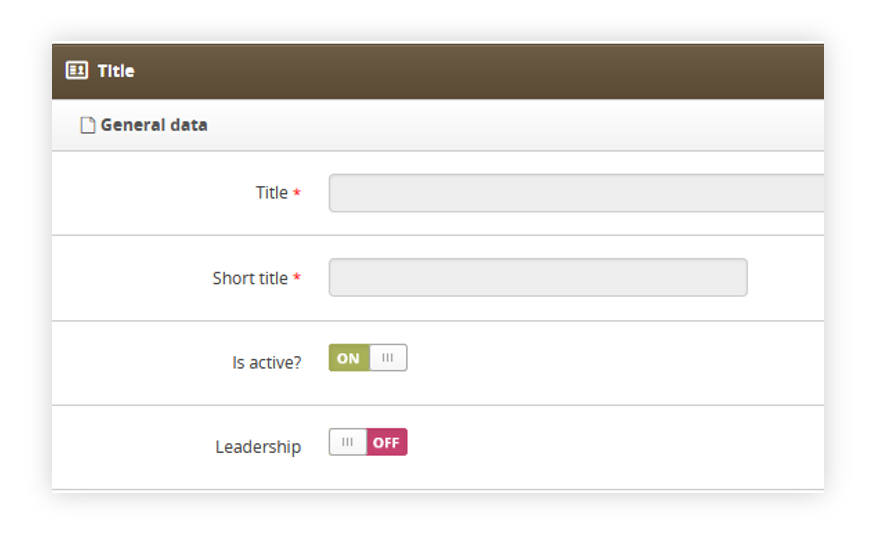 |
| *Visualization of the title section* |
| 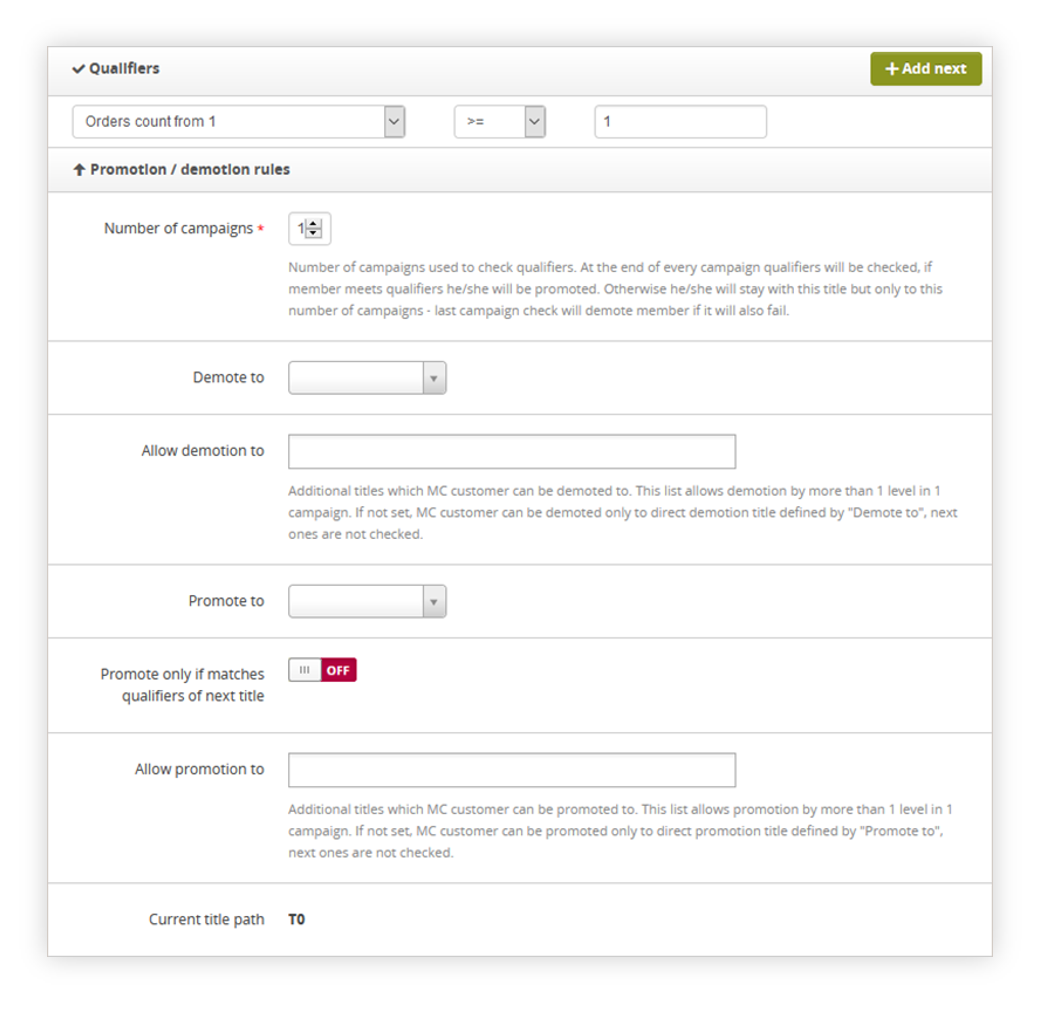 |
| *Visualization of the Qualifiers and Promotion / demotion sections* |
| 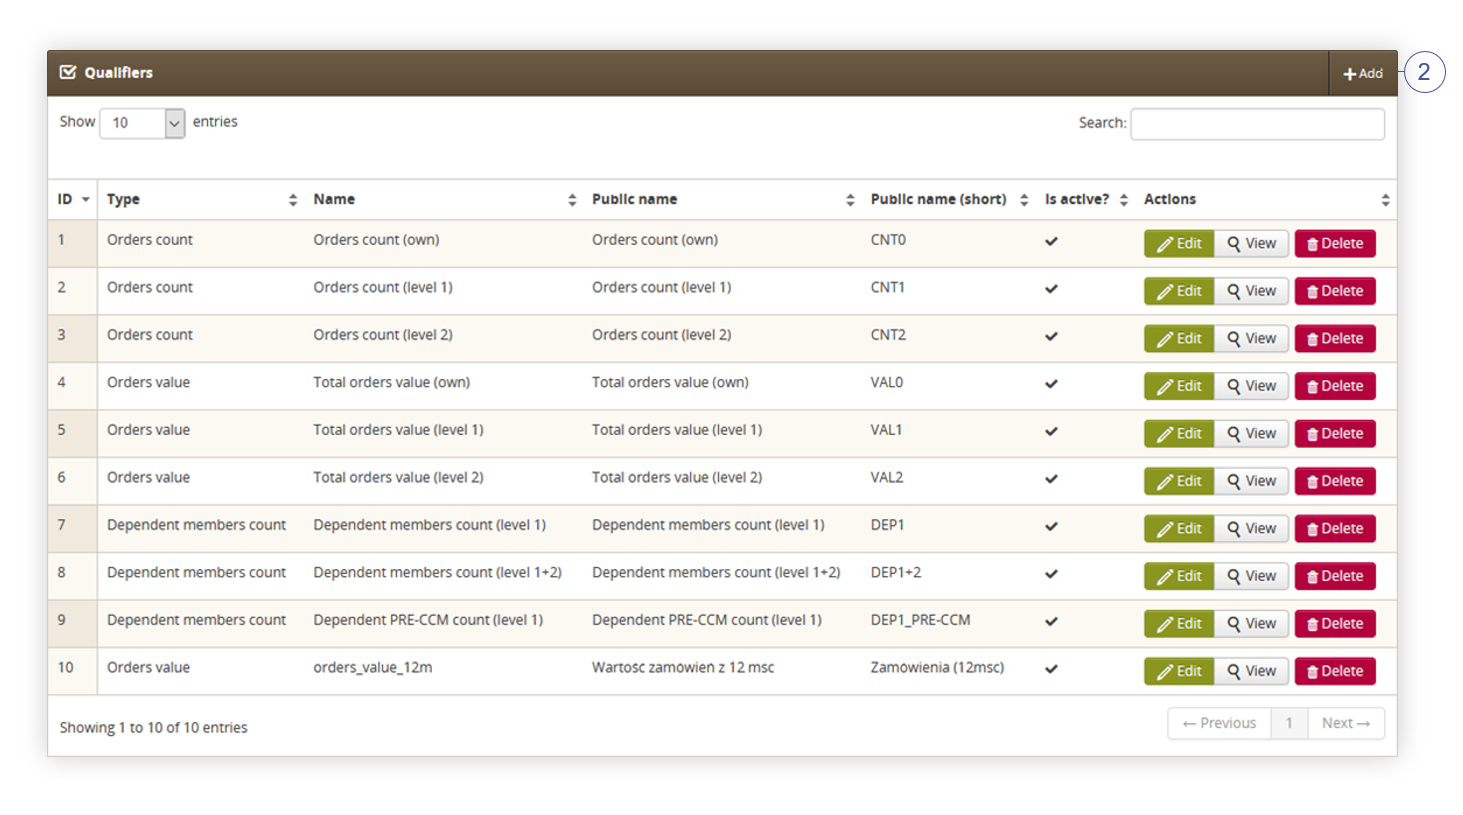 |
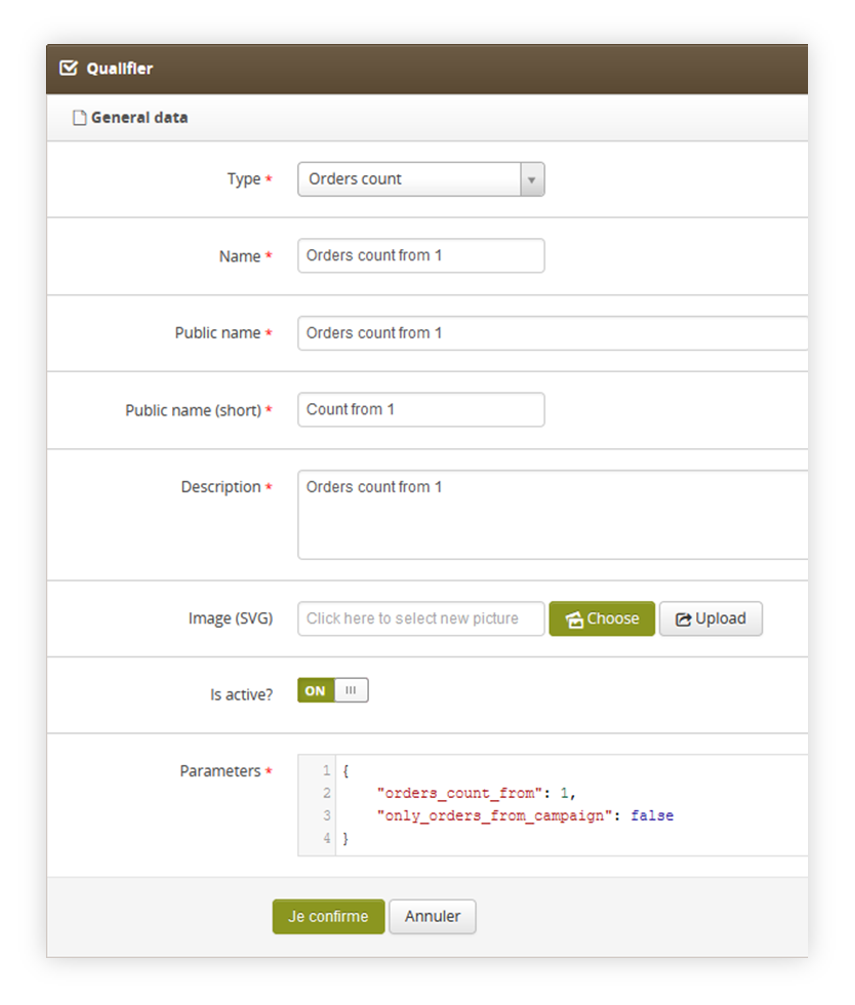
| *Visualization of the qualifiers section* |
|  |
| *Visualization of the qualifiers section* |
| 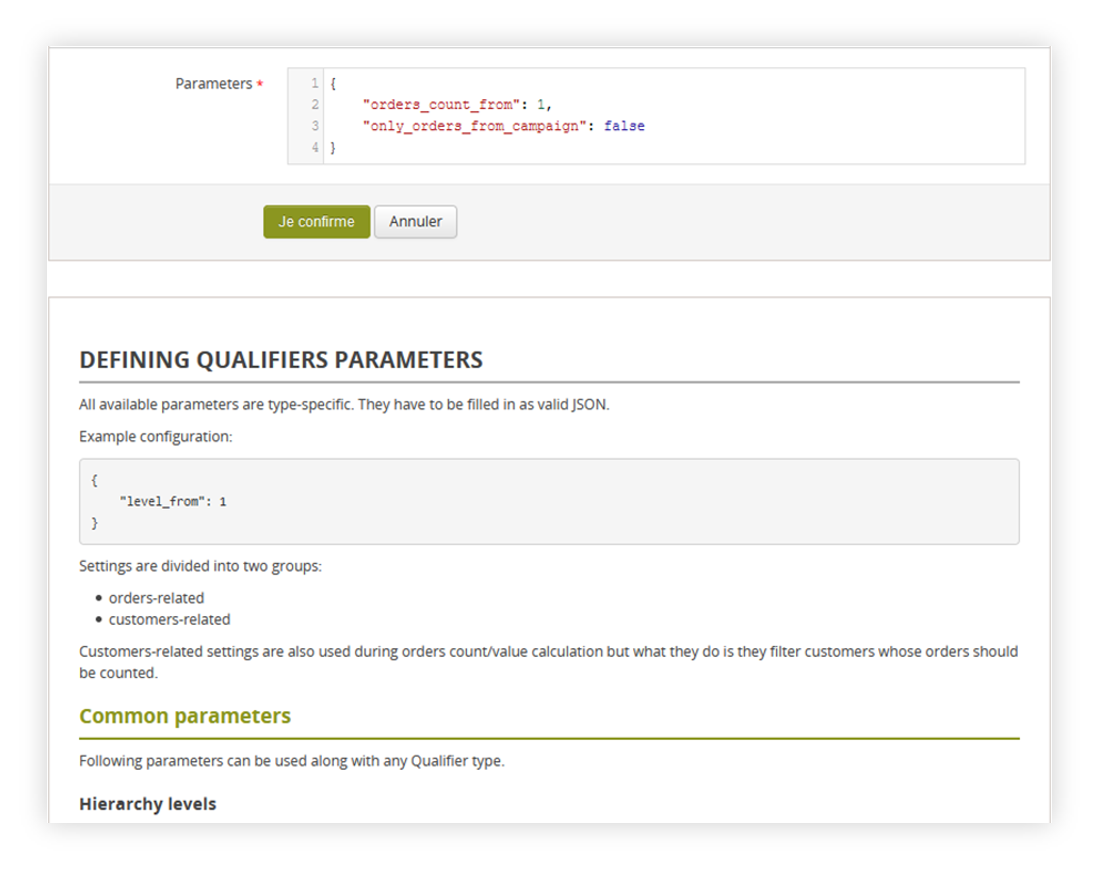 |
| *Visualization of the parameter documentation* |
|  |
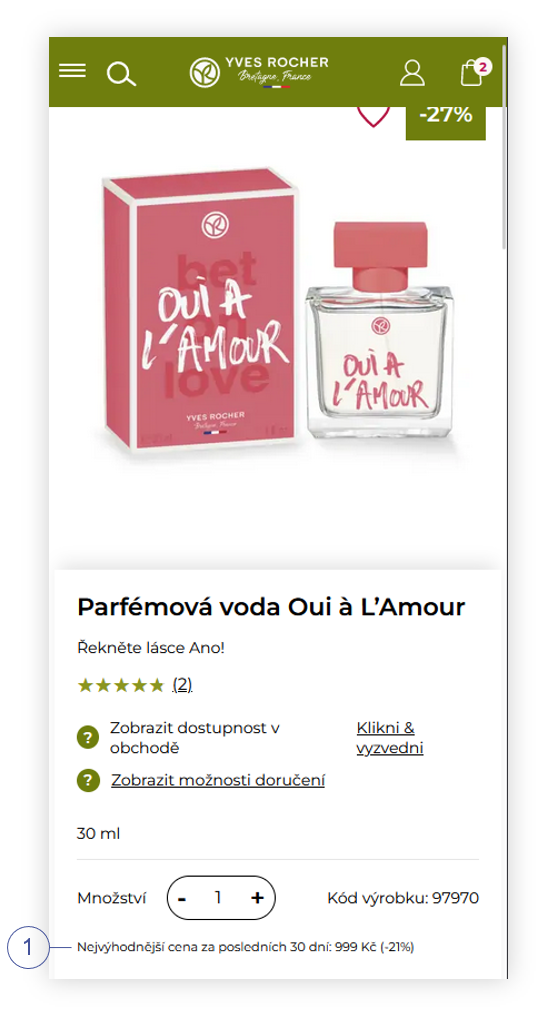
| *Visualization of the omnibus functionality on a product page (desktop)* |
|  |
| *Visualization of the omnibus functionality on a product page (mobile)* |
| 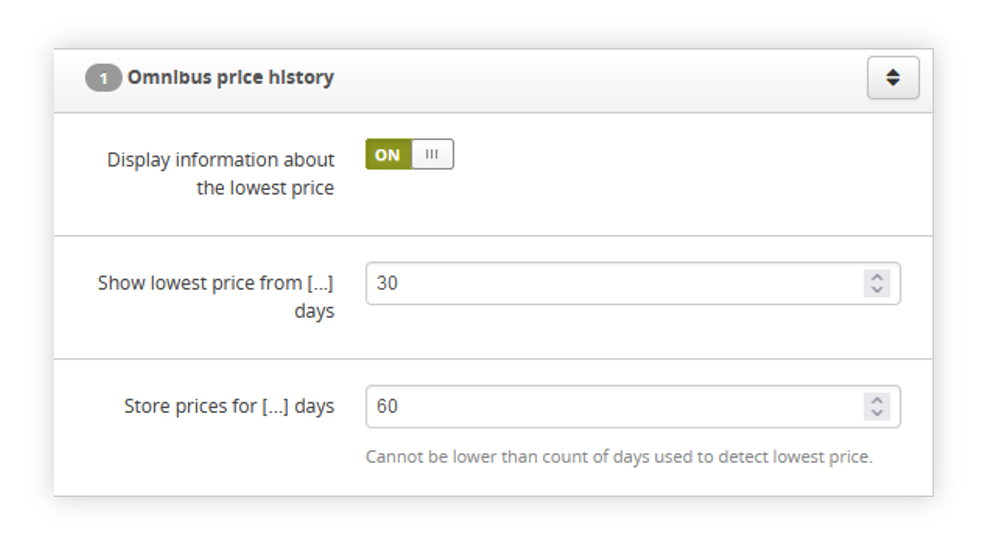 |
| *Visualization of the omnibus price history system settings* |
| 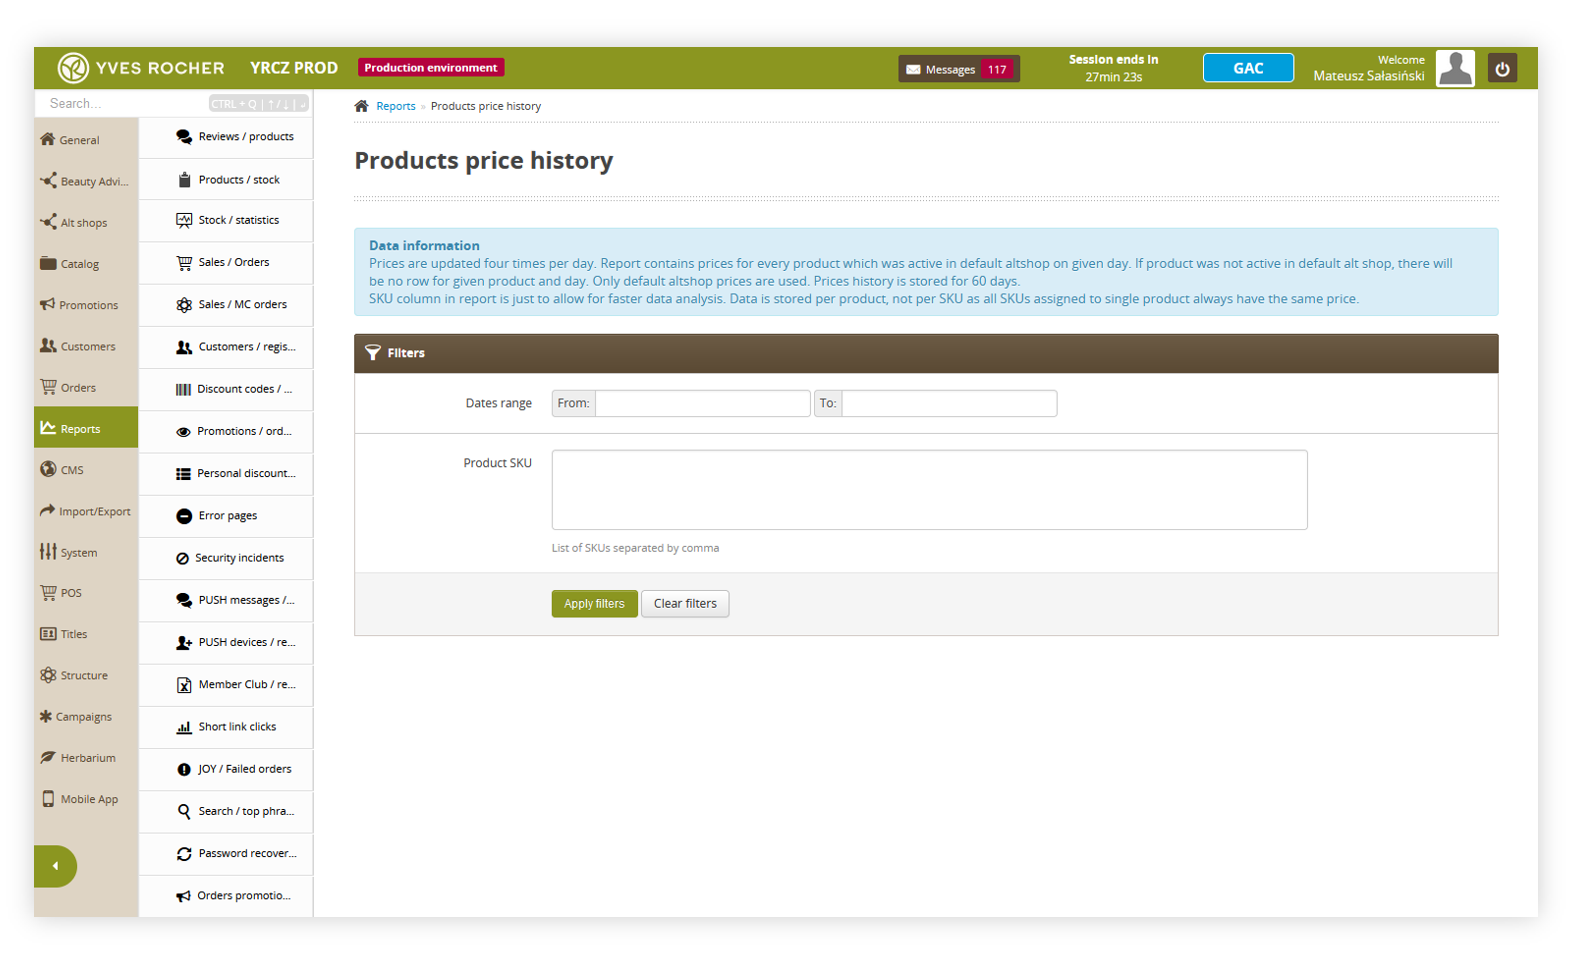 |
| *Visualization of the products price history* |
|  |
| *Visualization of the products price history xlx file* |
|  |
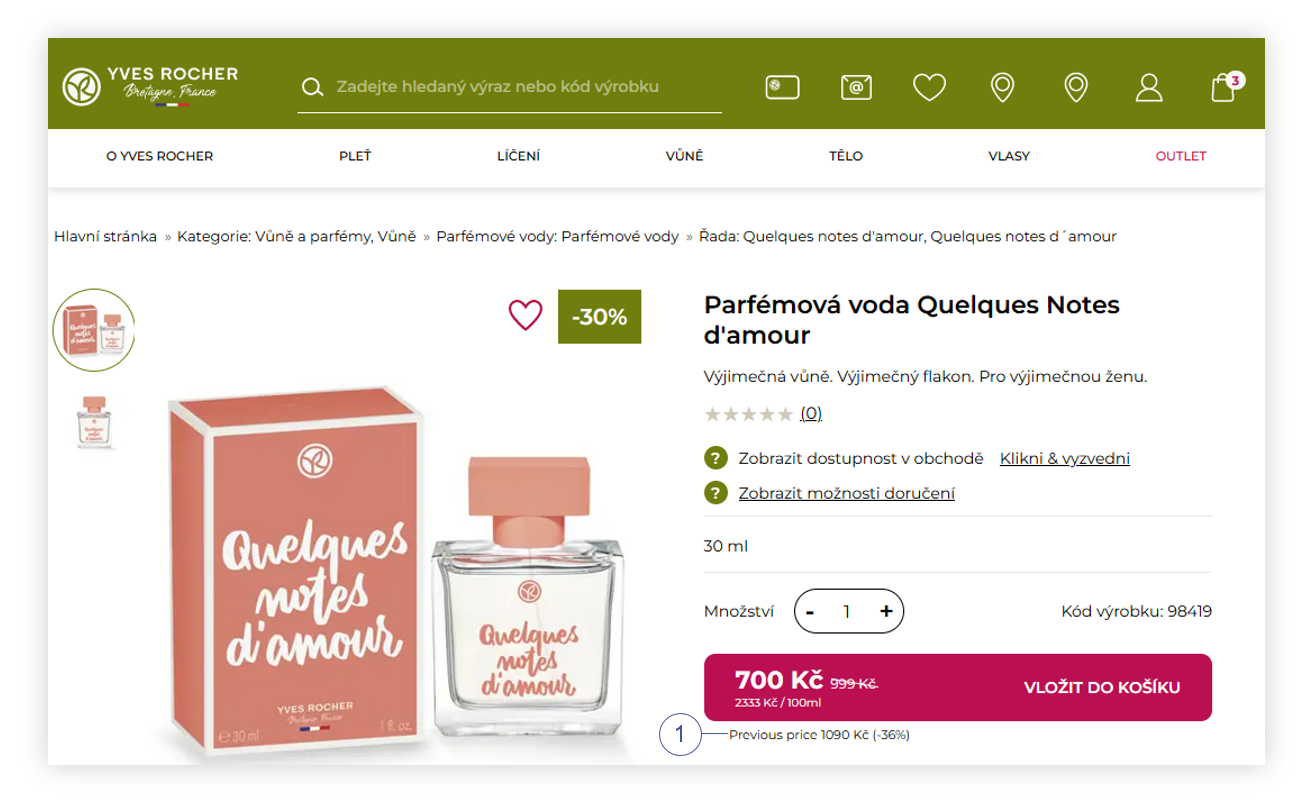
| *Visualization of the omnibus functionality when current catalog price is higher than previous one* |
|  |
| *Visualization of the omnibus functionality when current catalog price is lower than previous one* |
|  |
| *Visualization of the products in the product catalog (desktop* |
|  |
| *Visualization of the products in the product catalog (mobile)* |
|  |
| *Visualization of the mobile view of the home page.* |
|  |
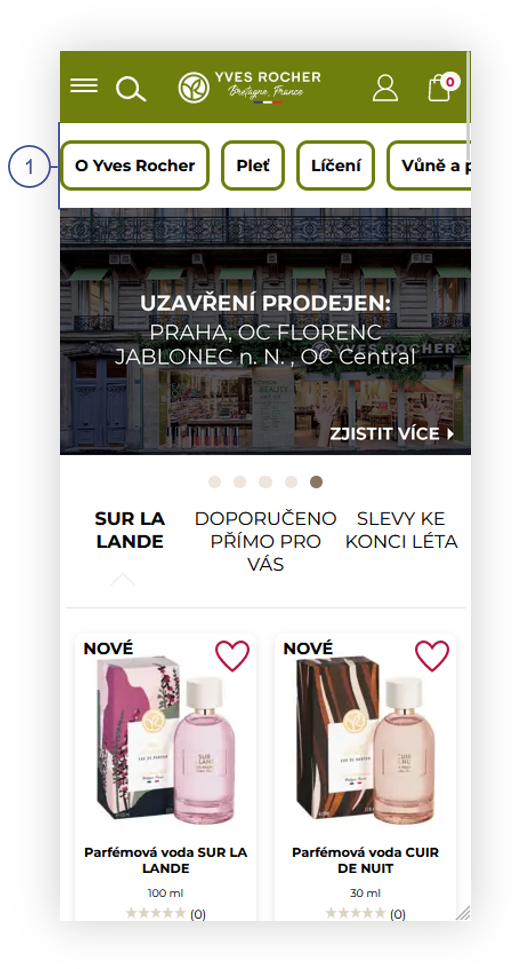
| *Visualization of the top menu tab* |
|  |
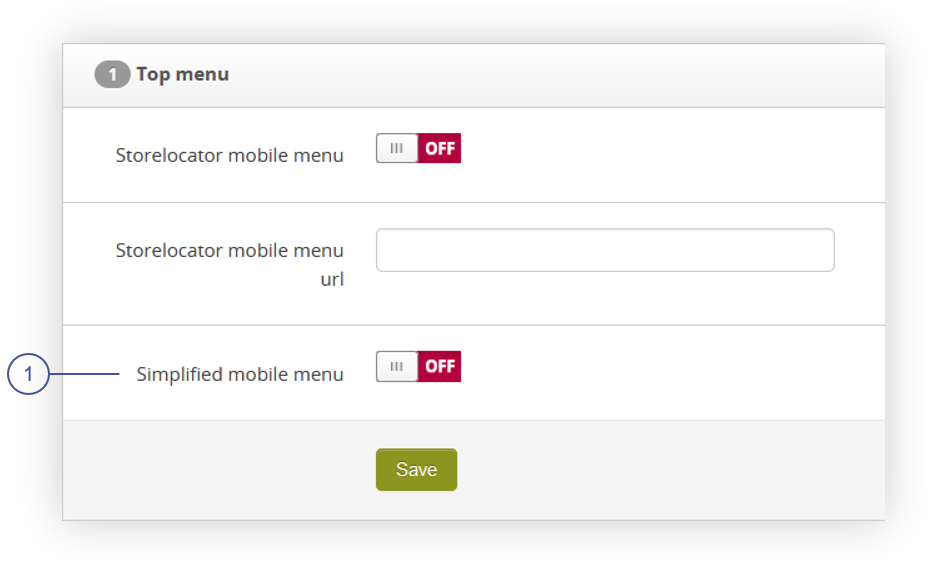
| *Visualization of the mobile top menu when functionality is turned off* |
|  |
| *Visualization of the mobile top menu when functionality is turned on* |
|  |
| *Visualization of the product page on the e-commerce platform* |
|  |
| *Visualization of the product page on the e-commerce platform (desktop view)* |
|  |
| *Visualization of the product page on the e-commerce platform (mobile view)* |
|  |
| *Visualization of the product filters* |
| 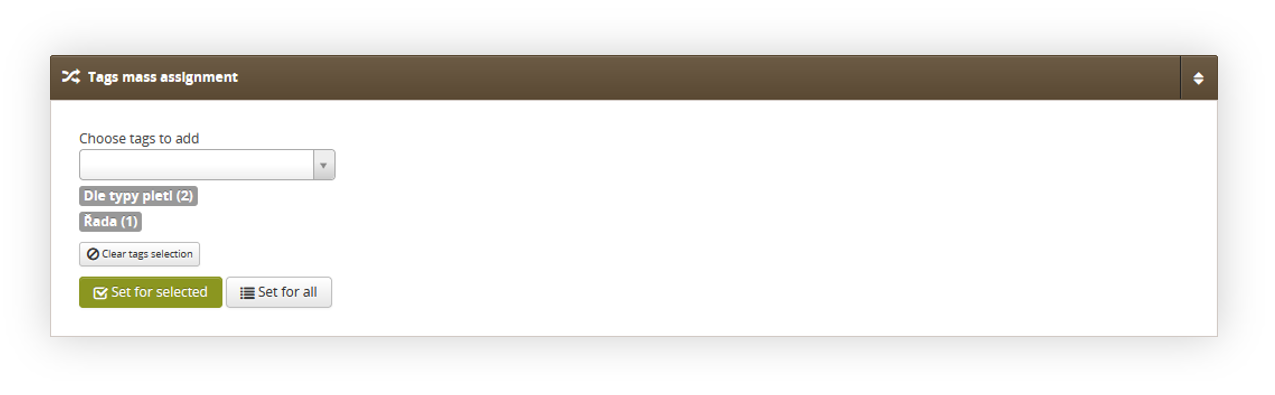 |
| *Visualization of the tags mass assignment section* |
| 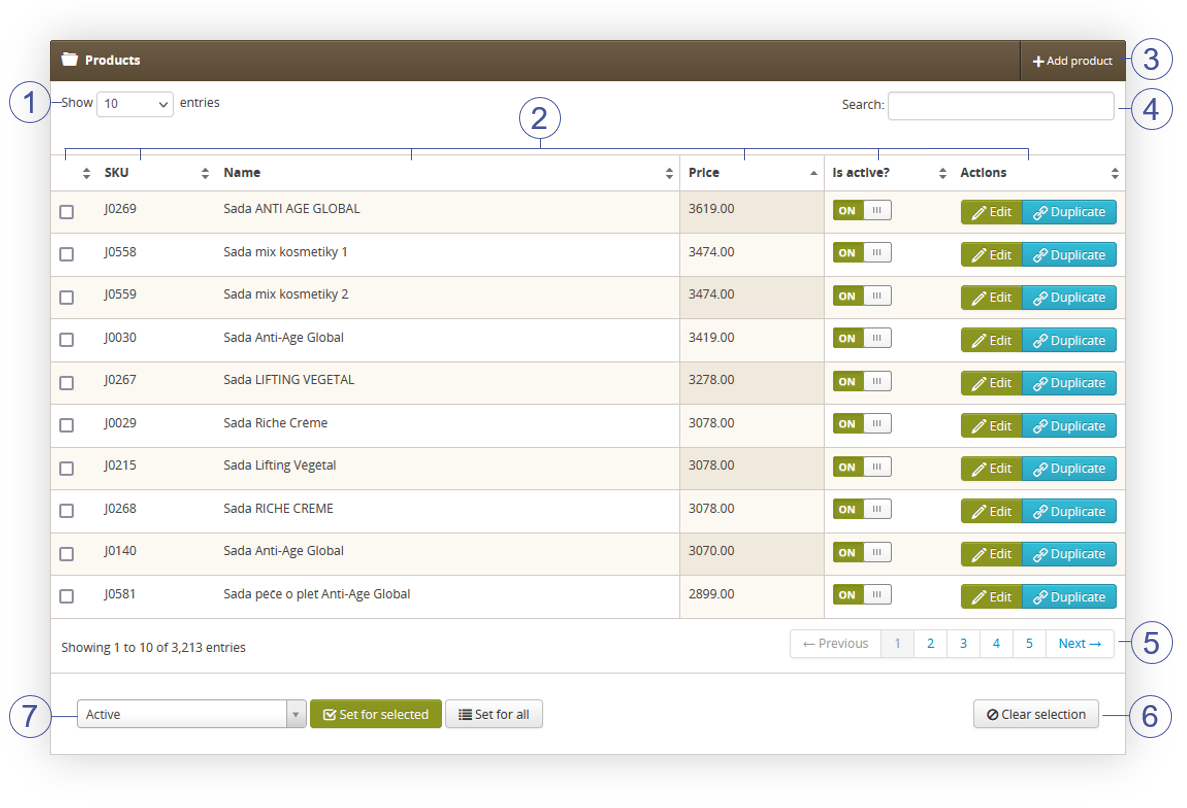 |
| *Visualization of the products section* |
| 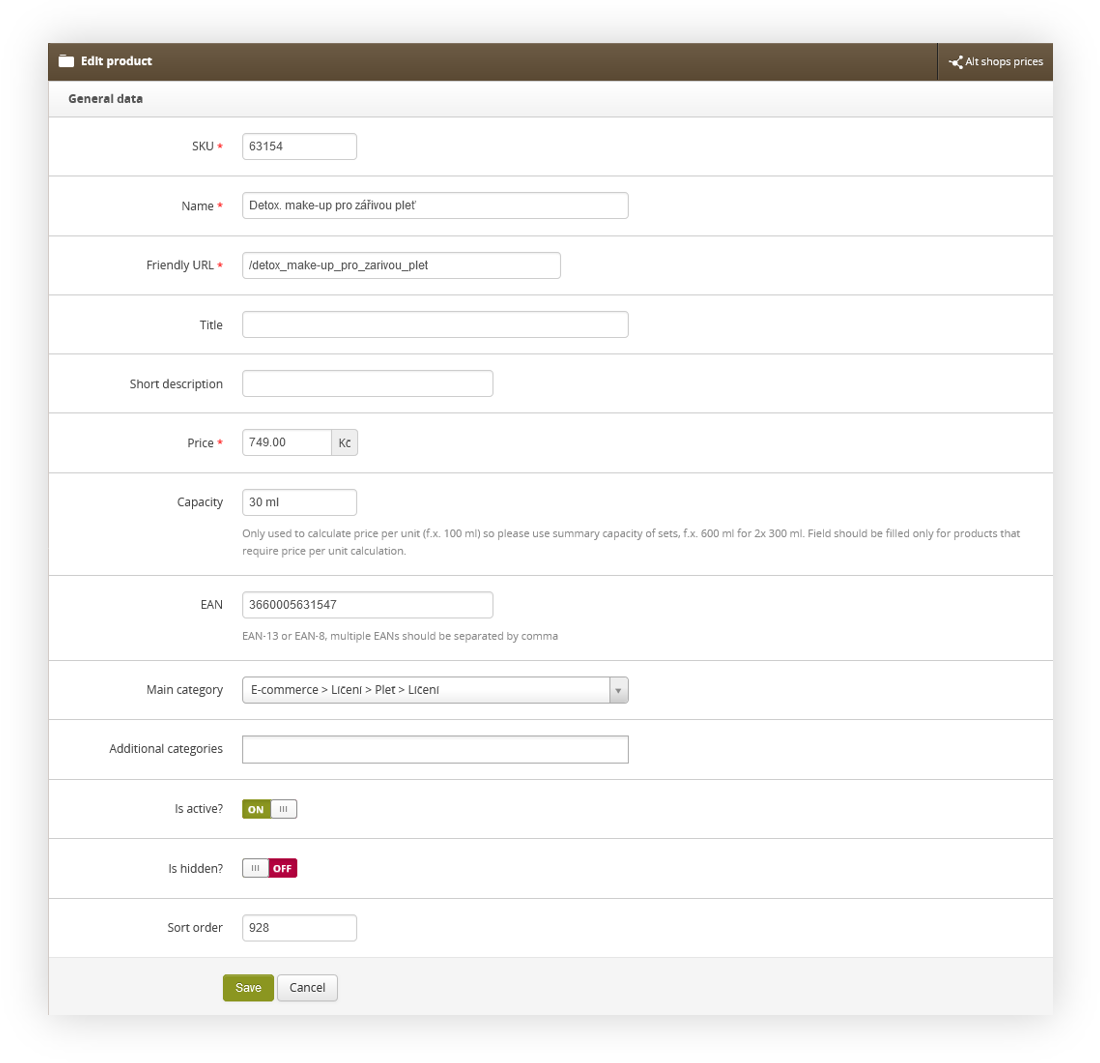 |
| *Visualization of the product edit form* |
| 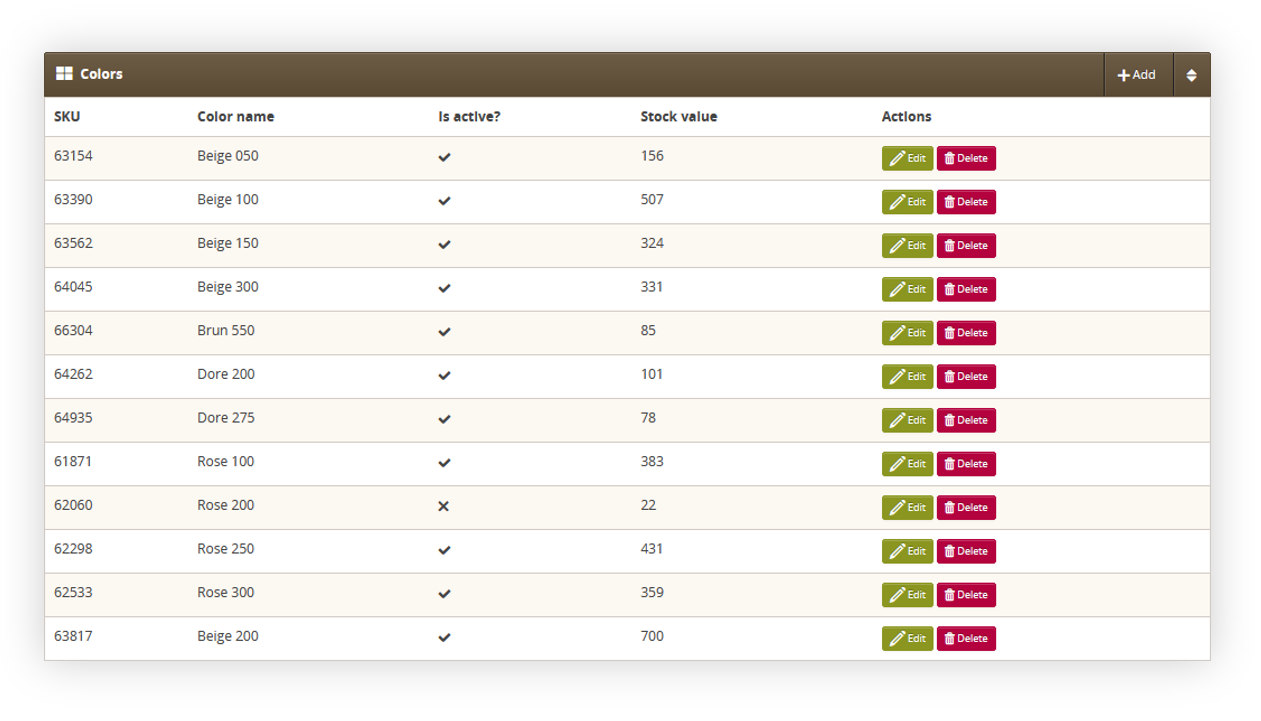 |
| *Visualization of the colors section in product edit form* |
| 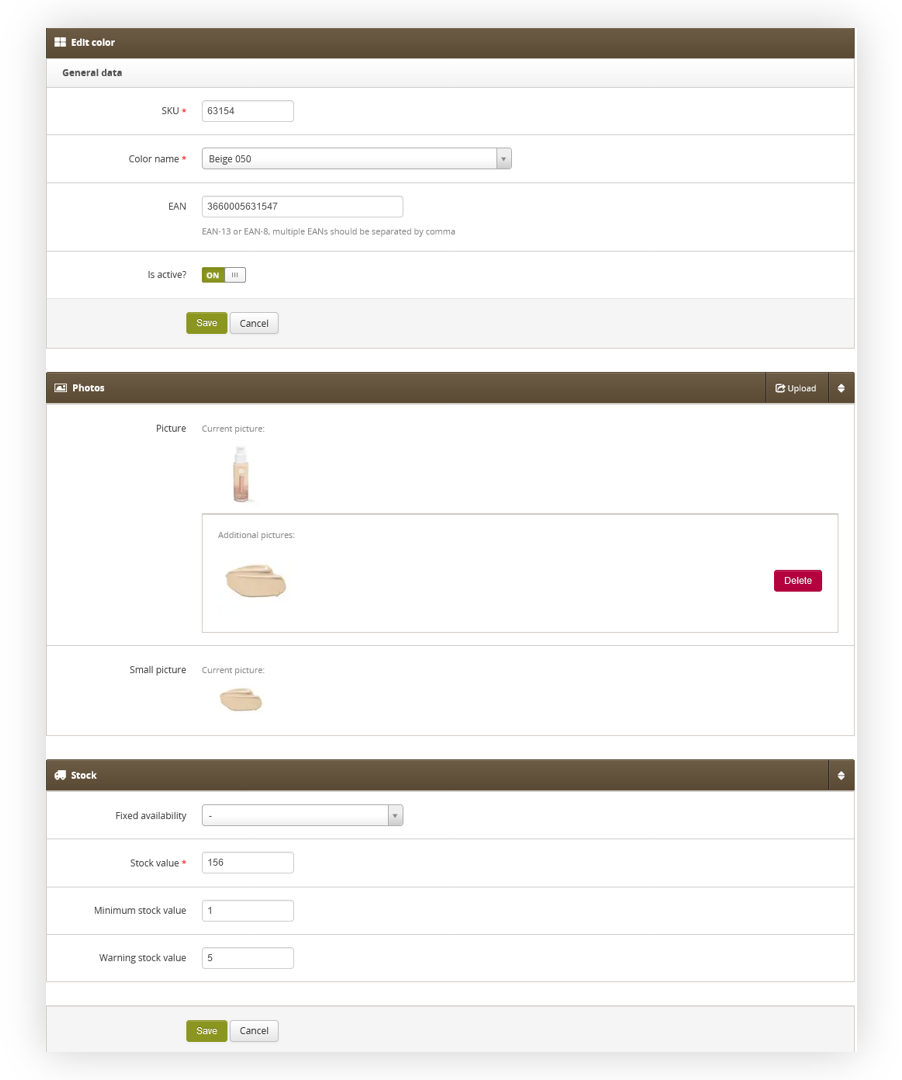 |
| *Visualization of the color creation for a product* |
| 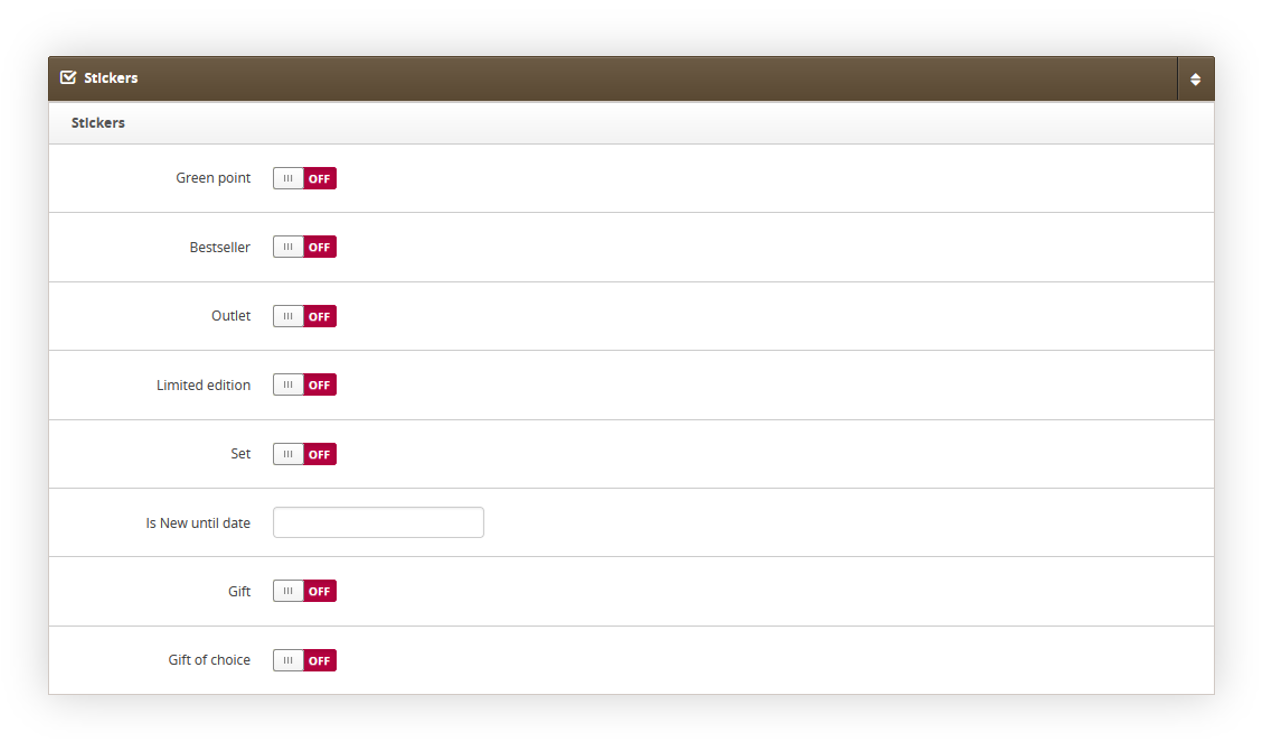 |
| *Visualization of the stickers section in product edit form* |
| 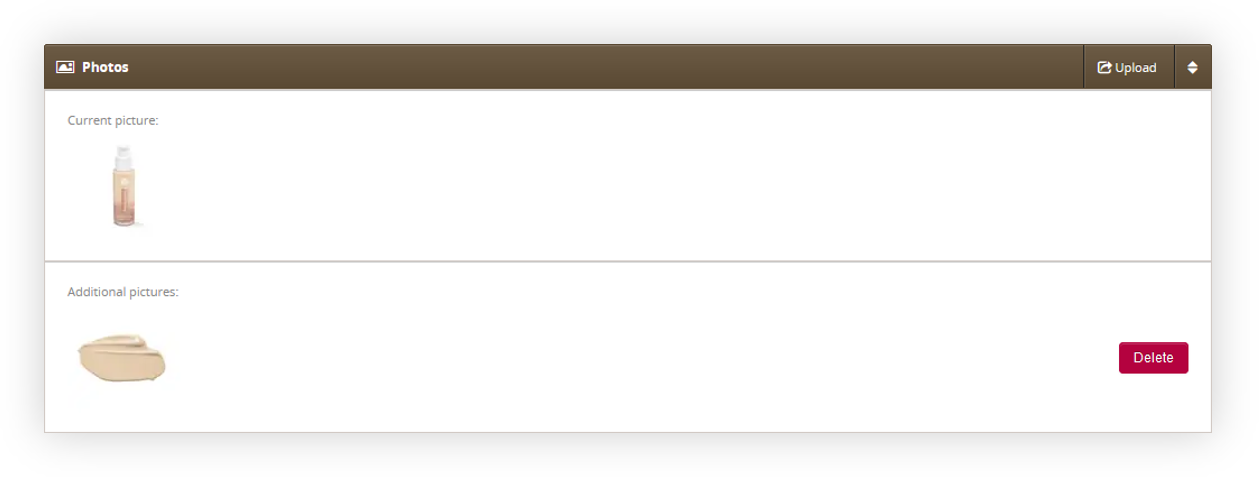 |
| *Visualization of the photos section in product edit form* |
| 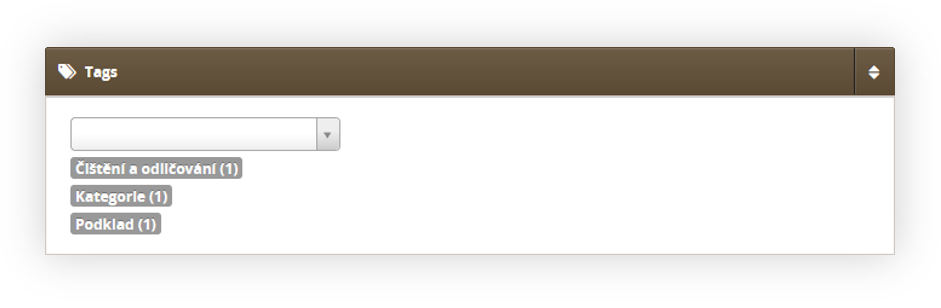 |
| *Visualization of the tags section in product edit form* |
| 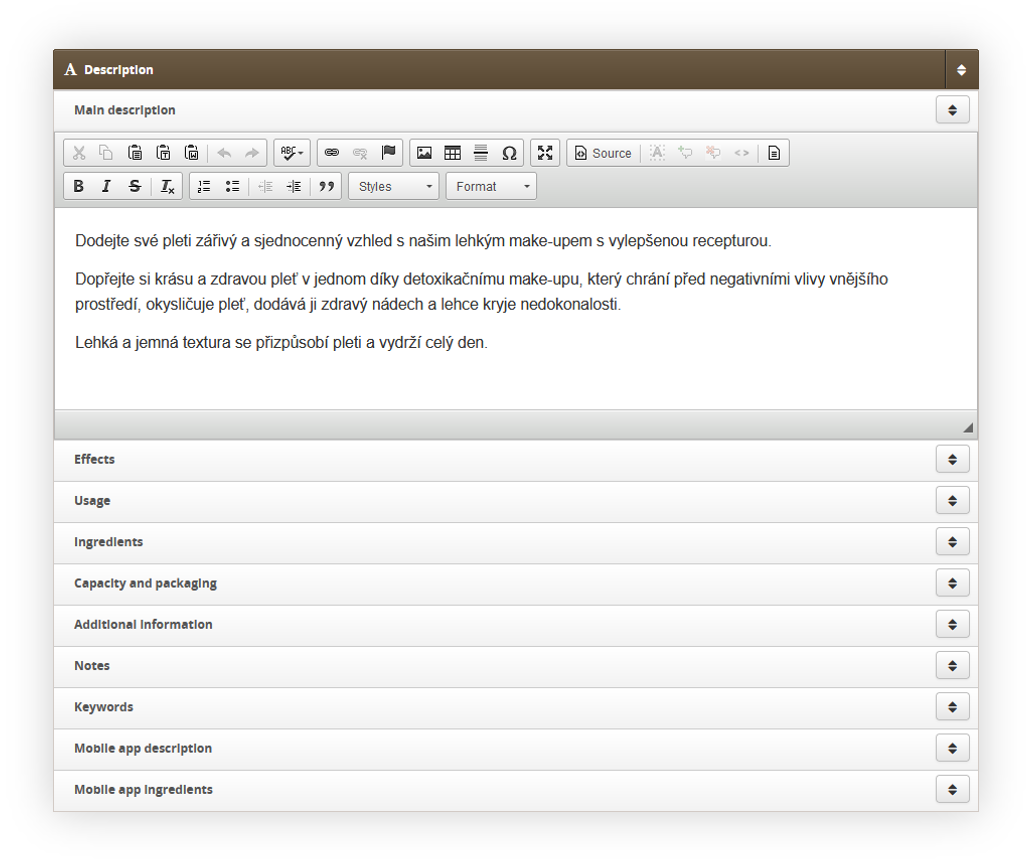 |
| *Visualization of the description section in product edit form* |
|  |
| *Visualization of the product page on the e-commerce platform* |
| 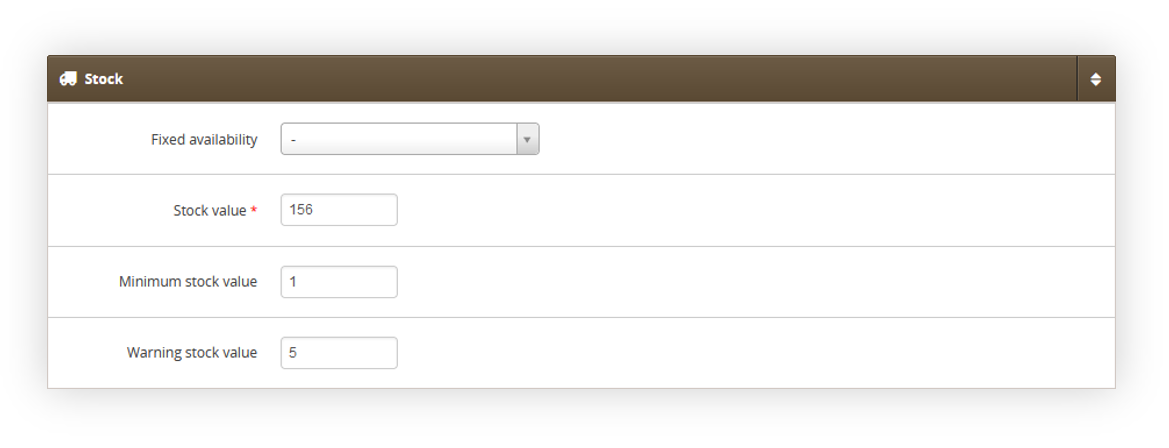 |
| *Visualization of the stock section in product edit form* |
| 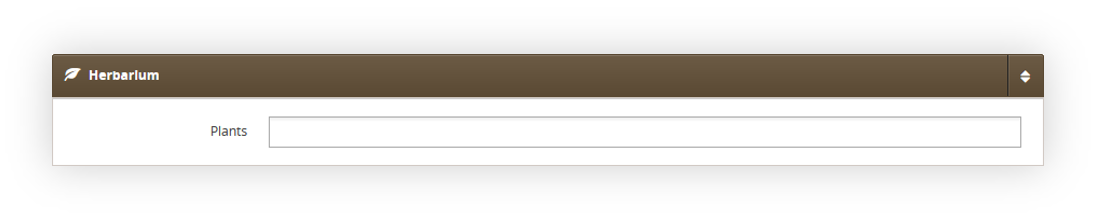 |
| *Visualization of the herbarium section in product edit form* |
| 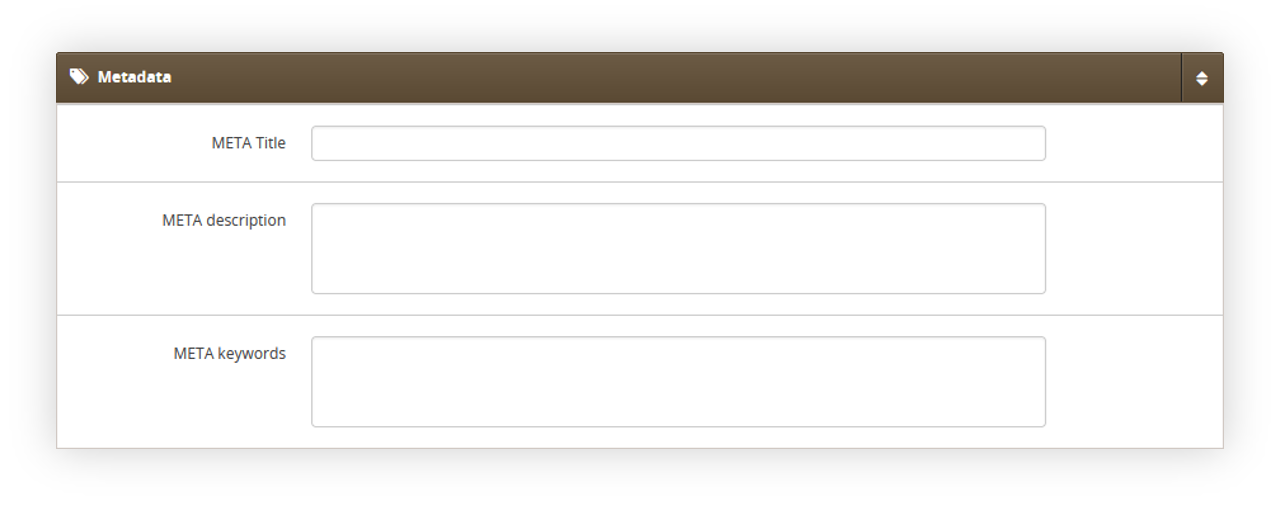 |
| *Visualization of the metadata section in product edit form* |
|  |
| *Visualization of the colors list* |
|  |
| *Visualization of the color creation* |
|  |
| *Visualization of the product filter on the platform* |
|  |
| *Visualization of the properties list* |
| 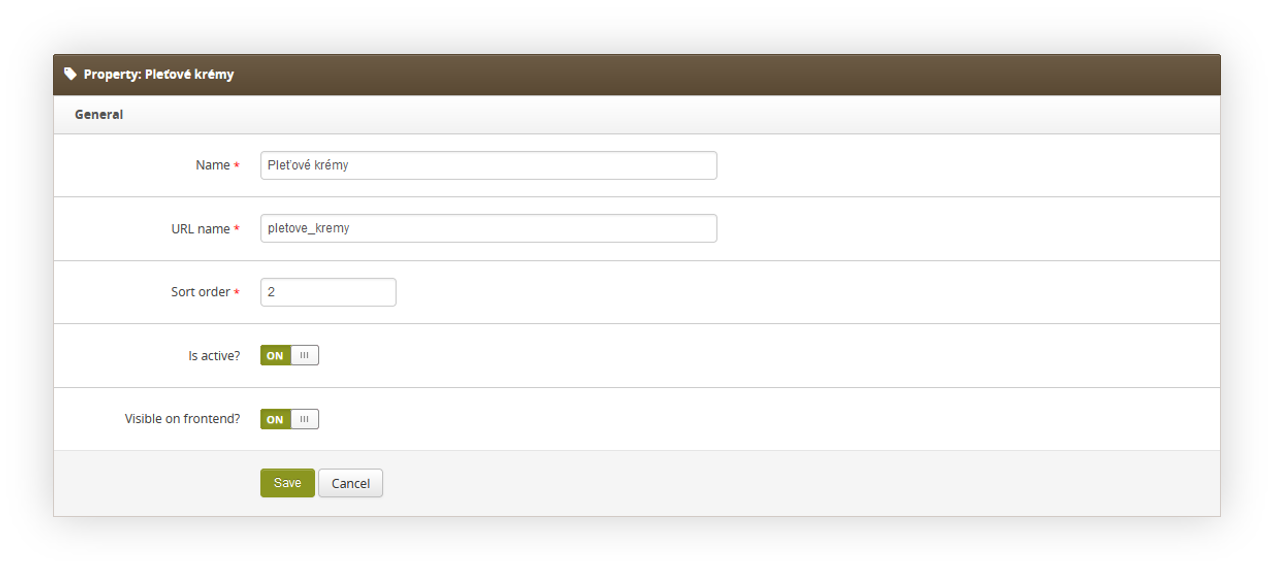 |
| *Visualization of the property creation* |
| 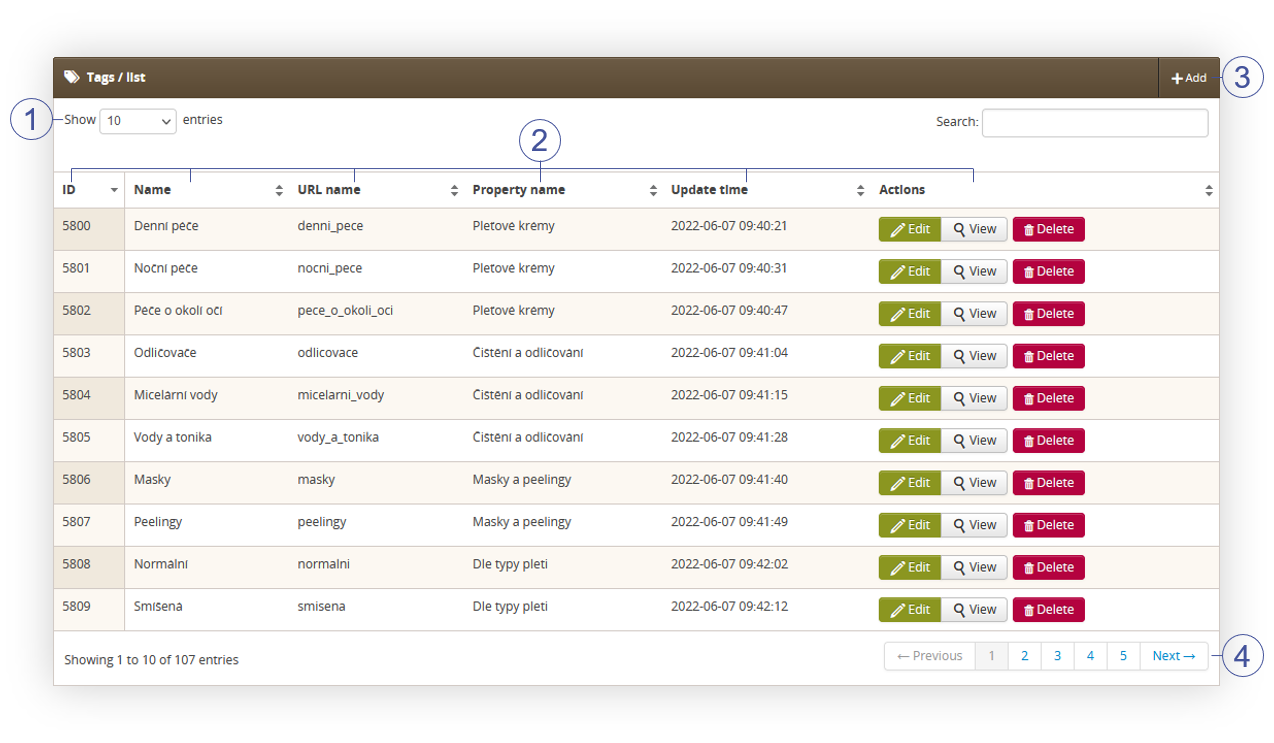 |
| *Visualization of the tags list section* |
|  |
| *Visualization of the tag edit form* |
|  |
| *Visualization of the product images import* |
|  |
| *Visualization of the mass product removal* |
| 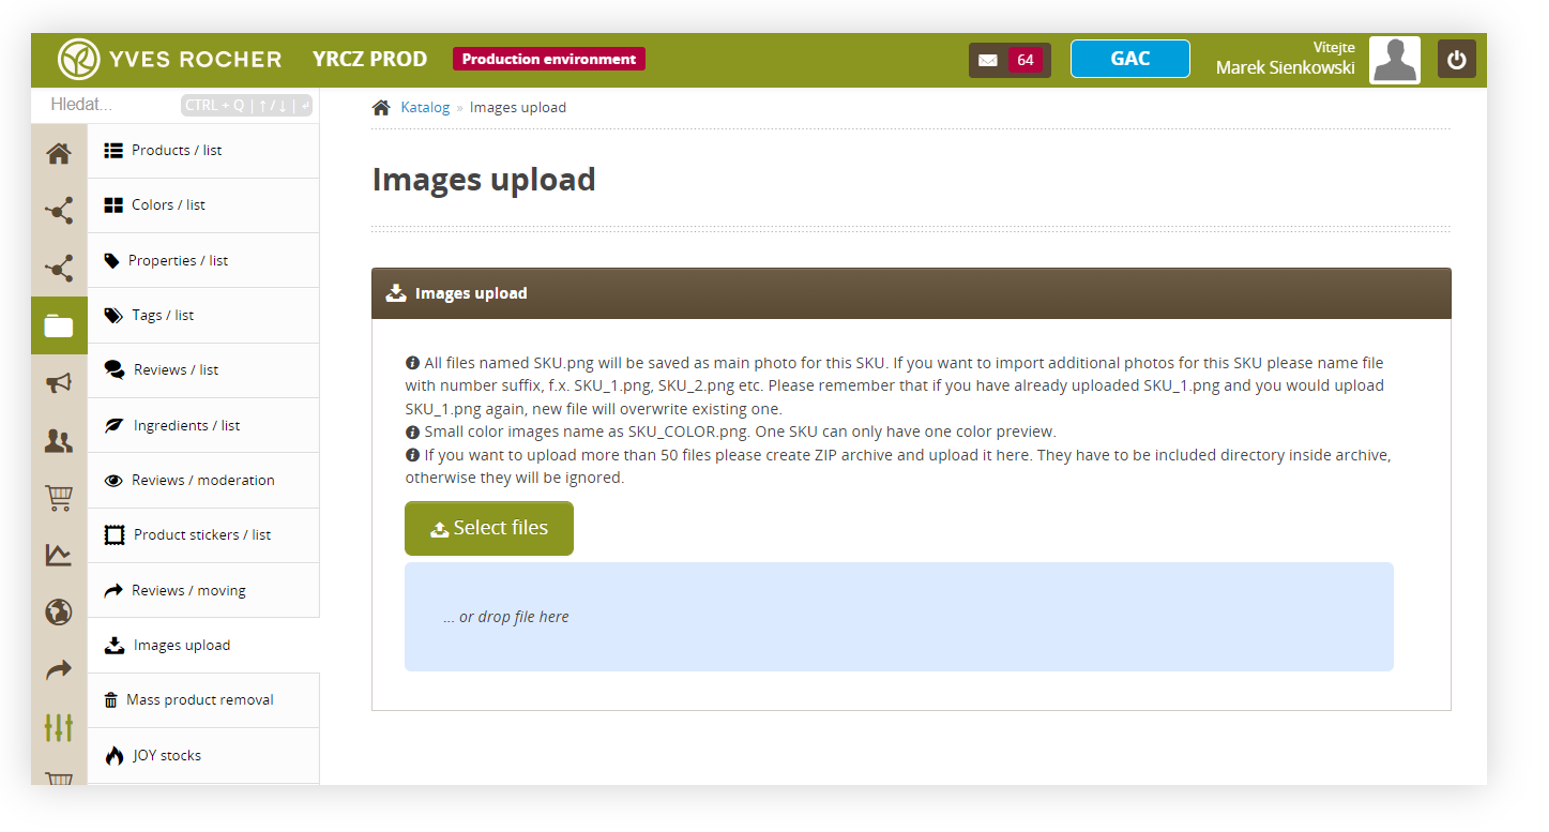 |
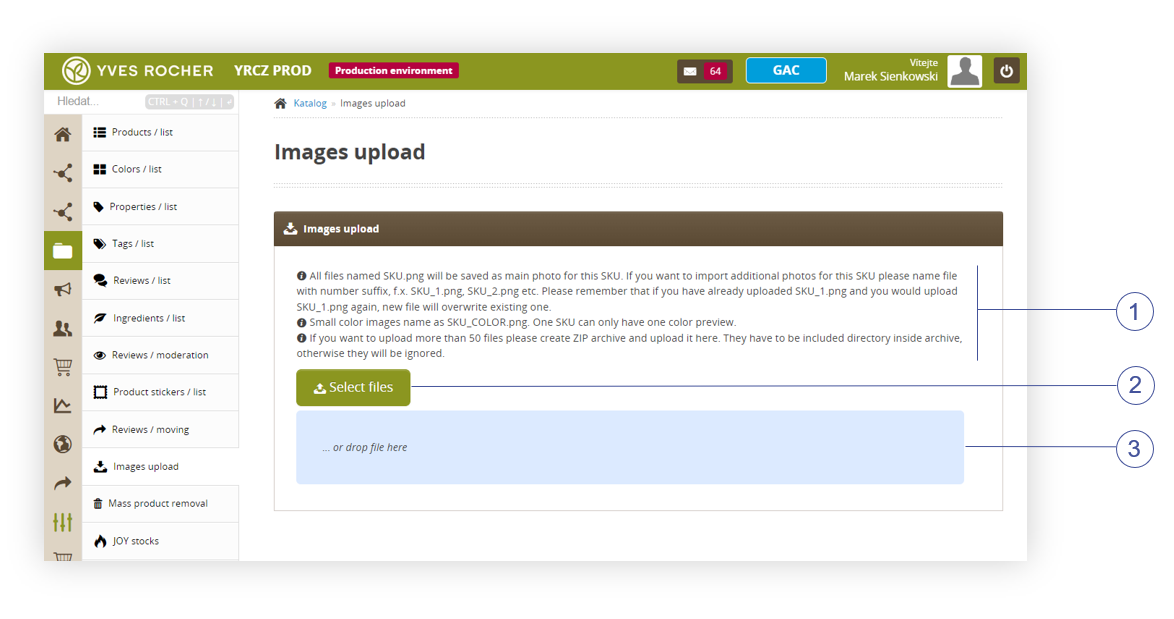
| *Visualization of the Catalog, Images upload* |
| 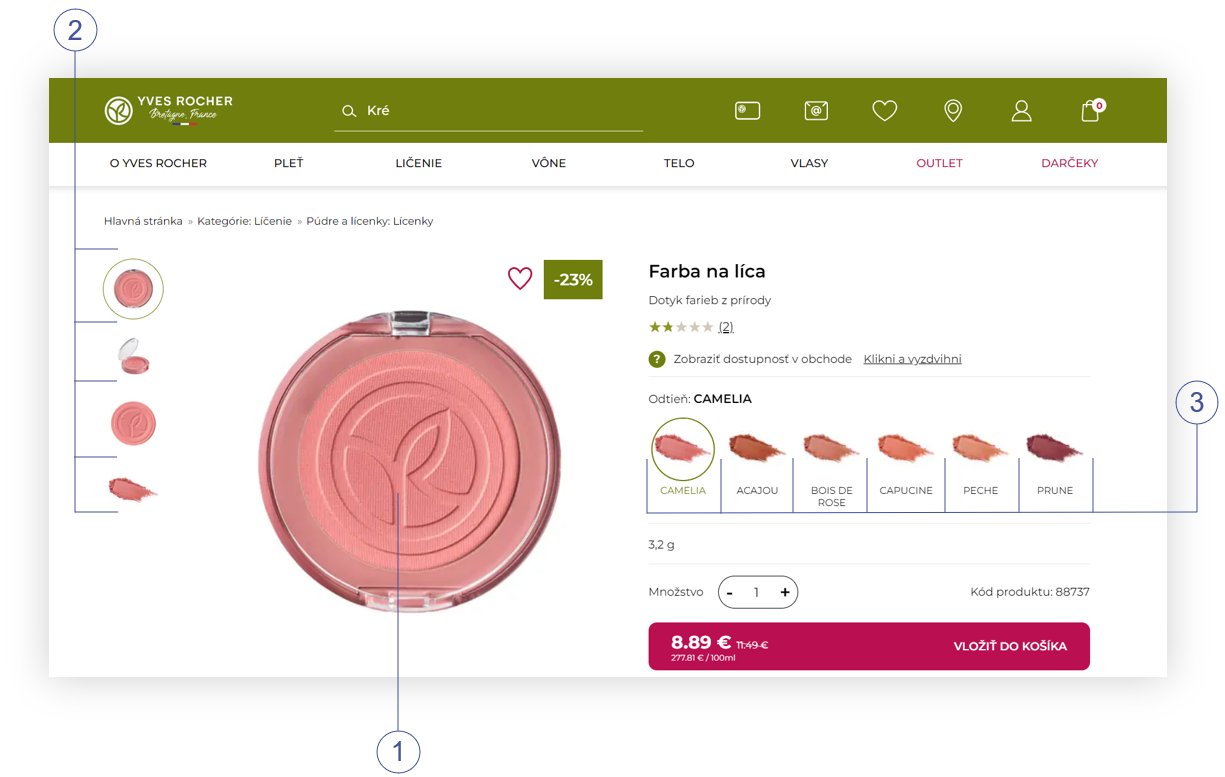 |
| *Visualization of the Product page, SKU 88737* |
| 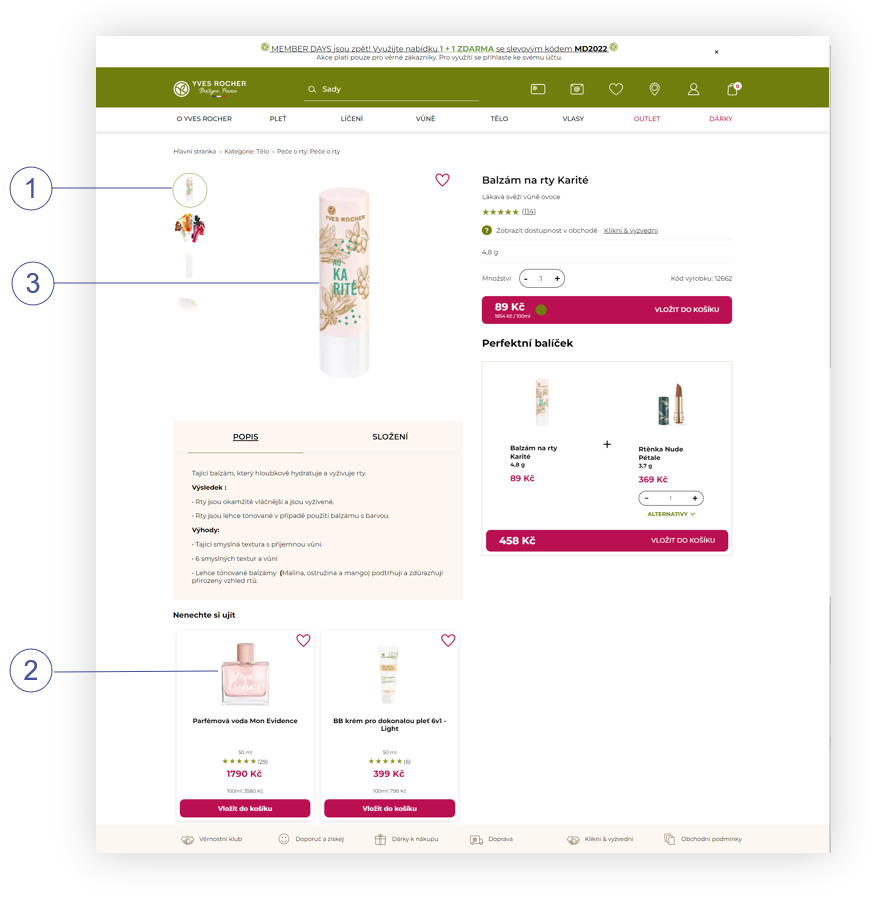 |
| *Visualization of the Product page, example of image sizes* |
|  |
| *Visualization of the Catalog, Images upload* |
| 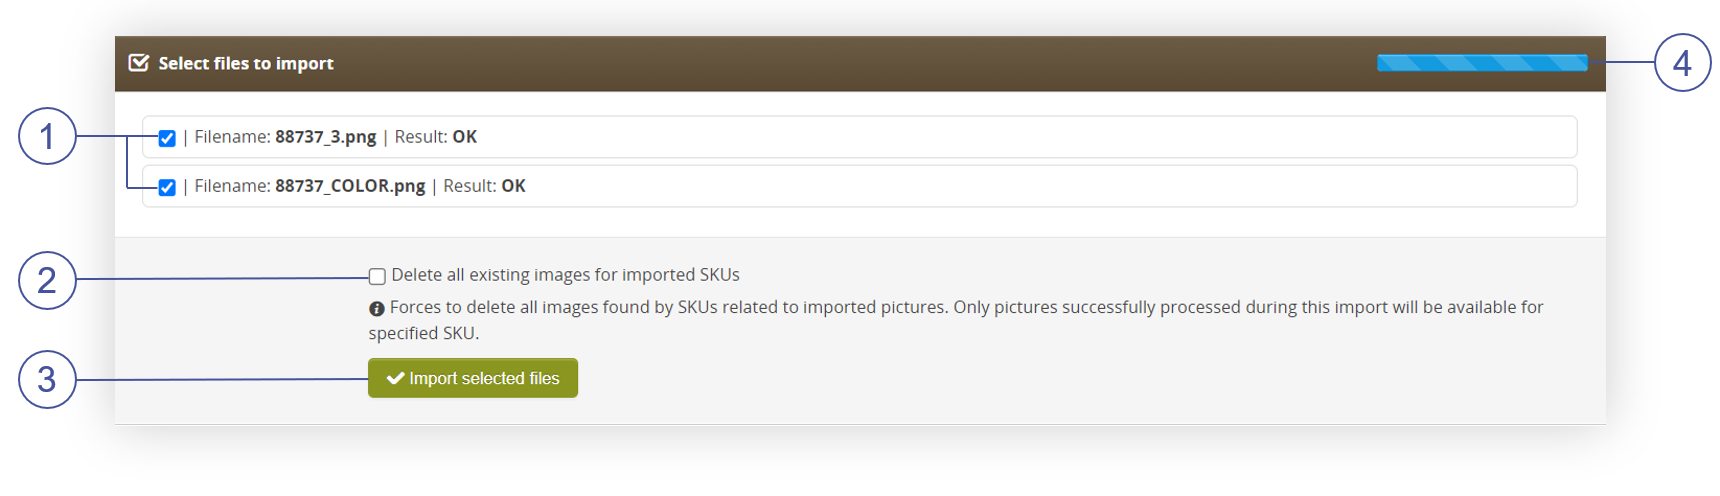 |
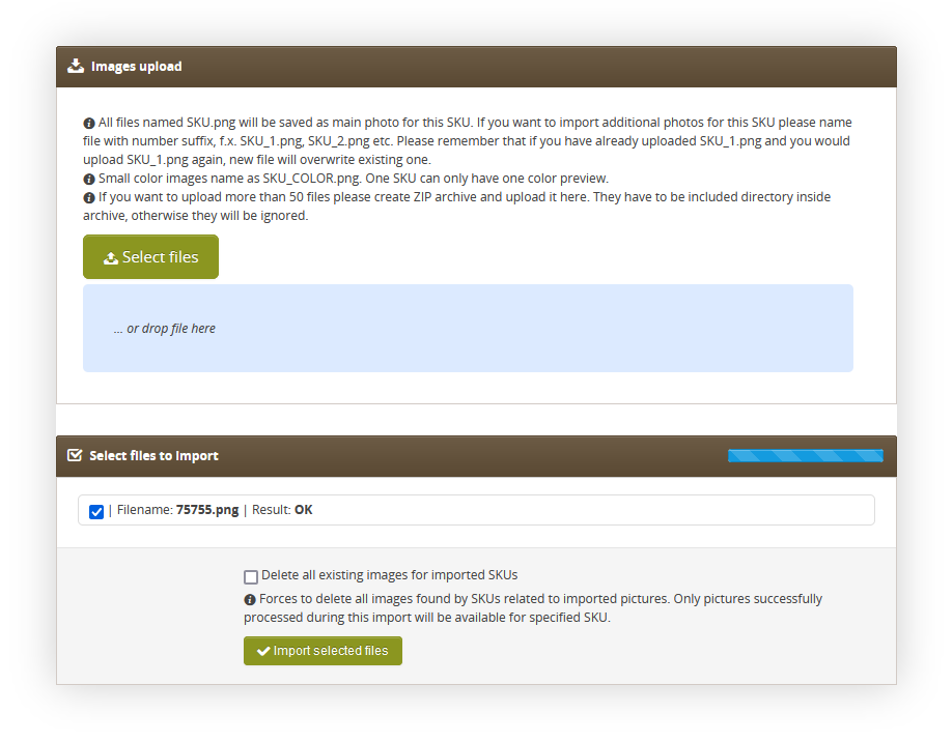
| *Visualization of the Catalog, Images upload- Select files to import* |
|  |
| *Visualization of the above\_cart\_steps\_banner in a /cart page* |
|  |
| *Visualization of the above\_layout\_content\_banner on a homepage* |
| 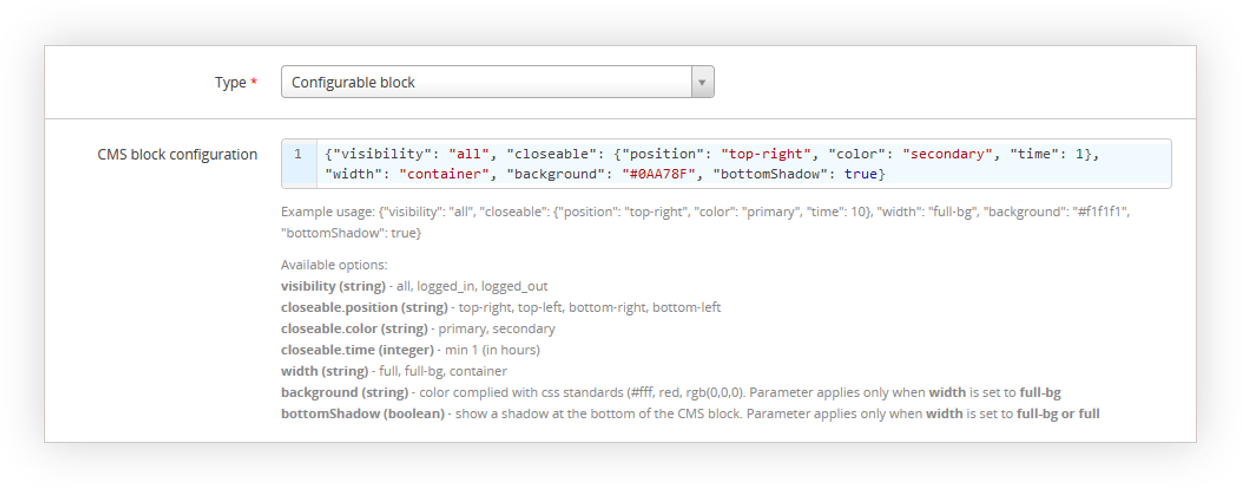 |
| *Visualization of the configurable block configuration* |
|  |
| *Visualization of the featured products on the home page (desktop view)* |
|  |
| *Visualization of the featured products on the home page (mobile view)* |
| 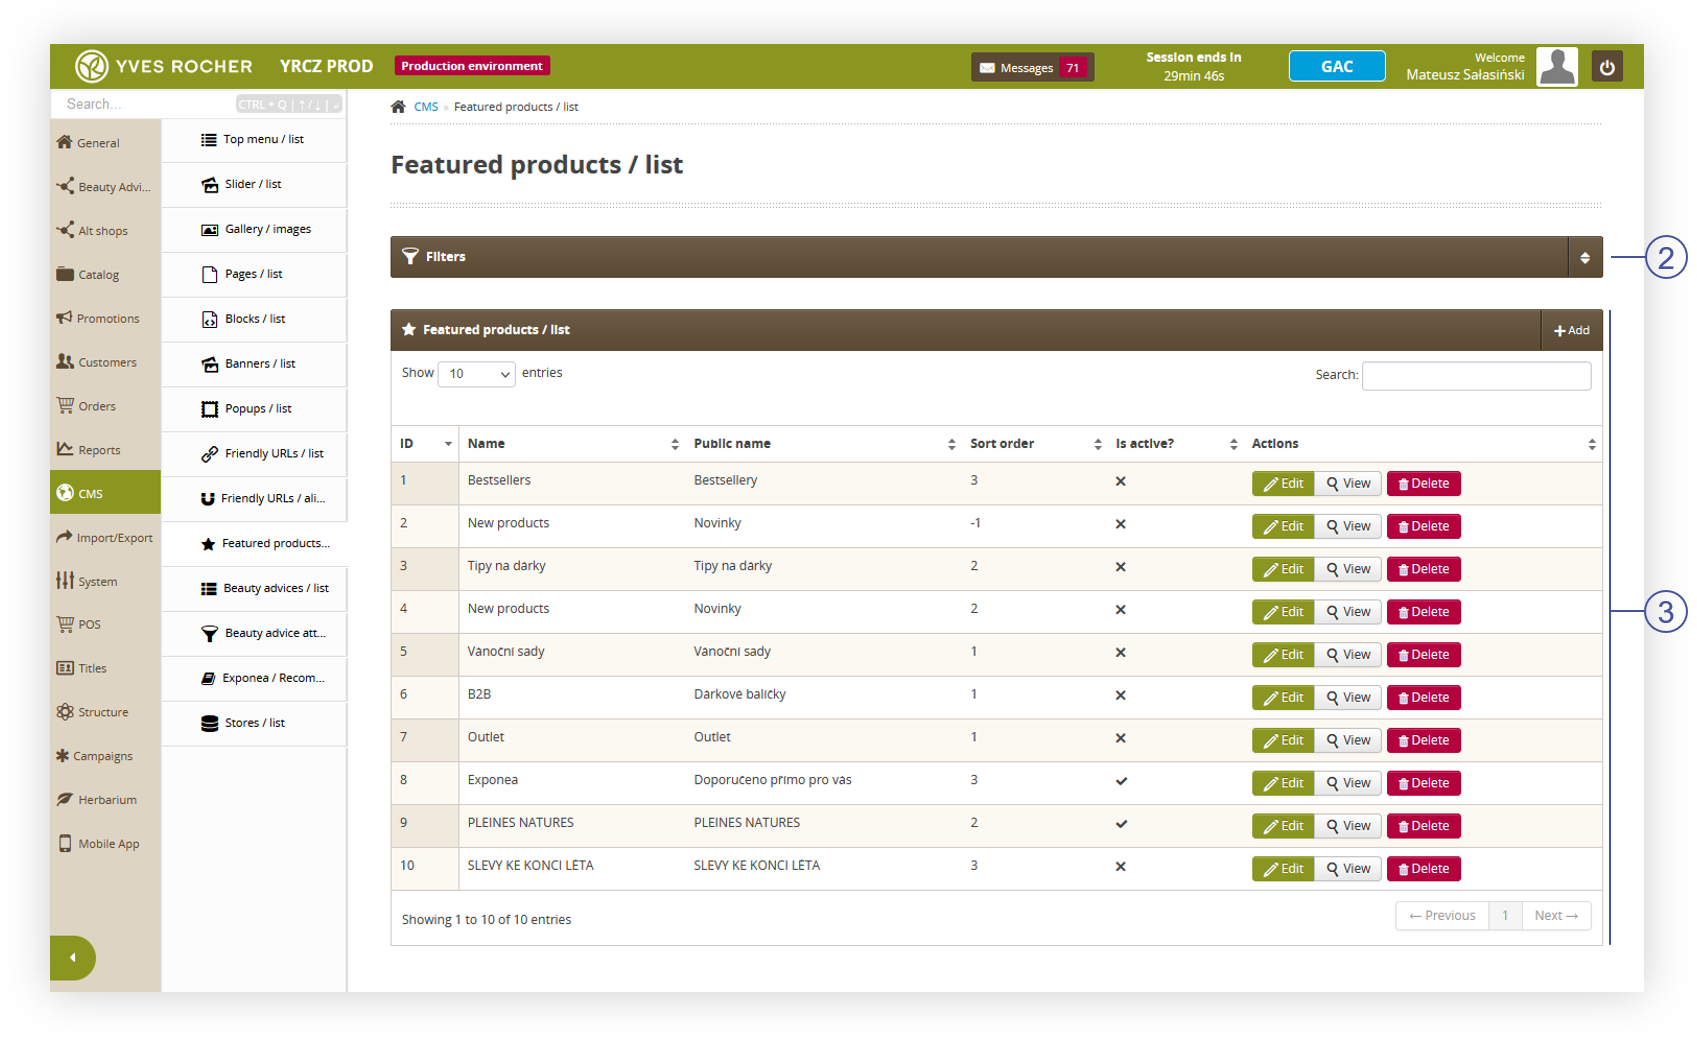 |
| *Visualization of the featured products / list* |
|  |
| *Visualization of the filters tab in the Featured products / list module* |
| 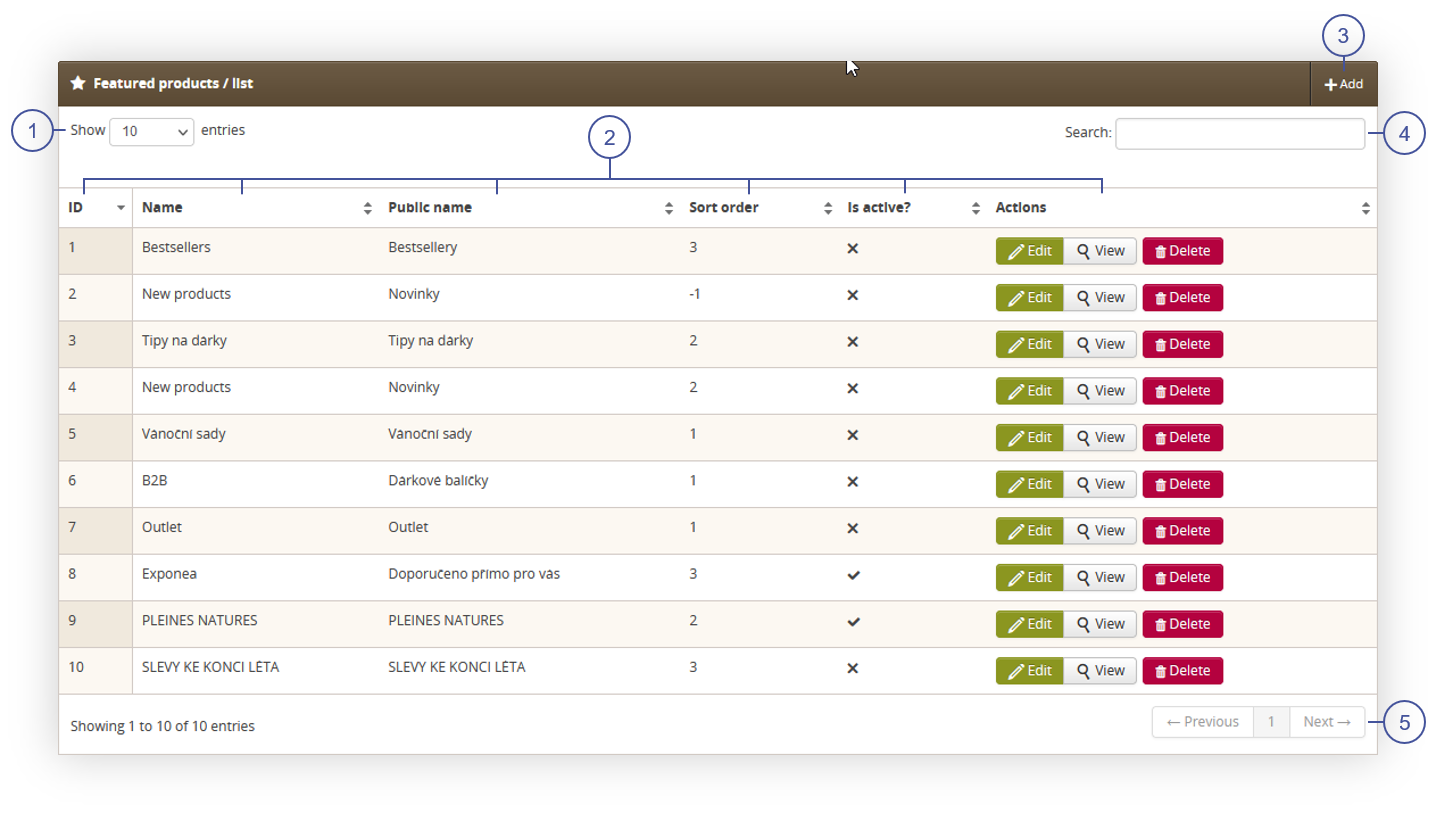 |
| *Visualization of the select list section in the Featured products / list module* |
| 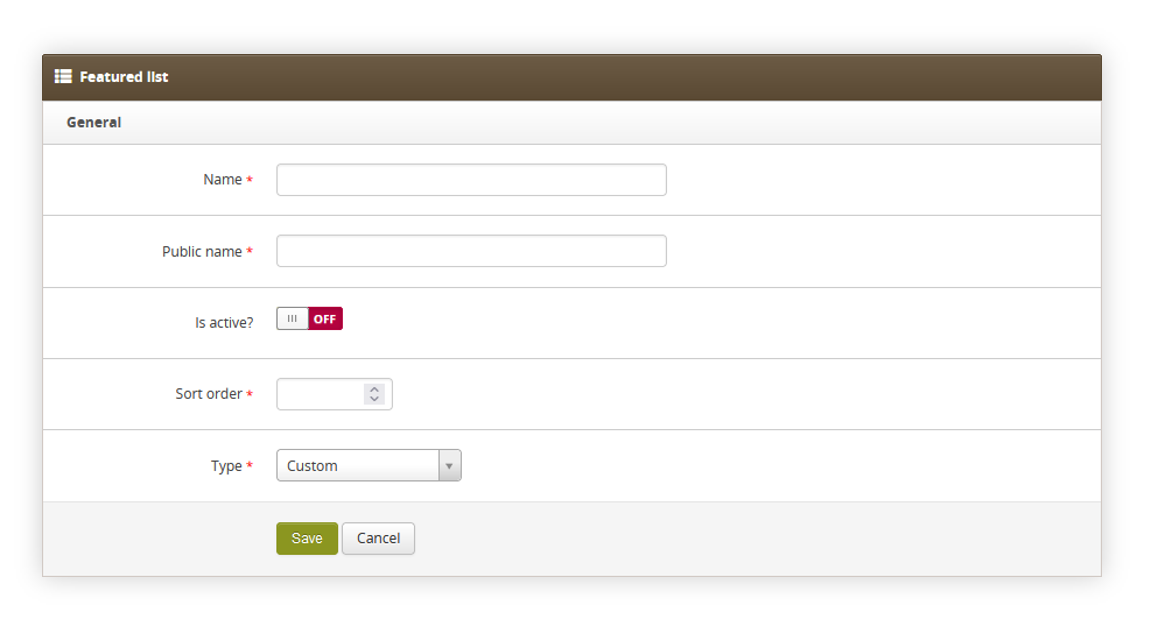 |
| *Visualization of the adding of the featured products list* |
| 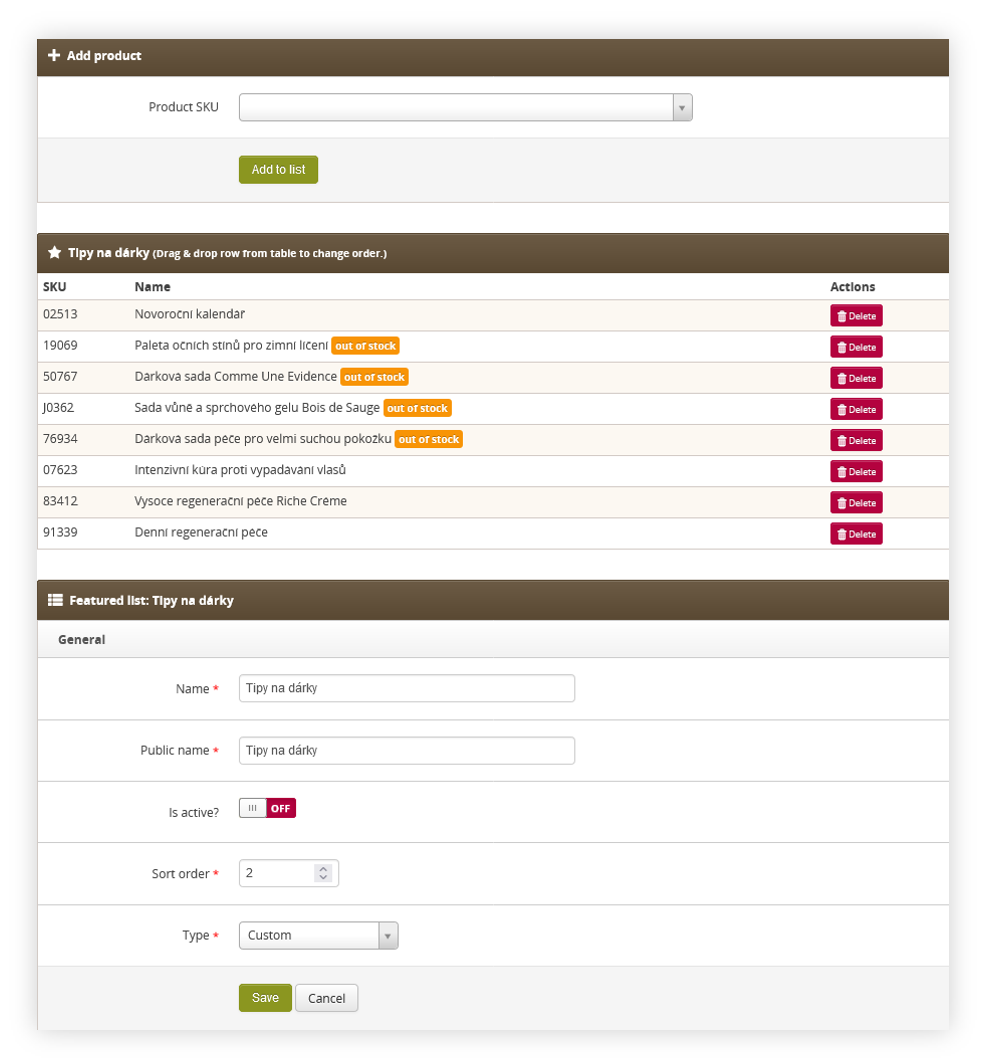 |
| *Visualization of the custom type* |
| 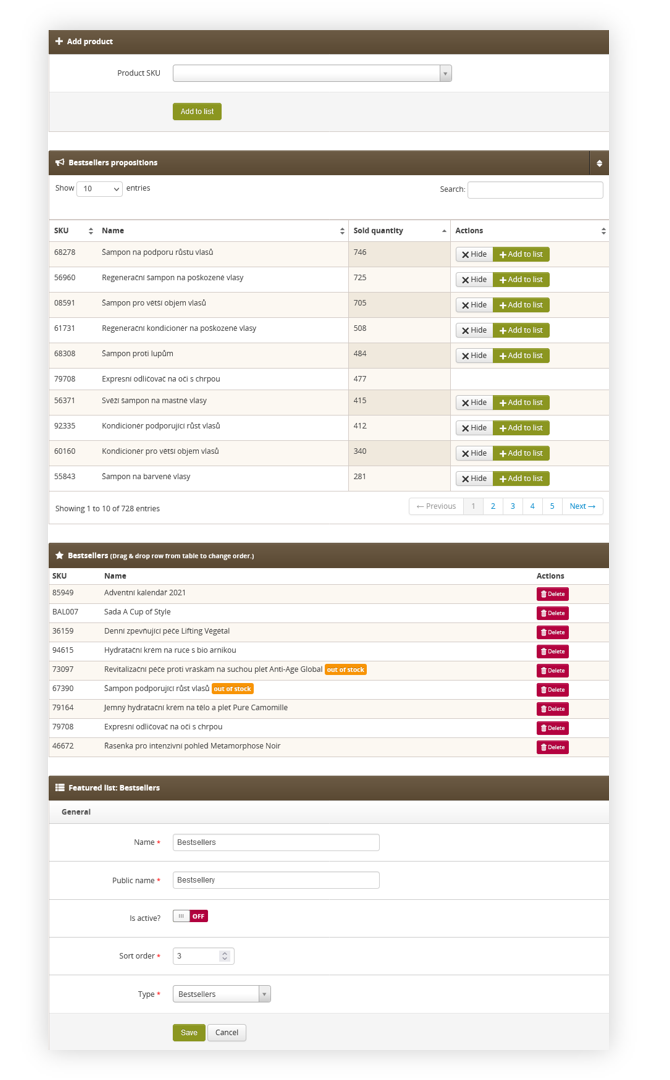 |
| *Visualization of the bestsellers type* |
| 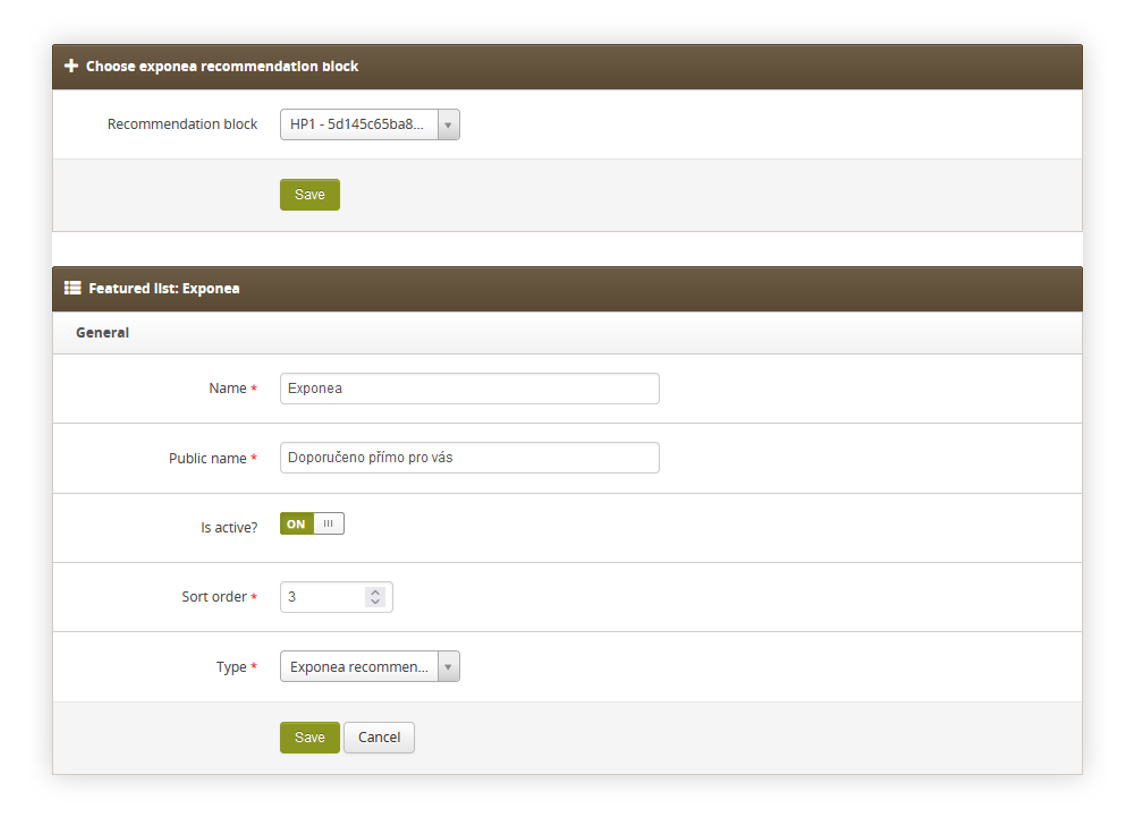 |
| *Visualization of the adding of the exponea recommendations type* |
| 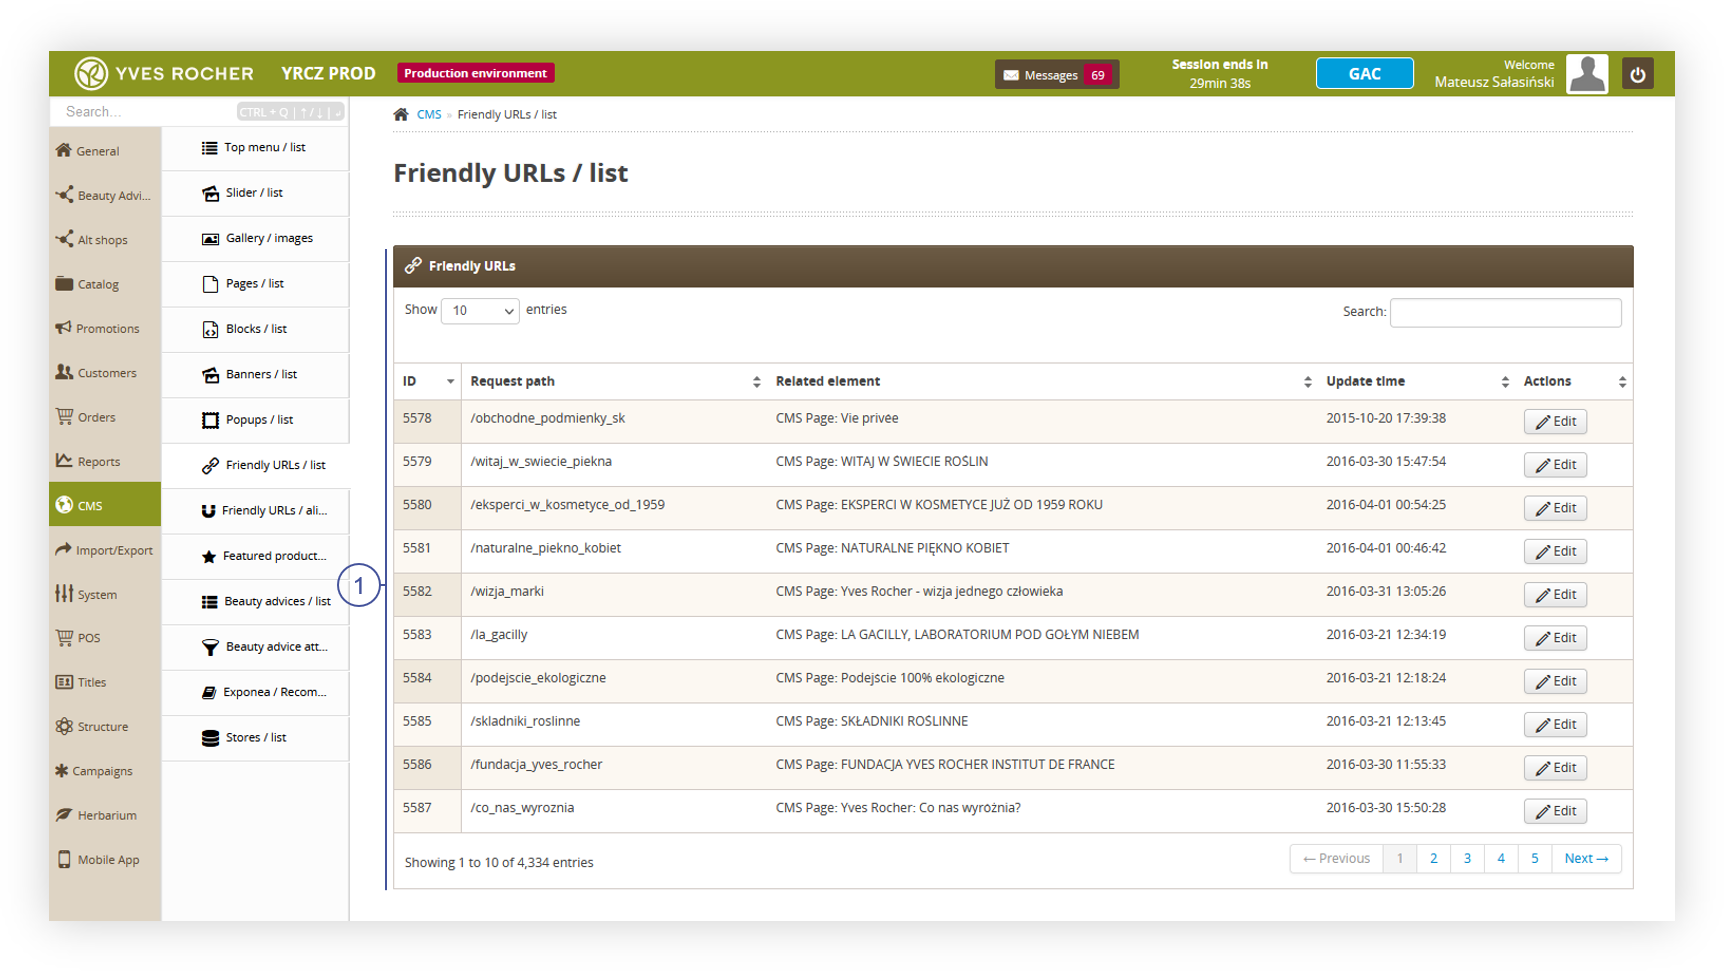 |
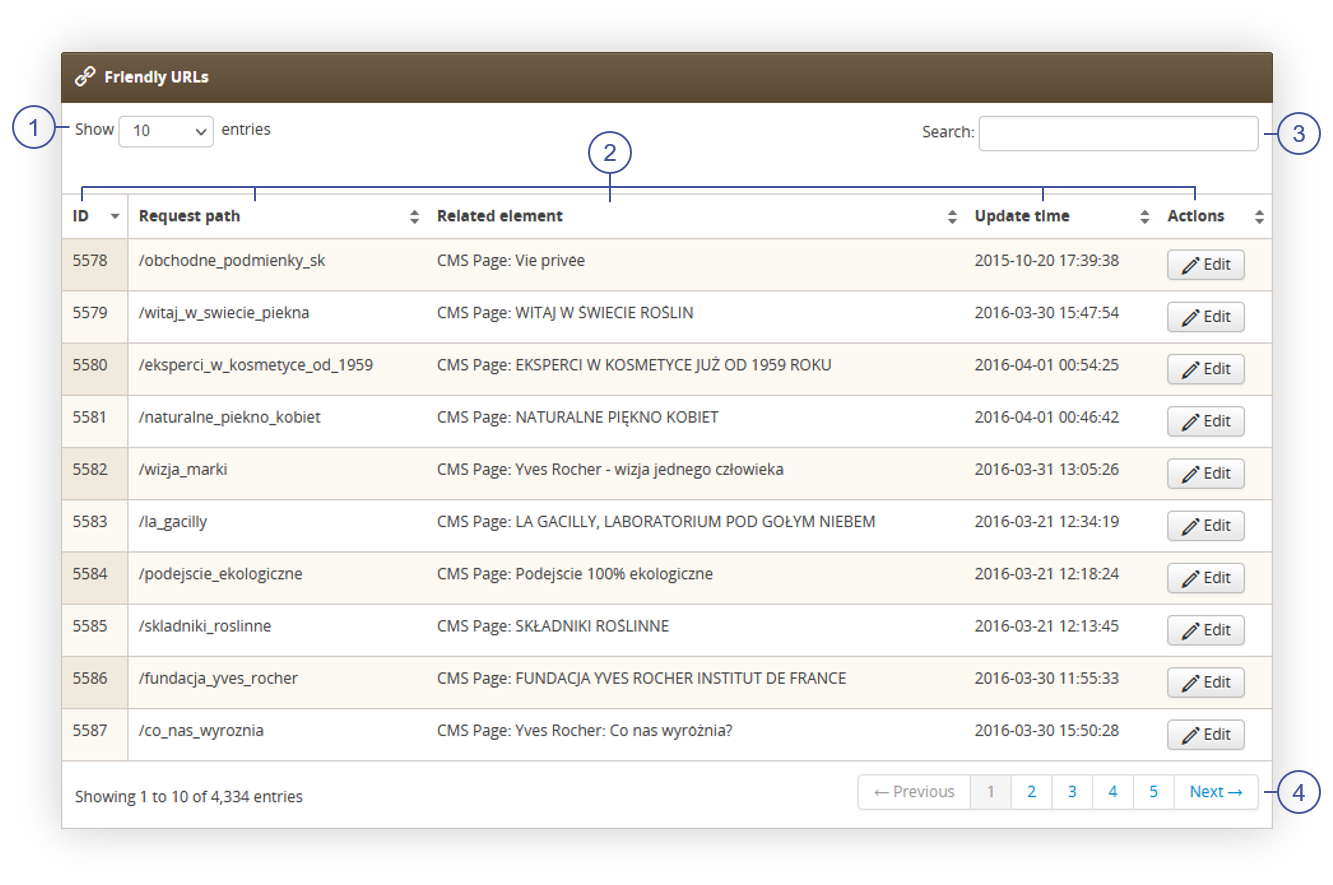
| *Visualization of the Friendly URLs / list page* |
| 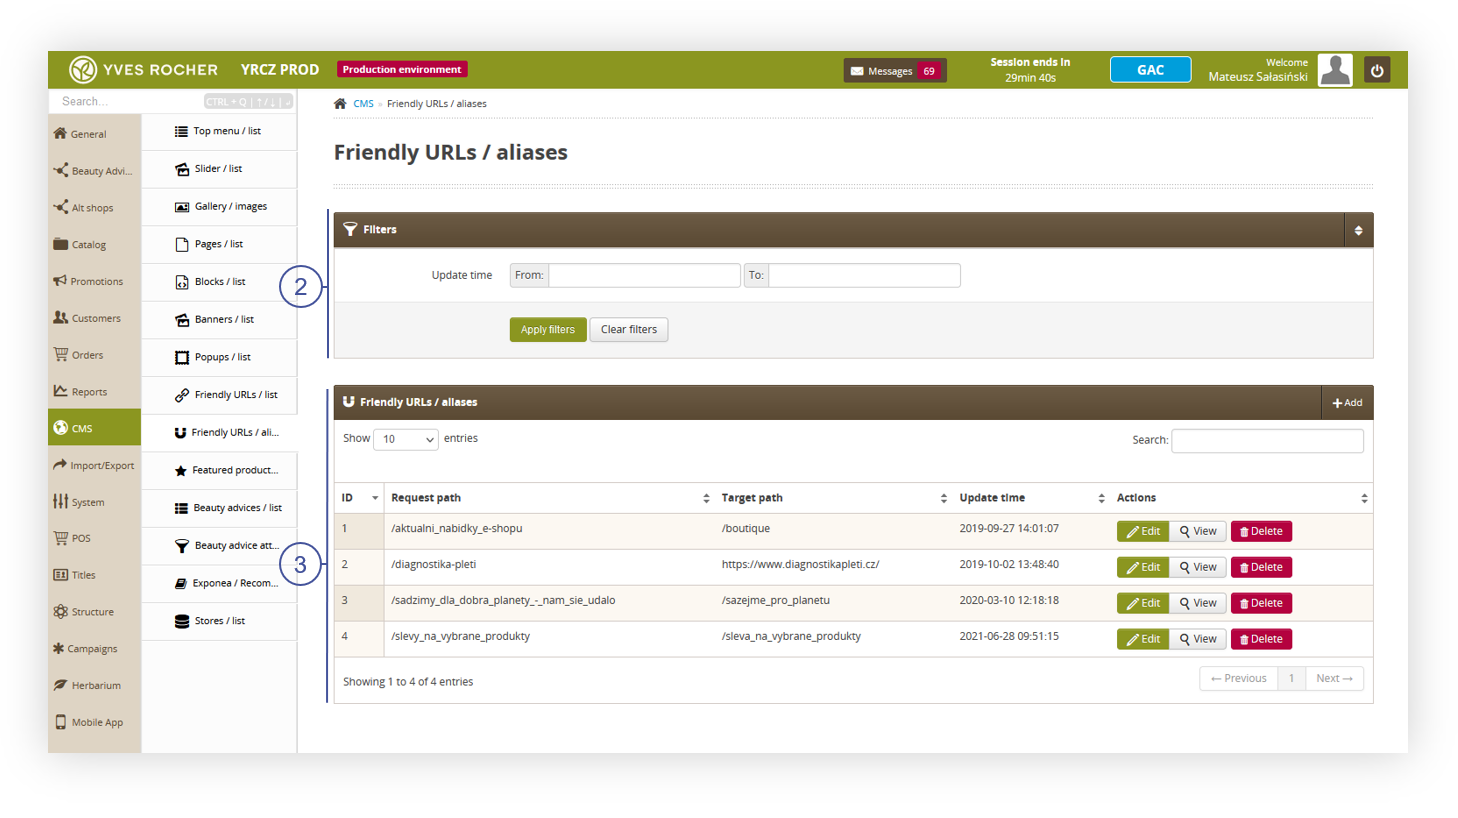 |
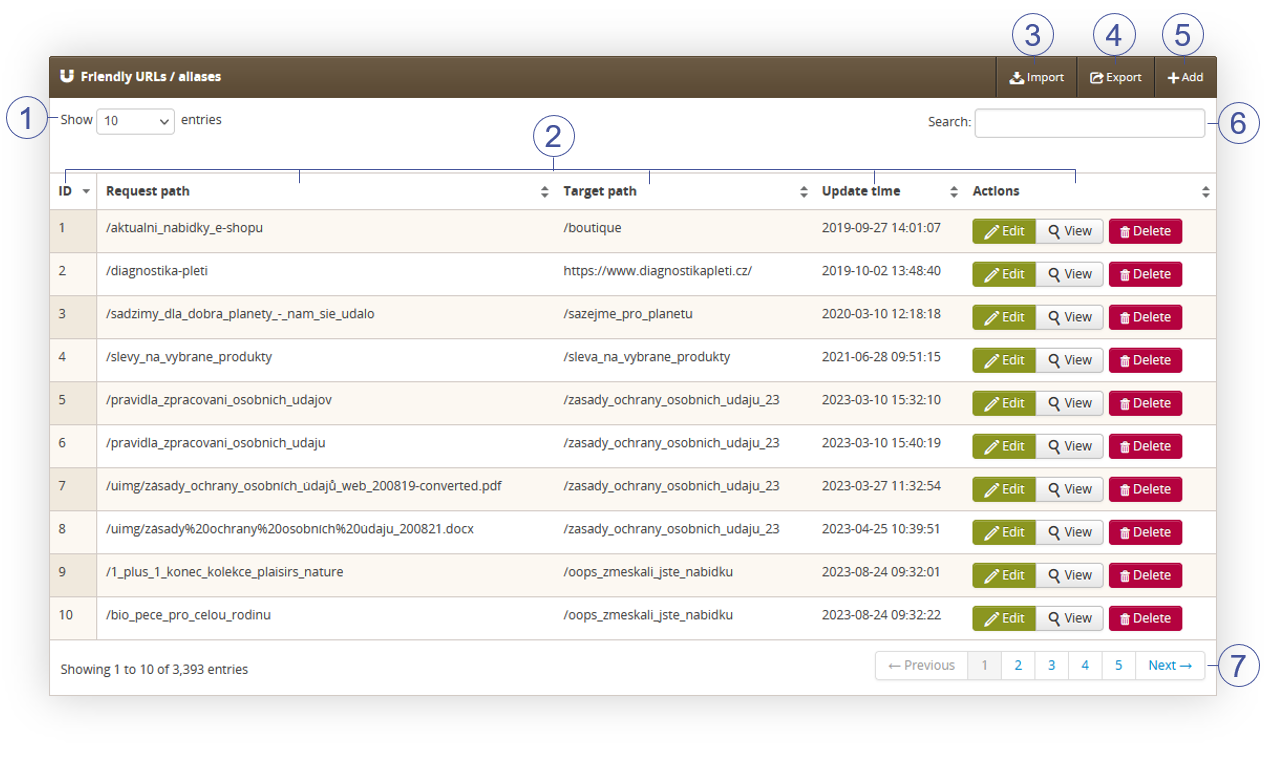
| *Visualization of the Friendly URLs / aliases page* |
|  |
| *Visualization of the Friendly URLs section* |
| 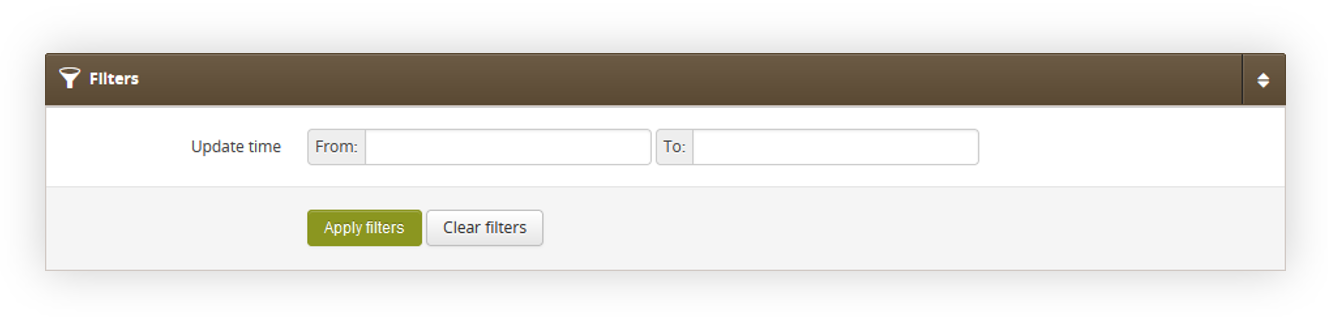 |
| *Visualization of the filters section in the Friendly URLs / aliases* |
|  |
| *Visualization of the Friendly URLs / aliases section* |
|  |
| *Visualization of the Friendly URLs / aliases section* |
|  |
| *Visualization of the Friendly URLs / aliases section* |
| 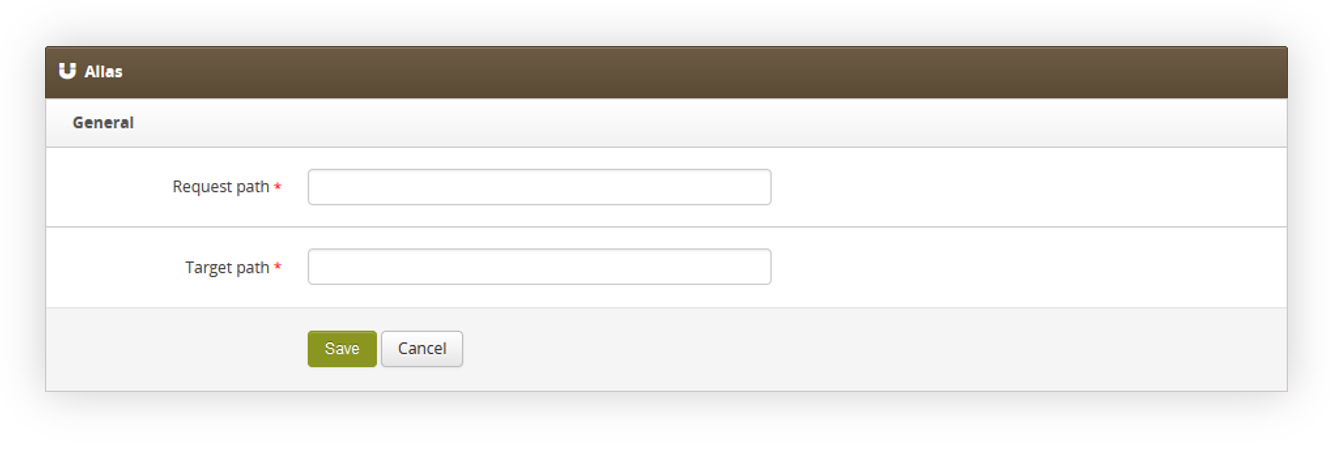 |
| *Visualization of the adding of the new aliases.* |
|  |
| *Visualization of the adding of the new aliases.* |
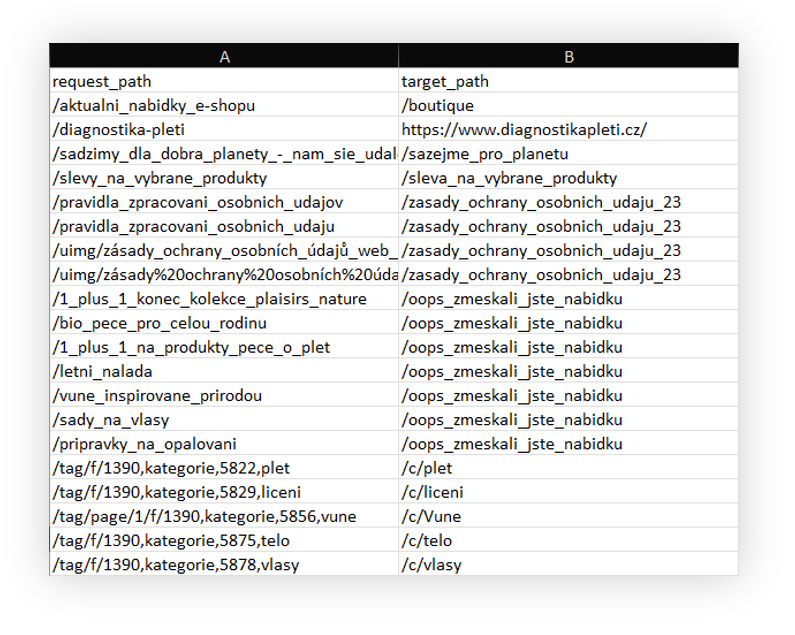
| request\_path | target\_path |
| /Webpage | /webpage |
| 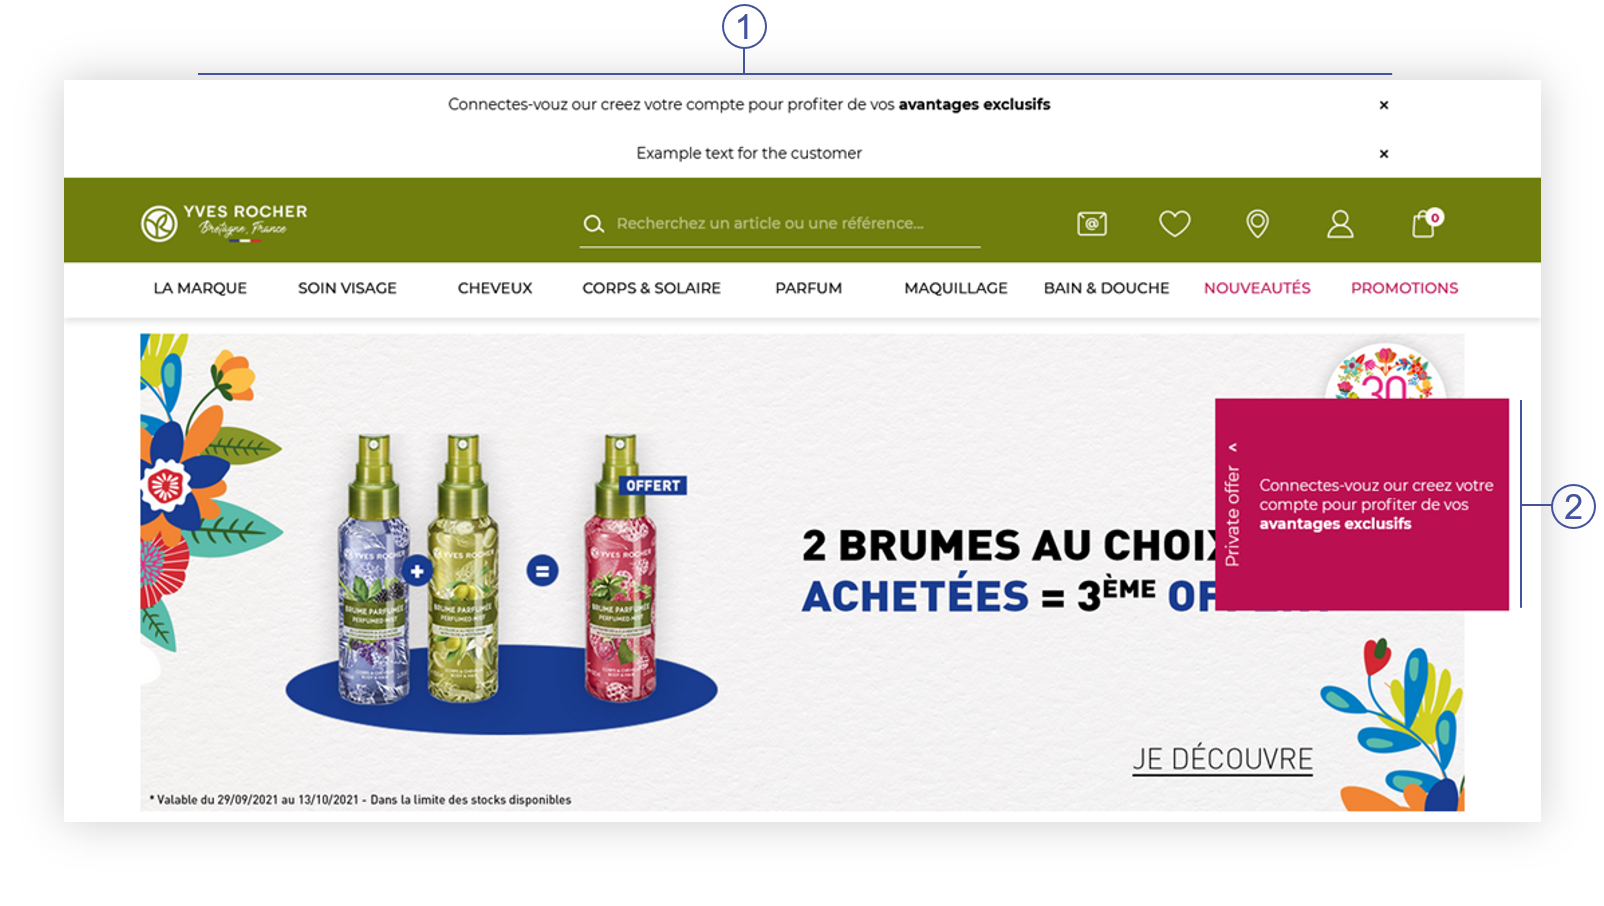 |
| *Visualization of the banners on the homepage (Desktop view)* |
| 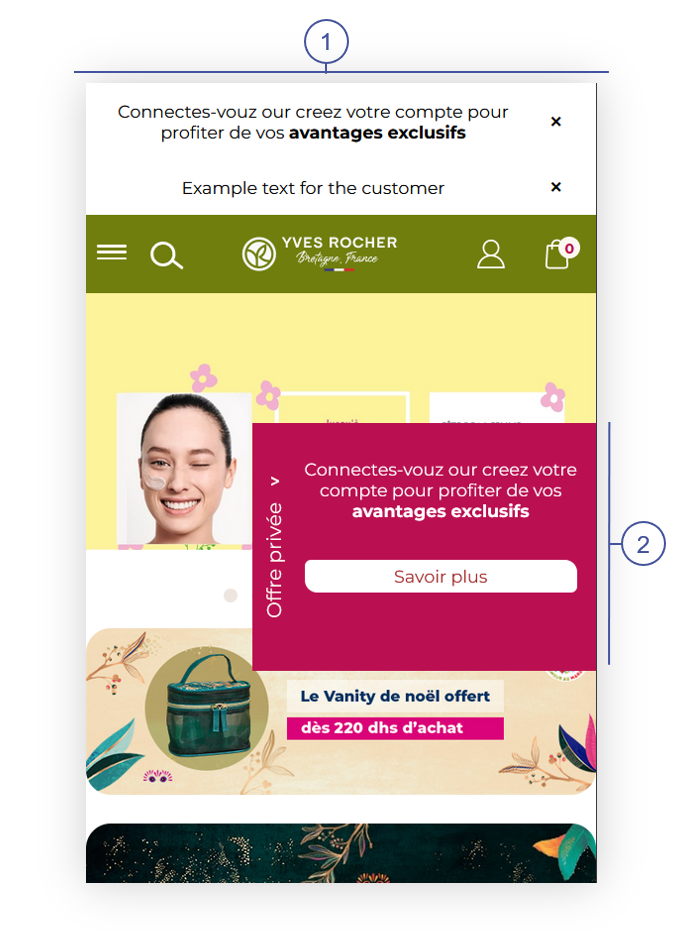 |
| *Visualization of the banners on the homepage (Mobile view)* |
|  |
| *Visualization of the Banners / list tab* |
|  |
| *Visualization of the new banner creation* |
Connectes-vouz our creez votre compte pour profiter de vos avantages exclusifs
|  |
| *Visualization of the Layout banners tab in the System / settings* |
|  |
| *Visualization of the banners on the homepage (Desktop view)* |
|  |
| *Visualization of the banners on the homepage (Mobile view)* |
| [](https://knowledge.tauceti-digital.com/uploads/images/gallery/2025-02/powerpnt-acw4u5h7sn.png) |
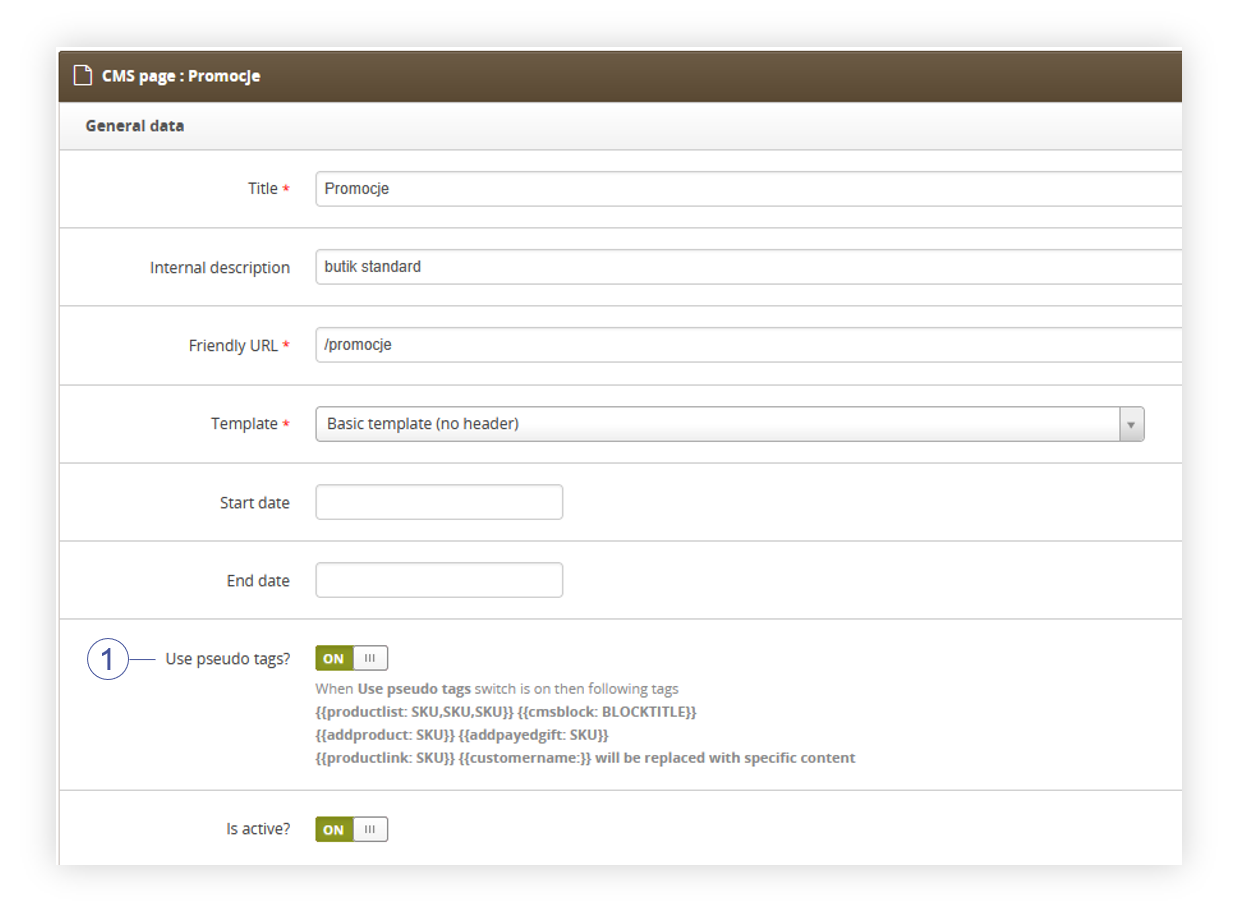
| *Visualization of the example usage of a pseudotag* |
| [](https://knowledge.tauceti-digital.com/uploads/images/gallery/2025-02/powerpnt-remqlvtnoa.png) |
| *Visualization of the use pseudo tags? button.* |
| **Name** | **Available arguments** |
| **cmsblock** | Title of a CMS block |
| **addpayedgift** | SKU number of a product |
| **addproduct** | |
| **productlink** | |
| **productlist** | **reload:true** - sets if the add to cart modal should be shown to the customer. If this argument is set to false customer will see add to cart modal, if it's set to true customer will remain on the page. **limit:6** - sets the limit how many products should be displayed at the same time SKU list separated by comma (",") |
| **blockproductlist** | |
| **productlistsmall** | |
| **productlistcolor** | |
| **productlistsmallcart** | |
| **productlistbig** | |
| **treescounter** | N/A |
| *Visualization of the* |
| 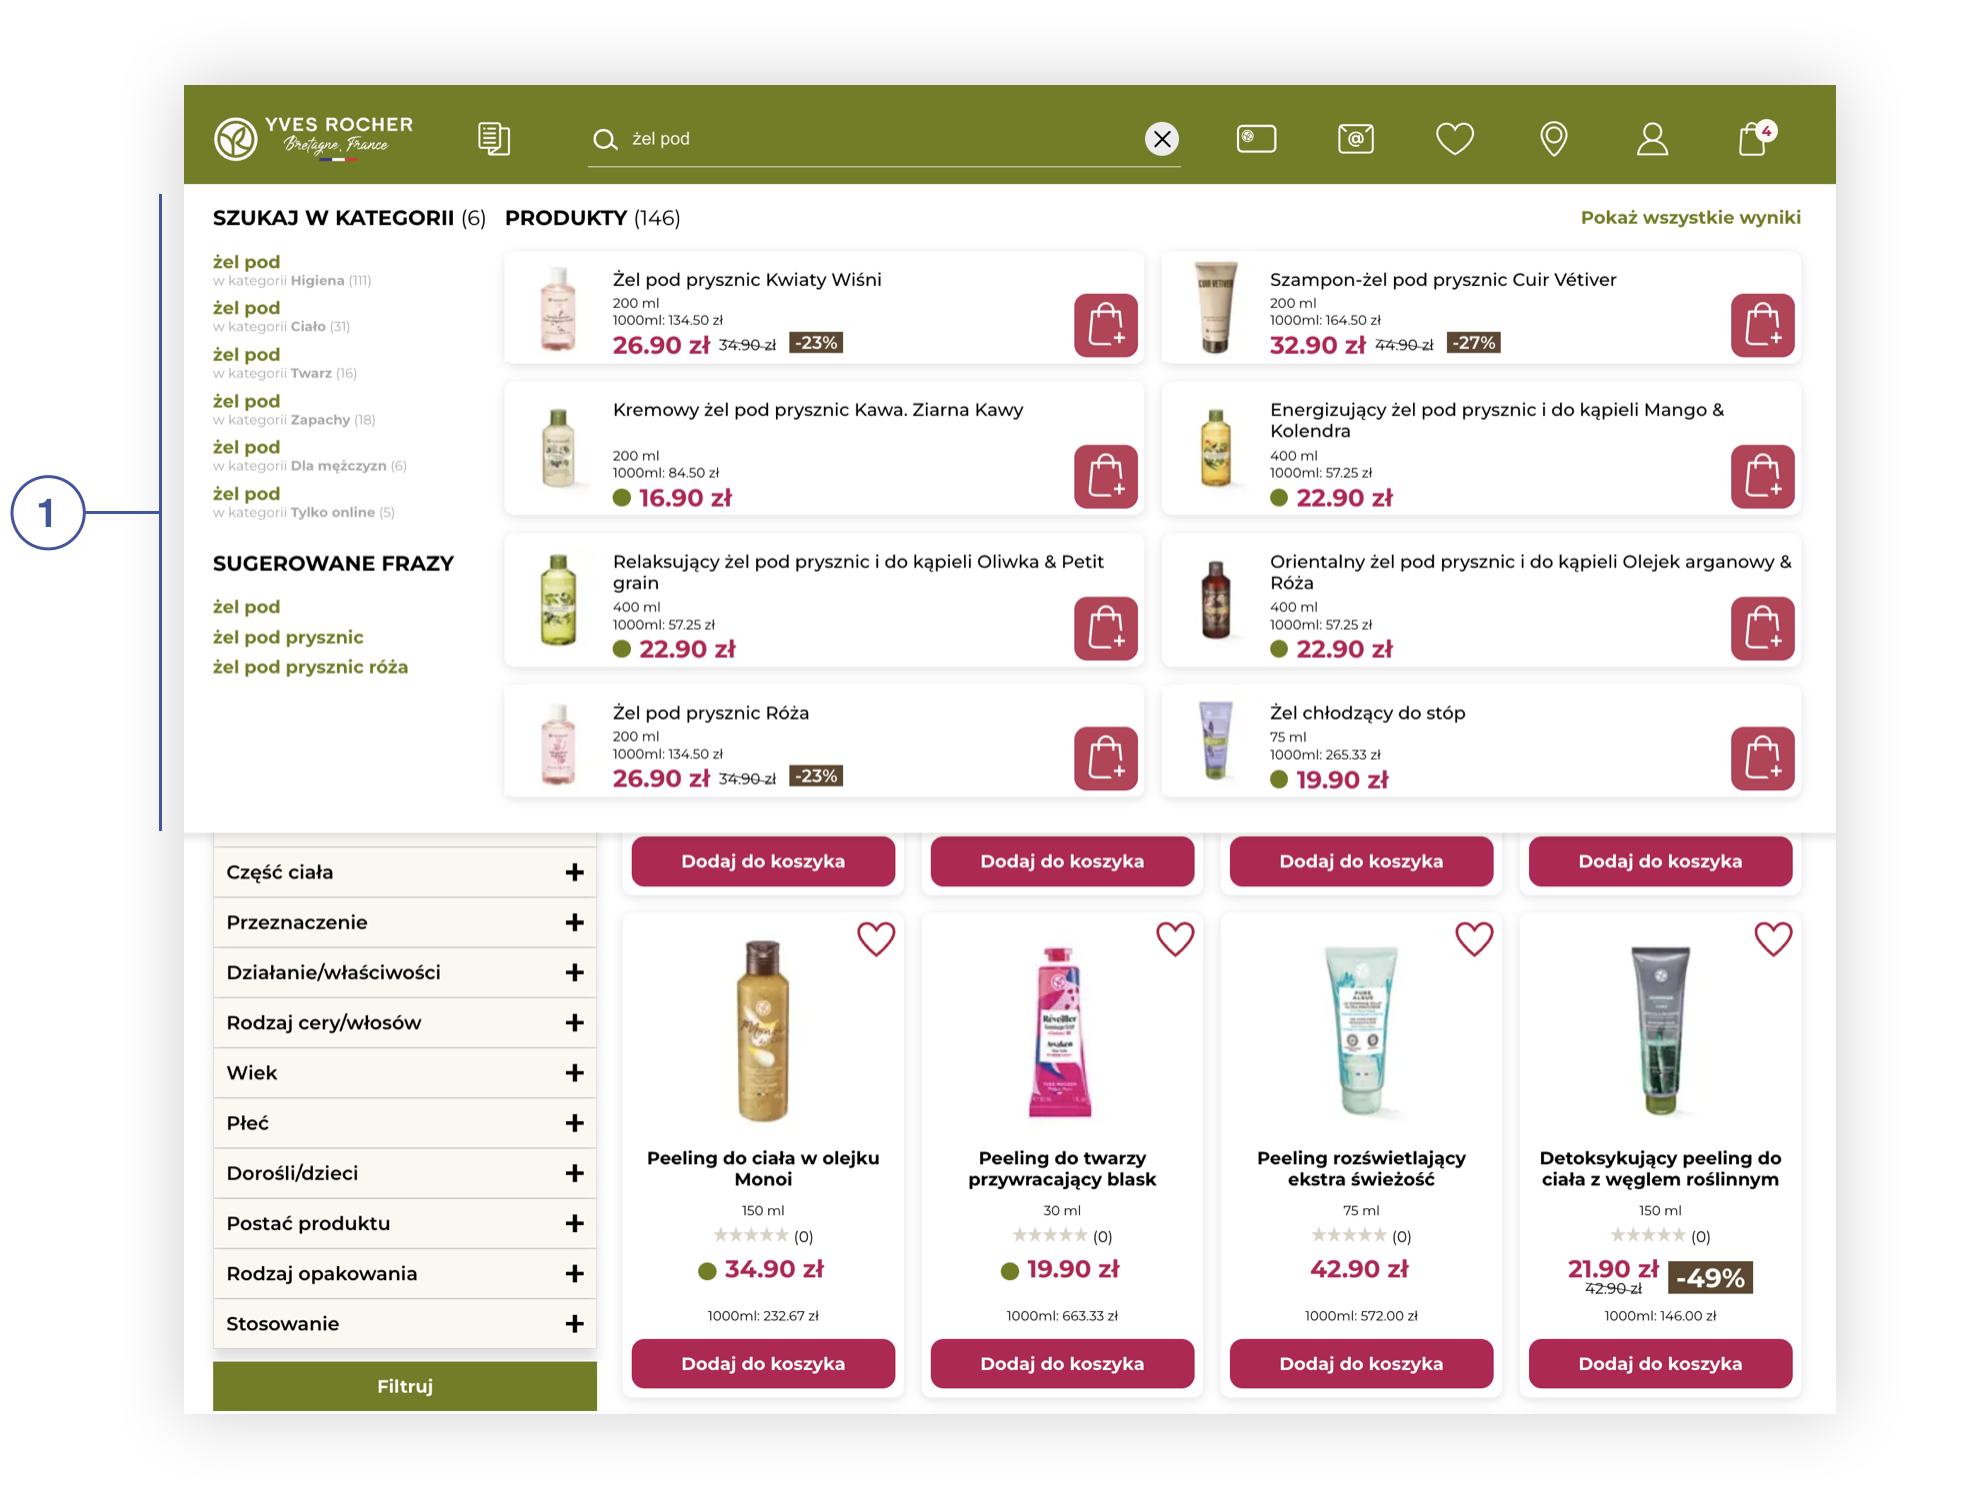 |
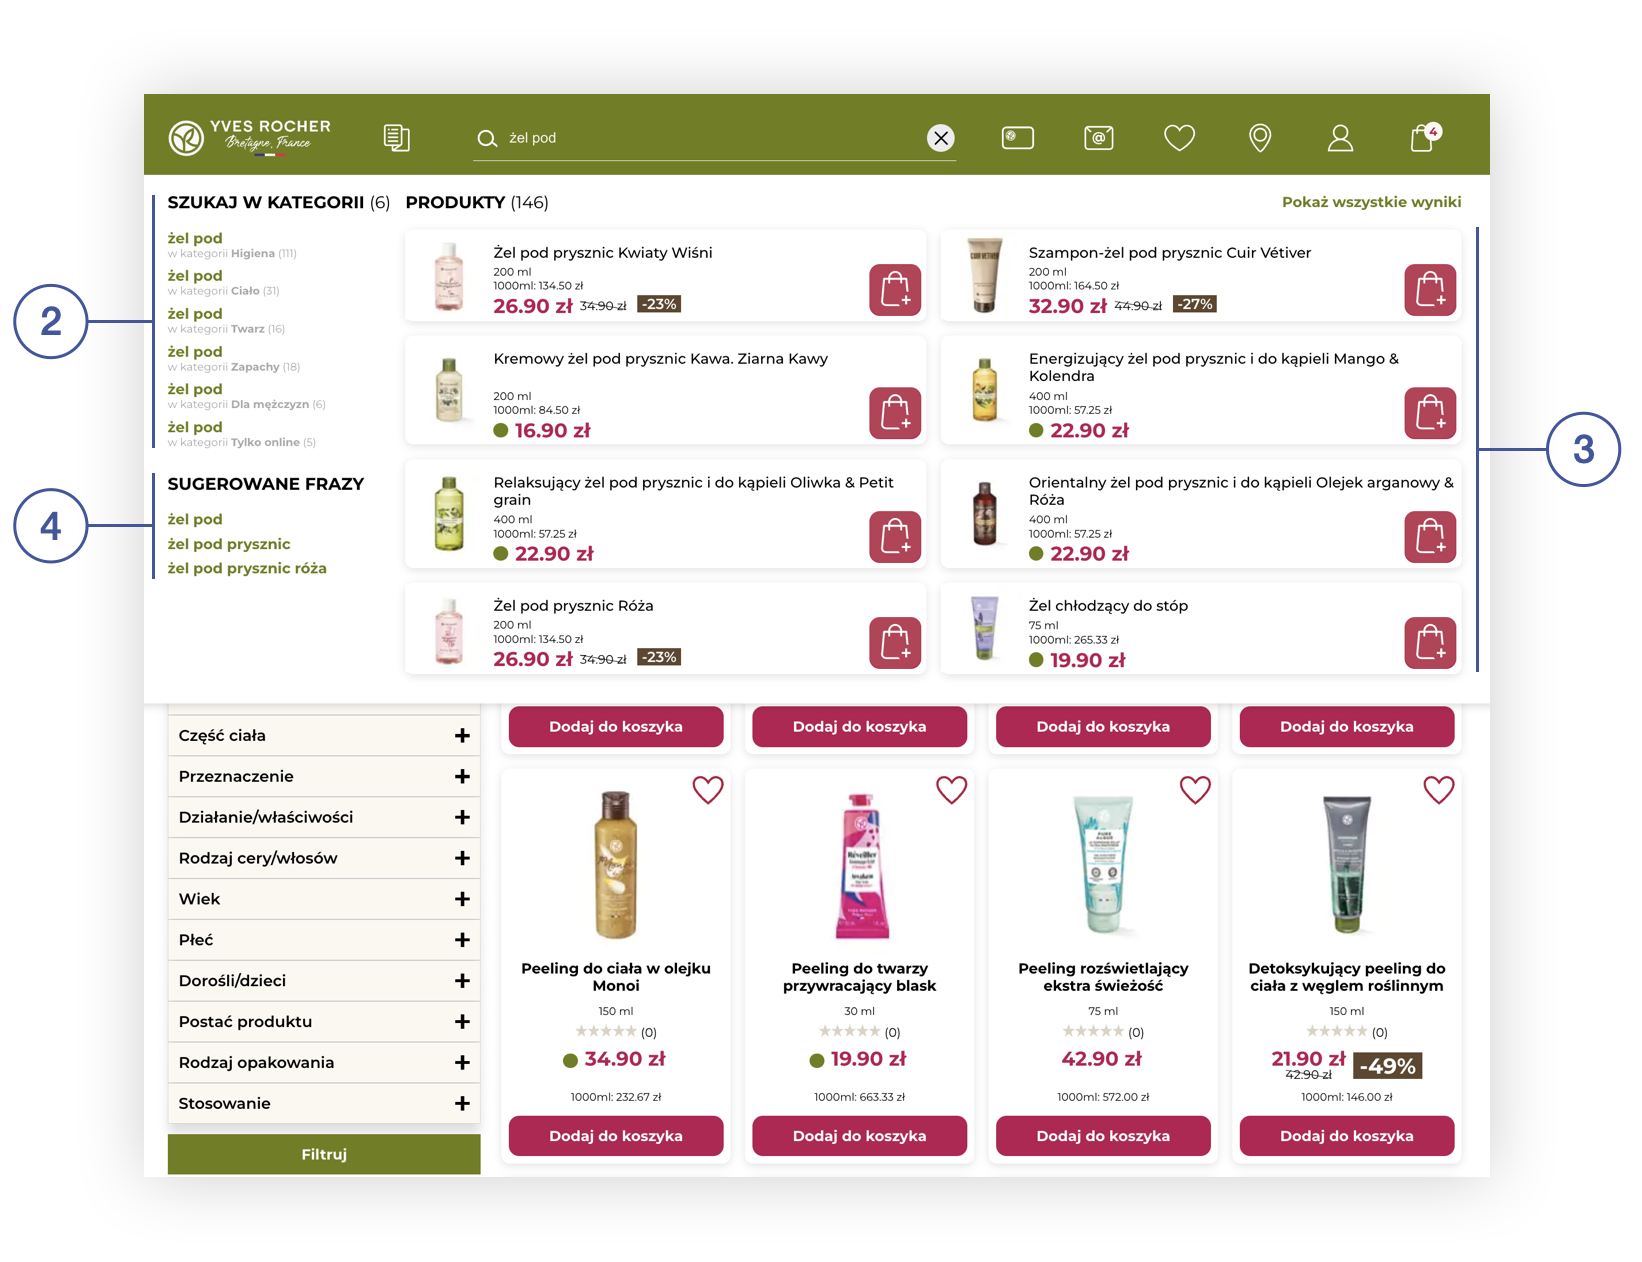
| *Visualization of the TCAI search mechanism UI (desktop)* |
|  |
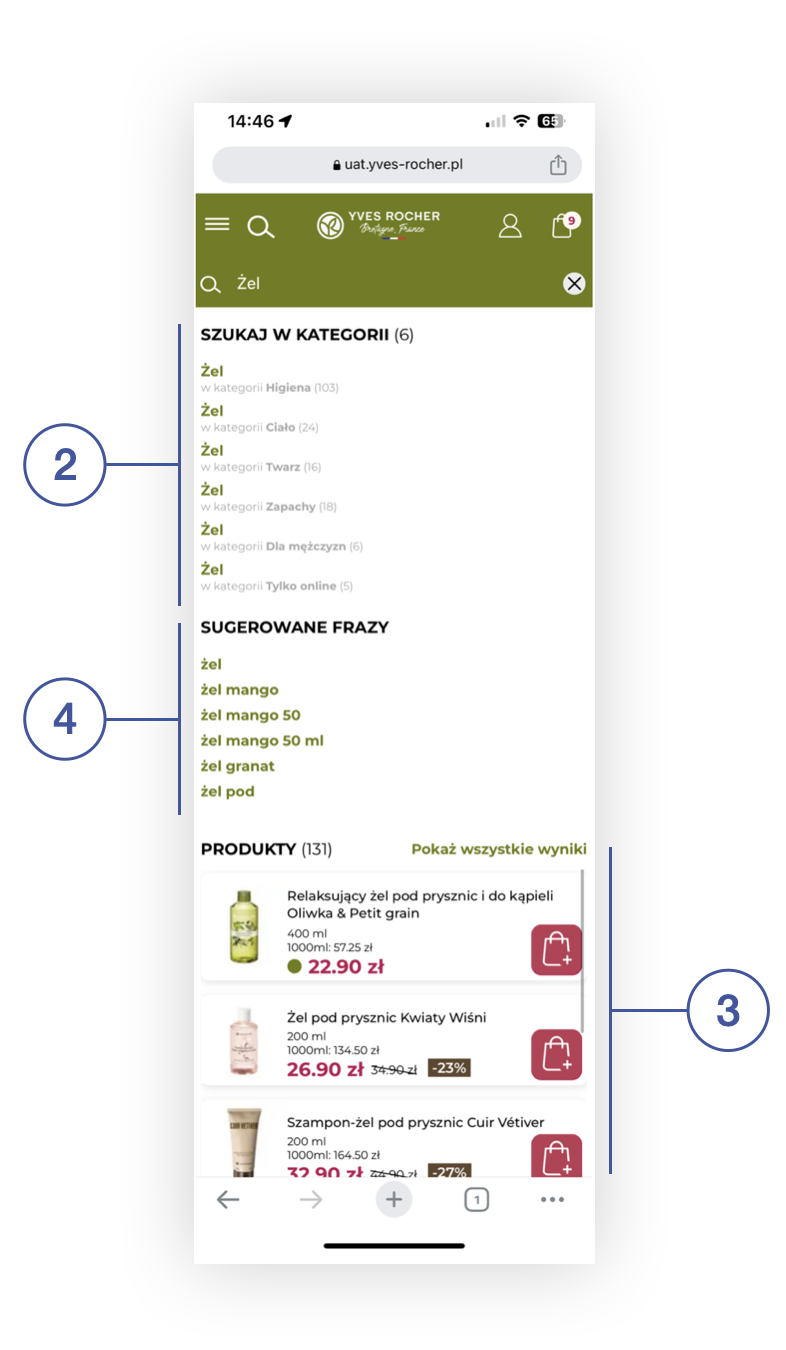
| *Visualization of the TCAI search mechanism UI (mobile)* |
| 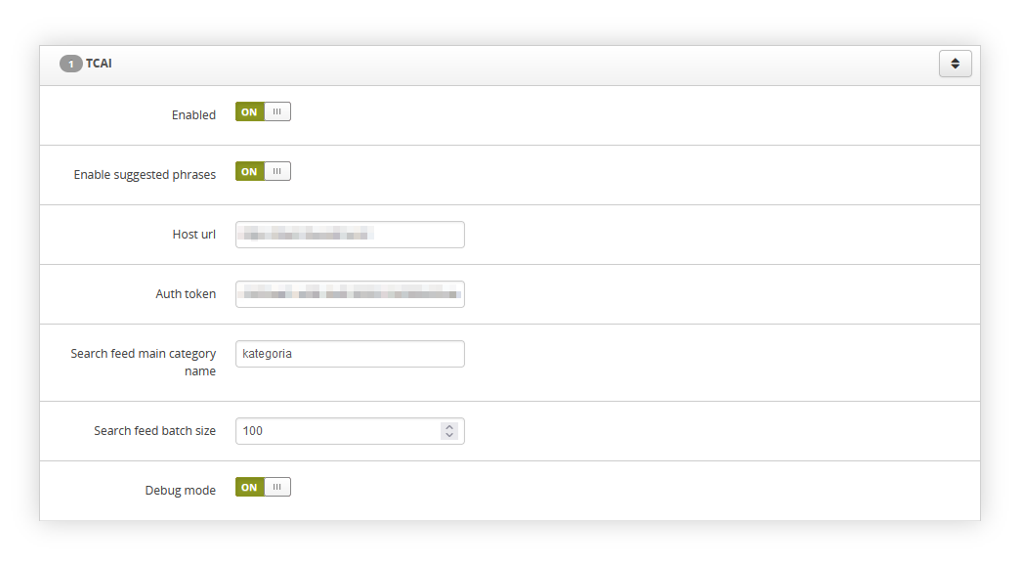 |
| *Visualization of the TCAI admin panel settings* |
| 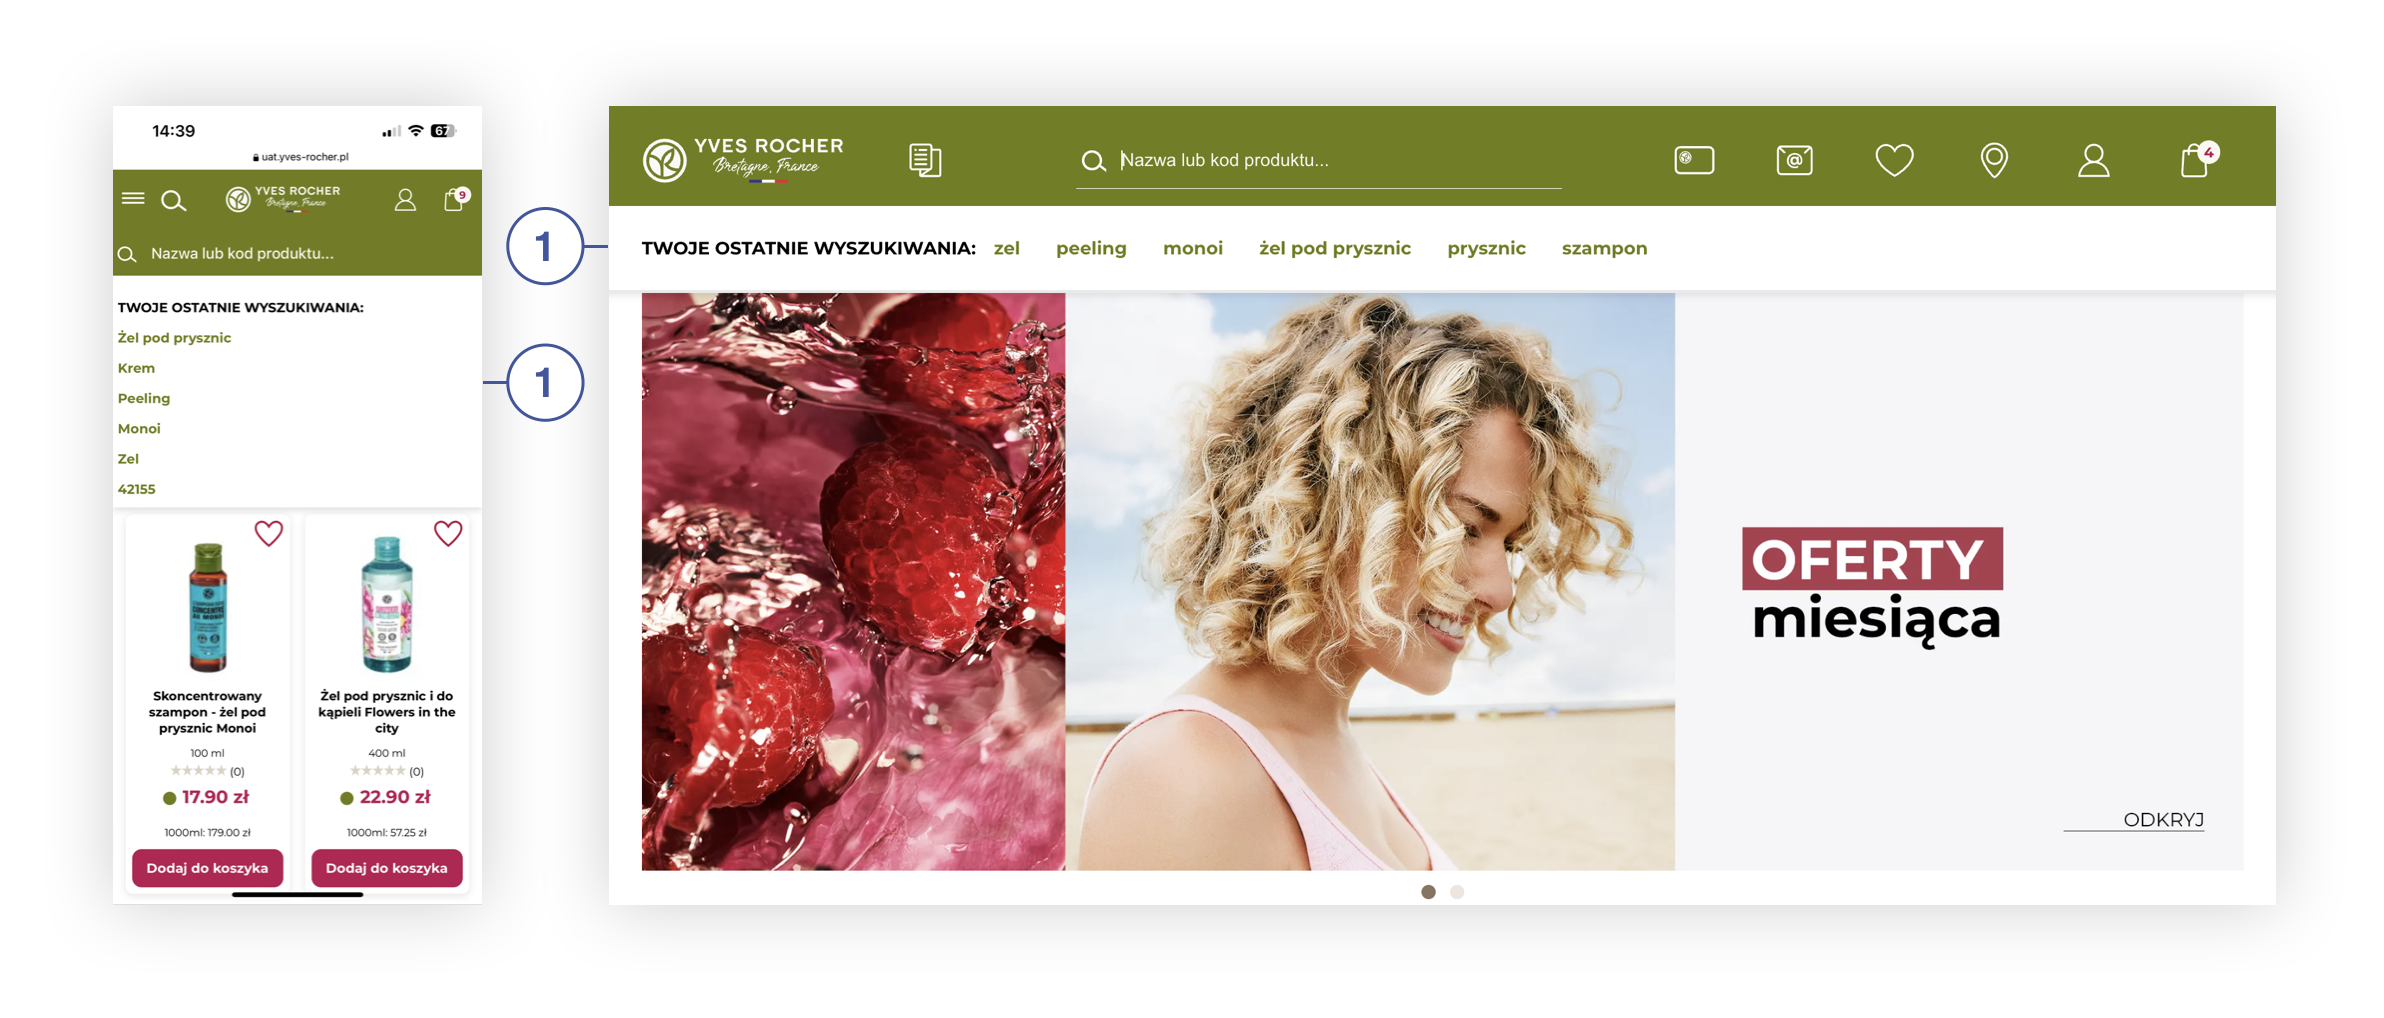 |
| *Visualization of the TCAI - last phrases UI (mobile&desktop)* |
|  |
| *Visualization of the Tau Ceti AI search mechanism UI (desktop)* |
|  |
| *Visualization of the Tau Ceti AI search mechanism UI (mobile)* |
| 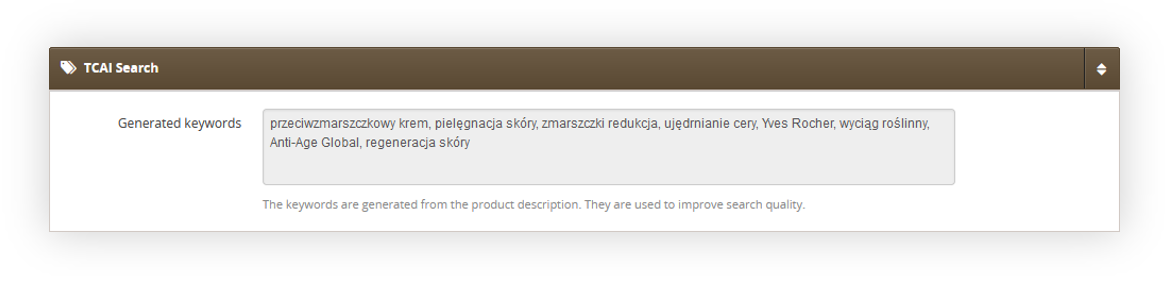 |
| *Visualization of the TCAI keywords* |
| 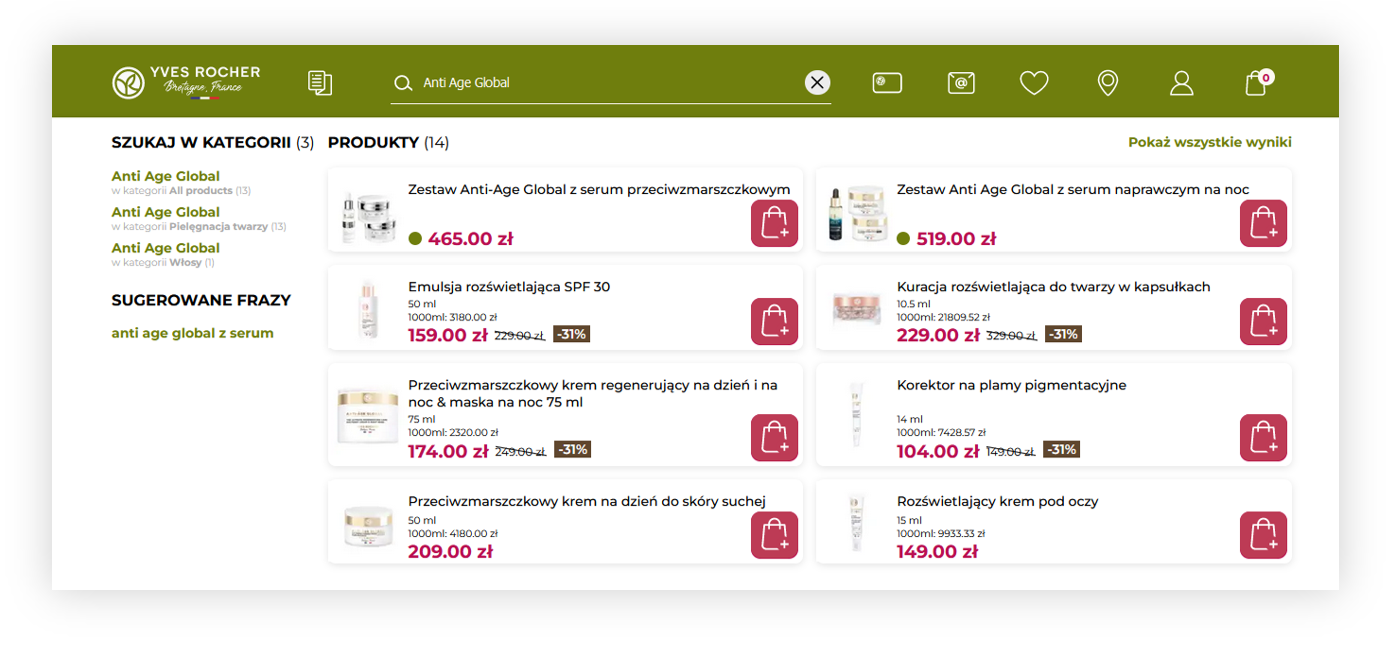 |
| *Visualization of the searching of a keyword in the TCAI search* |
| 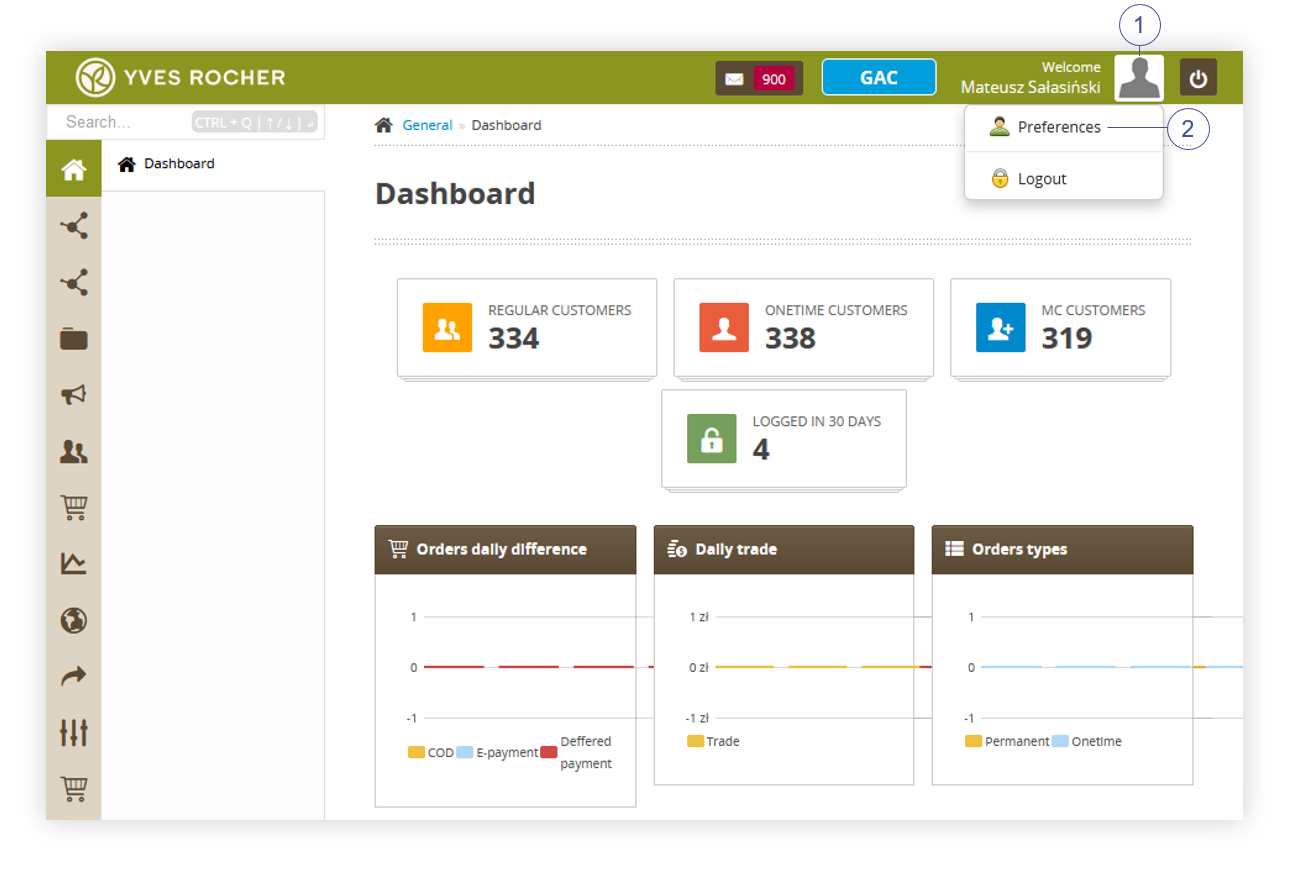 |
| *Visualization of the user preferences button location* |
| 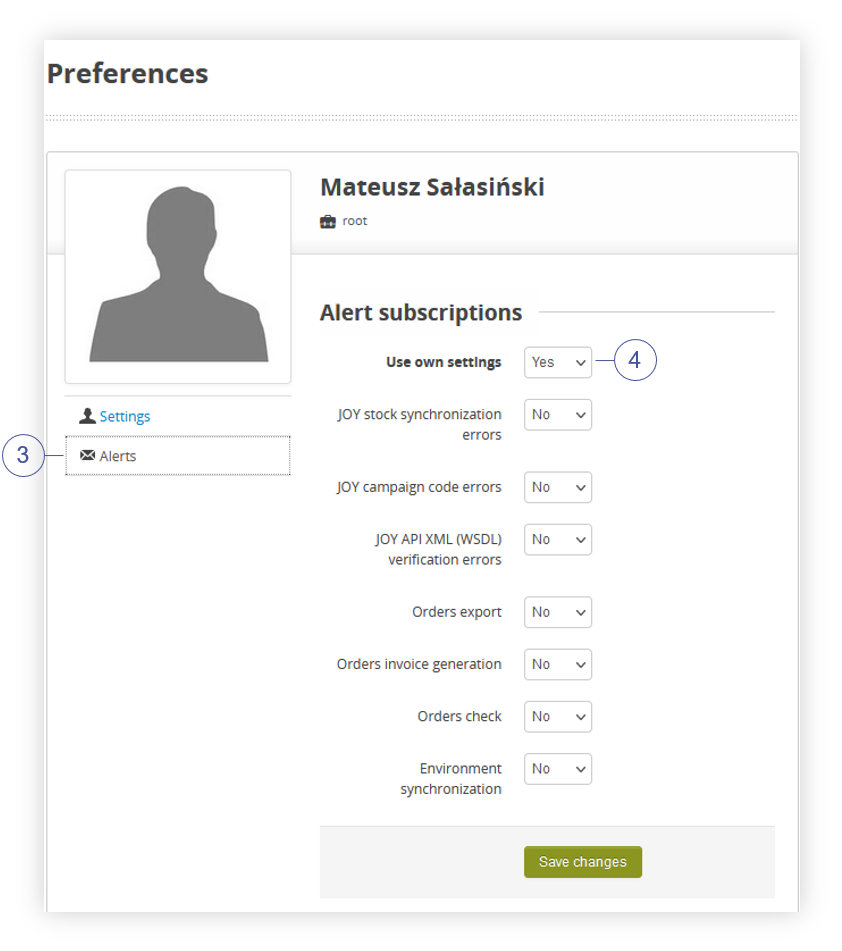 |
| *Visualization of the alerts in the admin panel.* |
|  | - Dashboard |
|  | - Contacts - Orders / list - Pending orders - New order - POS retail - Customer edit requests - Removed contacts |
|  | - Alt shops / list - Campaign codes / list - Delivery costs / list - Payment types / list - Products / list - Pages / list - Blocks / list - Product stickers / list - Banners / list - Popups / list - Featured products / list - Promotion pages / list - Opensets / list - Sales channels / list - Slider / list - Promotion validity dates |
|  | - Products / list - Colors / lit - Properties / list - Tags / list - Reviews / list - Ingredients / list - Reviews / moderation - Product stickers / list - Reviews / moving - Images upload - Mass product removal - JOY stocks |
|  | - Conditions / list - Actions / list - Rules / list - Discount codes / list - Promotion pages / list - Opensets / list - Campaign codes / list - Products excluded from promotion (global) - Push messages / list - Vouchers / list |
|  | - Customer / MC clients - Customers / list - Customer / leads - Customer / blacklist - Customer / data audit - Customer / opt-out mobile - Subscribers / list - Address Dictionary - Subscribers groups - Member get Member - Call center / new case - Call center / cases - Call center / contact ways - FIDEN2 / Search card - FIDEN2 / Change card balance - FIDEN2 / Automatic balance operations - FIDEN2 / Assign card - FIDEN2 / Card initialize - Forget requests / list - Customer / Redirect - Customer Private Offers - SMS Templates - Customer / Form - Customer / Contact Subject |
|  | - Orders / list - Orders / to verify - JOY / Check order - Orders / Order payments - JOY / Waybill log - PayU refunds - Allegro - Allegro delivery methods - Allegro errors - Voucher / GiftCard - BaseLinker - Baselinker delivery - Baselinker errors - Refunds - Baselinker Catalog - Baselinker integrations |
|  | - Reviews / products - Products / stock - Stock / statistics - Sales / Orders - Sales / MC orders - Customers / Registrations - Discount codes / sales - Promotions / orders - Personal discount codes - Error pages - Security incidents - PUSH messages / events - PUSH devices / registrations - Member Club / reports - Short link clicks - JOY / Failed orders - Search / top phrases - Password recoveries / list - Orders promotion rules - FIDEN2 - Products price history |
|  | - Top menu / list - Slider / list - Gallery / images - Pages / list - Blocks / list - Banners / list - Popups / list - Friendly URLs / list - Friendly URLs / aliases - Featured products / list - Beauty advices / list - Beauty advice attributes / list - Exponea / Recommended Product Block - Stores / list |
|  | - Export / SALESmanago tags - Export / catalog - Import - Export / customers - Export / subscribers - Export / POS users - Export / Jumia - Import / FIDEN2 points - Export / sales - Export / FIDEN2 cards - Import / discount codes - Generator / discount codes - Export / Invoices - Export / contacts - Export / orders - Export / gift cards payment - Mass personal codes removal |
|  | - Agreements - Admins / list - Available zip codes / list - Synchronization - Admins / Auth IPs - Admin / messages - Admin / banned IPs - Delivery types / list - Payment types / list - Delivery / payment exceptions - Translations / list - System / settings - Translations / missing list - SEO / settings - Tasks - Planned tasks - Public API / keys - APIv2 / Keys - Order status / list - SALESmanago / settings - Cross selling / settings - JOY / Real time validation - JOY Stock errors / list - Disabling site - Short links / list - Search / dictionary - Alternative authorization - Robots.txt - Redlink Messages - FIDEN2 / File history - FIDEN2 / Data flow dashboard - External imports / list - Delivery points / list - System log |
|  | - POS / Monthly report - Export / Monthly report - Assigned cards / report |
|  | - View - Qualifiers - Commission - Simulation - KPIs / list |
|  | - View structure - Movements - New region - View regions - Leaders / targets |
|  | - View - Add |
|  | - Plants - Plant families - Regions |
|  | - Carousel - Sub campaign - Boxes - Homepage products - Articles - Current offers - Cms elements - Cms categories - Catalog - Customer Private OFfers |
|  | - Dashboard |
|  | - Contacts - Orders / list - Pending orders - New order - POS retail - Customer edit requests - Removed contacts |
|  | - Alt shops / list - Campaign codes / list - Delivery costs / list - Payment types / list - Products / list - Pages / list - Blocks / list - Product stickers / list - Banners / list - Featured products / list - Promotion pages / list - Opensets / list - Sales channels / list - Slider / list - Promotion validity dates |
|  | - Products / list - Colors / lit - Properties / list - Tags / list - Reviews / list - Ingredients / list - Reviews / moderation - Product stickers / list - Reviews / moving - Images upload - Mass product removal - JOY stocks |
|  | - Conditions / list - Actions / list - Rules / list - Discount codes / list - Promotion pages / list - Opensets / list - Campaign codes / list - Products excluded from promotion (global) - Push messages / list - Vouchers / list |
|  | - Customer / MC clients - Customers / list - Customer / leads - Customer / blacklist - Customer / data audit - Customer / opt-out mobile - Subscribers / list - Address Dictionary - Subscribers groups - Member get Member - Call center / new case - Call center / cases - Call center / contact ways - FIDEN2 / Search card - FIDEN2 / Change card balance - FIDEN2 / Automatic balance operations - FIDEN2 / Assign card - FIDEN2 / Card initialize - Forget requests / list - Customer / Redirect - Customer Private Offers - SMS Templates - Customer / Form - Customer / Contact Subject |
|  | - Orders / list - Orders / to verify - JOY / Check order - Orders / Order payments - JOY / Waybill log - PayU refunds - Allegro - Allegro delivery methods - Allegro errors - Voucher / GiftCard - BaseLinker - Baselinker delivery - Baselinker errors - Refunds - Baselinker Catalog - Baselinker integrations |
|  | - Reviews / products - Products / stock - Stock / statistics - Sales / Orders - Sales / MC orders - Customers / Registrations - Discount codes / sales - Promotions / orders - Personal discount codes - Error pages - Security incidents - PUSH messages / events - PUSH devices / registrations - Member Club / reports - Short link clicks - JOY / Failed orders - Search / top phrases - Password recoveries / list - Orders promotion rules - FIDEN2 - Products price history |
|  | - Top menu / list - Slider / list - Gallery / images - Pages / list - Blocks / list - Banners / list - Friendly URLs / list - Friendly URLs / aliases - Featured products / list - Beauty advices / list - Beauty advice attributes / list - Exponea / Recommended Product Block - Stores / list |
|  | - Export / SALESmanago tags - Export / catalog - Import - Export / customers - Export / subscribers - Export / POS users - Export / Jumia - Import / FIDEN2 points - Export / sales - Export / FIDEN2 cards - Import / discount codes - Generator / discount codes - Export / Invoices - Export / contacts - Export / orders - Export / gift cards payment - Mass personal codes removal |
|  | - Agreements - Admins / list - Available zip codes / list - Synchronization - Admins / Auth IPs - Admin / banned IPs - Delivery types / list - Payment types / list - Delivery / payment exceptions - Translations / list - System / settings - Translations / missing list - SEO / settings - Planned tasks - Public API / keys - APIv2 / Keys - Order status / list - SALESmanago / settings - Cross selling / settings - JOY / Real time validation - JOY Stock errors / list - Disabling site - Short links / list - Search / dictionary - Alternative authorization - Robots.txt - Redlink Messages - FIDEN2 / File history - FIDEN2 / Data flow dashboard - External imports / list - Delivery points / list |
|  | - POS / Monthly report - Export / Monthly report - Assigned cards / report |
|  | - View - Qualifiers - Commission - Simulation - KPIs / list |
|  | - View structure - Movements - New region - View regions - Leaders / targets |
|  | - View - Add |
|  | - Plants - Plant families - Regions |
|  | - Carousel - Sub campaign - Boxes - Homepage products - Articles - Current offers - Cms elements - Cms categories - Catalog - Customer Private OFfers |
|  | - Dashboard |
|  | - Contacts - Customer edit requests - Removed contacts |
|  | - Alt shops / list - Campaign codes / list - Delivery costs / list - Payment types / list - Products / list - Pages / list - Blocks / list - Product stickers / list - Banners / list - Featured products / list - Promotion pages / list - Opensets / list - Sales channels / list - Slider / list - Promotion validity dates |
|  | - Products / list - Colors / lit - Properties / list - Tags / list - Reviews / list - Ingredients / list - Reviews / moderation - Product stickers / list - Reviews / moving - Images upload - Mass product removal - JOY stocks |
|  | - Conditions / list - Actions / list - Rules / list - Discount codes / list - Promotion pages / list - Opensets / list - Campaign codes / list - Products excluded from promotion (global) - Push messages / list - Vouchers / list |
|  | - Customer / MC clients - Customers / list - Customer / leads - Customer / blacklist - Customer / data audit - Customer / opt-out mobile - Subscribers / list - Address Dictionary - Subscribers groups - Member get Member - Call center / new case - Call center / cases - Call center / contact ways - FIDEN2 / Search card - FIDEN2 / Change card balance - FIDEN2 / Automatic balance operations - FIDEN2 / Assign card - FIDEN2 / Card initialize - Forget requests / list - Customer / Redirect - Customer Private Offers - Customer / Form - Customer / Contact Subject |
|  | - Orders / list - Orders / to verify - JOY / Check order - Orders / Order payments - JOY / Waybill log - PayU refunds - Allegro - Allegro delivery methods - Allegro errors - Voucher / GiftCard - BaseLinker - Baselinker delivery - Baselinker errors - Refunds - Baselinker Catalog - Baselinker integrations |
|  | - Reviews / products - Products / stock - Stock / statistics - Sales / Orders - Sales / MC orders - Customers / Registrations - Discount codes / sales - Promotions / orders - Personal discount codes - Error pages - PUSH messages / events - PUSH devices / registrations - Member Club / reports - Short link clicks - JOY / Failed orders - Search / top phrases - Password recoveries / list - Orders promotion rules - FIDEN2 - Products price history |
|  | - Top menu / list - Slider / list - Gallery / images - Pages / list - Blocks / list - Banners / list - Friendly URLs / list - Friendly URLs / aliases - Featured products / list - Beauty advices / list - Beauty advice attributes / list - Exponea / Recommended Product Block - Stores / list |
|  | - Export / SALESmanago tags - Export / catalog - Import - Export / customers - Export / subscribers - Export / Jumia - Import / FIDEN2 points - Export / sales - Export / FIDEN2 cards - Import / discount codes - Generator / discount codes - Export / Invoice - Export / orders - Export / gift cards payment - Mass personal codes removal |
|  | - Agreements - Admins / list - Available zip codes / list - Synchronization - Admins / Auth IPs - Admin / banned IPs - Delivery types / list - Payment types / list - Delivery / payment exceptions - Translations / list - System / settings - Translations / missing list - SEO / settings - Planned tasks - Public API / keys - APIv2 / Keys - Order status / list - SALESmanago / settings - Cross selling / settings - JOY / Real time validation - JOY Stock errors / list - Disabling site - Short links / list - Search / dictionary - Alternative authorization - Robots.txt - Redlink Messages - FIDEN2 / File history - FIDEN2 / Data flow dashboard - External imports / list - Delivery points / list |
|  | - POS / Monthly report - Export / Monthly report - Assigned cards / report |
|  | - View - Qualifiers - Commission - Simulation - KPIs / list |
|  | - View structure - Movements - New region - View regions - Leaders / targets |
|  | - View - Add |
|  | - Plants - Plant families - Regions |
|  | - Carousel - Sub campaign - Boxes - Homepage products - Articles - Current offers - Cms elements - Cms categories - Catalog - Customer Private OFfers |
|  | - Dashboard |
|  | - Alt shops / list - Campaign codes / list - Delivery costs / list - Payment types / list - Products / list - Pages / list - Blocks / list - Featured products / list - Promotion pages / list - Opensets / list - Sales channels / list - Slider / list - Promotion validity dates |
|  | - Products / list - Colors / list - Properties / list - Tags / list - Reviews / list - Ingredients / list - Reviews / moderation - Reviews / moving - Images upload - JOY stocks |
|  | - Conditions / list - Actions / list - Rules / list - Discount codes / list - Promotion pages / list - Opensets / list - Campaign codes / list - Products excluded from promotion (global) - Push messages / list - Vouchers / list |
|  | - Customer / MC clients - Customers / list - Customer / leads - Customer / blacklist - Customer / data audit - Customer / opt-out mobile - Subscribers / list - Address Dictionary - Subscribers groups - Call center / new case - Call center / cases - Call center / contact ways - FIDEN2 / Search card - FIDEN2 / Change card balance - FIDEN2 / Automatic balance operations - FIDEN2 / Assign card - FIDEN2 / Card initialize - Forget requests / list - Customer / Redirect - Customer Private Offers |
|  | - Orders / list - Orders / to verify - JOY / Check order - Orders / Order payments - PayU refunds - Allegro - Allegro delivery methods - Allegro errors - Voucher / GiftCard |
|  | - Reviews / products - Products / stock - Stock / statistics - Sales / Orders - Sales / MC orders - Customers / Registrations - Discount codes / sales - Promotions / orders - Personal discount codes - Error pages - PUSH messages / events - PUSH devices / registrations - Member Club / reports - Short link clicks - JOY / Failed orders - Search / top phrases - Password recoveries / list - FIDEN2 |
|  | - Top menu / list - Slider / list - Gallery / images - Pages / list - Blocks / list - Friendly URLs / list - Friendly URLs / aliases - Featured products / list - Beauty advices / list - Beauty advice attributes / list - Exponea / Recommended Product Block |
|  | - Export / SALESmanago tags - Export / catalog - Import - Export / customers - Export / subscribers - Export / Jumia - Import / FIDEN2 points - Export / sales - Export / FIDEN2 cards - Import / discount codes - Generator / discount codes - Export / Invoices - Export / orders |
|  | - Agreements - Admins / list - Available zip codes / list - Synchronization - Admins / Auth IPs - Admin / banned IPs - Delivery types / list - Payment types / list - Delivery / payment exceptions - Translations / list - System / settings - Translations / missing list - SEO / settings - Planned tasks - Public API / keys - APIv2 / Keys - Order status / list - SALESmanago / settings - Cross selling / settings - JOY / Real time validation - JOY Stock errors / list - Disabling site - Short links / list - Search / dictionary - Robots.txt - Redlink Messages - FIDEN2 / File history - External imports / list - Delivery points / list |
|  | - POS / Monthly report - Export / Monthly report - Assigned cards / report |
|  | - View - Qualifiers - Commission - Simulation - KPIs / list |
|  | - View structure - Movements - New region - View regions - Leaders / targets |
|  | - View - Add |
|  | - Plants - Plant families - Regions |
|  | - Carousel - Sub campaign - Boxes - Homepage products - Articles - Current offers - Cms elements - Cms categories - Catalog - Customer Private OFfers |
|  | - Dashboard |
|  | - Alt shops / list - Campaign codes / list - Products / list - Pages / list - Blocks / list - Banners / list - Product stickers / list - Featured products / list - Promotion pages / list - Opensets / list - Sales channels / list - Slider / list |
|  | - Products / list - Colors / list - Properties / list - Tags / list - Product stickers / list - Images upload |
|  | - Promotion pages / list - Opensets / list - Campaign codes / list |
|  | - Subscribers / list - Subscribers groups |
|  | - Top menu / list - Slider / list - Gallery / images - Pages / list - Blocks / list - Banners / list - Friendly URLs / list - Friendly URLs / aliases - Featured products / list - Beauty advices / list - Beauty advice attributes / list |
|  | - Export / catalog |
|  | - Admin / banned IPs - Translations / list - Translations / missing list |
|  | - Carousel - Sub campaign - Boxes - Homepage products - Articles - Current offers - Cms elements - Cms categories - Catalog - Customer Private OFfers |
|  | - Dashboard |
|  | - Banners / list - Product stickers / list |
|  | - Product stickers / list |
|  | - Gallery / images - Pages / list - Blocks / list - Banners / list - Friendly URLs / list |
|  | - Translations / list - Translations / missing list |
|  | - Carousel - Sub campaign - Boxes - Homepage products - Articles - Current offers - Cms elements - Cms categories - Catalog - Customer Private OFfers |
|  | - Dashboard |
|  | - Reviews / list - Reviews / moderation |
|  | - Vouchers / list |
|  | - Customers / list - Customers / data audit - Member get Member - FIDEN2 / Search Card - FIDEN2 / Change card balance - FIDEN2 / Assign card - FIDEN2 / Card initialize |
|  | - Orders / list - Orders / to verify |
|  | - Admin / banned IPs |
|  | - Carousel - Sub campaign - Boxes - Homepage products - Articles - Current offers - Cms elements - Cms categories - Catalog - Customer Private OFfers |
|  | - Dashboard |
|  | - Customer / MC clients - Customers / list - Customer / blacklist - Customer / data audit - Customer / opt-out mobile - Subscribers / list - Call center / new case - Call center / cases - Call center / contact ways - FIDEN2 / Change card balance - FIDEN2 / Card Initialize |
|  | - Orders / list - Orders / to verify |
|  | - Products / stock - Stock / statistics |
|  | - View structure |
|  | - Carousel - Sub campaign - Boxes - Homepage products - Articles - Current offers - Cms elements - Cms categories - Catalog - Customer Private OFfers |
|  | - Dashboard |
|  | - Customer / MC clients - Customers / list - Customer / leads - Customer / blacklist - Customer / data audit - Call center / new case - Call center / cases - Call center / contact ways - FIDEN2 / Search card - FIDEN2 / Assign card |
|  | - Orders / list - Orders / to verify - BaseLinker - Baselinker errors |
|  | - Sales / Orders - Sales / MC orders - Customers / registrations |
|  | - Carousel - Sub campaign - Boxes - Homepage products - Articles - Current offers - Cms elements - Cms categories - Catalog - Customer Private OFfers |
|  | - Dashboard |
|  | - Friendly URLs / list |
|  | - Plants - Plant families - Regions |
|  | - Carousel - Sub campaign - Boxes - Homepage products - Articles - Current offers - Cms elements - Cms categories - Catalog - Customer Private OFfers |
|  | - Dashboard |
|  | - POS / Monthly report |
|  | - Carousel - Sub campaign - Boxes - Homepage products - Articles - Current offers - Cms elements - Cms categories - Catalog - Customer Private OFfers |
|  | - Dashboard |
|  | - Images upload |
|  | - Carousel - Sub campaign - Boxes - Homepage products - Articles - Current offers - Cms elements - Cms categories - Catalog - Customer Private OFfers |
| 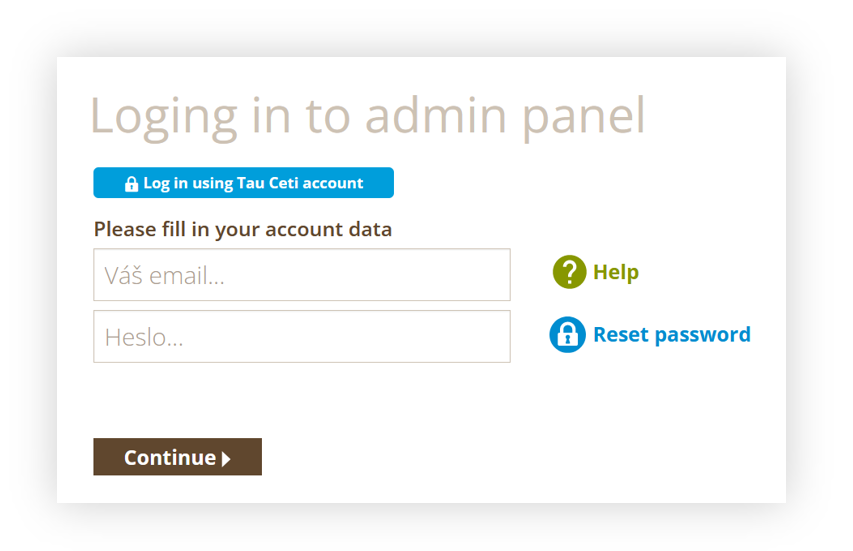 |
| *Visualization of the /baadmin log in page* |
| 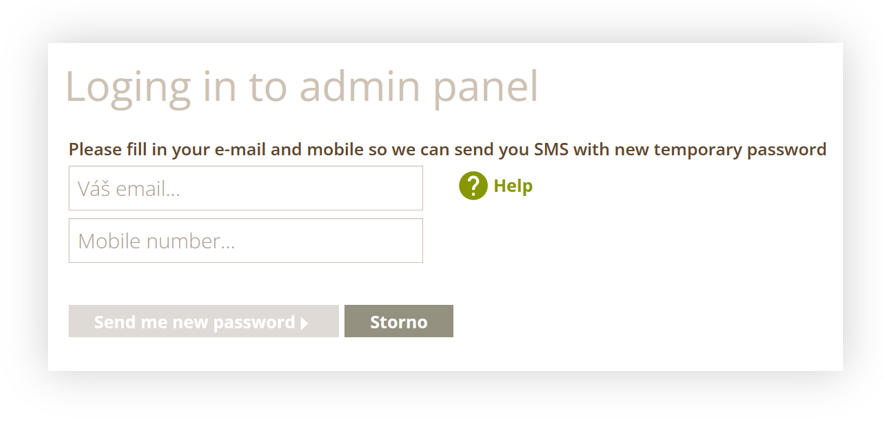 |
| *Visualization of the reset password page* |
|  |
| *Visualization of the login /baadmin log in page* |
| 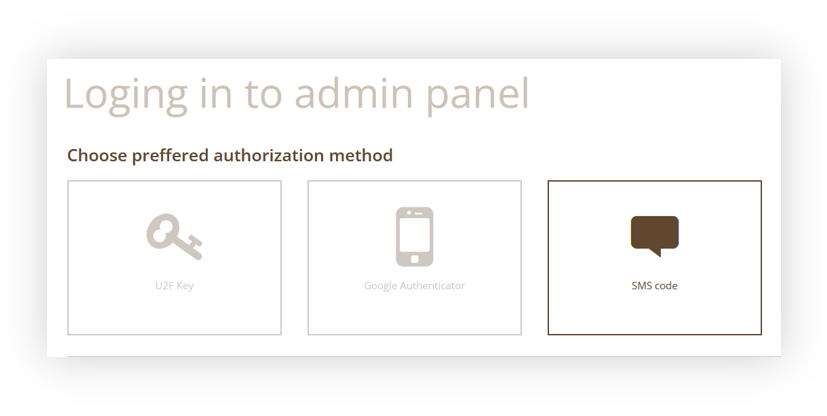 |
| *Visualization of the authorization page* |
| 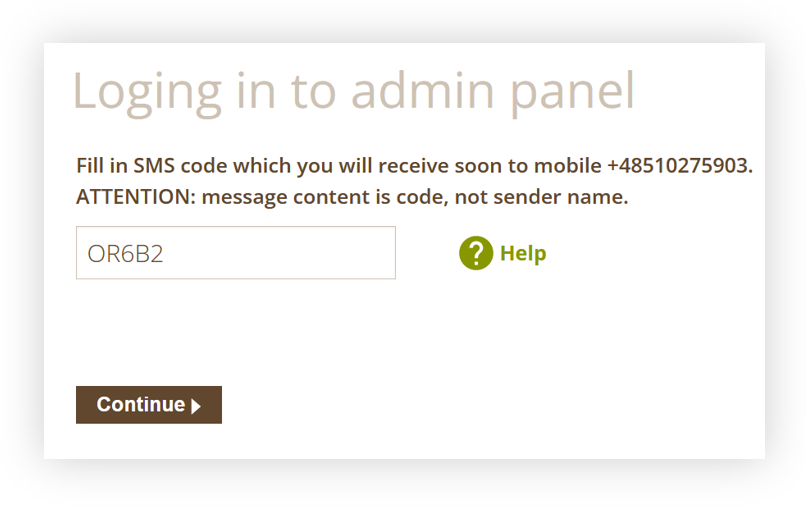 |
| *Visualization of the SMS authorization* |
| 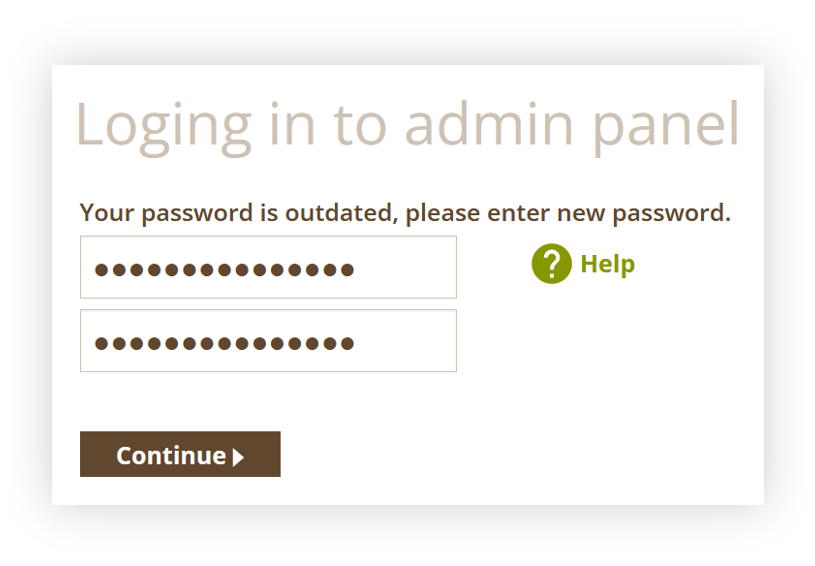 |
| *Visualization of the password update process* |
| 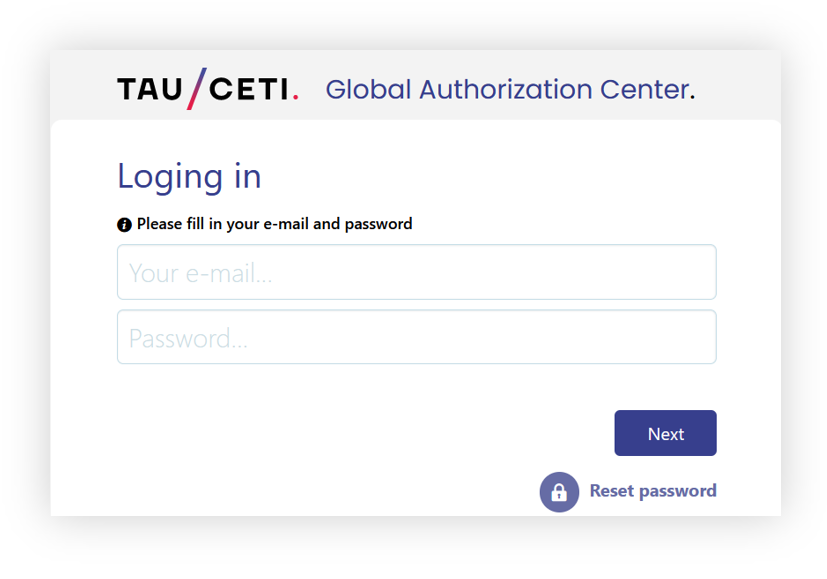 |
| *Visualization of the GAC log in page* |
| 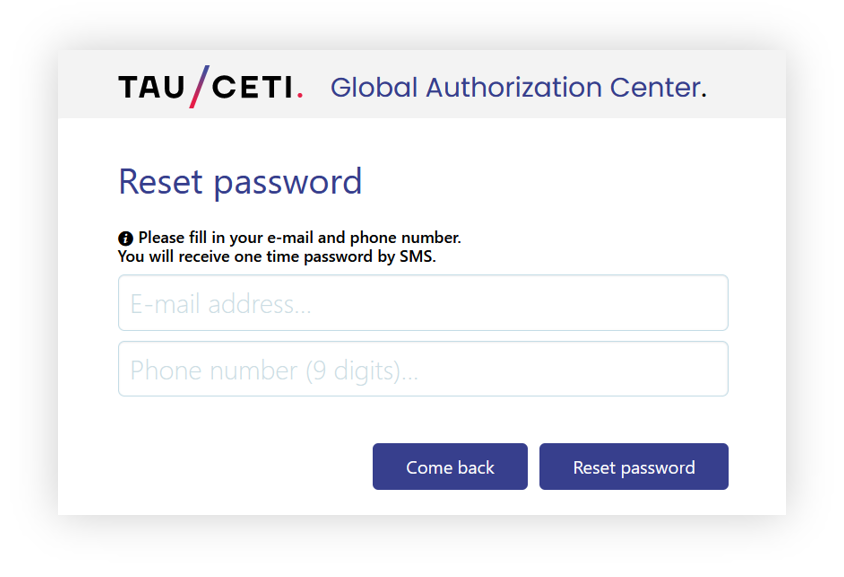 |
| *Visualization of the password reset process* |
| 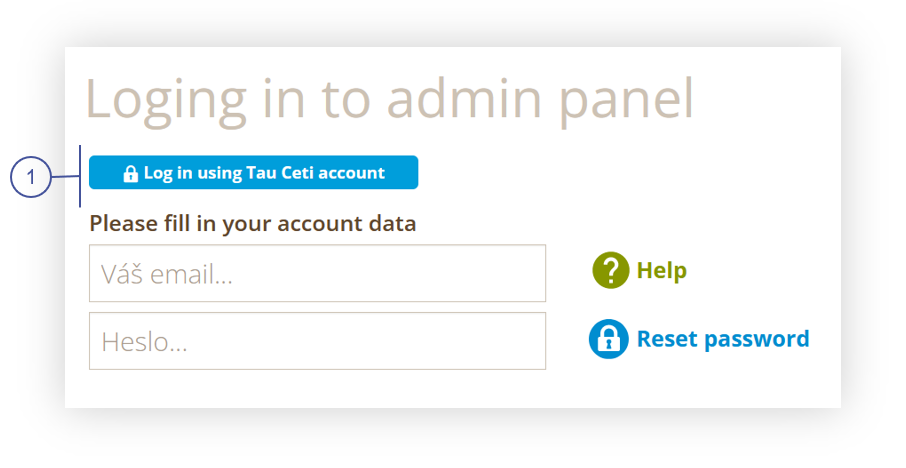 |
| *Visualization of the alternate way to log in to GAC* |
| 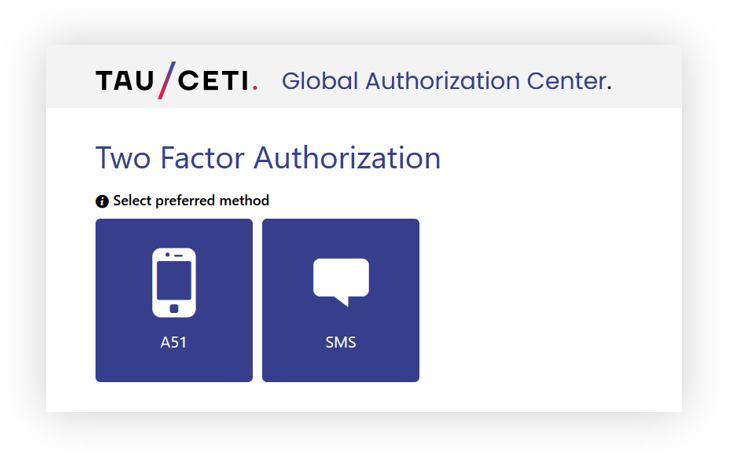 |
| *Visualization of the GAC authorization methods* |
| 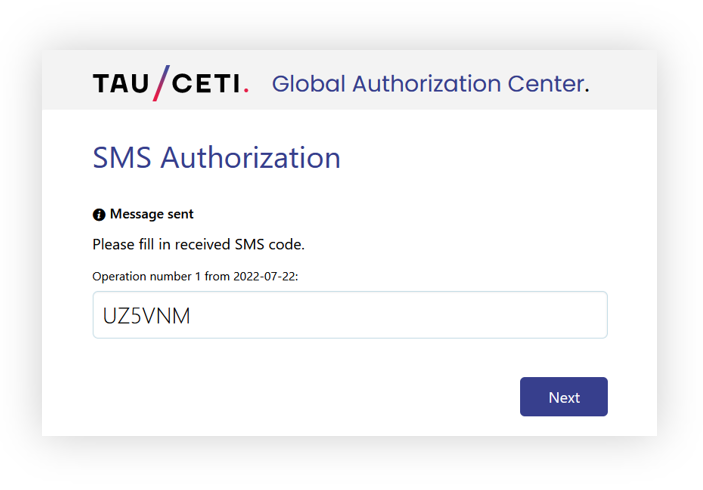 |
| *Visualization of the SMS authorization* |
| 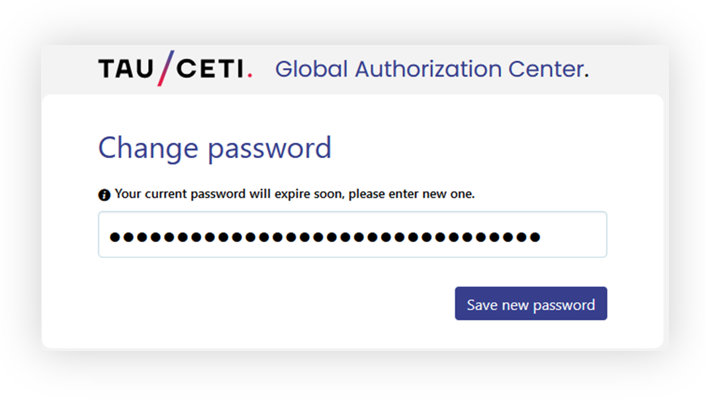 |
| *Visualization of the password update process* |
|  |
| *Visualization of the EasyRedmine log in screen* |
| 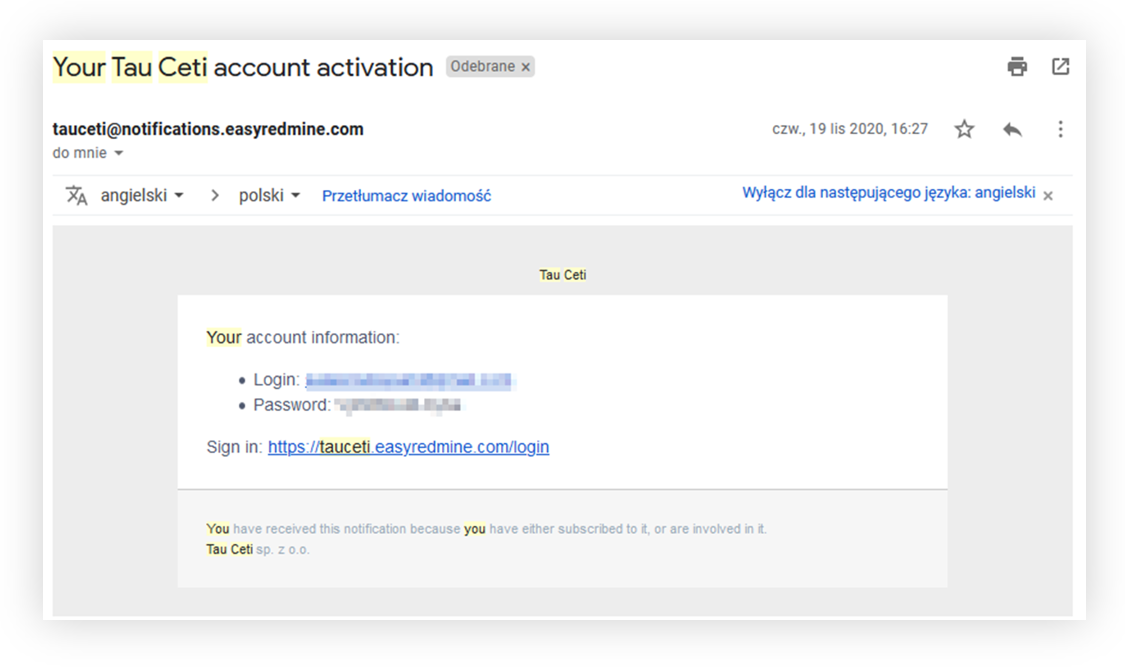 |
| *Visualization of the EasyRedmine account activation e-mail* |
|  |
| *Visualization of the EasyRedmine password creation* |
| 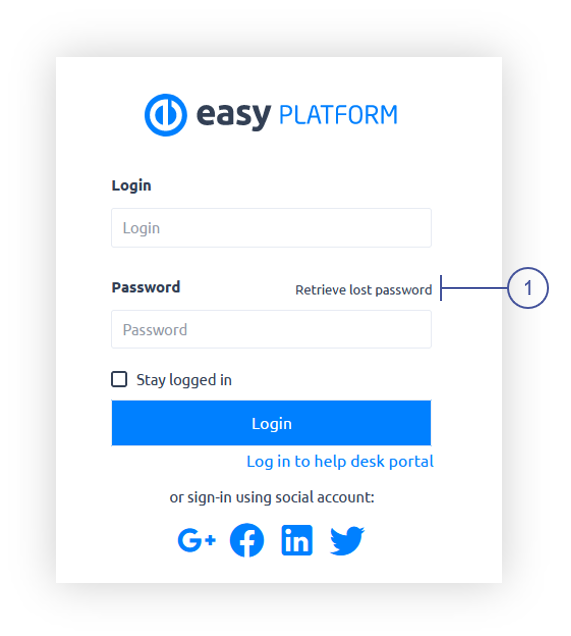 |
| *Visualization of the EasyRedmine log in screen* |
|  |
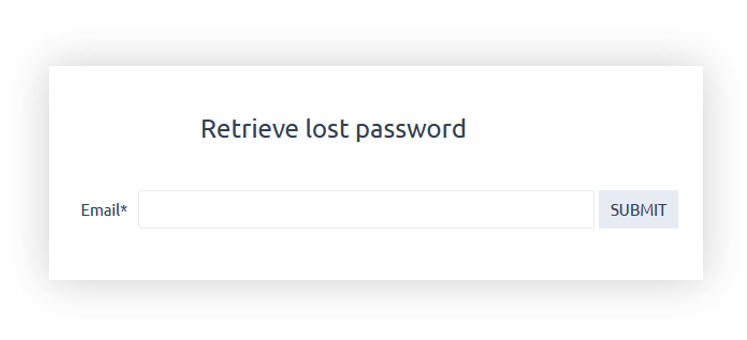
| *Visualization of the EasyRedmine password reset screen* |
| 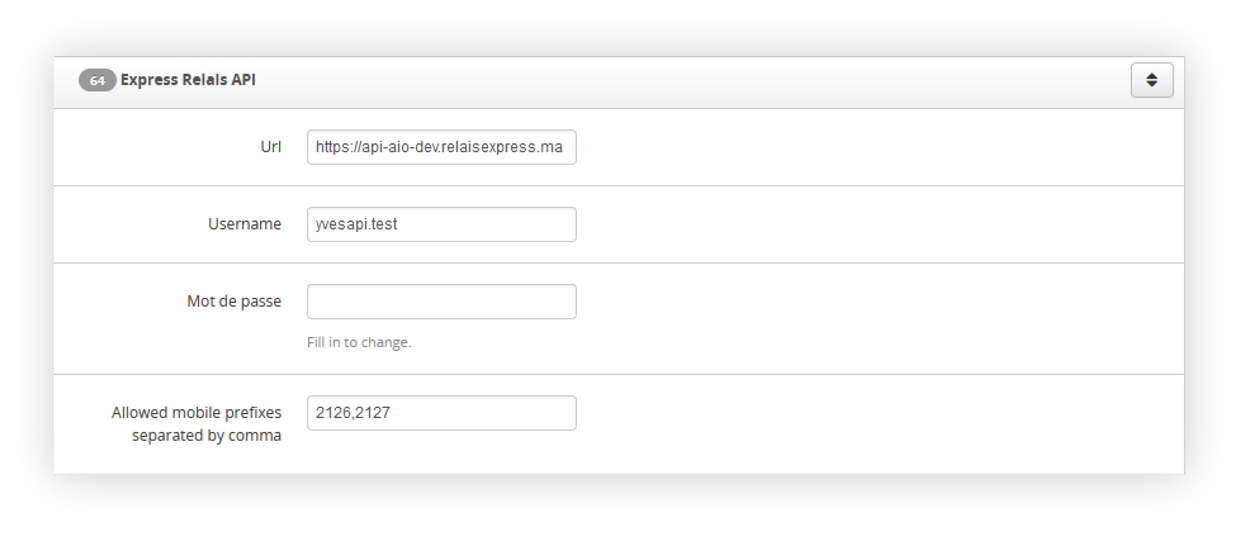 |
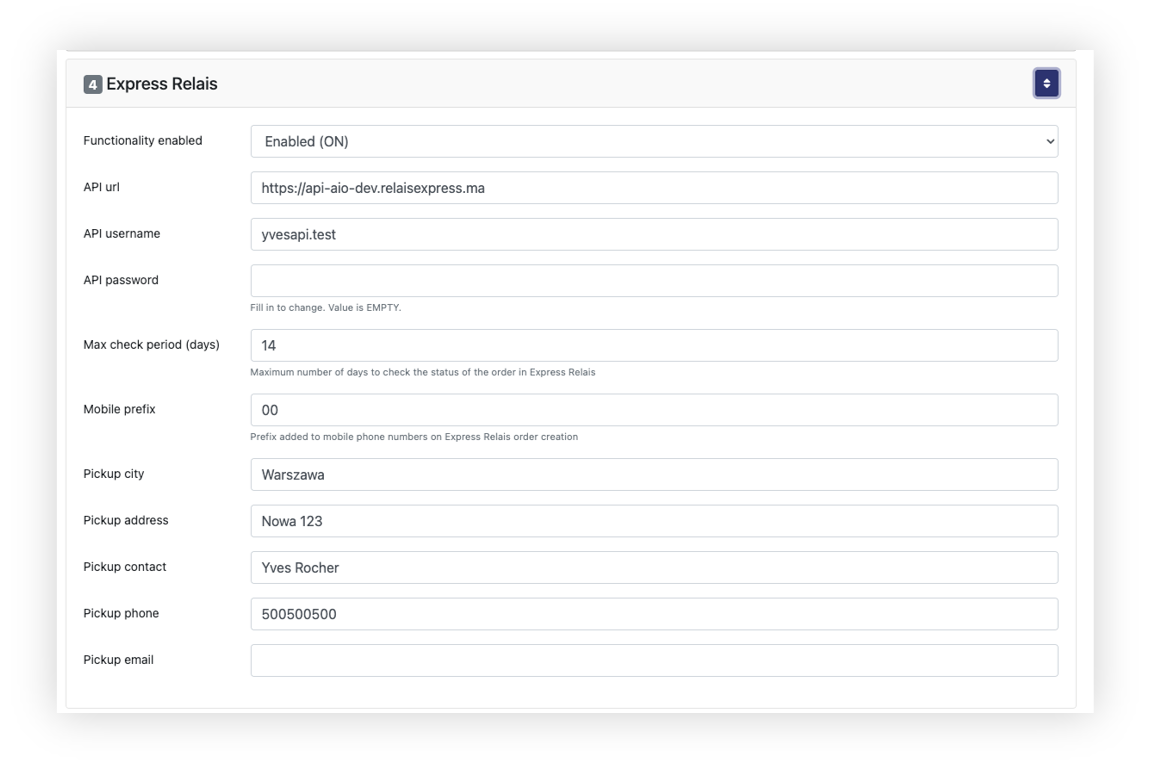
| *Visualization of the Express Relais system settings* |
| 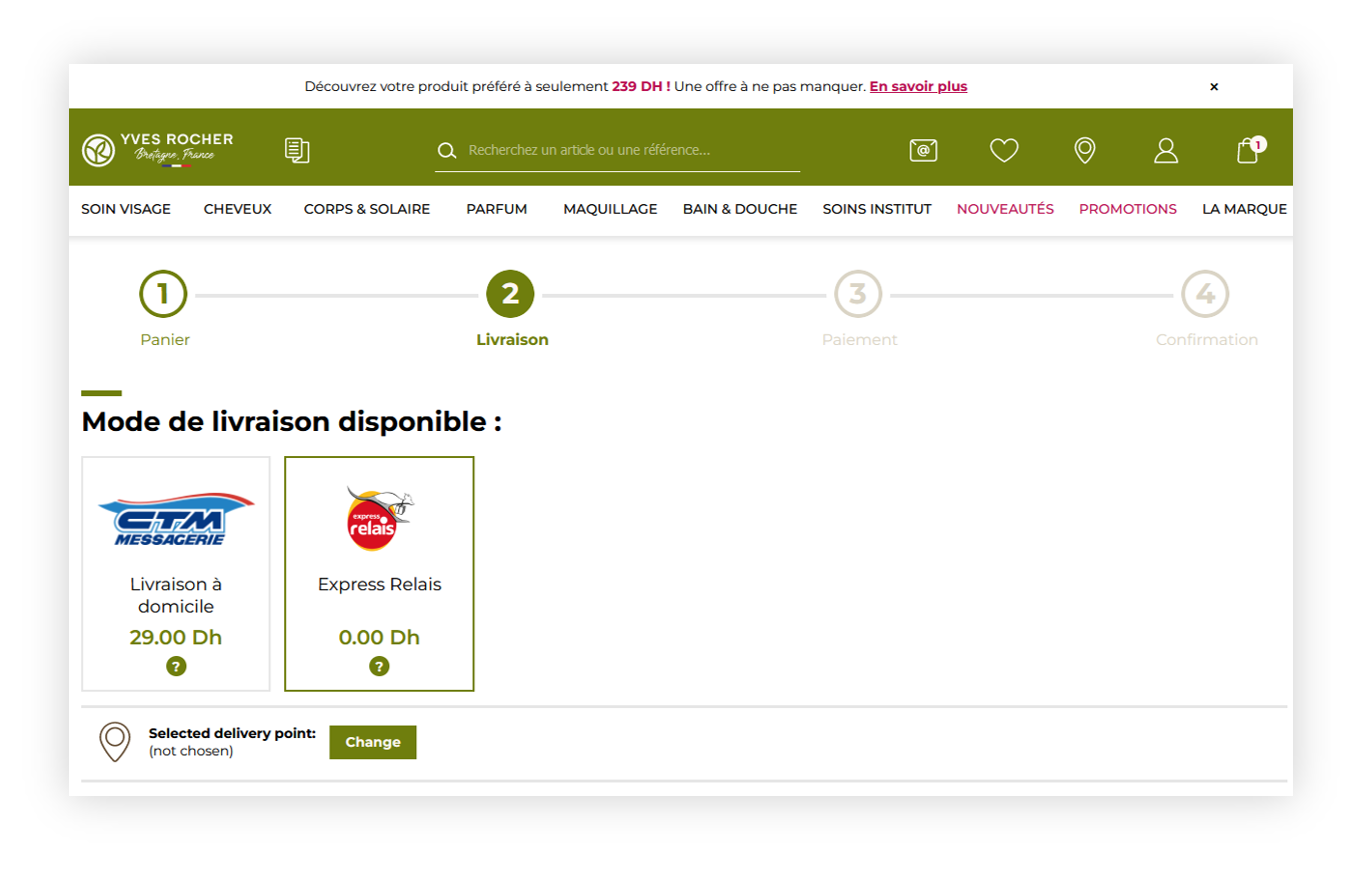 |
| *Visualization of the Express Relais delivery* |
| 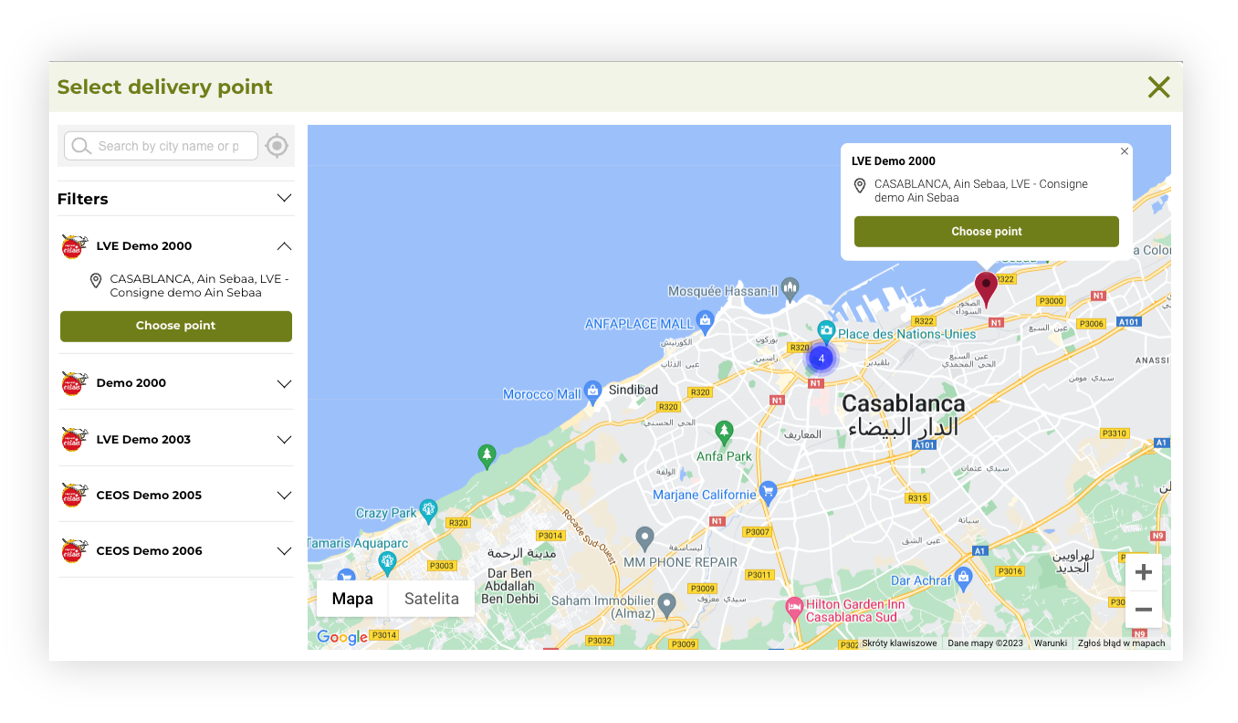 |
| *Visualization of the delivery point widget* |
|  |
| *Visualization of the TC logistics system settings* |
|  |
| *Visualization of the TC logistics order details (Details tab)* |
**Express Relais status** | **TCLogistics status** | **ER status description** |
NEW_ORDER | ID_PACKAGING | Initial status at order creation |
ORDER_CONFIRMED | ID_READY_TO_SHIP | Order Confirmed |
ORDER_CANCELED | ID_CANCELLED | The order was canceled by the client |
ORDER_REFUSED | ID_DELIVERY_FAILURE | Order refused by Express Relais |
MISSING_PARCEL | ID_DELIVERY_FAILURE | Missing parcel during pickup |
PARCEL_PICKEDUP | ID_SHIPPED | Parcel picked up |
PARCEL_IN_AGENCY | ID_SHIPPING_IN_PROGRESS | The package arrived at the regional agency |
PARCEL_IN_TRANSIT | ID_SHIPPING_IN_PROGRESS | Parcel in transit |
PARCEL_IN_DELIVERY | ID_SHIPPING_IN_PROGRESS | The parcel is delivered to the locker or destination address |
DELIVERED_TO_LOCKER | ID_SHIPPING_IN_PROGRESS | Parcel delivered to the locker |
PARCEL_RETRIEVED | ID_DELIVERED | Parcel received from Smartlocker |
WAITING_IN_LOCKER | ID_SHIPPING_IN_PROGRESS | The package waiting for pickup from the automated locker |
DELAY_IN_RETRIEVE | ID_SHIPPING_IN_PROGRESS | Package delayed for pickup at the destination locker |
WAITING_COD | ID_SHIPPING_IN_PROGRESS | The package arrived at the destination locker and awaiting payment upon delivery |
COD_PAID | ID_SHIPPING_IN_PROGRESS | Payment upon delivery at the locker completed, the recipient can retrieve their parcel |
PARCEL_TO_RETURN | ID_RETURN | The client has initiated the return of the parcel in question |
PARCEL_ABANDONED | ID_RETURN | The package was abandoned because the package was not delivered and the client did not initiate its return |
PARCEL_RETURNED | ID_RETURN | Parcel returned successfully |
PARCEL_IN_FINAL_AGENCY | ID_SHIPPING_IN_PROGRESS | Parcel has arrived at the final agency |
RETURN_REQUEST_CONFIRMED | ID_RETURN | The requested return parcel has been confirmed |
| 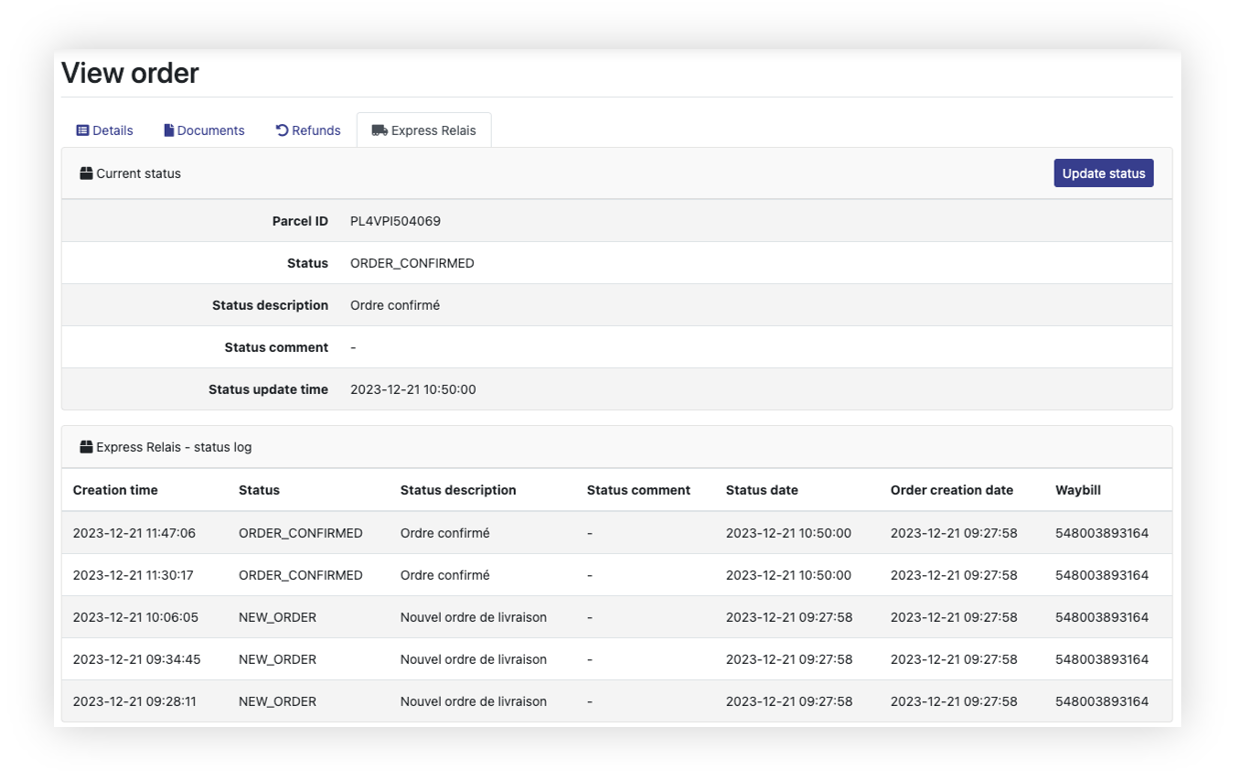 |
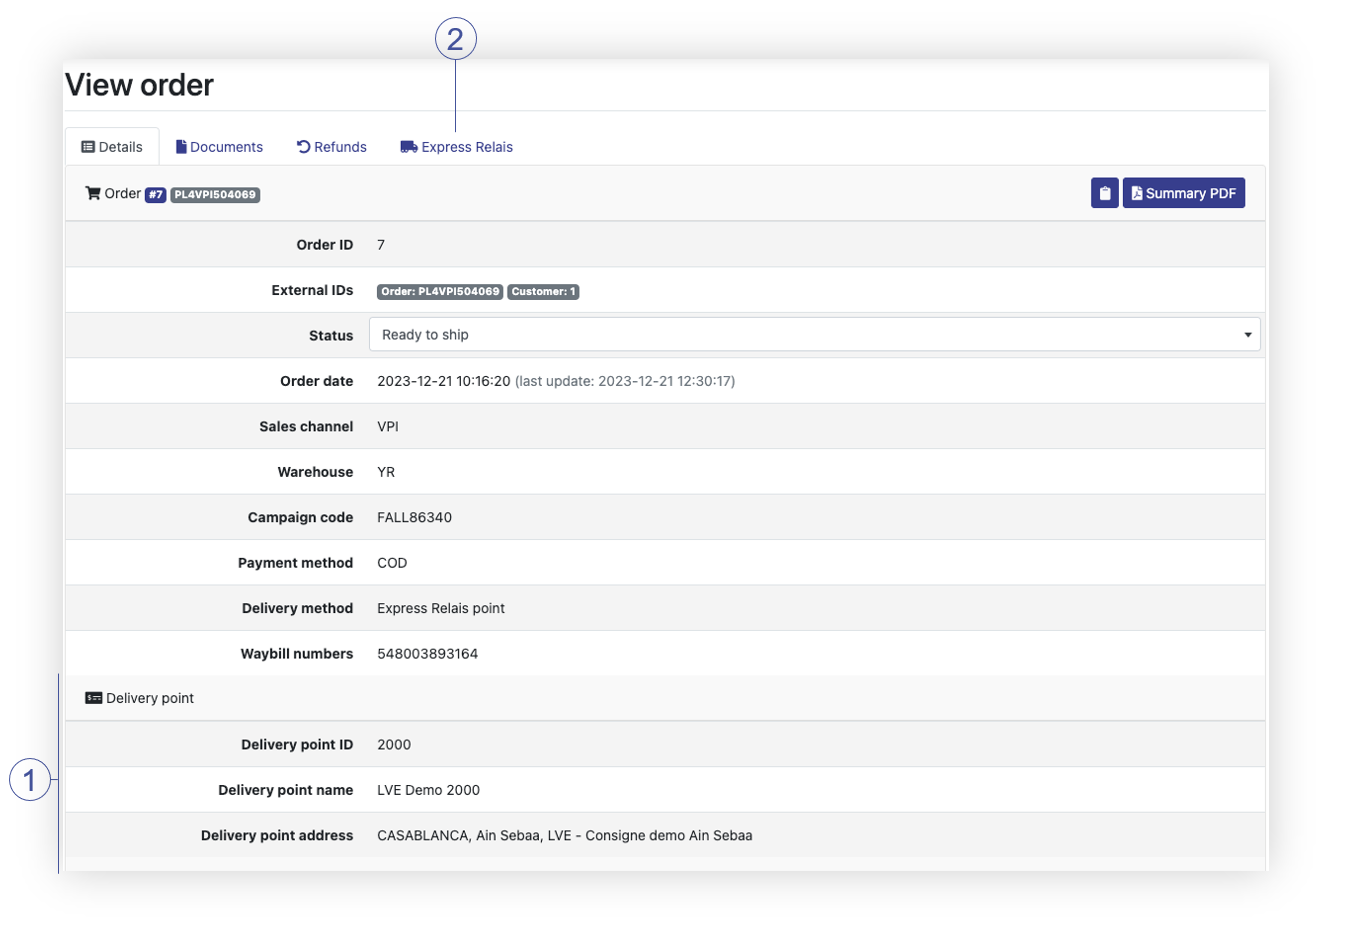
| *Visualization of the TC logistics order details (Express Relais tab)* |
| 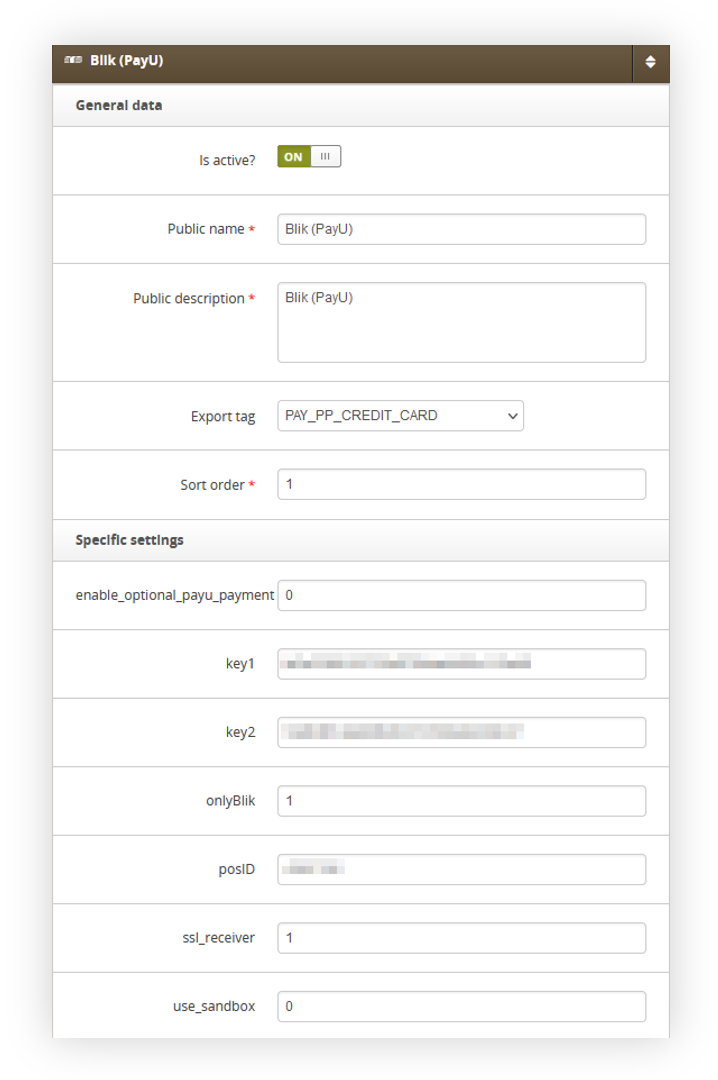 |
| *Visualization of the BLIK configuration* |
| 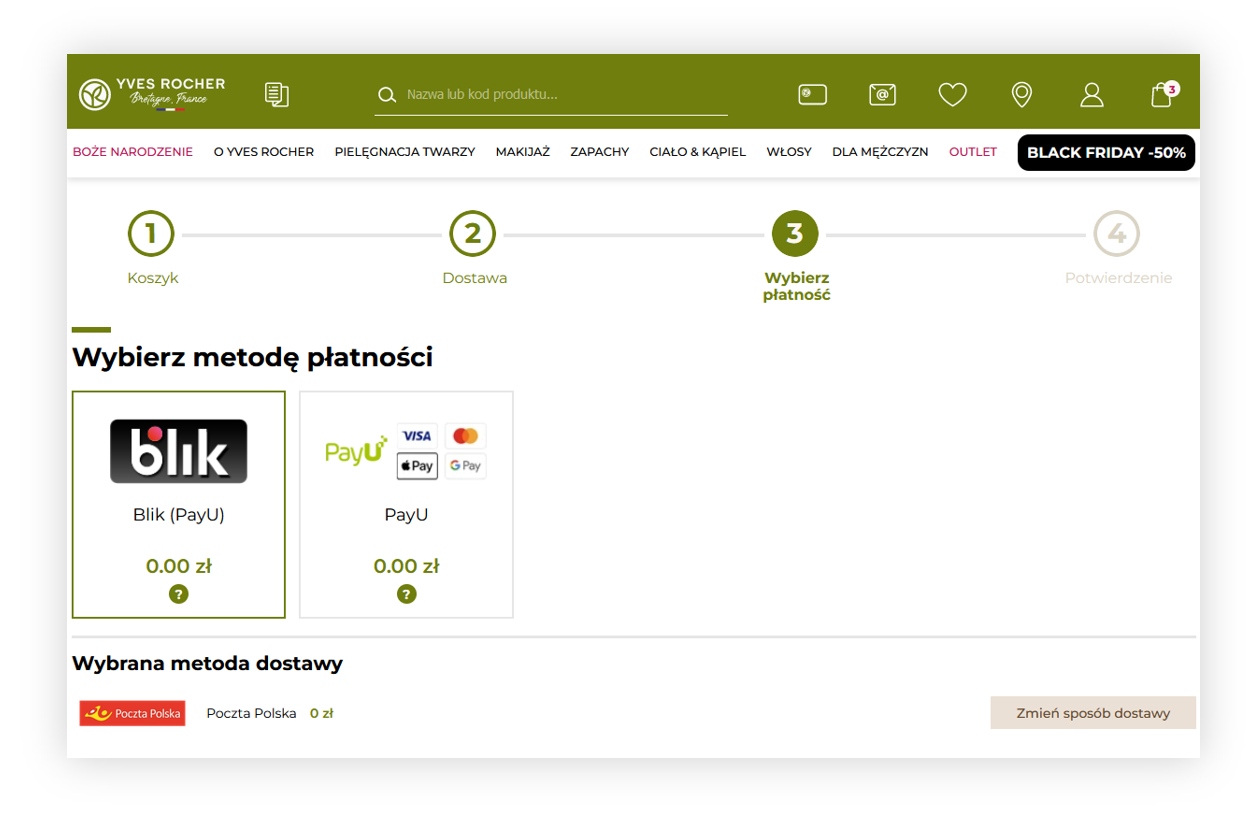 |
| *Visualization of the payment options in the order process* |
|  |
| *Visualization of the BLIK payment* |
| 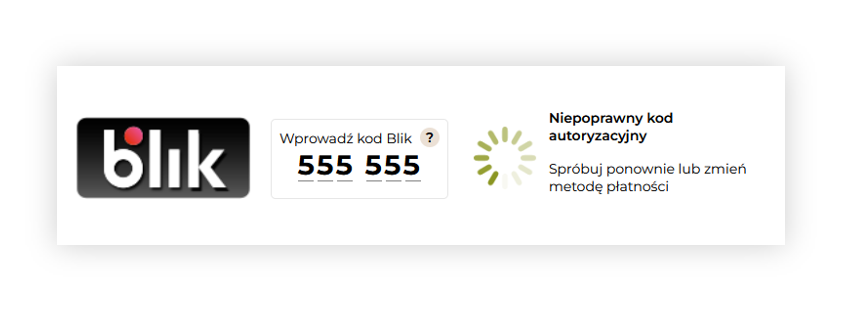 |
| *Visualization of the incorrect BLIK code* |
| 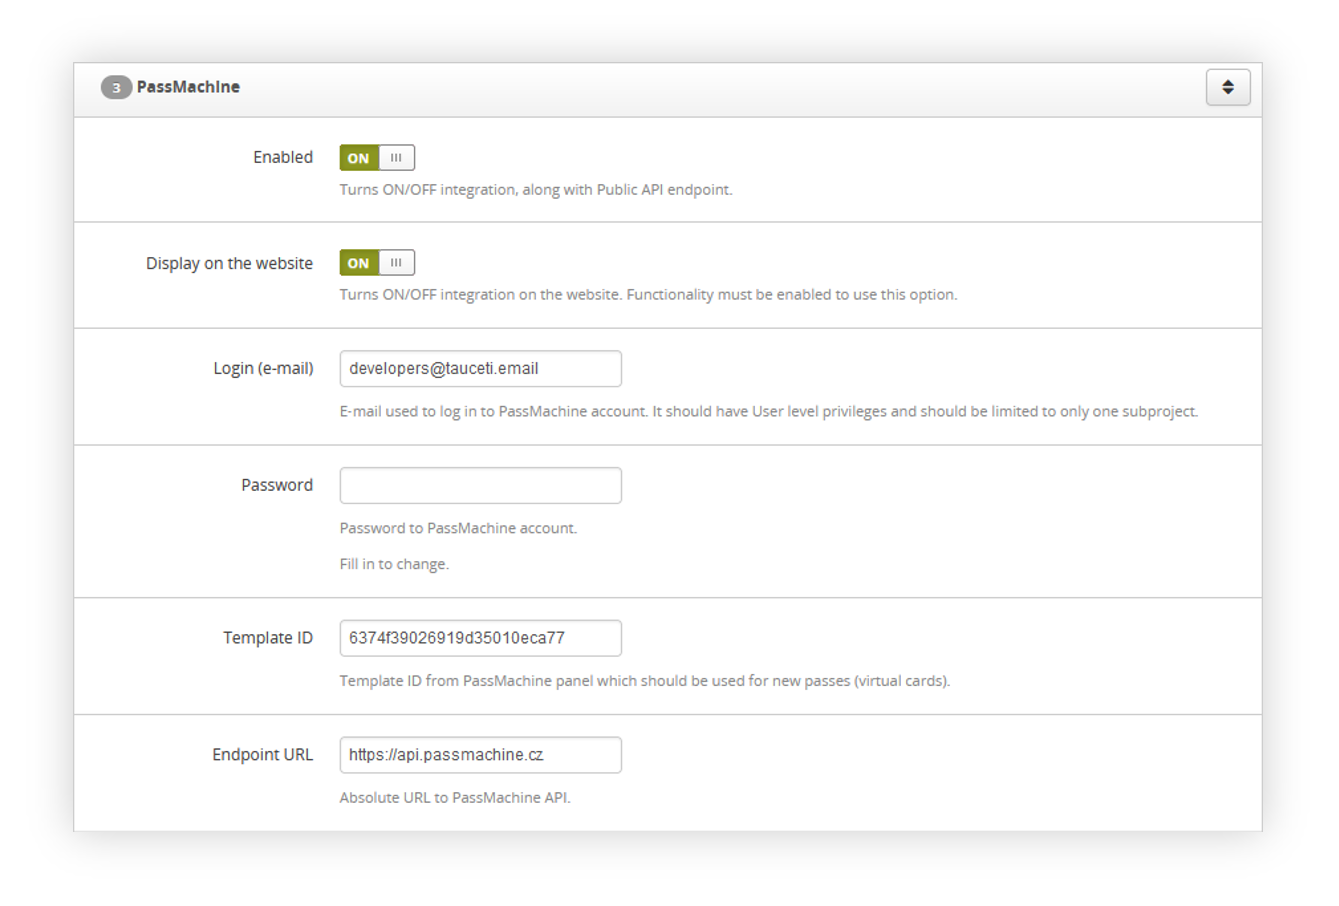 |
| *Visualization of the passmachine system settings* |
| 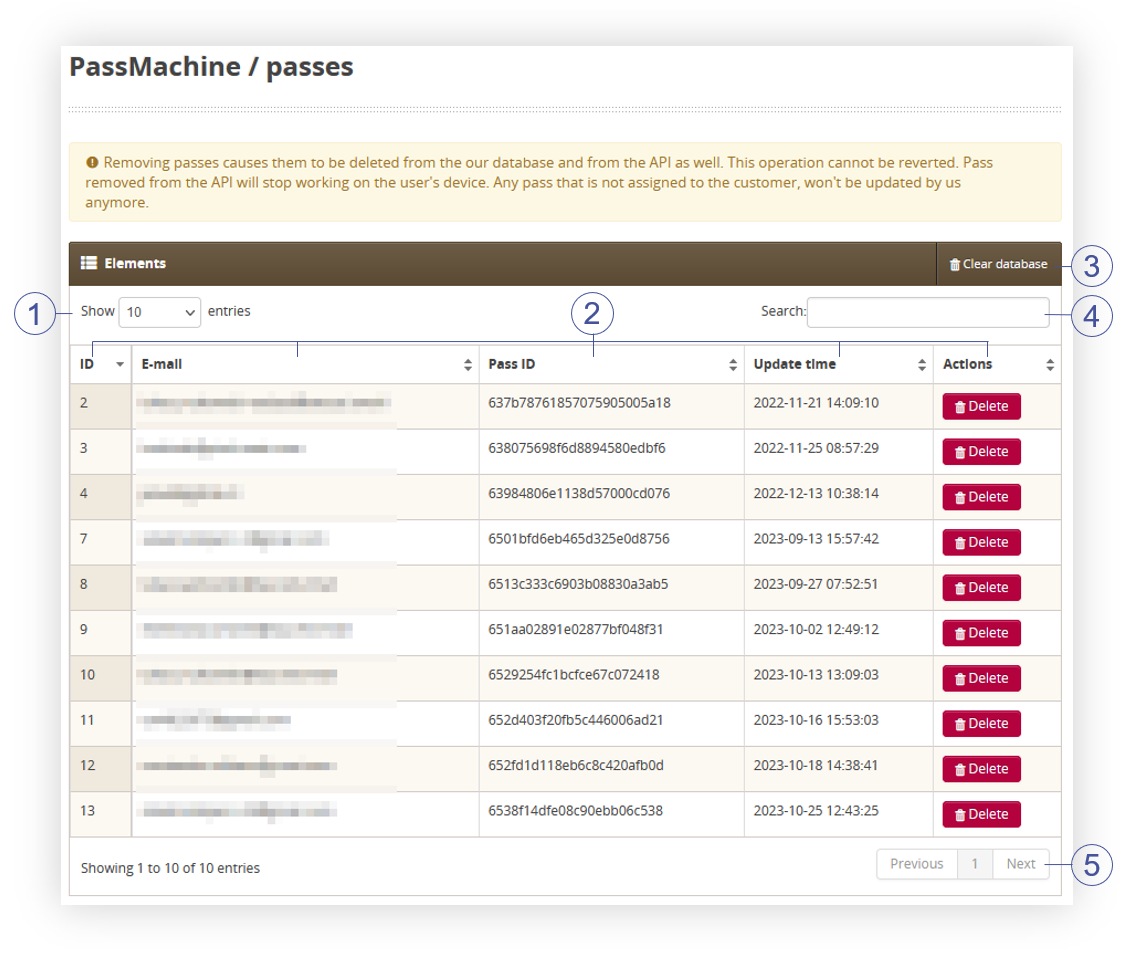 |
| *Visualization of the passmachine passes tab* |
|  |
| *Visualization of the customer profile* |
|  |
| *Visualization of the passmachine website* |
|  |
| *Visualization of the Delivery step in the order process* |
|  |
| *Visualization of the Orlen delivery window* |
| *Visualization of the* |
| *Visualization of the* |
| *Visualization of the* |
|  |
| *Visualization of the JOY webservices tab in System / Settings* |
|  |
| *Visualization of the Orders / to verify tab* |
|  |
| *Visualization of the JOY stocks* |
|  |
| *Visualization of the filter in JOY failed orders report* |
| 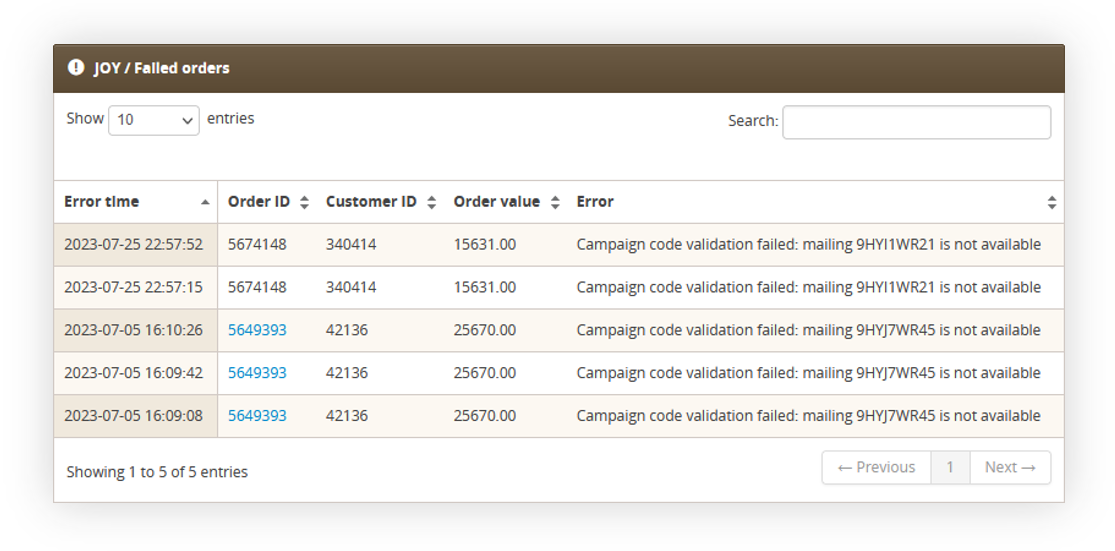 |
| *Visualization of the filtered JOY failed orders* |
| 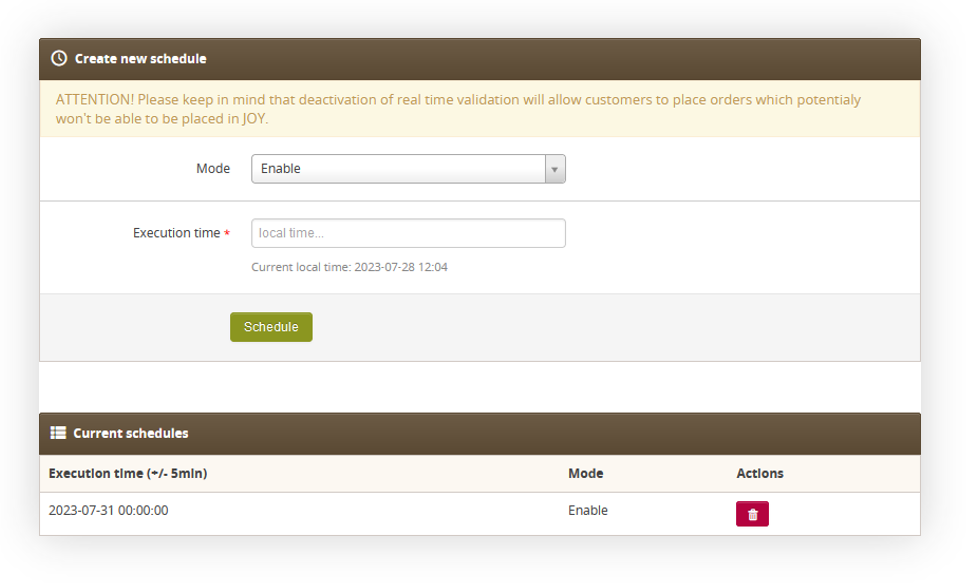 |
| *Visualization of the JOY real time validation tab* |
| [](https://knowledge.tauceti-digital.com/uploads/images/gallery/2024-12/powerpnt-ggz8u3e3ze.png) |
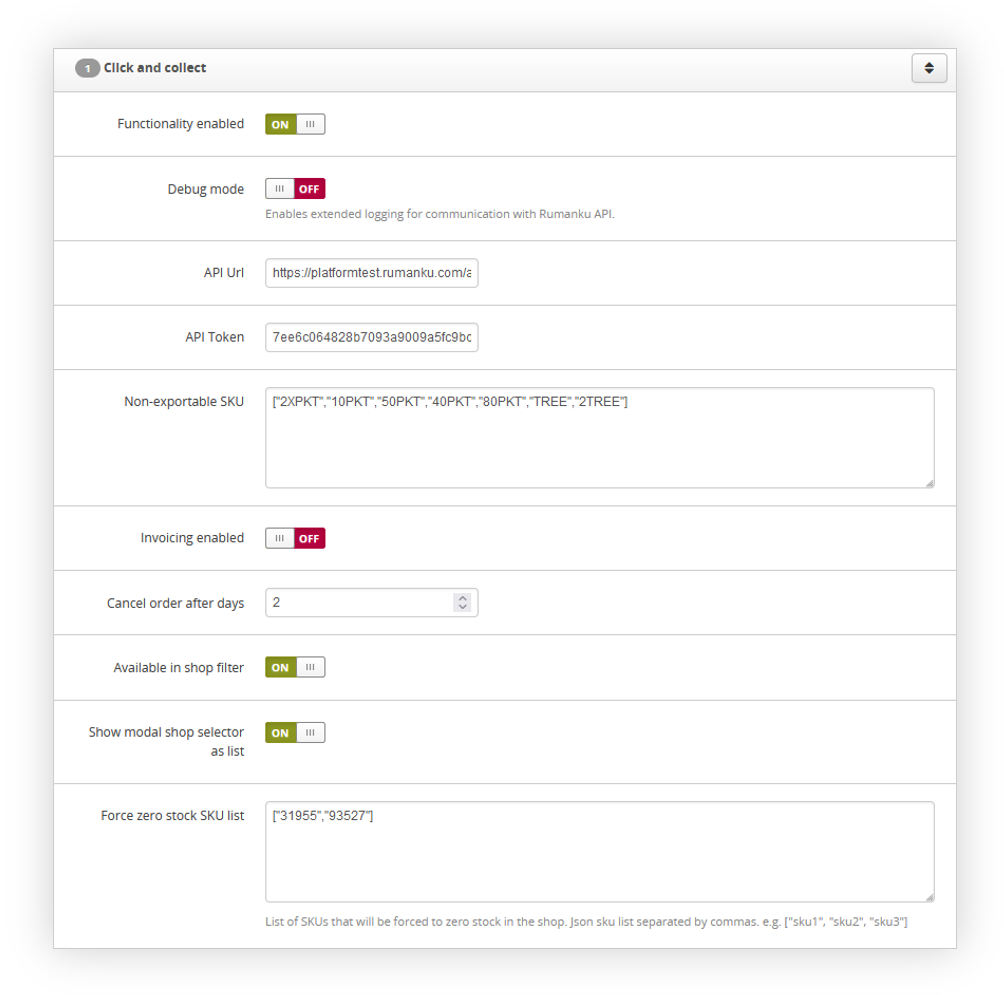
| *Visualization of the Click and Collect functionality* |
| 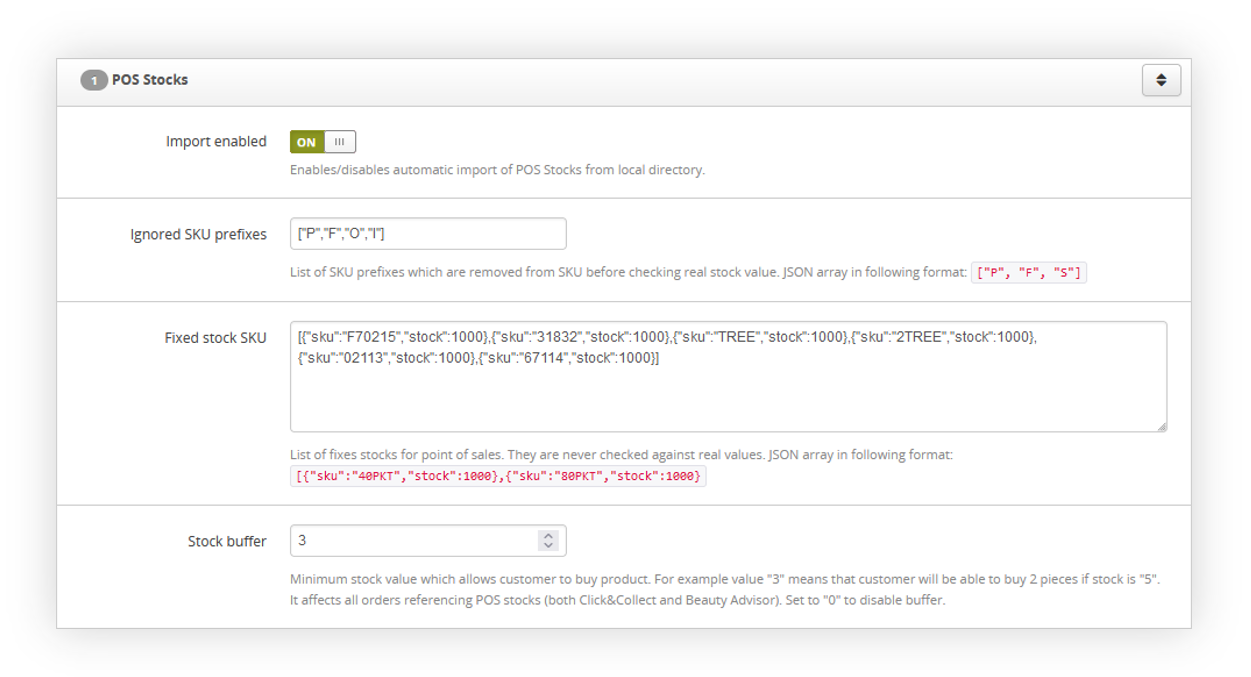 |
| *Visualization of the POS stocks system settings* |
|  |
| *Visualization of the Click & Collect POS selection (desktop)* |
|  |
| *Visualization of the Click & Collect POS selection (mobile)* |
|  |
| *Visualization of the POS selection popup (modal tiles)* |
|  |
| *Visualization of the POS selection popup (list)* |
|  |
| *Visualization of the POS selection popup (mobile)* |
| 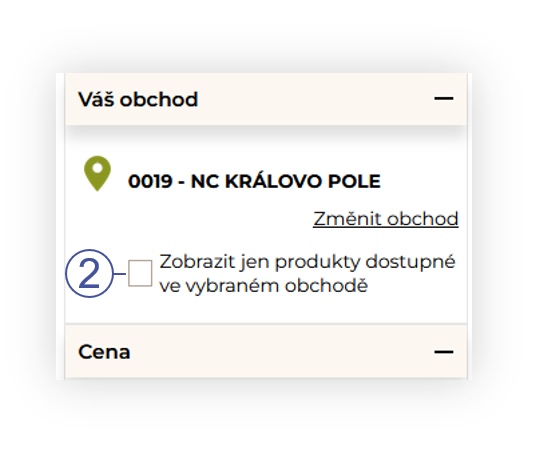 |
| *Visualization of the "Show only products available products in the store" filter* |
| 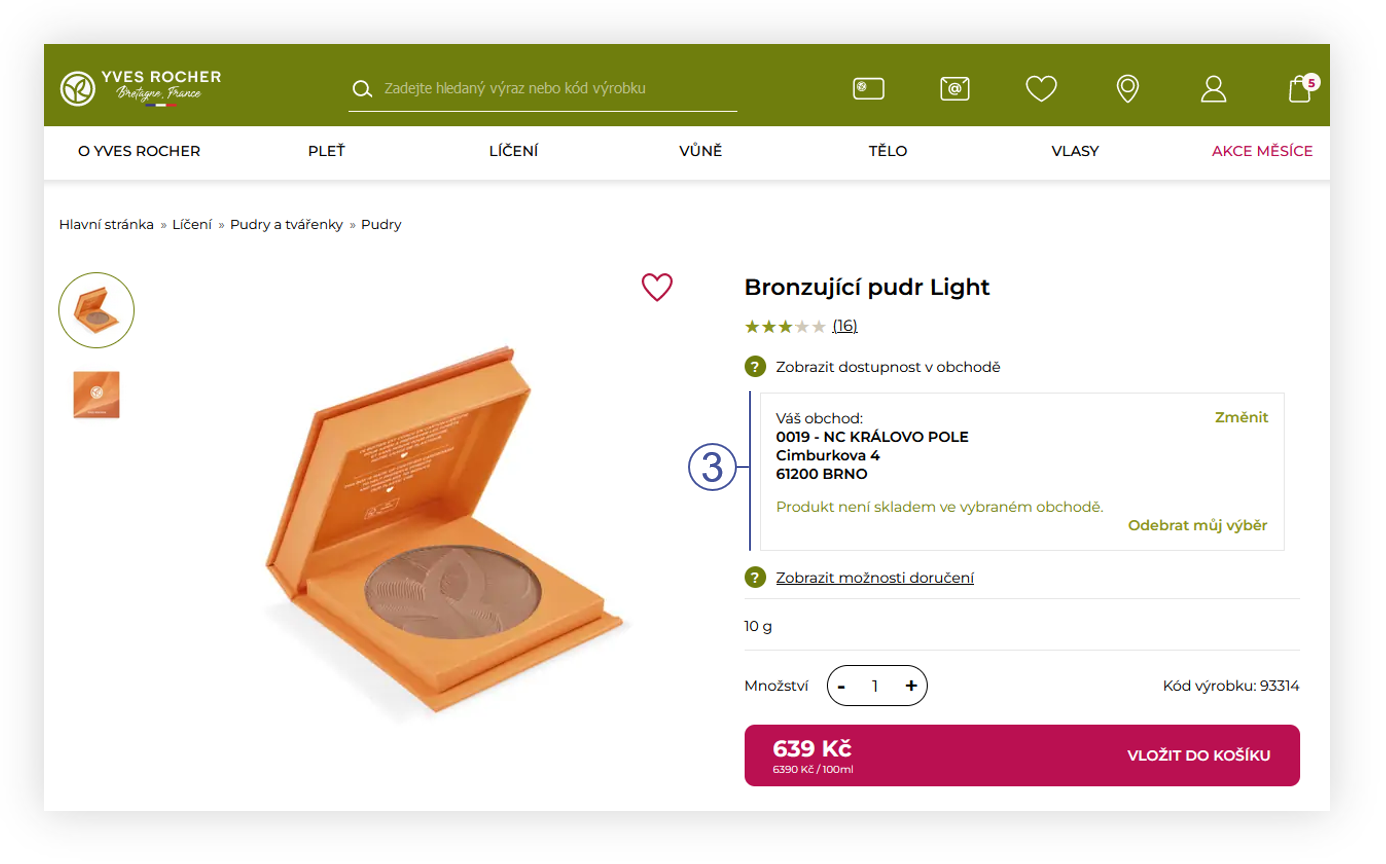 |
| *Visualization of the product stock information on the product page (desktop)* |
| 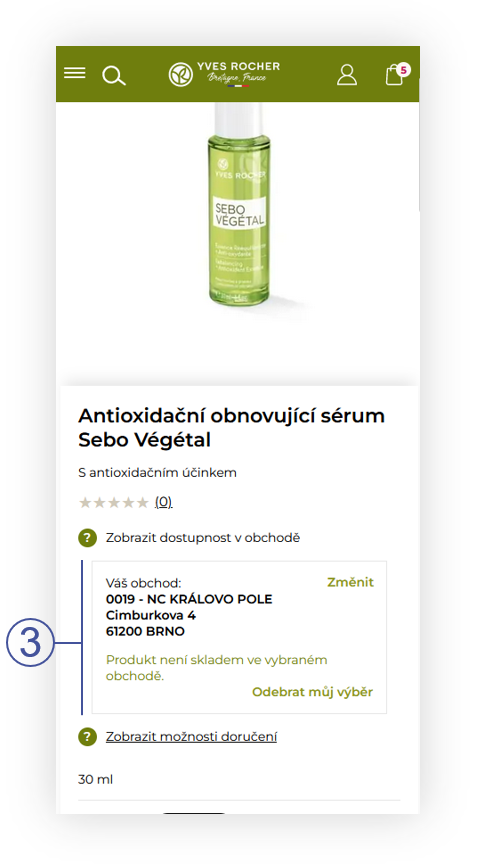 |
| *Visualization of the product stock information on the product page (mobile)* |
|  |
| *Visualization of the Click & Collect delivery option* |
| 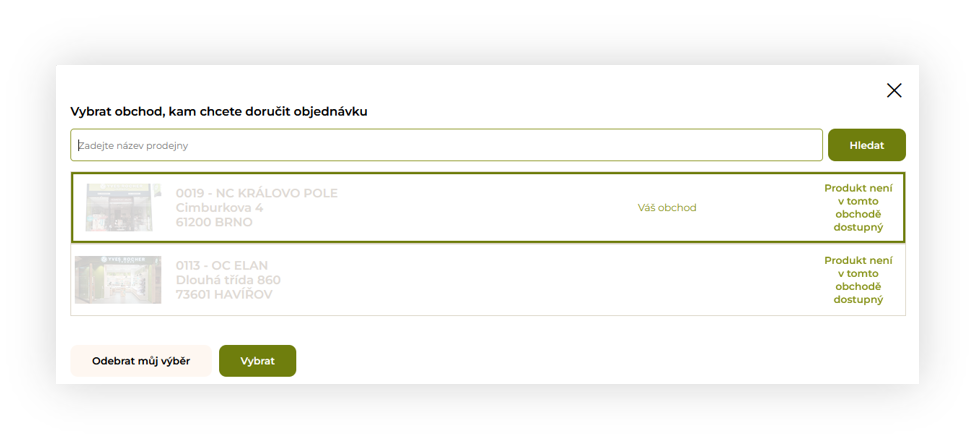 |
| *Visualization of the POS store list with unavailable products from the cart* |
| 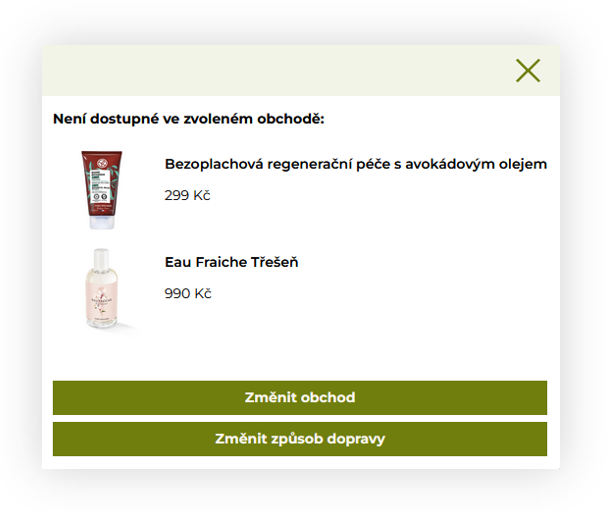 |
| *Visualization of the popup informing which products are not available in the selected store* |
|  |
| *Visualization of the zbozi.cz feed* |
| 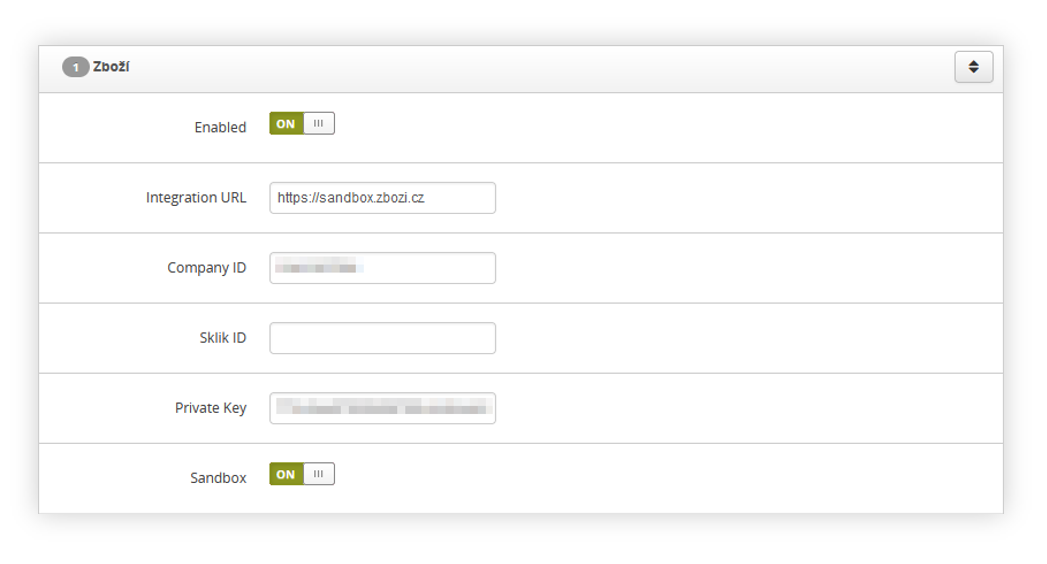 |
| *Visualization of the zbozi configuration in the system / settings* |
|  |
| *Visualization of the example order sent to zbozi* |
| 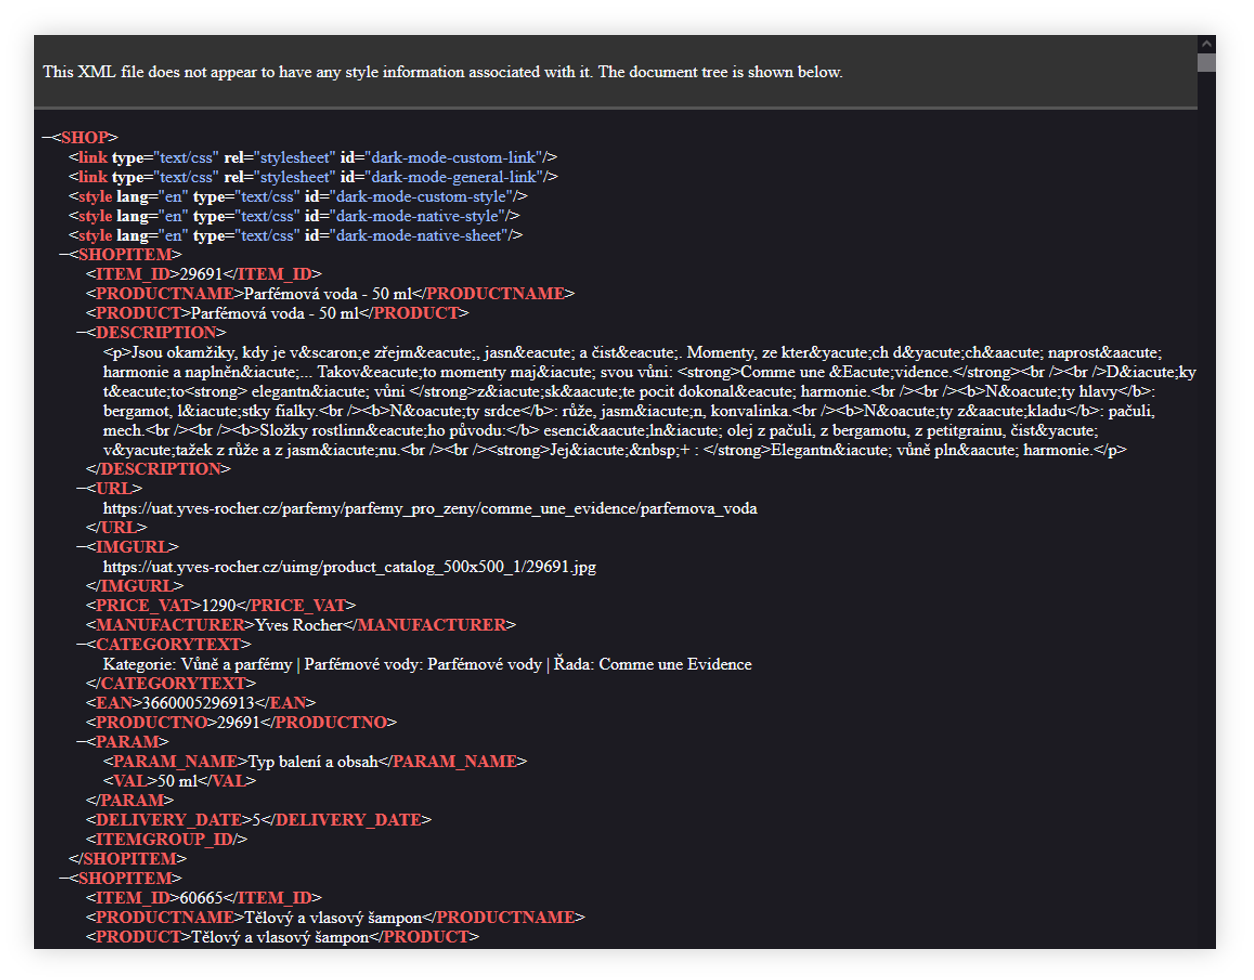 |
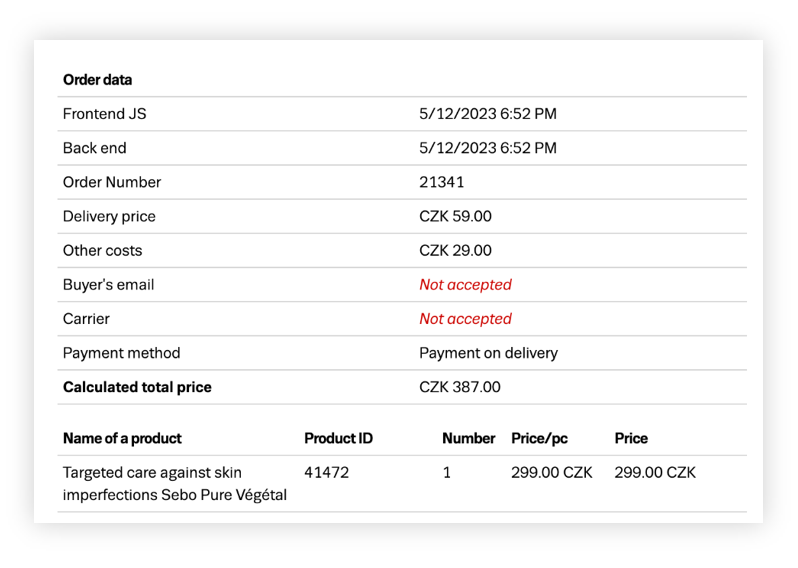
| *Visualization of the Heureka xml feed* |
| 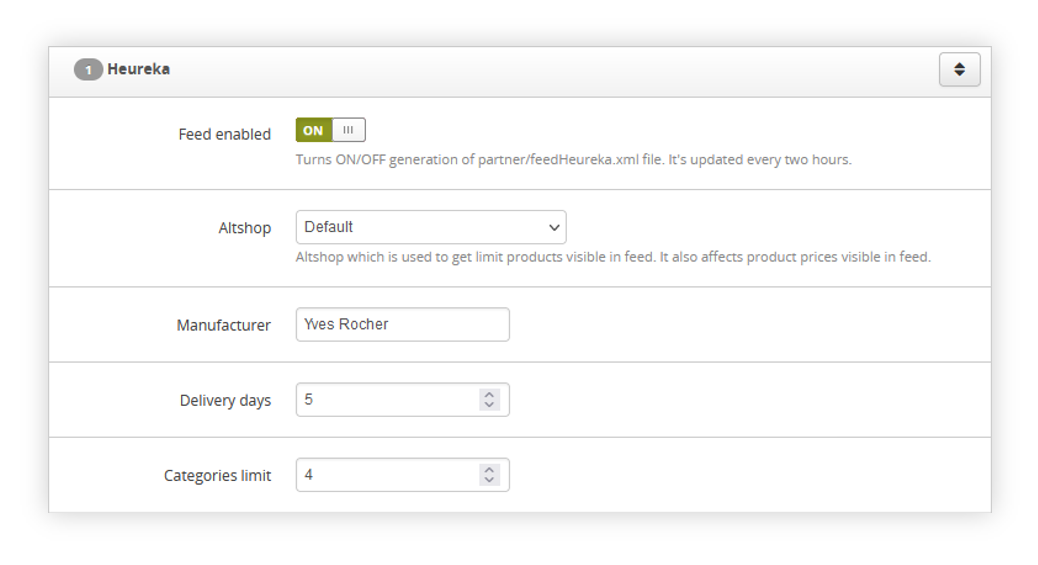 |
| *Visualization of the Heureka integration in the System settings.* |
|  |
| *Visualization of the Heureka xml feed* |
|  |
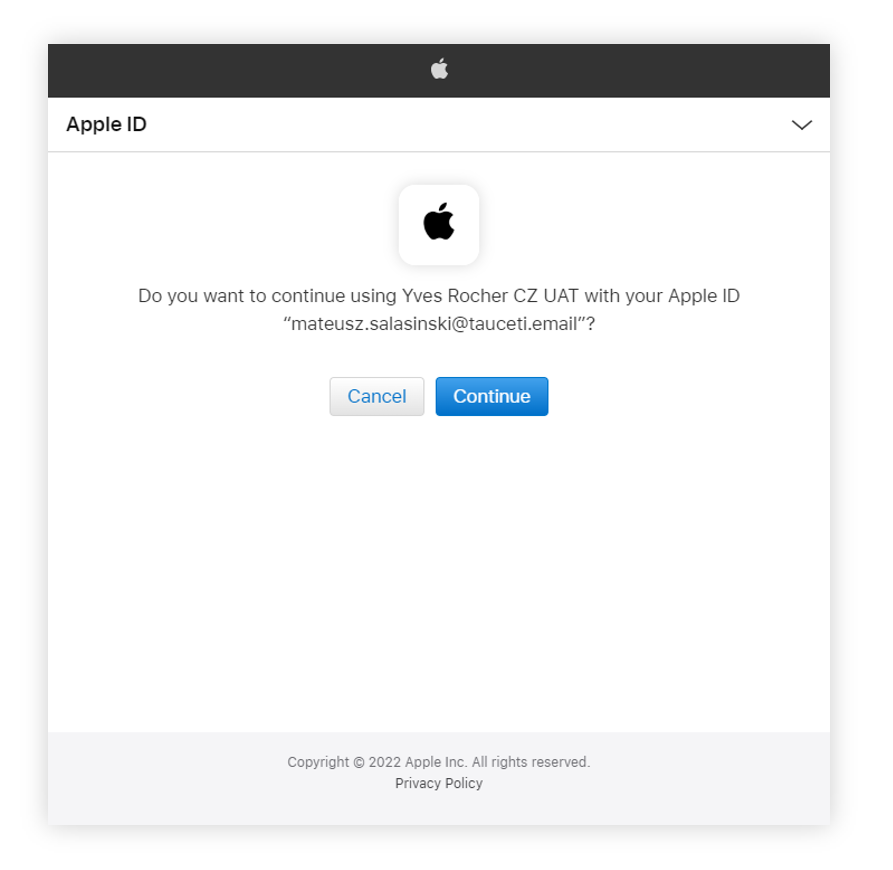
| *Visualization of the Apple ID authorization button on the log in page* |
| 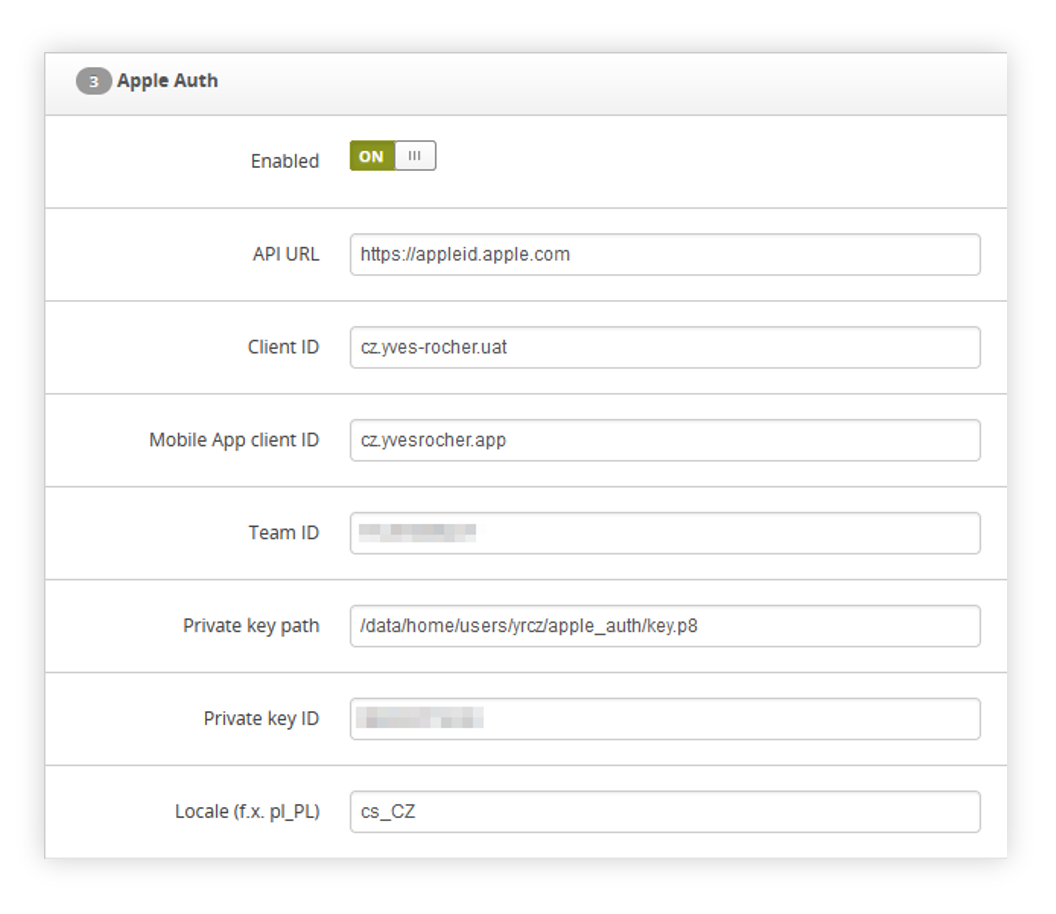 |
| *Visualization of the Apple.cz authorization tab* |
| 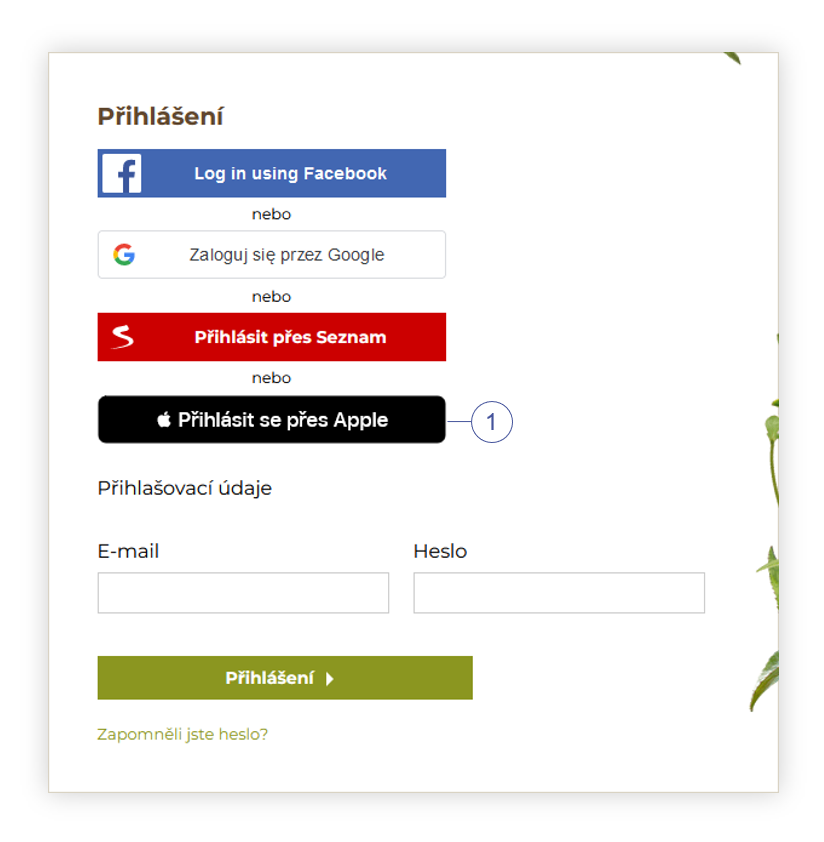 |
| *Visualization of the Apple authorization button on the log in page* |
| 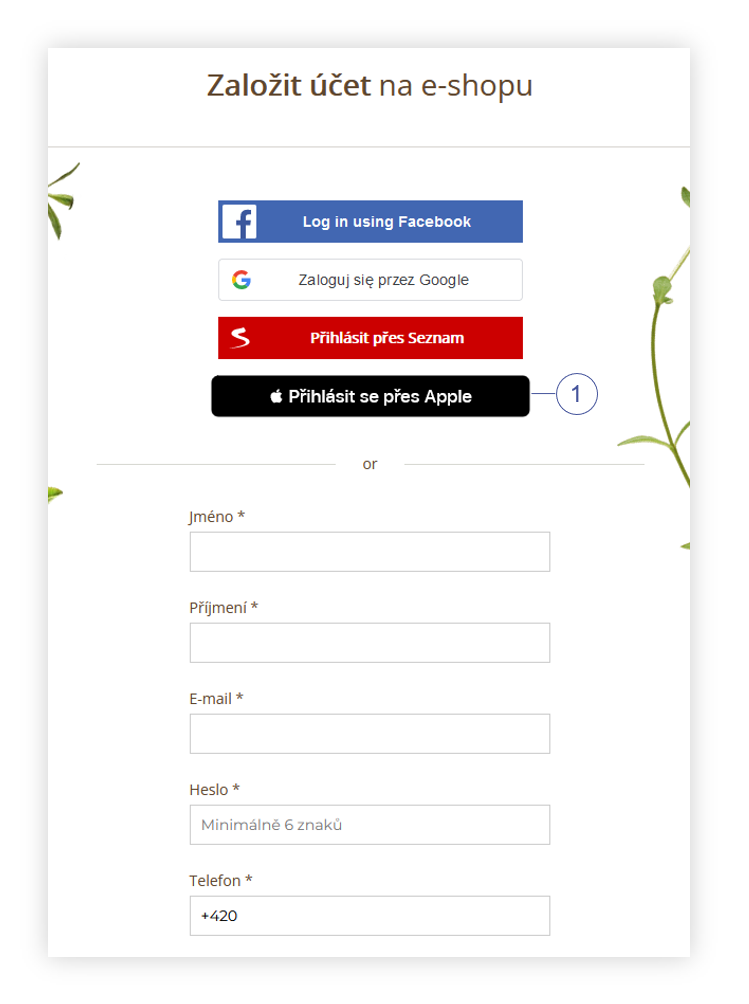 |
| *Visualization of the Apple authorization button in the register tab* |
| 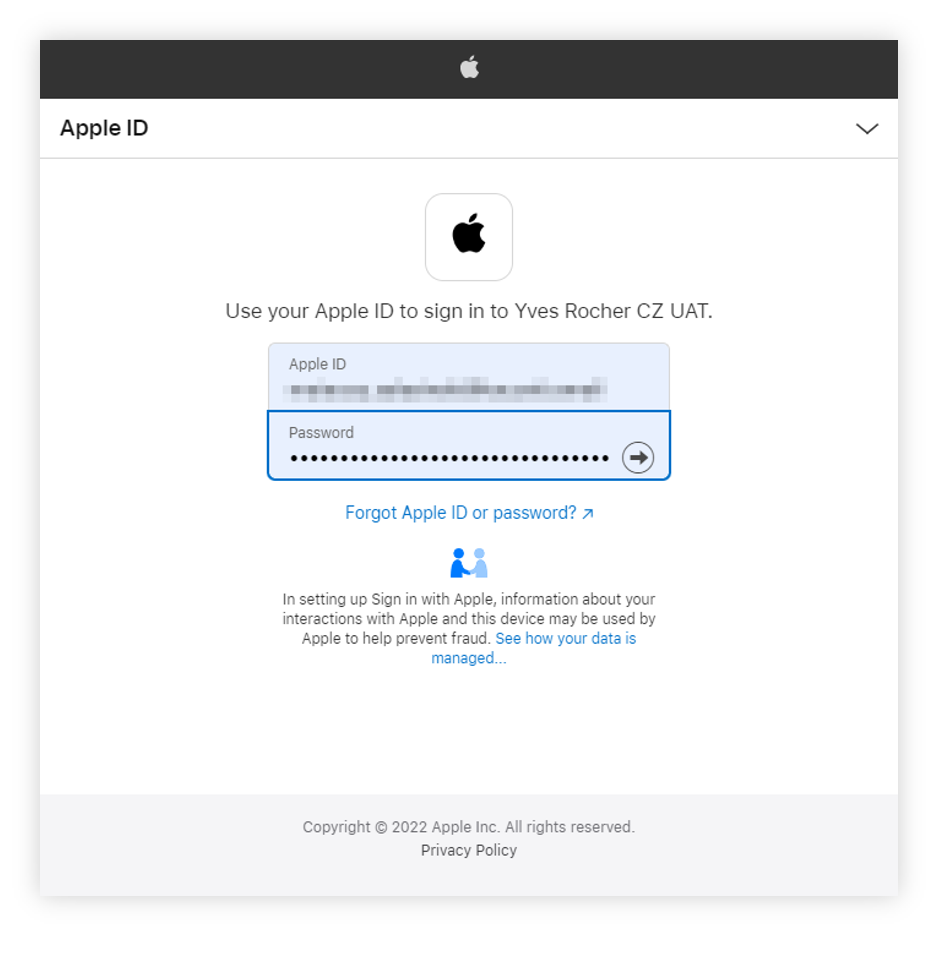 |
| *Visualization of the Apple authorization* |
|  |
| *Visualization of the Apple authorization* |
| 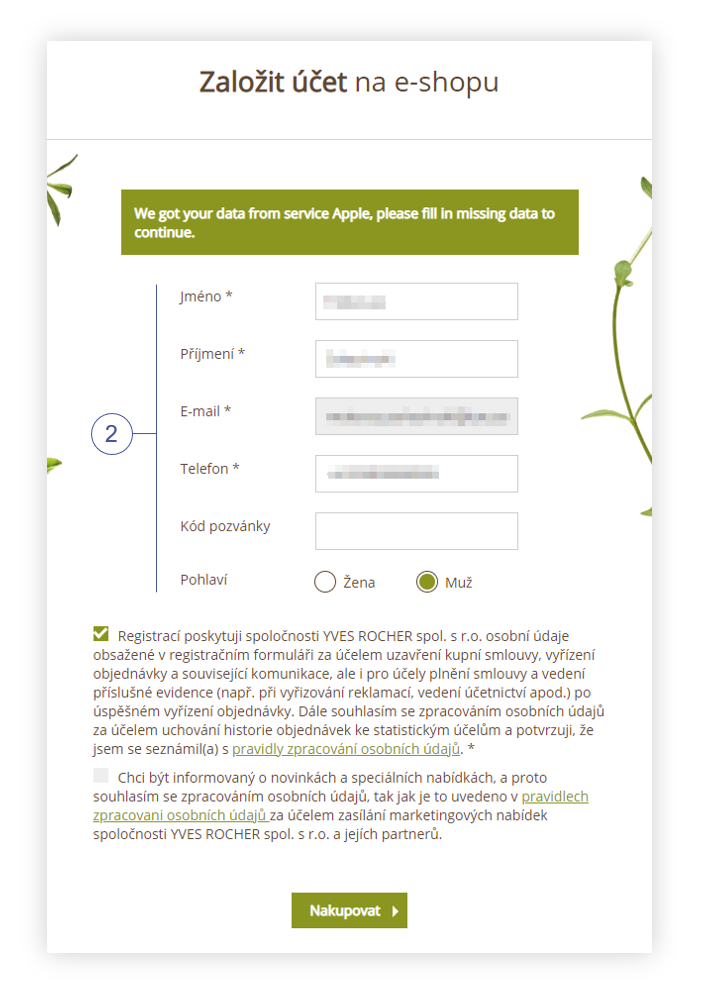 |
| *Visualization of the Apple additional information page* |
|  |
| *Visualization of the Glovo feed* |
|  |
| *Visualization of the Glovo system settings* |
|  |
| *Visualization of the Glovo feed* |
| **yr\_gtm\_ab** | *object* |
| *-* **.** | *object* |
| **.offer\_segment** | Old\_offer |
| **.total\_visits** | 189 |
| **.total\_orders** | 8 |
| **yr\_gtm\_ac** | *object* |
| **.0** | CC1664286880 |
| **.1** | CC1661009512 |
| **.2** | CC1498480417 |
| **.3** | CC1658042828 |
| **yr\_gtm\_ad** | *object* |
| **.0** | 3CYLAWS11 |
| **.1** | 3CYL8WS11 |
| **.2** | 3CYGCWP01 |
| **.3** | 3CYL7WS11 |
| **yr\_gtm\_m** | *object* |
| **.0** | 97701 |
| **yr\_gtm\_n** | *object* |
| **.0** | F02113 |
| **.1** | F94615 |
| **.2** | F67114 |
| **yr\_gtm\_x** | *object* |
| **.0** | 05241 |
| **.1** | 74084 |
| **.2** | 74084 |
| **yr\_gtm\_y** | *object* |
| **.0** | Kategorie: Vlasy > Masky a octy: Masky > Cílená péče: Detox vlasů |
| **.1** | Kategorie: Vlasy |
| **.2** | Kategorie: Vánoce |
| **.3** | Kategorie: Vánoce |
| *-***yr\_gtm\_z** | *object* |
| **.0** | 22456 |
| **.1** | J0437 |
| **.2** | 83020 |
|  |
| *Visualization of the Magyar Posta delivery pickup selection* |
|  |
| *Visualization of the Magyar Posta delivery system settings* |
| 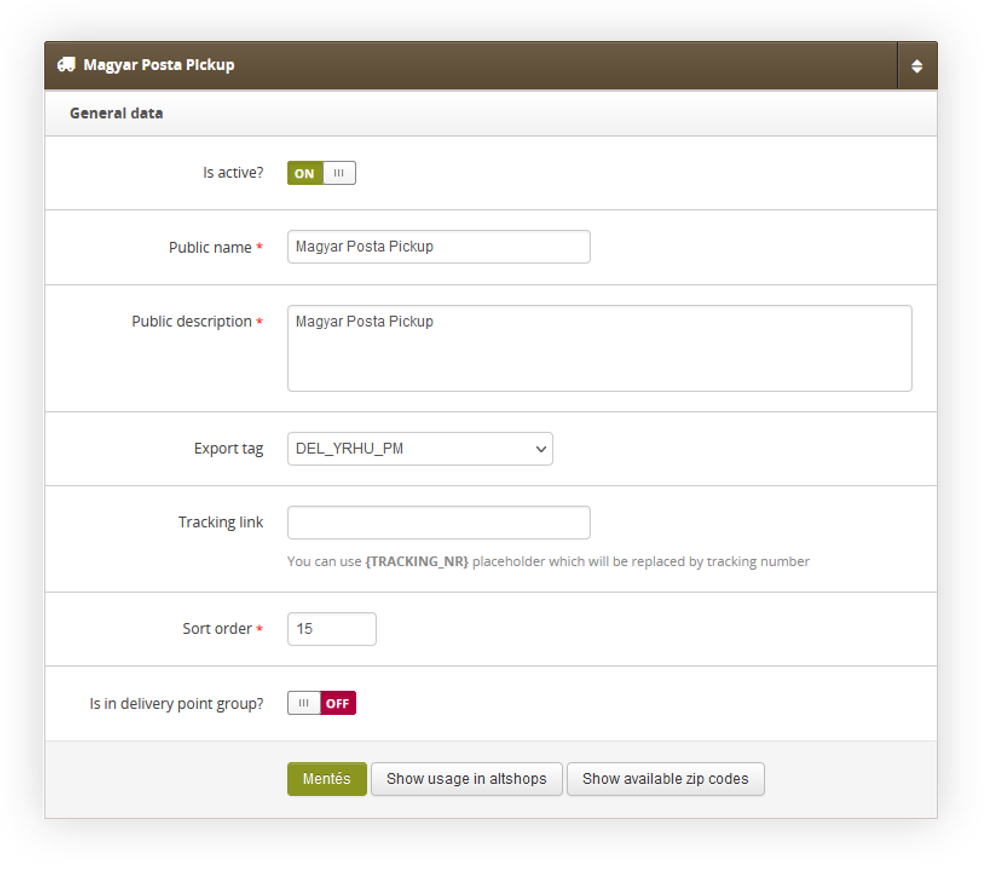 |
| *Visualization of the Magyar Posta delivery settings* |
| 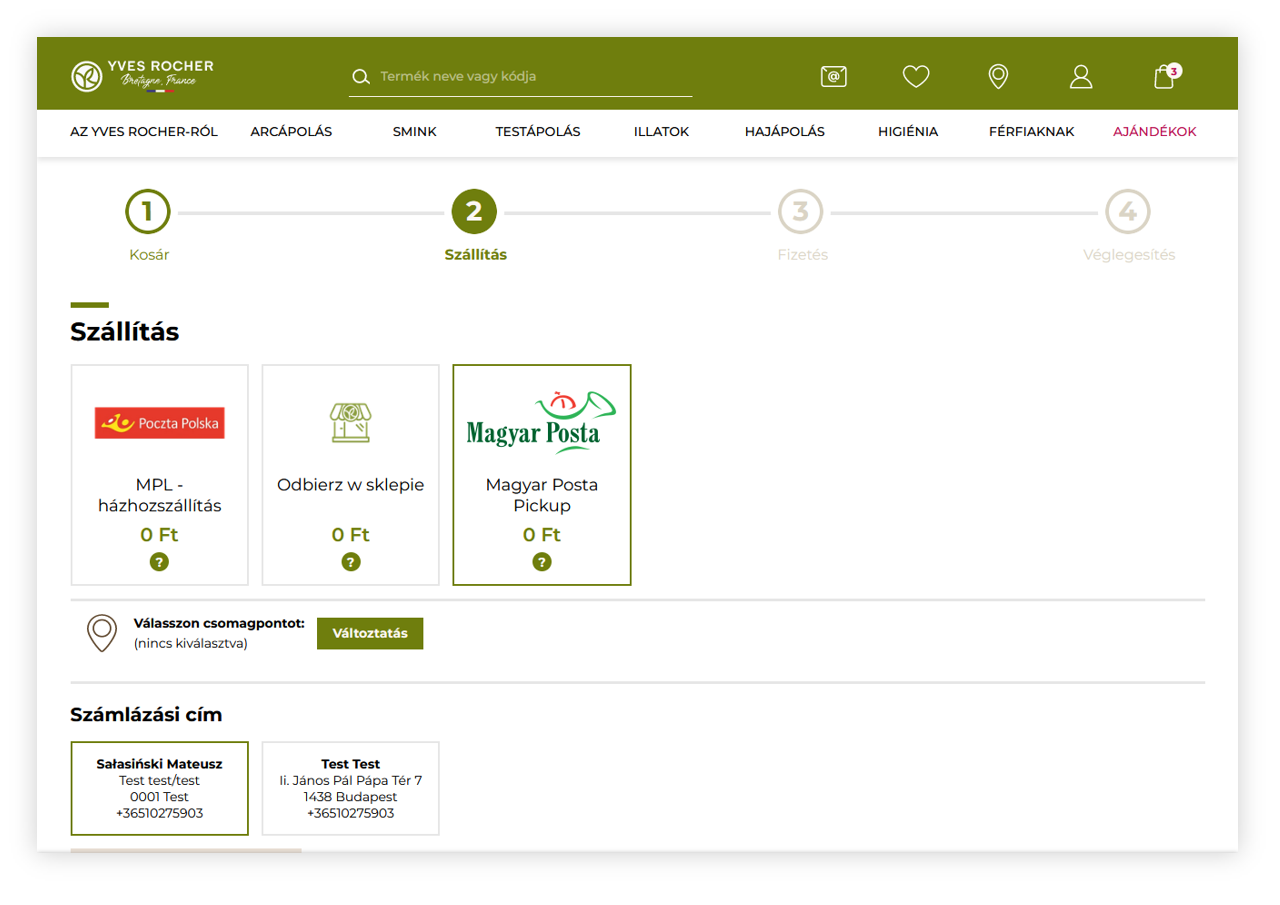 |
| *Visualization of the magyar post delivery method in the delivery step* |
|  |
| *Visualization of the magyar Posta delivery pickup selection* |
| 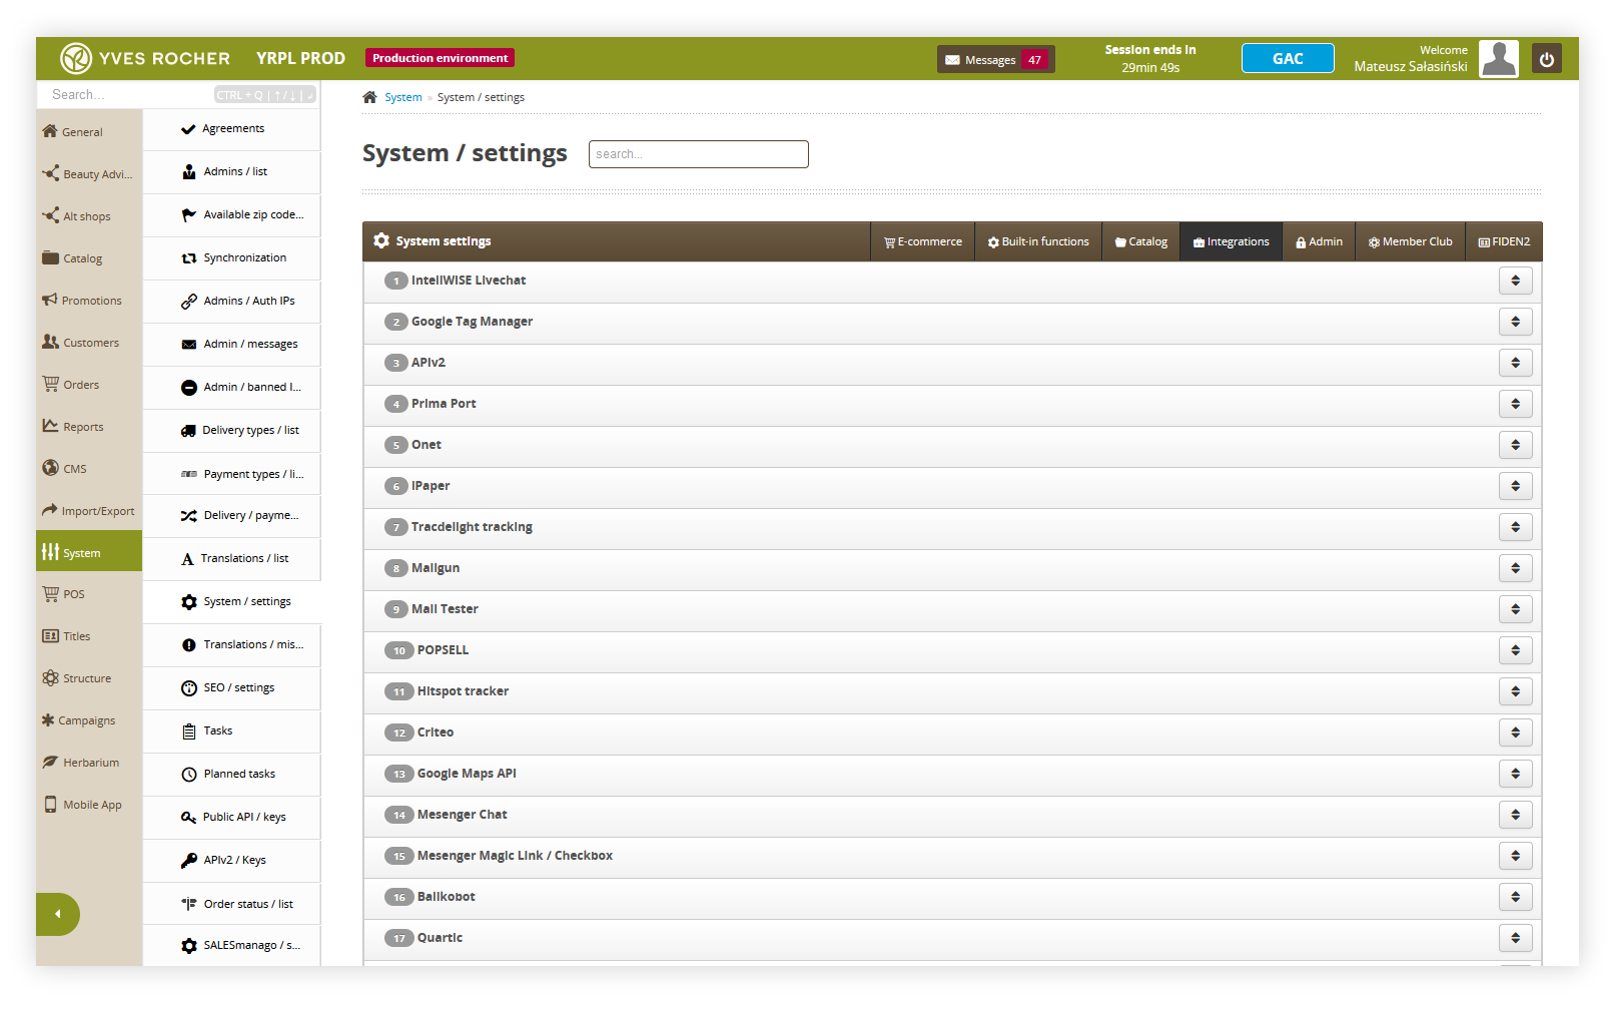 |
| *Visualization of the system settings integration location* |
| 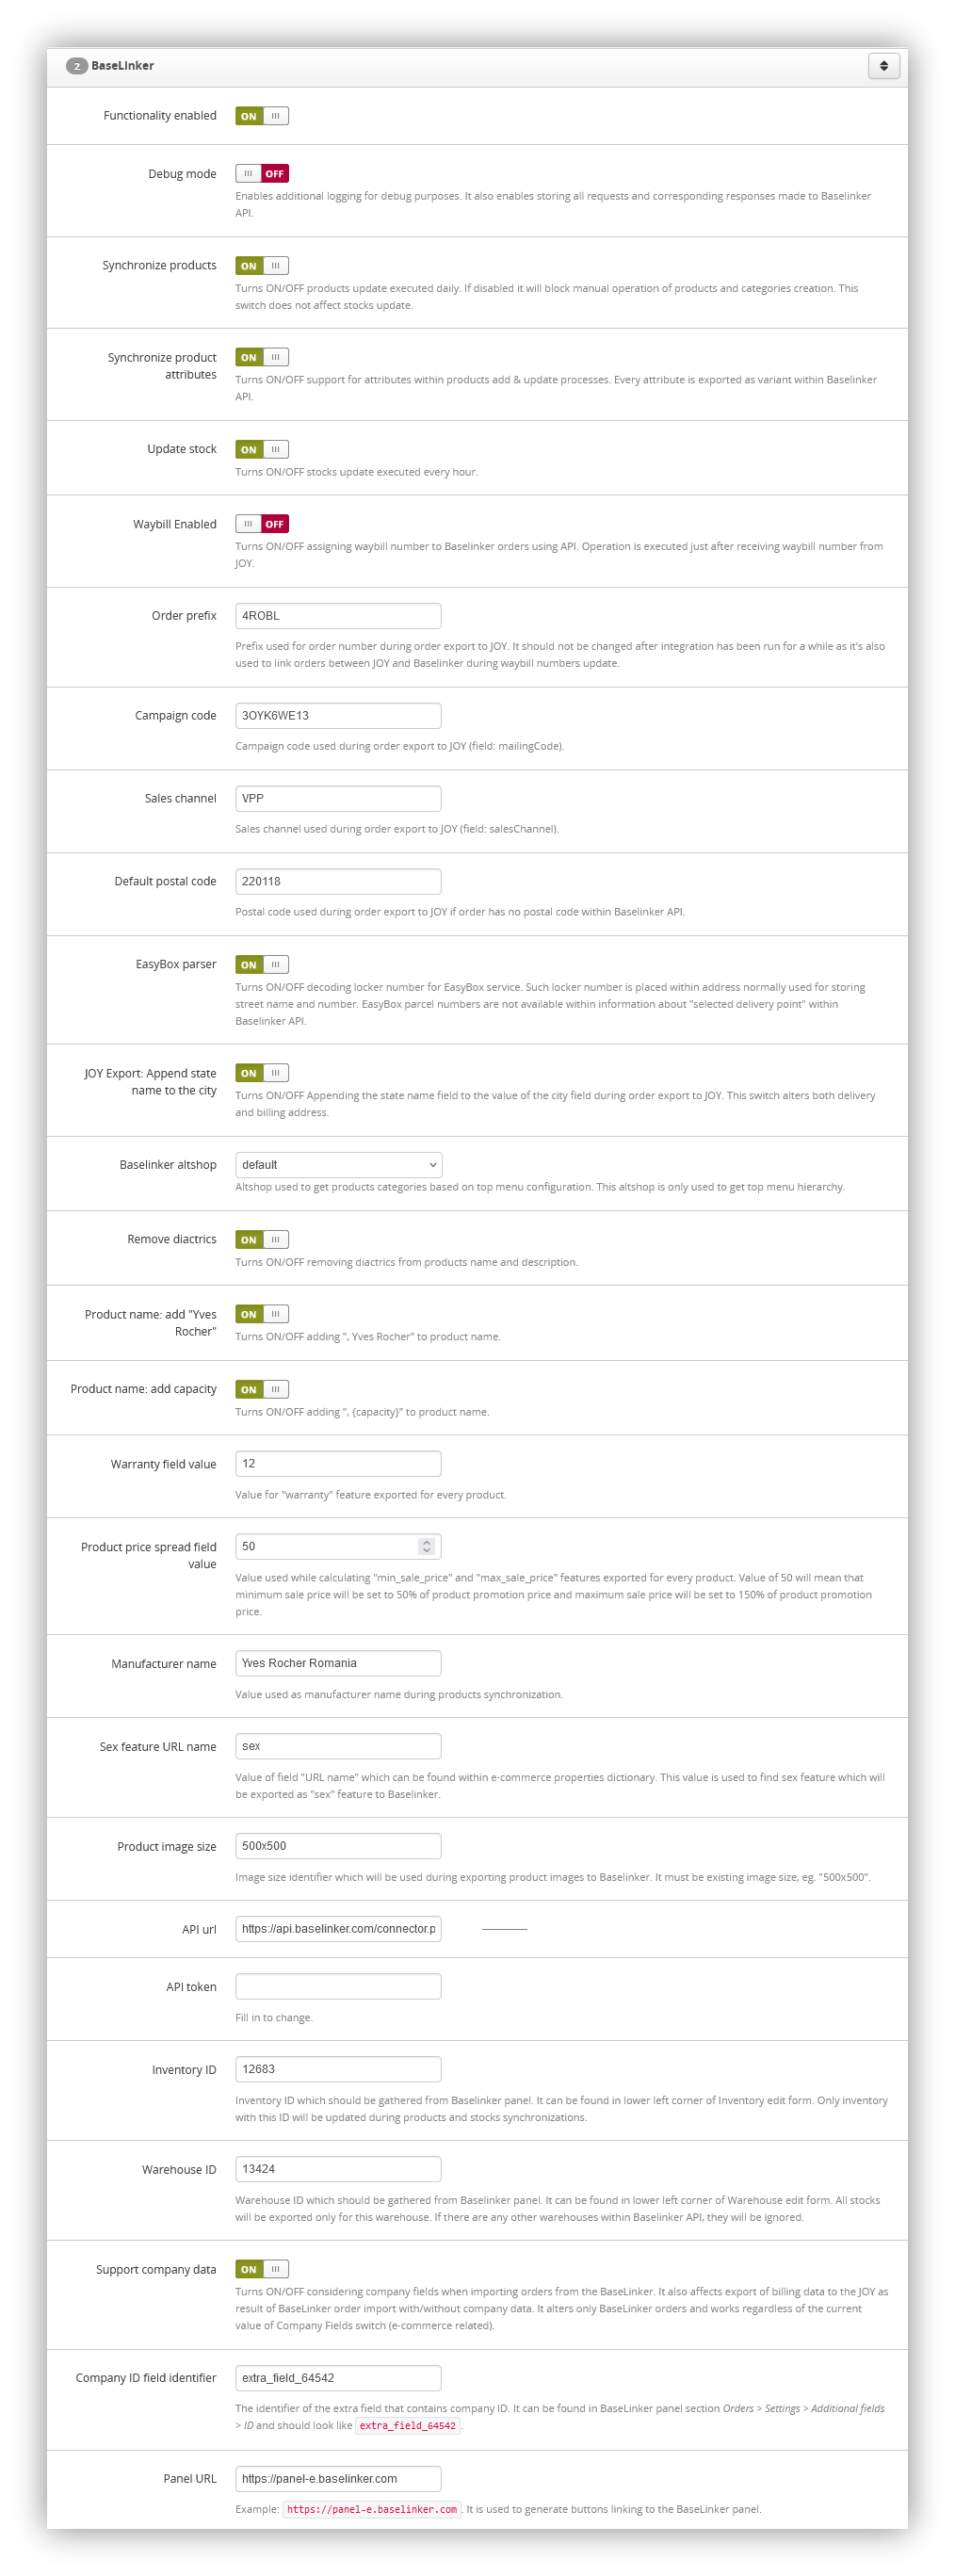 |
| *Visualization of the BaseLinker settings* |
| 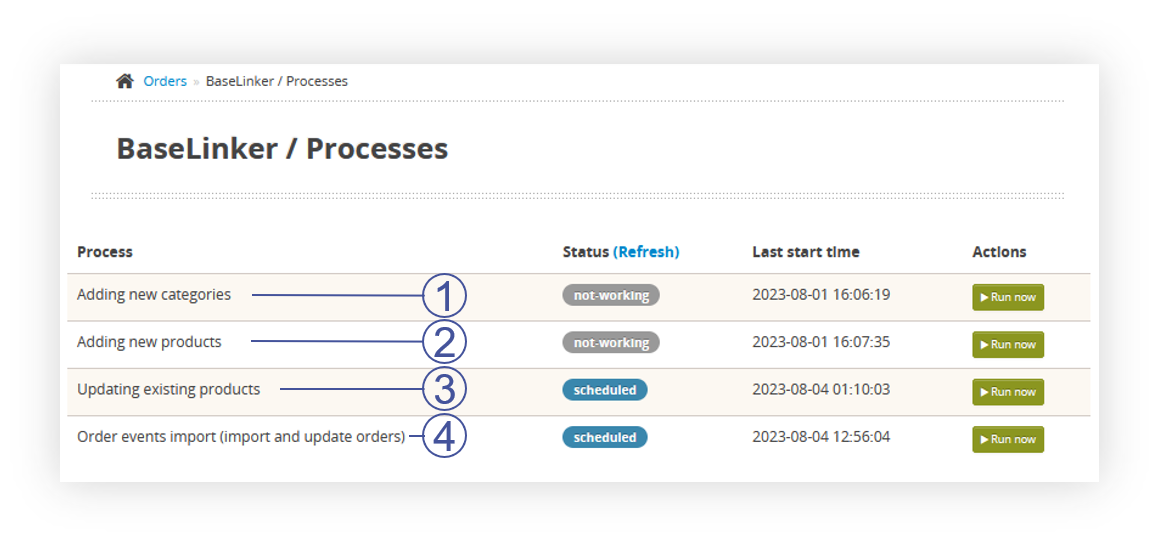 |
| *Visualization of the BaseLinker processes* |
| **Field name** | **Description** | **Data source** |
| inventory\_ID | Catalog ID | ID from TC system settings (BaseLinker\_inventory\_id) |
| product\_ID | Product ID | Always null |
| is\_Bundle | Is the product a part of a set | Always false |
| ean | EAN of a product | First found in the database EAN of the product. In case of multiple EAN codes, the first one taken from the database is exported. |
| sku | SKU of a product | Main SKU of the product. Attribute sku if data is generated for product variant. |
| tax\_rate | VAT tax rate | Vat percentage taken from TC system settings from vat\_percentage field. |
| weight | Weight of the product | Capacity field from the product page. This field is converted to a floating point number or 0.0. |
| height | Height of the product | Always 0.0 |
| width | Width of the product | Always 0.0 |
| length | Length of the product | Always 0.0 |
| star | Star type (indication in the BaseLinker panel) | Always 0 |
| manufacturer\_id | Manufacturer ID | Manufacturer ID with a name that matches the BaseLinker\_manufacturer\_name system setting. Obtained from the getInventoryManufacturers method. If the manufacturer does not exist, it is created automatically. |
| category\_id | Category ID | ID obtained from the API in the process of going through the categories to create a product. In the case of finding a product within several categories, it is the ID of the first category encountered |
| prices | The list of prices in the price groups. | **id-price-group:** **price**, where ID of the group is taken from the getInventoryPriceGroups method. Always default price group is used (is\_default: true). |
| locations | Additional information regarding the location of the product in the warehouse | Always an empty table (\[\]) |
| text\_fields | descriptive fields with possible variants in different languages / for different integrations | Object with a set of fields compatible with the [**Supported text fields** table](#bkmrk-supported-text-field). |
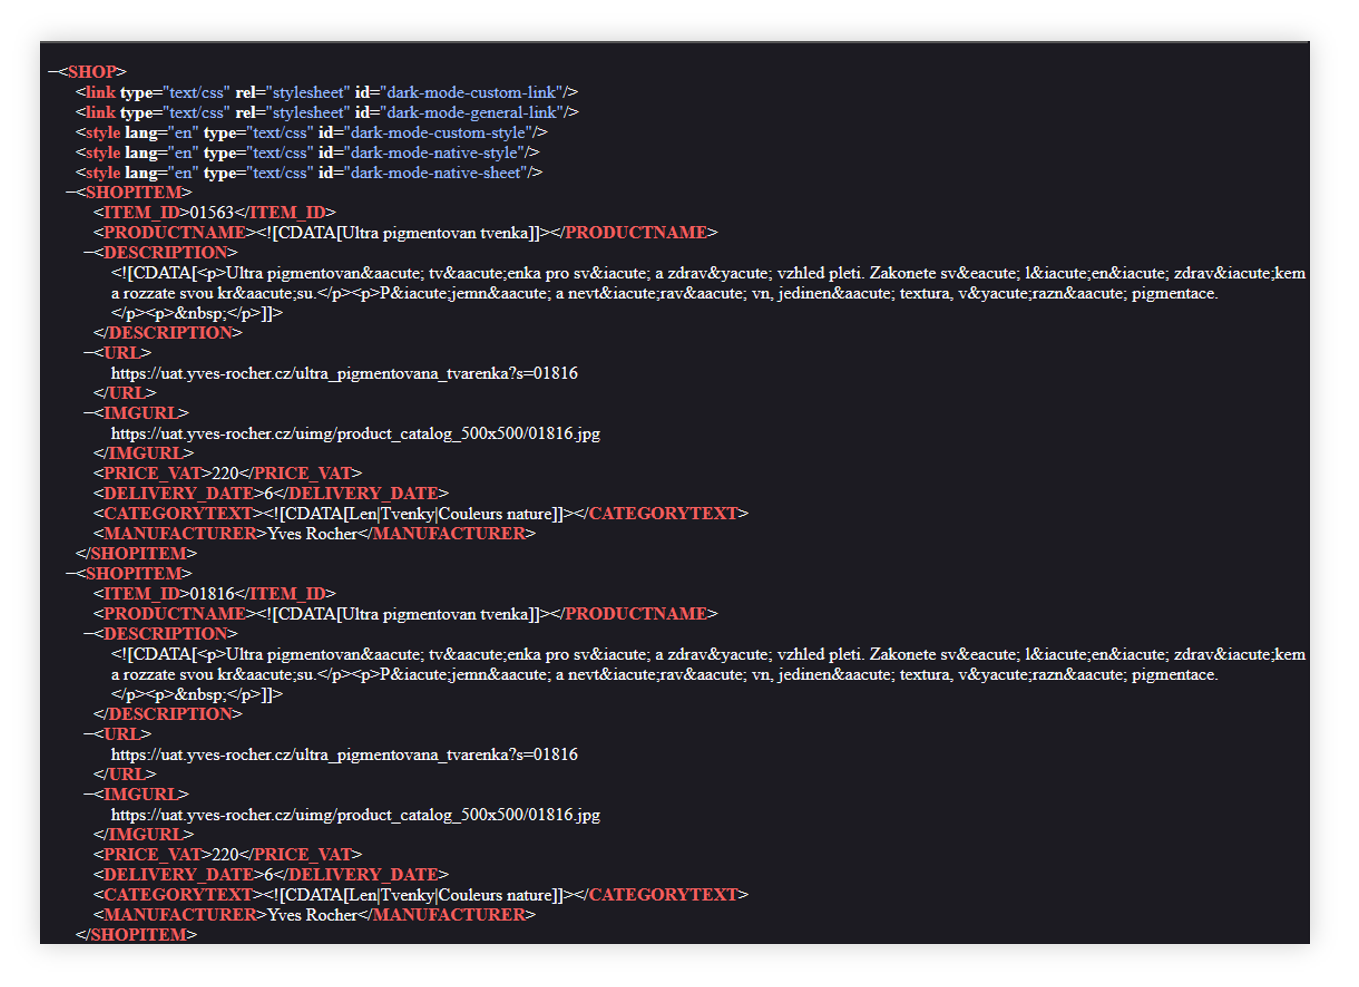
| images | Product pictures | List of images assigned to attribute if data is generated for product variant. The main photo is marked with index 0. We pass the photos as string url: {address}. If there are currently fewer photos than there were previously, the pre-existing object indexes are transferred with the value "" in order to force the deletion of the old photos. We are transferring photos in size 500x500px (system setting: **BaseLinker\_product\_img\_size**). The list is limited to 15 items. Note: BaseLinker returns a list of photos with indexes increased by 1. When referring to these images, this index should always be decreased by 1. For update requests, the numbering is from 0, when retrieving product information, the numbering is from 1. We only provide images related to the SKU set in the product, i.e. in the case of a SKU color variant, we will transfer only photos associated with a particular color. |
| links | Identifications of the product in the other warehouses. | Always an empty table (\[\]) |
| stock | Stock value | { "stock-id": { "stock-status" } where ID of the warehouse comes from the system setting, while the stock is set according to the default altshop configuration. The logic is according to the cyclic process of updating stock levels. |
| **Name of the field** | **Description** | **Data source** |
| name | Name of the product | Product name. adds `- {color name}` if data is generated for product variant. Value ", Yves Rocher" is added if the system setting **BaseLinker\_product\_name\_manufacturer** is equal to 1. Value ", {capacity}" is added if the system setting **BaseLinker\_product\_name\_capacity** is equal to 1 and the product has a non-empty capacity field value. Within the text, all diacritical characters are converted to characters in the ASCII range if the setting of the **BaseLinker\_remove\_diactrics** system setting has a value of 1. |
| description | Description of the product | combined text of all descriptions in order: **main, effects, usage, ingredients, capacity, additional\_info, notes.** Within the text, all diacritical characters are converted to characters in the ASCII range if the setting of the **BaseLinker\_remove\_diactrics** system setting has a value of 1. |
| description\_extra1 | Additional description 1 | Always an empty string ("") |
| description\_extra2 | Additional description 2 | Always an empty string ("") |
| description\_extra3 | Additional description 3 | Always an empty string ("") |
| description\_extra4 | Additional description 4 | Always an empty string ("") |
| features | Features of the product | List of product features with additional features (please see [Supported Features section](#bkmrk-supported-features)). `status` is `0` when the product is globally inactive (disabled in product definition). `status` is `0` if the product is active but data is generated for the inactive product variant. |
| 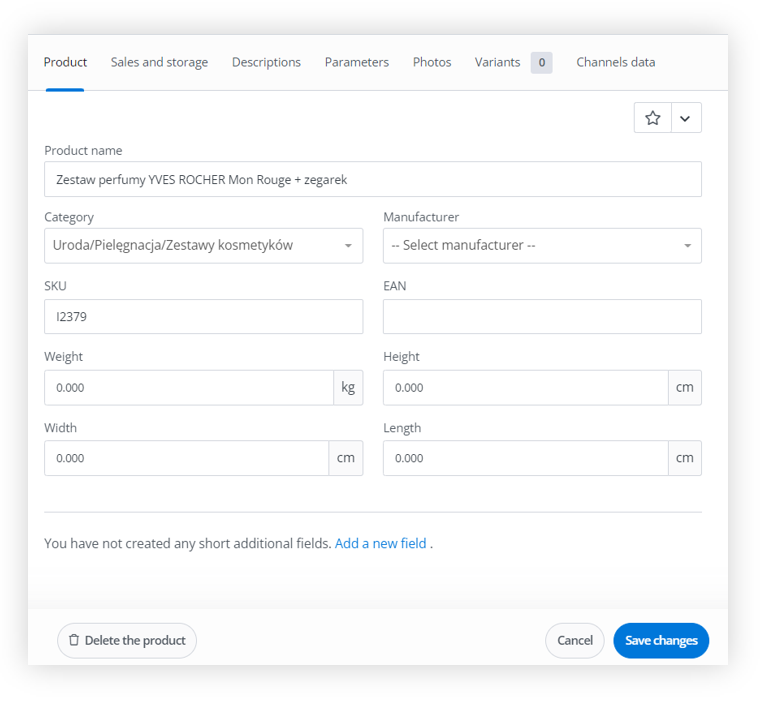 |
| *Visualization of the BaseLinker product edit* |
| 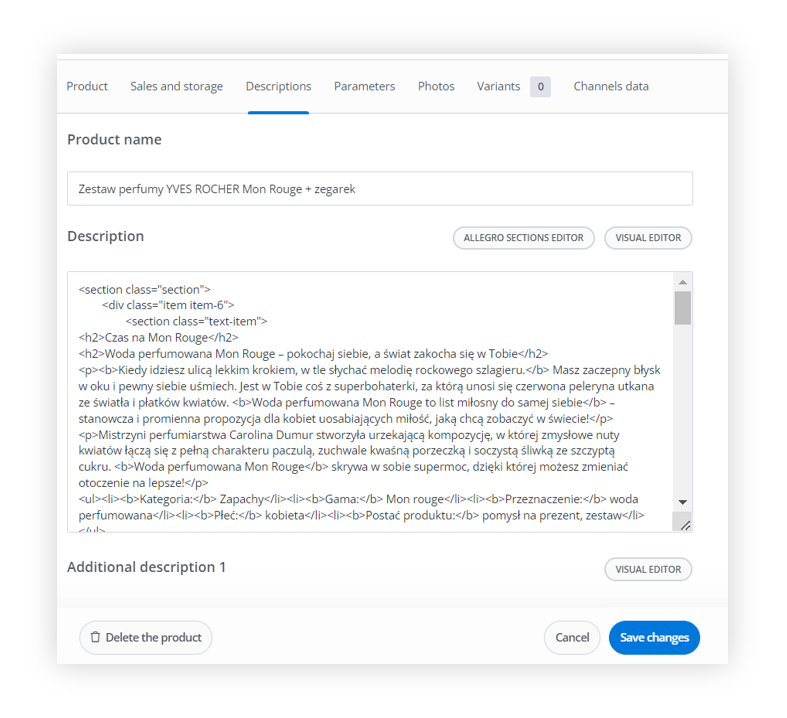 |
| *Visualization of the BaseLinker product edit description* |
| 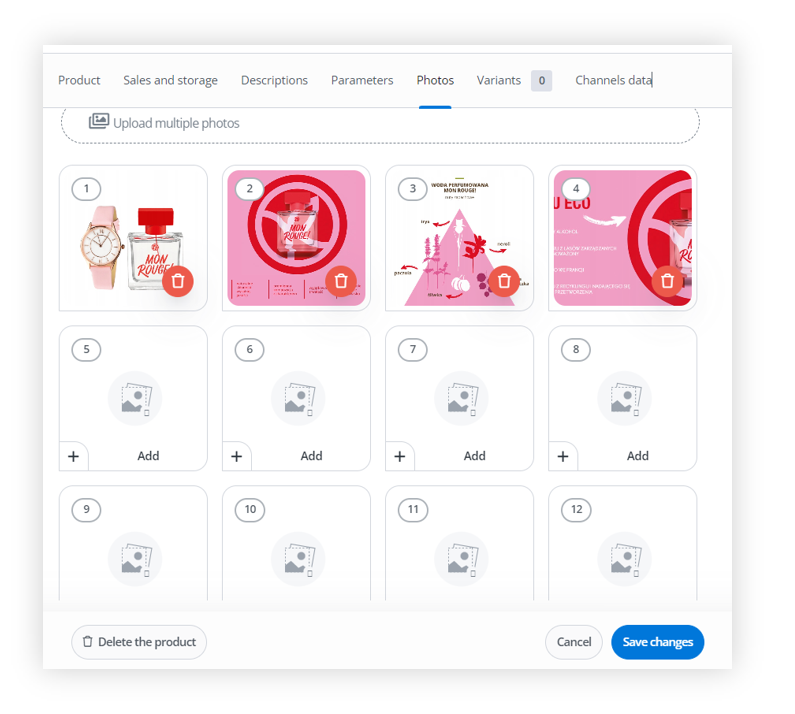 |
| *Visualization of the BaseLinker product edit photos* |
|  |
| *Visualization of the BaseLinker product edit parameters* |
| 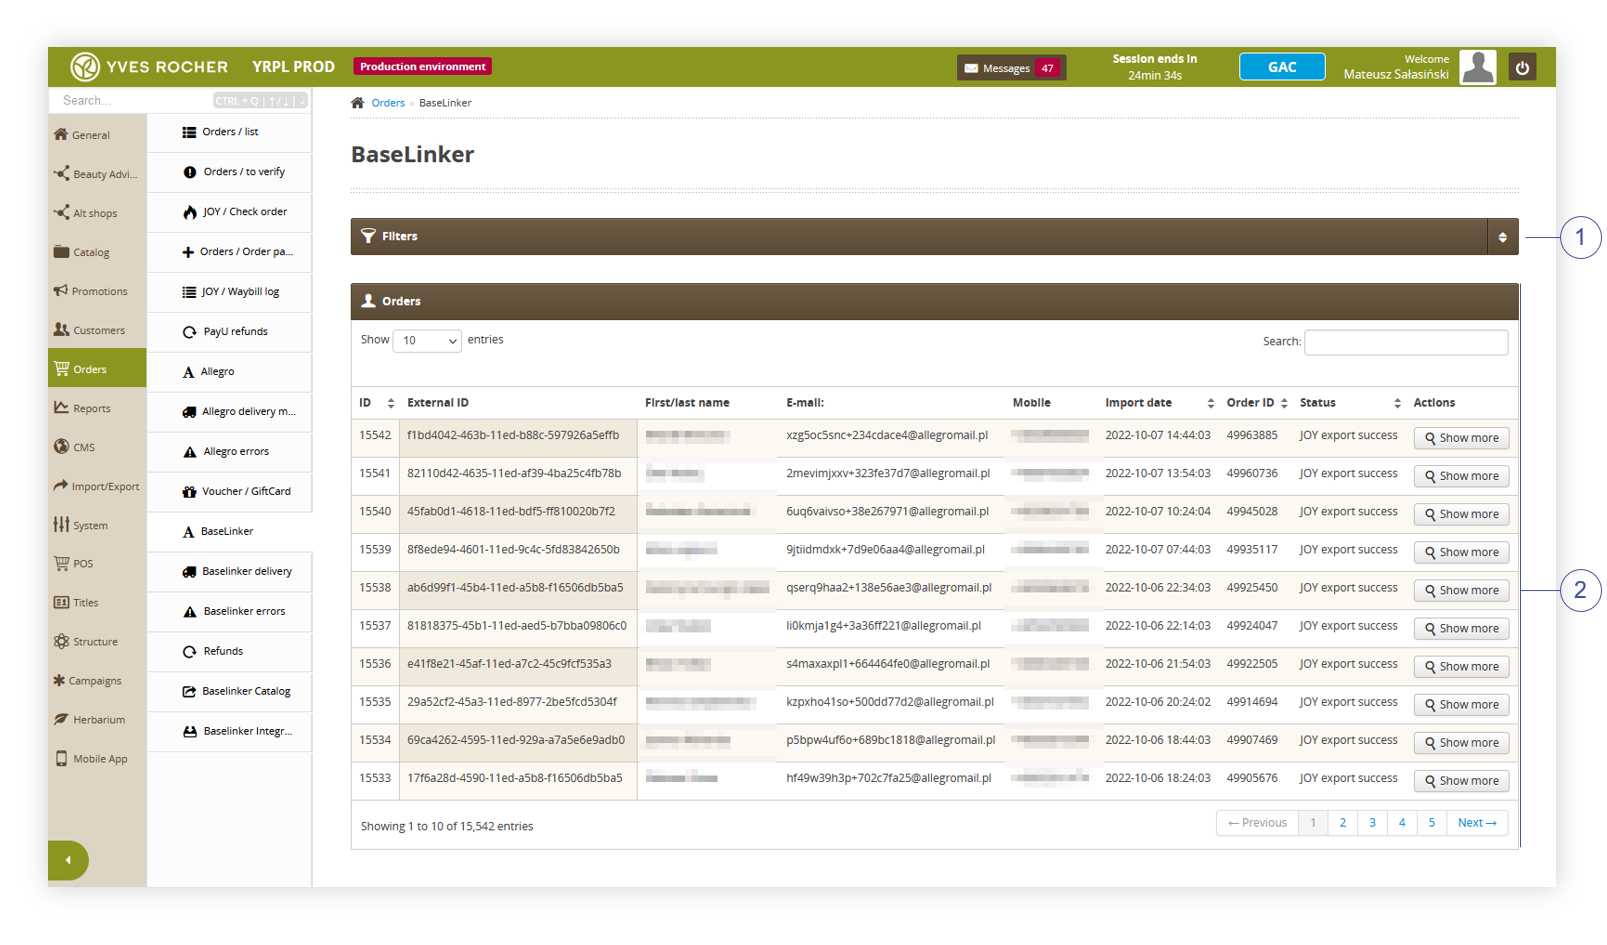 |
| *Visualization of the BaseLinker orders tab* |
| 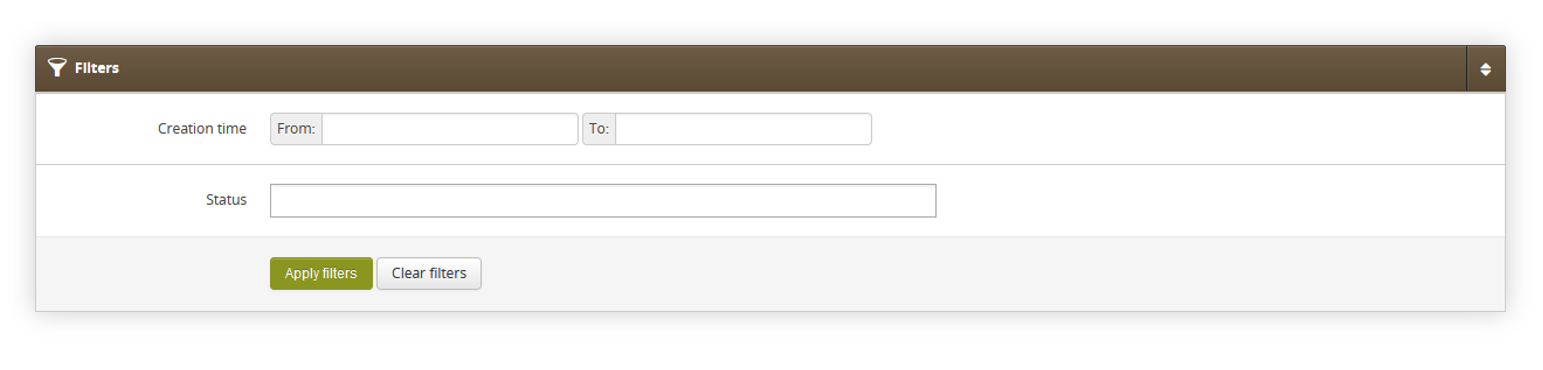 |
| *Visualization of the filters tab in the BaseLinker page* |
| 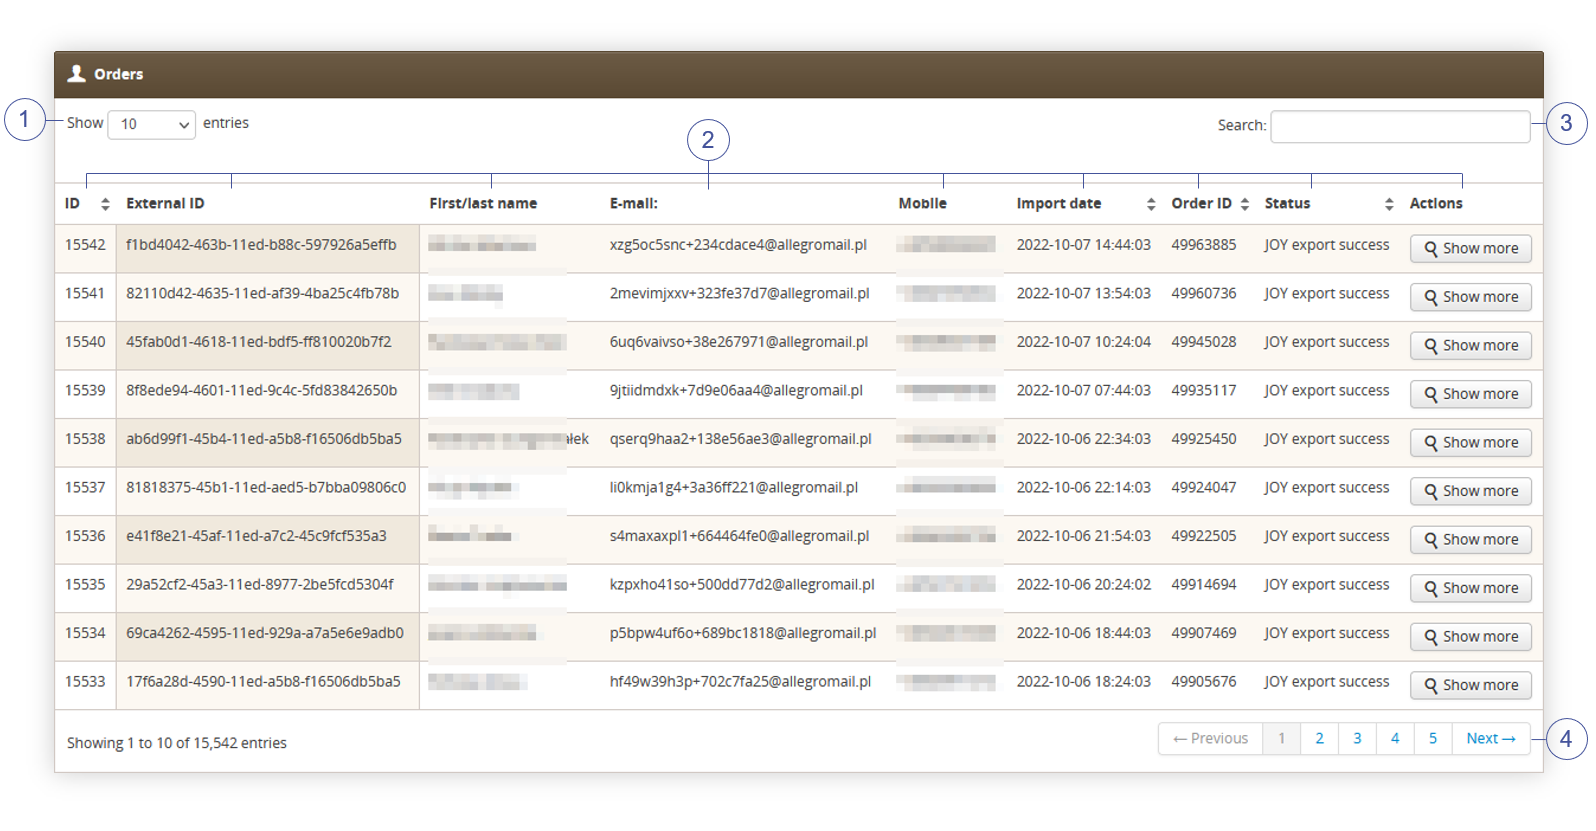 |
| *Visualization of the orders tab in the BaseLinker orders page* |
| 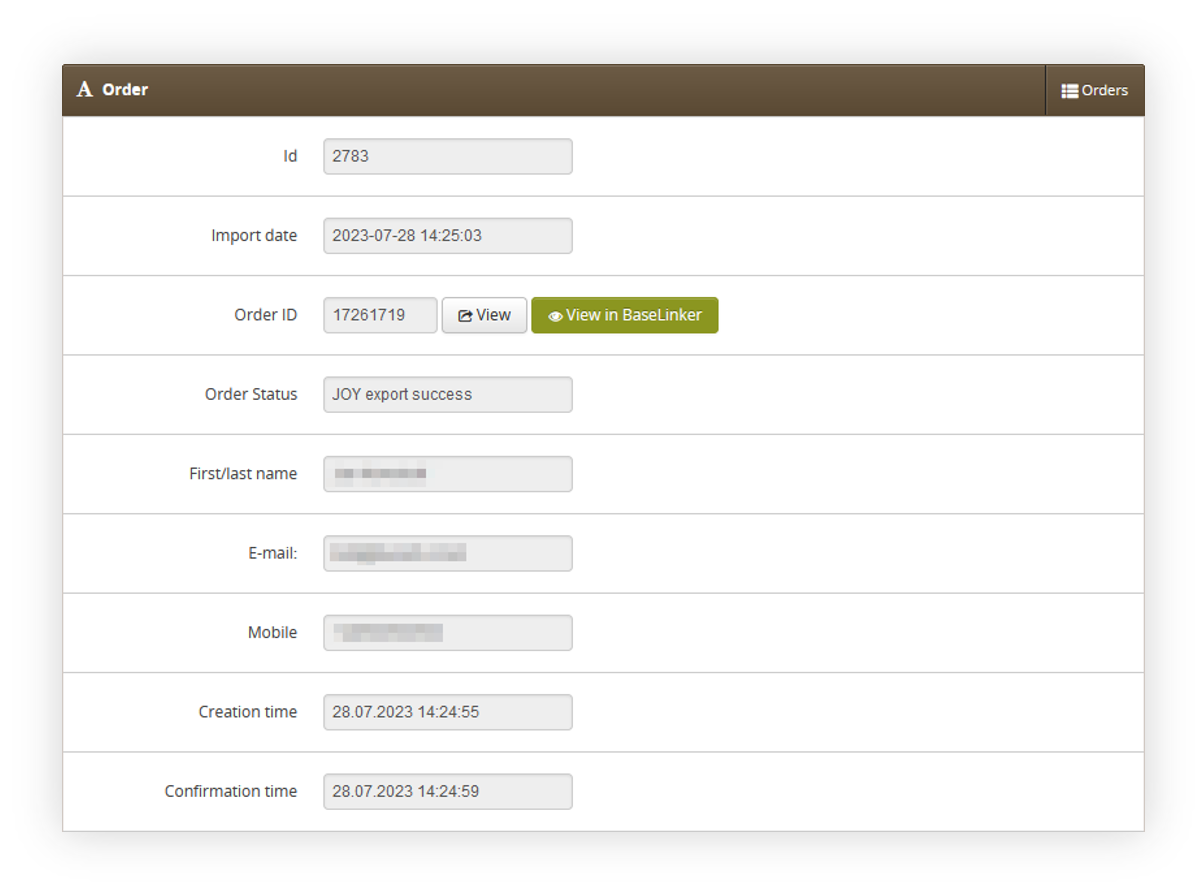 |
| *Visualization of the order tab* |
|  |
| *Visualization of the delivery address tab* |
| 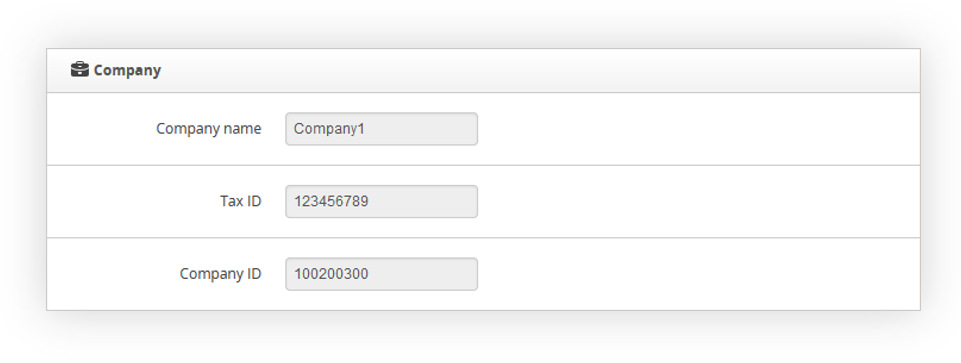 |
| *Visualization of the Company tab* |
| 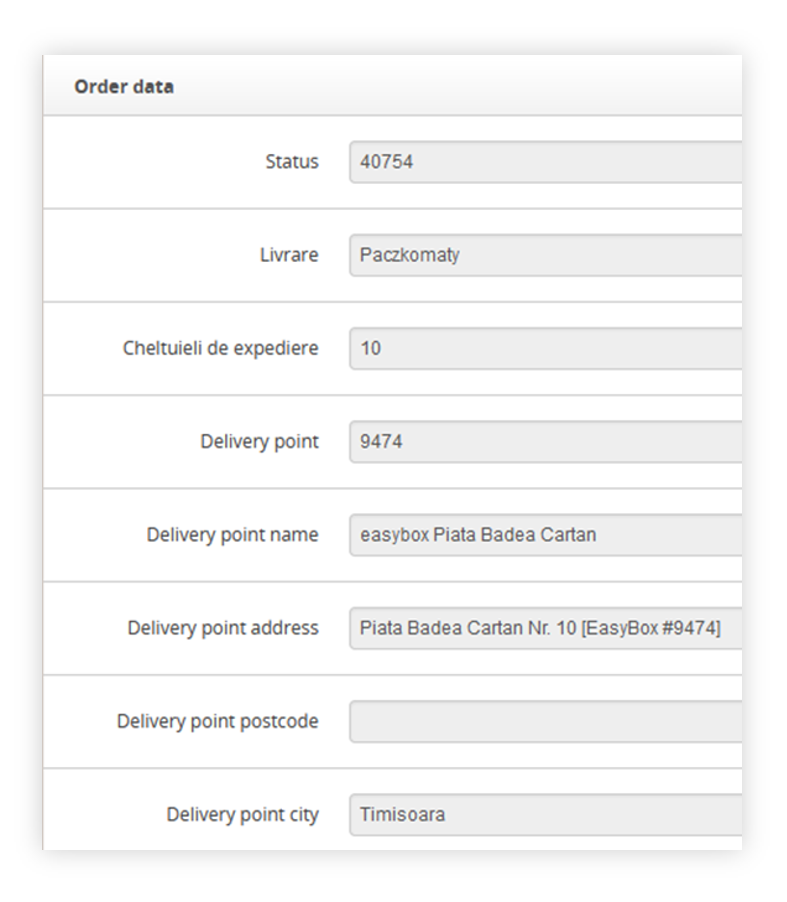 |
| *Visualization of the order data tab* |
| 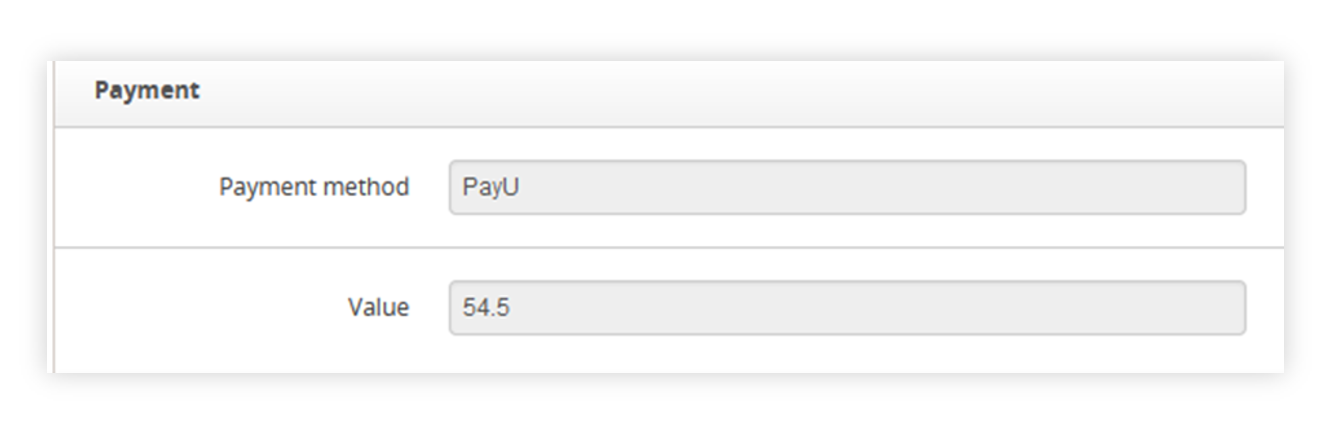 |
| *Visualization of the payment tab* |
| 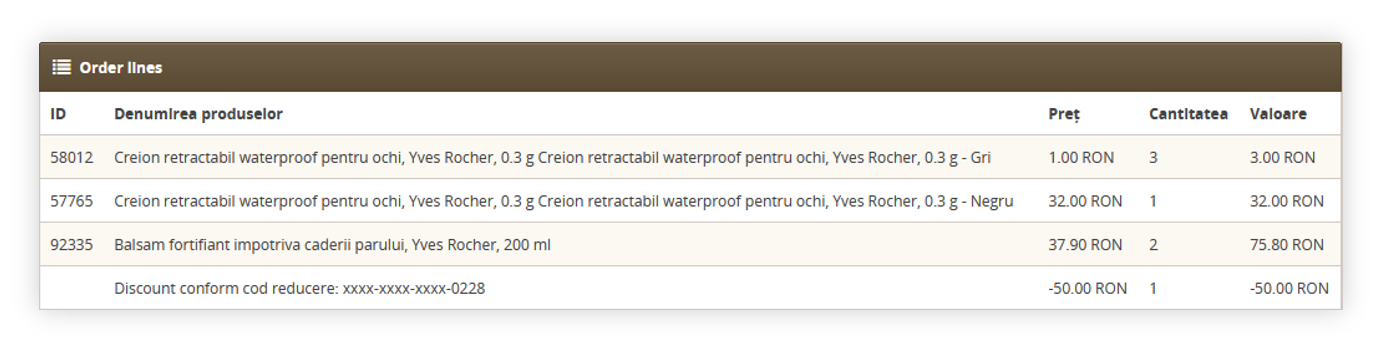 |
| *Visualization of the order lines tab* |
| 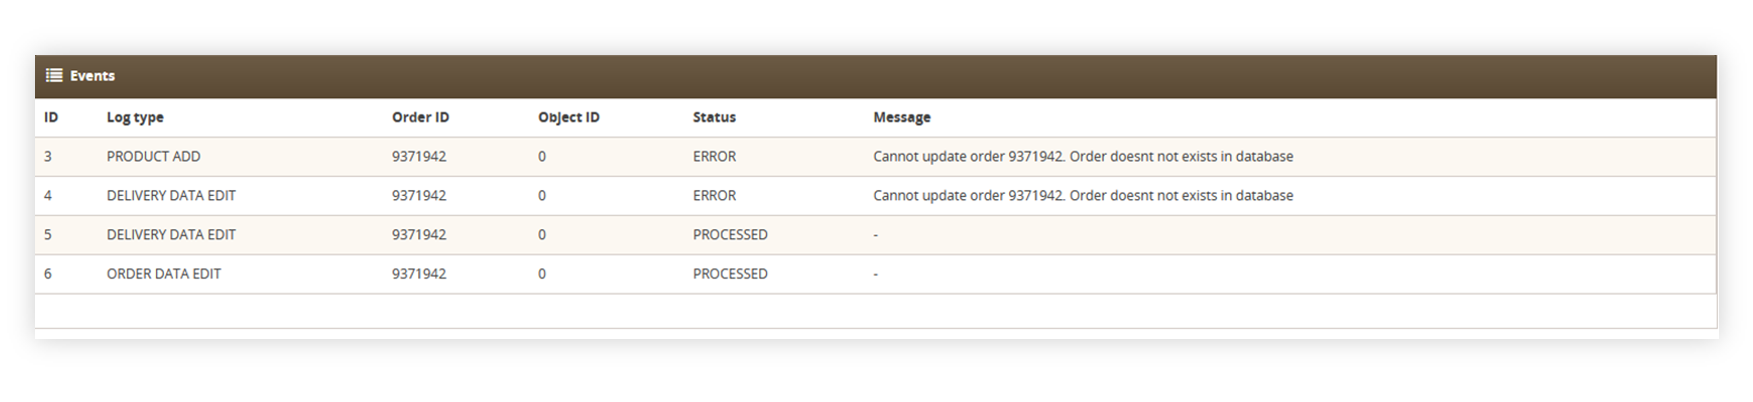 |
| *Visualization of the events tab* |
| 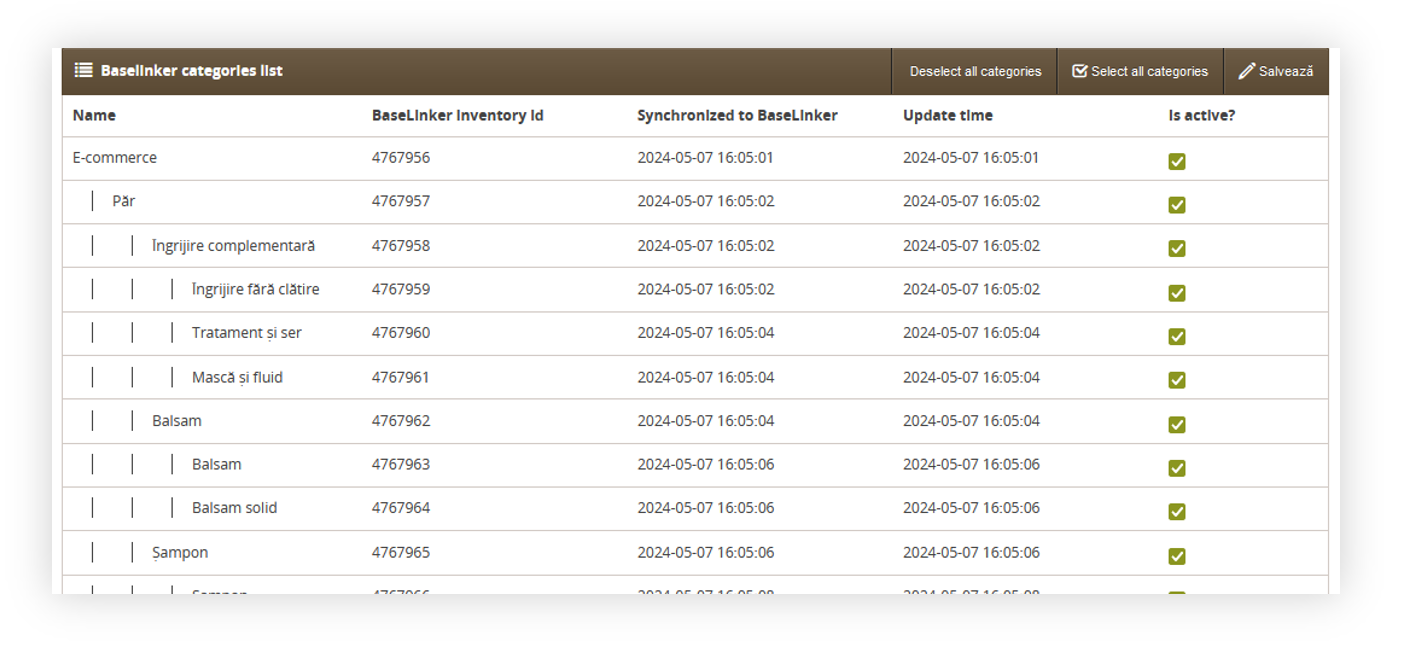 |
| *Visualization of the Baselinker categories section* |
| 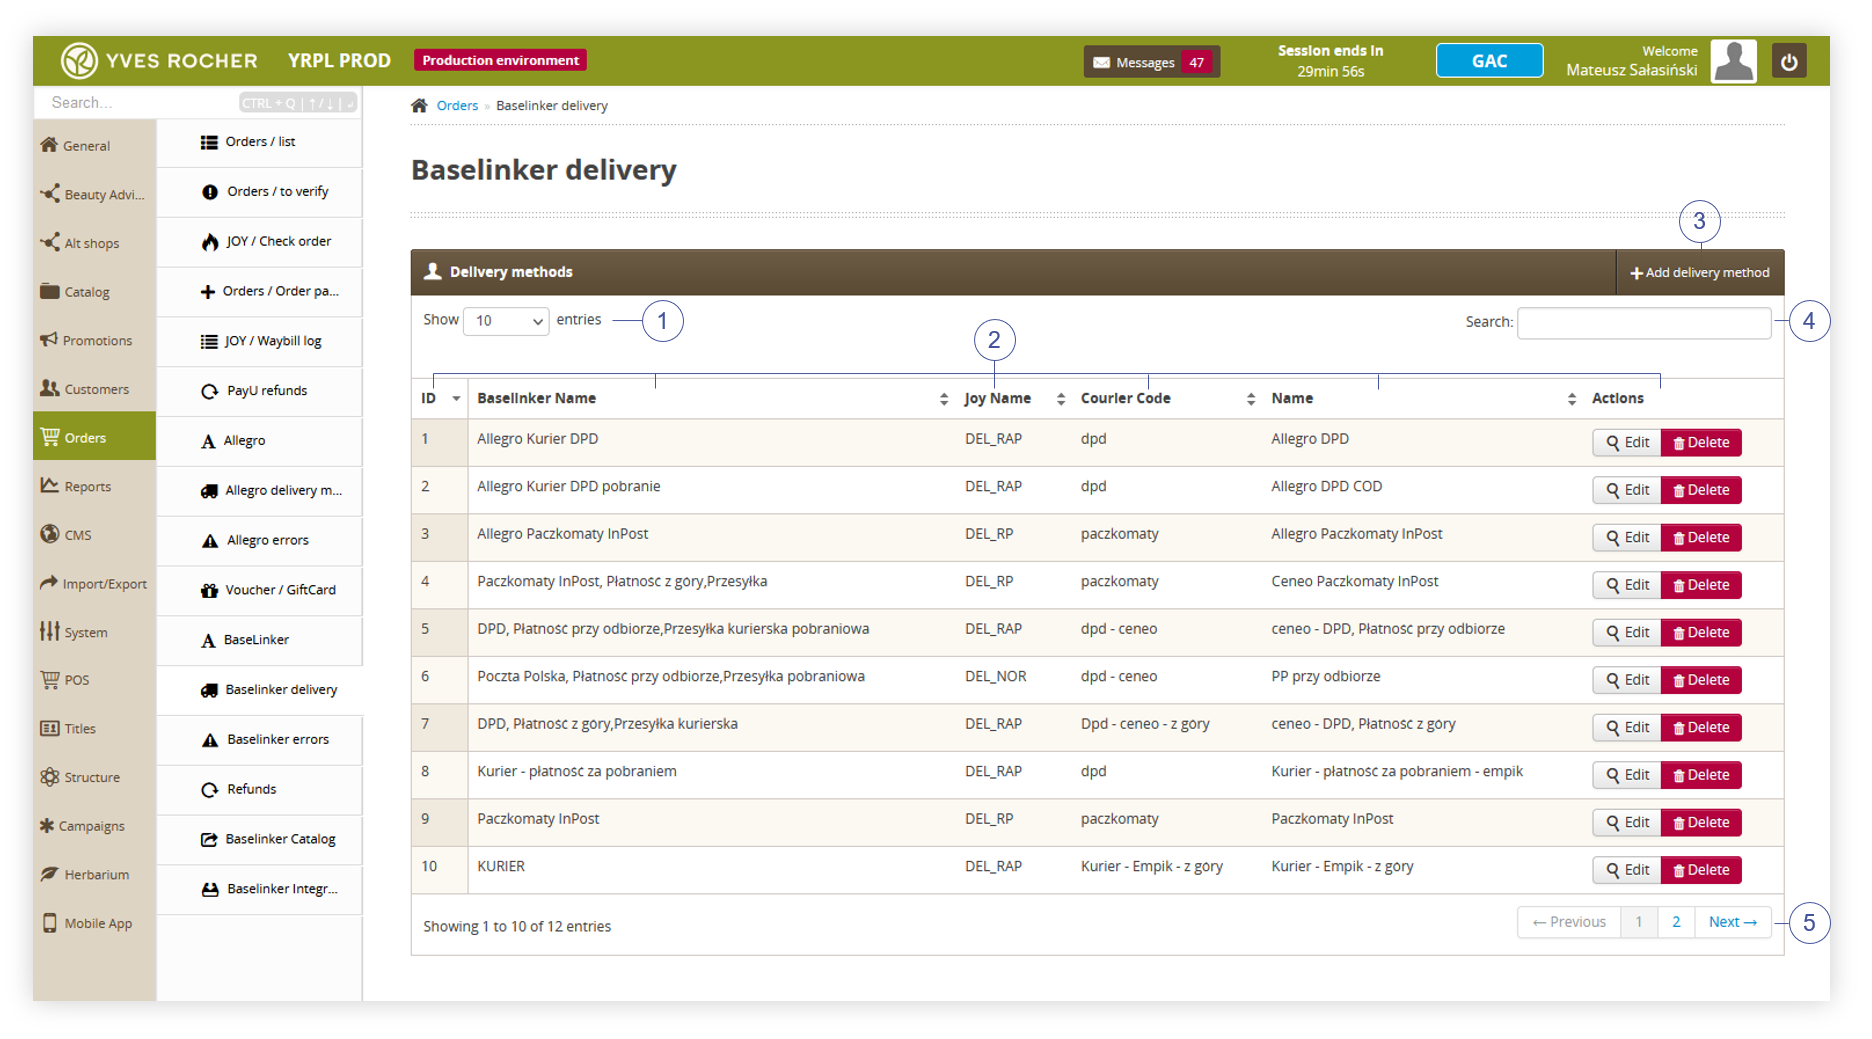 |
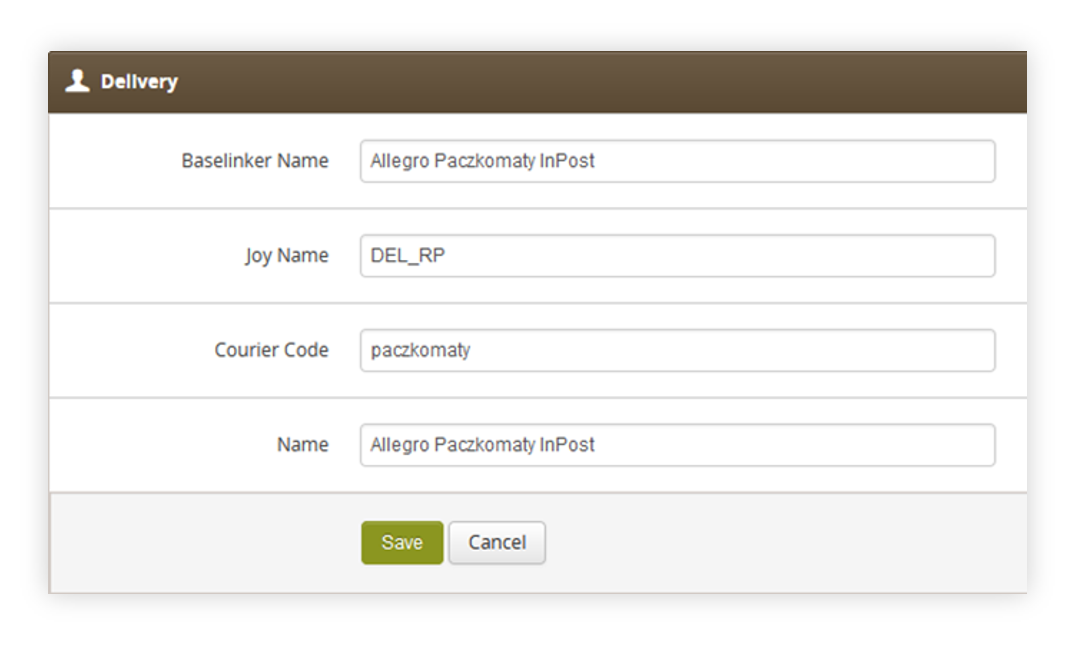
| *Visualization of the BaseLinker delivery tab* |
|  |
| *Visualization of the adding of the new delivery method* |
|  |
| *Visualization of the BaseLinker campaign codes tab* |
| 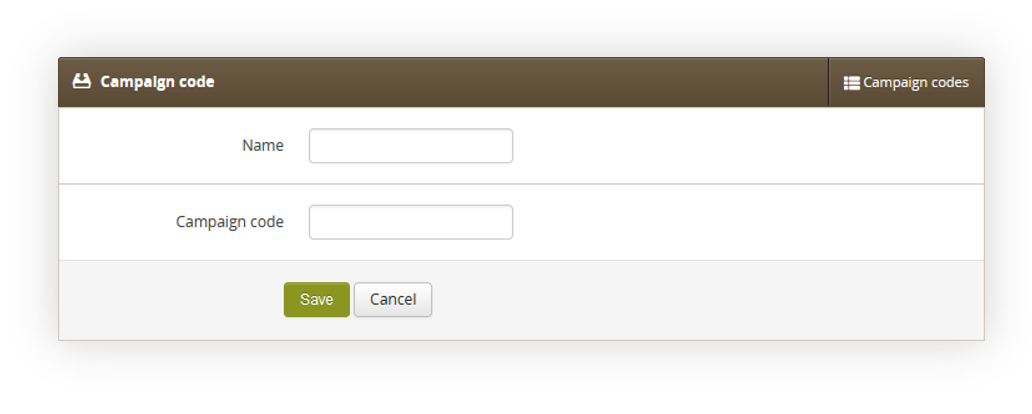 |
| *Visualization of the campaign code creation* |
| 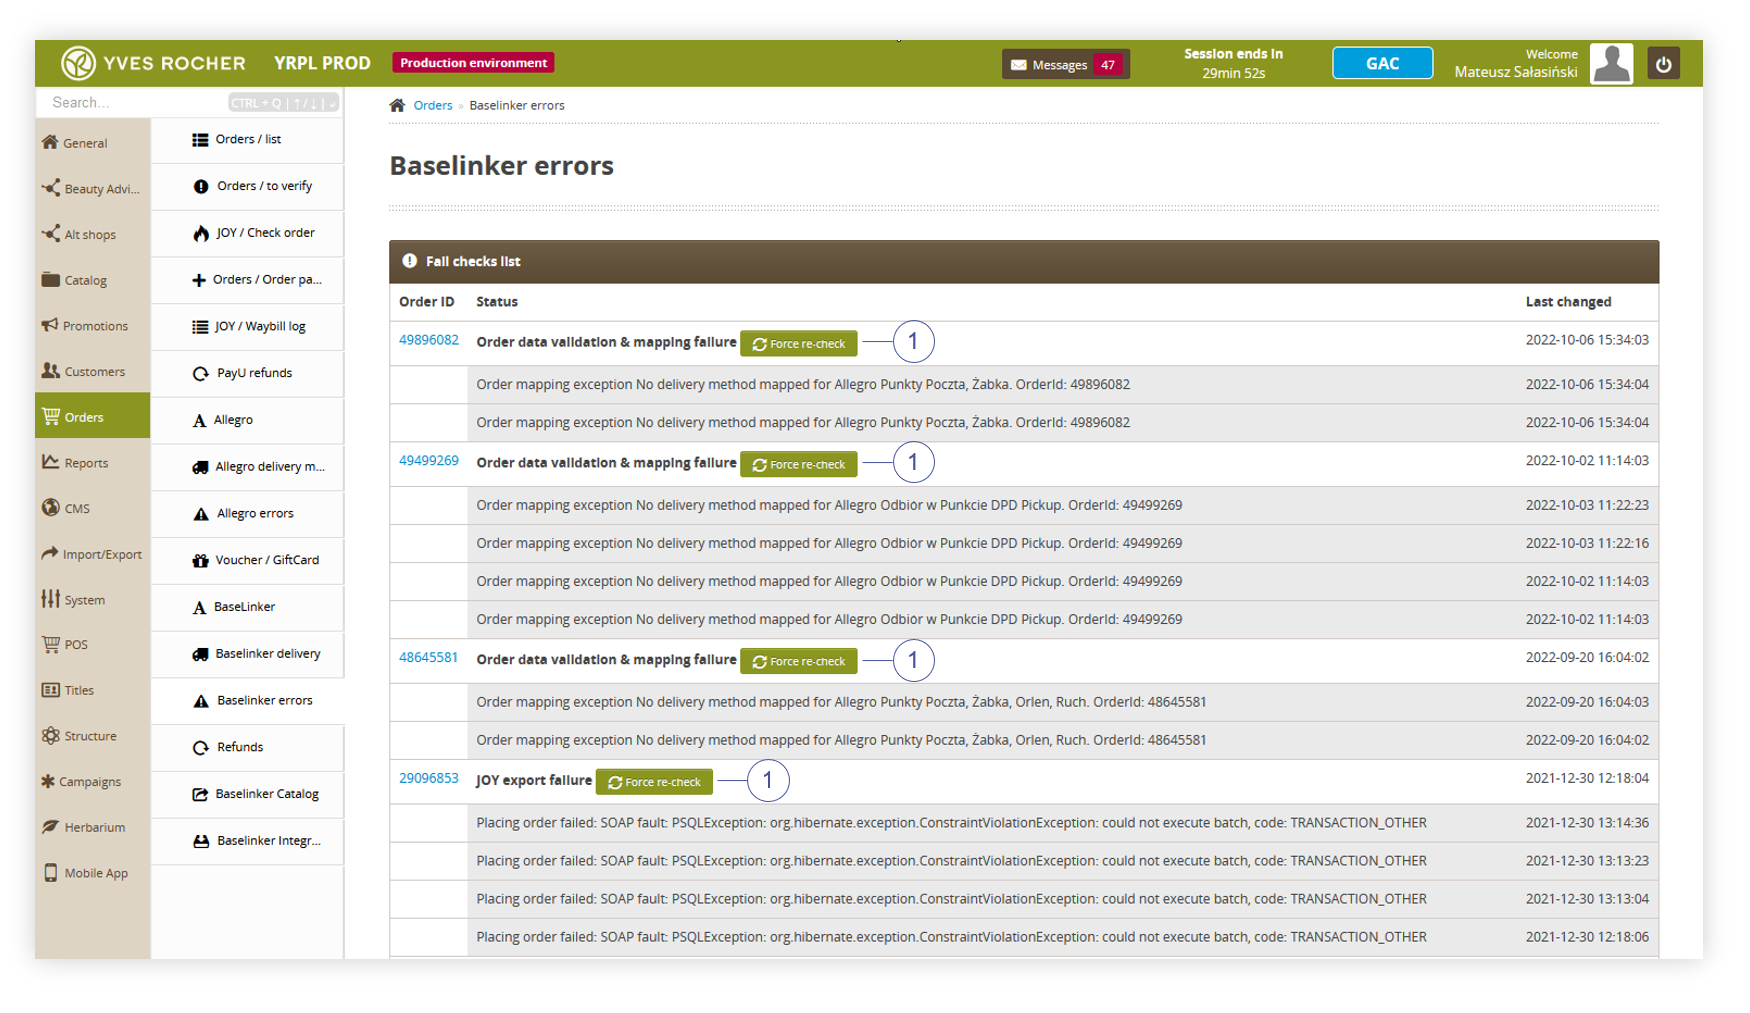 |
| *Visualization of the BaseLinker errors tab* |
|  |
| *Visualization of the Allegro orders tab* |
| 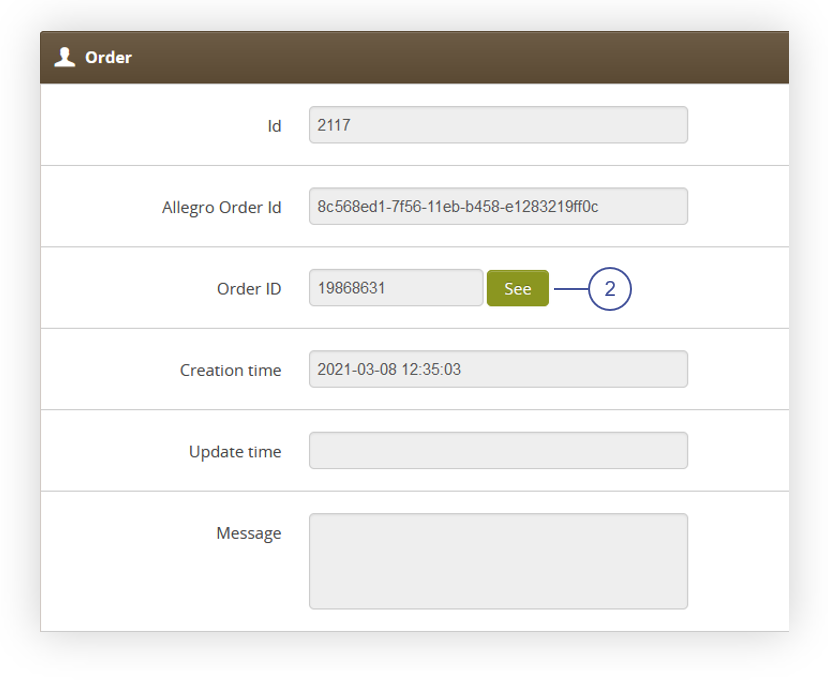 |
| *Visualization of the order tab in the order details* |
| 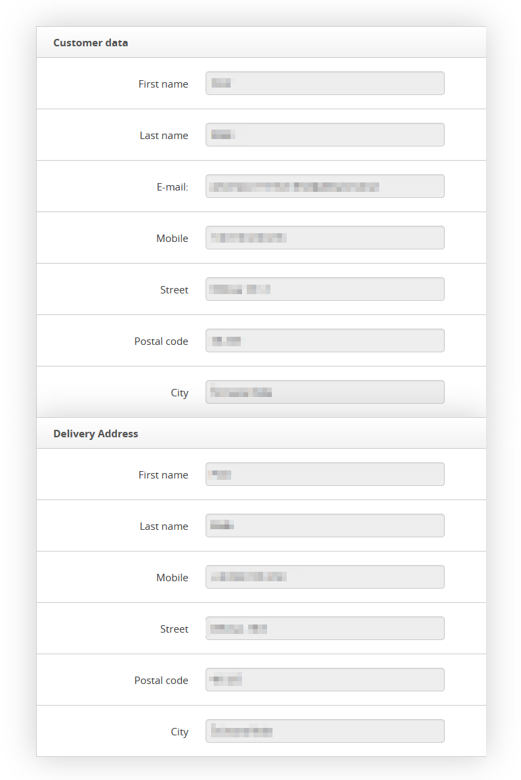 |
| *Visualization of the Customer data and Delivery address tabs in the order details* |
| 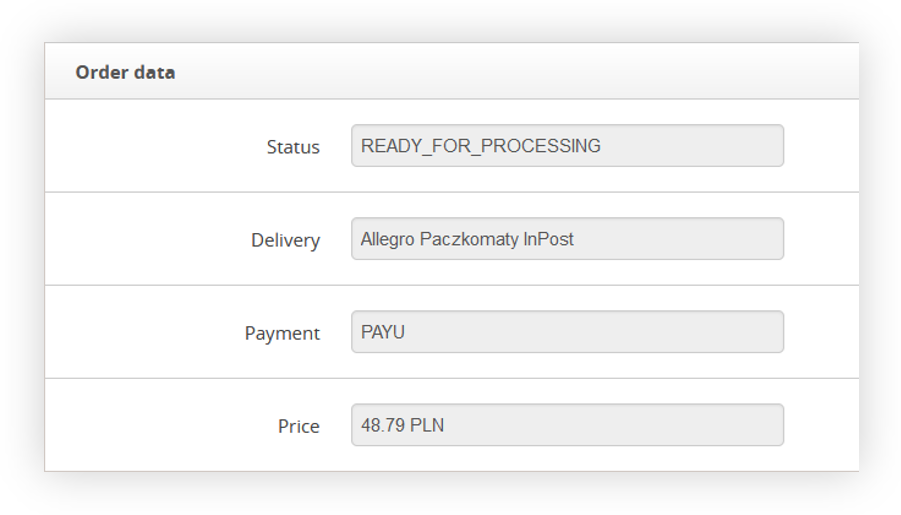 |
| *Visualization of the Order data tab in the order details* |
| 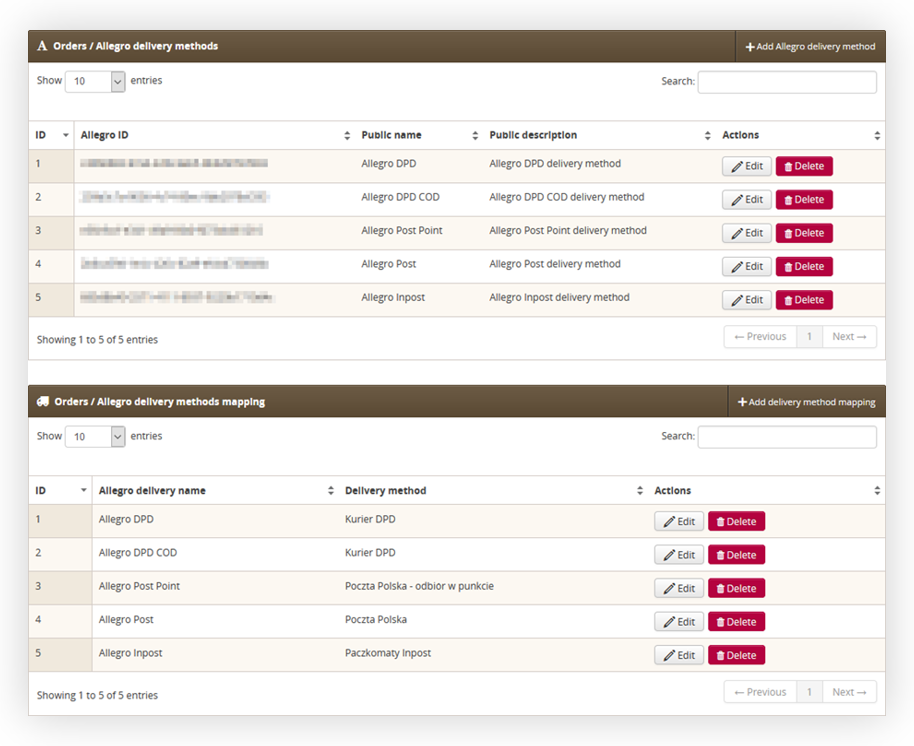 |
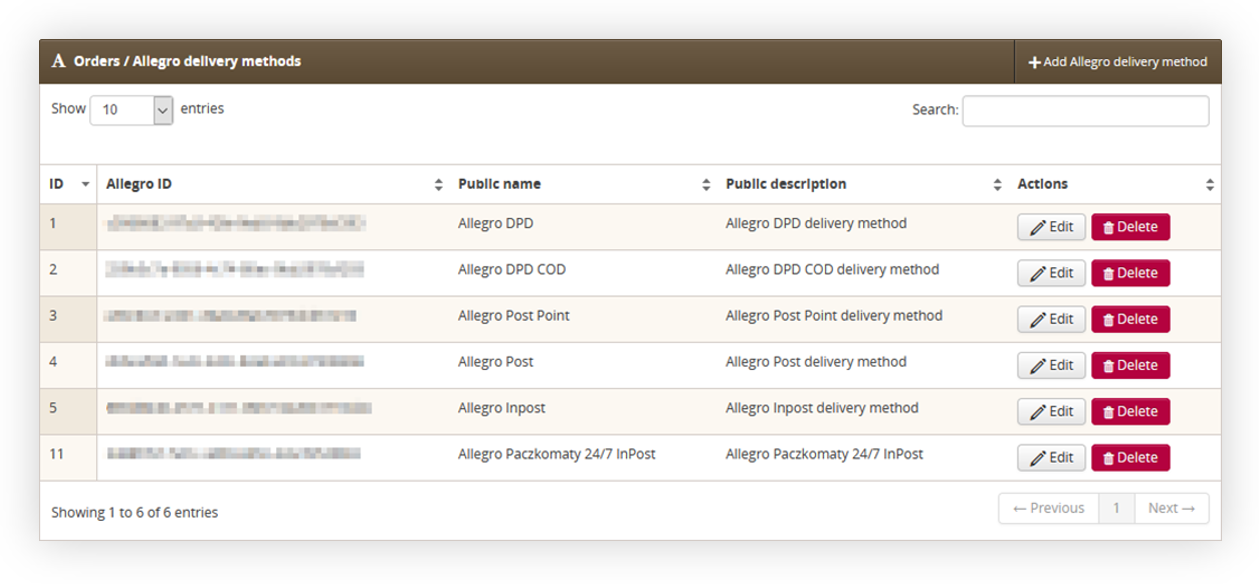
| *Visualization of the Allegro delivery method page* |
|  |
| *Visualization of the adding new Allegro delivery method* |
|  |
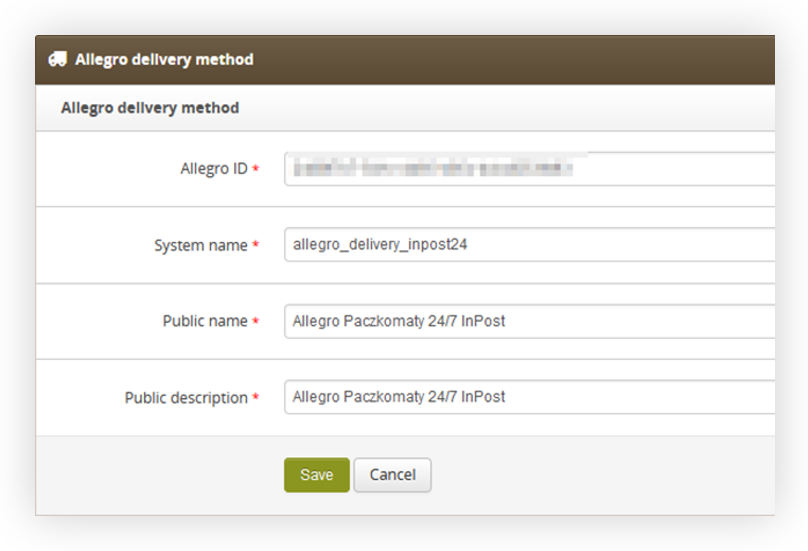
| *Visualization of the added Inpost24 delivery method* |
|  |
| *Visualization of the mapping delivery method* |
|  |
| *Visualization of the mapped delivery method* |
| 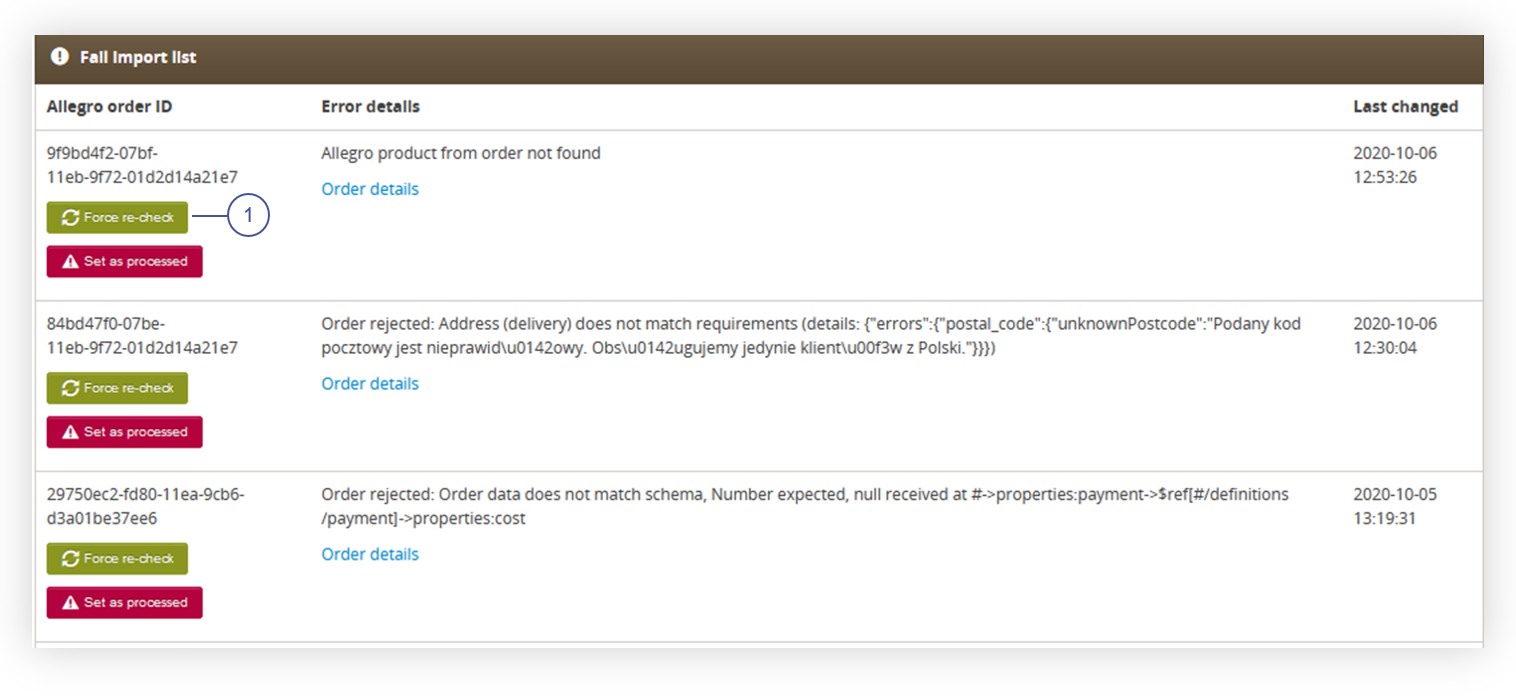 |
| *Visualization of the Allegro errors tab* |
| 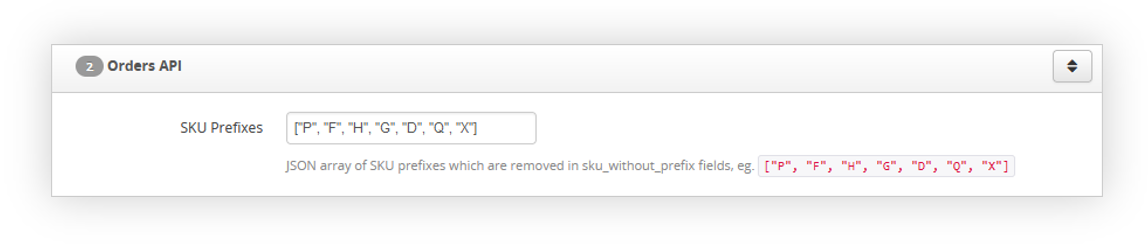 |
| *Visualization of the Orders API tab* |
| 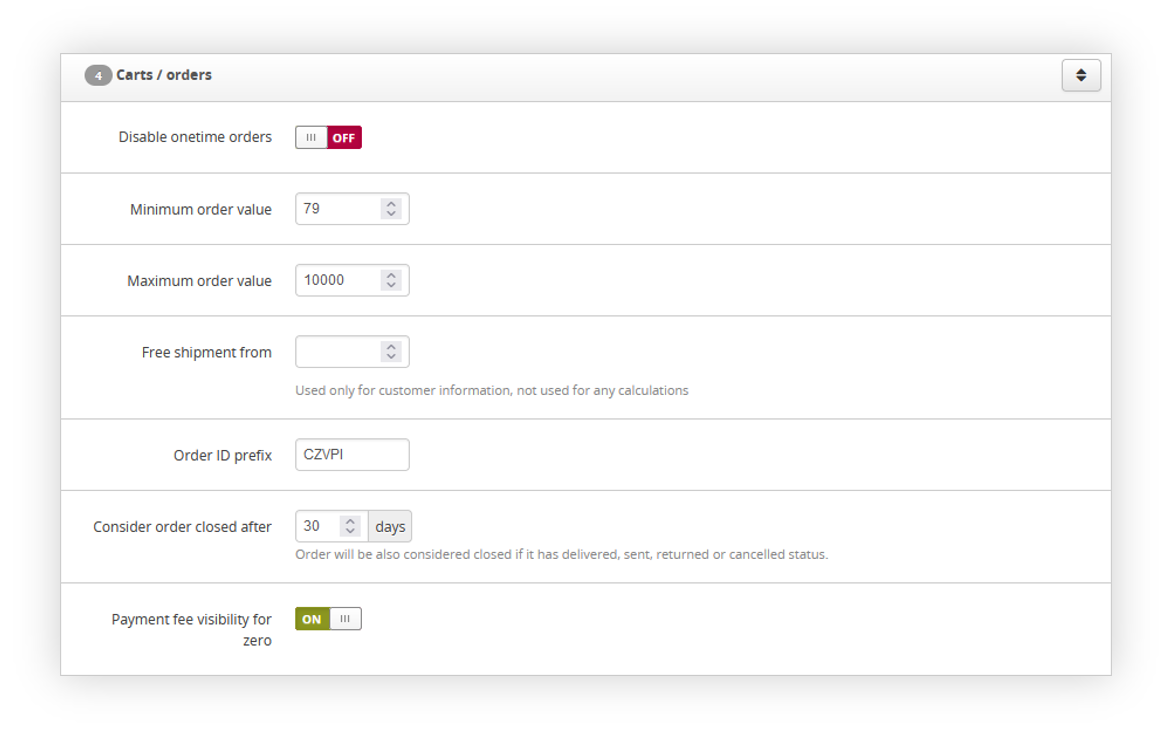 |
| *Visualization of the Cart / orders tab* |
| 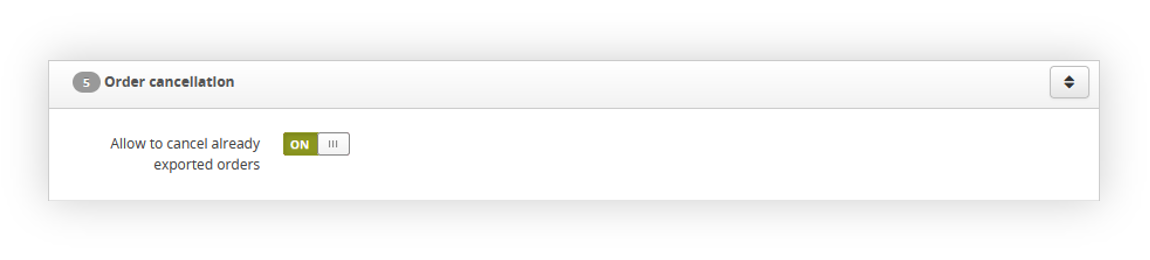 |
| *Visualization of the Order cancellation tab* |
| 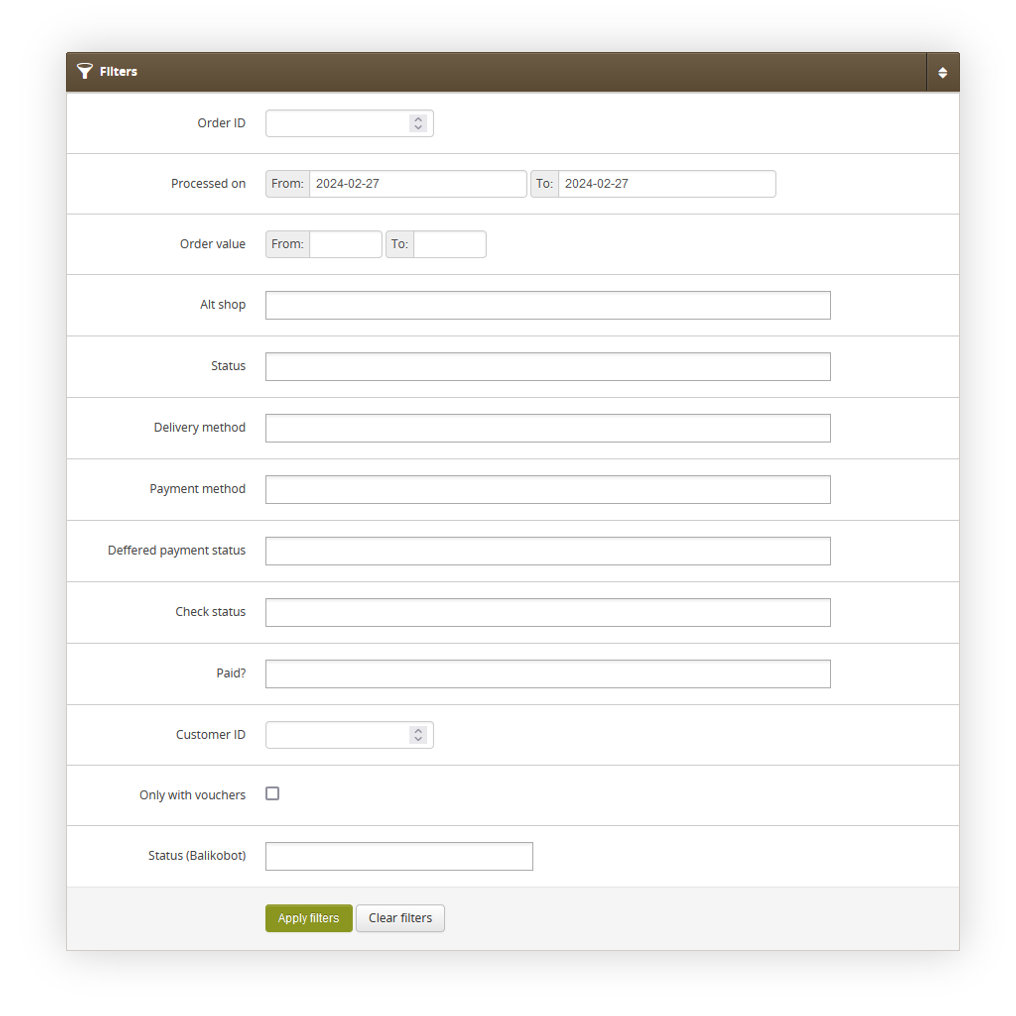 |
| *Visualization of the filter tab in orders / list* |
| 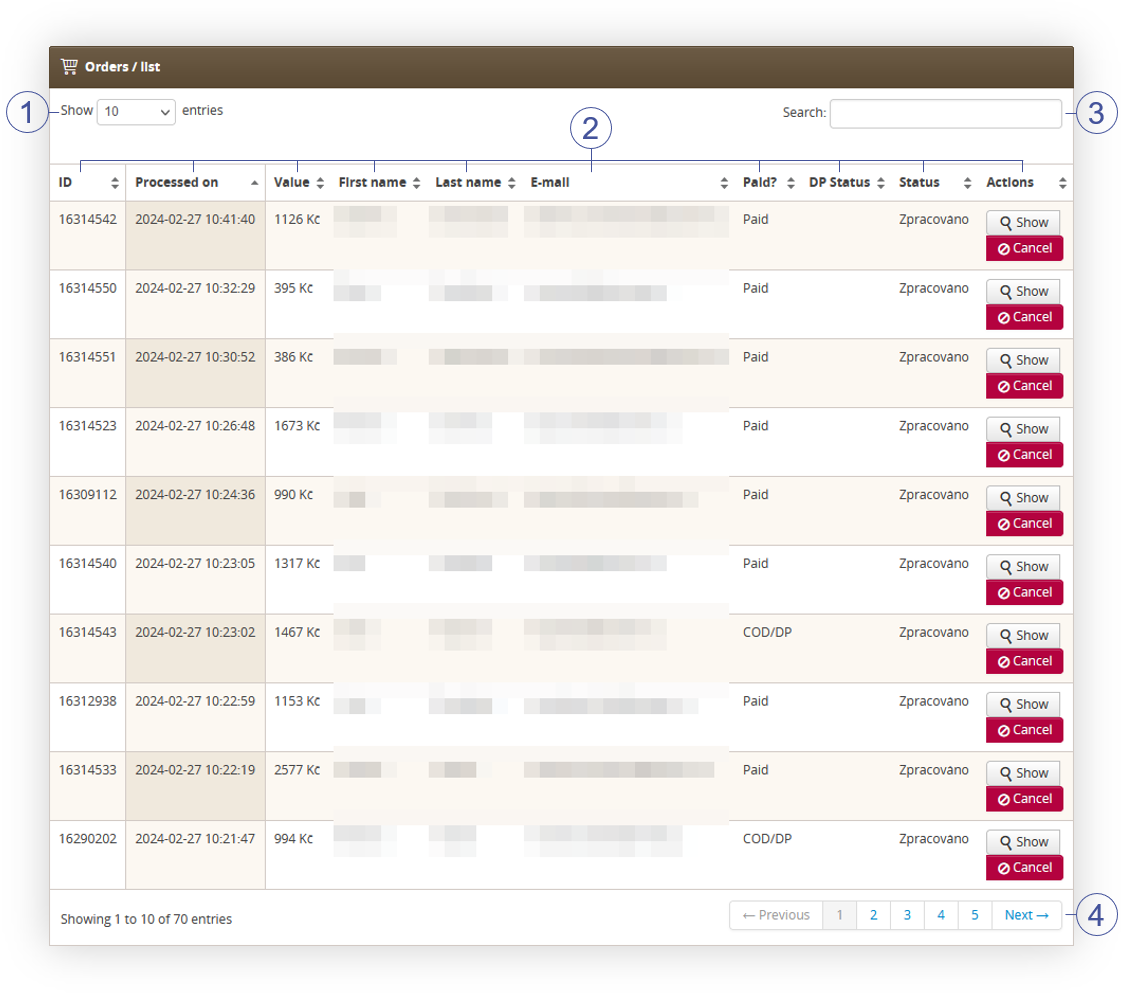 |
| *Visualization of the orders / list table* |
| 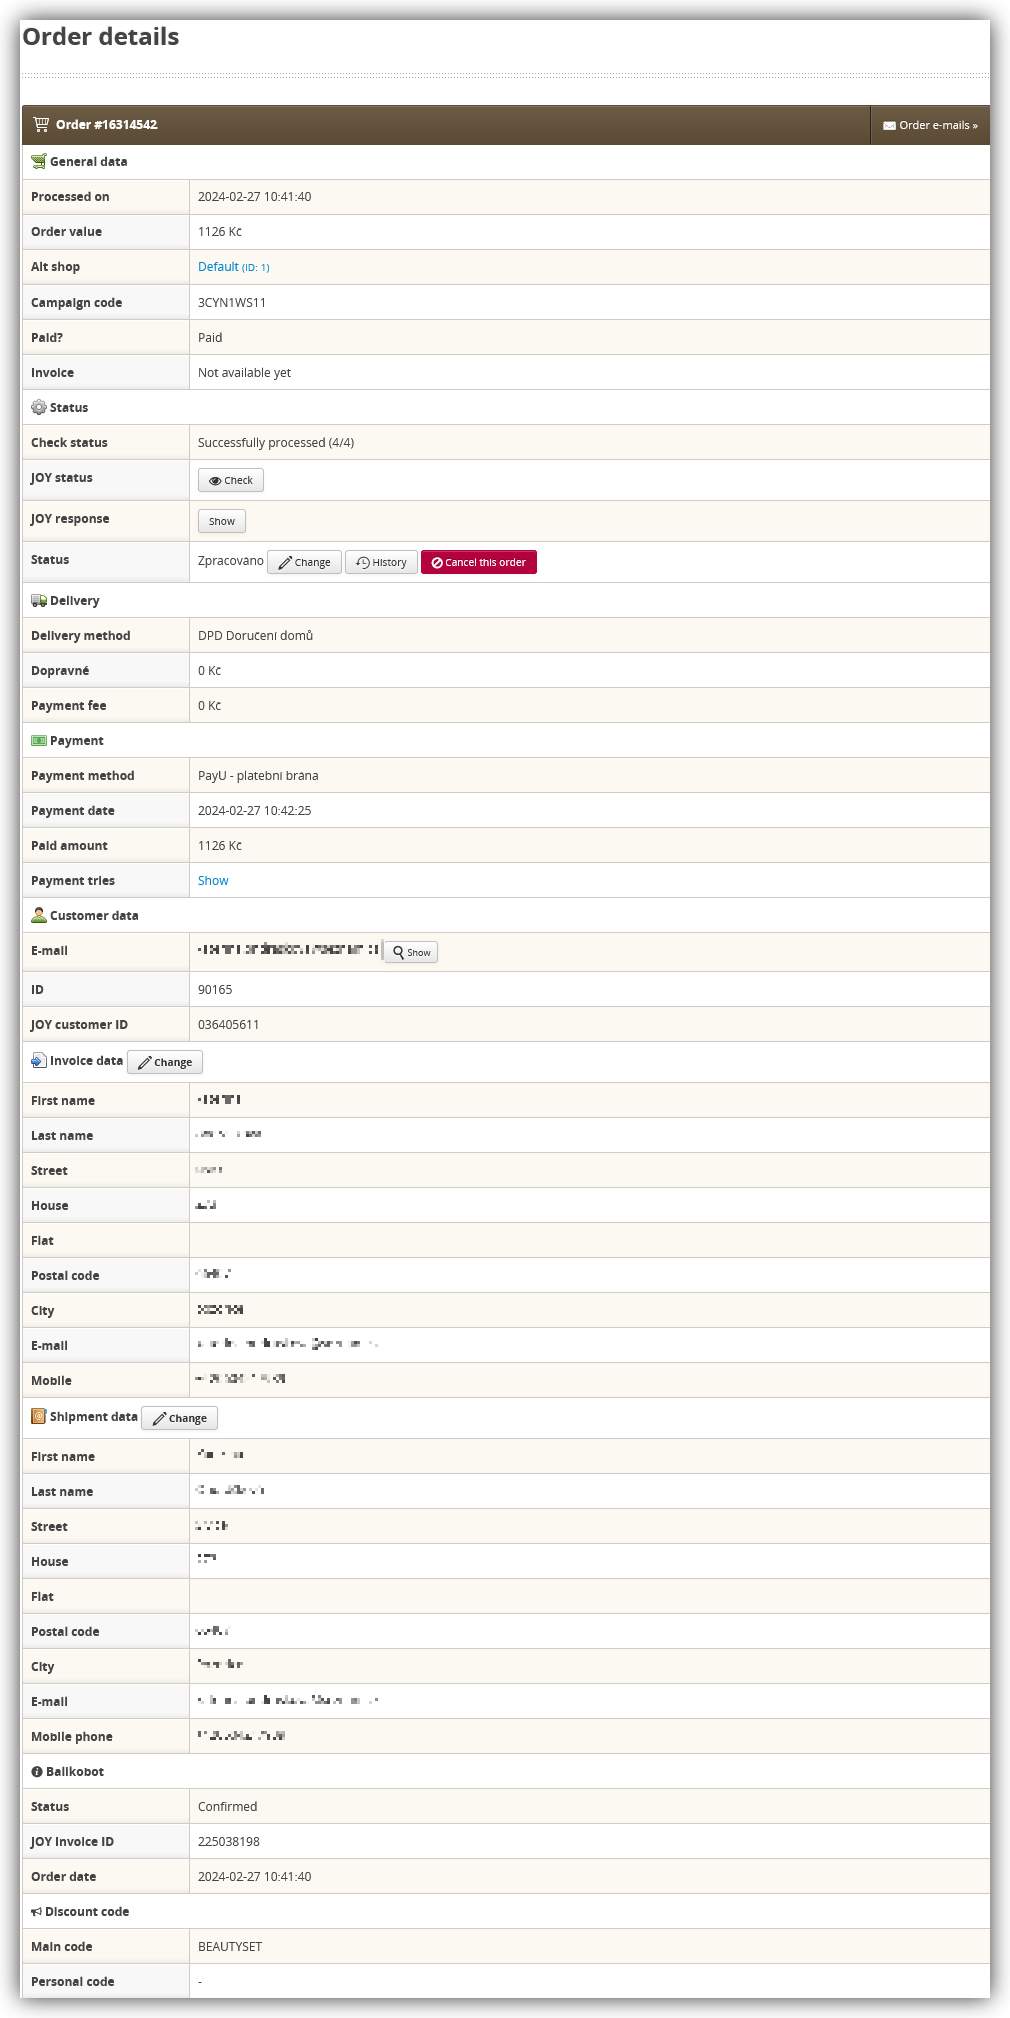 |
| *Visualization of the order details* |
| 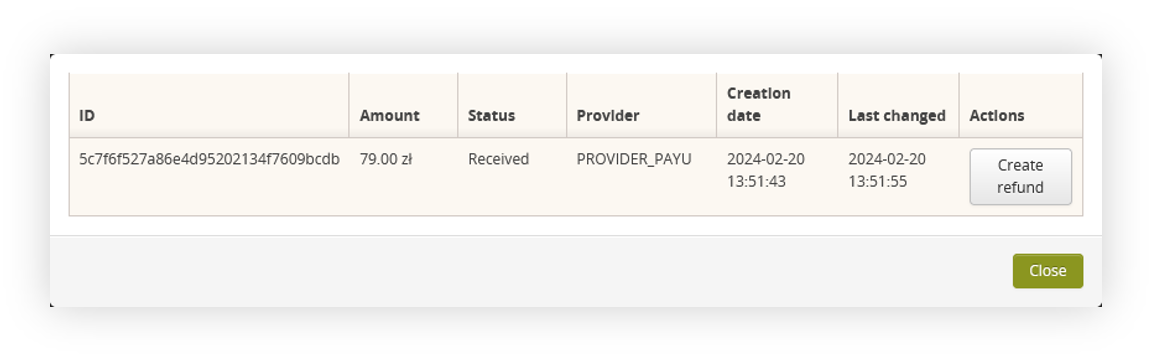 |
| *Visualization of the payment tries* |
| 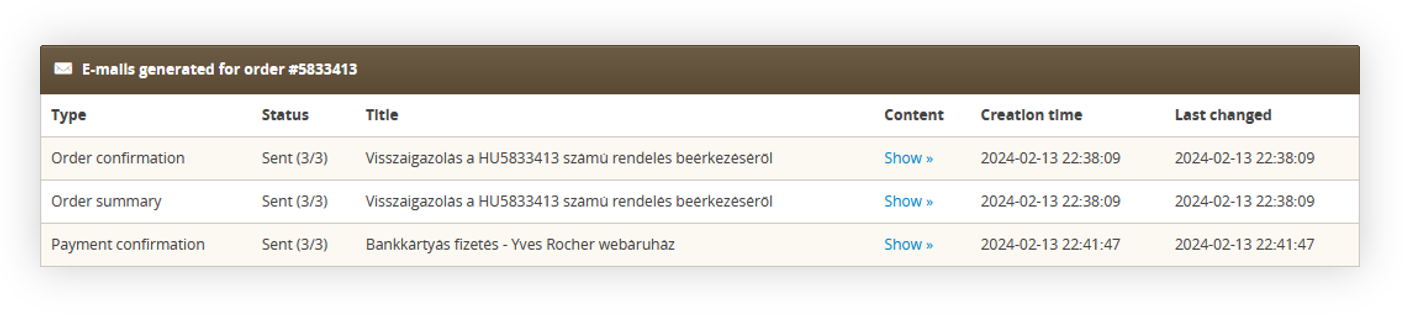 |
| *Visualization of the generated e-mails for a selected order* |
| 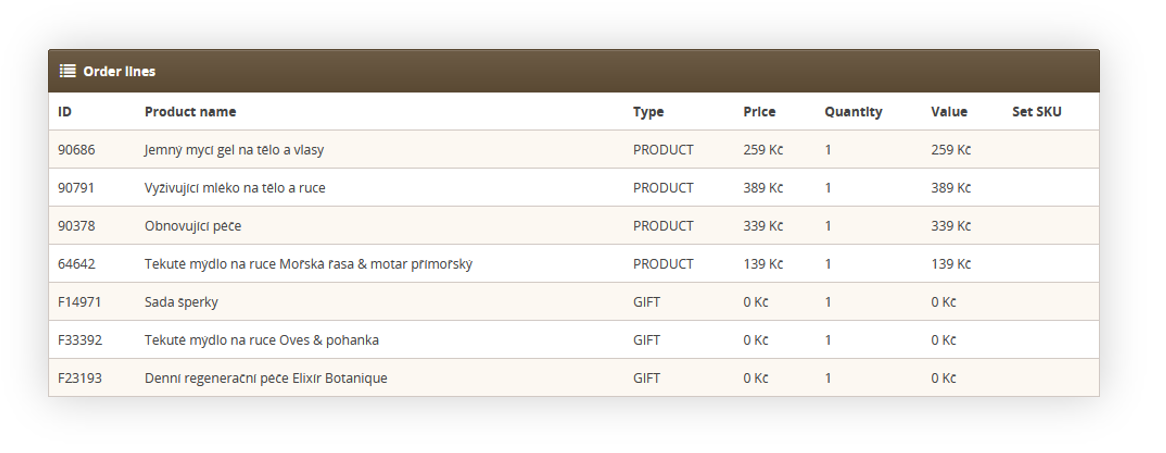 |
| *Visualization of the order lines table* |
| 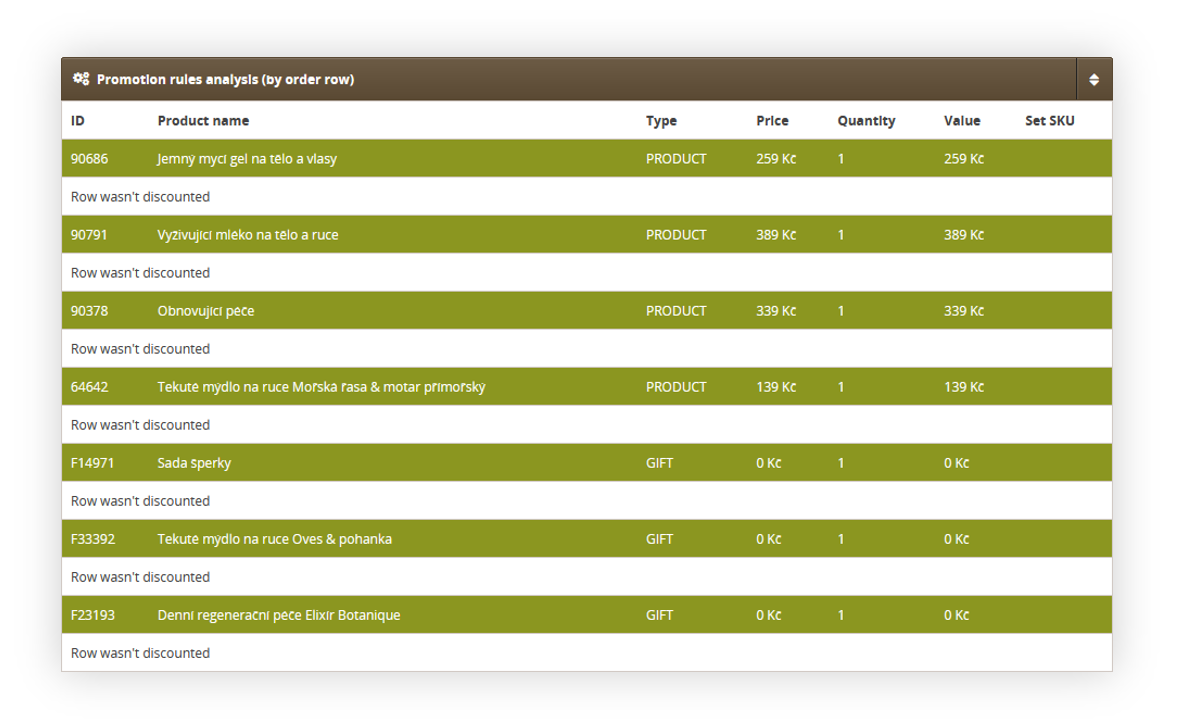 |
| *Visualization of the Promotion rules analysis (by order row) table* |
| 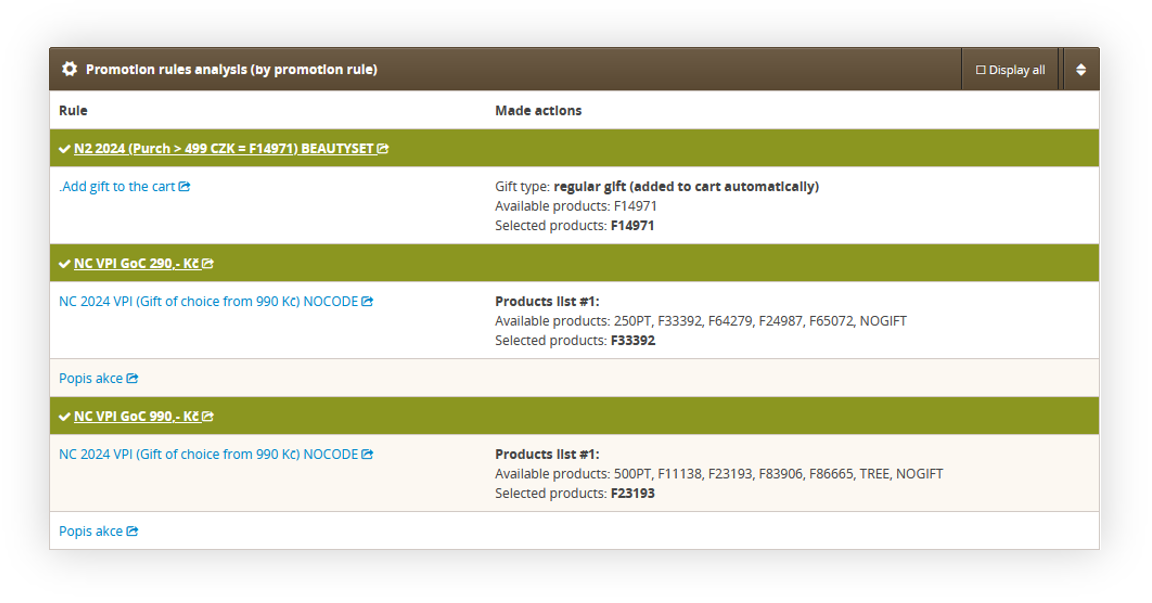 |
| *Visualization of the Promotion rules analysis (by promotion rule) table* |
| 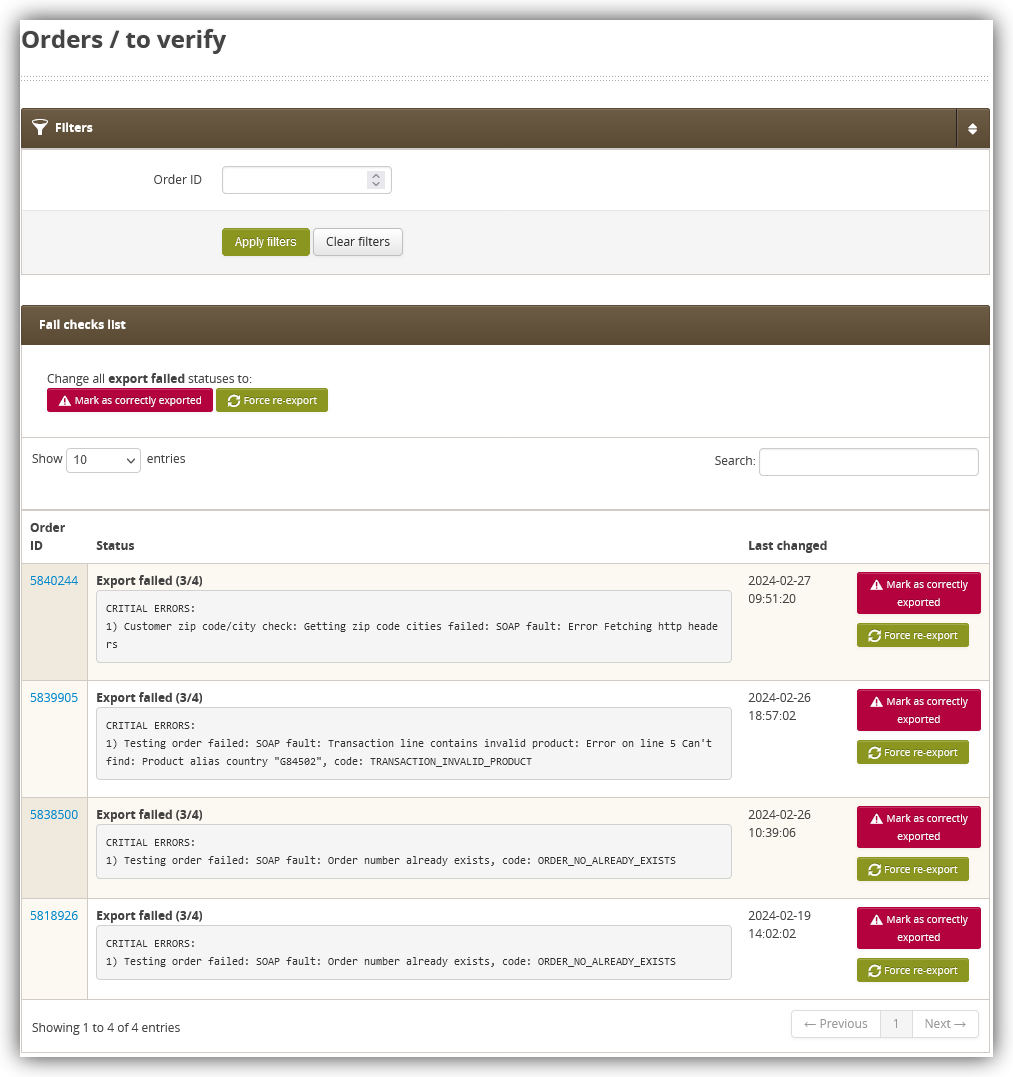 |
| *Visualization of the orders to verify* |
| 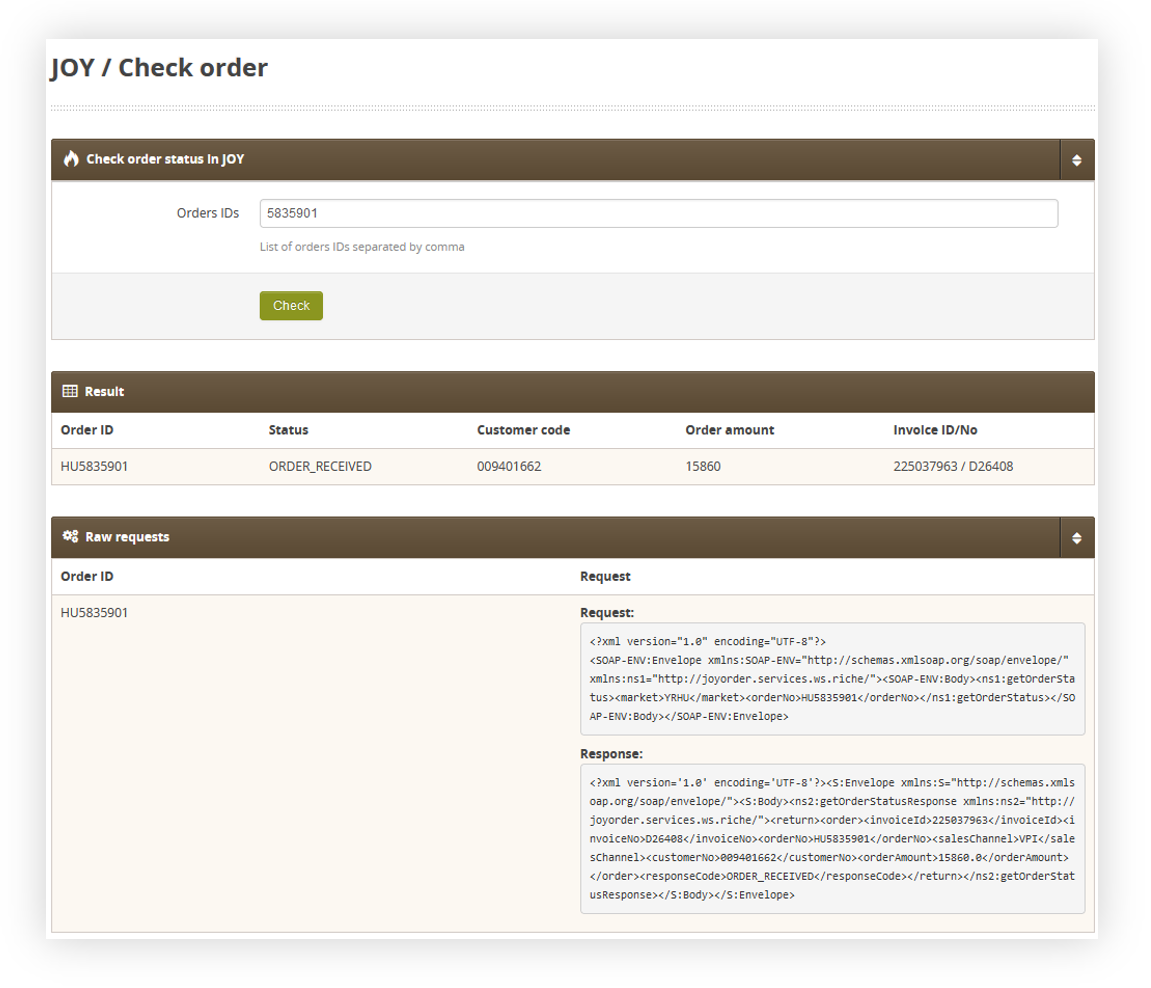 |
| *Visualization of the joy check order* |
| 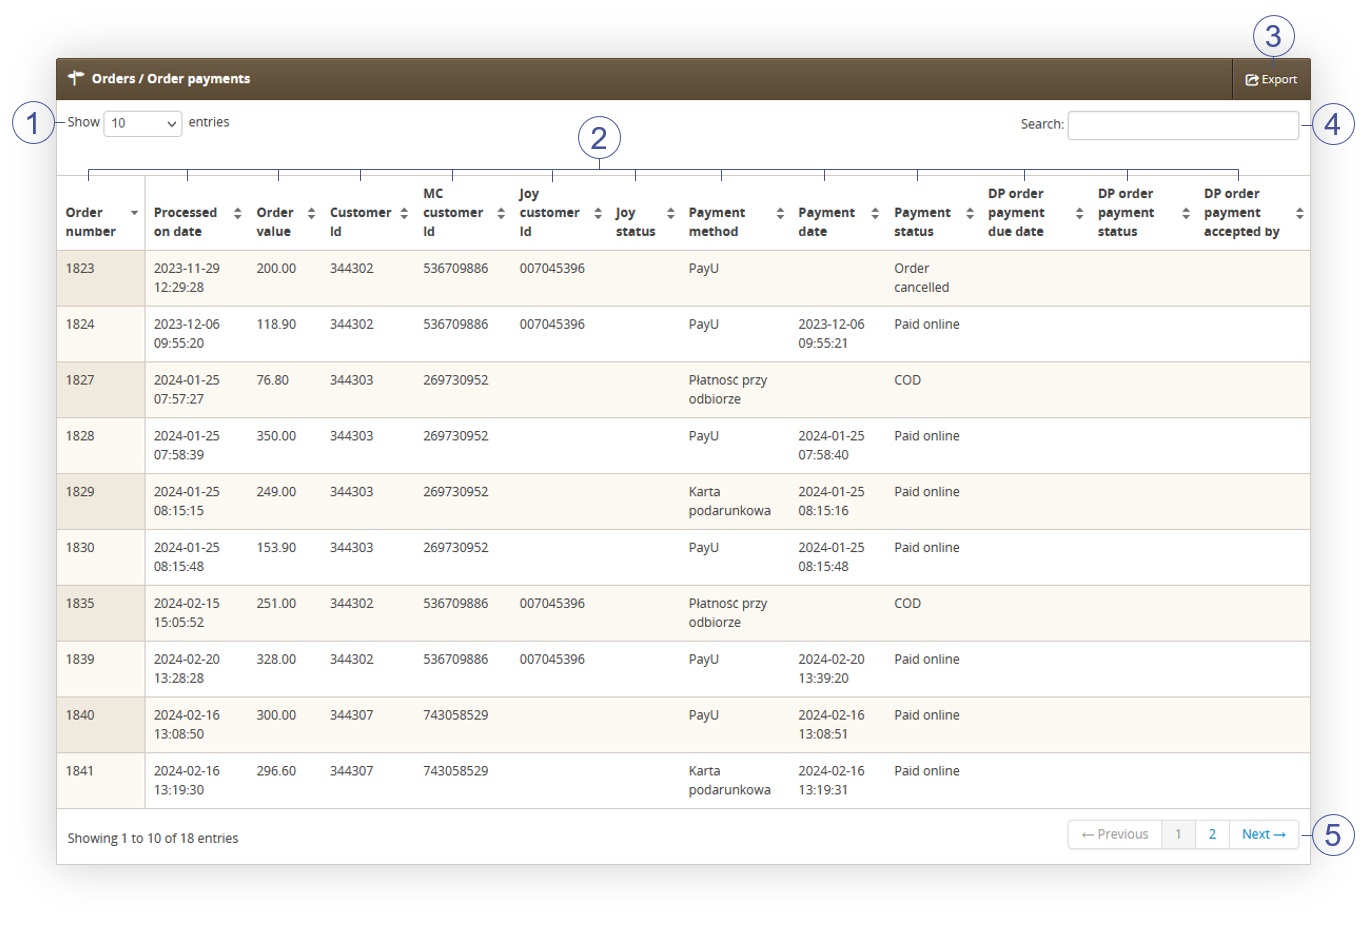 |
| *Visualization of the Order payments tab* |
| 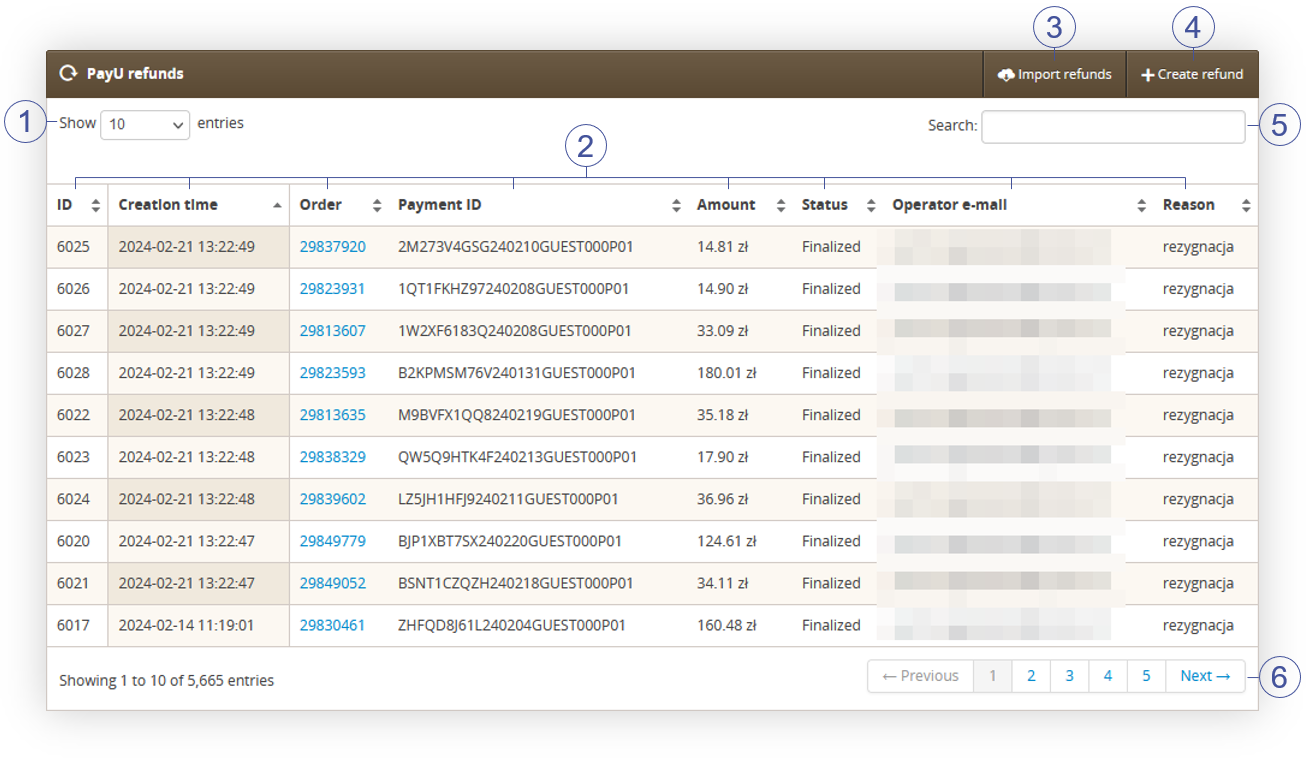 |
| *Visualization of the PayU refunds page* |
| 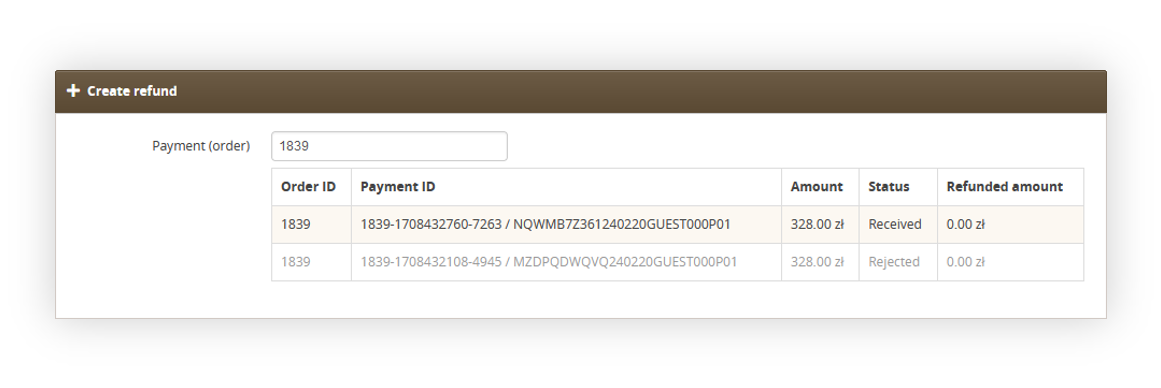 |
| *Visualization of the refund creation* |
| 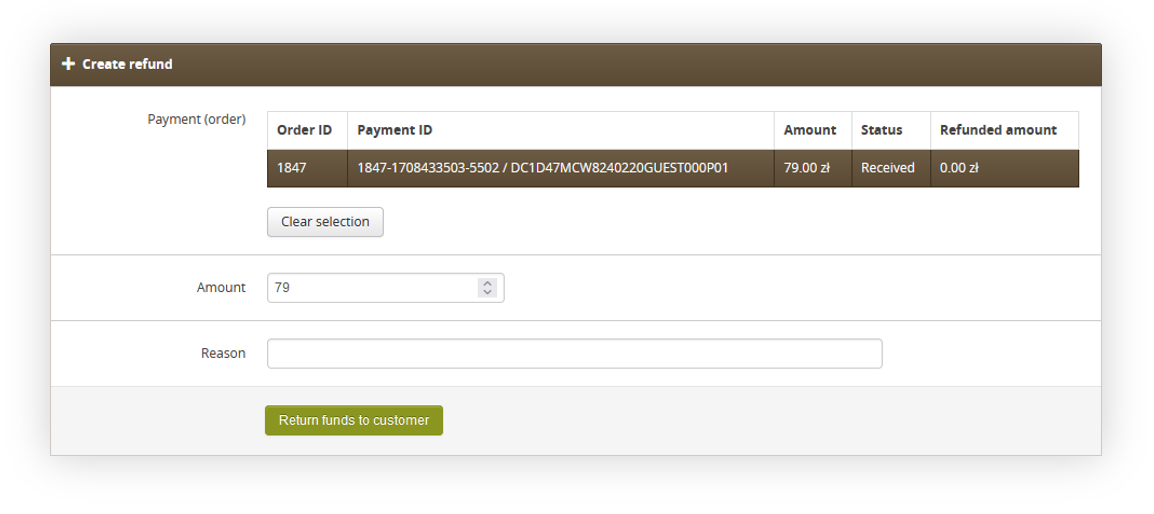 |
| *Visualization of the selection of refund amount* |
| 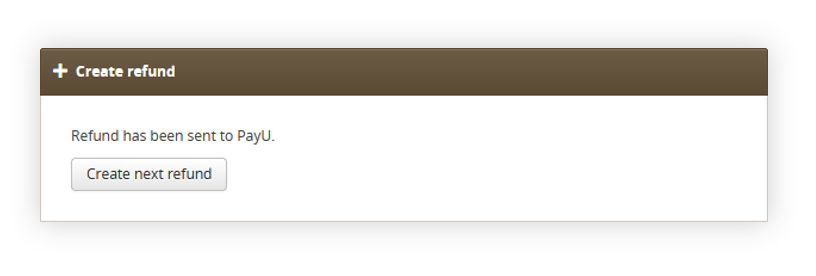 |
| *Visualization of the created refund* |
| 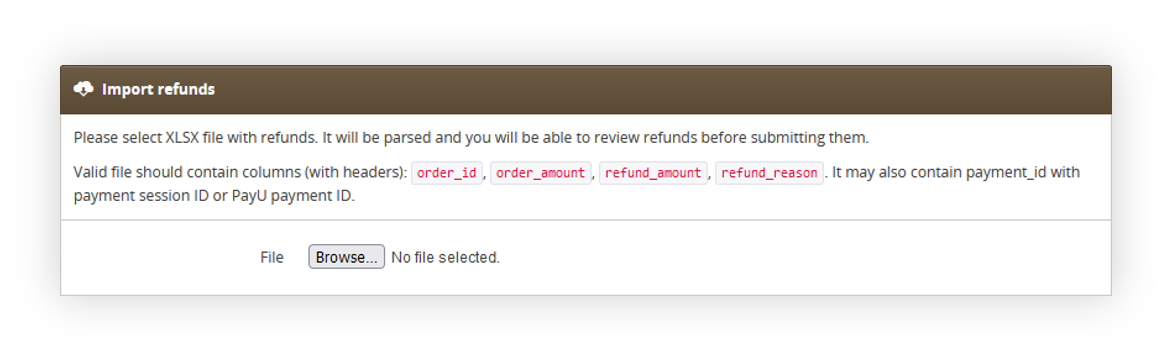 |
| *Visualization of the refund import* |
| 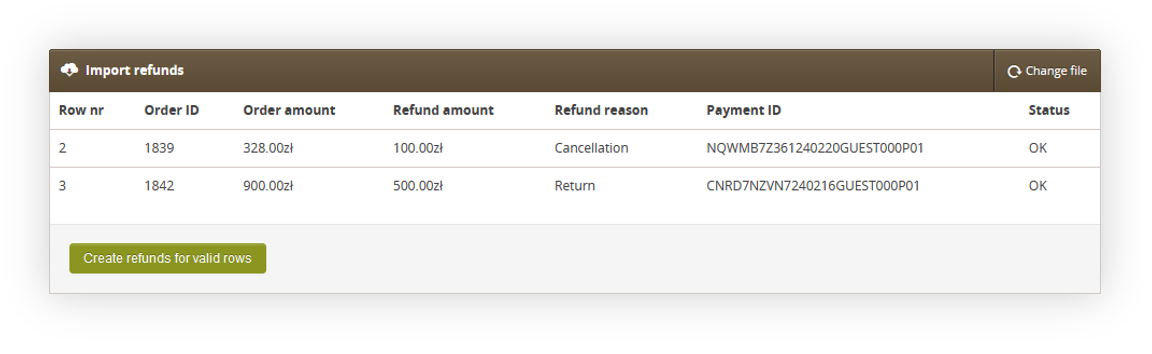 |
| *Visualization of the refund import* |
| 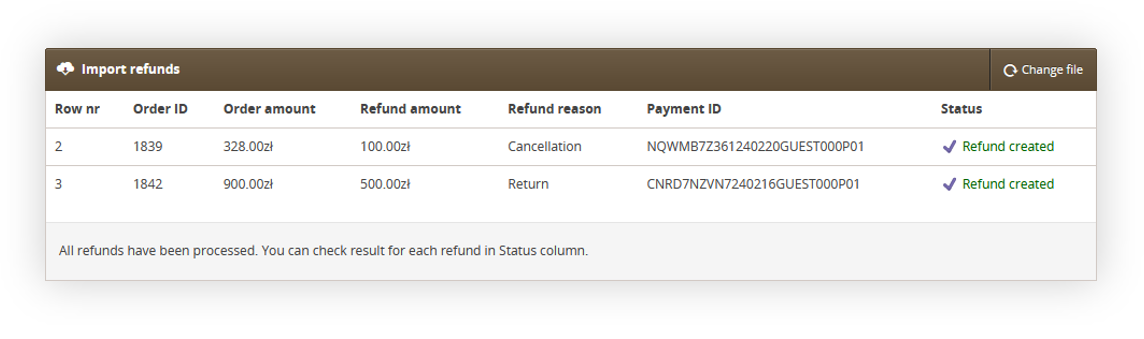 |
| *Visualization of the refund import* |
| 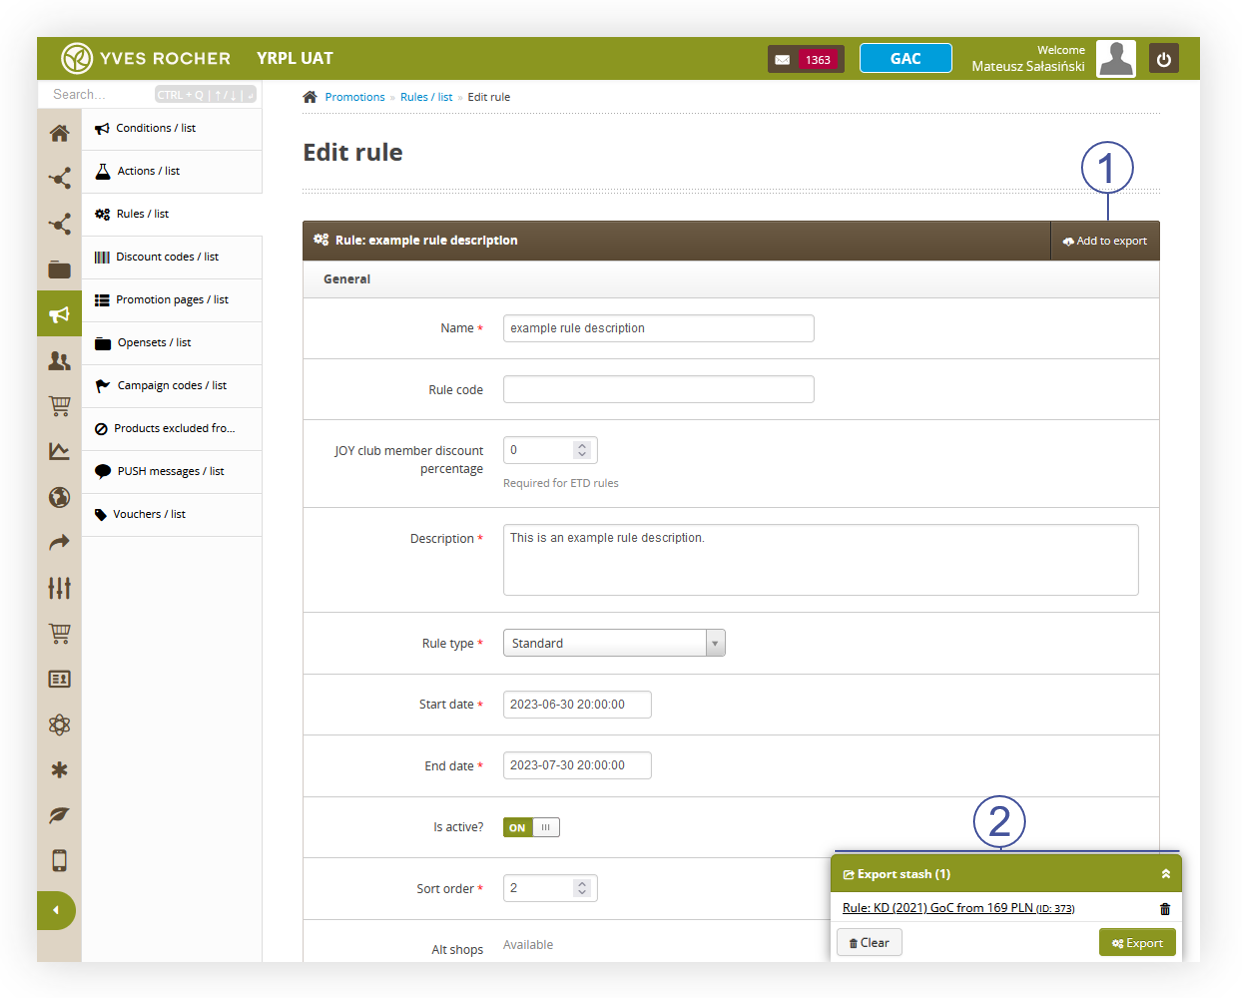 |
| *Visualization of the export button in the rule edition view* |
| 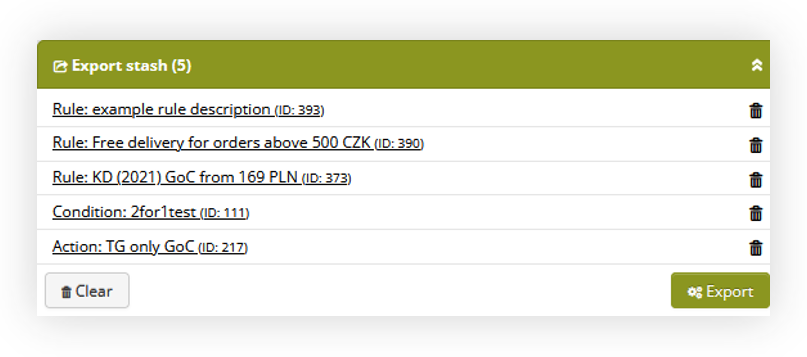 |
| *Visualization of the export stash* |
| 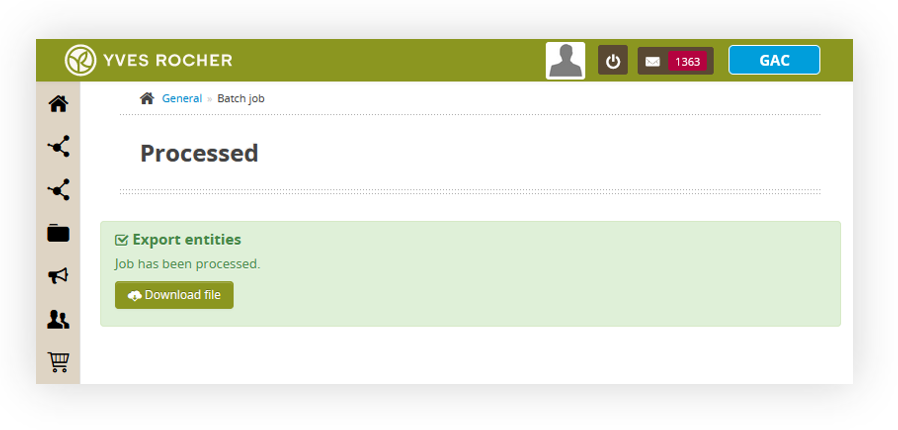 |
| *Visualization of the entities export* |
| 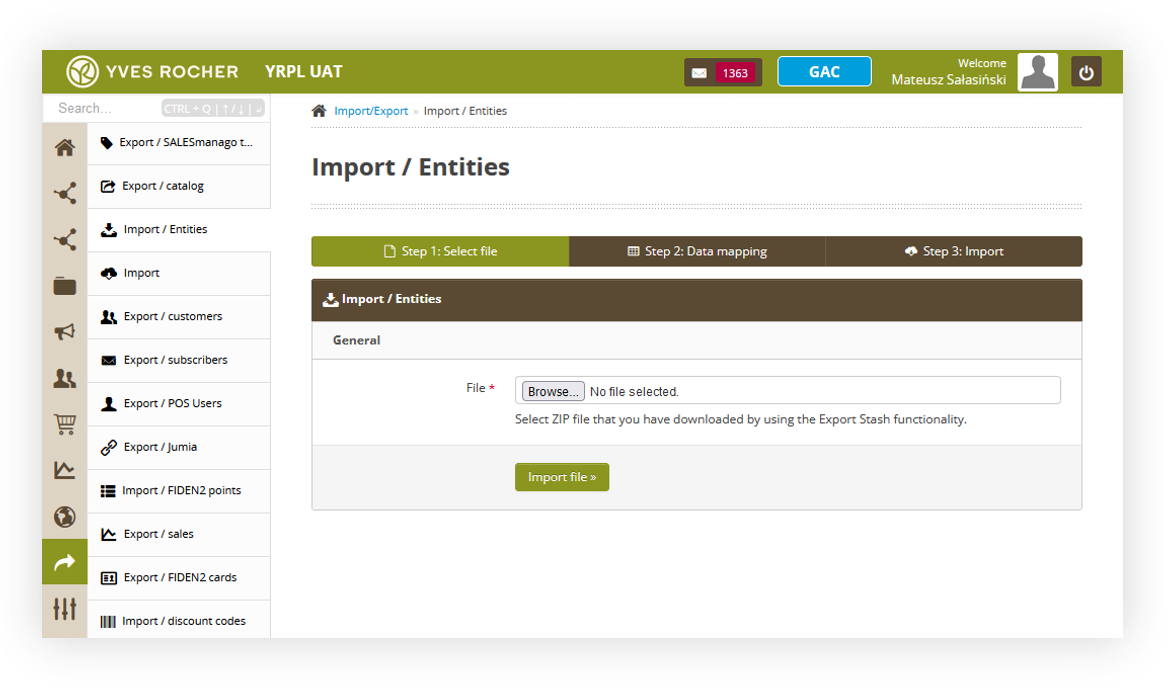 |
| *Visualization of the import / entities tab* |
| 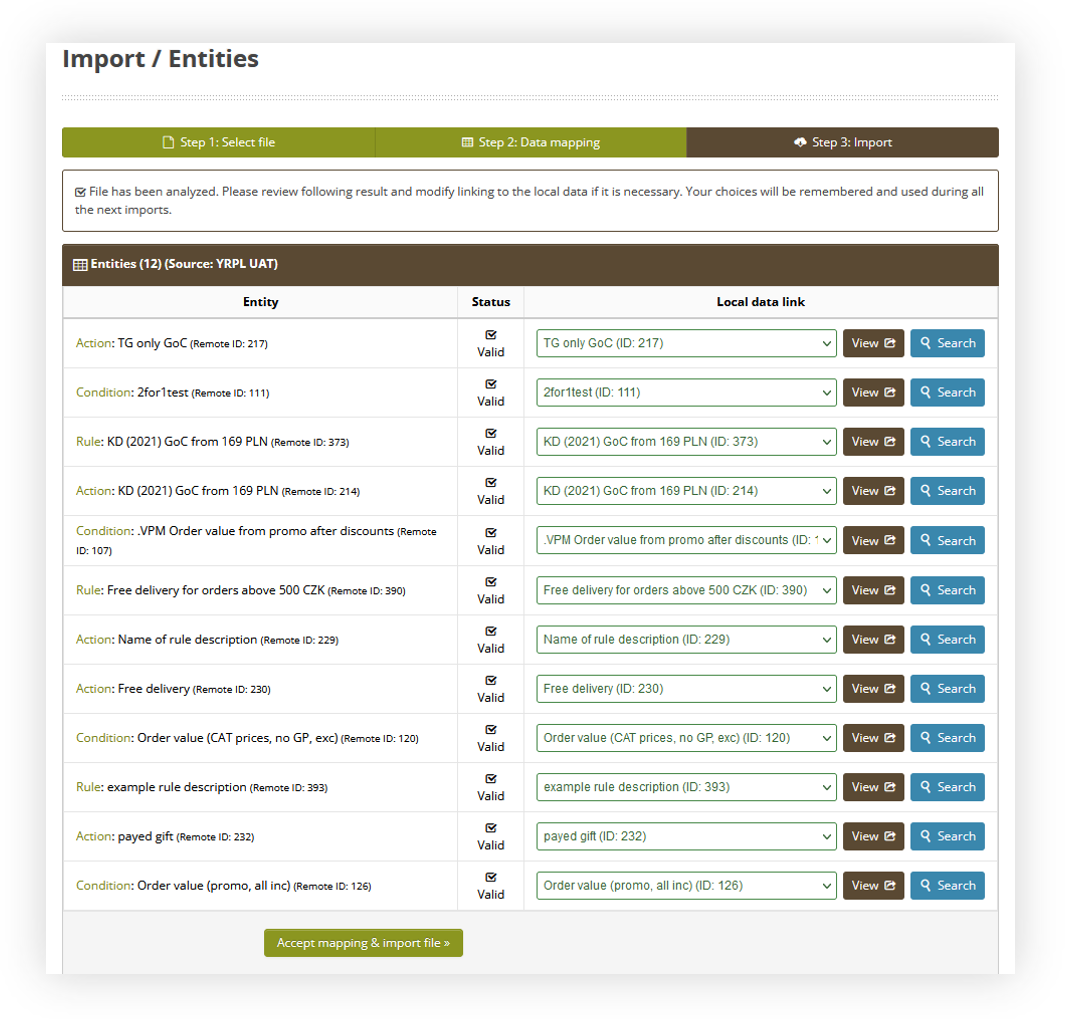 |
| *Visualization of the data mapping step* |
| 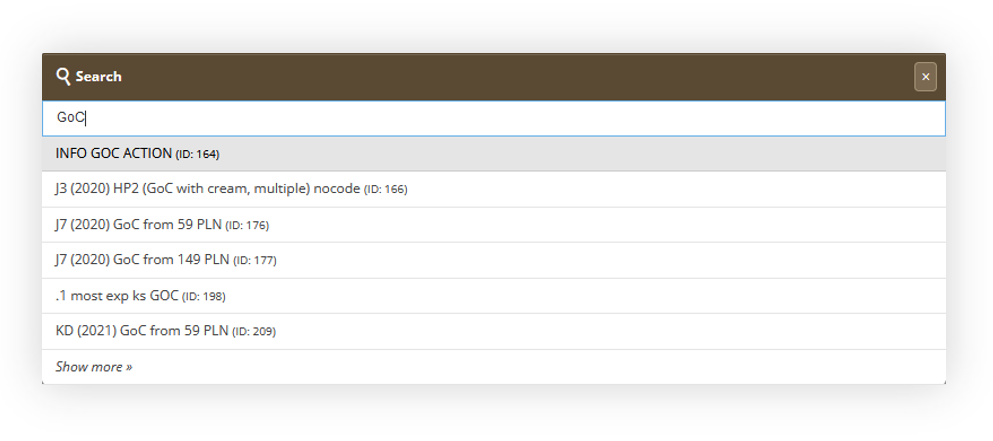 |
| *Visualization of the search functionality* |
| 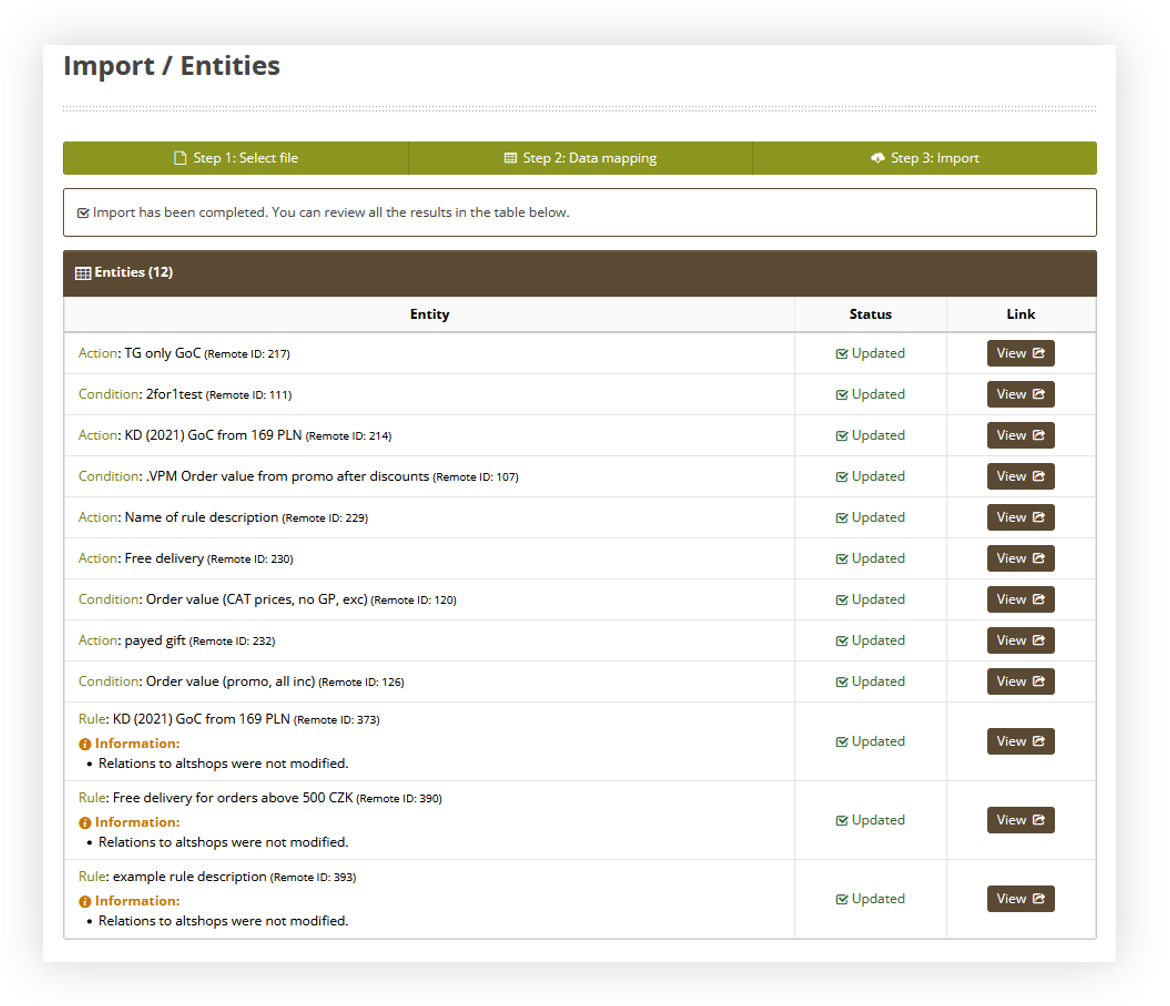 |
| *Visualization of the import step* |
| 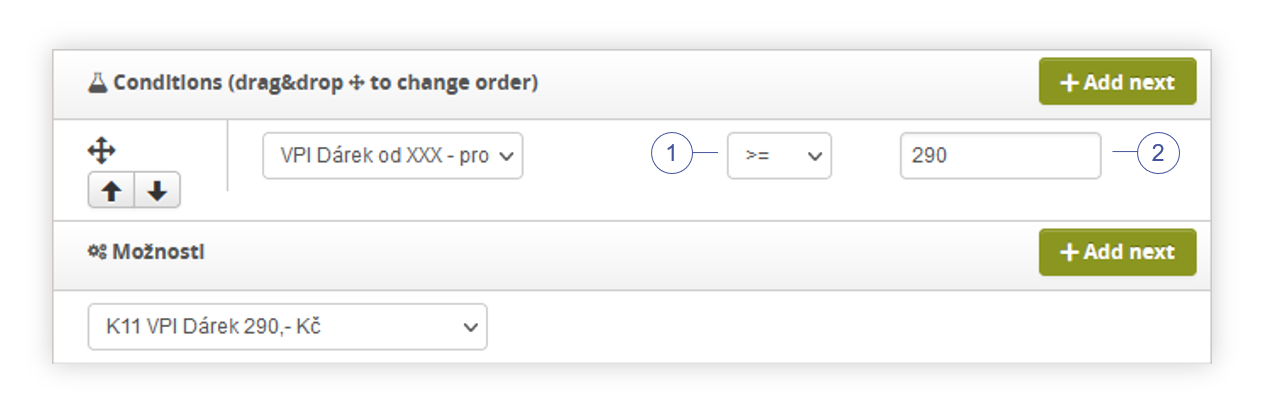 |
| *Visualization of the rule configuration of the promotion.* |
|  |
| *Visualization of the gift of choice promotion on the website* |
|  |
| *Visualization of the rule configuration of the promotion.* |
|  |
| *Visualization of the applied promotion* |
|  |
| *Visualization of the rule configuration of the promotion.* |
|  |
| *Visualization of the applied promotion* |
|  |
| *Visualization of the rule configuration of the promotion.* |
| 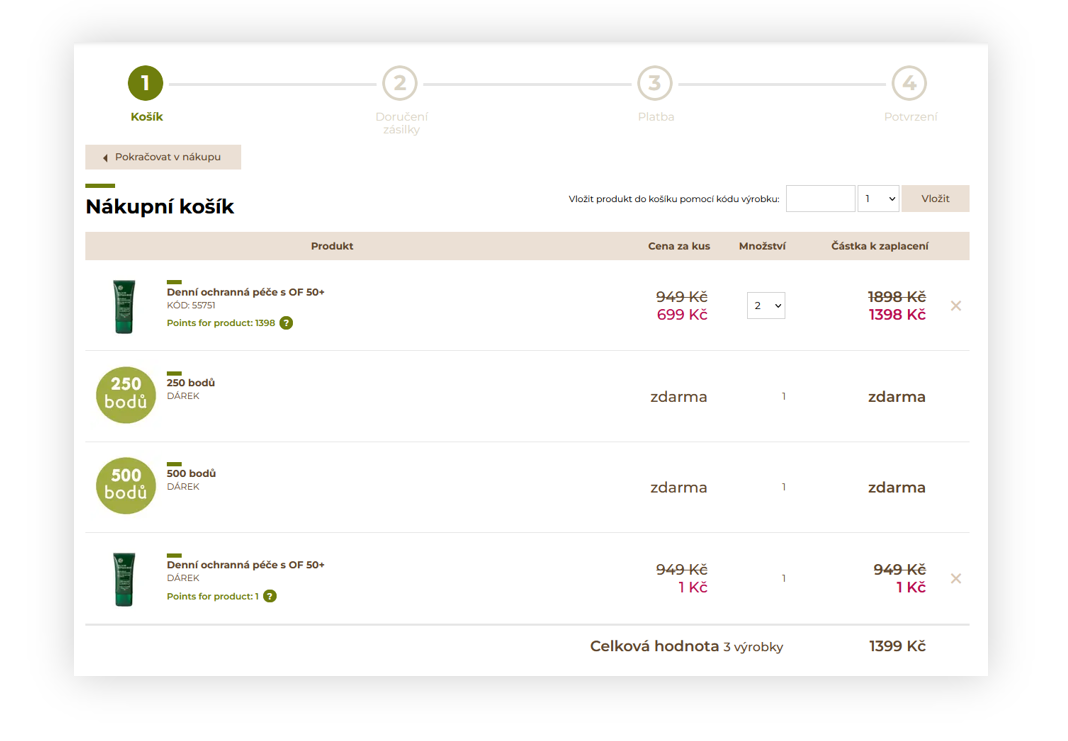 |
| *Visualization of the applied promotion* |
| 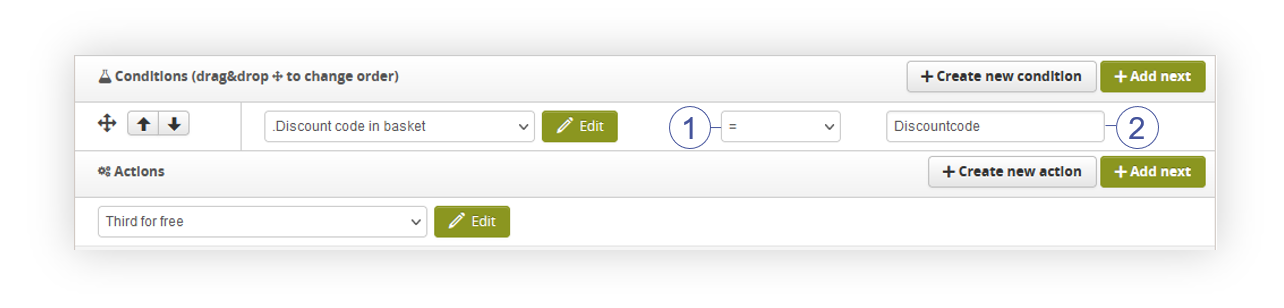 |
| *Visualization of the rule configuration of the promotion.* |
| 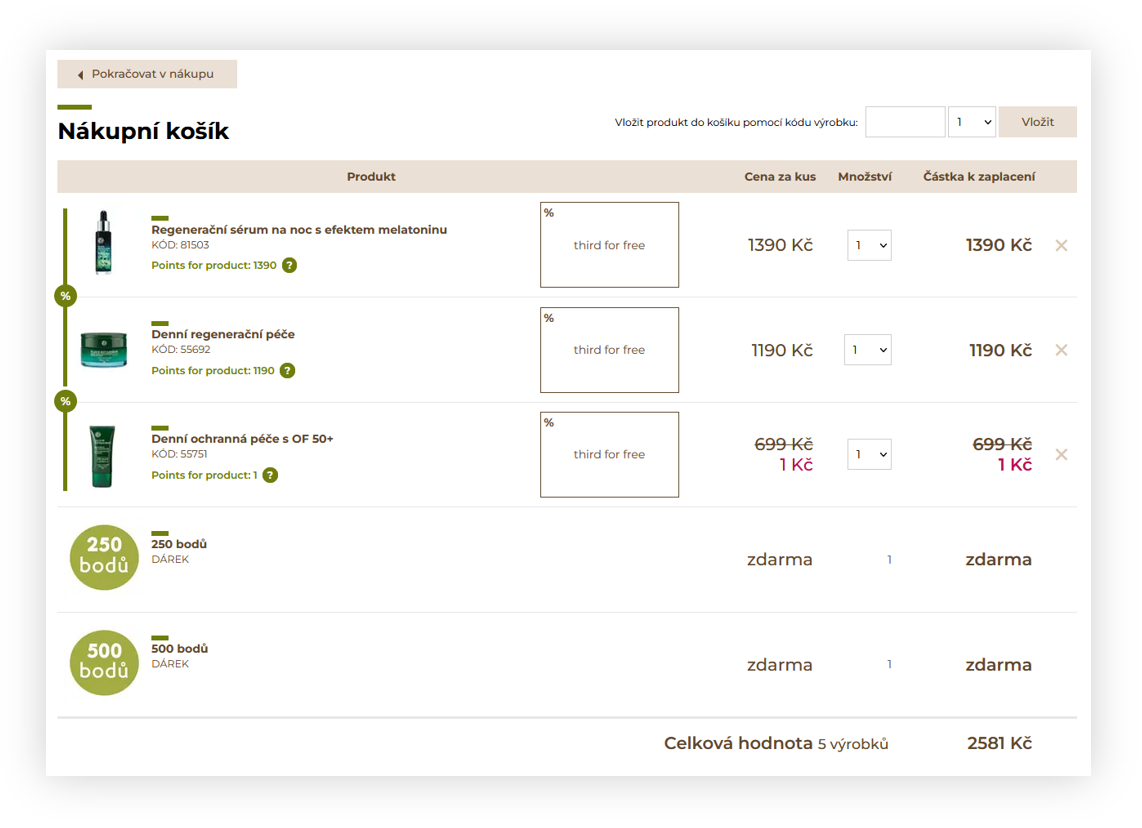 |
| *Visualization of the applied promotion* |
| 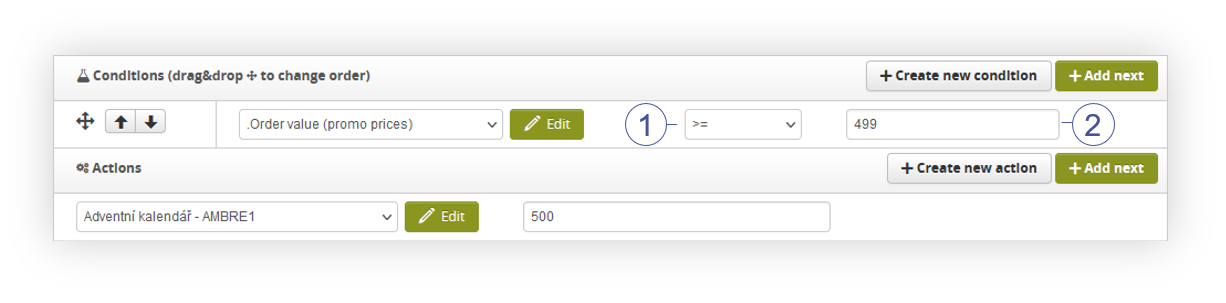 |
| *Visualization of the rule configuration of the promotion.* |
| 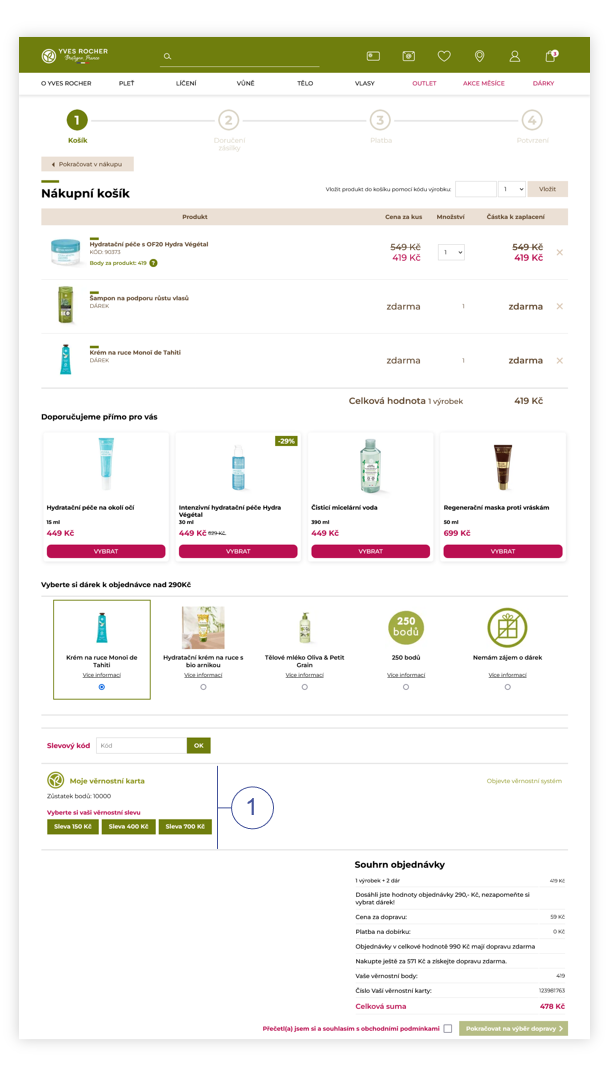 |
| *Visualization of the FIDEN2 location in the cart (desktop)* |
| 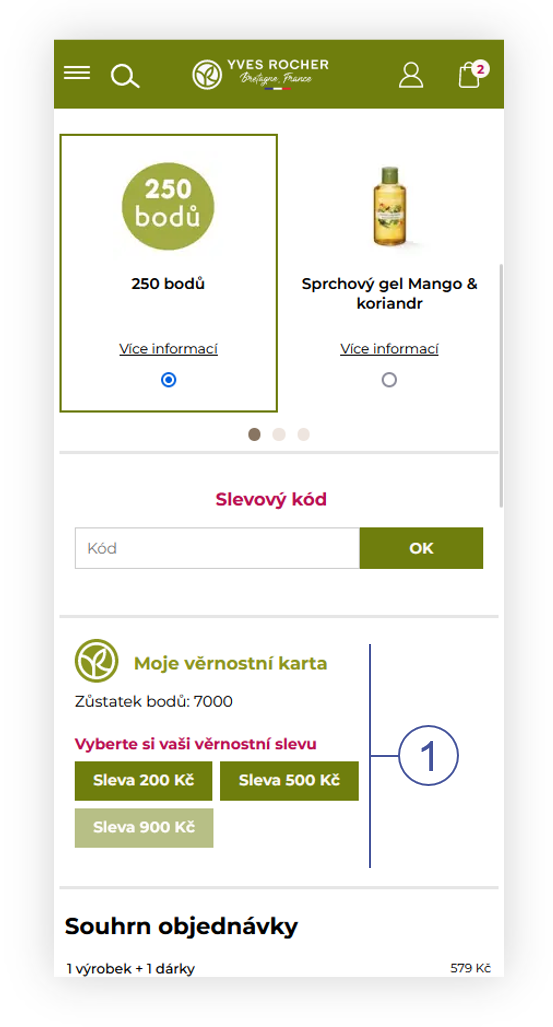 |
| *Visualization of the FIDEN2 location in the cart (mobile)* |
| 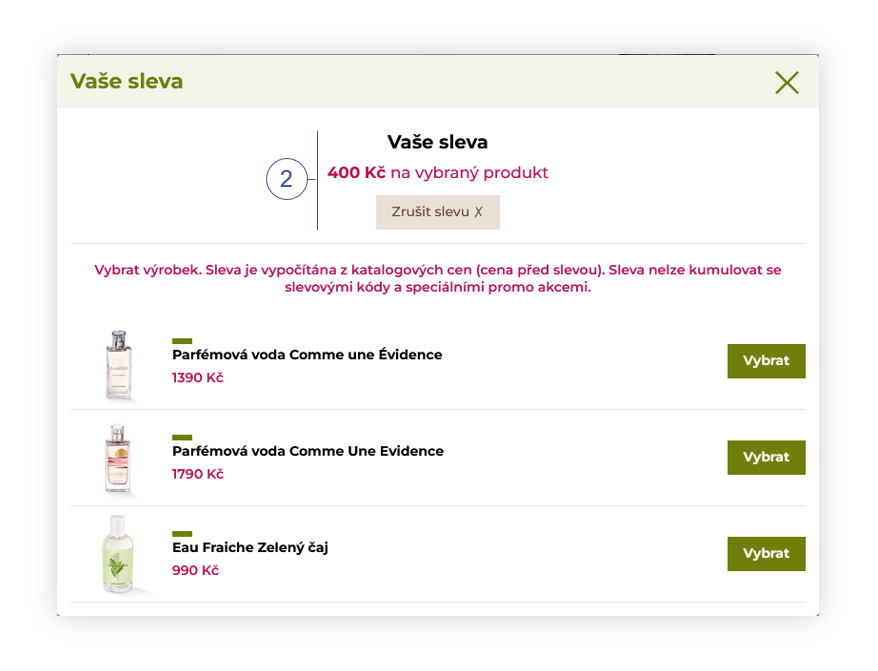 |
| *Visualization of the adding of the discount through FIDEN2 functionality (desktop)* |
| 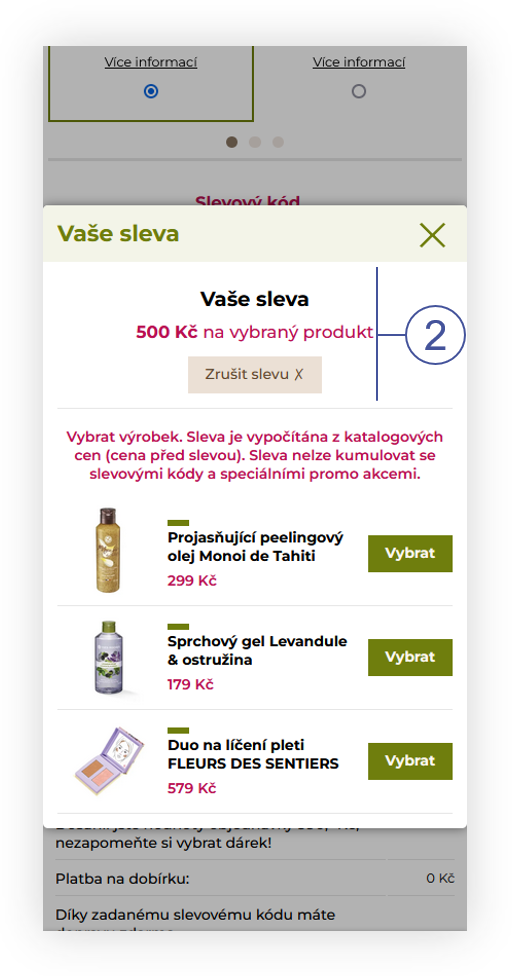 |
| *Visualization of the adding of the discount through FIDEN2 functionality (mobile)* |
| 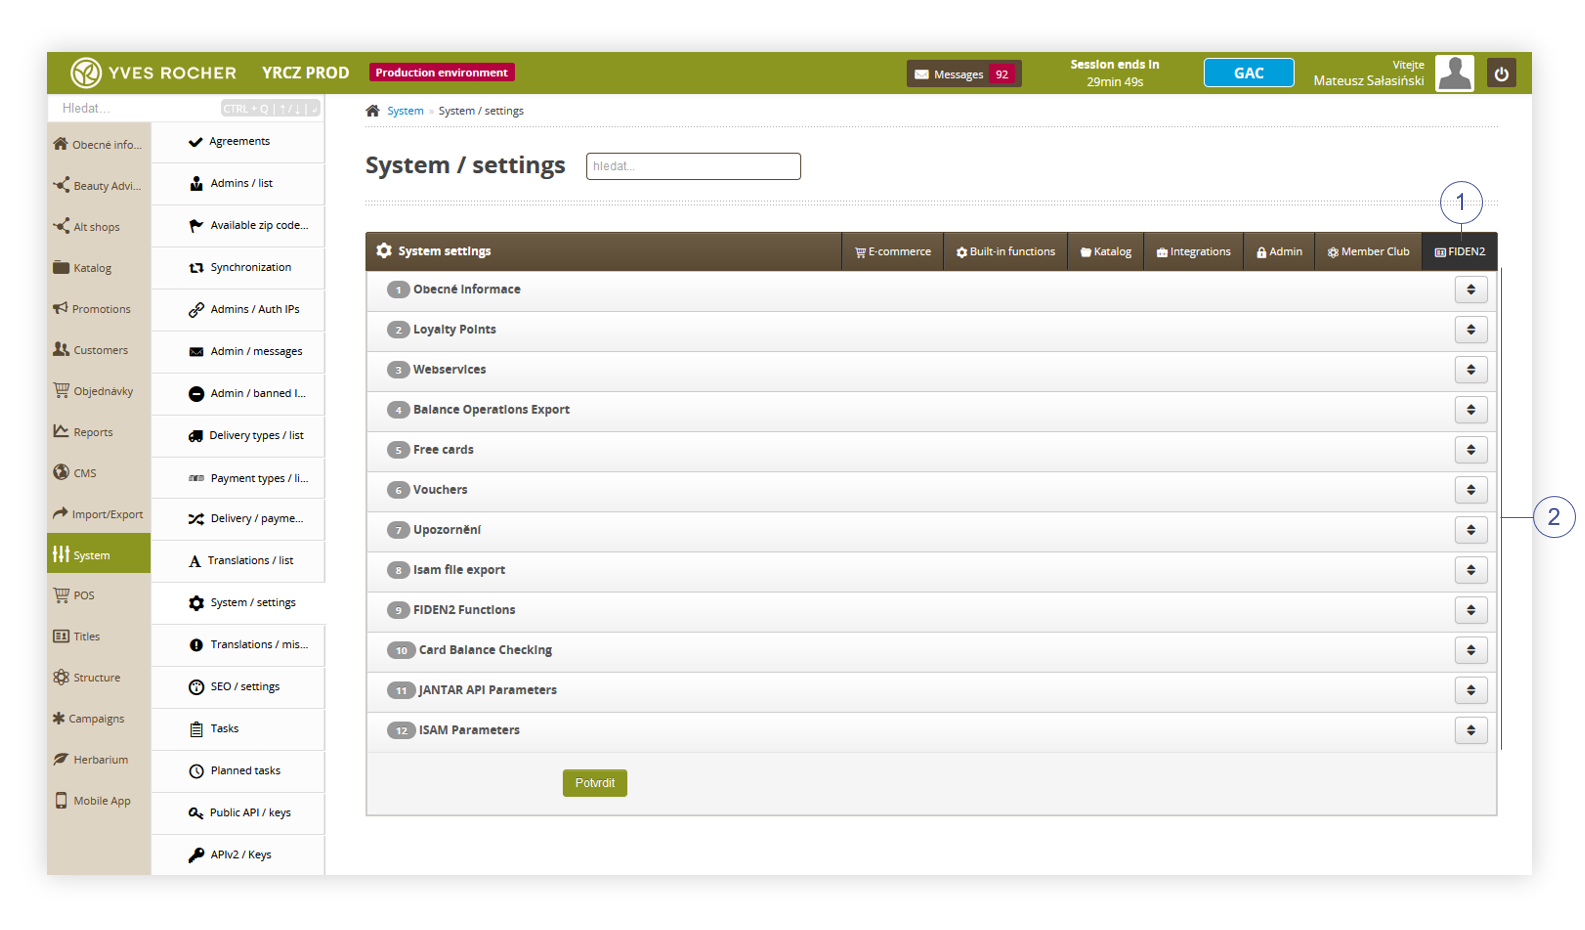 |
| *Visualization of the FIDEN2 tab in System / settings* |
| 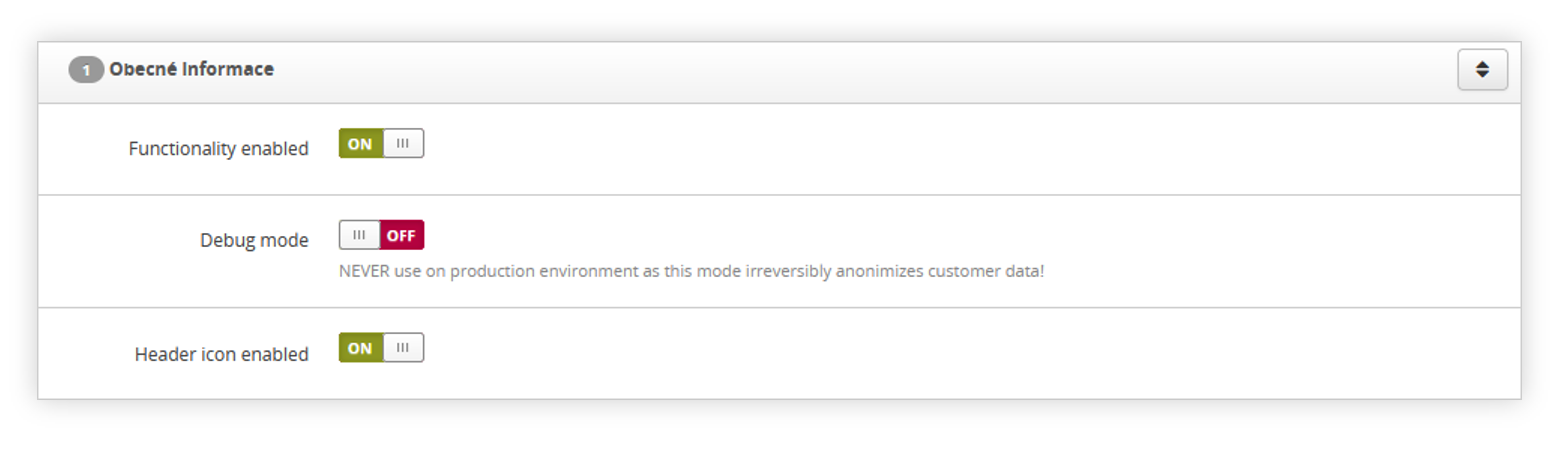 |
| *Visualization of the General tab* |
| 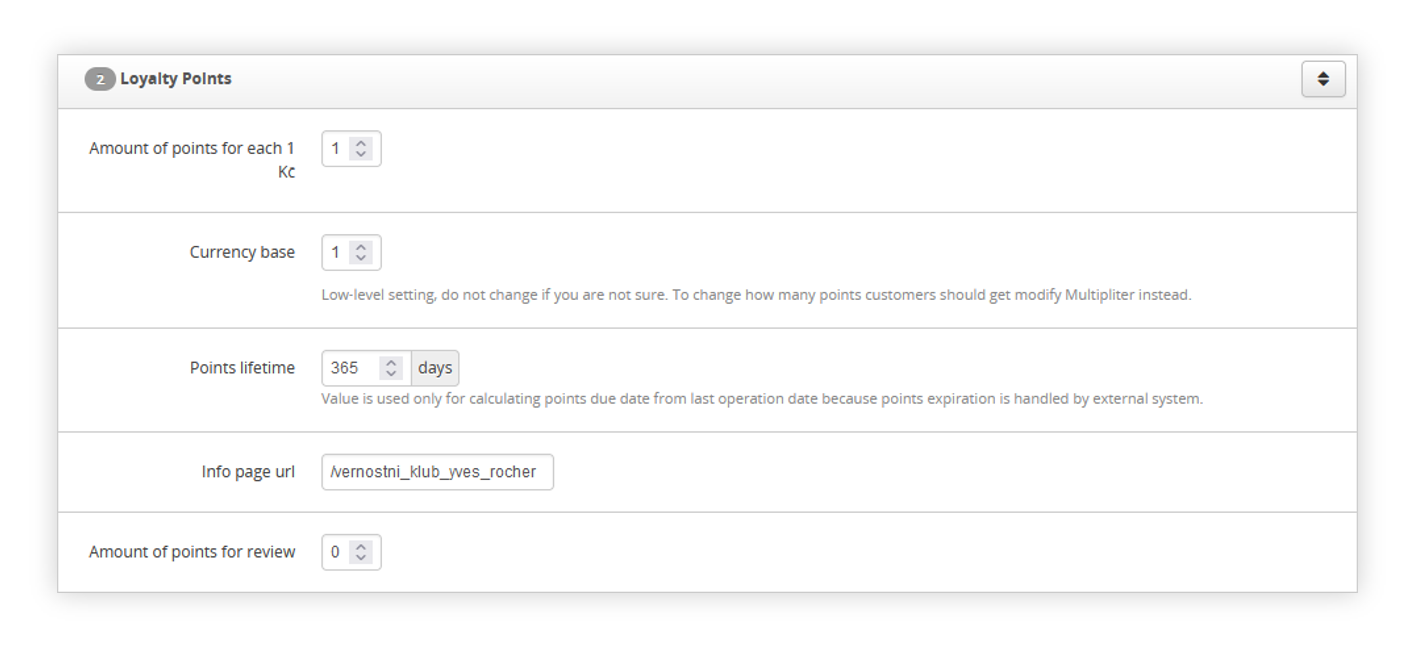 |
| *Visualization of the Loyalty points tab* |
|  |
| *Visualization of the Webservices tab* |
| 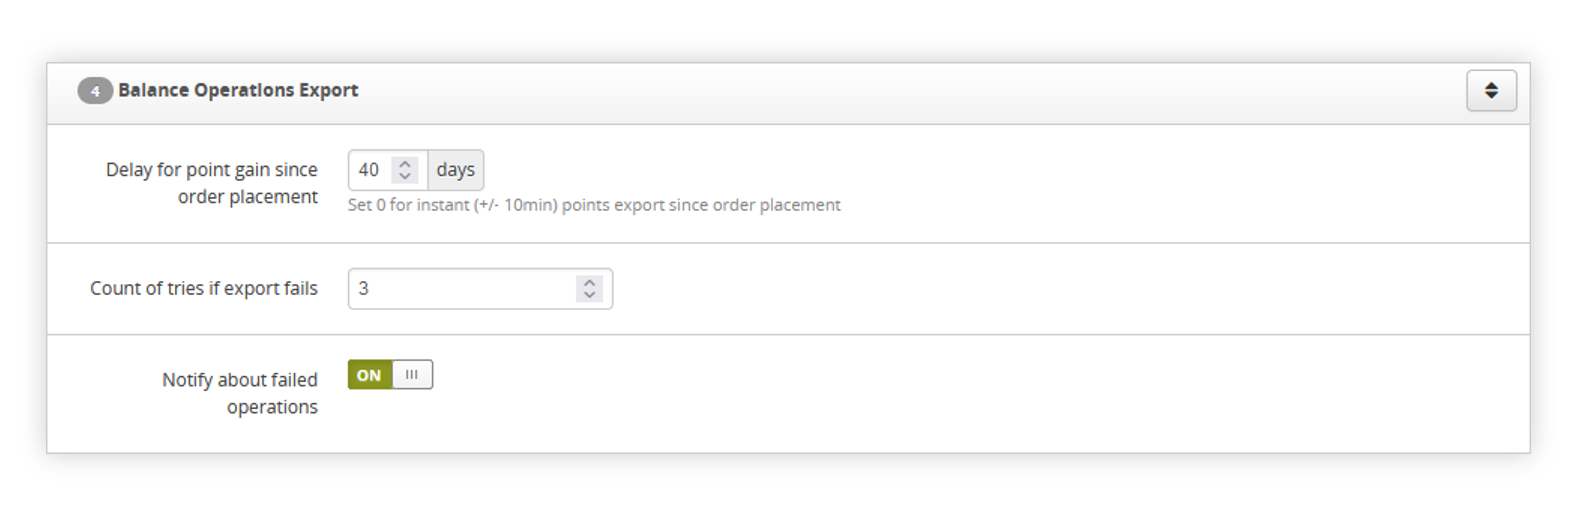 |
| *Visualization of the Balance operations export tab* |
| 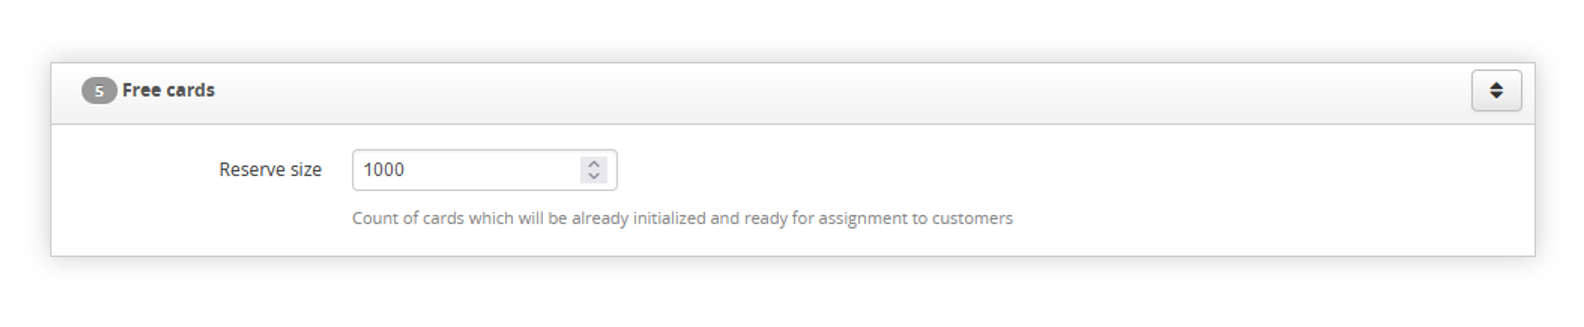 |
| *Visualization of the Free cards tab* |
|  |
| *Visualization of the Vouchers tab* |
| 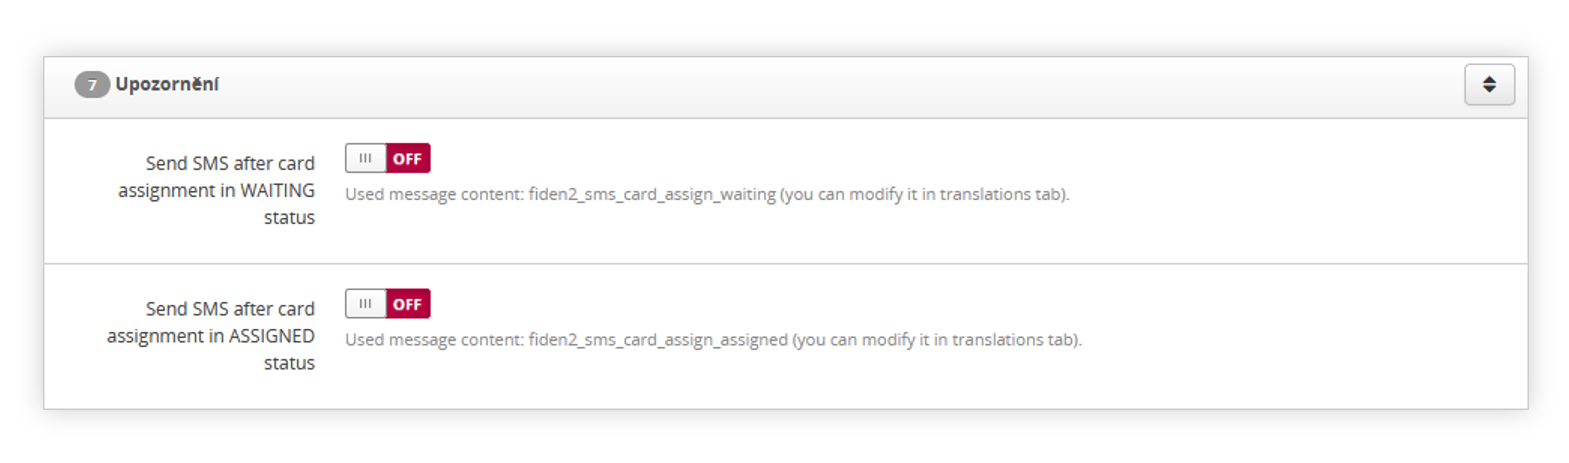 |
| *Visualization of the Notifications tab* |
|  |
| *Visualization of the ISAM file export tab* |
| 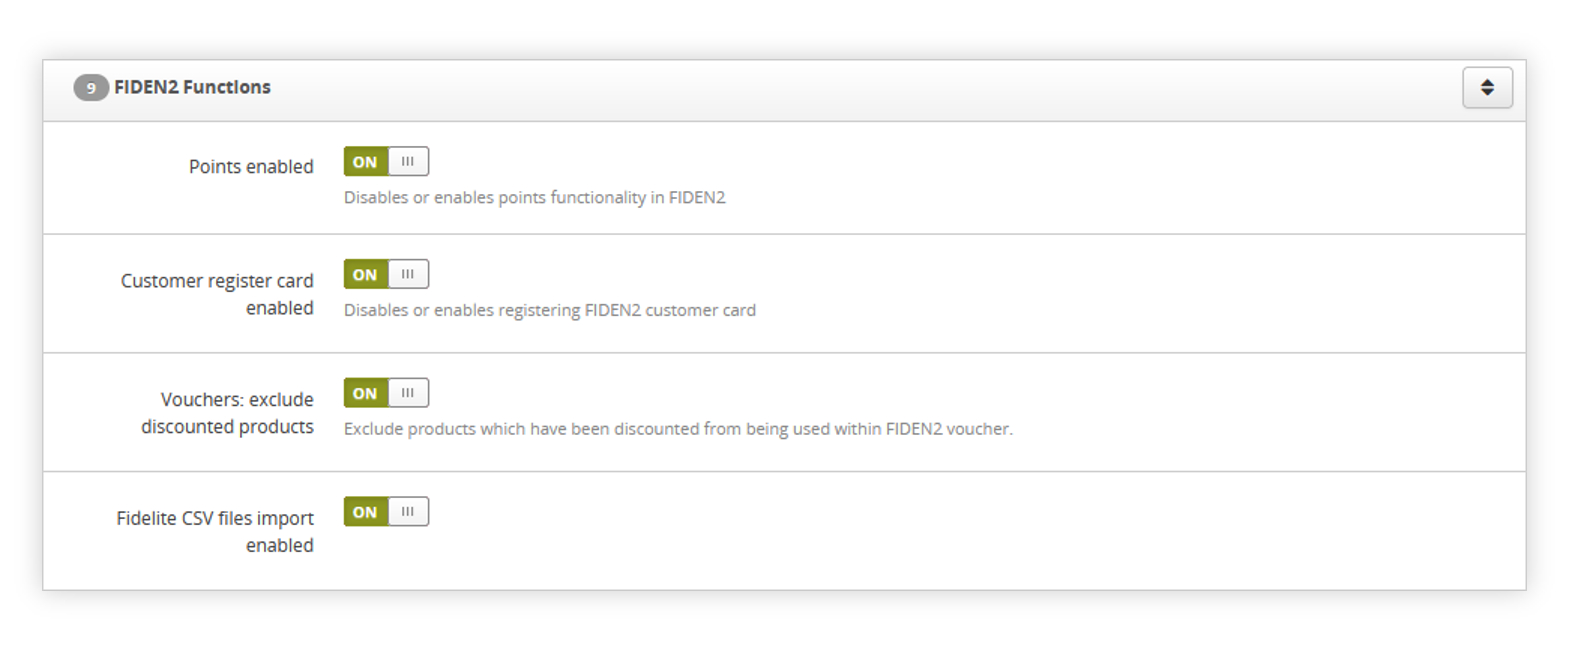 |
| *Visualization of the FIDEN2 functions tab* |
| 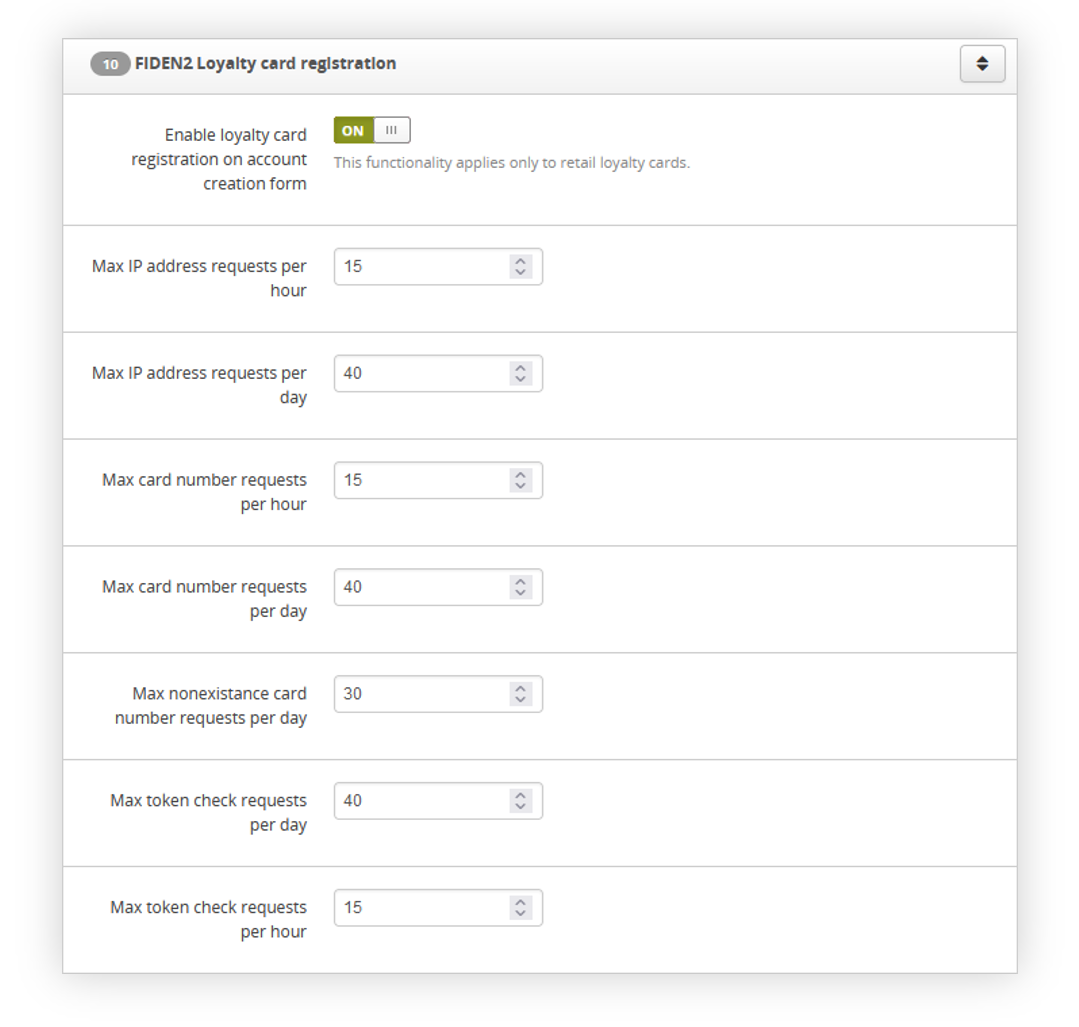 |
| *Visualization of the FIDEN2 loyalty card registration tab* |
|  |
| *Visualization of the Card balance checking tab* |
| 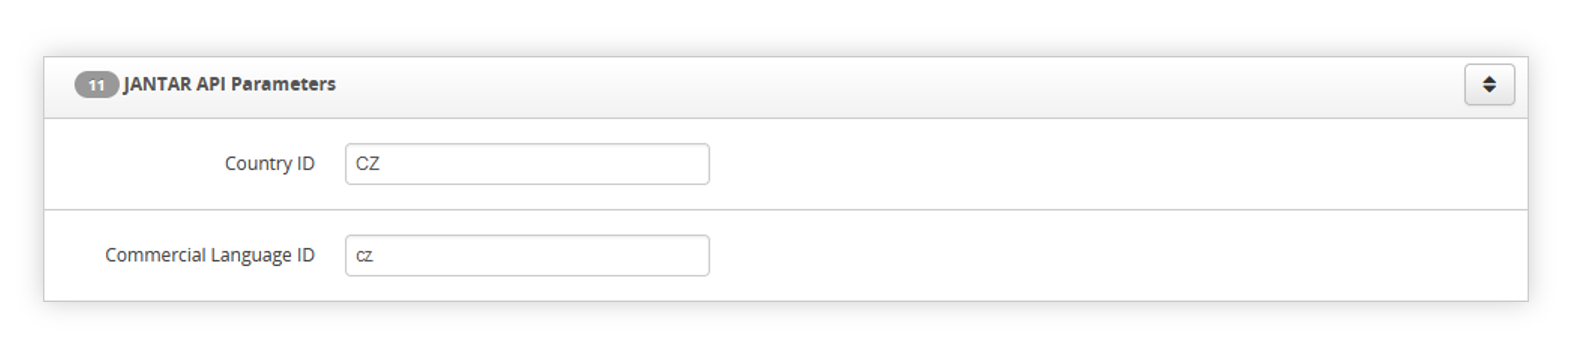 |
| *Visualization of the JANTAR API parameters tab* |
| 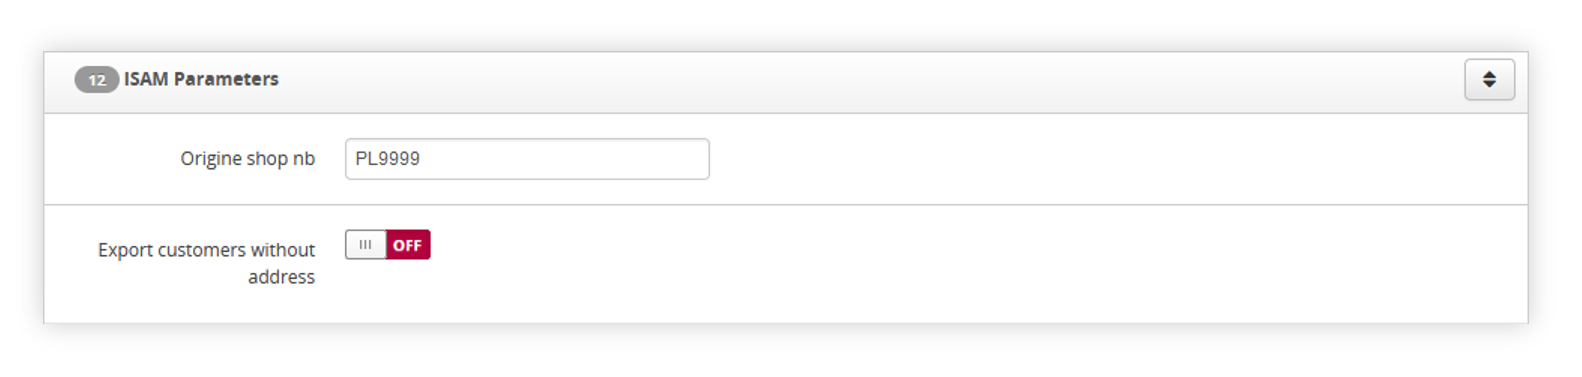 |
| *Visualization of the ISAM parameters tab* |
| 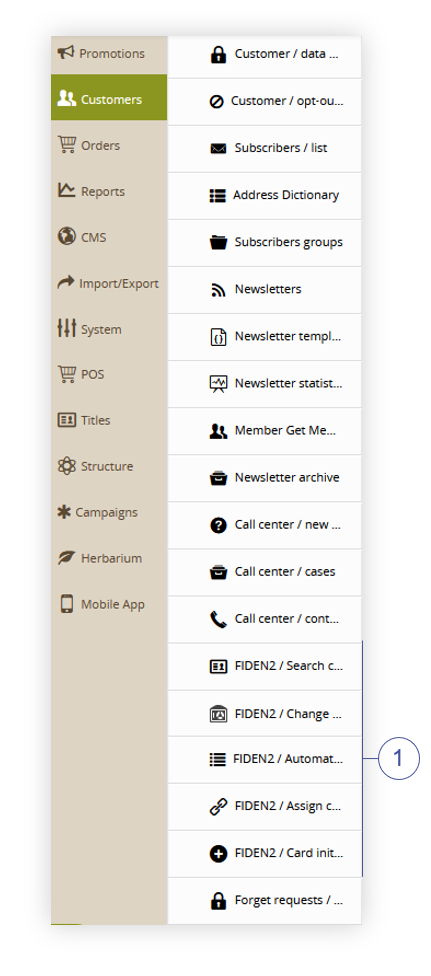 |
| *Visualization of the FIDEN2 card management location* |
| 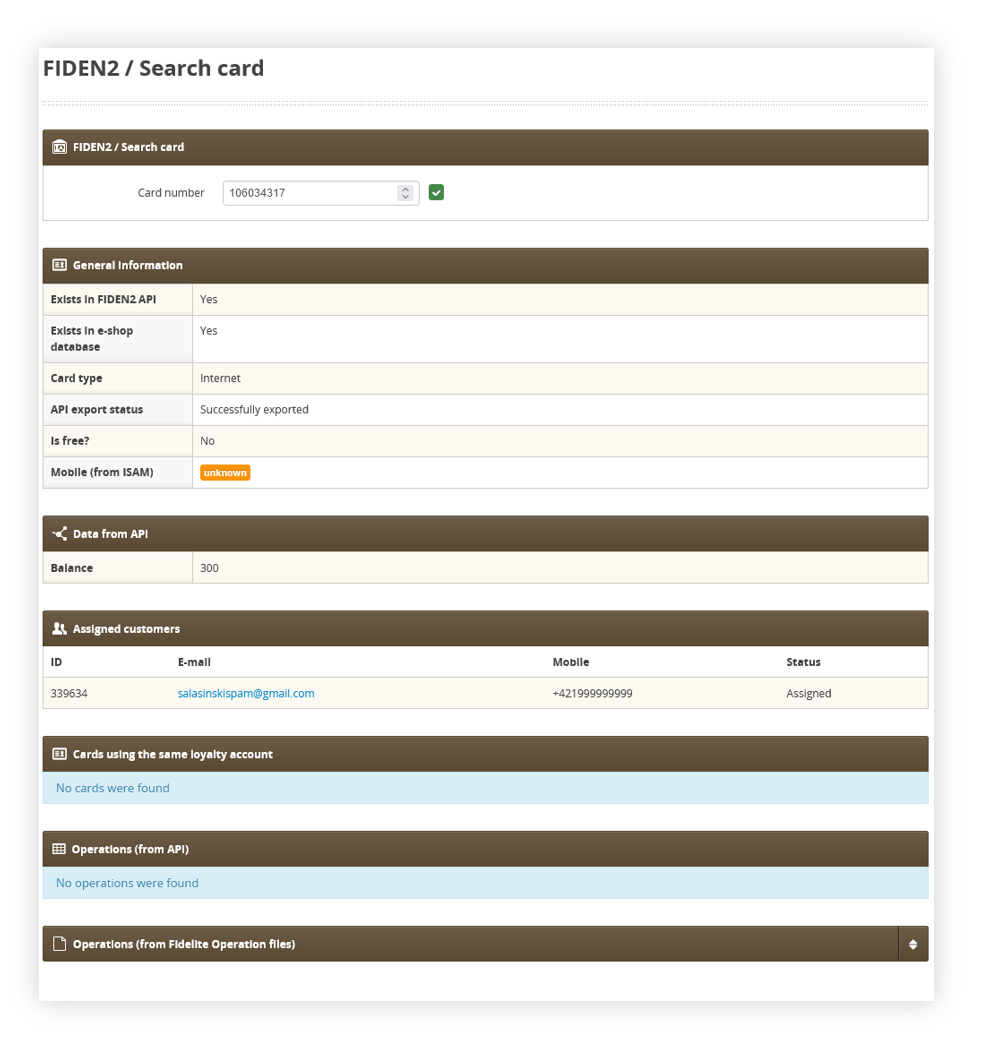 |
| *Visualization of the FIDEN2 / search card page* |
| 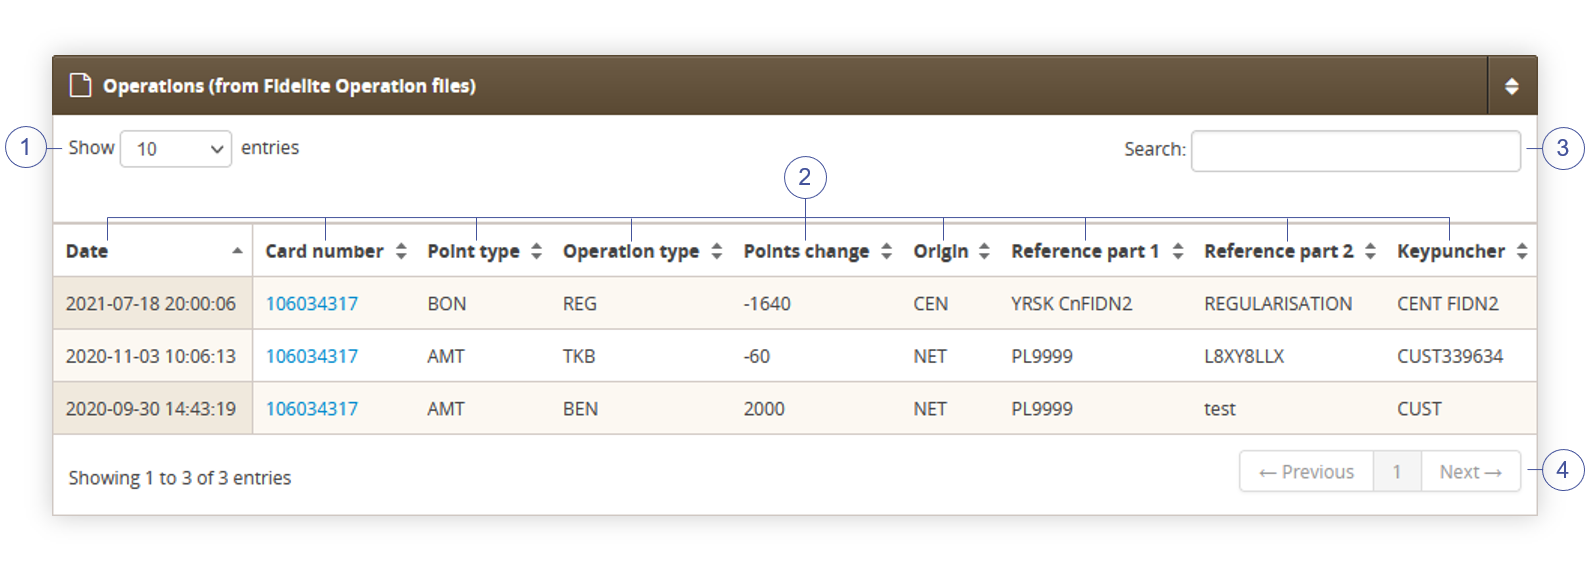 |
| *Visualization of the operations tab* |
|  |
| *Visualization of the FIDEN2 / Change card balance page* |
| 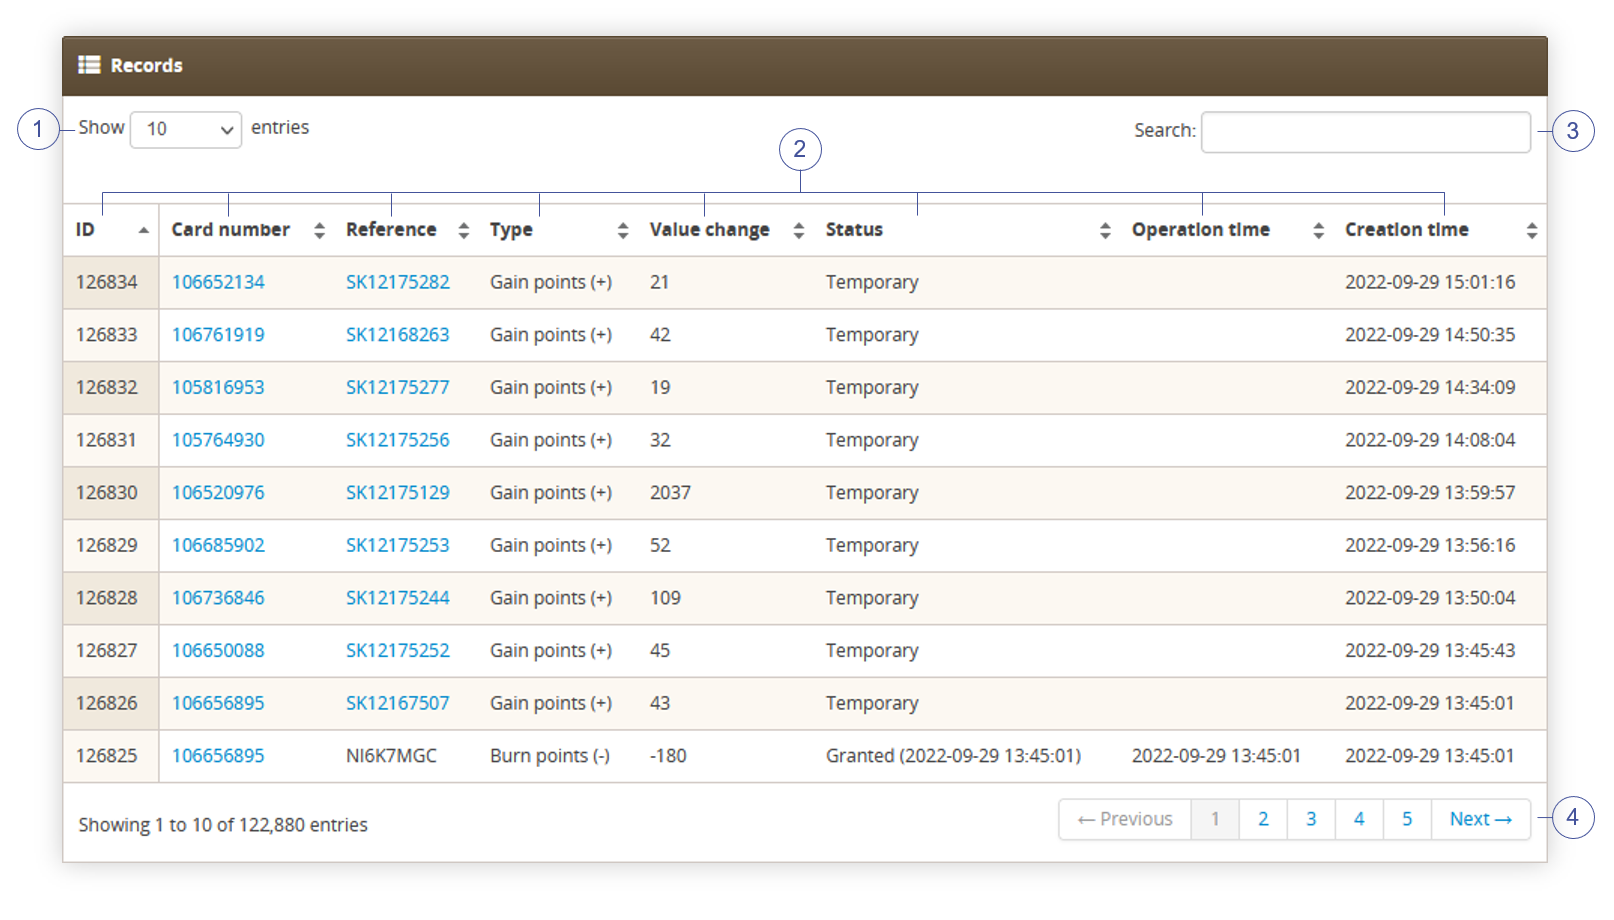 |
| *Visualization of the automatic balance operations page* |
| 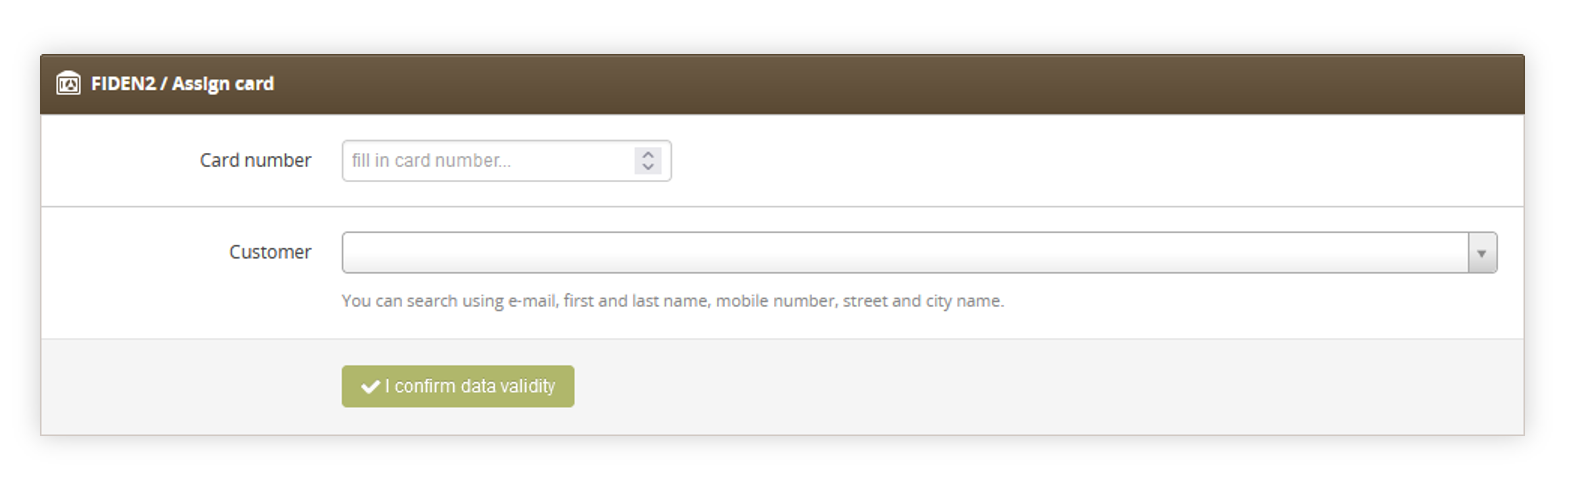 |
| *Visualization of the FIDEN2 / assign card page* |
| 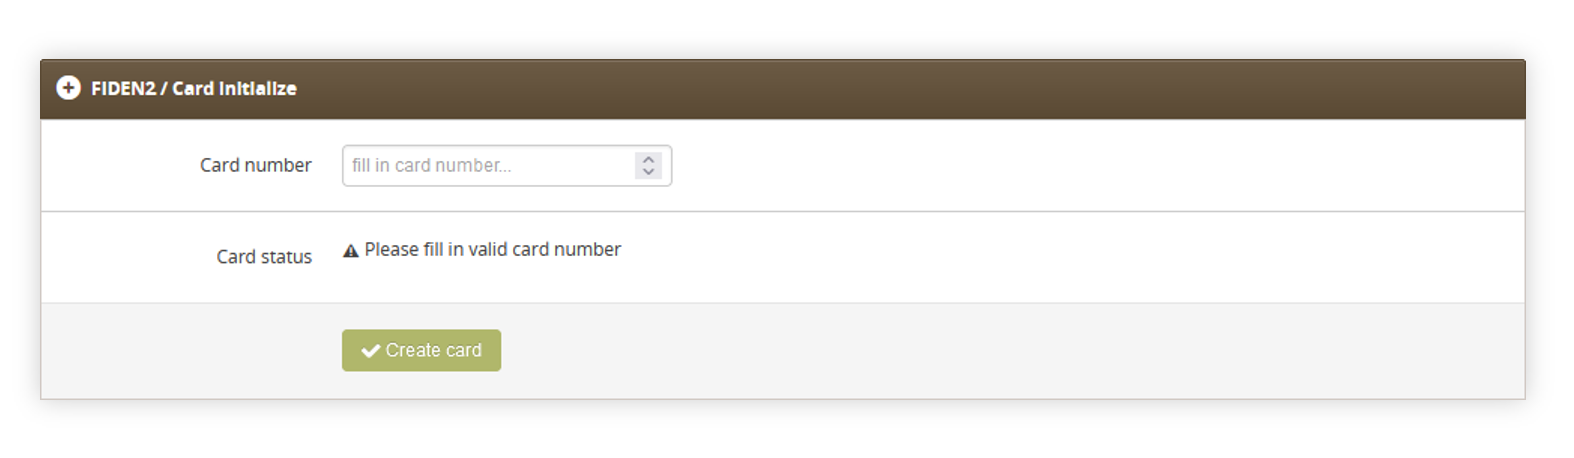 |
| *Visualization of the FIDEN2 / card initialize page* |
| 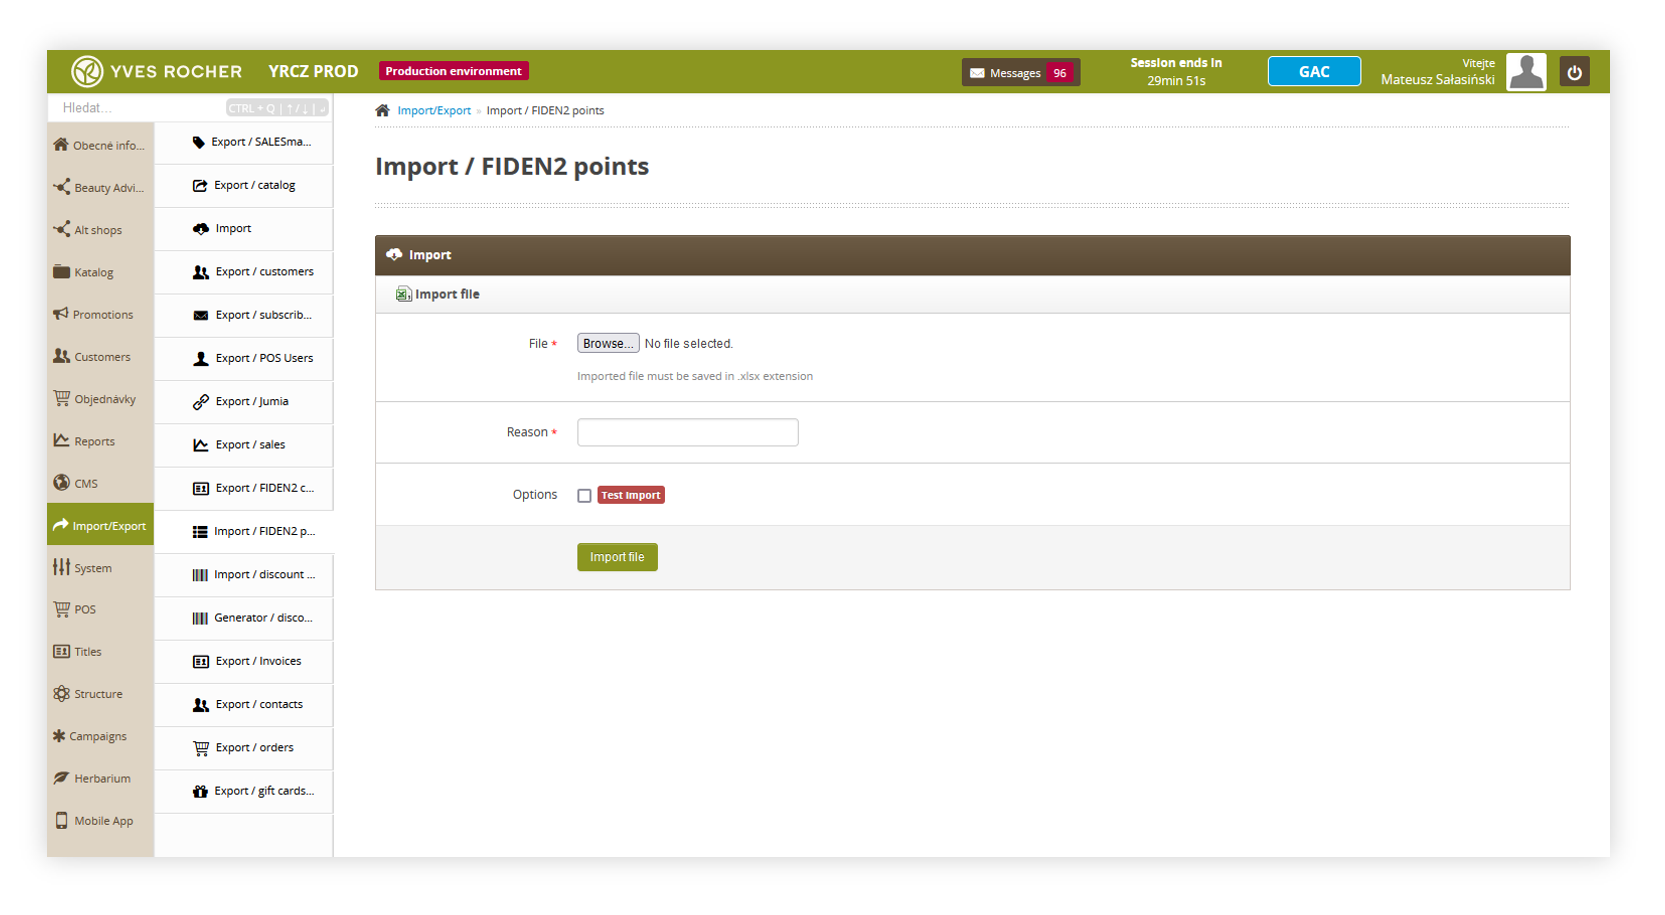 |
| *Visualization of the FIDEN2 / card initialize page* |
| 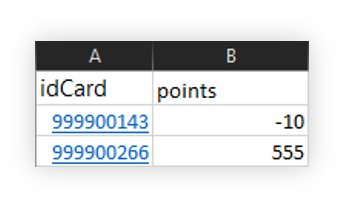 |
| *Visualization of the FIDEN2 points import file* |
| 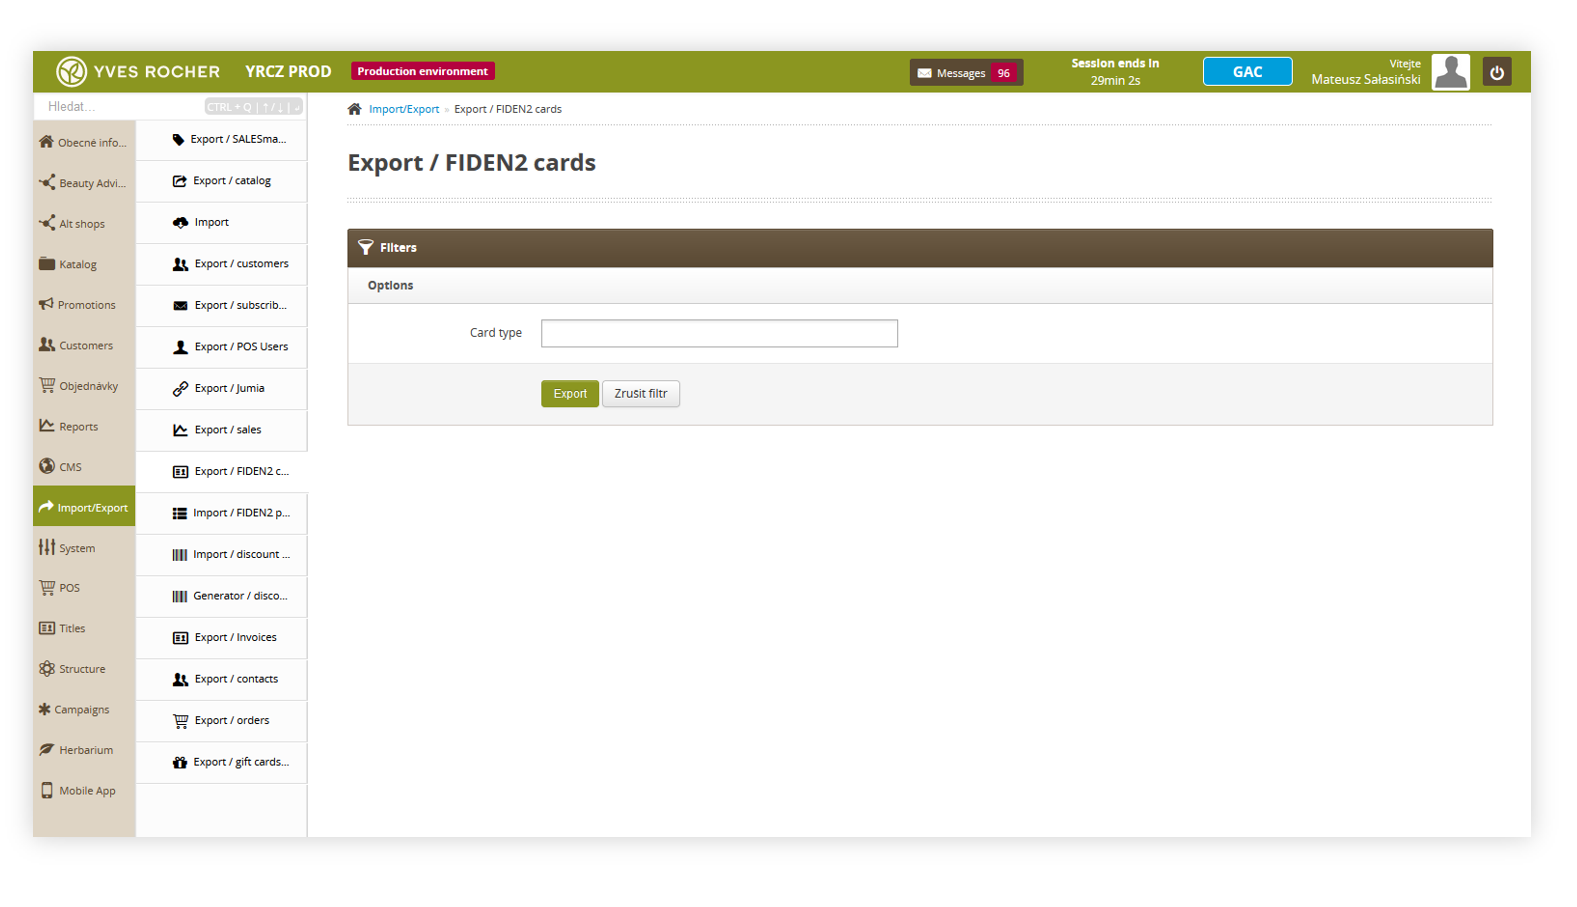 |
| *Visualization of the FIDEN2 / card initialize page* |
| 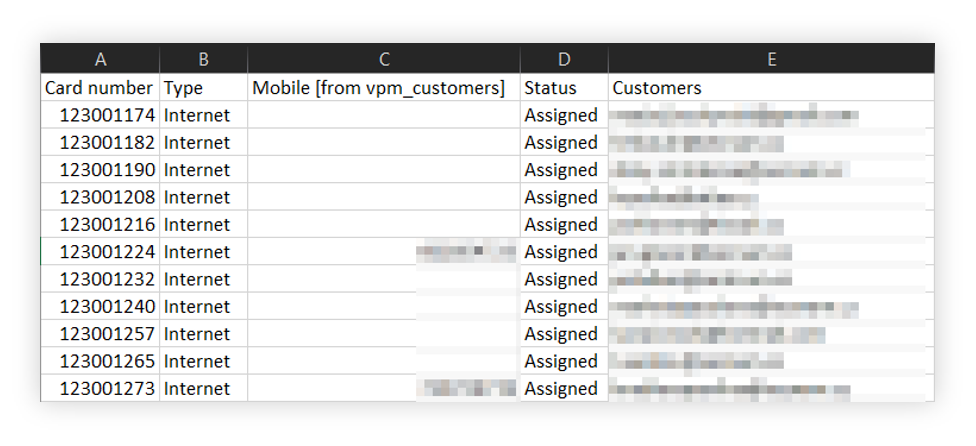 |
| *Visualization of the FIDEN2 / card initialize page* |
| 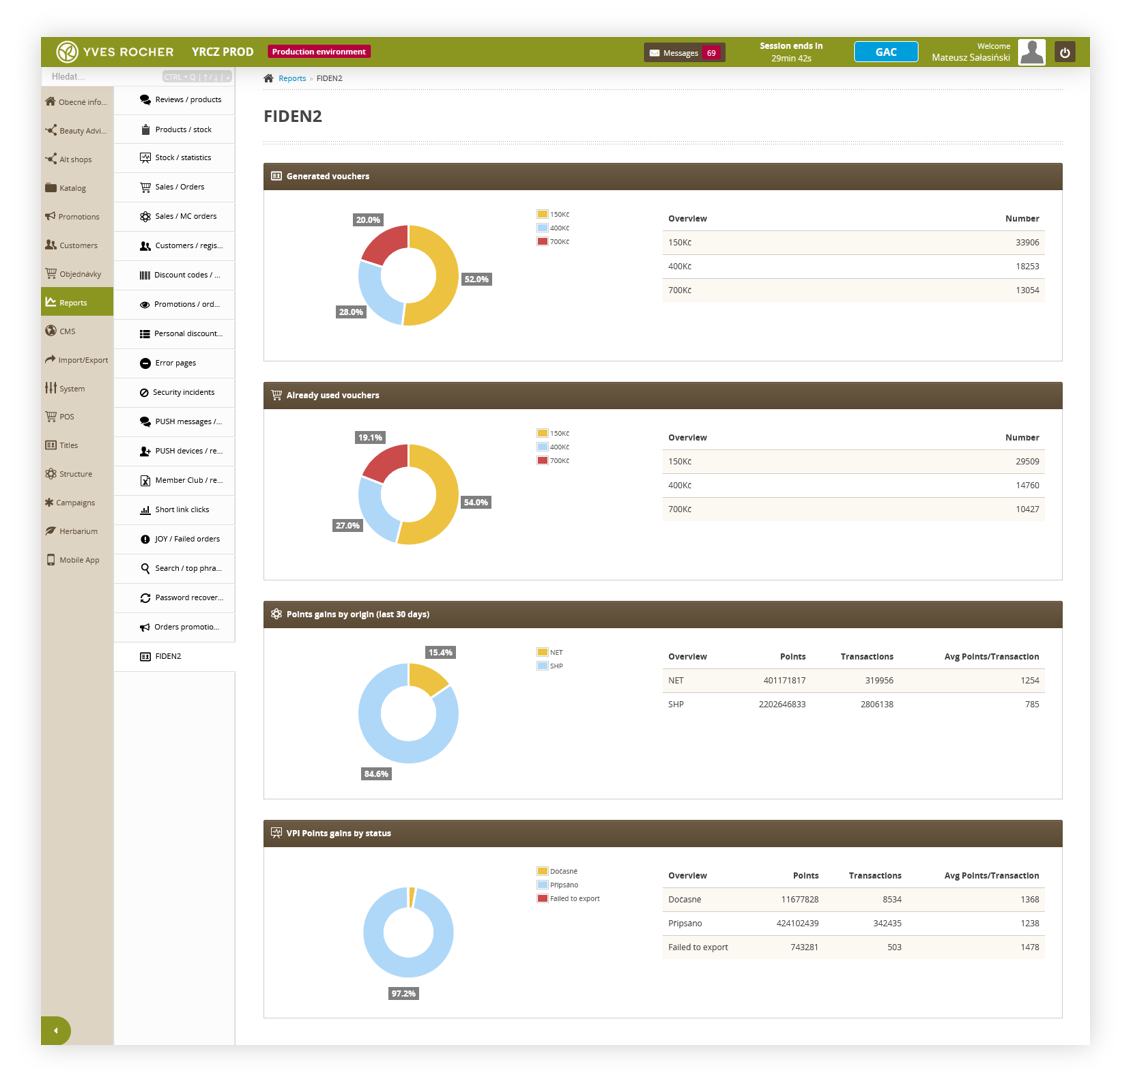 |
| *Visualization of the FIDEN2 / card initialize page* |
| 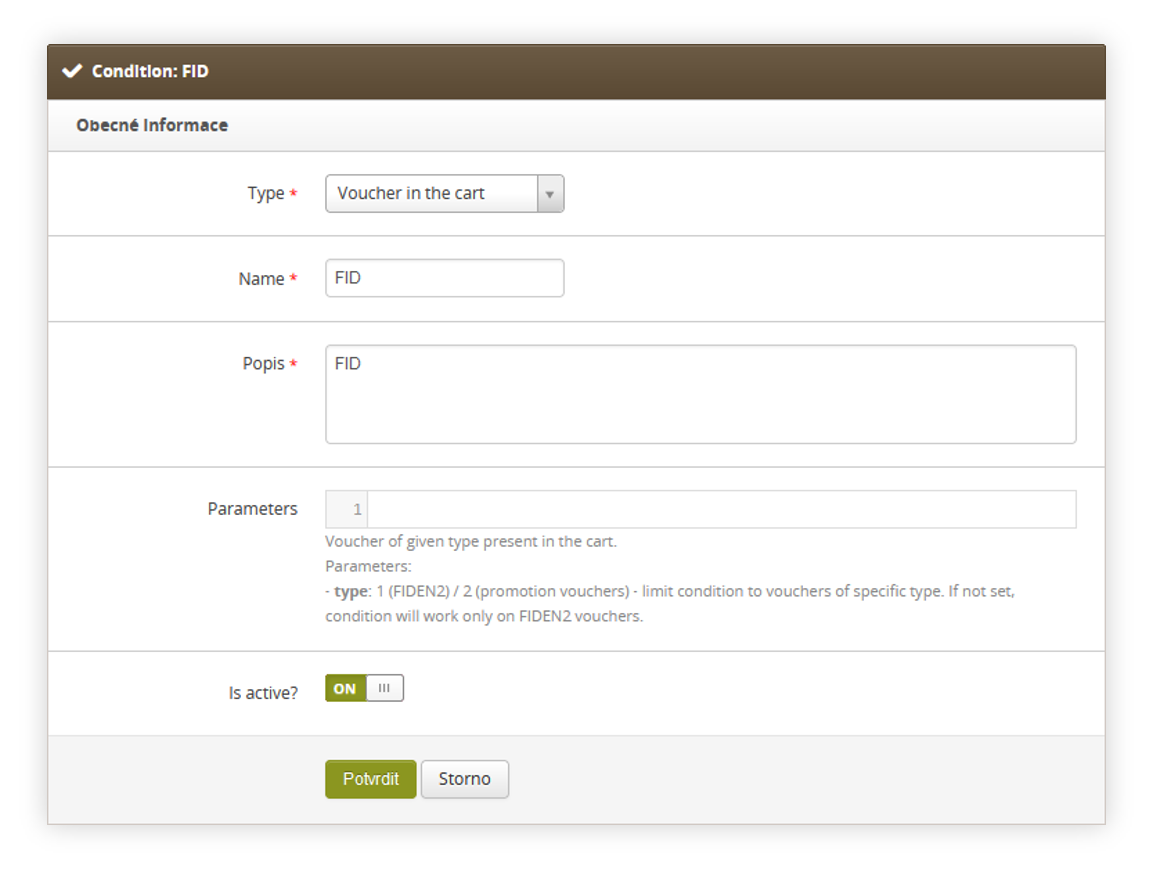 |
| *Visualization of the FIDEN2 condition* |
| 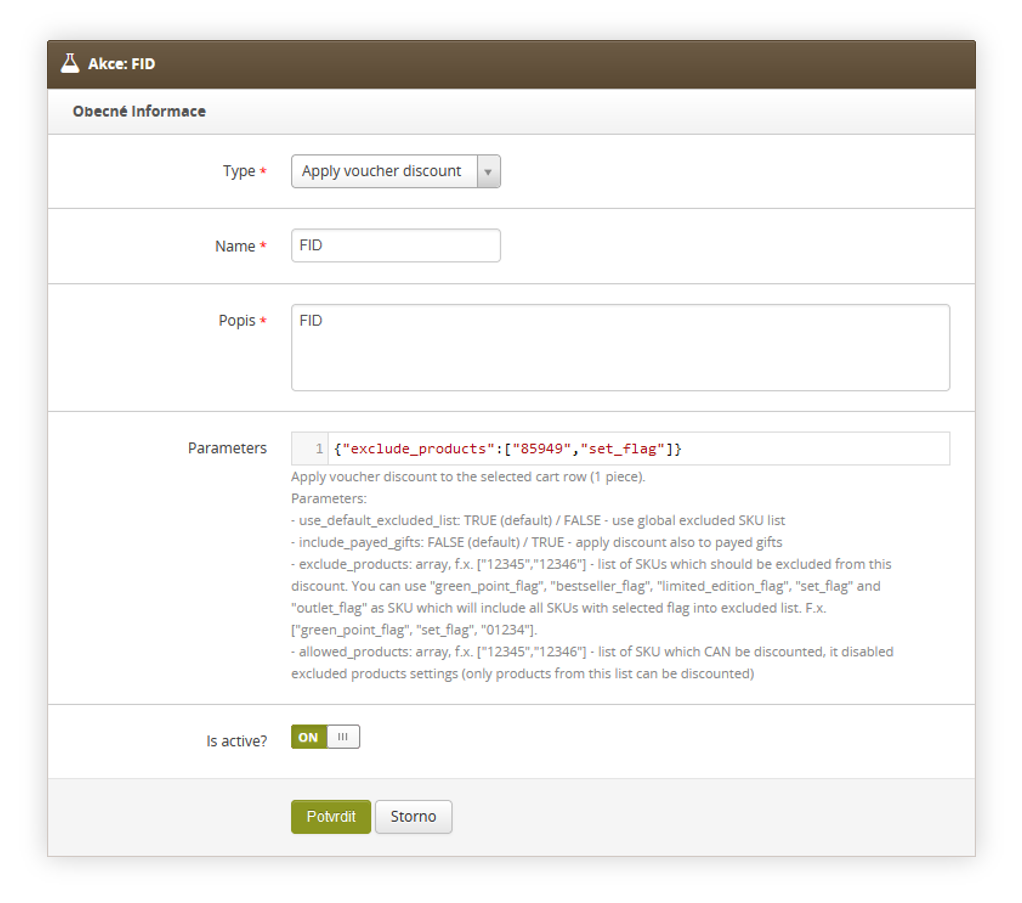 |
| *Visualization of the FIDEN2 action* |
| 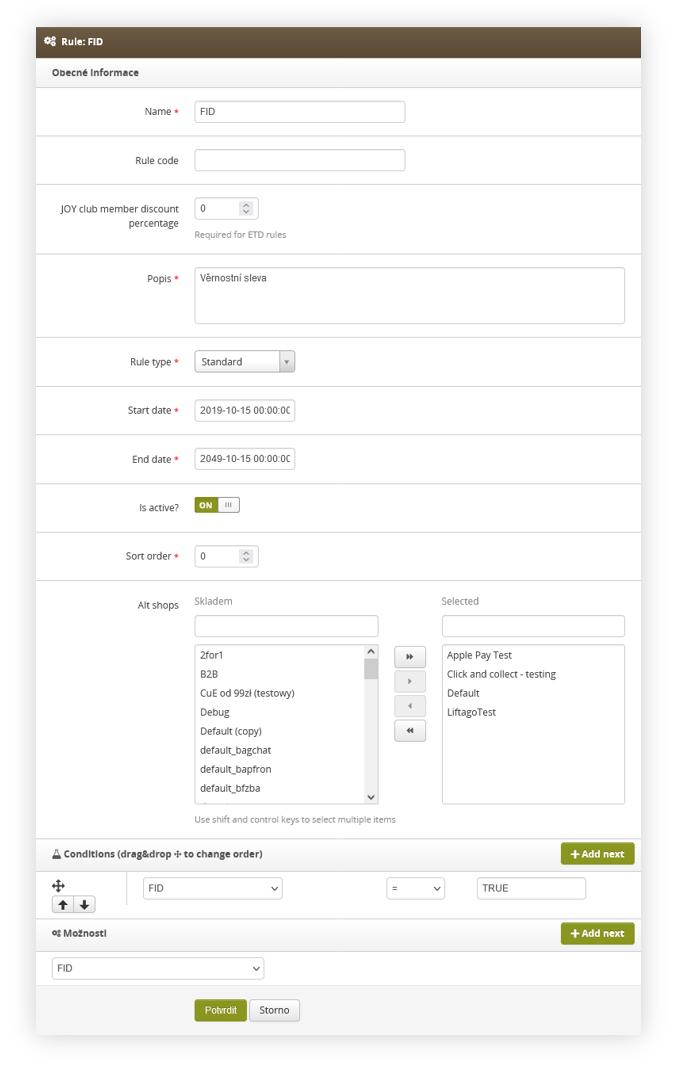 |
| *Visualization of the FIDEN2 rule* |
| 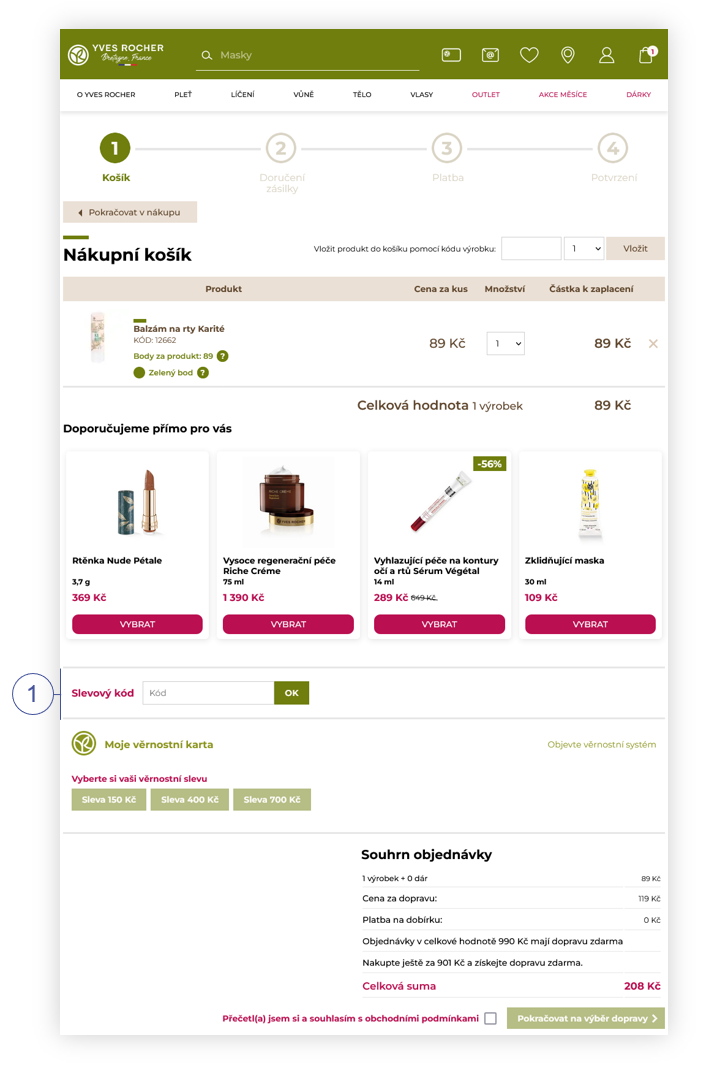 |
| *Visualization of discount code field in the cart* |
| 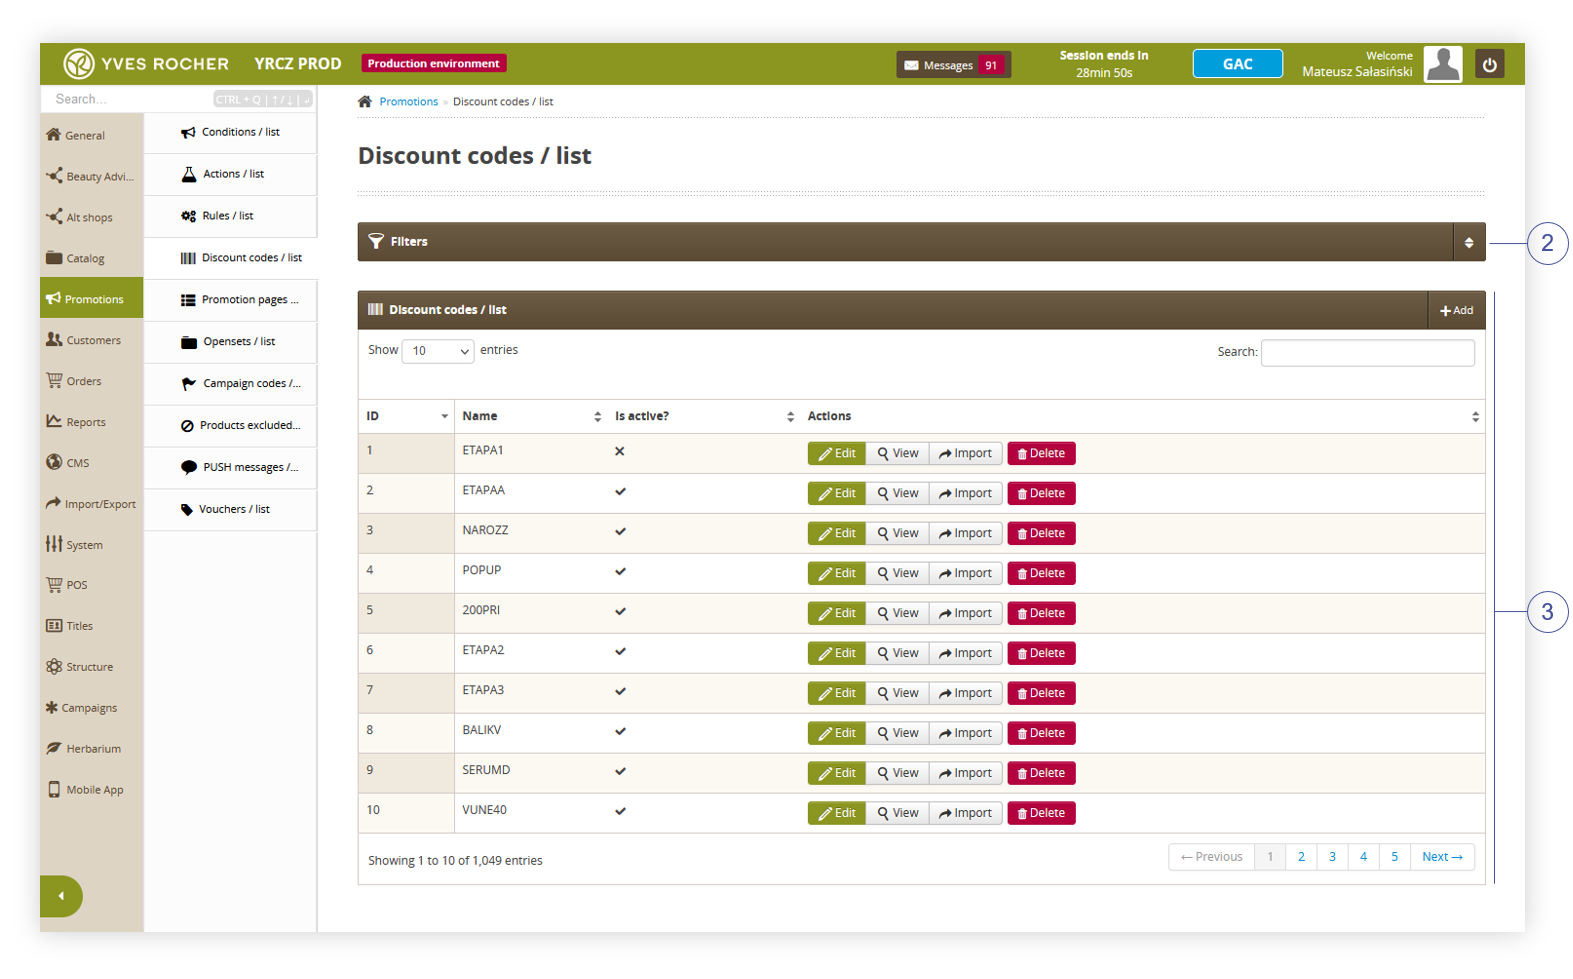 |
| *Visualization of the discount code / list* |
| 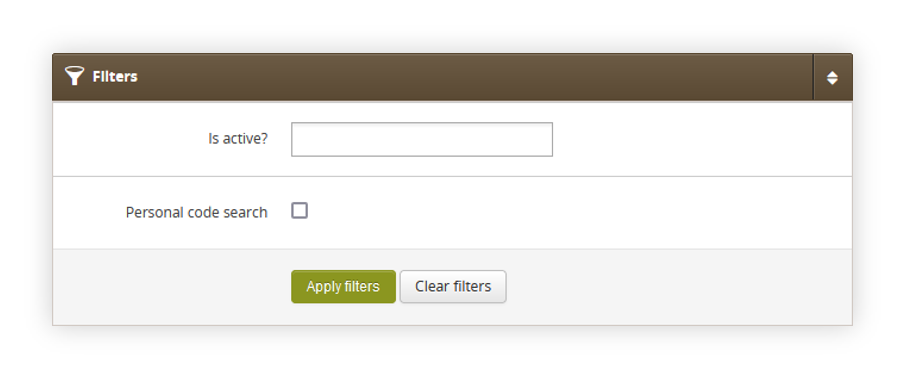 |
| *Visualization of the filters tab in the discount codes / list module* |
| 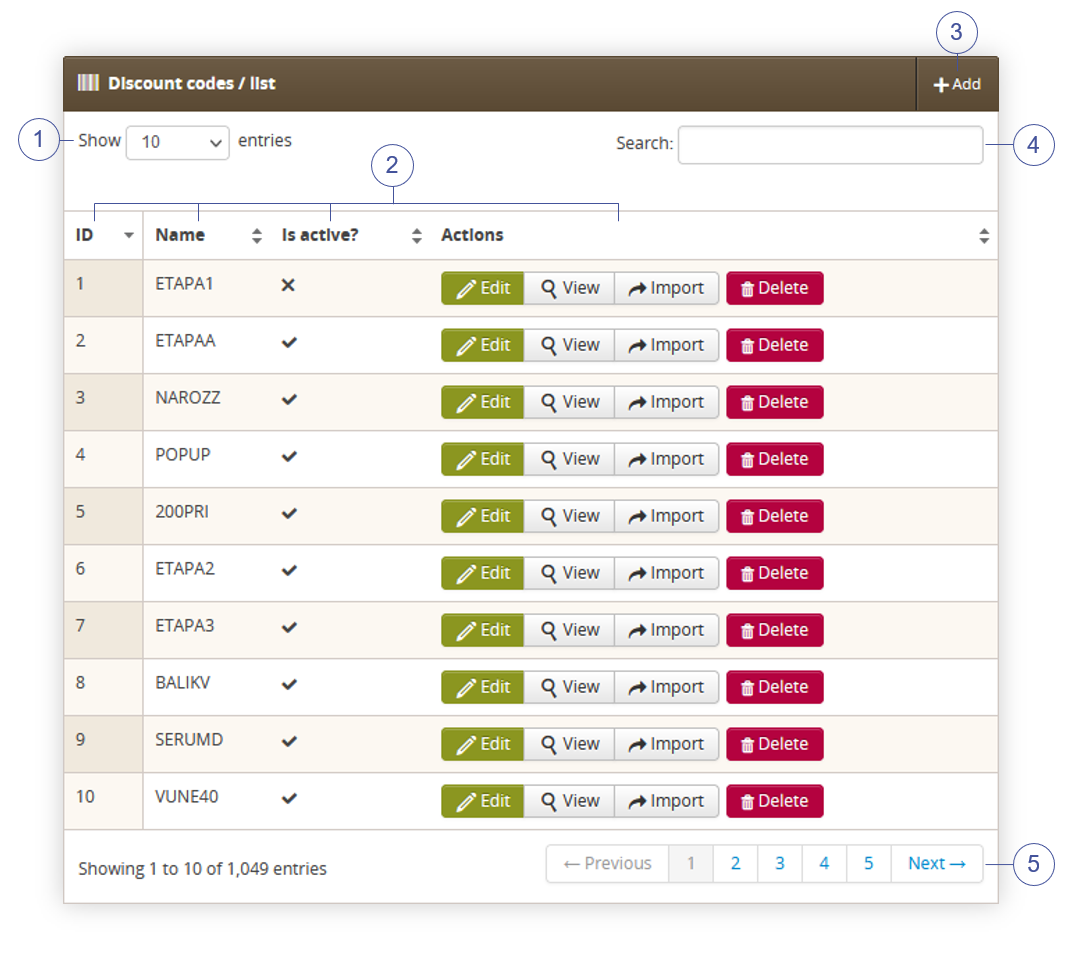 |
| *Visualization of the discount codes / list section in the discount codes / list* |
| 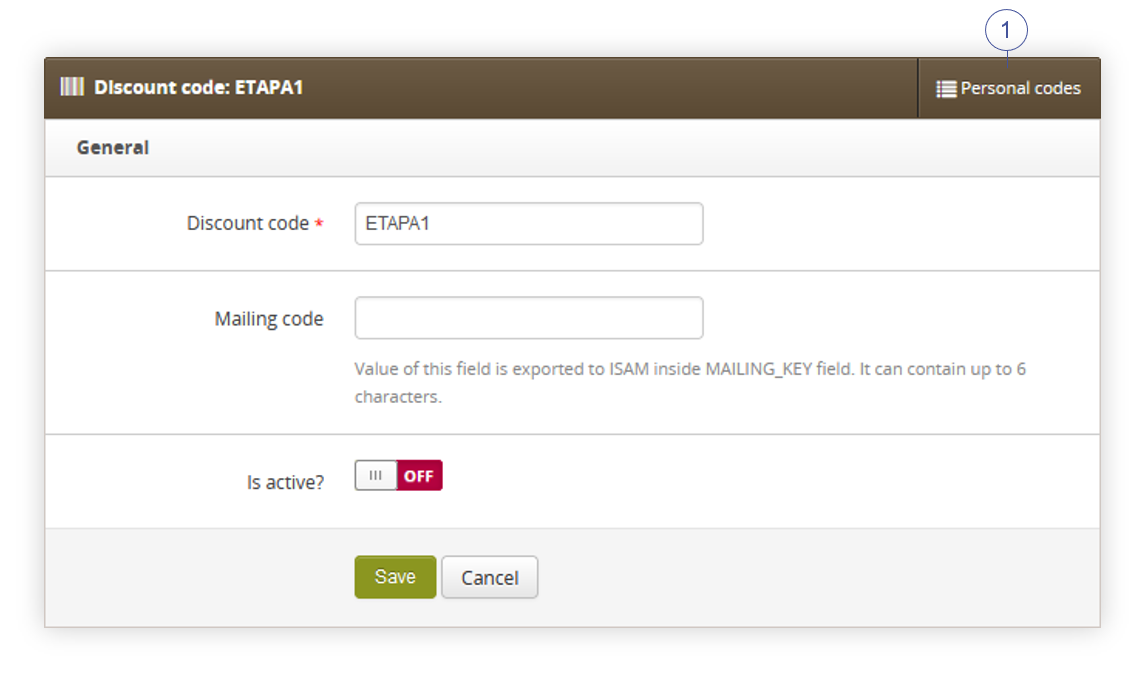 |
| *Visualization of the adding of the featured products list* |
| 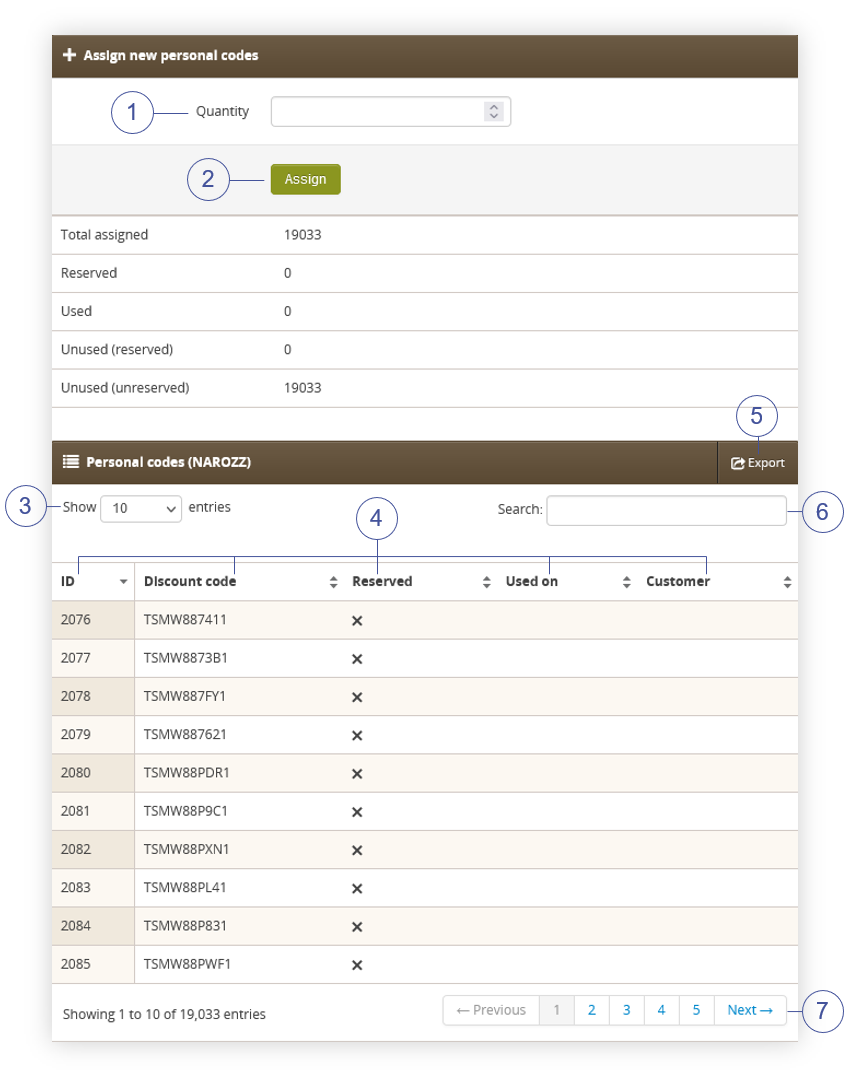 |
| *Visualization of the adding of the featured products list* |
| 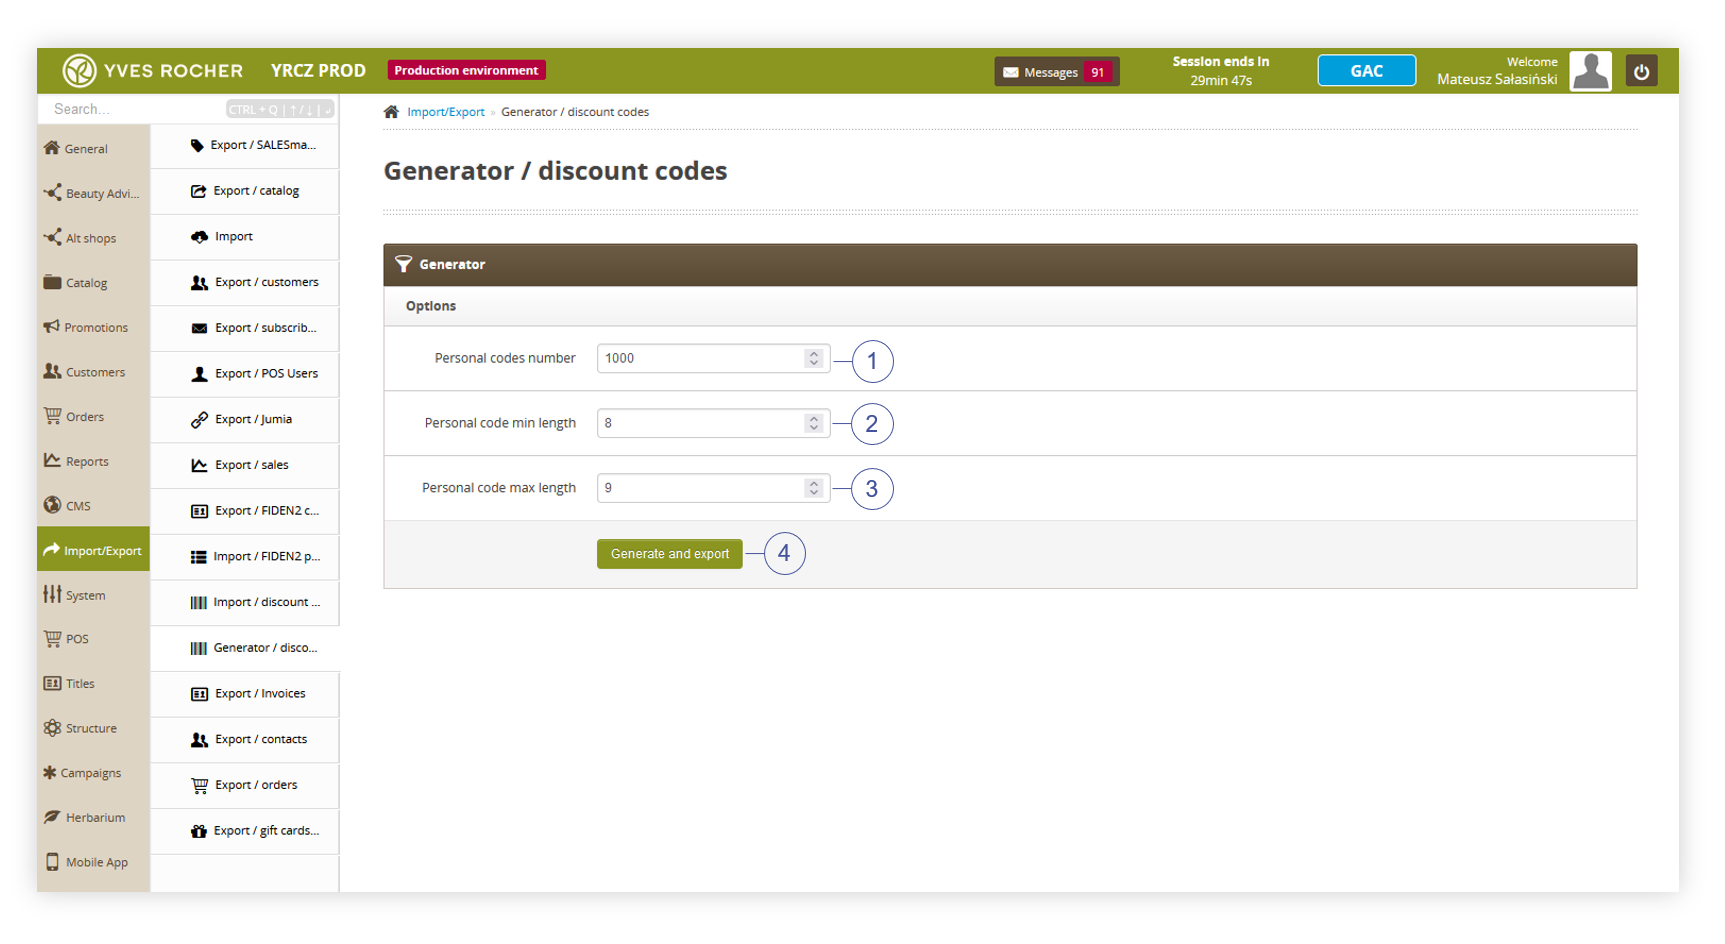 |
| *Visualization of the personal code generator* |
| 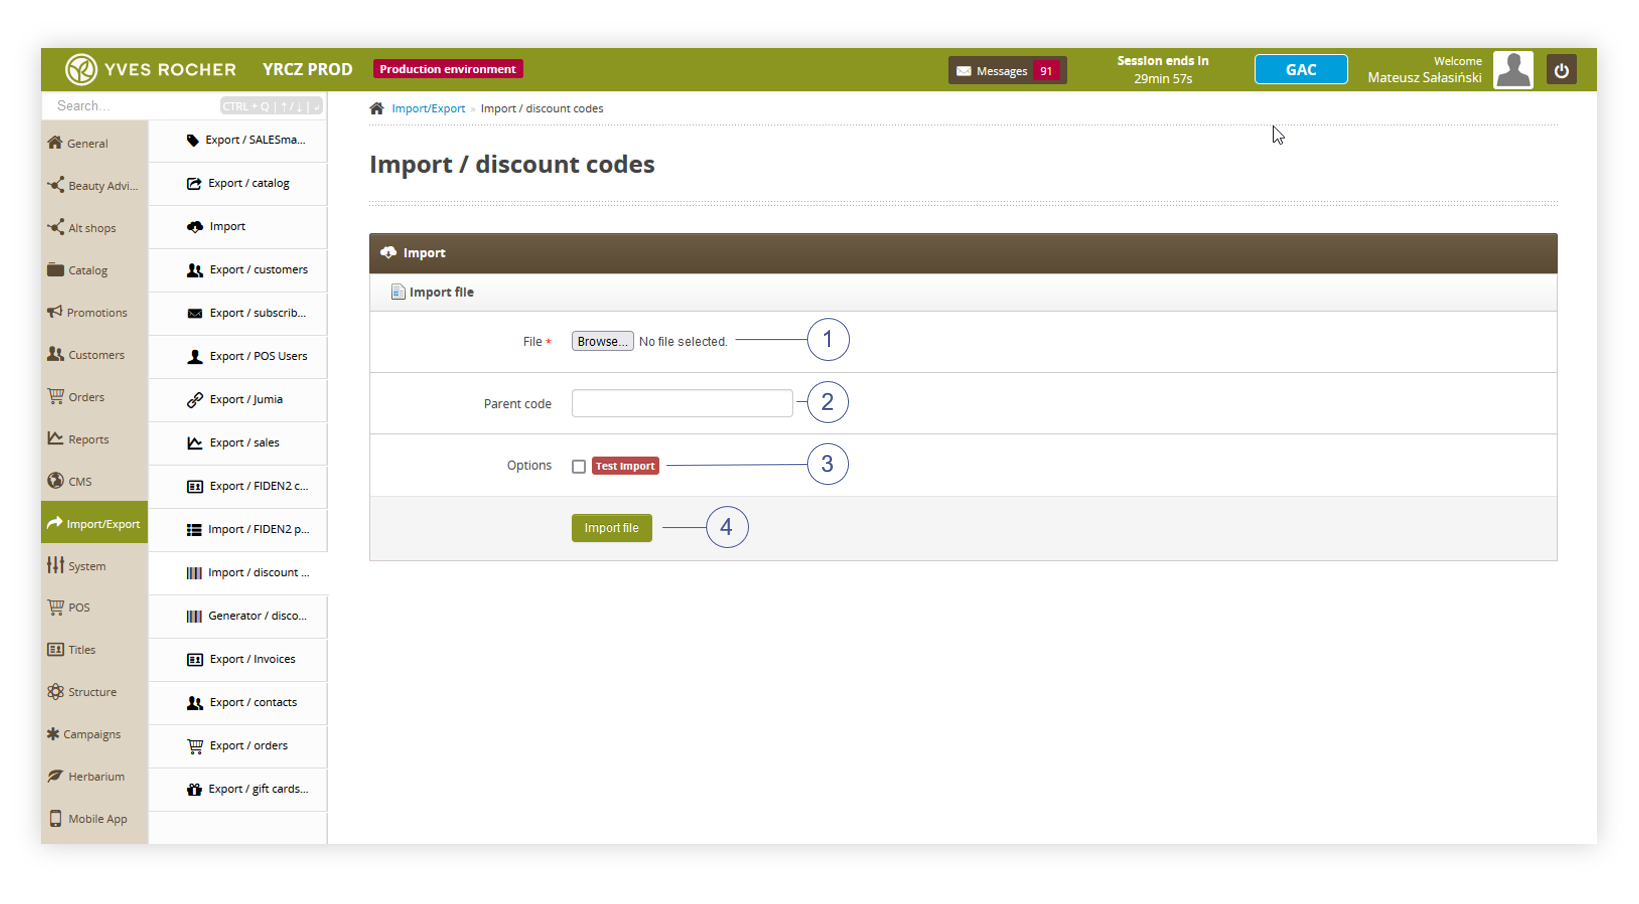 |
| *Visualization of the personal code import* |
| 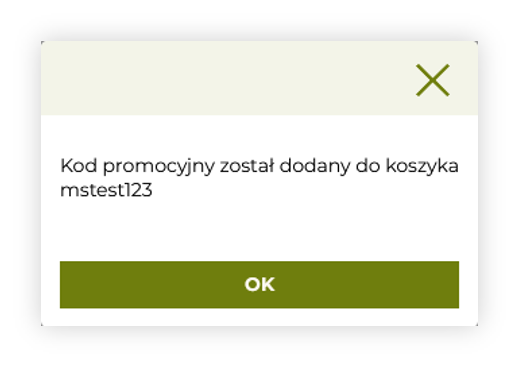 |
| *Visualization of the correct discount code message* |
| 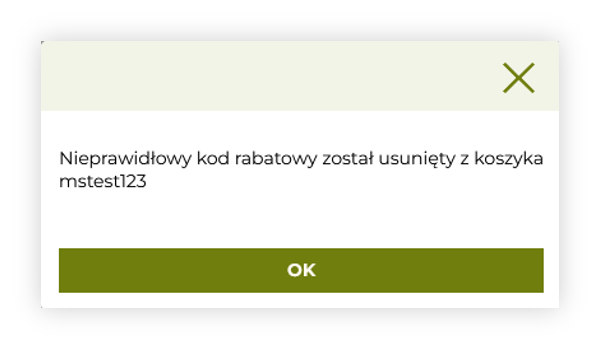 |
| *Visualization of the incorrect discount code message* |
| 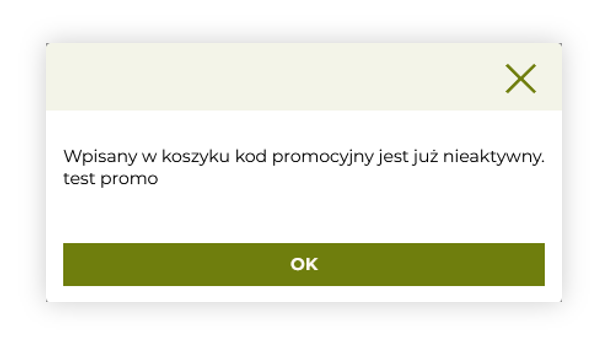 |
| *Visualization of the inactive discount code message* |
| 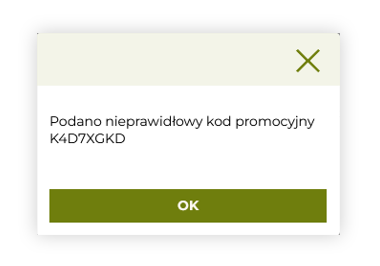 |
| *Visualization of the used personal code message* |
| 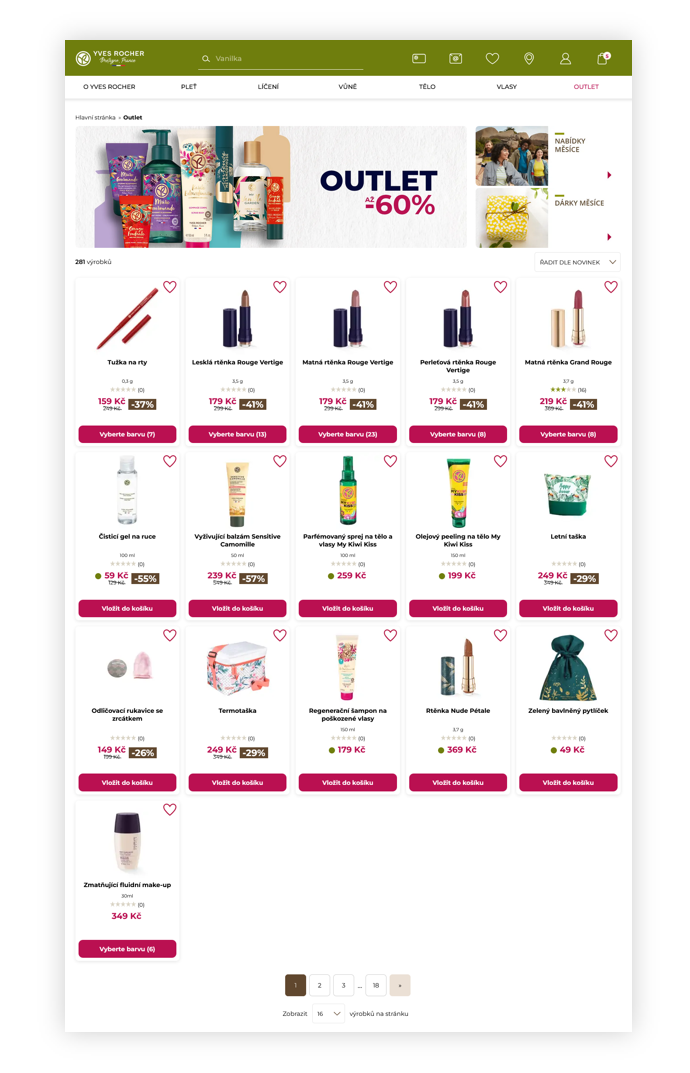 |
| *Visualization of the promotion page (desktop view)* |
| 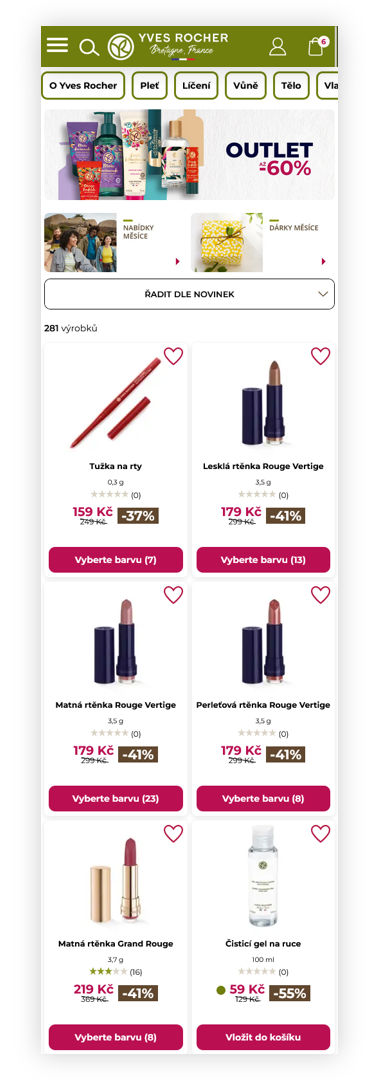 |
| *Visualization of the promotion page (mobile view)* |
| 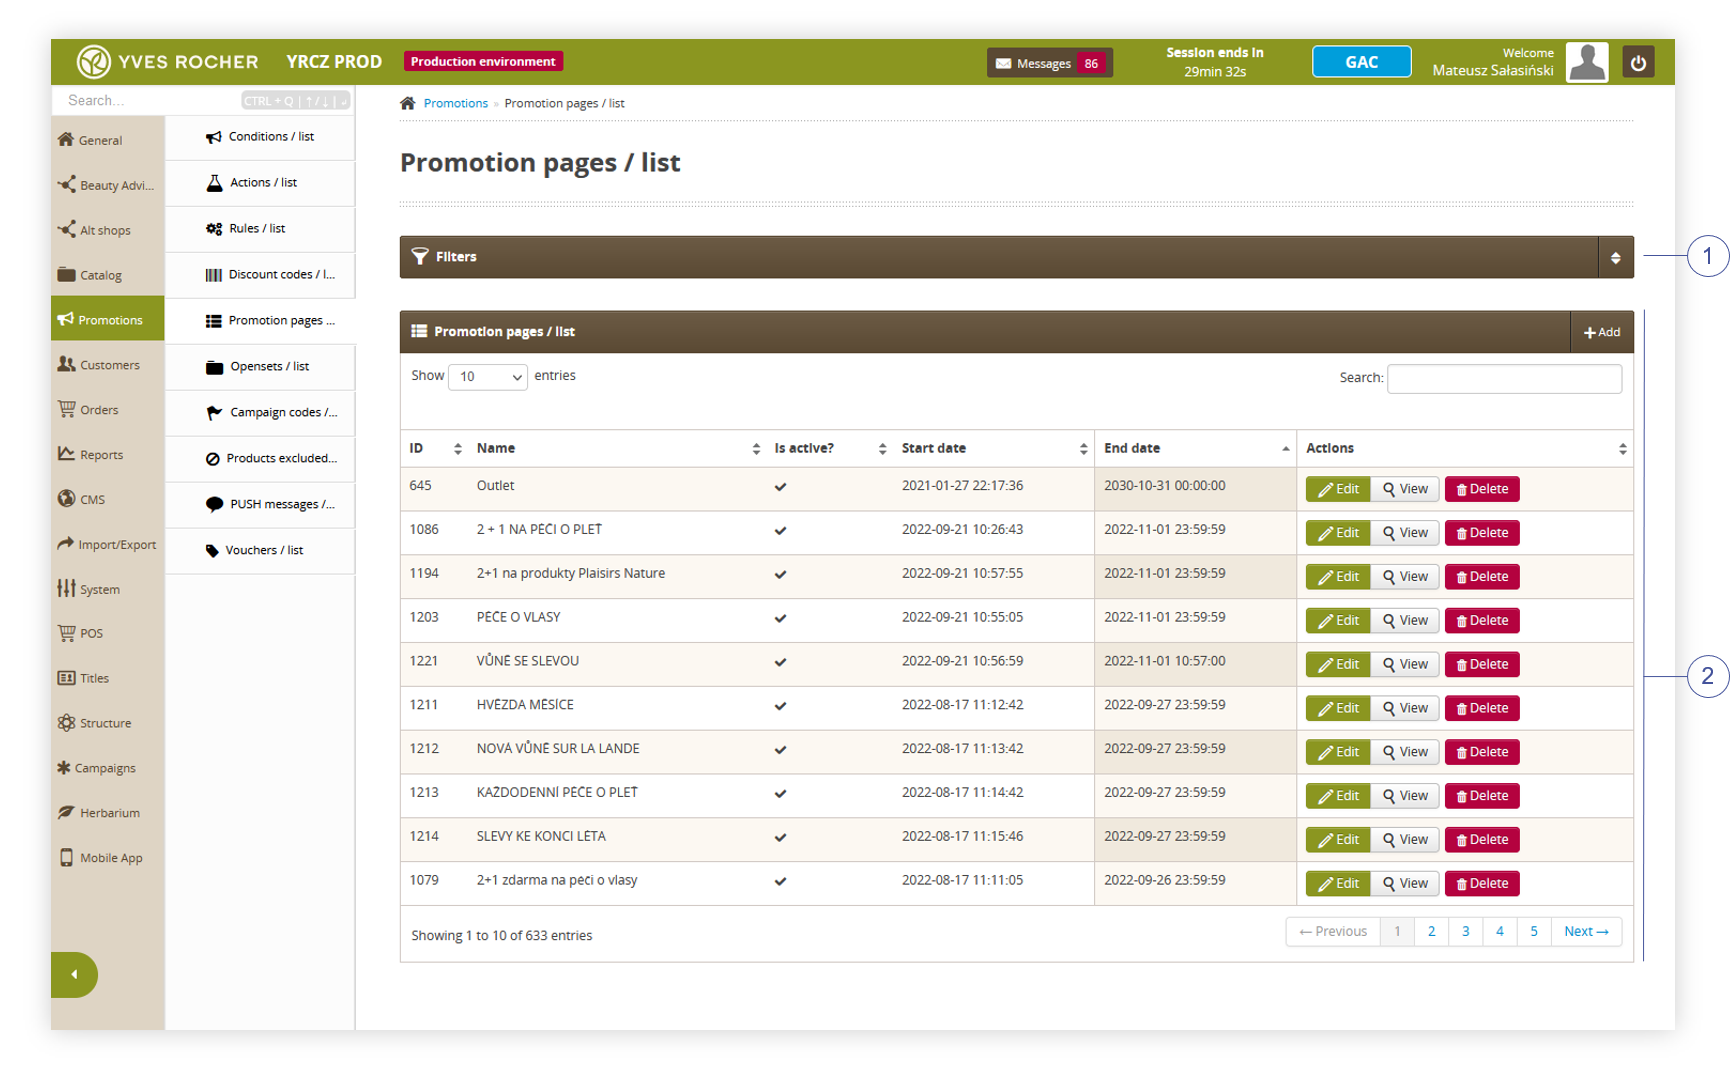 |
| *Visualization of the promotion pages / list section in the administrator panel* |
| 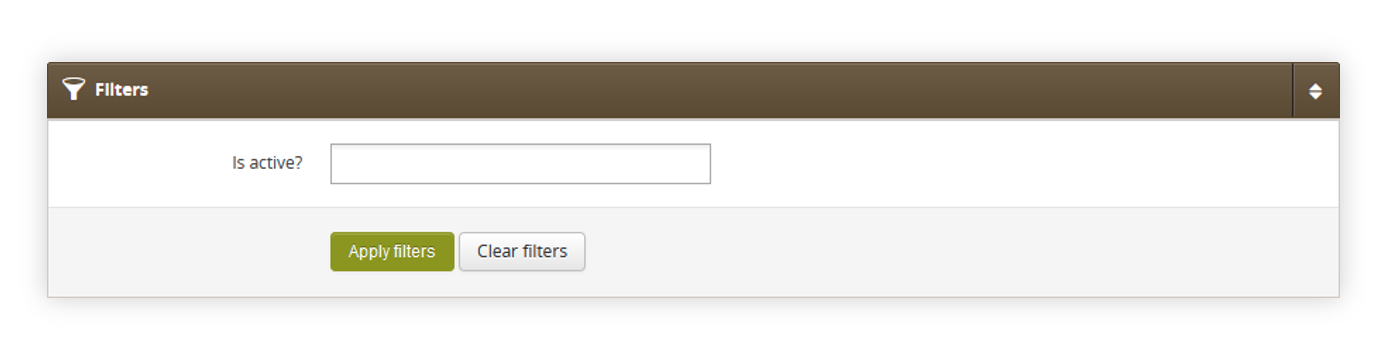 |
| *Visualization of the filters section in the promotion pages / list.* |
| 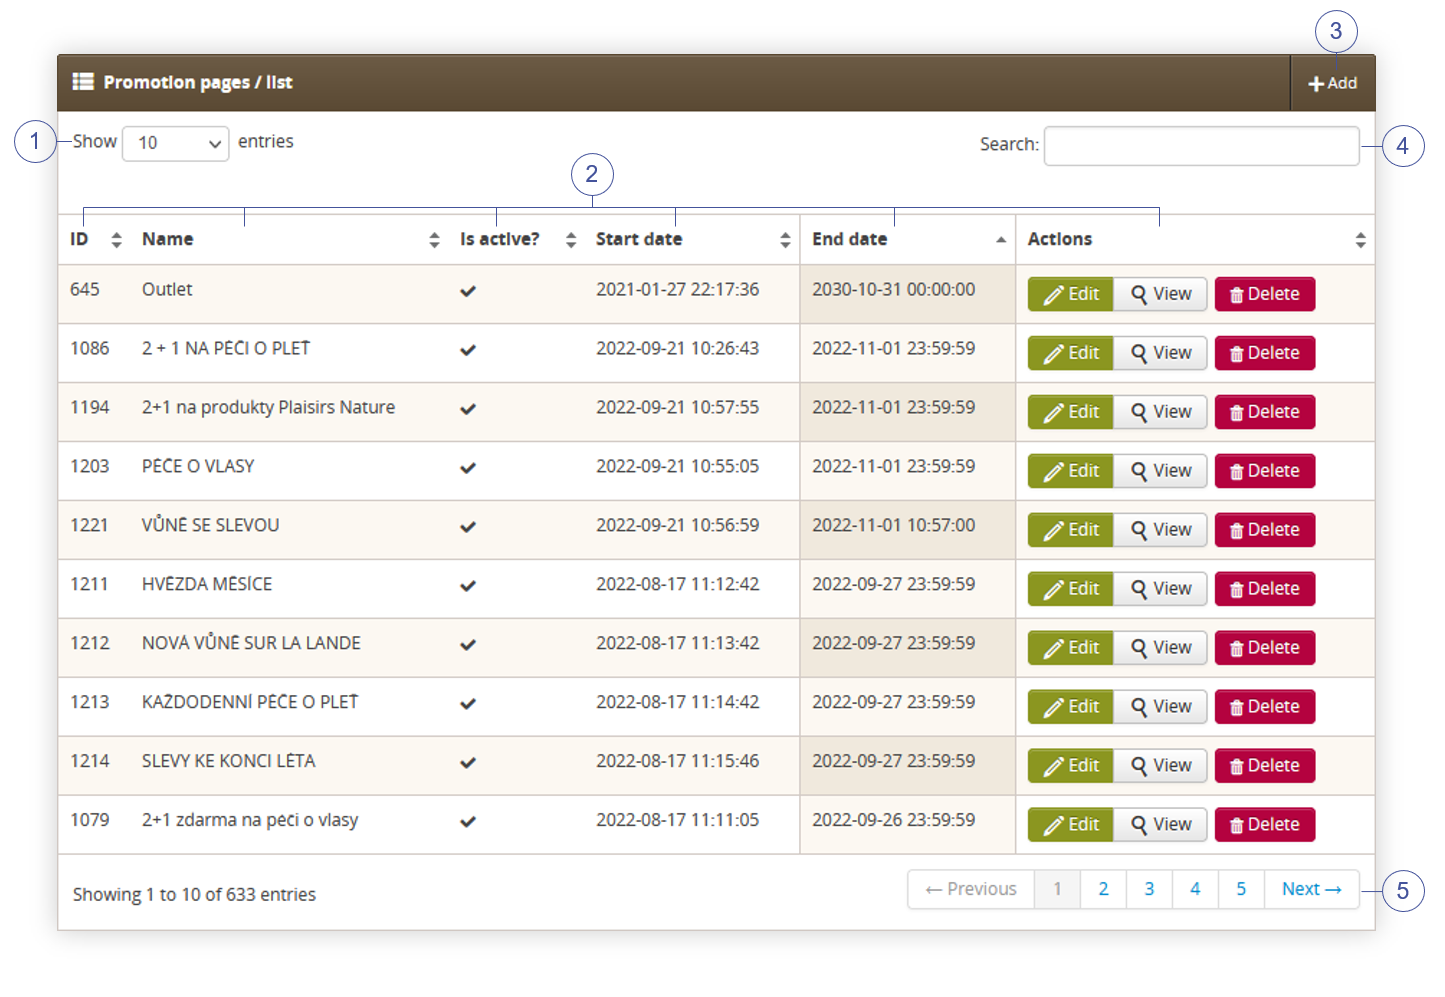 |
| *Visualization of the promotion pages / list section in the promotions pages / list* |
| 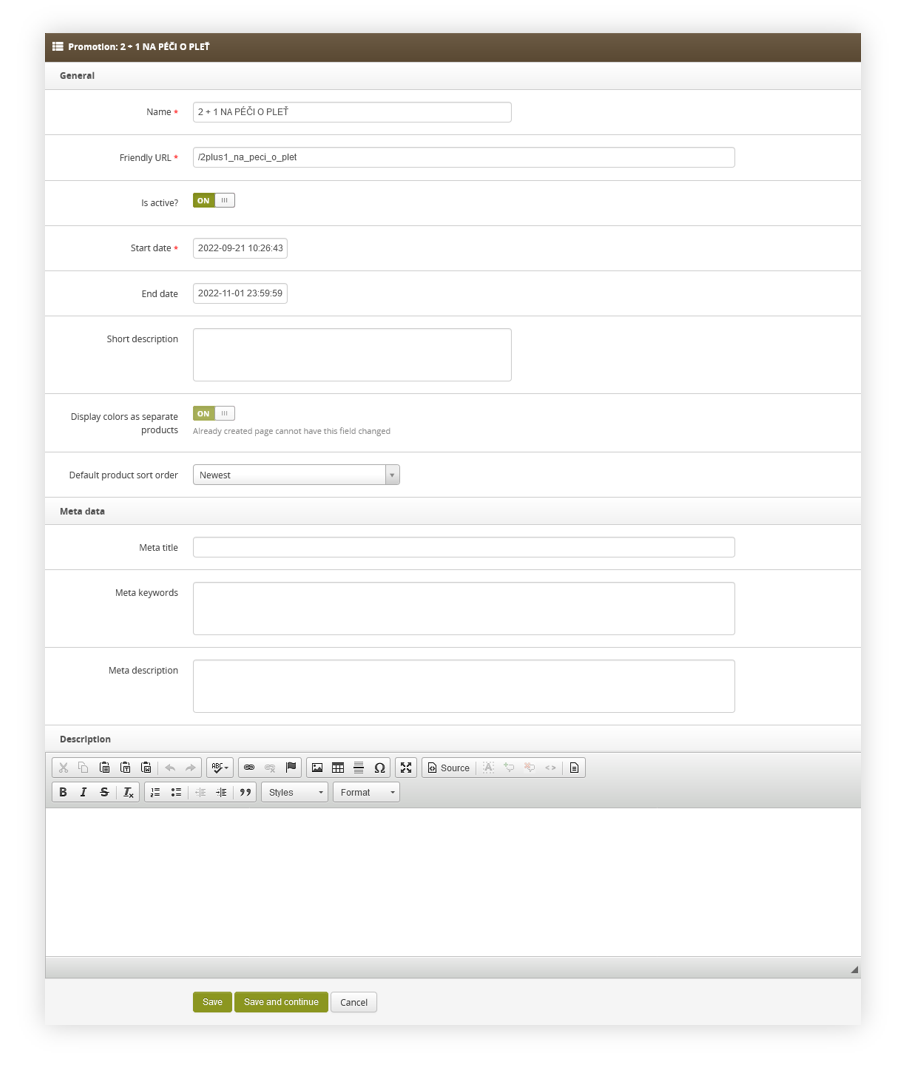 |
| *Visualization of the promotion page creation.* |
| 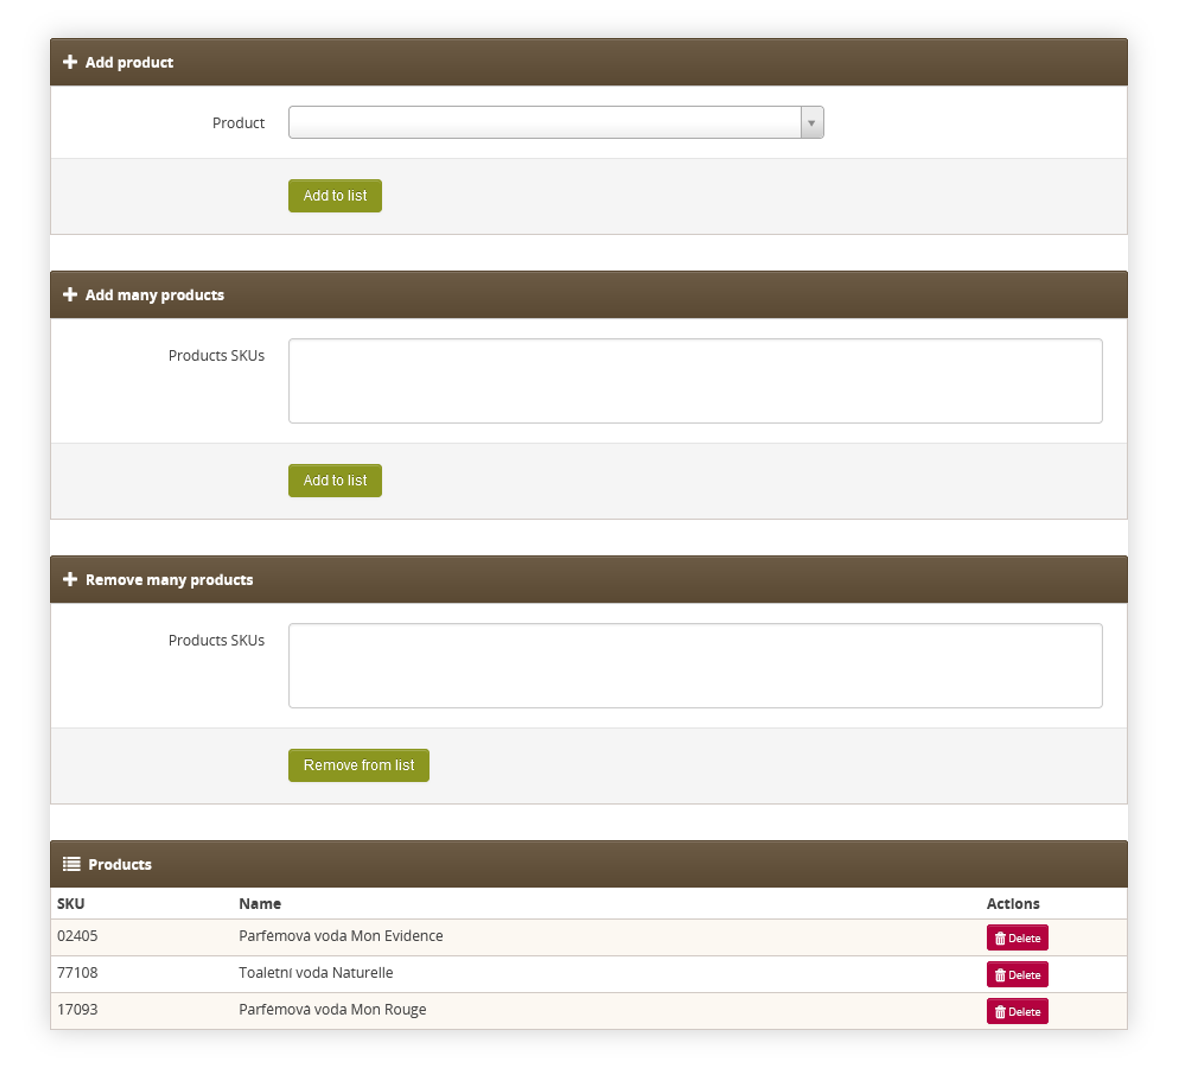 |
| *Visualization of the additional edit actions* |
| 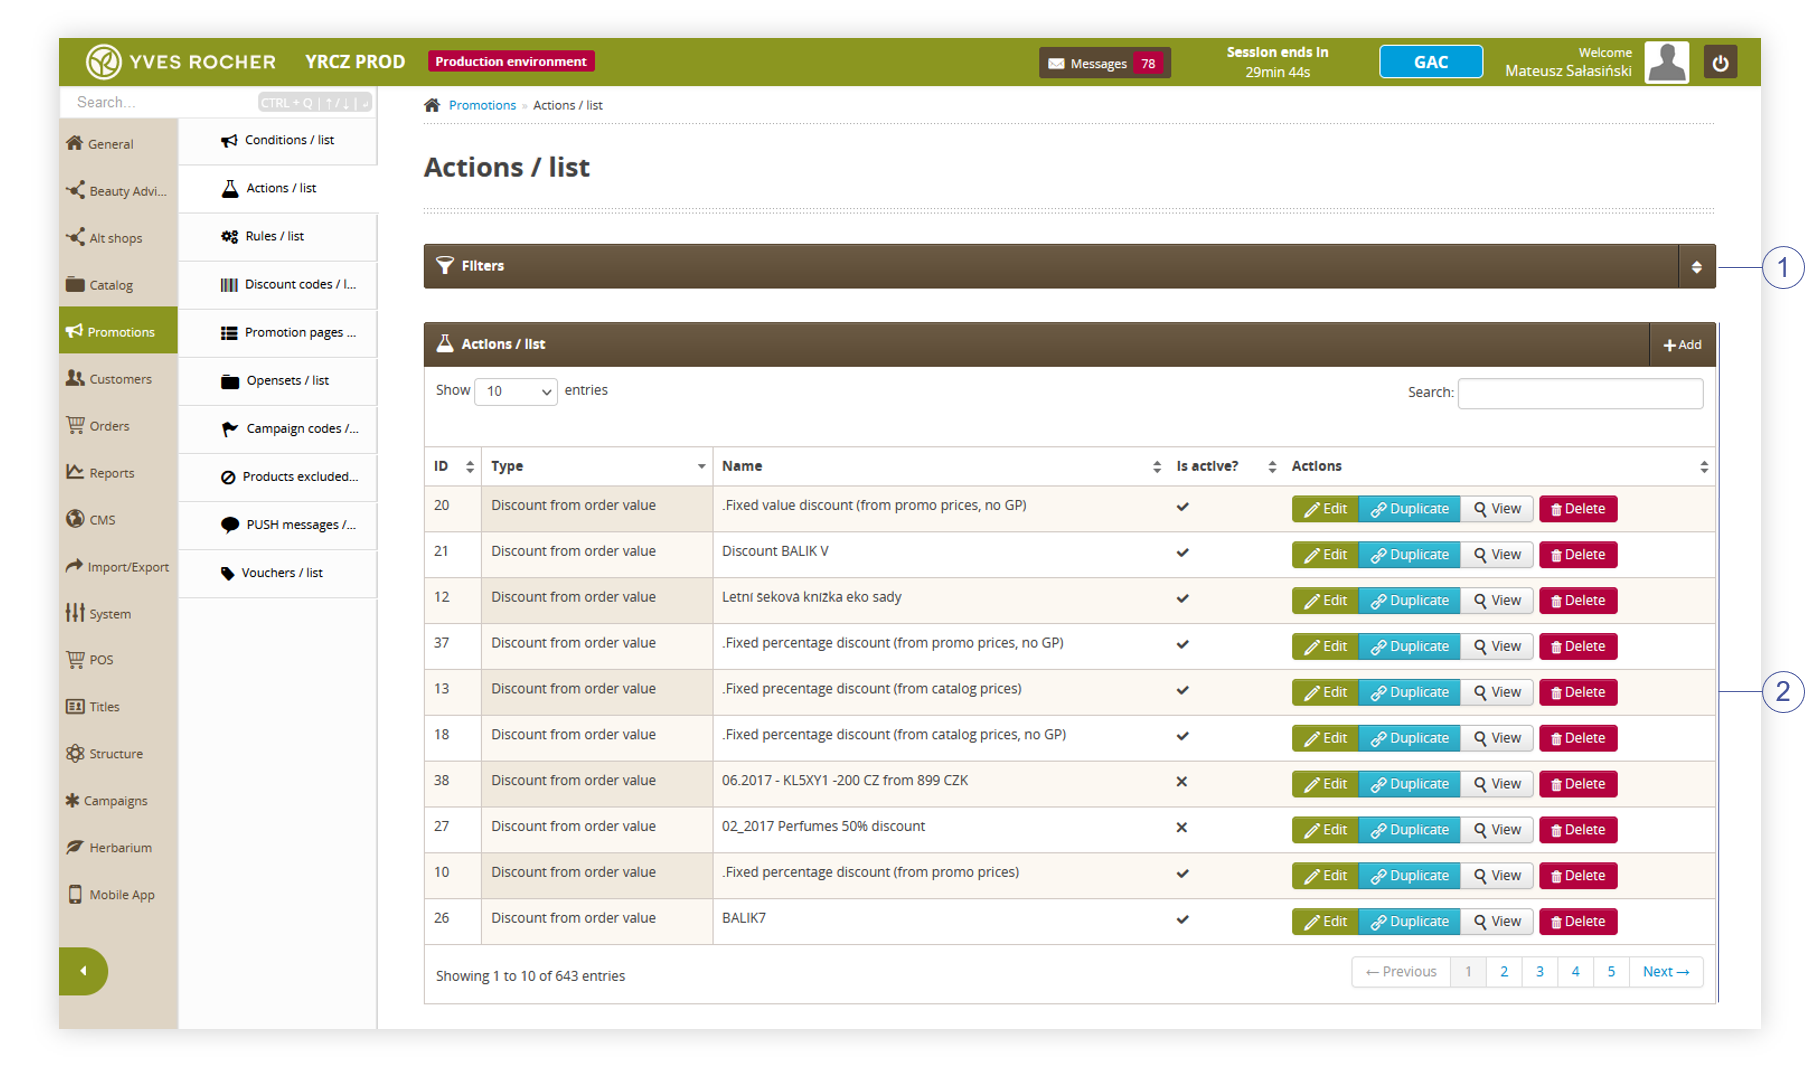 |
| *Visualization of the actions / list module in the administrator panel* |
| 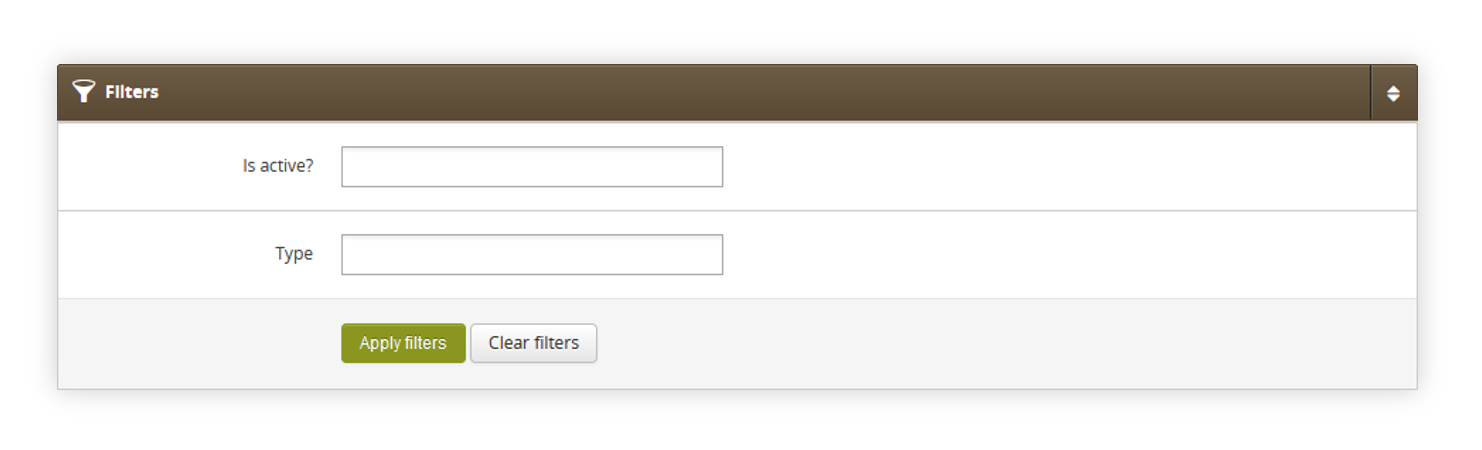 |
| *Visualization of the filters tab in the actions / list* |
| 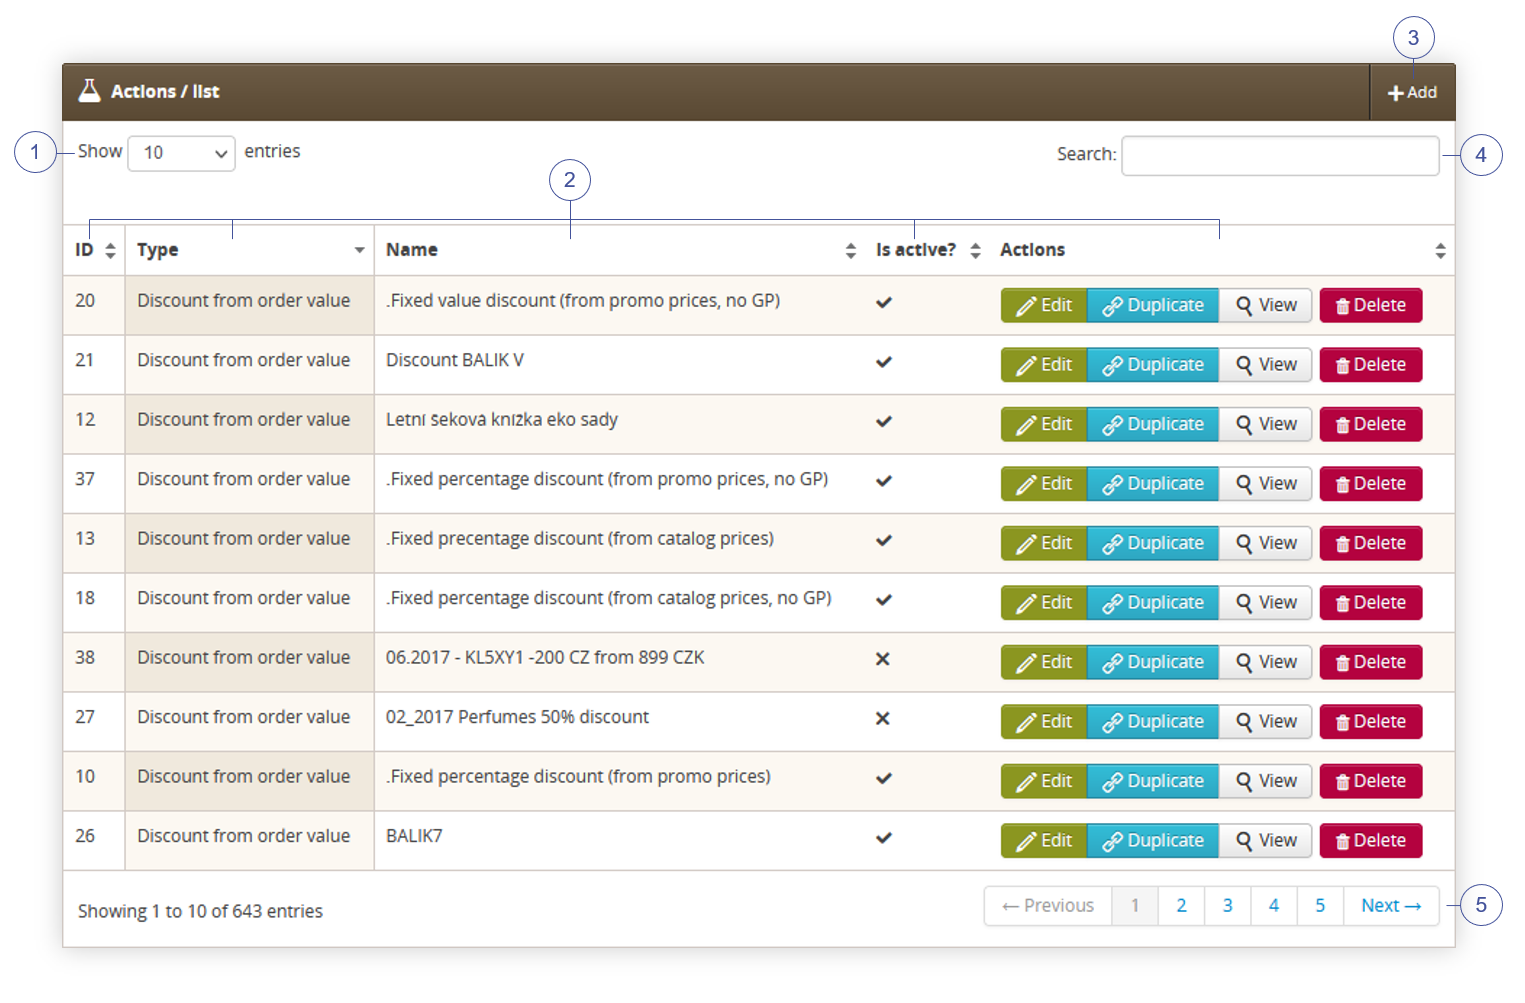 |
| *Visualization of the Actions / list tab in the Actions / list.* |
| 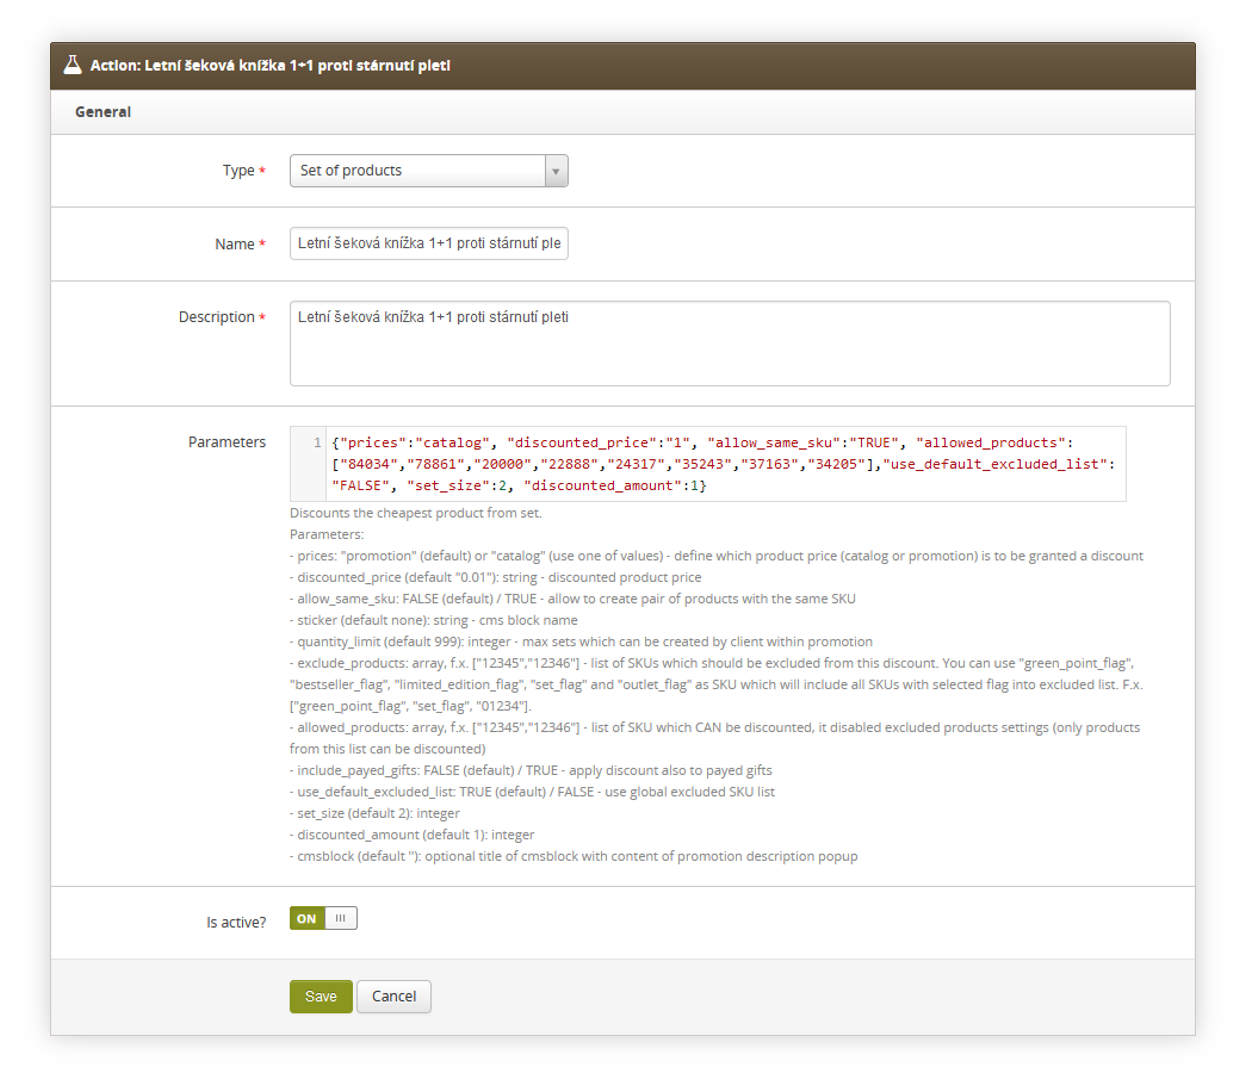 |
| *Visualization of the adding of the new action.* |
| 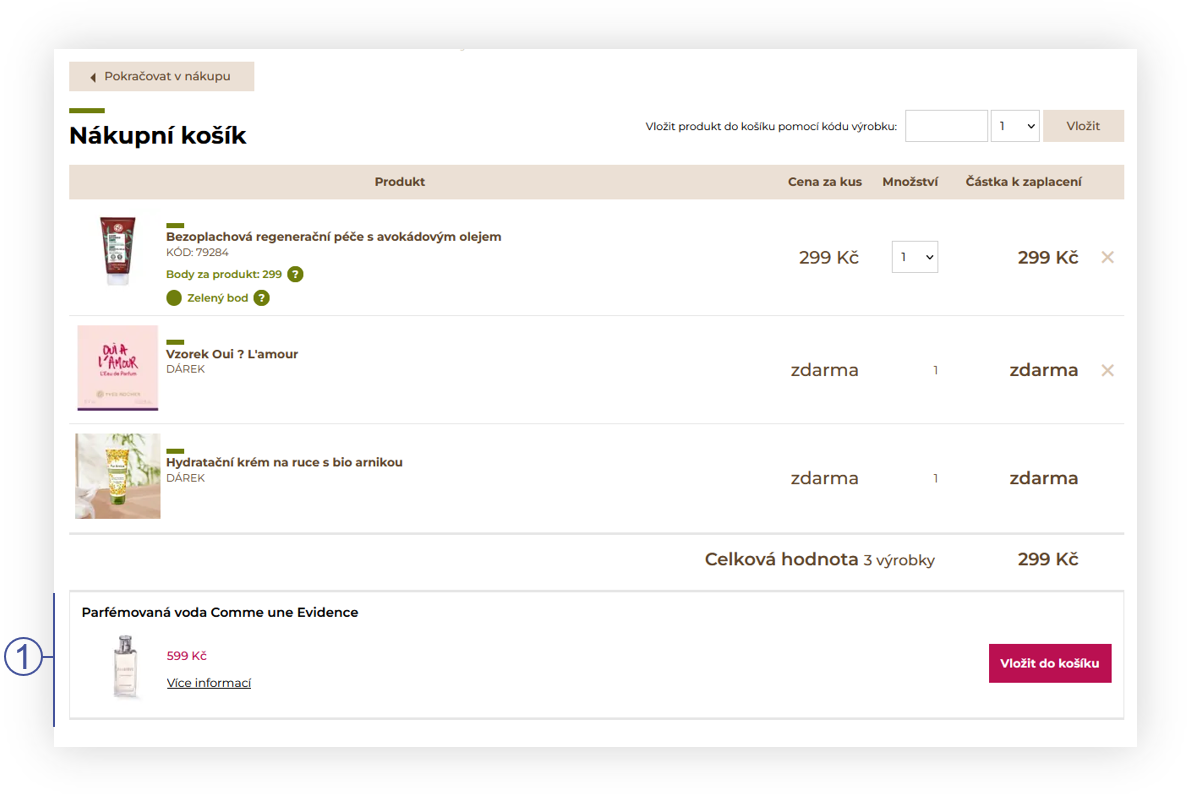 |
| *Visualization of the payed gift in the cart* |
| 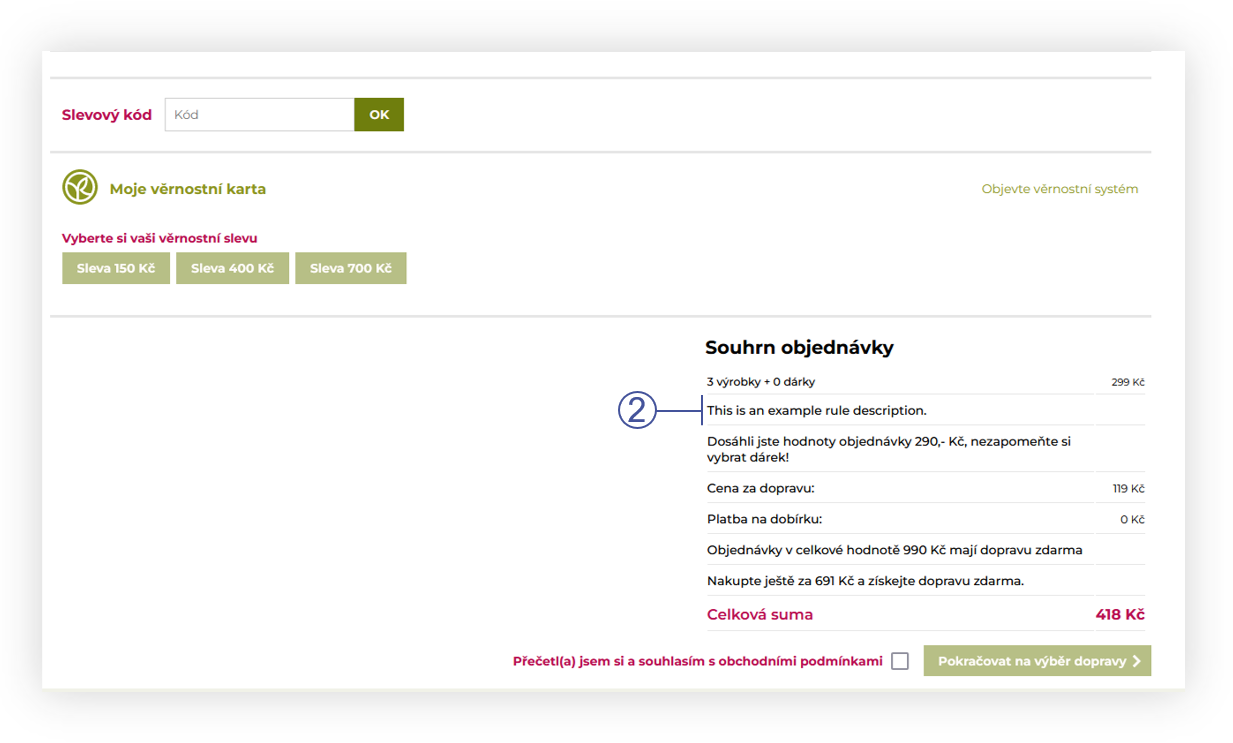 |
| *Visualization of the show rule description action.* |
| 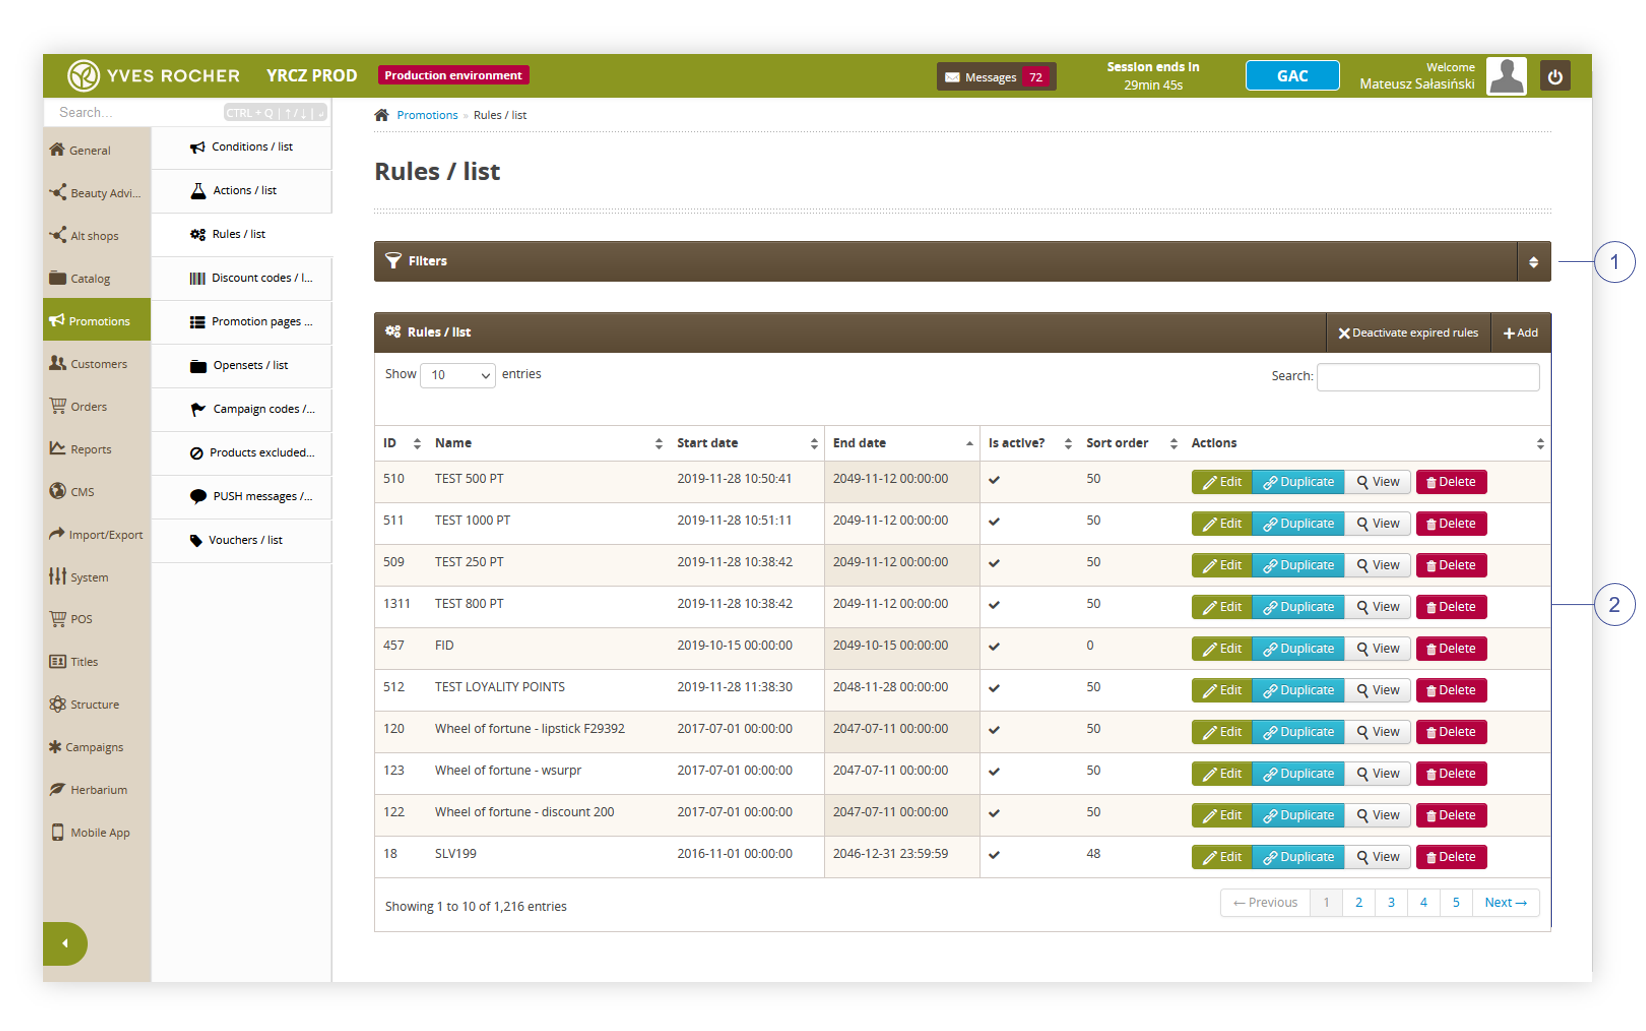 |
| *Visualization of the rules / list module in the administrator panel* |
| 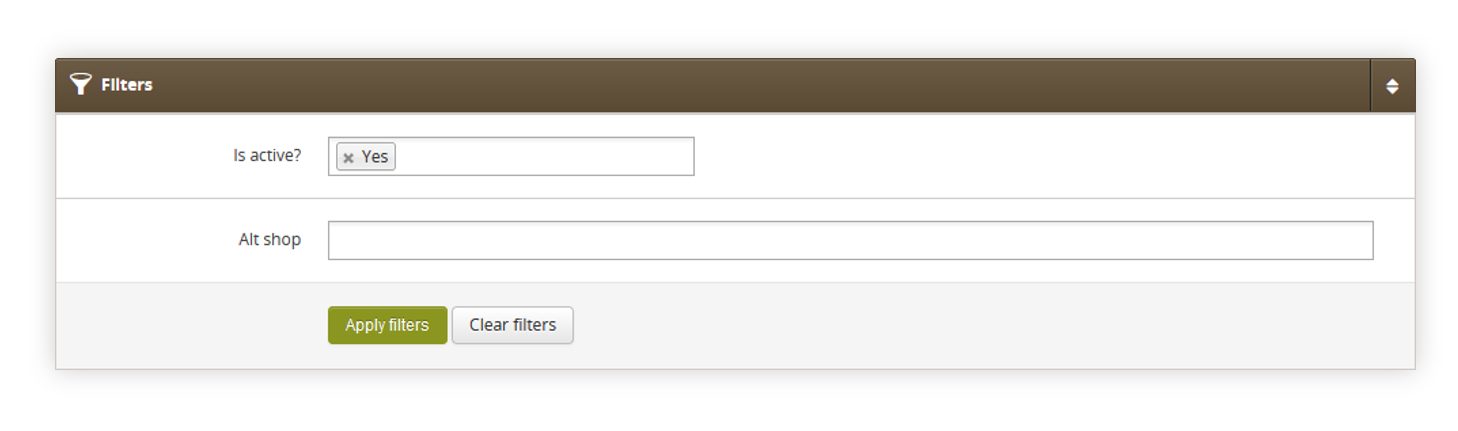 |
| *Visualization of the filters tab in the rules / list* |
| 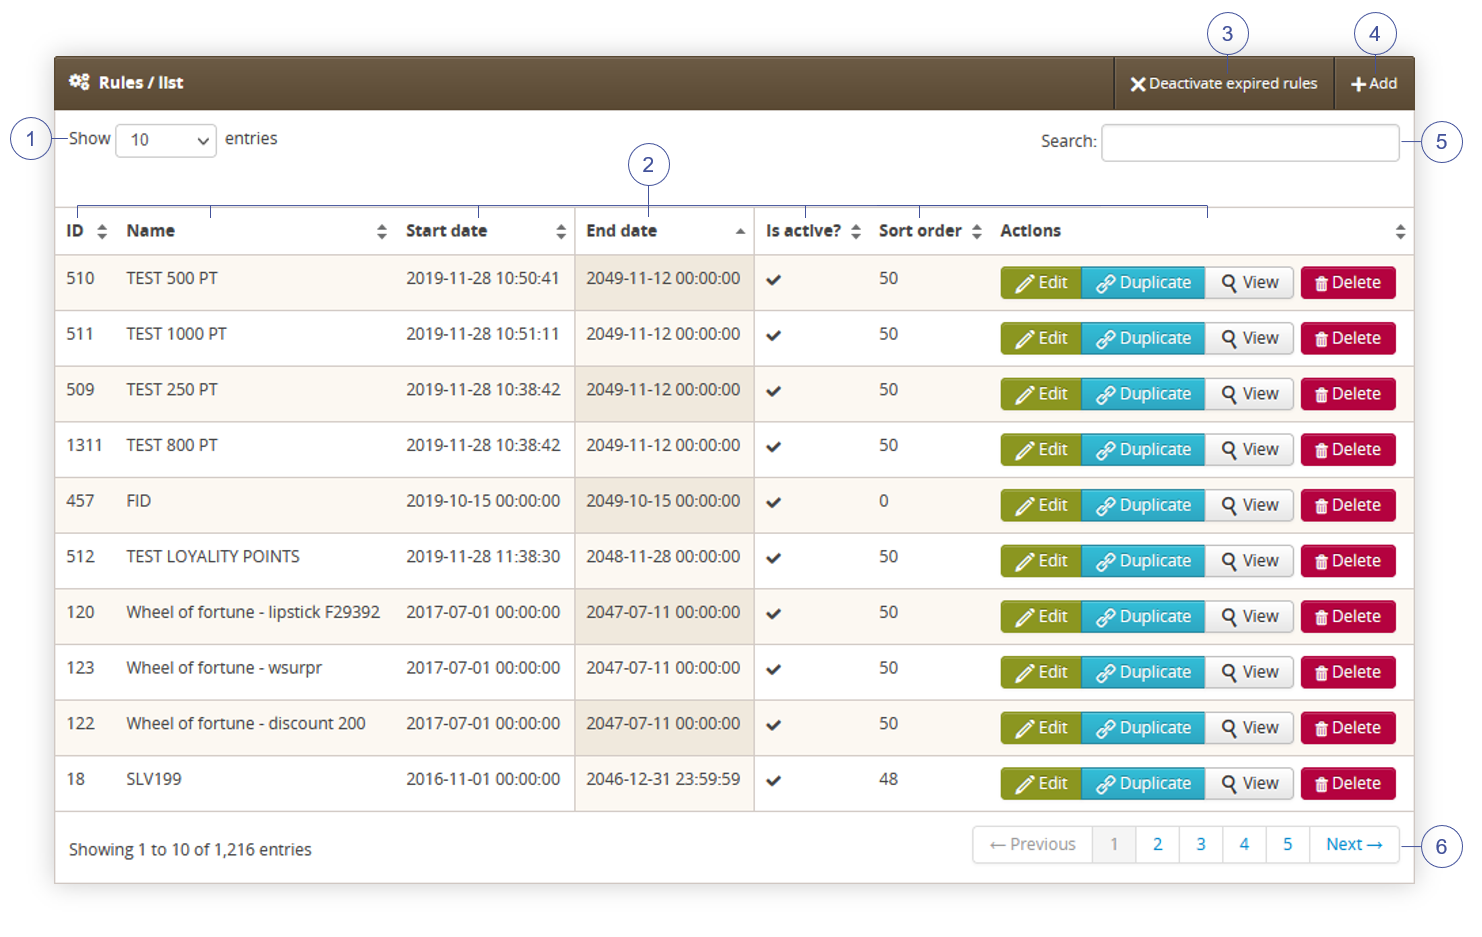 |
| *Visualization of the Rules / list tab in the Rules / list.* |
| 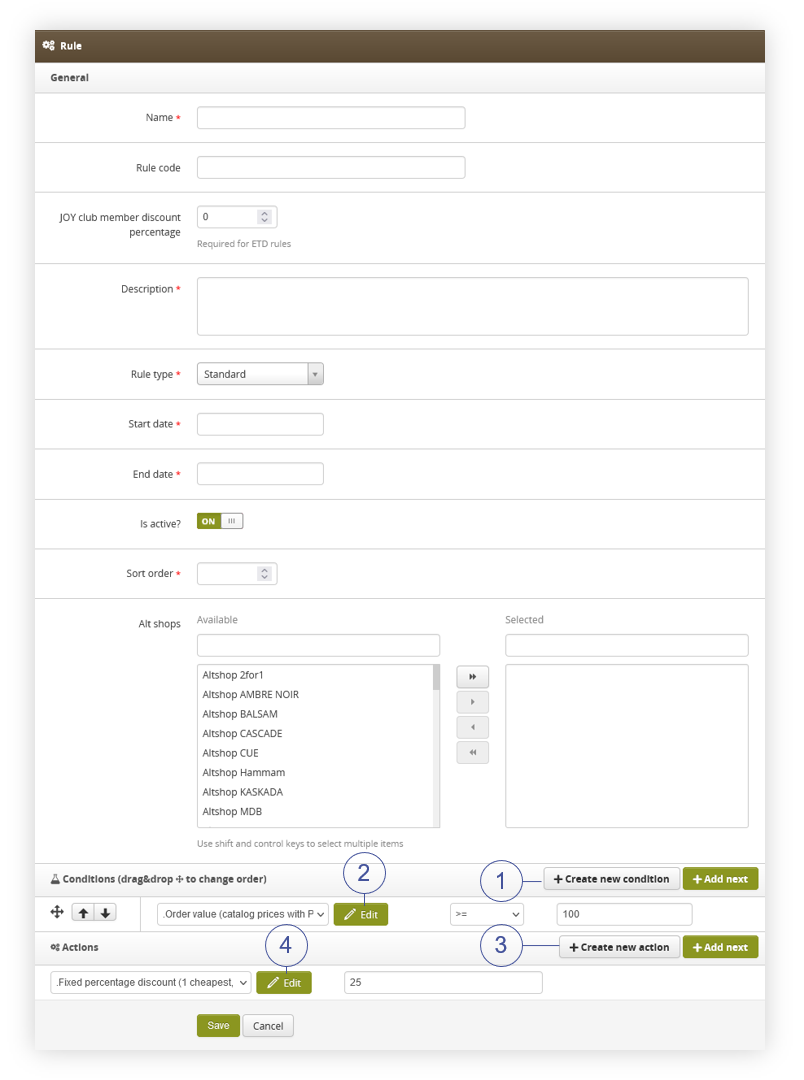 |
| *Visualization of the adding of the new rule.* |
| 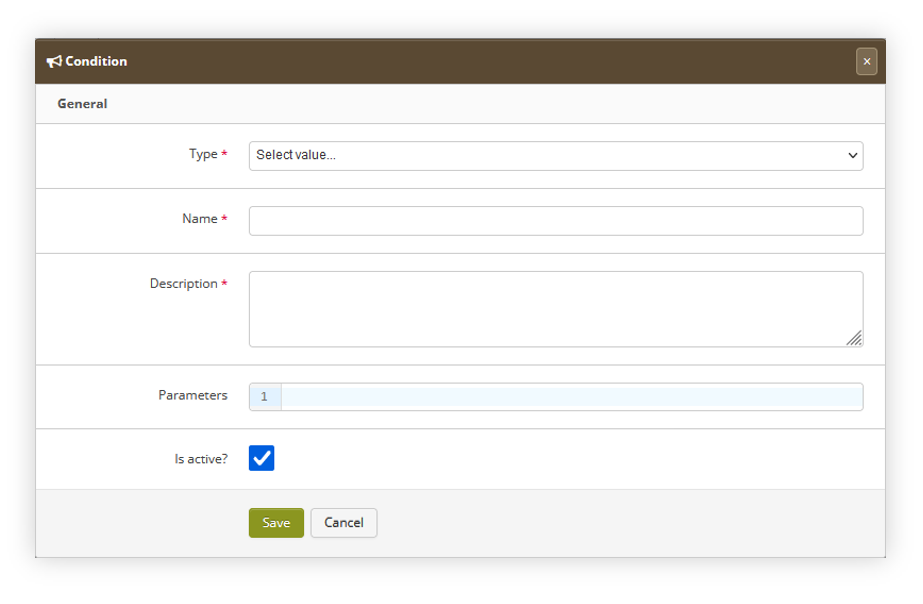 |
| *Visualization of the condition creating window* |
| 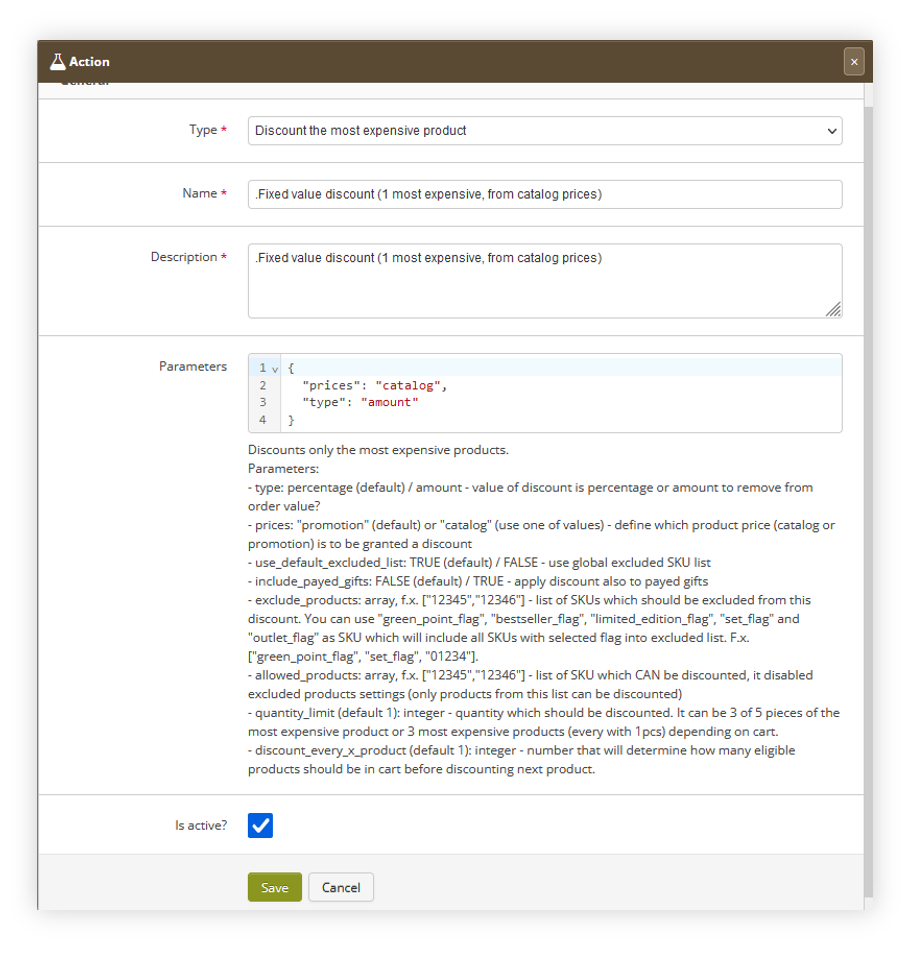 |
| *Visualization of the action editing window* |
| 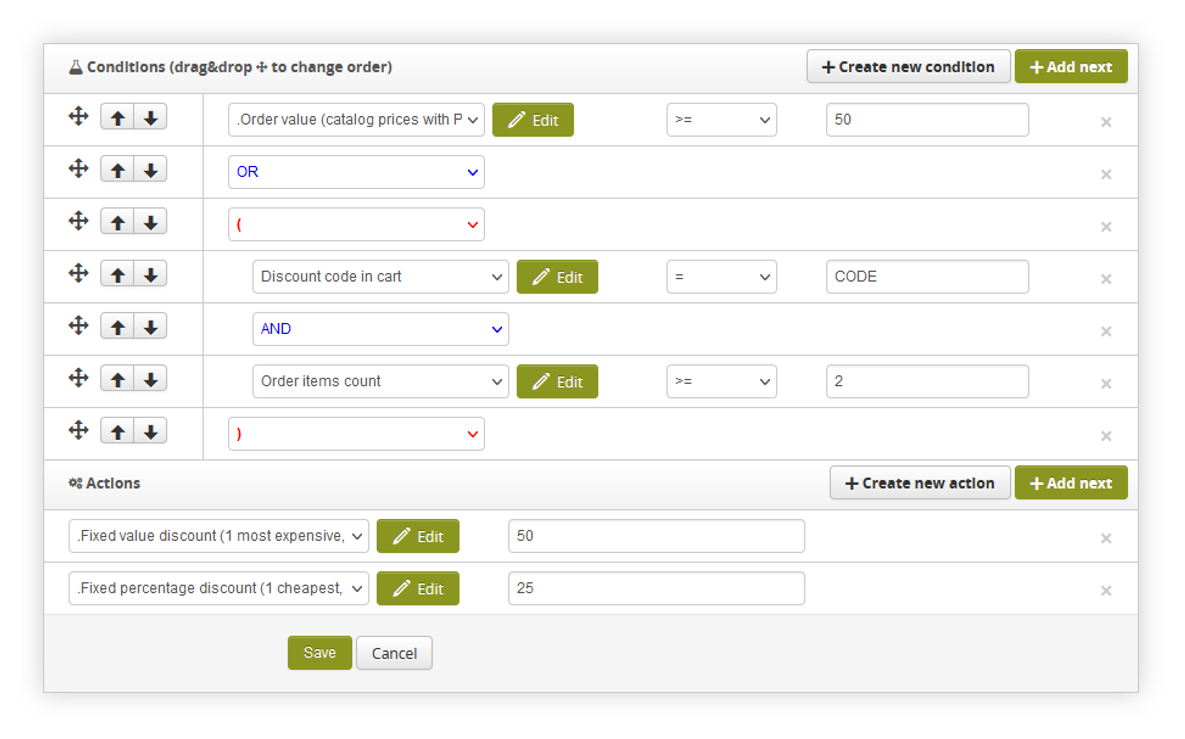 |
| *Visualization of the example promotion rule configuration* |
| 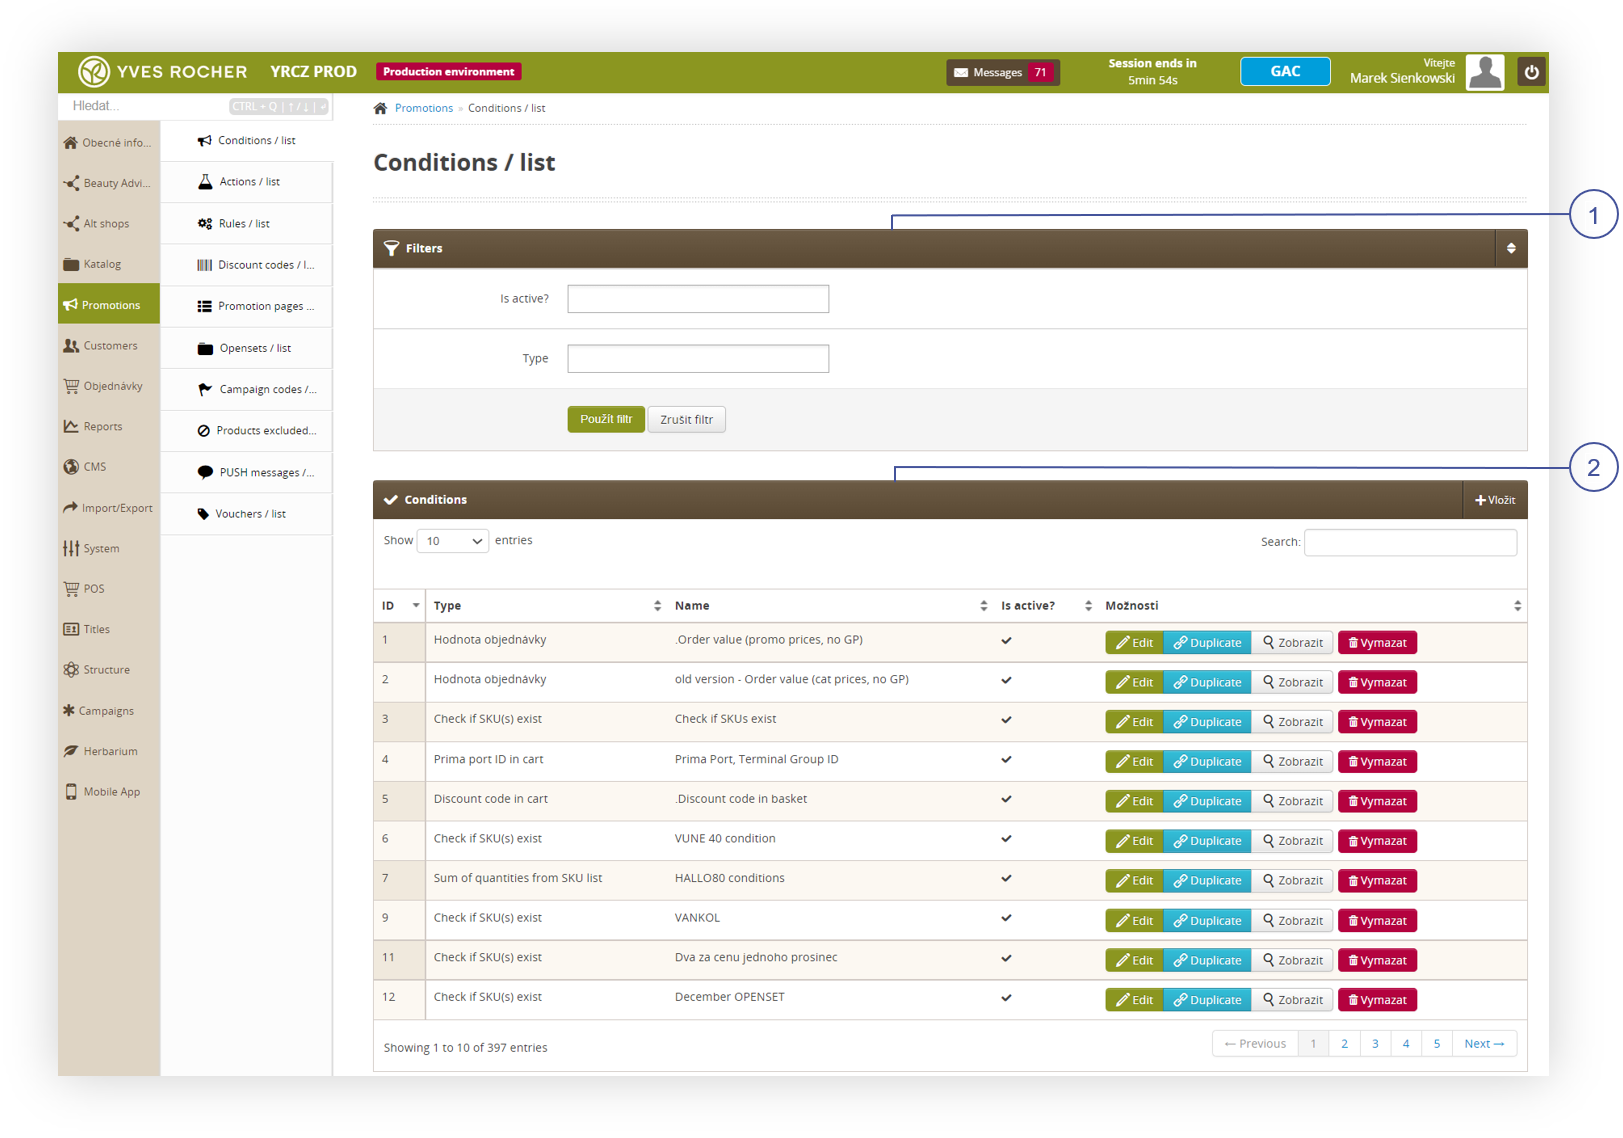 |
| *Visualization of the Promotions, Conditions / list* |
| 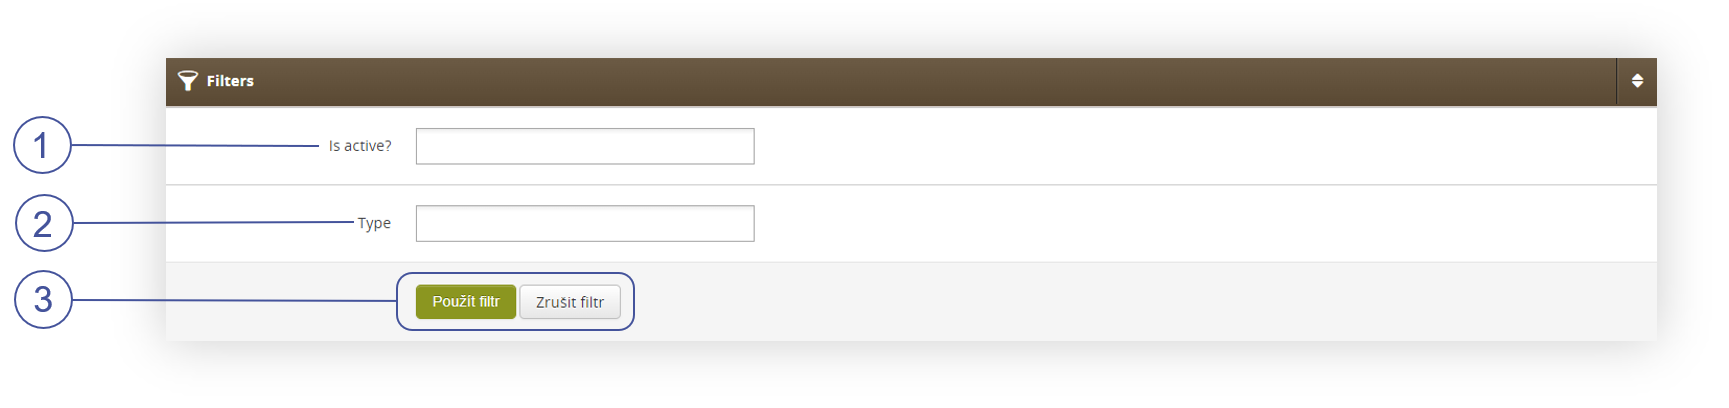 |
| *Visualization of Filters, Conditions / list* |
|  |
| *Visualization of Filters, Conditions / list* |
| 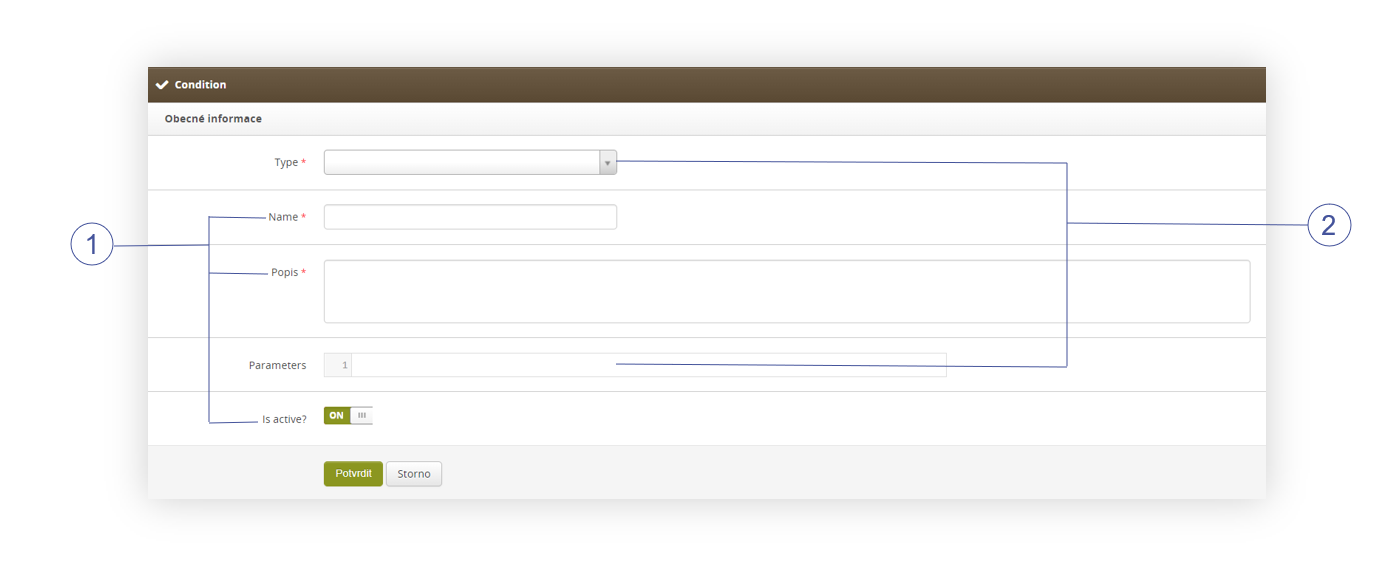 |
| *Visualization of Filters, Conditions / list* |
| 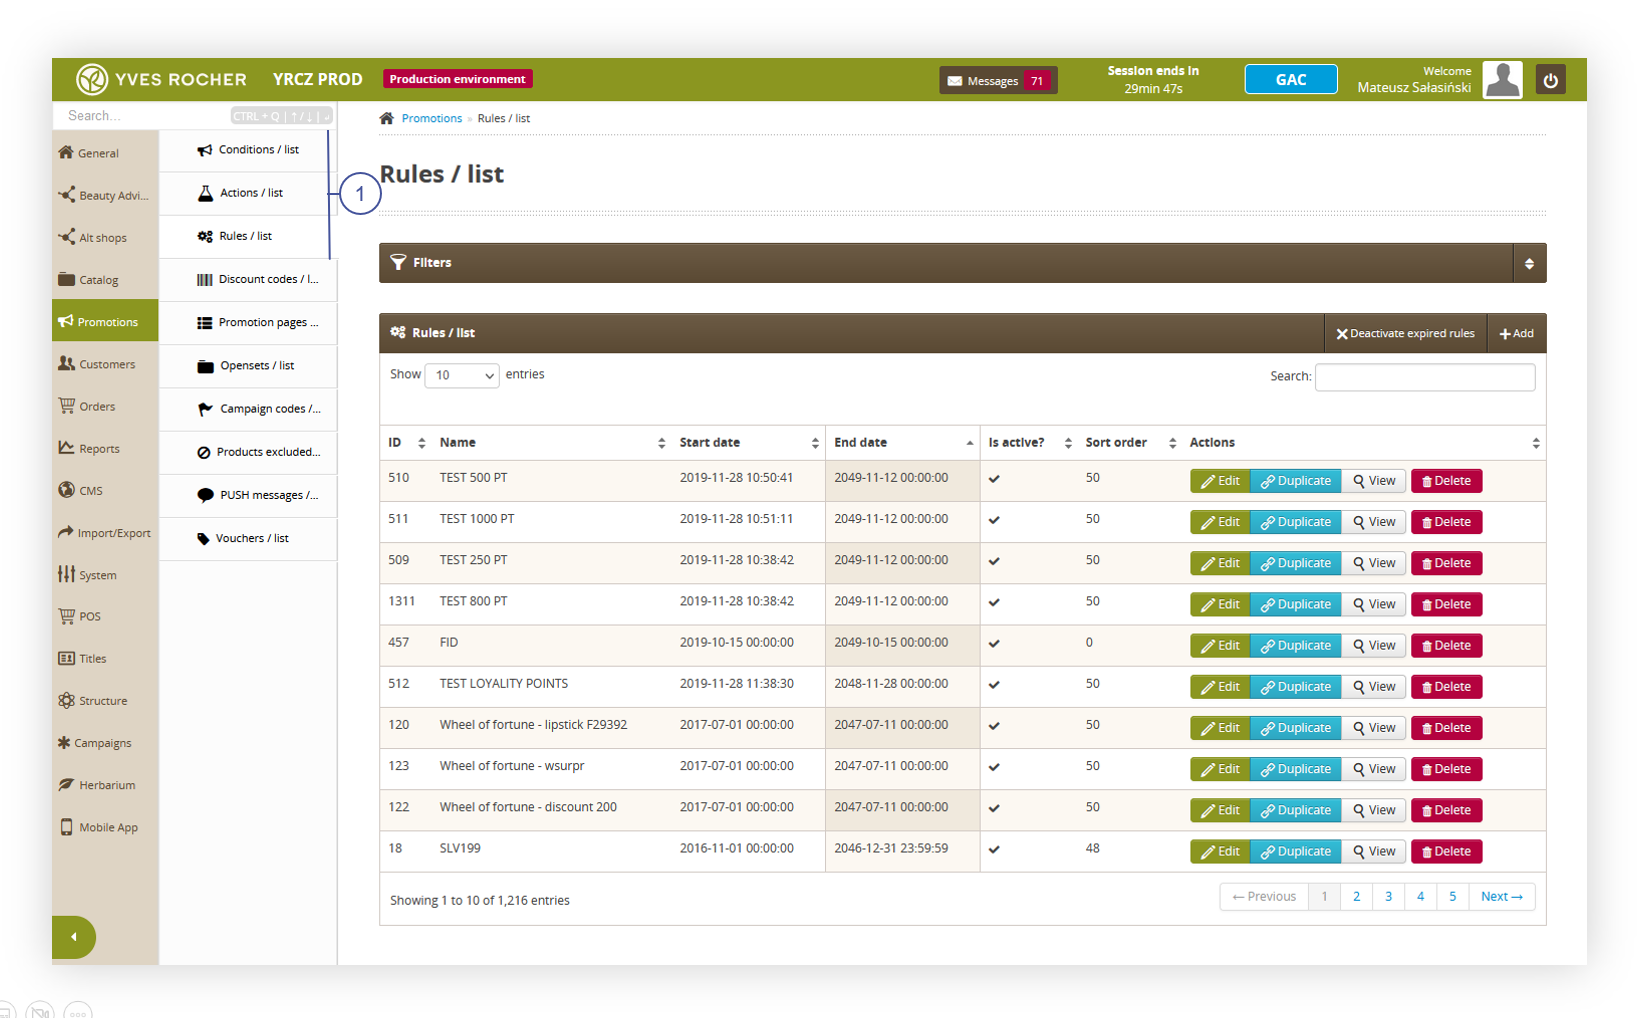 |
| *Visualization of the promotion module* |
| 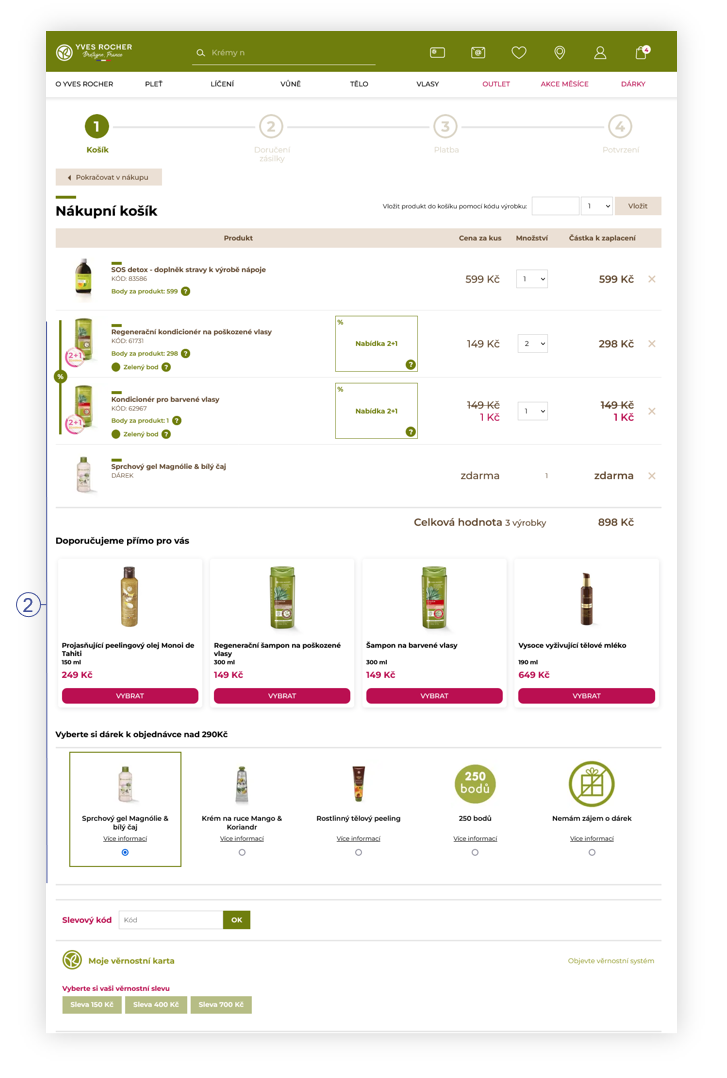 |
| *Visualization of the promotions in the cart on the website* |
| 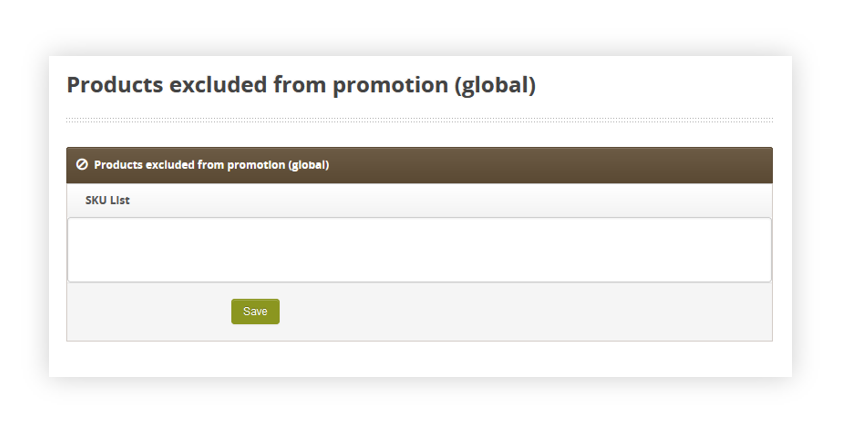 |
| *Visualization of the products excluded from promotion (global) tab.* |
| 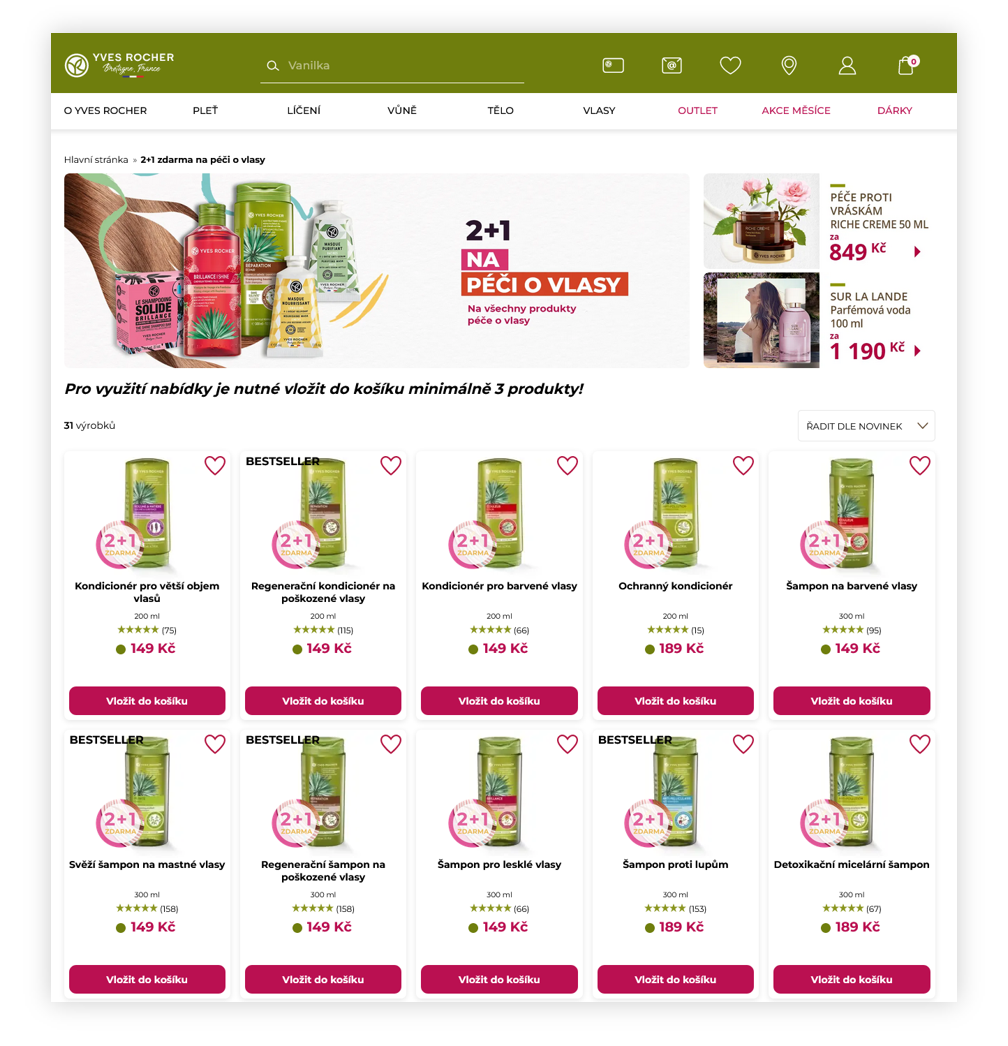 |
| *Visualization of the promotion page* |
| 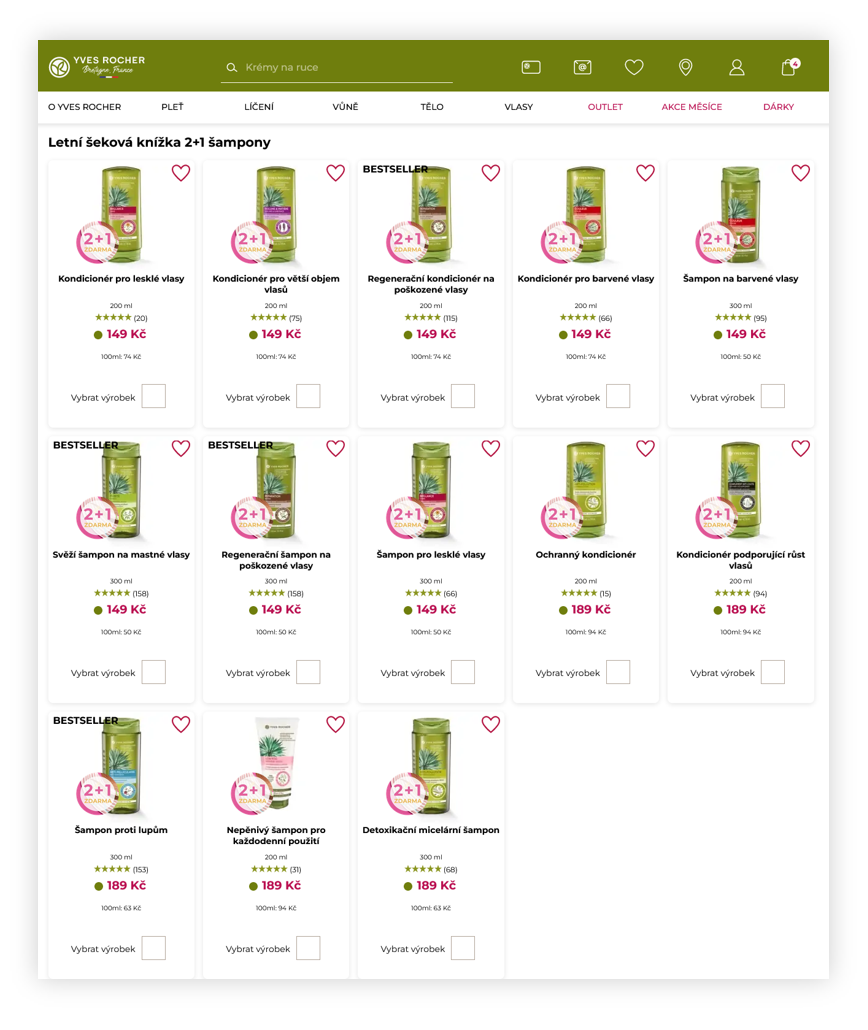 |
| *Visualization of the normal openset* |
| 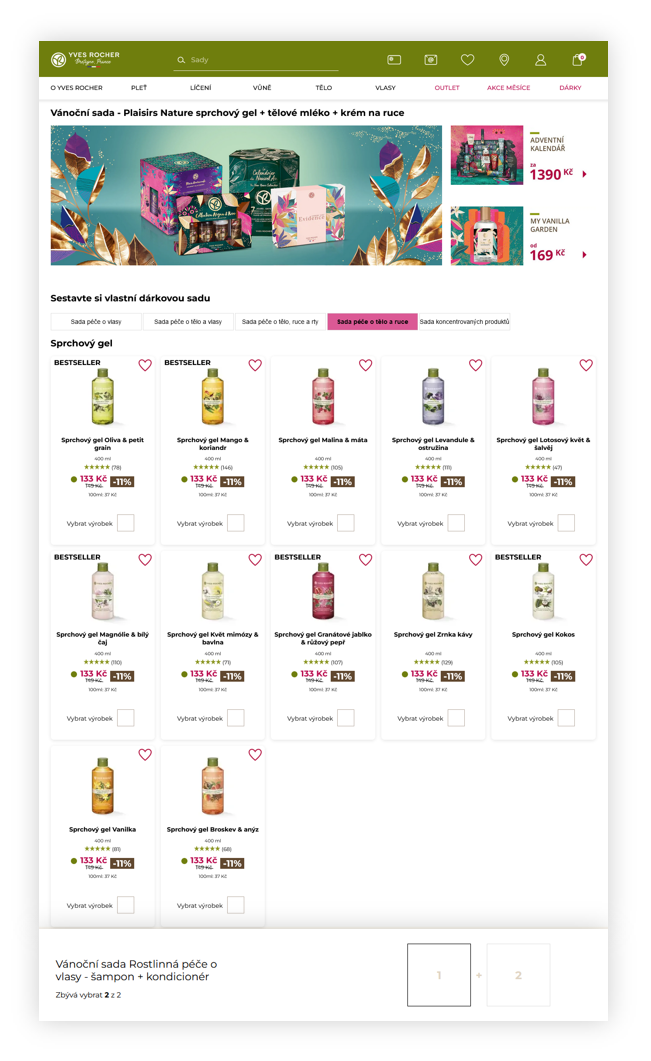 |
| *Visualization of the DIY openset* |
| 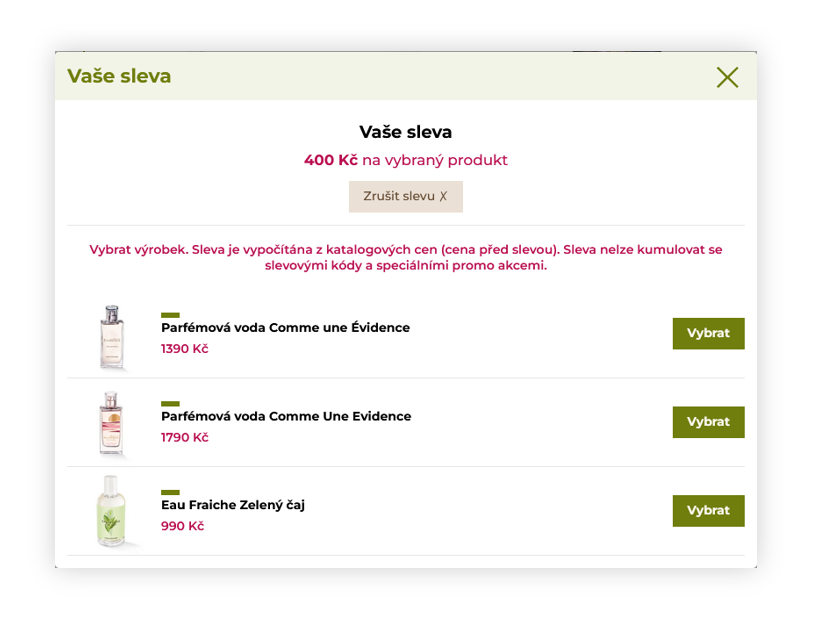 |
| *Visualization of the adding of the discount through FIDEN2 functionality* |
|  |
| *Visualization of the DIY openset* |
| 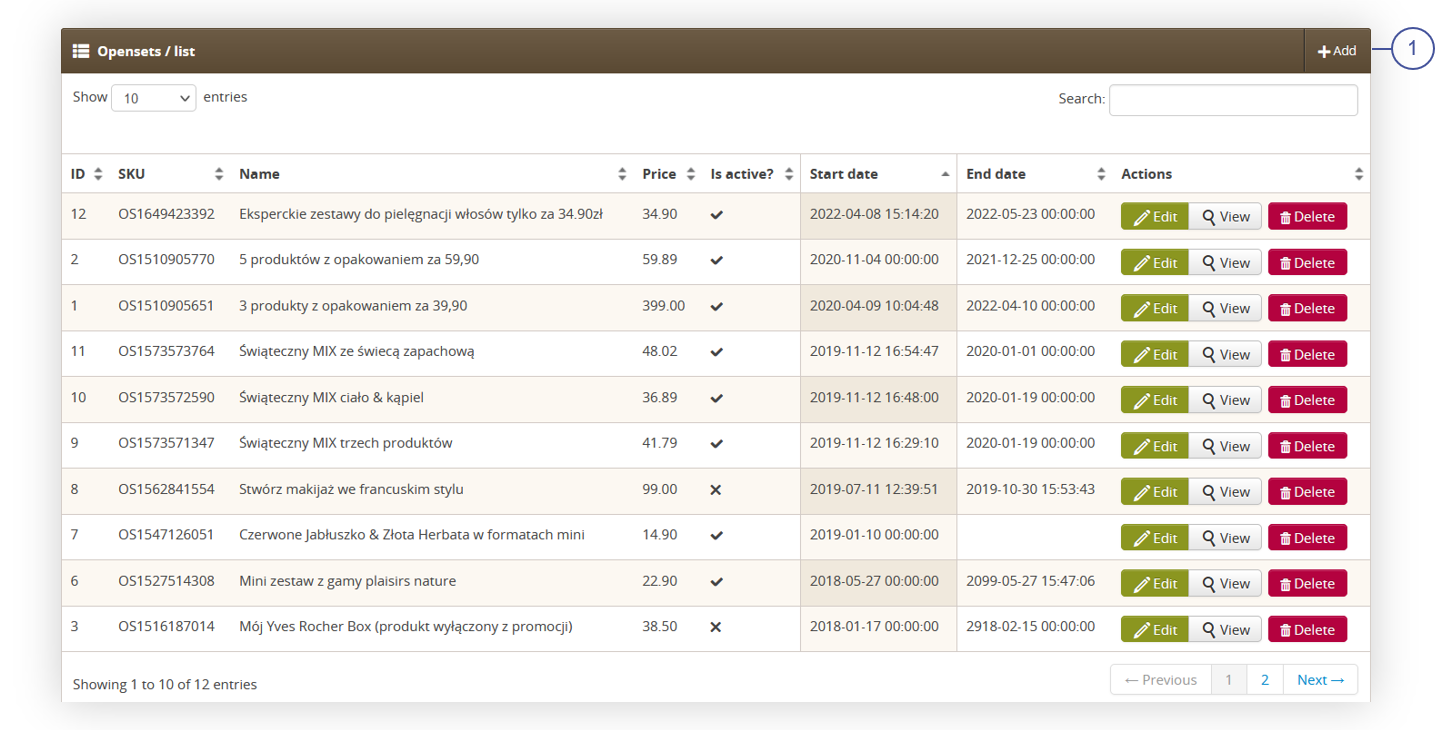 |
| *Visualization of the opensets / list tab* |
|  |
| *Visualization of the normal openset creation.* |
| 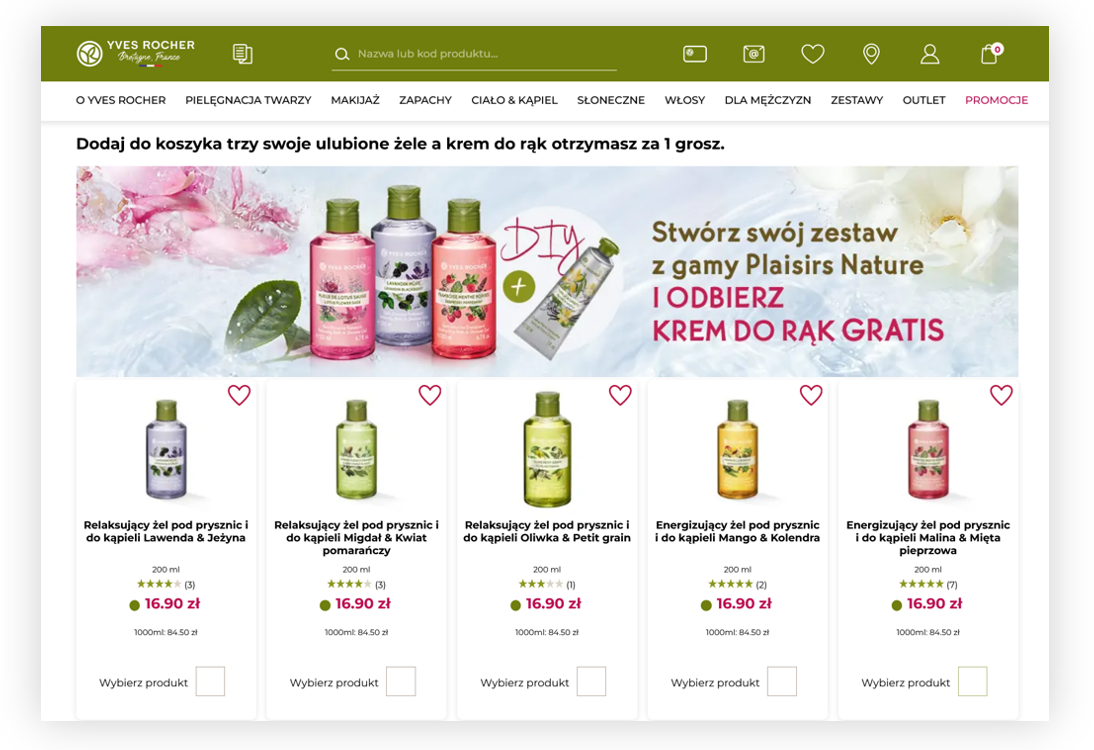 |
| *Visualization of the normal openset on desktop* |
| 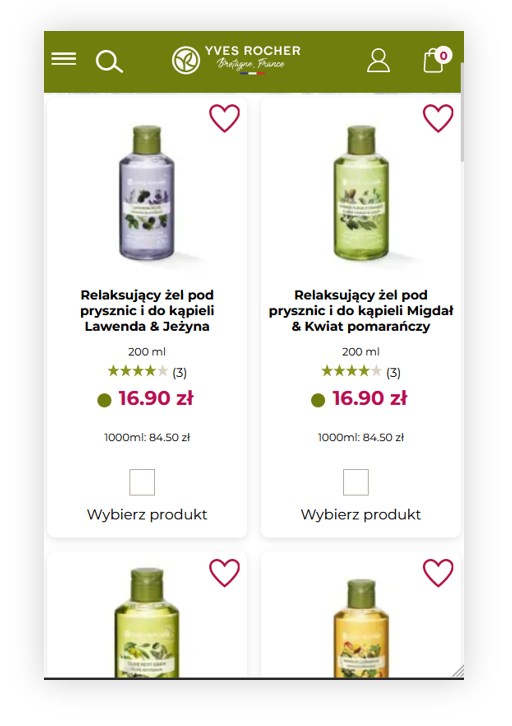 |
| *Visualization of the normal openset on mobile* |
|  |
| *Visualization of the CMS blocks tab* |
| 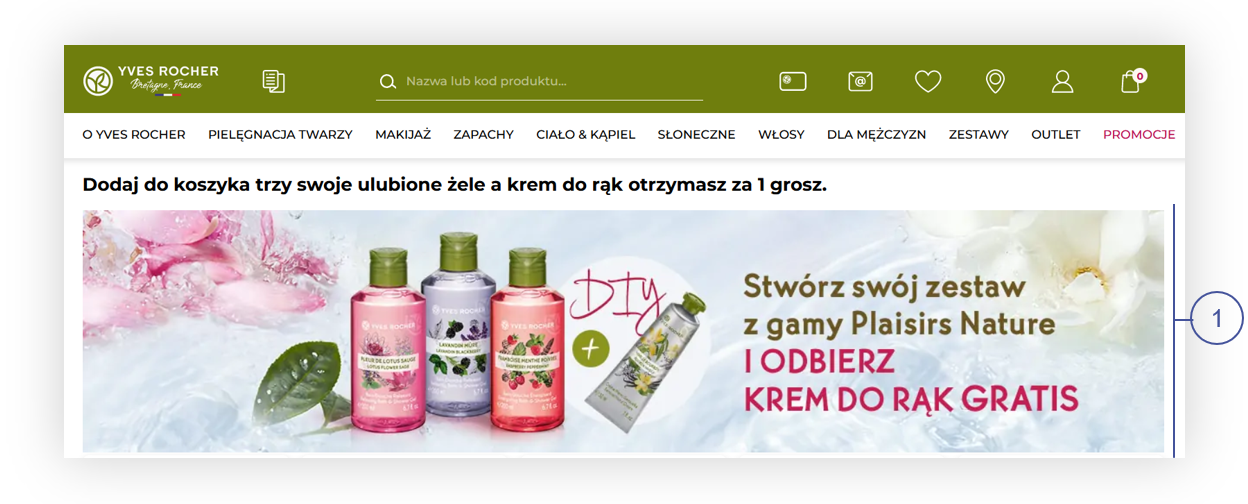 |
| *Visualization of the openset CMS block* |
|  |
| *Visualization of the DIY openset in the admin panel* |
|  |
| *Visualization of the DIY openset* |
|  |
| *Visualization of the system settings* |
|  |
| *Visualization of the error message when the account is expired* |
|  |
| *Visualization of the example re-activation e-mail.* |
| 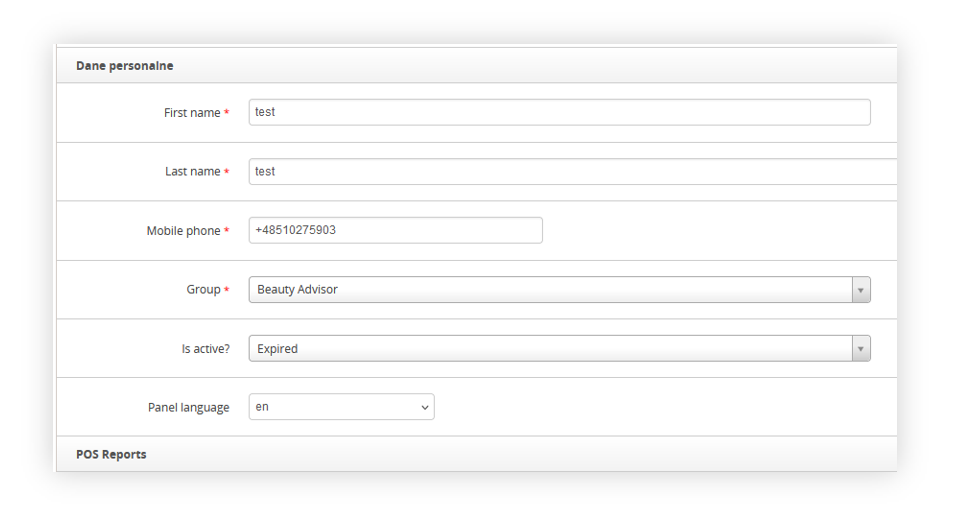 |
| *Visualization of the user profile in the admin panel* |
| 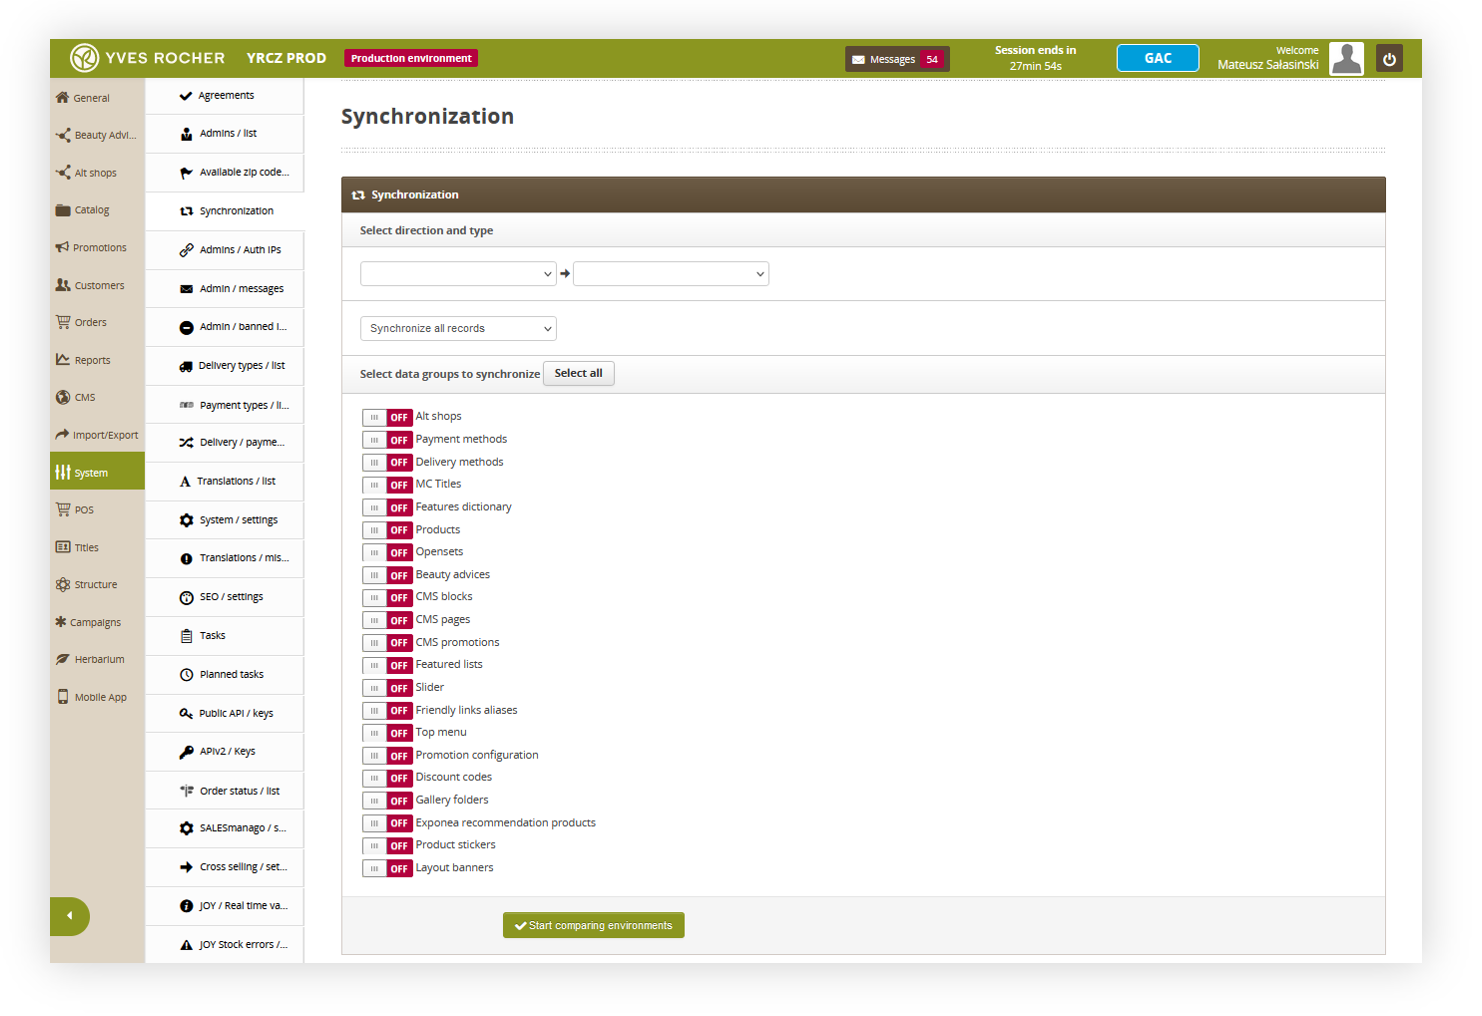 |
| *Visualization of the synchronization tab* |
| 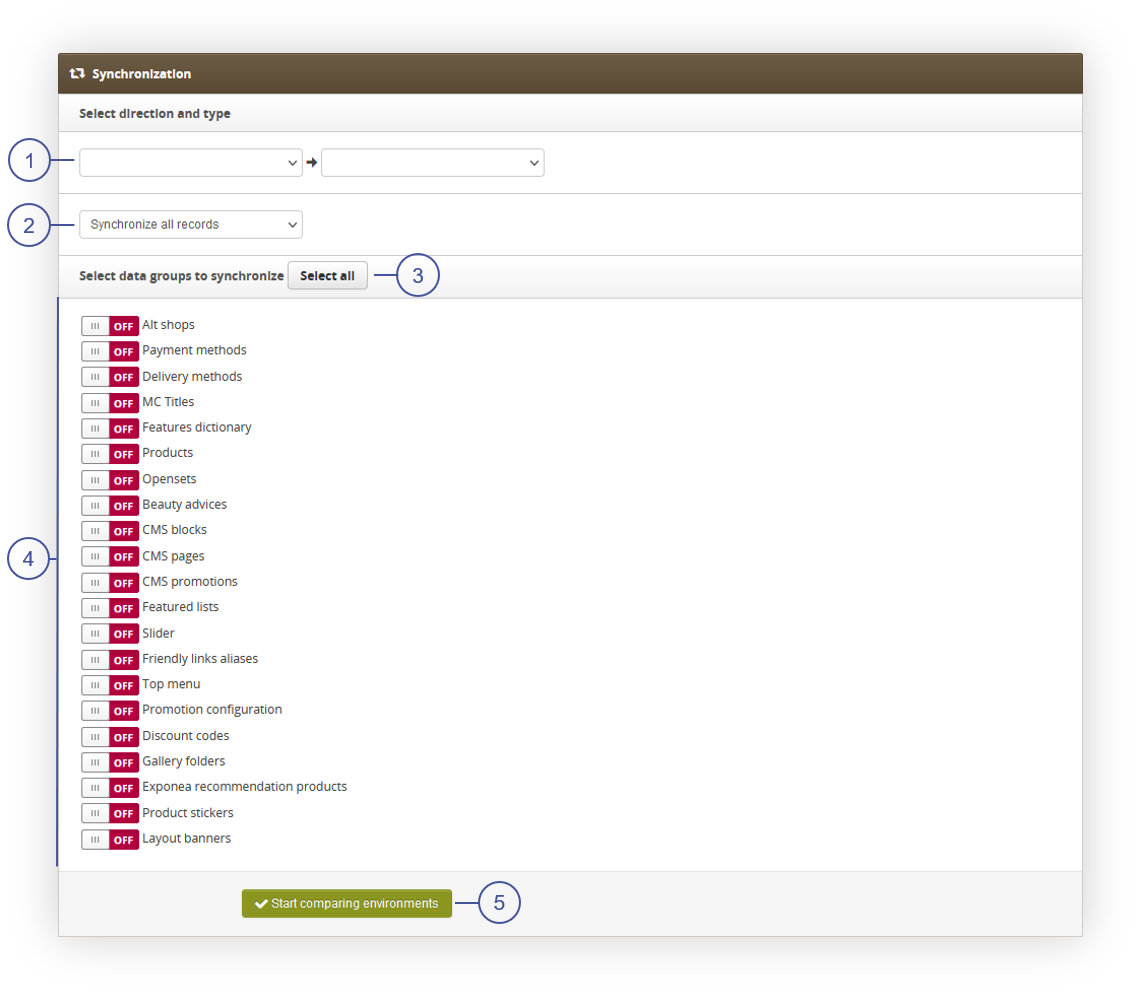 |
| *Visualization of the synchronization tab* |
| 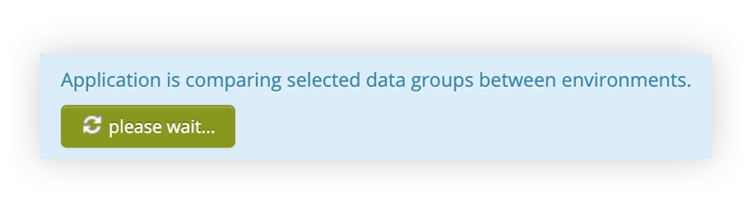 |
| *Visualization of the e-mail message* |
|  |
| *Visualization of the changes review tab* |
| 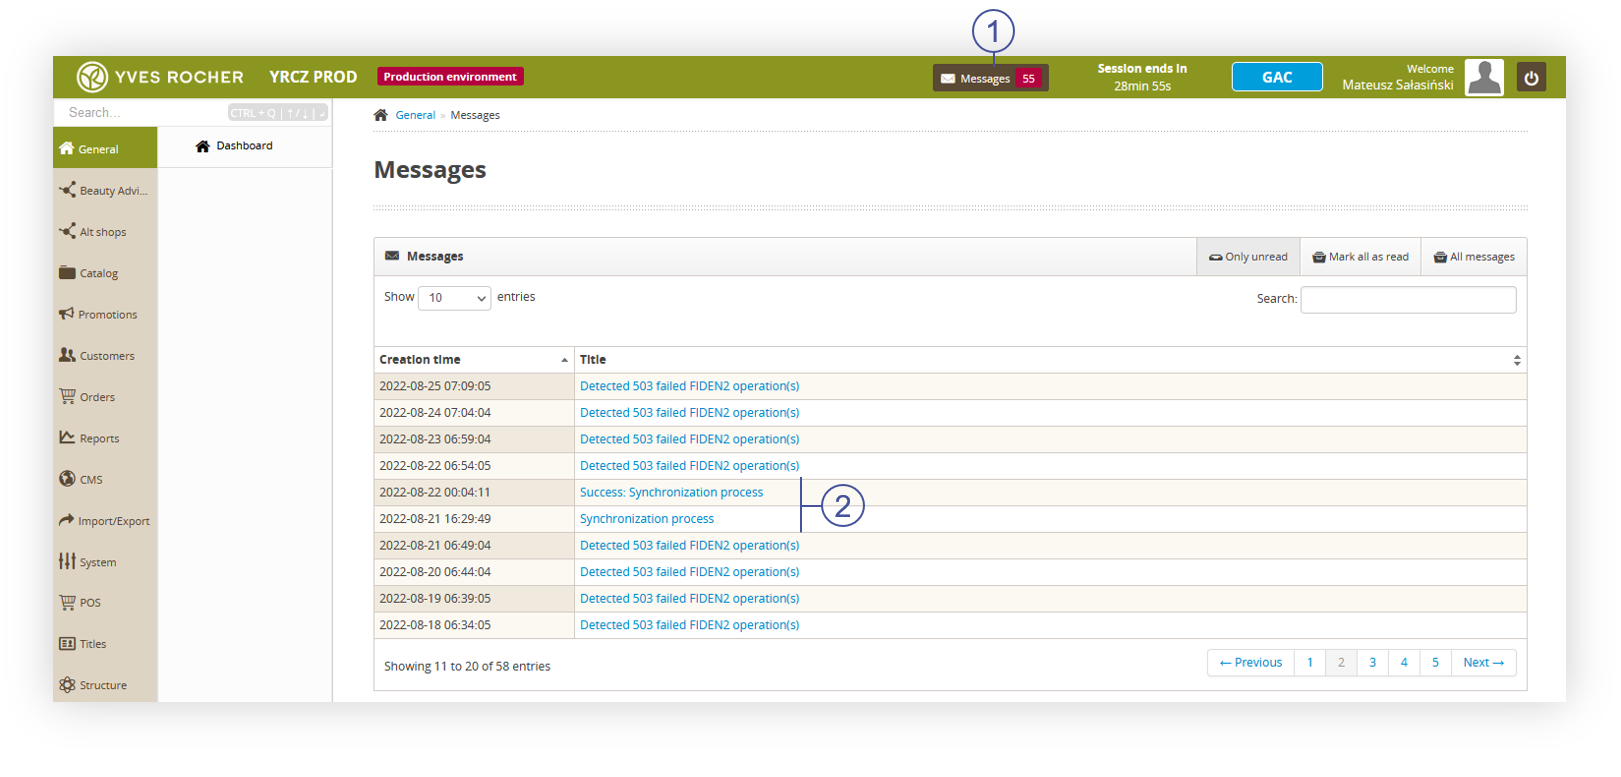 |
| *Visualization of the messages tab* |
| 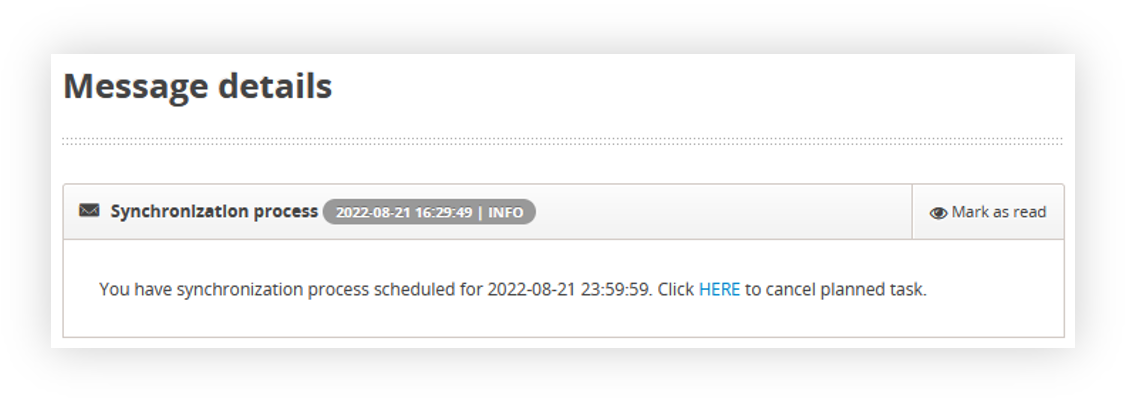 |
| *Visualization of the synchronization process message tab* |
| 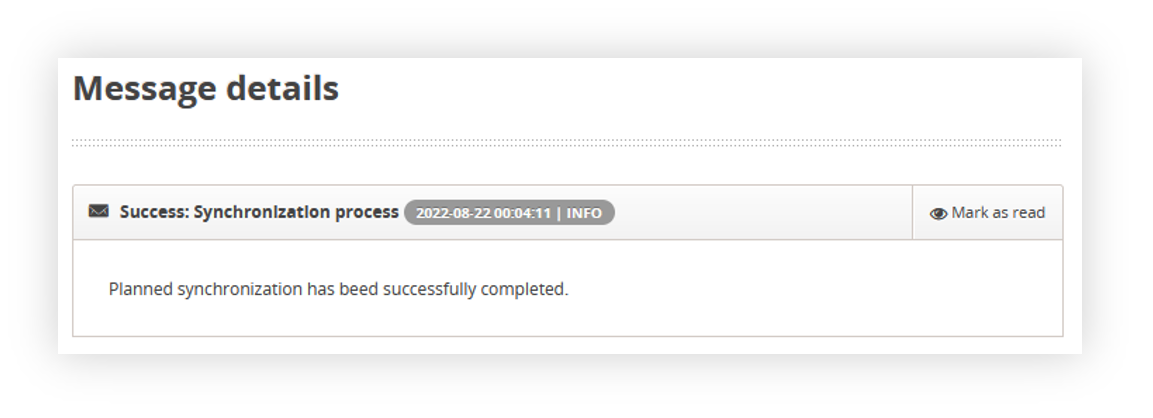 |
| *Visualization of the success: synchronization process message tab* |
| 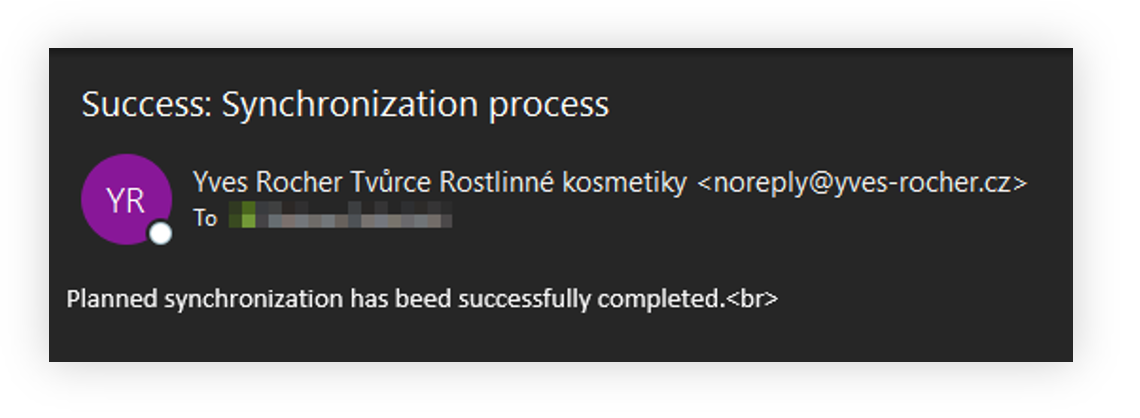 |
| *Visualization of the e-mail message* |