Campaigns and titles
 Getting started
In this article, you can find how campaigns are created and accepted after a certain period of time and the associated titles and qualifiers by which the application is able to promote consumers who have met the conditions.
Campaign is a process that works for a selected period of time. Campaigns count all the orders made with their value and according to qualifiers promote or demote customers that met
set requirements.
Title is a customer rank that affects his used altshop and with that possibly products, promotions, and content on the website. A title can be possibly promoted or demoted depending on set qualifiers and the customer result of the campaign.
Qualifier is a JSON function that set various requirements in order to promote users if they are met.
Table of contents:
Campaigns
Campaign as a process decides based on qualifiers what account will be promoted or demoted to the next title depending on customer purchase history.
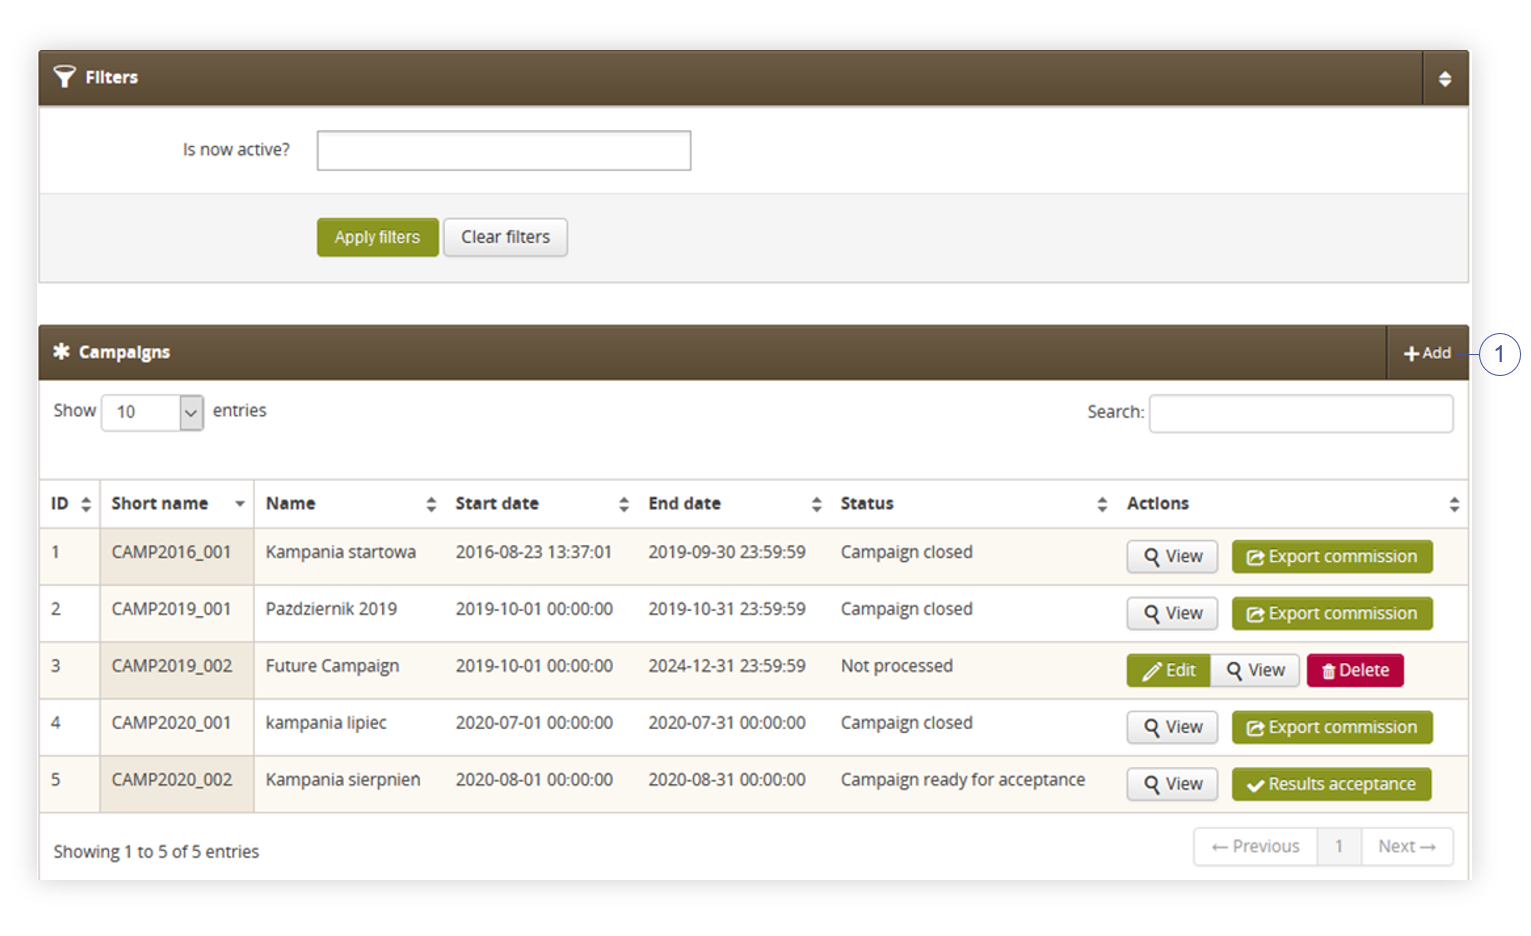
Campaigns can be found in the admin panel under Campaigns > View.
![]() Warning Campaigns were created with the intention to be handled regularly. Whenever a campaign is ready to be accepted and calculated it should be done as soon as possible. There shouldn't be a situation, where two campaigns at once are ready to be accepted and calculated.
Warning Campaigns were created with the intention to be handled regularly. Whenever a campaign is ready to be accepted and calculated it should be done as soon as possible. There shouldn't be a situation, where two campaigns at once are ready to be accepted and calculated.
Calculating both campaigns at once will result in an error and calculation freeze, which will result in the campaign system being unusable until fixed by Tau Ceti.
 |
| Visualization of the campaigns list |
In the campaign view, You can filter campaigns whether they are active or not. The campaign is seen as active only when the current date is between the specified date range.
For example, if a campaign has a range of 1/11/2020 – 30/11/2020 it will be visible as active only if the current day is in this range.
In this view, you can see all past, currently active, and future campaigns with their information like:
- ID – System ID of the campaign, it cannot be changed. The system recognizes various components on the website by their ID.
- Short name – Short name of the campaign. It is specified automatically by the system. The name depends on the year and the number of the campaign.
- Name – Full name of the campaign.
- Start date – Date on which the campaign will start. The set time is always local time.
- End date – End date of the campaign. After the end date is reached the campaign will receive “Campaign ready for acceptance” status, which will allow the user to accept the campaign and process user title changes. More on accepting the completed campaign can be found on Accepting completed campaign. The set time is always local time.
-
Status – Current status of the campaign. you have three statuses:
- Not processed – Campaign did not end yet. This status will be visible on current and future campaigns in the admin panel.
- Campaign ready for acceptance – Campaign ended and still hasn’t been processed by the Yves Rocher employee.
- Campaign closed – Campaign ended and has been processed.
This page also has Add button (1) located in the top right corner of the Campaigns table. This button will create a new campaign. More on creating a new campaign can be read in Creating new campaign section.
Creating new campaign
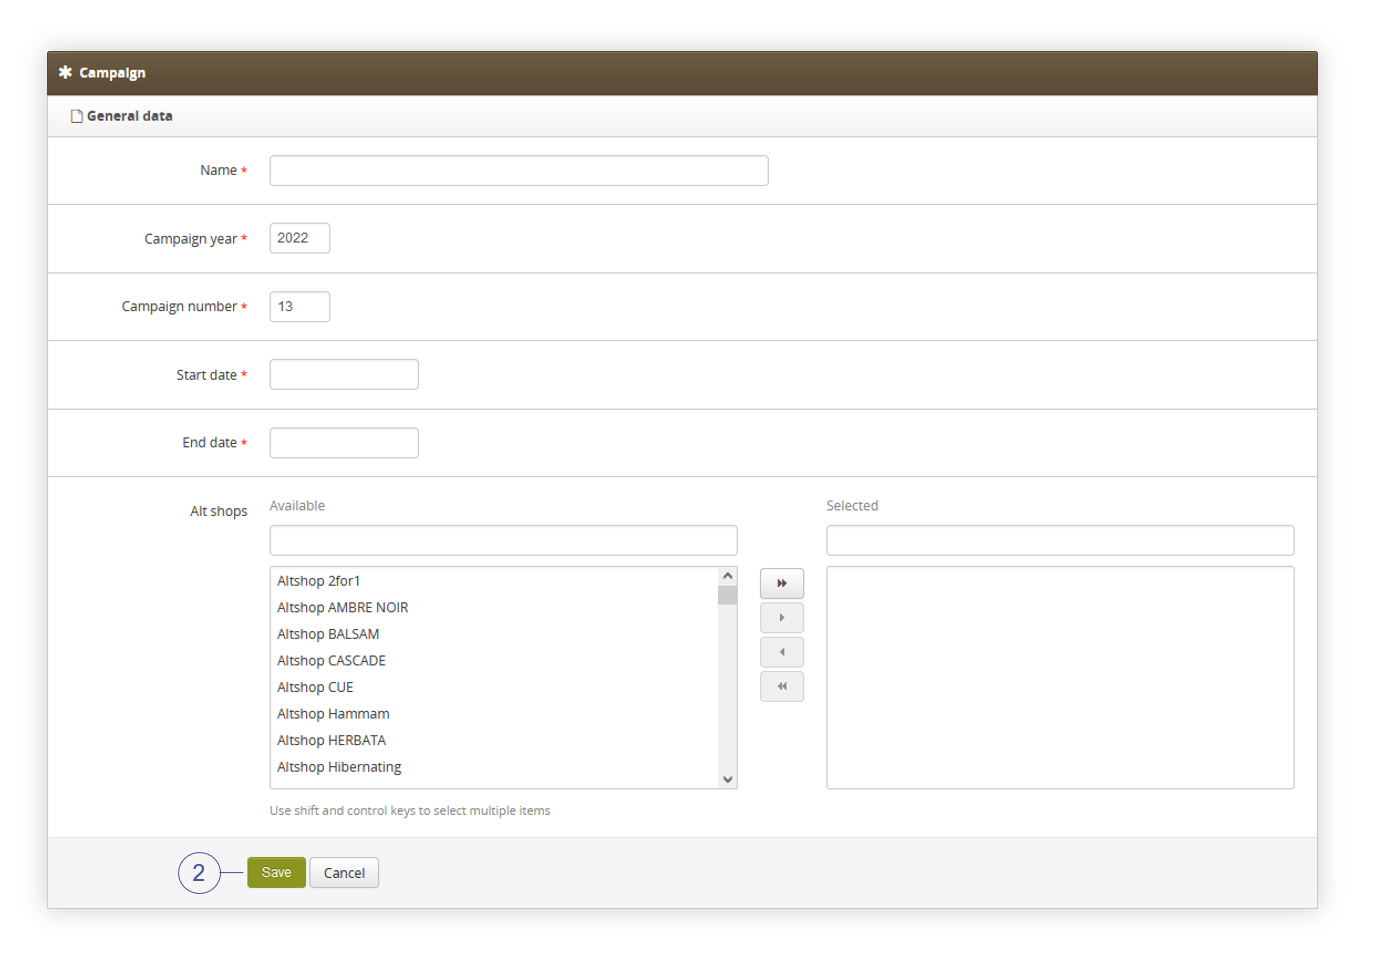
In order to create a new campaign you need to click Add button (1).
 |
| Visualization of the creating of the new campaign |
In order to create a new campaign you need to specify information like:
- Name – A Long name of the campaign.
- Campaign Year – Year of the campaign. This year will be visible on the short name of the campaign in the admin panel.
- Campaign Number – Number of the campaign, it’s usually set to a current campaign month. This number will be visible on the short name of the campaign.
- Start date – Start date of the campaign. The set time is always local time.
- End date – End date of the campaign. After the end date is reached the campaign will receive “Campaign ready for acceptance” status, which will allow a user to accept the campaign and process user title changes. More on accepting the completed campaigns can be found on Accepting completed campaign. The set time is always local time.
- Altshops – Altshops on which created campaign will gain orders information.
After you fill in all the necessery fields you can save our newly configured campaign by pressing the Save button (2).
With our campaign saved it’ll activate automatically on a set start date and end on the end date. A campaign that ended is not closed or processed and it needs to be accepted manually by the employee in order to grant customers promotions and demotions.
More on accepting the campaigns can be found in Accepting completed campaign section.
Accepting completed campaign
When the campaign is over, the user of the administration panel will be given the opportunity to move to campaign acceptance by selecting the Results acceptance button. After selecting the button, the application will start the operation of calculating and promoting the customers that participated in the campaign.
![]() Warning In case two campaigns are ready for acceptance at once, please accept only one campaign, wait for it to calculate (so the report for this campaign can be accessed), and then proceed with accepting the other campaign. Accepting both campaigns at once will result in an integration freeze and they won't get calculated until fixed by the Tau Ceti team.
Warning In case two campaigns are ready for acceptance at once, please accept only one campaign, wait for it to calculate (so the report for this campaign can be accessed), and then proceed with accepting the other campaign. Accepting both campaigns at once will result in an integration freeze and they won't get calculated until fixed by the Tau Ceti team.
The campaign acceptance process consists of four stages, described below:

Commission
 |
| Visualization of the commision view |
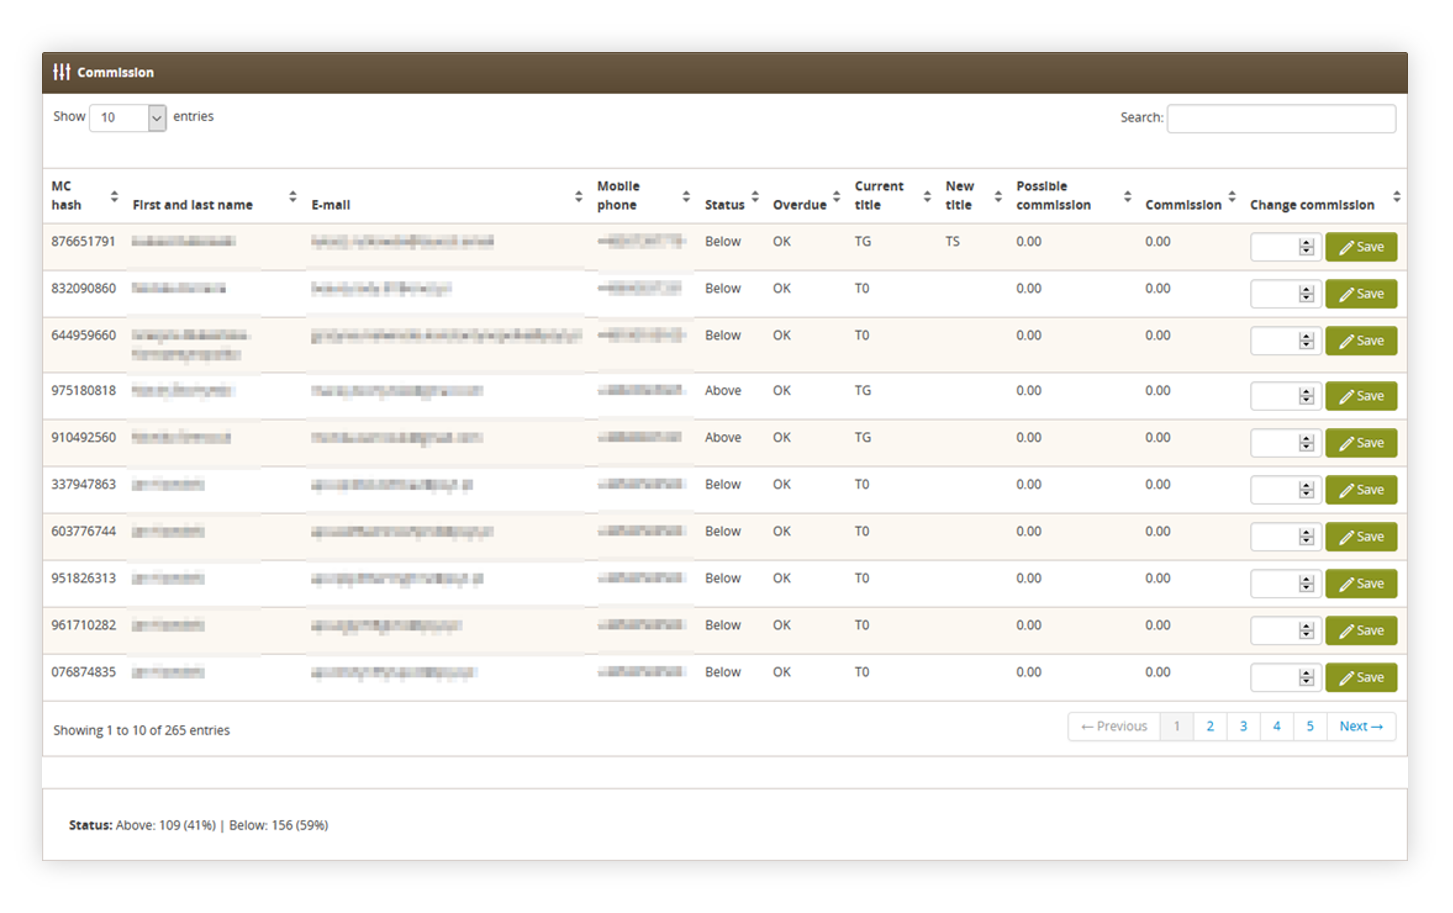
This step was used to determine what commission Member Club customers will get.
As Member club is mostly abandoned functionality, this step can be skipped.
Titles
 |
| Visualization of the titles view |
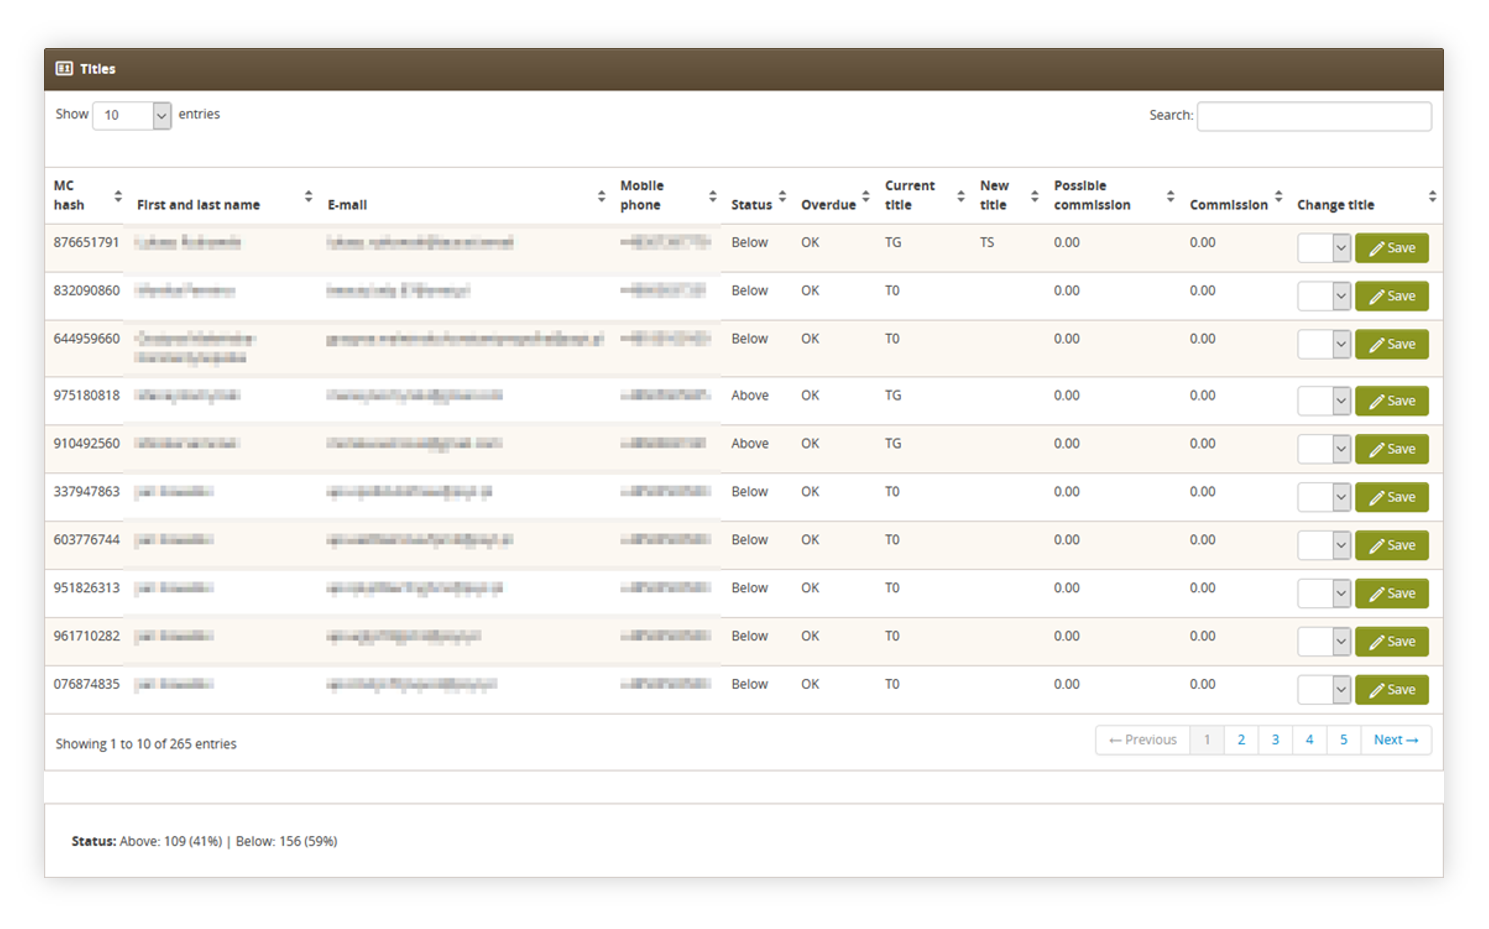
In this step, you can see all customers that participated in the selected campaign.
From customer information, you can see their MC hash, first and last name, e-mail address, and phone number. you can also see their title statuses:
- Status – Status of the title qualifier. It can be above qualifier, which will promote the customer, or below qualifier which won’t do anything if a customer meets current qualifier conditions. If a customer doesn’t meet current qualifier conditions he can be demoted if a title is configured like so.
- Overdue – invoice payment status. That was MC functionality. Not used anymore.
- Current title – Customer current title.
- New title – Customer's new title, which will be assigned to him after acceptance of the campaign. It can be set or changed with “Change title”
In this step you can manually change the title of the customer just in case there is a need.
Hierarchy changes
Changes in the hierarchy are member club functionality that isn’t used anymore, this step can be skipped.
Confirmation
This step is the last step of campaign acceptance.
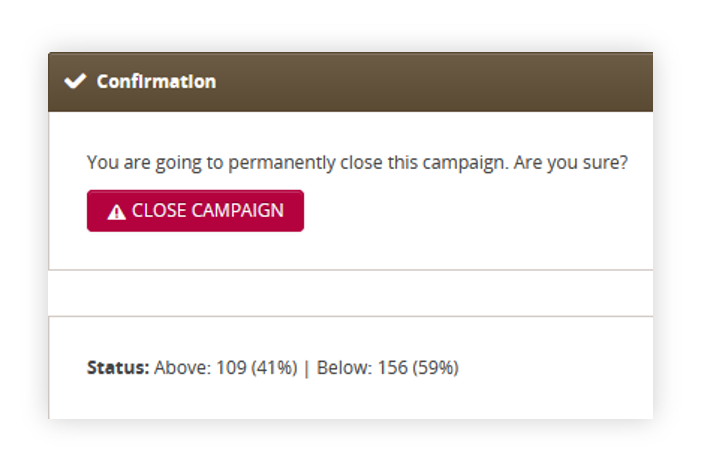 |
| Visualization of the confirmation view |
In this step, you can see the number of customers with the above and below statuses with their total percentage. After ensuring that the campaign is correct and promotions and demotions are correct, you can close the campaign with the Close campaign button (4).
With the campaign closed all the customers that had the Above status will be promoted depending on the qualifiers to the new title or demoted depending on the title settings.
Titles
Titles as customer ranks allow us to set specific qualifiers for them in order to create a title hierarchy, which will give us more options to manage what customers will be able to see on the website based on their order history.
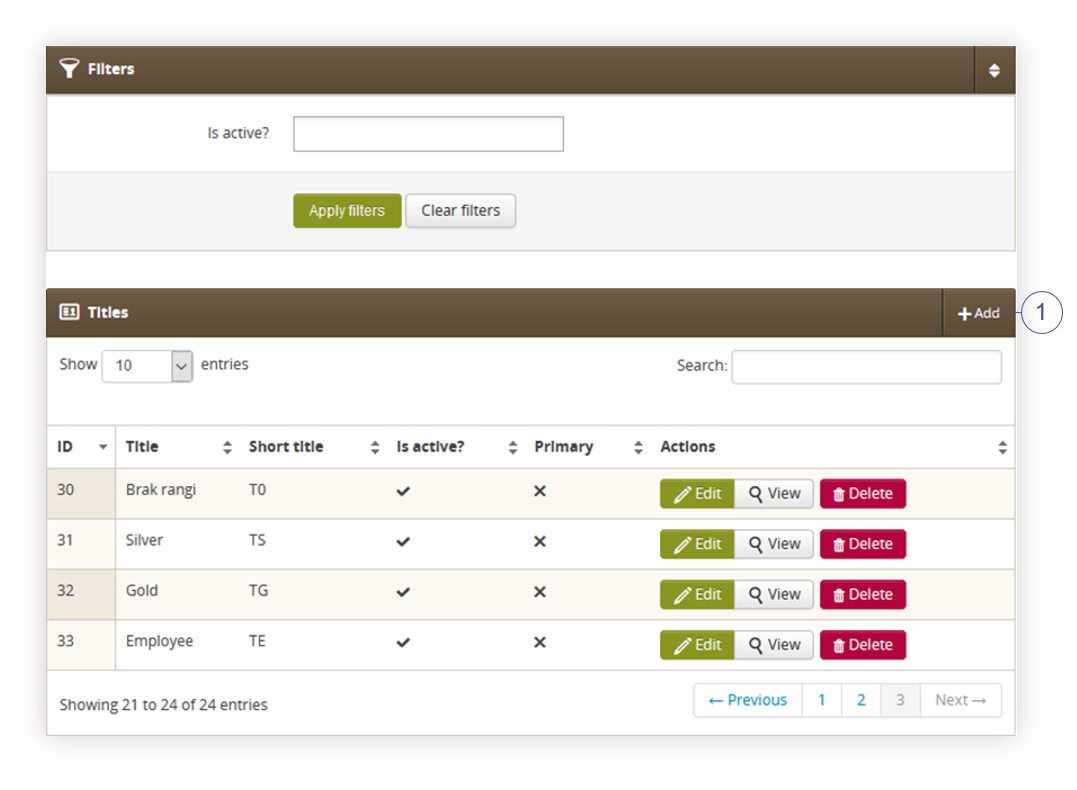
Titles can be found in the admin panel under Titles > View.
 |
| Visualization of the titles section |
Titles can be filtered by their activity (if they’re active or not). Filtered activity is read from “is active?” field.
In the Titles tab you can see basic information about the title:
- ID – The system ID of the title, it cannot be changed. The system recognizes various components on the website by their ID.
- Title – Full title name
- Short title – Short title name usually used in promotions and qualifiers options.
- Is active? – check If the selected title is currently active.
- Primary – Member club functionality that isn’t used anymore.
You can create new titles with Add button (1) located on the top right corner of the table. More on creating titles can be found on Creating new titles located on the page below.
Creating new titles
If there’s a need to create a new title you can do it by pressing Add button (1) located in the top right corner of the titles section.
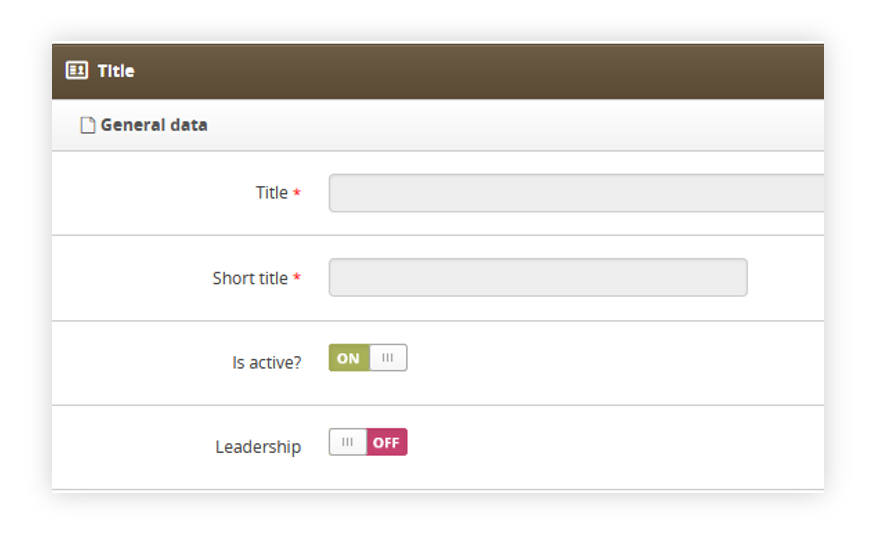
Creating or editing the title is separated by sections. The first one is the Title section.
 |
| Visualization of the title section |
In the Title section you need to specify:
- Title – A name of the title
- Short title – Short name of the title (e.g. T0, TS, TG)
- Is active? – switch if the title is active
There’s also a Leadership switch. This was Member Club functionality, so it’s not used anymore. It should be left on OFF.
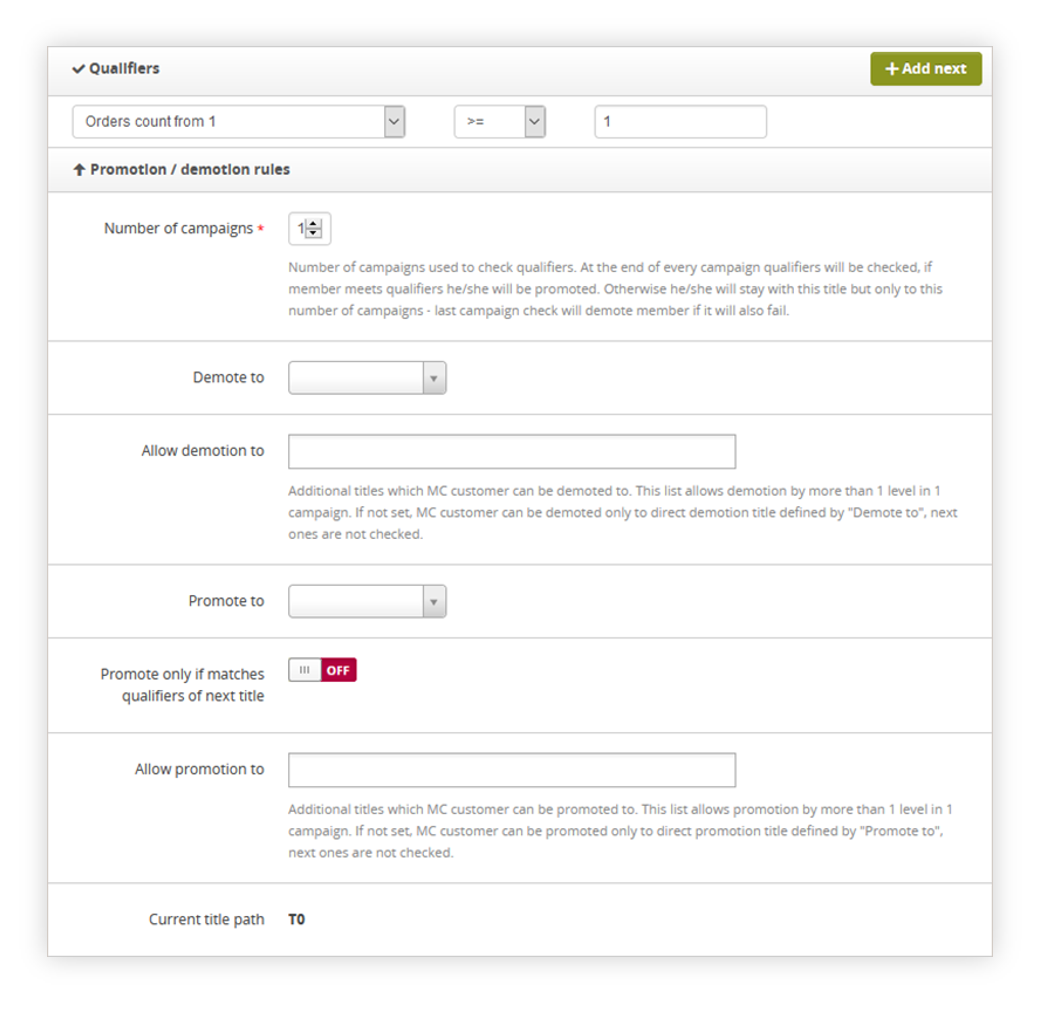
The next sections are Qualifiers and Promotion / demotion rules.
 |
| Visualization of the Qualifiers and Promotion / demotion sections |
In the Qualifiers section, you need to select our created qualifier and apply rules to it
(e.g. Orders count from 1 >= 1).
More on qualifiers can be found in the Qualifiers section.
In Promotion / demotion rules section you have various fields you can customize:
- Number of campaigns – In this field, you can select a number of campaigns that will be used to check qualifiers. E.g. if it’s set to 2, the customer needs to meet qualifier requirements for 2 campaigns in order to promote / demote. This field is in most cases left on 1.
- Demote to – Drop down menu which allows us to select other titles that are supposed to be lower in the hierarchy. That customer with this title will be demoted if doesn’t meet current title qualifier requirements.
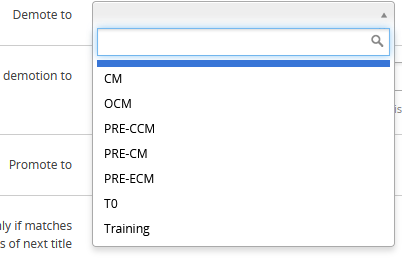
- Allow demotion to – In this field you can specify other titles that customers can be demoted.
![]() ExampleBased on the title promotion path set to T0 > TS > TG and with a customer that has current title TG.
ExampleBased on the title promotion path set to T0 > TS > TG and with a customer that has current title TG.
If a Customer with a title TG doesn’t anymore meet the requirements for that title in the next campaign, he’ll be demoted to TS if Demote to is set to TS.
With set Allow demotion to: T0 when a customer also doesn’t meet requirements for TS title, he’ll be demoted to T0 title.
As normal demotion path would go TG > TS > T0 because on this campaign he doesn’t meet requirements for TG so the next check for TS qualifier requirement will be on the next campaign it’ll demote TG > T0 as system checks, that customer also doesn’t meet requirements for TS so it demotes him 2 titles at the same time to the T0 title.
-
Promote to – Drop-down menu which allows selecting titles that are supposed to be higher in the hierarchy. If that customer met the qualifier requirements for the next title,
he will be promoted. - Promote only if matches qualifiers of next title – Switch that will read the qualifiers of the next title. It can be used when in the current title there are no specified qualifiers, so when T0 title has no qualifiers and the next title in the hierarchy, TS has “Orders count from 1 >= 1” qualifier it will promote the customer to the TS title if he makes 1 or more orders in the selected campaign.
- Allow promotion to – In this field you can specify other titles that customers can be promoted to. This work same as with Allow demotion to
- Current Title path – In this section, you can see the current title path. Current title will be bolded out. Example of the title path:
There are also sections:
- Credit policy
- Commission
- Reports access
- Dashboard tabs access
But as they’re Member club functionalities they’re not used or supported anymore, so they’ll be skipped in this documentation.
Qualifiers
Qualifiers are the requirements that need to be met in order to promote the customer to the next title or in case the customer does not meet the requirements he will be possibly demoted depending on the current title setup.
Qualifiers can be found in Titles > Qualifiers
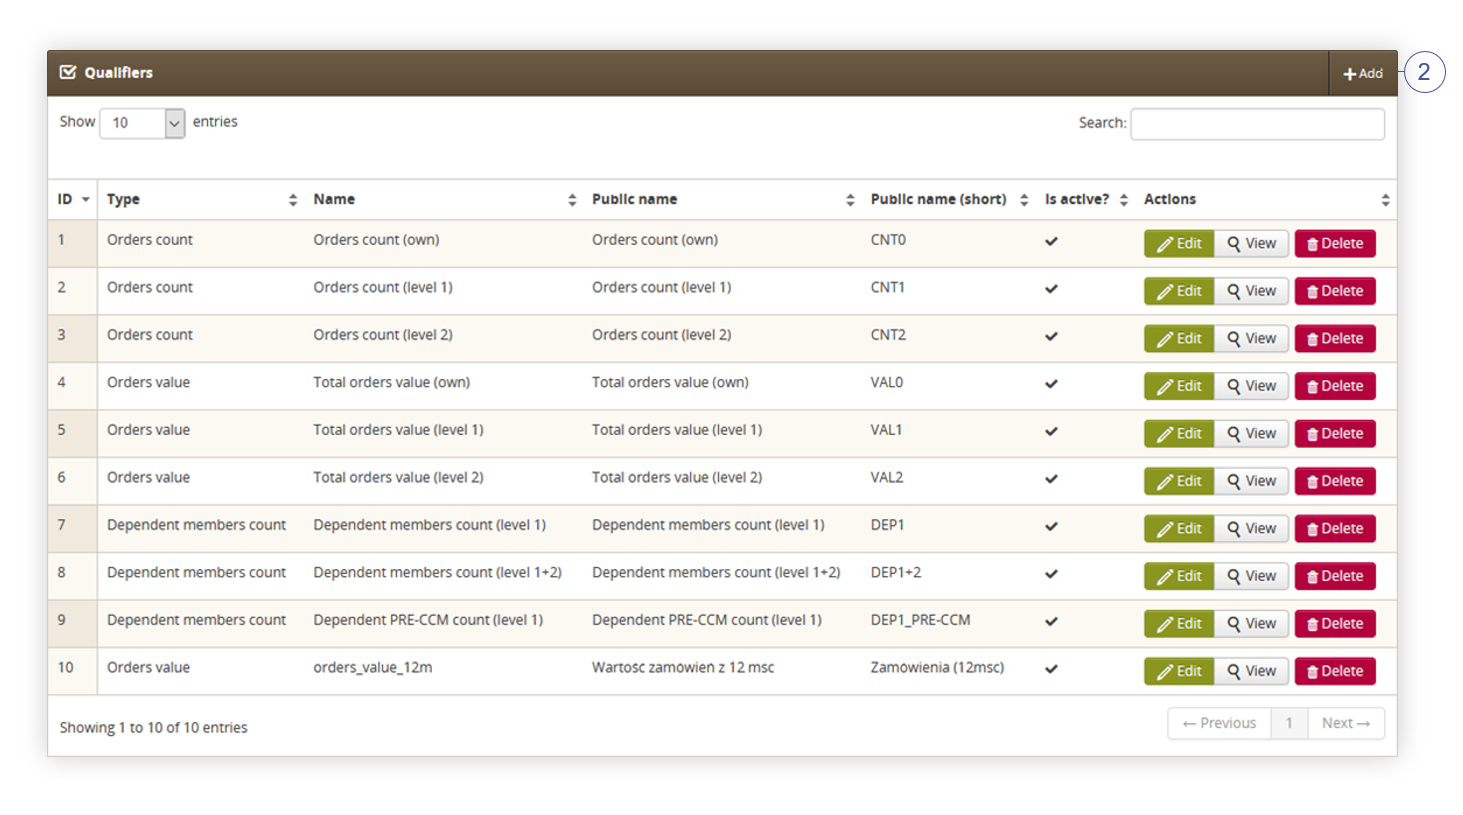 |
| Visualization of the qualifiers section |
In the qualifiers section you can see basic information about qualifiers:
- ID – System ID of the qualifier. It cannot be changed. The system recognizes various components on the website by their ID.
-
Type – Type of the qualifier. You currently have 3 qualifier types:
- Orders count – This type will count the number of the orders
- Orders value – This type will count the value of the orders
- Dependent members count – This type is from Member Club functionality, which is not supported anymore.
- Name – Name of the qualifier
- Public name – Public name of the qualifier. It’s Member club functionality so it’s not visible anywhere anymore.
- Public name (short) – Short public name of the qualifier. It’s Member club functionality so it’s not visible anywhere anymore.
- Is active? – Check if the qualifier is currently active.
You can add new qualifiers with the Add button (2) or edit existing ones.
 |
| Visualization of the qualifiers section |
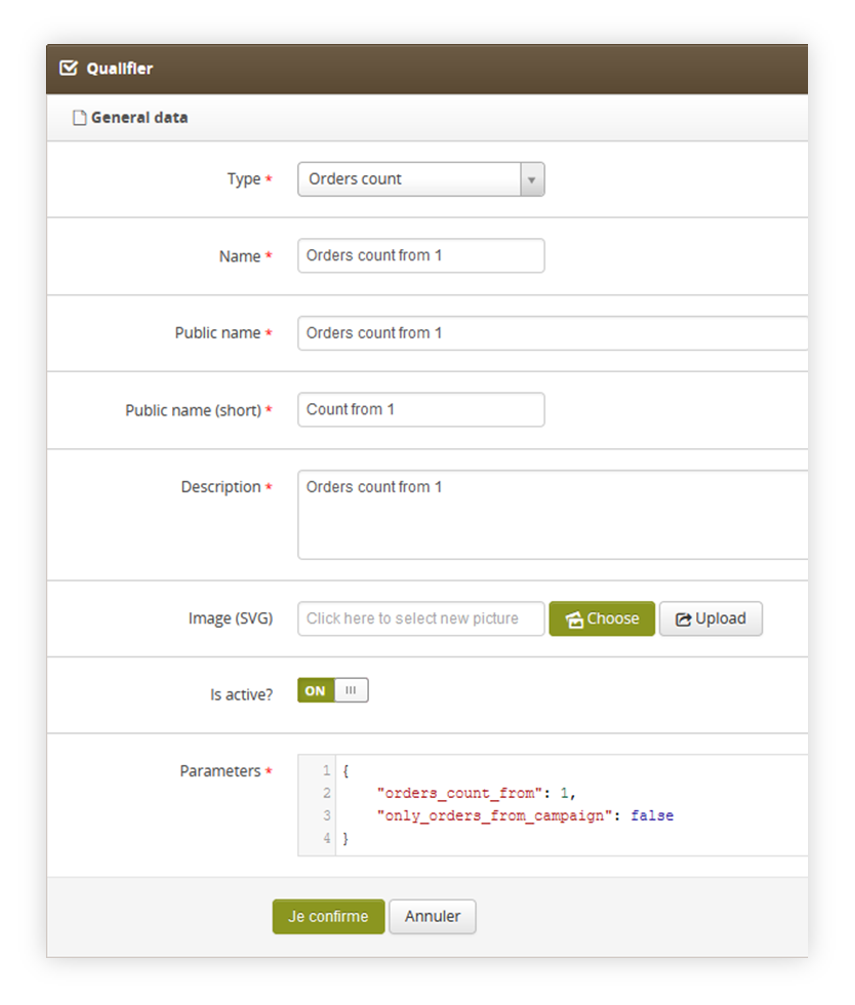
The fields you can find while adding or editing qualifiers are:
-
Type – Type of the qualifier. You currently have 3 qualifier types:
- Orders count – This type will count the number of the orders
- Orders value – This type will count the value of the orders
- Dependent members count – This type is from Member Club functionality, which is not supported anymore.
- Name – Name of the qualifier
- Public name - Public name of the qualifier. It’s Member club functionality so it’s not visible anywhere anymore.
- Public name (short) - Short public name of the qualifier. It’s Member club functionality so it’s not visible anywhere anymore.
- Description – Description of the qualifier. It’s Member club functionality so it’s not visible anywhere anymore.
- Image (SVG) – Image of the qualifier. It was used by Member club functionality so It doesn’t do anything now.
- Is active? – Switch if the selected qualifier is active.
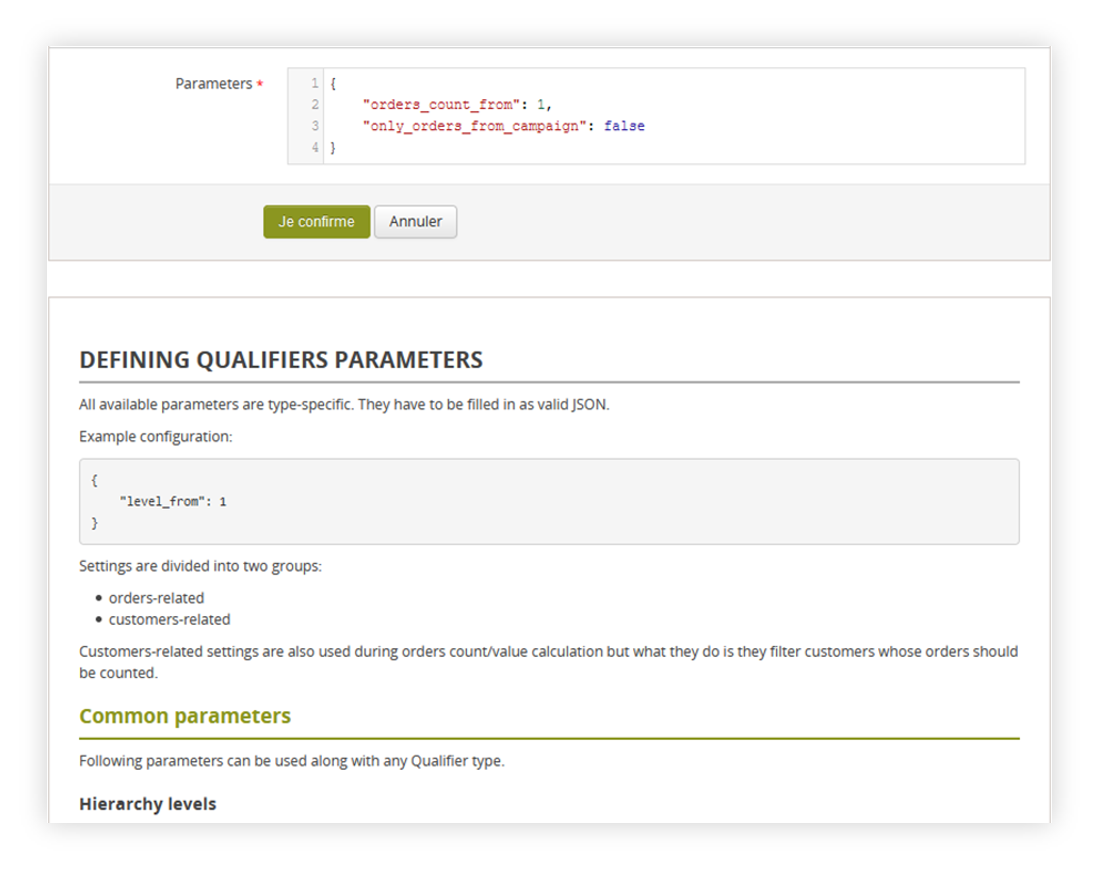
- Parameters – JSON parameters of the qualifier.
![]() ExampleWith parameter JSON set to:
ExampleWith parameter JSON set to:
{
"orders_count_from": 1,
"only_orders_from_campaign": false
}
The qualifier counts all the orders from 1st created order as orders_count_from is set to 1 even those orders without the campaign because only_orders_from_campaign is set to false. So when you set this qualifier in Title settings to Qualifier >= 1 the customer will be promoted to the set title when he creates 1 or more orders and created campaign gets processed as titles are granted after the campaign is processed by the employee.
As qualifiers are wide in range of possibilities the documentation of the parameters is separate and can be found when editing or creating new qualifiers on the website below the parameters section.
 |
| Visualization of the parameter documentation |