Storelocator
 Getting started
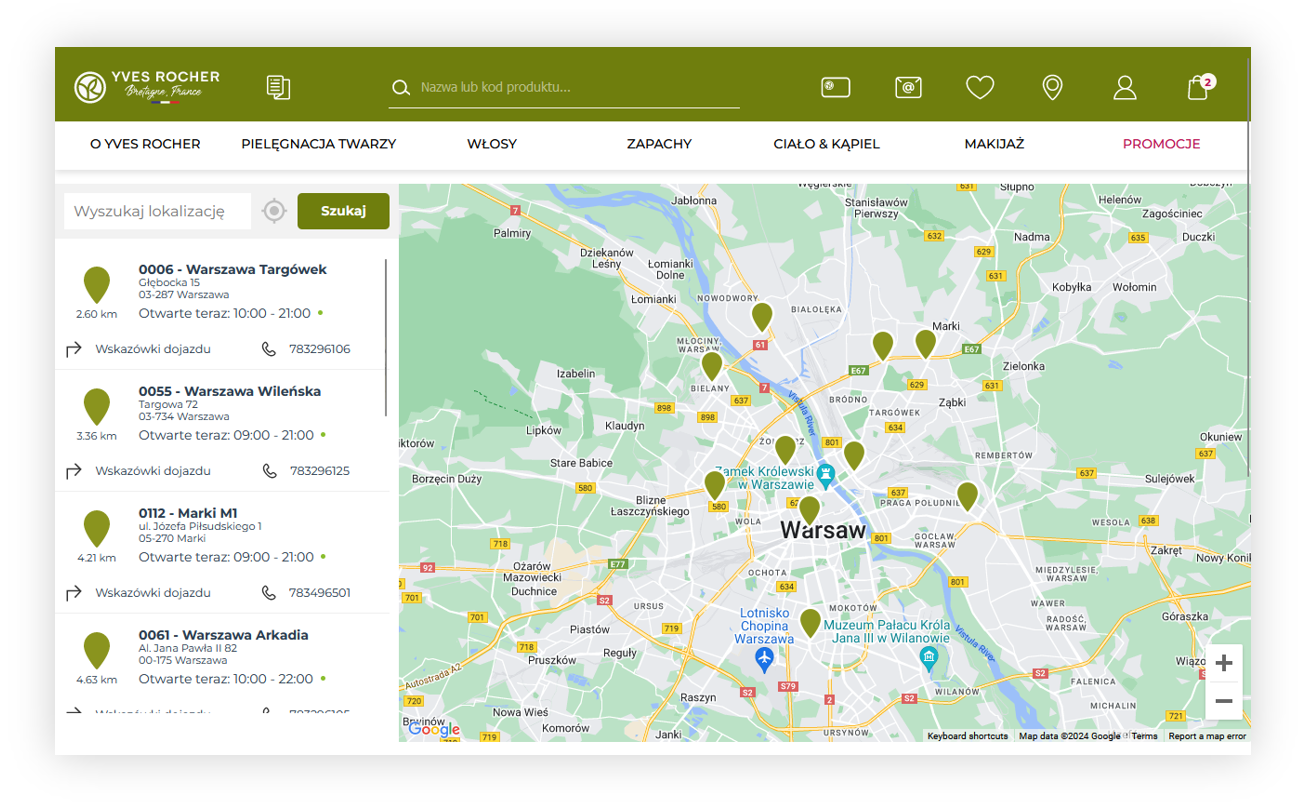
In this article, you can find information about store locator functionality. Storelocator allows customers to access configured url open a Google map of the selected country and see all of the configured stores. The map contains a search field, which allows customers to find their desired street or city as well as an option to get their location automatically.
Visible points on the map are displayed in the left panel with their basic information like name, address, and current opening / closing hours.
 |
| Visualization of the store locator |
Table of contents:
Configuration
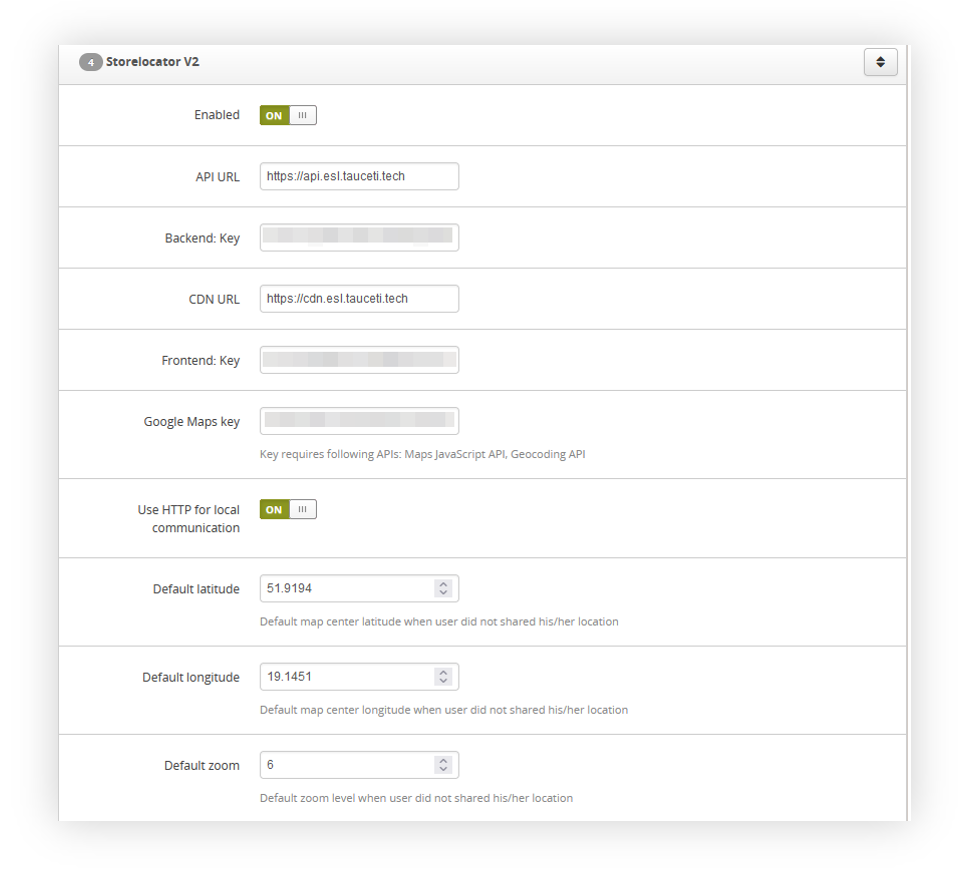
It is possible to configure the storelocator aspects in
System > System / Settings > Integrations > Storelocator v2.
 |
| Visualization of the storelocator system settings |
In the storelocator system settings you can find the following options:
- Enabled - A switch that defines if the functionality is enabled. If this switch is set to OFF customers will get an 404 error when accessing the storelocator URL.
- API URL - URL of the storelocator API. It shouldn't be modified.
- Backend: Key - Backend key of the functionality provided by Tau Ceti.
- CND URL - URL of the Tau Ceti CDN. It shouldn't be modified.
- Frontend: Key - Frontend key of the functionality provided by Tau Ceti.
- Google maps Key - Google maps frontend API key.
- Use HTTP for local communication - Switch that defines if HTTP protocol should be used for local communication. This switch shouldn't be modified.
- Default latitude - Default latitude of the opened map
- Default longtitude - Default longitude of the opened map
- Default zoom - Default zoom of the opened map between 1 and 10. The higher the value the closer the map is.
The map URL can be changed in the System > Translations / list. You can find it under the translation phrase storelocator_url.
Stores list
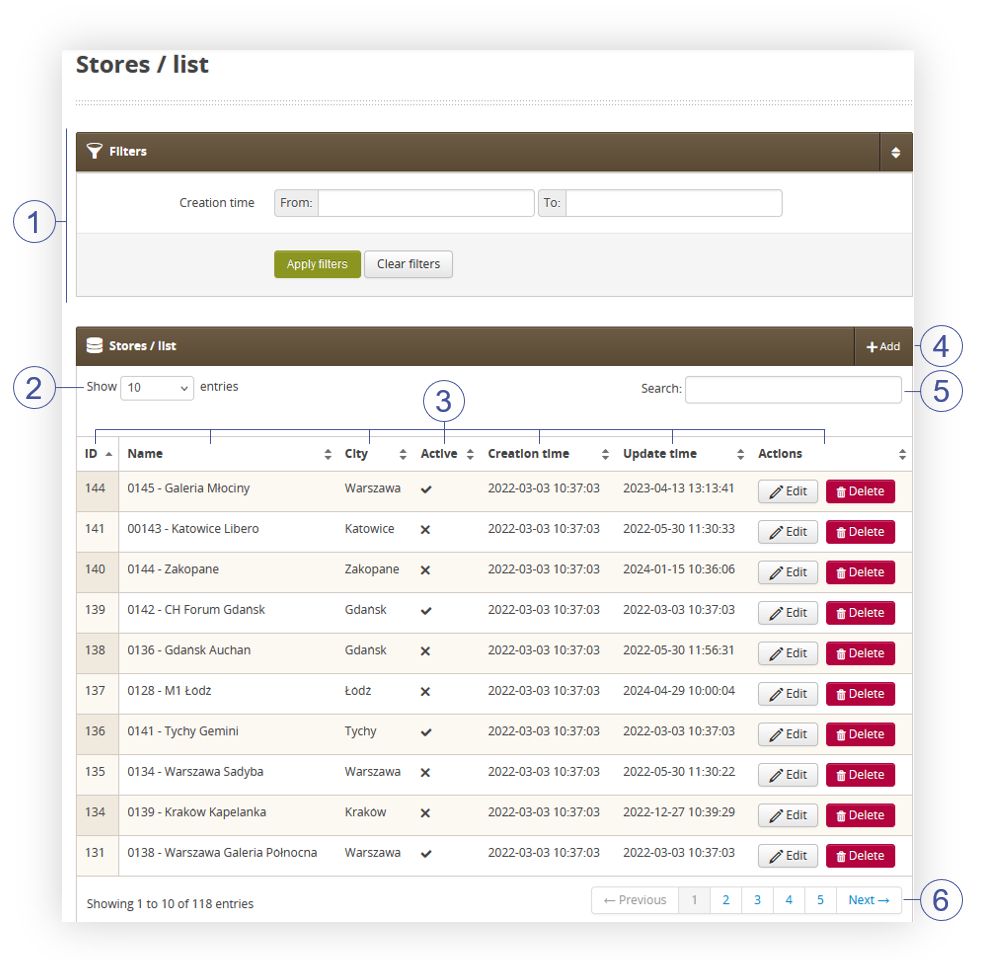
By default store locator doesn't have any stores created. They are managed from the admin panel in
CMS > Stores / list.
 |
| Visualization of stores in stores / list |
Below you will find a list of possible actions in Stores / list.
- Filters section (1) allows filtering the visible stores by their creation time range
- Show X entries (2) section defines how many stores per page should be visible.
-
Stores table (3) provides basic information about the store. You can find the following columns in the table:
- ID - The internal identification number of the created store.
- Name - The name of the store. This name is visible to the customers
- City - City where the store is located.
- Active - Activity status of the store. It can be true or false.
- Creation time - A date and time when the selected store was created.
- Update time - A date and time when the store was updated last time.
-
Actions
- Edit - Allows to edit the selected store. Store edit form is the same as creating a new one. You can find more about it in the Store creation section.
- Delete - A button that allows to delete the selected store from the database. This action cannot be reverted.
- Add button (4) allows the creation of a new store entry. You can find more about store creation in the Store creation section.
- Search field (5) allows to search for the available stores by their names or a city.
- Page number (6) section allows to you show more stores by switching to a different page.
Store creation
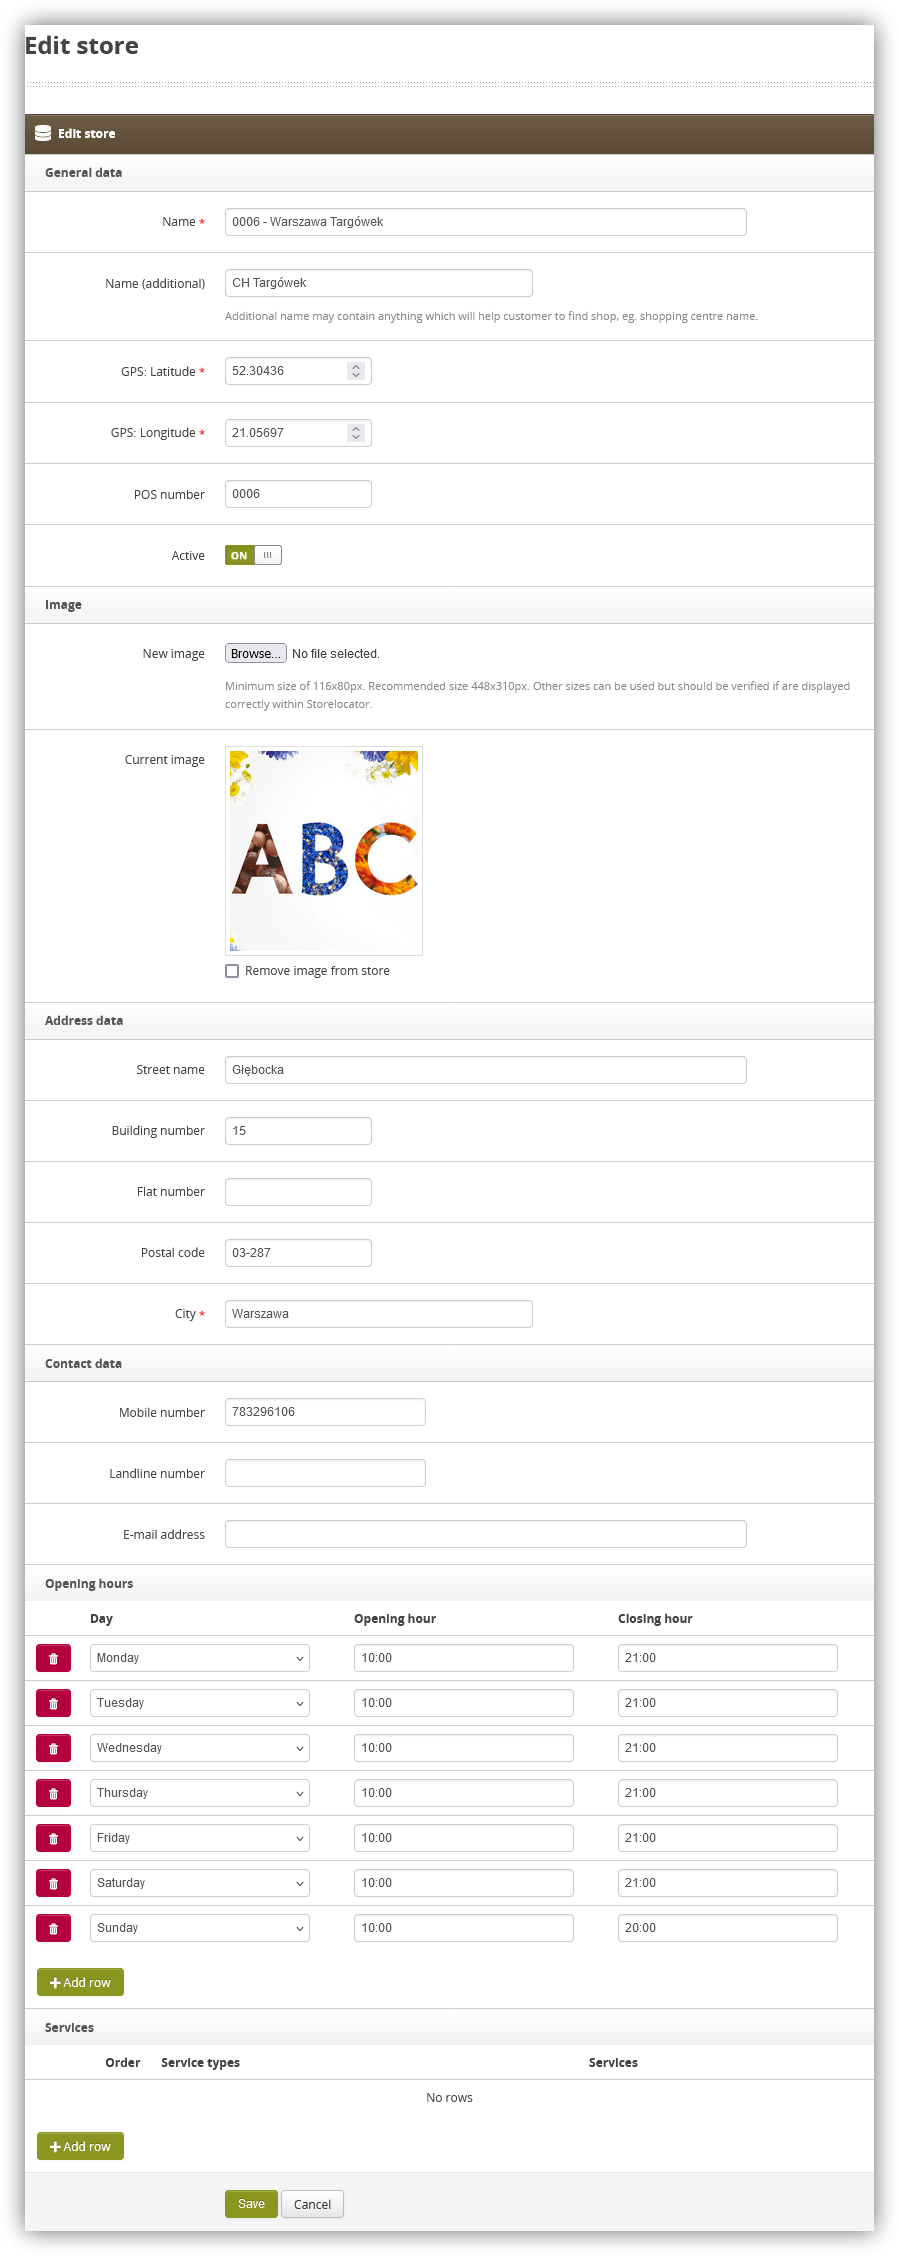
When the Add or Edit button is selected you will be redirected to the store edit page
 |
| Visualization of the store creation |
When creating or editing a store you can define the following fields:
- Name - The name of the store. This name is visible to the customers.
- Name (additional) - Additional name to the store, that will help customers find it.
- GPS: Latitude - A latitude where the store pin will be placed at.
- GPS: Longitude - A longitude where the store pin will be placed at.
- POS number - POS number of the store.
- Active - Activity status of the store.
- Image - Image of the store that is displayed with the store popup.
- Mobile number - The phone number of the store that customers can call
- Landline number - The landline number of the store that customers can call
- E-mail address - E-mail address of the store
- Opening hours - Opening hours of the store. It is possible to define the exact opening hours for the selected day of the week. It is possible to assign multiple opening hours on the same day as long as they do not interfere with each other.
- Services - Services that are available in the selected store. Adding a new service only provides a text field that can be filled in with the type of service and it is displayed to the customers on the popup of the store.
Customer perspective
Customers can access the storelocator by the storelocator button in the header or by accessing the defined URL from translations.
|
|
Visualization of the store locator |
The storelocator page opens on the default longitude and latitude defined in the system settings. Customers are able to search for their selected street or use the find location functionality to find their current location and display stores around them. The left panel also displays 10 stores with their basic information.
When the customer selects one of the stores from the left panel or selects one of the pins on the map the store popup will show
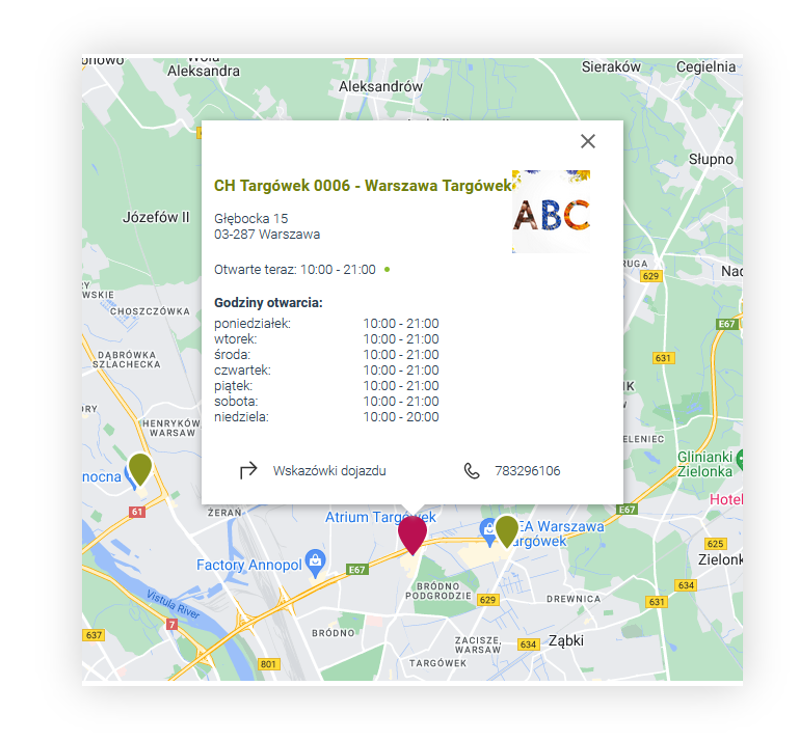 |
|
Visualization of the store locator |
Store popup contains all of the configured store information described in Store creation section. Customers can select the mobile number to directly call it if they are on a mobile device, or the can press on the directions button next to it, to open Google Maps and get automatic directions from their current location to the selected store.